Home Blog Page 21

Download Samsung Galaxy A70 Android 10 via Odin [One UI 2]

6
Download Samsung Galaxy A70 Android 10 via Odin [One UI 2]

Samsung Galaxy A70 has started receiving the Android 10 update. If you won the Galaxy A70, you can now update it and enjoy the Android 10 with all-new One UI 2. In this guide, I will show you the steps to download Samsung Galaxy A70 Android 10 via Odin. We will download the firmware using SamFirm and install it using Odin. Before you update Galaxy A70 to Android 10, let me tell you what’s new in this firmware.

Samsung Galaxy A70 Android 10

Android 10 for Galaxy A70

The biggest change in the Android 10 update is the addition of One UI 2. Samsung has completely overhauled its One UI. The One UI 2, at first, fixes everything that was wrong in the original One UI. With the new One UI 2, the animations of the entire UI have got a lot more fluid. One UI 2 also brings a better integration of the One-Handed mode. Samsung Galaxy A70 owners can also enjoy the native screen recorder, it will appear in the toggles of the phone. Another notable feature of the new Android 10 update is how the call pop-up appears especially when you are playing a game or watching a video. You can also change the size of this call pop-up using the phone app’s settings.

Samsung One UI 2 also gives you better control over your notifications. It changes the icons and some menus in the settings application. The icons are also slightly changed for the apps on the home screen and inside the app drawer. Furthermore, you can now enjoy the Dynamic Lock Screen on the phone as well. The fingerprint scanner’s icon can now appear on the AOD screen. The Camera app has got a new “More” section which now houses all features like Super SLOW-MO, Night Mode, Panorama, Pro Mode, and other important modes. Apart from all these goodies, Samsung has massively improved the performance and battery life of the device. To learn more about the new Android 10, you can definitely take a look at the One UI 2’s changelog.

What I just wrote above, it all comes from my personal experience and to be honest, I have liked the One UI 2 on the Galaxy A70 more than anything else. Another thing that I’d like Samsung to fix on this phone is its camera. The camera of the A70 needs an overhaul in terms of quality, but it’s not just happened yet.

Updating Galaxy A70 to Android 10

There are two methods to get Android 10 on your Galaxy A70 right now. The first and easiest one is the OTA update. You can just go to your Phone’s Settings > About Phone > Software Update > Check for update. If Samsung has rolled out the Android 10 for your region, you will get the update there. For example, at the moment, the A70’s Android 10 has rolled out in Ukraine and the Ukranian users are receiving the OTA update. But if the update is not out for your region yet, you can download the Android 10 manually and install it via Odin. The first method is something that you can pretty much do on your own, but the 2nd method needs a proper guide to be followed. So, down here in this post, you will find the steps to download Galaxy A70 Android 10, and then the steps to install Android 10 on the Galaxy A70.

Download Samsung Galaxy A70 Android 10
Source: TizenHelp

Requirements

  • Samsung Galaxy A70 with Android 9 on it.
  • Android 10 update for A70 A705FNDownload from Sammobile | Download using SamFirm [Note: At the moment, this update is out for the A705FN variant of A70. Do not flash the A705FN firmware on any other variant. You can check the update for your variant on the aforementioned platforms]
  • Odin3 3.13.1Download & Install
  • Samsung USB DriversDownload & Install
  • Your phone’s USB Cable.
  • A Windows computer.
  • USB Debugging & OEM Unlocking on the A70 – Turn it on.

Download Samsung Galaxy A70 Android 10

Follow these steps to install Android 10 on the A70.

Total Time: 10 minutes

Open Odin & Add Firmware Files

Open the Odin3.exe on your computer. In the Odin, click on the AP tab and add the firmware’s AP file, add the BL File to the BL tab, CP file to the CP tab and depending on your choice, add the CSC or Home_CSC to the CSC tab.

Enter Download Mode on your Galaxy A70 & Connect it to the computer

Turn off your Galaxy A70. When the phone is off, press and hold Volume Up + Power button to enter recovery, once you are booted into the recovery mode, select “Reboot to bootloader” and press the power key to enter it. Now your phone is Download Mode, connect it to the computer. The Odin will show “Added” in the log box.Download Samsung Galaxy A70 Android 10

Click on the Start button in Odin

Making sure that all files are added in Odin and the A70 is successfully connected in the Download Mode, click on the Start button.Installing Android 10 One UI 2 on Samsung Galaxy A70

Wait for Firmware Flashing to end.

Odin will start flashing the firmware now, it will take about 8-10 minutes to finish. Wait for Odin to show “Success”.galaxy a70 android 10
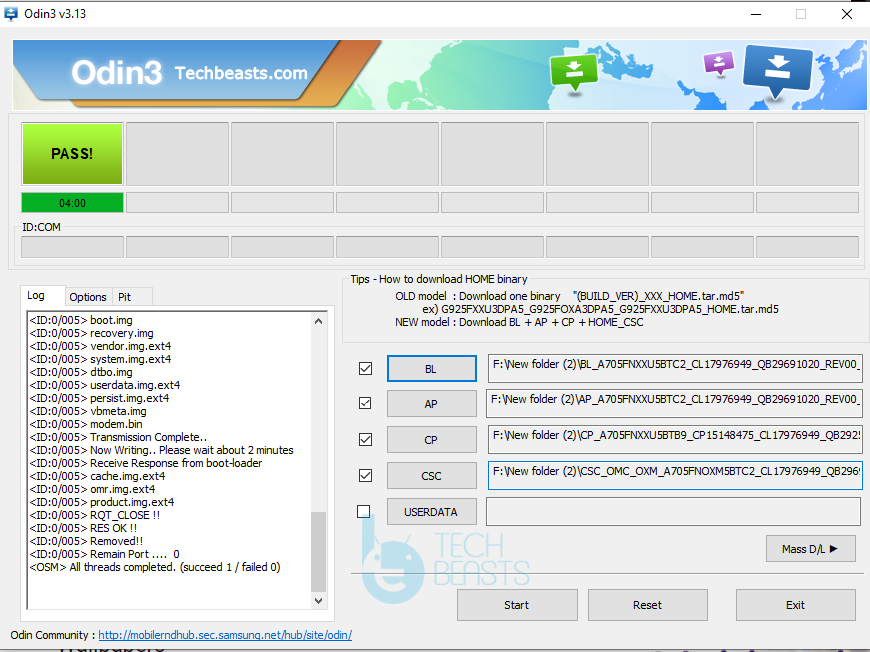
Disconnect the phone and let it start on Android 10.

Once the firmware flashing successfully ends, your phone will restart. Disconnect the phone, wait for it to boot up and enjoy the all-new Android 10 on it.

Galaxy A70 Android 10 Review – Video

Use Snapchat on a School’s Wi-Fi Network

0
Use Snapchat on a School’s Wi-Fi Network

With the help of my guide, all you guys who want to use Snapchat on a School’s Wi-Fi Network, they will. You can use the instructions provided below and easily bypass all the restrictions on your School’s Wi-Fi Network.

Nowadays, Teenagers, especially in schools and colleges, use Snapchat and other social media platforms more than anything. Keep that in mind, most of the schools and colleges have blocked services like Snapchat, Instagram, Facebook, etc.

Snapchat on a School’s Wi-Fi

I mean that is really good, all the educational institutes should follow such strict policies. Teenagers should spend more time studying rather than uploading Snaps, Stories on social media apps.

But this is also learning, students should know a bit about the Tech world. So if you want to Use Snapchat on a School’s Wi-Fi Network, heed the instructions below.

Must Read

Before you proceed, you must know, a huge number of schools have very strict policies regarding the use of social media apps. That’s why they have closed Wi-Fi networks just for internal use. Moreover, they also provide students with pre-programmed devices so that they only use them for informational and academic purposes.

So if this is the scenario in your school, I think you must not follow the instructions provided below. Using these tricks means you are breaking your school laws & rules, which means you will in trouble if you get caught.

Try: Best Free VPN Apps for Android in 2020

That’s before doing anything keep the consequence in your mind. Now let’s proceed and learn how to Use Snapchat on a School’s Wi-Fi Network.

Use Snapchat on a School’s Wi-Fi Network

Ok, now as we are going to bypass all the restrictions on our school’s Wi-Fi network. But bypass all of them you need to know what are the restrictions. heed the instruction below and try all these one by one.

By trying these methods you will get to know what kind of restrictions are set to block Snapchat and other social media services.

Use HTTPS:

Since you don’t know what kind of restrictions are applied to stop you from using Snapchat or Instagram, using Https does the job. But not all the time.

All you have to do is add HTTPS before the main URL. This trick works most of the time because I have learned that most of the school systems only block port 80 and they don’t go for port 443.

So I think you should give it a try.

Also Read: Best Free VPN Apps for Chinese Android Phones

Use a Free Proxy:

This is another trick that I would suggest but I am not recommending it. You can always use Google to look for a free proxy and once you find one, type in the Url and you will bypass all the restrictions.

Why I don’t recommend using a free Proxy, there is only one reason for it. Free Proxy servers don’t encrypt your traffic. This means your IT administrator will know that what you have used on your device.

Use Snapchat on a School’s Wi-Fi Network using VPN

This method is 100% recommended and I have tested it. It’s pretty simple, all you have do is download and VPN app on your smartphone. You can unblock all the Websites and apps on your school’s WiFi.

But there is one thing you should keep in the mind, not all the free VPN apps do the job. It would be better to choose from the best free VPN Apps. Or you can always go for the paid version and believe they work. Moreover, it not only lets you unblock apps and websites.

All premium VPN encrypts your traffic and also they have pretty tight security measures when it comes to privacy. So If you do go for paid ones, you will be glad to know that, your data & connection are secure and encrypted.

Use Snapchat on a School’s Wi-Fi Network using Portable Browser

If you are using a closed network in your school that means you cannot install Add-ons on your browser as-well. Same as you cannot use some apps and websites on a closed WiFi network. However, you will be glad to know, you can use portable browsers and install any Add-on you want to.

Get yourself a USB Drive, download portable browser such as Oprea & Firefox. Plug USB in your system and directly open your portable browser form the USB.

That’s all for today. Please do try these tricks and unblock Instagram or Snapchat on a School’s WiFi network.

How to Jailbreak iPhone 11, 11 Pro, 11 Pro Max on iOS 13.3

0
How to Jailbreak iPhone 11, 11 Pro, 11 Pro Max on iOS 13.3
Jailbreak iPhone 11
Image for reference only

Got an iPhone 11, 11 Pro or 11 Pro Max running on iOS 13.3? It’s time to Jailbreak it. Follow this guide to Jailbreak iPhone 11, 11 Pro, 11 Pro Max on iOS 13.3, iOS 13.2.3, iOS 13.2, iOS 13.1, and iOS 13. We will use the Unc0ver 4.3.1 to Jailbreak the Apple A12 and A13-powered iPhones/iPads.

Jailbreaking iPhone 11, iPhone 11 Pro, iPhone 11 Pro Max – The new Unc0ver 4.3.1

A few days back, Unc0ver develoepr pwn20wnd took it to twitter to announce the Unc0ver 4.0 with Jailbreak support for iOS 13 – iOS 13.3. This stood valid for all Apple A12 – A13-powered iPhones and iPads. Prior to this, Jailbreaking iOS 13 was possible with Checkra1n, but only the devices older than the iPhone X. The Unc0ver tool opened a new world of possiblities for the newer devices i.e. the iPhone 11 lineup. Here is what the developer tweeted.

The Unc0ver tool, since its official release for iOS 13, has recieved numerous updates fixing all of the underlying bugs. The Unc0ver is at its version 4.3.1 right now and has become a lot more stable for the iOS 13 to iOS 13.2.3 versions.

Furthermore, a number of methods has landed to allow installation of Unc0ver on the iPhone. If you fancy any iPhone iPhone XR onwards, you can use this guide to Jailbreak it. I am going to list all the methods to Jailbreak iPhone using Unc0ver 4. These methods include the methods with and without PC.

Jailbreak iPhone 11, 11 Pro, 11 Pro Max on iOS 13.3

  1. Download, install and setup AltStore on your computer.
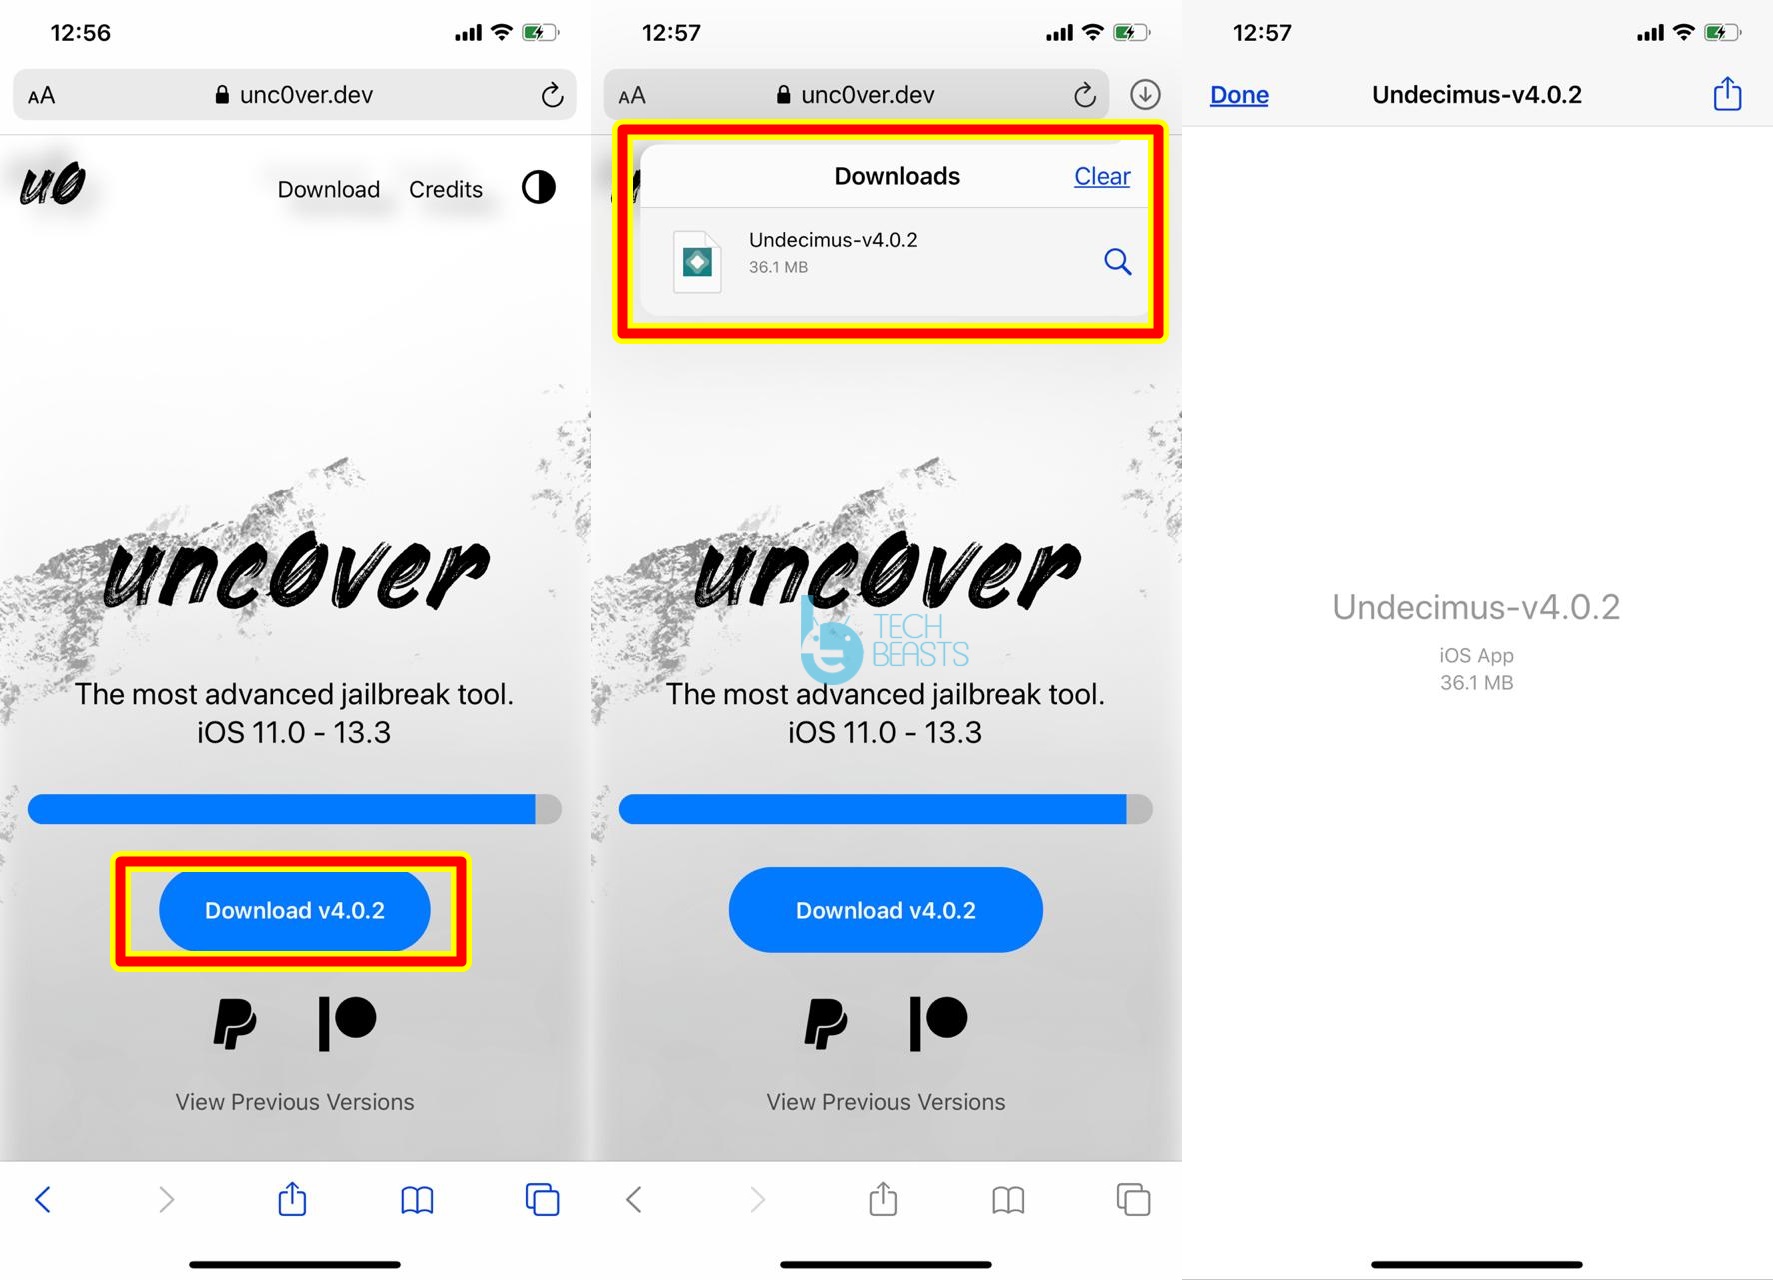
  2. On your iPhone, open the Safar Browser and go to Unc0ver.dev.
  3. Download the Unc0ver IPA.
  4. Now open the Download Manager in Safari and open the Unc0ver IPA.Unc0ver Jailbreak via altStore
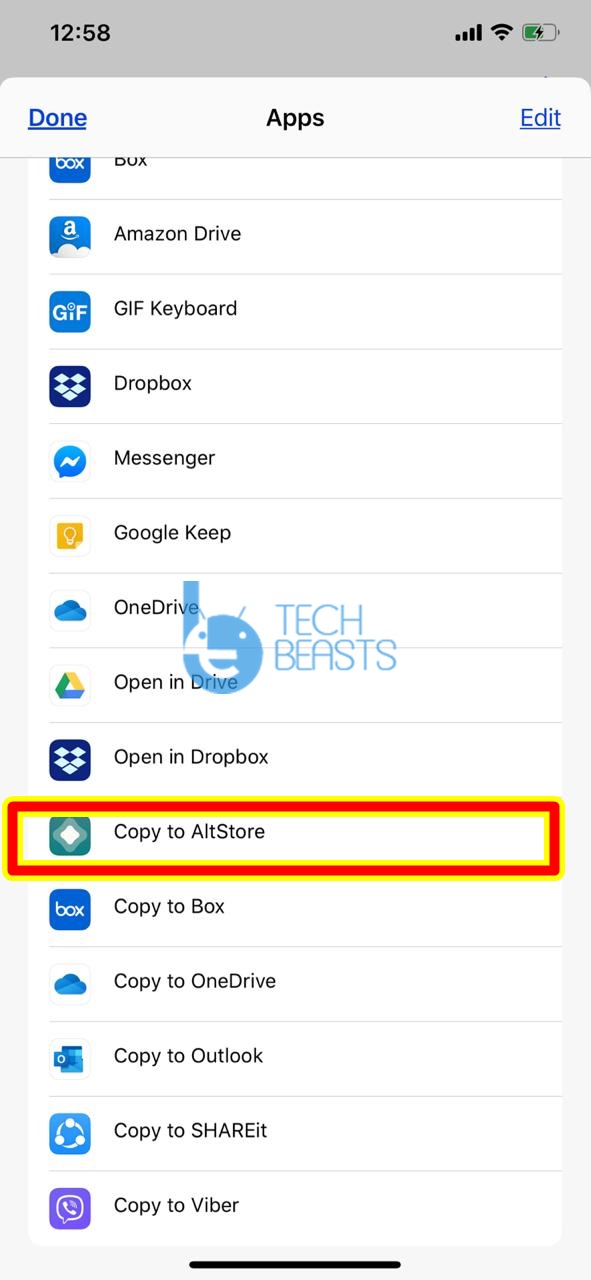
  5. Click on the Share button and then click on “Copy to AltStore”.copy to altstore
  6. If the AltStore asks for your user ID and password, enter the same details that you used to install the AltStore.
  7. Unc0ver will be installed now.
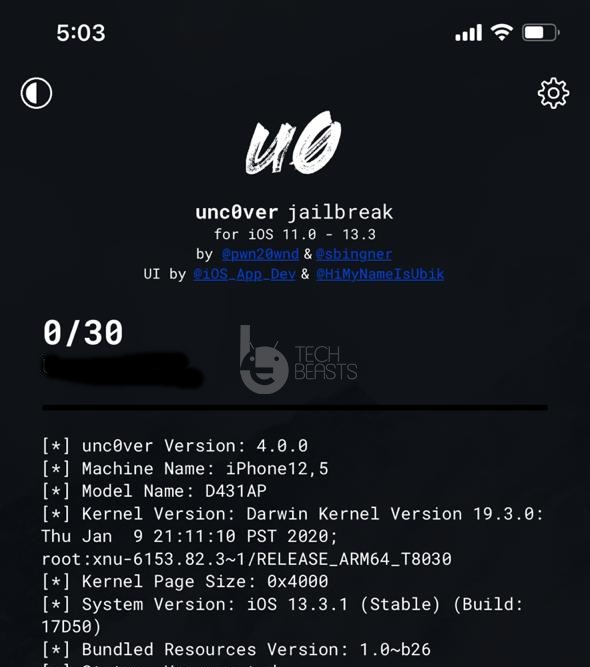
  8. Open the My Apps application of the AltStore and find the Unc0ver there.Unc0ver Jailbreak via altStore
  9. Launch the Unc0ver tool and click on Jailbreak.

Let the Unc0ver tool Jailbreak your iPhone. It will take a few minutes. Once installed, you will get the Cydia app in your iPhone.

Everytime you restart your iPhone, you will loose the Jailbreak. So, you will open the Unc0ver app everytime after restarting and Jailbreak your iPhone again.

More methods to Jailbreak:

If you have any questions regarding the Unc0ver tool or this Jailbreak method, feel free to use the comment box below.

70+ Free Best iOS 13.3 Jailbreak Tweaks [Cydia & Sileo]

0
70+ Free Best iOS 13.3 Jailbreak Tweaks [Cydia & Sileo]
Image used for reference only.

Here are over 70 free and best iOS 13.3 Jailbreak Tweaks. These tweaks are compatible with both Cydia and Sileo. If you have Jailbroken your iPhone or iPad using Unc0ver, Chimera, or Checkra1n, feel free to install these Tweaks. Take your iPhone or iPad to a whole new level with these iOS 13 Jailbreak-compatible tweaks.

Best iOS 13.3 Jailbreak Tweaks

iOS 13 Jailbreak

Until a few days back, it was only possible to Jailbreak the older iPhones on iOS 13. With the release of the Unc0ver 4.0, it has been made possible to Jailbreak almost all the iPhones and iPads powered by iOS 13.3 and below. If you fancy a new iPhone like the iPhone 11, 11 Pro, 11 Pro Max, or even last year’s XR, and Xs models, you can quickly Jailbreak those devices given that they are running on the iOS 13.3, iOS 13.2 or the iOS 13. The new Unc0ver tool Jailbreaks all the Apple A12 and A13-powered devices. Even the Chimera tool has been shown off Jailbreaking an iPad which means it’s also on the verge of its release.

Best iOS 13 JailBreak Tweaks
Image used for reference only.

With all the goodies available on the horizon, you should definitely unleash the full potential of your iOS device. Jailbreaking is a completely legal process and you can unjailbreak your device at any given point.

Jailbreak Tweaks

When you go after Jailbreaking the device, the very first question that comes to your mind is what Jailbreak Tweaks will be compatible with your device. Given how rare the Jailbreaks have become, it’s not easy to find active Jailbreak tweaks all the time. For this very reason, a list of all the working and best iOS 13 Jailbreak tweaks can come in handy to all those iPhone 11 and iPhone Xs owners.

For those who still don’t know, Jailbreak Tweaks are the reason why you Jailbreak your device. With the help of tweaks, you can load new UI features on your iPhone or iPad. You can also modify the look and functionality of the stock iOS applications. The entire home screen and lock screen of your iPhone can be modified with the help of the working Jailbreak tweaks. To cut it short, the Jailbreak tweaks open a whole new world of possibilities for your very limited iOS device.

70+ Free Best iOS 13.3 Jailbreak Tweaks

  1. AnsweringMachine XS 1.2-6
  2. Appaze 2
  3. AutounlockX (Spark)
  4. Bactchomatic (BigBoss)
  5. BarMoji (PackiX v1.8.1)
  6. BatteryLife
  7. BioProtect XS
  8. BrowserDefault
  9. CallBar X
  10. CallBarX
  11. Camera Tools (BigBoss)
  12. CCCalc Player (POackiX)
  13. Cercube (Alfhaily)
  14. Choices
  15. Clean Home Screen (Dynastic)
  16. Clean Player (PackiX)
  17. Complications
  18. Dark Keys (Dynastic)
  19. DismissAnyWhere (BigBoss)
  20. Evanesco
  21. Faces Pro
  22. Faces Pro
  23. Filza & Filza Plus
  24. Filza Files Manager (BigBoss)
  25. FiveDock 13
  26. Flame (BigBoss)
  27. Flex 3
  28. Floating Dock (BigBoss)
  29. Fluid Tabs (PackiX)
  30. Gestures13 (BigBoss)
  31. Groovify
  32. Hide Bar X (Spark)
  33. iClearn & iCleaner Pro
  34. LibertyLite Beta 0.2.12
  35. LocalIAStore 13
  36. Manila (PackiX)
  37. Mitsuha Infinity (Chr0nict, Nepeta, Connor)
  38. NoDNDBanner (PackiX)
  39. NoLowPowerAutoLock (Spark)
  40. OhMyFlash (PackiX)
  41. PencilChargingIndicator
  42. Pivot
  43. Power App (Dynastic)
  44. Pull to Respring (BB)
  45. RealCC (BigBoss)
  46. RecordAnywhere
  47. Relocate 0.1.1
  48. RepoFinder
  49. Shey Page Dots (BigBoss)
  50. Shuffle
  51. Shy Page Dots (BigBoss)
  52. Silent Screenshot (PackiX)
  53. SleepyTime (Spark)
  54. Small Siri (Packix)
  55. SmallSiri
  56. Smoothe Cursor
  57. Snowboard (Spark) Lotus ZOD
  58. Speed Intensifier (BigBoss)
  59. Succession (BigBoss)
  60. Sunflower (Chariz)
  61. TapTapFlip (PackiX)
  62. TouchFlow
  63. Tweak Count 2 (BigBoss)
  64. TweakConfigurator
  65. Whoops
  66. Wipe for More (BigBoss)
  67. WishDia (Julio)
  68. Xen HTML (PackiX & BigBoss)
  69. YouTube Tools
  70. Zebra (Xtm3x)

Premium Tweaks

  1. Apaturize (PackiX)
  2. BetterCCXI (PackiX)
  3. JellyFish (PackiX)
  4. NextUp 2 (PackiX)
  5. Noctis Neo (PackiX)

Install Free Best iOS 13 Jailbreak Tweaks

  • Open Cydia on your Jailbroken iPhone.
  • Install Flame from Cydia.
  • Now click on Sources in Cydia and then click on Edit > Add > Paste the sources (sources are listed below).

Sources for iOS 13 Jailbreak Tweaks

  • BigBoss & Dynastic are pre-installed.
  • https://apt.alfhaily.me/
  • http://julioverne.github.io/
  • https://chr0nict.github.io/Nepeta-Mirror/
  • https://repo.packix.com/
  • https://repo.chariz.io
  • http://cydia.zodttd.com/repo/cydia/
  • https://repo.packix.com/
  • https://gilesgc.github.io/repo/
  • https://sparkdev.me/
  • https://conorthedev.github.io/repo/
  • https://xtm3x.github.io/repo/
  • https://sparkdev.me/

Conclusion

That’s all you need for now. If you have any questions regarding the Jailbreak Tweaks or even the Unc0ver tool, feel free to drop your questions in the comment section below. I will try my best to get back to you as soon as possible.

Use Split-screen Mode and Floating Window on Huawei Mate Xs [ EMUI 10 ]

0
Use Split-screen Mode and Floating Window on Huawei Mate Xs [ EMUI 10 ]

Herewith this guide, you will learn How to use Split-screen Mode and Floating Window on Huawei Mate Xs running EMUI 10.

Split-screen Mode and Floating Window on Huawei Mate Xs

Well, all know that Huawei Mate Xs is the foldable smartphone introduced by Huawei and it’s pretty good not the best but good. Since Huawei Mate Xs has huge 8-inch widescreen and it is foldable, which means we can use Split-screen Mode on Huawei Mate Xs.

Not only Split-screen Mode, but you can also enjoy the Floating Window and Split-screen Mode at the same time. Well, why not use slipt mode, Huawei Mate Xs has a big like a very big screen and this is the best way to utilize it.

If you want to Install Google Installer on your Huawei devices. Try this, Download Play Store APK for Huawei Phones Working 2020

If you are getting confused with the Split-screen mode, let me clear things for you. I am talking about the Multi-Windows options, just like we use it on our PC. Same goes for Split-screen mode, you can use two apps at a time and they will be displayed side by side.

There are many benefits of Split-screen mode but there is one like I like the most. I got tons of documents to work with and believe me, I can easily edit documents and copy & paste content from one to another.

Once you start using it, you will get a better idea of what I am talking about. Now the next feature is the floating window, If you have a specific app that you use the most then the floating window feature is for you.

No need to switch between apps, all you have to do is dock your favorite apps. Once done, now a user can use three apps at the same time, two apps in Split-screen mode and one app in the floating window.

I think that is enough for the introduction of both Split-screen mode and floating Window. Let me tell you now how you can Use Split-screen Mode and Floating Window on Huawei Mate Xs. Also, keep in mind these instructions are for EMUI 10.

Use Split-screen Mode and Floating Window on Huawei Mate Xs:

Let’s start now and tell you how to use both of these features on Huawei Mate Xs. I am starting with the Split-screen Mode.

Split-screen Mode:

Before you start using any feature, first you must enable it. Heed the instructions below to Enable Split-screen Mode.

Enable Split-screen Mode from the Multi-Window Dock:

Step1: Open an app and start swiping inwards, either to the left or right edge. While doing that keep holding on and it will bring up the MultiWindow dock.

Step2: Once the MultiWindow dock is activated, drag an app out of the MultiWindow dock.

Switch the split-screen panes:

Now that you have enabled Split-screen Mode. Let me tell you how you can easily switch the split-screen panes.

It’s also very easy, all you need do is touch & hold the adjuster icon located at the top. Keep on dragging and holding until the pane shrinks. Once it’s shrunk, move it across the screen.

Install Huawei Mate 30 Pro Google Play Store and GMS

Exit Split-screen mode:

It’s very easy, all of us know that. Use the back key to exit Split-screen mode.

Now let me tell you how to use the Floating Window. Before moving on, please know that Floating Window is also accessed through Multi-Window Dock.

  1. First, you need to swipe inwards either from left or right and keep on holding. This will bring up the Multi-Window dock.
  2. Now once Multi-Window dock is activated, just tap on the app icon to open an app in a floating window.

Add, Move, or Remove an App from the Multi-Window Doc:

If you have used Samsung in the past, you will be well familiar with the edge Panel. Where you can add a number of Apps for quick access. The same goes for Multi-Window Doc on Huawei Mate Xs. You can easily remove, Add, Move apps from multi-window.

    • If you need to add an app on Huawei Mate Xs Multi-Window Doc. Tap on + button, select an app from the suggested apps shown there.
    • Moving an app from one position to another is very simple too. Again Tap on + Button, now drag any app from one position to another.
    • Removing an app from Multi-Window dock is the same, tap on + button, you will see a “-” icon against every app. Tap on it to remove.

Disable Multi-Window:

  • Settings > Accessibility features > Multi-Window, then disable Multi-Window dock.

That’s all. This is how you can use Split-screen Mode and Floating Window on Huawei Mate Xs. Let me know if you don’t get anything.

Download Unc0ver 4.3.1 IPA [Jailbreak iOS 13 – 13.3]

0
Download Unc0ver 4.3.1 IPA [Jailbreak iOS 13 – 13.3]

Unc0ver 4.3.1 is now out with Jailbreak support for iOS 13 to iOS 13.3. You can now Jailbreak any iPhone or iPad powered by the A12 or A13 chip. Download Unc0ver 4.3.1 IPA from here to Jailbreak iOS 13 – iOS 13.3 now. The tutorial to install the Unc0ver IPA is also given below.

Unc0ver 4.0 IPA

Unc0ver

Unc0ver is a famous Jailbreak tool for iOS devices. For years, the Unc0ver has allowed Apple users to achieve untethered Jailbreak on their devices with or without a computer. Recently, the Unc0ver once again rose to popularity when it allowed Jailbreaking the iOS 12.4 and below on the iPhone X and prior devices. Since then, users have been eyeing a new version of Unc0ver which could let them Jailbreak a newer version of iOS and also the newer iPhones/iPads. After months of wait and the immense hard work by the Unc0ver developer pwn20wnd, the Unc0ver 4.0 is here and it successfully Jailbreaks iOS 13, 13.1, 13.2, and 13.3 on all iPhones and iPads. This is yet another untethered Jailbreak. 

There is another tool to Jailbreak the  A11 powered devices, it’s known as Checkra1n, however, for Checkra1n, you need a macOS powered device. With the Unc0ver, you can Jailbreak A12 and A13-powered devices and that too without a computer.

Here is what the Unc0ver 4.3.1 supports.

  • All Apple A8 – A11 devices running on iOS 13/13.1/13.2/13.3
  • iOS 13/13.1/13.2/13.3 Apple A12 and A13 Chipsets
  • Apple iPhone 6, 6 Plus, 6s, 6s Plus, iPhone 7, iPhone 7 Plus, iPhone 8, iPhone 8 Plus
  • iPhone X
  • iPhone XR
  • Apple iPhone Xs
  • Apple iPhone Xs Max
  • iPhone 11
  • iPhone 11 Pro
  • Apple iPhone 11 Pro Max
  • iPad Mini 5th Gen and iPad Air 3rd Gen/2019

Unc0ver Updates

  • Uncover 4.0 – Initial update with Jailbreak support for iOS 13 – 13.3.
  • 2nd update: Unc0ver 4.0.1: App Store fix for A12-13, Push Notifications fix, improved reliability for A12 – A13 devices on iOS 13.0 – 13.3
  • 3rd Update: Unc0ver 4.0.2: Fixes iOS 13.0 – 13.2.3 support and injection into WebContent
  • 4th Update: Unc0ver 4.0.3
    • Fixes App Store on A12-A13
    • Fixes a bug that affected system services on A12-A13
    • Improve the exploit reliability by guiding the user on the proper use
  • 5th Update: Unc0ver 4.2.0
    • Fix issues with system services on A12-A13 (i.e. iMessage notifications)
    • Add iOS 13.0-13.3 support for A8-A11 devices
    • Fix temporary freeze after the jailbreak completed alert
    • You must reboot in order to install this update if you are already jailbroken
    • @Pwn20wnd’s substitute bootstrap tooling is used on A8-A11 devices running iOS 13.0-13.3 for battery saving features, improved performance, and compatibility reasons
    • There is no particular reason to switch to the unc0ver jailbreak if you are already running the checkra1n jailbreak (Other than the convenience of being able to re-jailbreak your device without a computer)
    • Your jailbreak apps and tweaks will be preserved when switching from the checkra1n jailbreak for A8-A11
    • You can switch back to the checkra1n jailbreak while preserving your jailbreak apps and tweaks but you will need to manually install Cydia Substrate from Cydia after switching back
    • All devices running iOS 13.0-13.3 are now supported
    • The connected Apple Watch may re-sync after jailbreak. It will take around a minute or two and it won’t touch your data
  • 6th Update: Unc0ver 4.2.1
    • Fix a bug that caused unreliability in starting up substitute
    • Fix an issue that broke battery settings and caused extra battery drain

Latest Update: Unc0ver 4.3.1

  • Add support for rebooting the userspace for the first time in a jailbreak
  • Support for injecting to the entire userspace
  • Add support for looking up or registering services from the sandbox with the cy: prefix for developers
  • Reboot the userspace after jailbreaking
  • Make major design changes to preserve stock system performance
  • Fix random reboots, freezes, memory issues and any known problem that affected system services or apps
  • Fixed persistent software update blocker on iOS 13 (Works in the jailed state too)
  • Fix a design problem that affected the Succession restore tool
  • Automatically re-enable software updates when restoring RootFS

Download Unc0ver 4.3.1 IPA

Unc0ver 4.3.1 IPADownload

Update: Install Unc0ver Jailbreak via AltStore

Installing the Unc0ver 4.3.1 IPA

  1. Download and install Cydia Impactor on your computer.
  2. Open Cydia Impactor.
  3. Connect your iPhone/iPad to the computer.
  4. Select your device in the Cydia Impactor now.
  5. Drag and drop the Unc0ver IPA on to the Cydia Impactor.
  6. The impactor will ask for an app-specific password now. Open your Apple ID on the computer and go to Security Settings to get the app-specific password.
  7. Enter the Password into the Cydia Impactor now to install the IPA.
  8. Disconnect your iPhone now.
  9. On the iPhone, go to Settings > General > Device Management > Click on the Profile appearing there and trust it.
  10. Now go to Settings > General > Storage > Delete any pending iOS 13 updates and restart your iPhone.
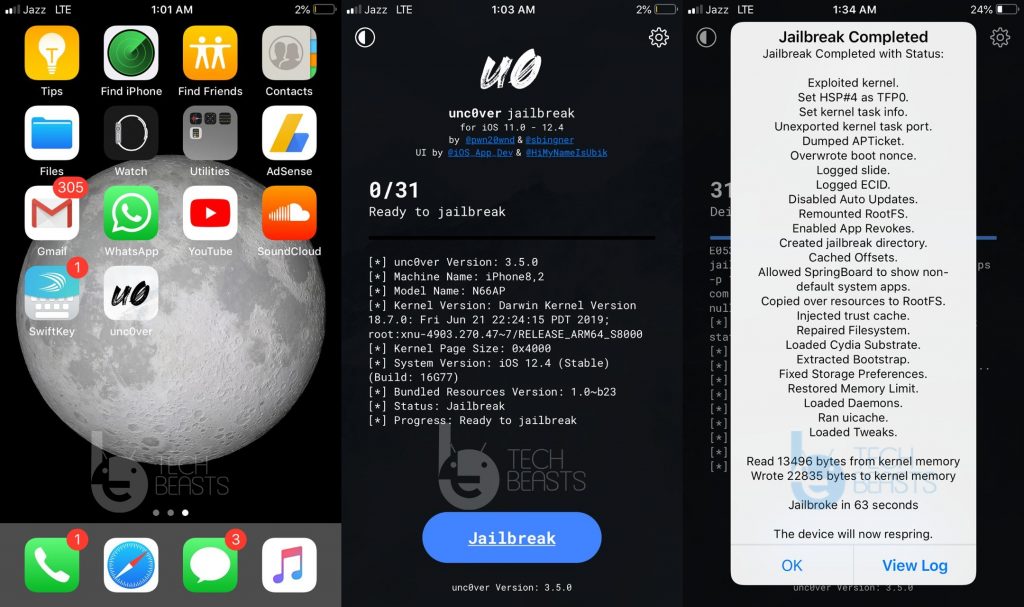
  11. Now launch the Unc0ver app on the iPhone and press Jailbreak! That’s all.

If the Unc0ver doesn’t Jailbreak your phone in the first try, repeat the process until it Jailbreaks. Once done, you can open Cydia and find the available tweaks. Install the tweaks and take your iPhone to a whole new level.

That’s all.

How To Block Google From Tracking Your Location

0
How To Block Google From Tracking Your Location

With the help of this guide, you will be able to learn How To Block Google From Tracking Your Location. We all know very well all the big social media apps track our location easily.

We are living in a digital age and believe me nothing is secure, the more we adopt then more we are exposed. But on the other hand, we cannot anything with just a single tap or click. There are goods and there are bads in every aspect of life, the same goes for the digital world.

The biggest concern nowadays everyone has is the privacy breach and believe me it is possible and easy for these social media companies to access our information. No matter what they say, they do access our data without our permission. Let me give you an example whenever you visit a place and after sometimes you will get a notification that what are your thoughts about that place, please give us a review.

Now doesn’t it feel a bit uncomfortable, I mean your location is turned off from settings. But still, Google can track your physical moves. I am not comfortable with that, I don’t want anyone to keep track of my movements.

This is the same situation I was in and that is why I created this post. I will help you to Block Google From Tracking Your Location.

Block Google From Tracking Your Location:

Heed the instructions below to learn what you can do to stop Google from tracking your location without your permission.

The first thing that comes to our mind when a location review message shows up from Google. I have turned off location from my Settings and still, I am getting that.

It doesn’t matter that you have toggle off your location from settings, Google still has a number of ways to track your location. We use a number of Google services and apps on a daily basis, apps such as Weather, Maps, Googe Now, etc.

Moreover, if you are an Android user then you should know that you won’t be able to use your device unless you have Google service. Therefore, Google can easily track your location, your movements and more. Google also keeps track of your location history using Google Maps and after that, you will be served with targeted adverts.

Now let’s move on with the guide and let’s Block Google From Tracking our Location. It’s very simple and easy you don’t have to go pro. Just heed the instructions below.

Blocking location tracker on an Android phone:

Step1: Head over to the Settings on your Android device.

Step2: Scroll down and Tap on Accounts -> Google and select your account.

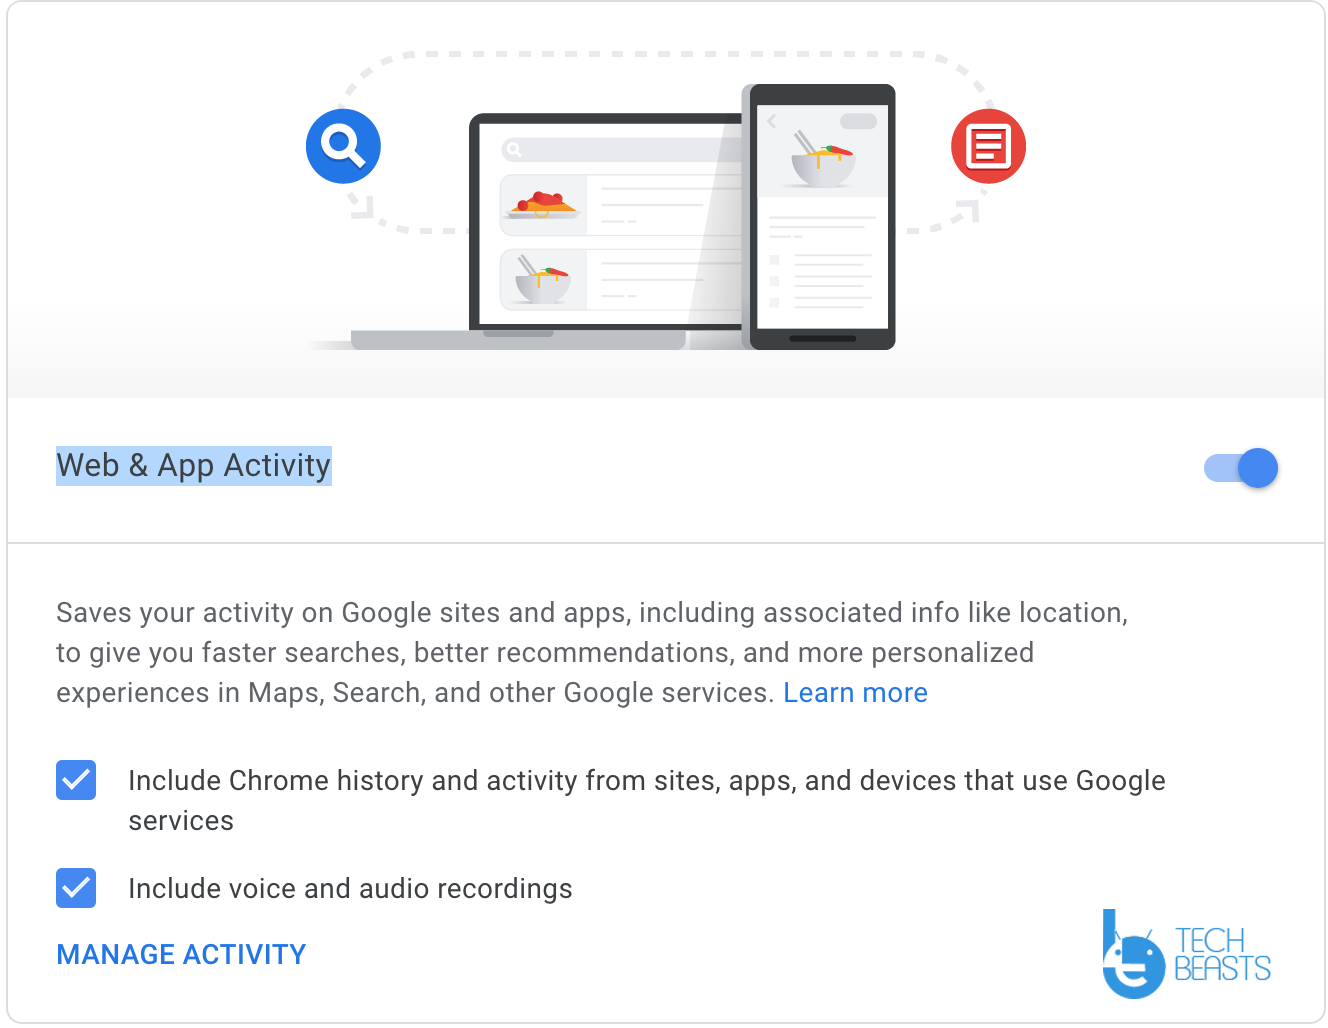
Step3: Tap on Data & personalization -> Web & App Activity.

Step4: Now turn off Web & App Activity.

If you want to turn off your location history, you can visit my other guide.

Blocking Location Tracker on an iPhone, iPad or Laptop:

You can use these same instructions on your Apple device and on your PC, Laptop.

Step1: Open Up Google Chrome on your PC or iPhone and type in

Step2: Click on the profile icon and next Manage your Google Account.

Block Google From Tracking our Location


Step3: On the next page, click on the Data & personalization.

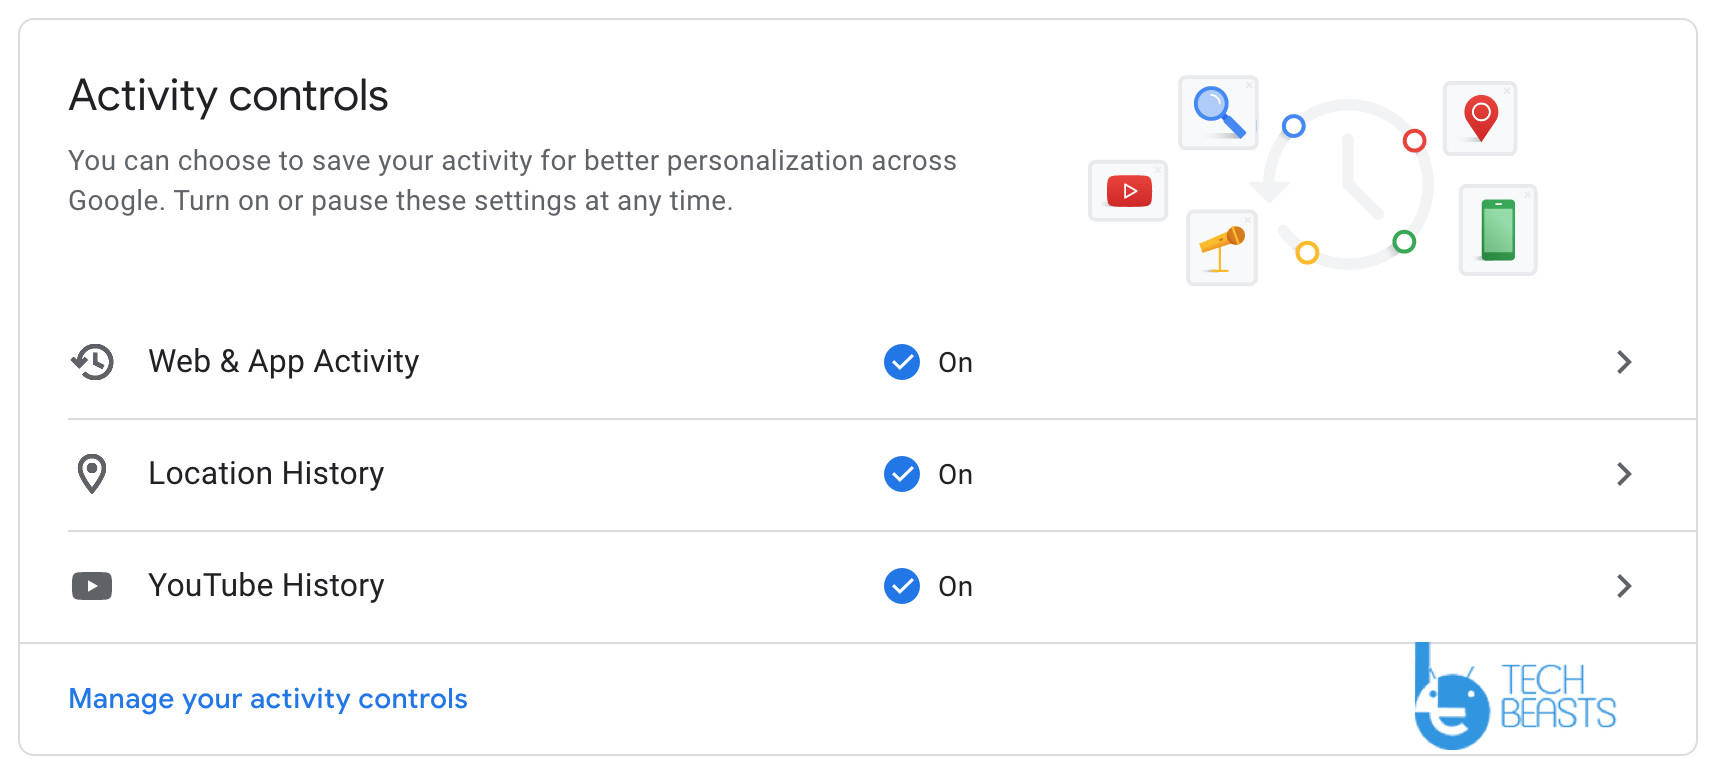
Step4: Now in Data & personalization you will find the following settings.

    • Web & App Activity.
    • Location History.
    • YouTube History.

Block Google From Tracking our Location

Step5: Select Web & App Activity and toggle it off.

Once you have done that, you have blocked Google From Tracking Your Location. Once the Web & App Activity is off, your device won’t be feeding any data to Google.

Conclusion:

Once you have followed all my instructions and toggle off your location services. You can go anywhere with peace of mind. Now no one is tracking you, You have blocked Google From Tracking Your Location

Download Play Store APK for Huawei Phones Working 2020 [APK Download]

Download Play Store APK for Huawei Phones Working 2020 [APK Download]

A new APK to install the Google Play Store and Play Services on Huawei and Honor phones has landed. You can once again get the Play Store working on any Huawei or Honor handset. Download Play Store APK for Huawei Phones from here. The attached APK will work for all EMUI 9 and EMUI 10 smartphones.

Play Store APK for Huawei Phones

Play Store on Huawei Phones

Back in August 2019, Huawei was banned from using any of the Google services including the Android ecosystem. Since then, Huawei users have relied on workarounds to get the Play Store and Play services working on the phones. The existing Huawei phones did not lose the Google Apps, but the upcoming Huawei phones were not allowed. As a result, all the Huawei and Honor handsets that released after August 2019, they come without the Play Store.

Just yesterday, I got my hands on the Huawei Y7p. To no surprise, the phone did not have anything called Google. Huawei has integrated its new HMS in the new Huawei phones instead. The HMS replaces the GMS and opens the door for Android apps once again. With the HMS, you can sideload all the Android and AOSP applications on the phone which include sideloading the Play Store APK as well.

Google Play Store on Huawei P40, P40 Pro or P40 Pro+ (GMS)

To date, there have been hundreds of Play Store packages that have made things easy for the Huawei users, but every now and then, those APKs stop working. This time around, another new APK going by the name “Chat-partner” has landed. This application is a chat client basically and when you install it, it looks for the Play Services Framework on your phone. Upon not finding the Framework, it informs the users that something is wrong with their phone. Users can click on the “Repair” button and the app installs all of the Google Services within a few seconds.

We are not sure for how long this new solution will keep working, but as of now, it is working well. I used this application to install the Play Store on my Huawei Y7p and I’ve been enjoying all the official Google Apps since then. The best part about this application is that Huwaei’s App Installer doesn’t detect anything wrong with it. The installation process is extremely smooth. There are no confusions involved.

Take a look at the steps to install Google Play Store via the Chat Partner app on your Huawei or Honor smartphone now.

Download Play Store APK for Huawei & Honor

Play Store Chat-Partner APKDownload

  1. Copy the APK to your phone.
  2. Open Files on your phone and click on the copied APK.
  3. Allow the app installation and go ahead.
  4. Now launch the chat partner app from the home screen.
  5. In the Chat Partner app, click on the Repair button.
  6. Wait for the Chat Partner App to install Play Store.
  7. Once it is done fixing the phone, you will find Play Store on the home screen.
Play Store APK for Huawei Phones

That’s all. That’s how easy it was to get the Play Store working on your Huawei handset once again. If you found this tutorial working, please drop your feedback below. In case you are facing any issues, feel free to reach out to me. I will try my best to help you out with this.

Previous solutions:

Install Huawei Mate 30 Pro Google Play Store and GMS [Working 2020]

Scan Documents Using Android Camera [ How To ]

0
Scan Documents Using Android Camera [ How To ]

Here’s How you can easily Scan Documents Using Android Camera. Yes! you have heard it right, you can directly scan your documents using Android Camera.

Gone are the days when we used to scan documents using dedicated scanner machines. Since technology is growing each day and users always look for a solution that works on the go.

Moreover, smartphones are taking over everything, nowadays there are very few things that we cannot do through our smartphones. Other than them, we can do all sorts of things using our Android devices.

Try: Free CamScanner Alternatives 2020

Now as I was talking about scanning documents using an Android camera, you will be surprised to know that you don’t require any third-party app to scan using your Android device camera. Your stock camera will do all, get the document you want to scan, open up your camera app. Point your camera to the document and give it a second.

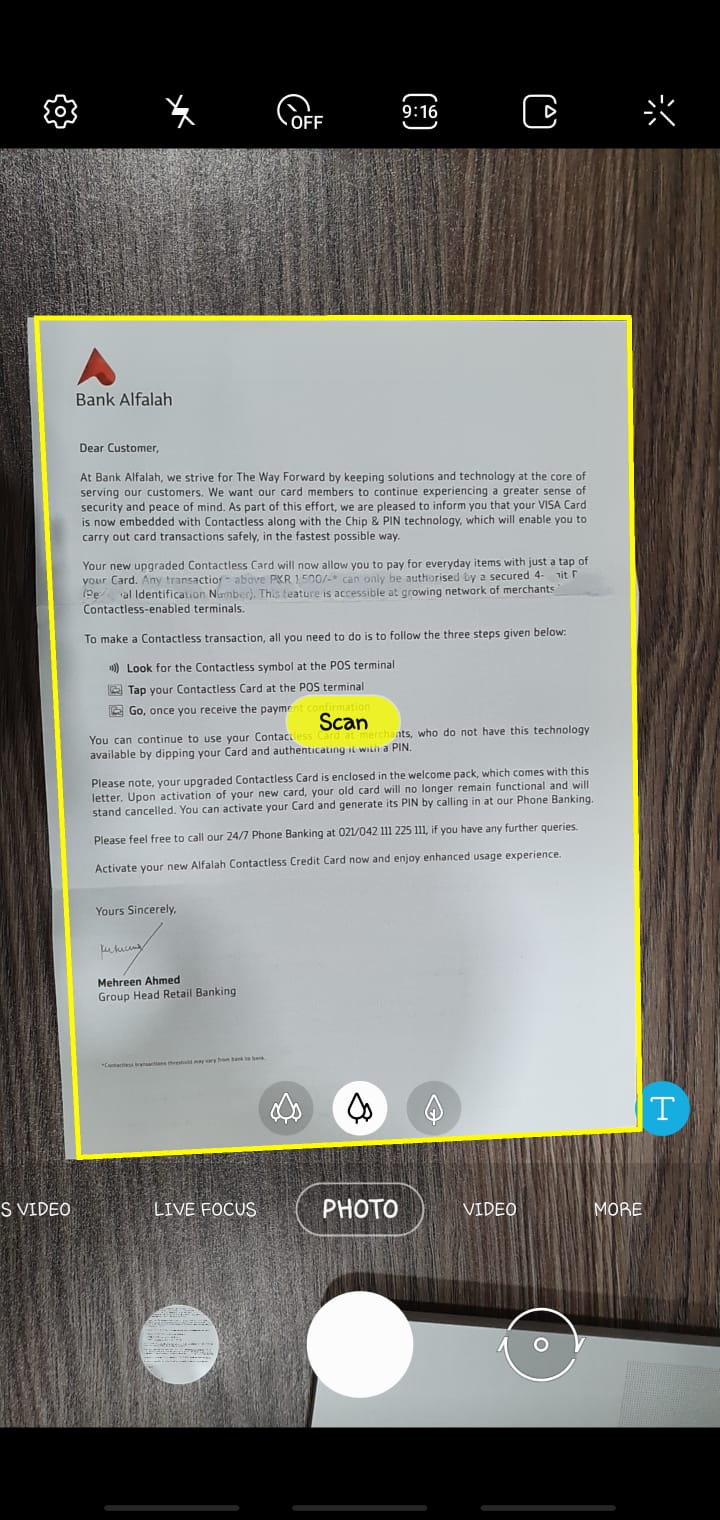
After a few seconds, you will see a yellow outline with a scan button. Now in order to scan, select the section you want to scan, just to be clear, your camera will only scan the section which is inside the outline.

Tap the scan button and leave the rest to your device. Once the process is finished, you will see the cropped photo into your gallery.

How to Scan Documents Using Android Camera:

What have I told you above it was a general process but not all the devices let you scan documents like that? Yes! that is true. However, it is also true that your stock camera app on your Android phone allows you to scan documents. 

In order to do so, you need to change some settings and after that, you will be able to  Scan Documents Using Android Camera. Let’s get to it.

Scan Documents Using Samsung Galaxy S10+ Camera:

Scan Documents Using Android Camera

  • Get your document, you want to scan and place it on a table or flat surface.
  • Launch Camera, tap on settings -> Scene optimiser -> Enable Document Scan.
  • Now point your camera to your document you want to scan. Tap on the scene optimizer to turn off and then turn it on again. 
  • Keep pointing at your document and you see a yellow outline and in the center, you will see a scan button. Tap on it and the section in the yellow outline will be scanned and saved in your gallery.

That’s all.

iMessage and AppStore Issues after Jailbreaking iOS 13

0
iMessage and AppStore Issues after Jailbreaking iOS 13

I have seen a ton of users are reporting on different forums that after they have Jailbroken their device running on iOS 13. It seems iMessage and AppStore start behaving abnormally. So I started digging more about iMessage and AppStore Issues after Jailbreaking iOS 13 and it was true. After Jailbreaking iOS 13, a number of users reported this same issue.

iMessage and AppStore Issues

So I thought why not help you all and provide you with some workarounds that will help you fix iMessage and AppStore Issues after Jailbreaking iOS 13.

So before I move on and tell you what you have to do fix these issues. I need to shed some light on the iMessage and AppStore Issues. Apparently, there is a glitch or a bug that is effecting App Store and iMessage workings. For e.g, Once you have Jailbroken your device, there will be no app update for you. App Store won’t show you a single update of any app unless you UnJailbreak your device.

Now for iMessage, whenever you receive a new message, you won’t be notified. Moreover, image preview doesn’t work, sometimes it does sometimes it doesn’t.

There you go now you have a better picture of all the issues people are facing after Jailbreaking iOS 13. Let’s get going and fix these issues.

Fix iMessage and AppStore Issues after Jailbreaking:

Since iMessage and AppStore started behaving abnormally after the Jailbreak. The first thing that comes to our mind is Un-Jailbreak our device. I also agree with you all, this is what we all should do. But, I think, this should be our last option.

I have found some potential solutions to Fix iMessage and AppStore Issues. But I do need to remind you that these workarounds will only work on a Jailbroken device. If you still want to keep Jailbreak on your device then you try the following solutions.

Otherwise, you can Un-Jailbreak your device whenever you like.

Read more:

AppStore Updates Problem:

In order to Fix the AppStore Update issue, you need to install a tweak called iCleaner Pro. Once installed run it and it will fix the AppStore update issue on your iOS 13 Jailbreak device.

iMessage Notifications Bug:

  • First, you need to install an app called NewTerm, it’s a free terminal app. Once installed, lunch it and type in ‘su’. You will be asked to enter your root password. Try ” Alpine “.
    • (https://repo.chariz.com)
  • After that, you need to type ‘ldrestart’.

Fix iMessage Image Bug:

  • Open Cydia and Add source using (https://cydia.ichitaso.com). After that install an app called PowerSelector.
  • Launch PowerSelector and Select ‘UICache’.

Download Samsung Galaxy S20 Ultra Stock Wallpapers

0
Download Samsung Galaxy S20 Ultra Stock Wallpapers

Galaxy S20 Ultra’s wallpapers are fabulous. You may not be able to spend that huge amount of money to get this phone, but you can definitely download its stock wallpapers. Here in this post, you will find the Galaxy S20 Ultra Wallpapers plus a surprise. Go ahead, download Samsung Galaxy S20 Ultra Stock Wallpapers and along with that, grab the Galaxy Z Flip Stock Wallpapers too.

Samsung Galaxy S20 Ultra Stock Wallpapers
All wallpapers of the S20 Lineup & Galaxy Z Flip.

Samsung Galaxy S20 Ultra

Samsung’s new Galaxy S flagship devices just a couple of weeks back. The ordinary Galaxy S20 devices were just the regular flagship upgrades, but the revolution happened when Samsung took the wraps off from the new Galaxy S20 Ultra. The Galaxy S20 Ultra simply slaughters every other flagship device that exists to date. The ming-boggling features of the Galaxy S20 Ultra do not leave any room for other phone makers to compete, at least in the year 2020.

Samsung Galaxy S20 Ultra Stock Wallpapers

To start off, the Galaxy S20 Ultra has a 6.9-inches Dynamic AMOLED QHD+ display on the front. This is not an ordinary display, at first, this moniker has a 20:9 aspect ratio, and this whopping screen is powered by a 120 Hz refresh rate. The refresh rate, for now, works at 1080P, but the news has it that Samsung is all set to unlock it for QHD+ resolution.

Galaxy S20 Ultra is powered by the Exynos 990 or the Snapdragon 865 CPU. These are the latest chipsets for top-of-the-line smartphones. The S20 Ultra takes things to a whole new level when it comes to RAM. This phone is available with a RAM starting from 12GB which goes all the way up to 16GB with 512GB storage. The S20 Ultra packs a 5000 mAh battery under the hood which supports up to 45W super-fast charging.

On the camera end, Samsung has added 4 sensors at its back. The main camera is a 108 megapixels nona-binning shooter. It’s got a 48 megapixels telephoto shooter, a 12 megapixels ultrawide, and a 5 megapixels TOF Depth sensor. On the front, the S20 Ultra houses a 40 MP camera. This phone can zoom in for about 100 times. You heard that right: it’s got Space Zoom!

Samsung Galaxy S20 Ultra Stock Wallpapers

The Galaxy S20 Plus and S20 come in with a 6.7 and 6.39-inches display. These two phones do not have a 108 megapixels camera and that 100x zoom, they deploy a 64 megapixels main shooter instead. Except for the changes in the screen size and camera capabilities, the remaining specifications of the Galaxy S20 phones remain the same. The S20 Plus has a 4500 mAh battery and the S20 has a 4000 mAh battery. All of the S20 models can shoot 8K videos at 30 FPS.

Samsung Galaxy S20 Ultra Stock Wallpapers
S20, S20 Plus, & S20 Ultra

Furthermore, the wallpapers of all the Galaxy S20 phones are also the same. Galaxy S20, S20 Plus, and S20 Ultra have the same 8 stock wallpapers. You can find the Galaxy S20 Stock Wallpapers, Galaxy S20 Plus Stock Wallpapers, and the Galaxy S20 Plus stock wallpapers below.

Galaxy S20 Ultra Stock Wallpapers

As mentioned earlier, there are 8 S20 Ultra stock wallpapers in total. These wallpapers have a resolution of 3200 x 3200 pixels. You can apply these wallpapers to the screen of any Android phone or even an iPhone. You can either download the S20 Ultra wallpapers one-by-one or use the all-in-one link.

All Galaxy S20 Ultra Stock Wallpapers – Download

Samsung Galaxy S20 Ultra Stock Wallpaper

Galaxy S20 Ultra Video Wallpapers

Video Wallpaper from the S20

Video Wallpaper from the S20

Bonus: Galaxy Z Flip Stock Wallpapers

Now here is the bonus I talked about. The Galaxy Z Flip has 4 stock wallpapers in total. It’s got 3 static wallpapers and one video wallpaper. All the Galaxy Z Flip stock wallpapers carry a resolution of 2636 x 2636 pixels. Just like the S20’s stock wallpapers, you can use these wallpapers on any phone’s screen.

All Galaxy Z Flip Stock Wallpapers: Download

Galaxy Z Flip Video Wallpaper

Check out more stock wallpapers in our site’s wallpapers section.

That’s all. I hope you guys enjoyed these wallpapers. If you have any questions, feel free to use the comment box below. I will try my best to get back to you as soon as possible.

How To Recover Spotify Deleted Playlist

0
How To Recover Spotify Deleted Playlist

With the help of this guide, you will be able to Recover Spotify Deleted Playlist. Heed the instructions provided below.

How to Stop Spotify from Opening on Startup

Every now and then, by accident, we had deleted things that we don’t want to. It could me messages, Pictures, Important Documents, Playlists and more. Today, I will be helping you with Spotify Playlist. Once a playlist is deleted or erased on Spotify, how you can recover it?

Recover Spotify Deleted Playlist

Every app has its own unique processing or methods to recover anything which got deleted by mistake. The same goes for the Spotify, you can easily Recover Spotify Deleted Playlist.

You won’t be needing any third-party tool or service to do so. All you have to do is following the instructions provided below. Let’s get started.

Fix Spotify buttons on the lock screen no longer working

How To Recover Spotify Deleted Playlist:

Just follow the instructions provided below and you will be able to recover your deleted Spotify playlist.

Total Time: 5 minutes

Spotify web player:

In order to recover a deleted Spotify Playlist. You need to use Spotify web player if you haven’t downloaded Spotify web player on your PC. You can always head over to the Spotify’s official Website and download it.

Sign in:

After you have downloaded the Spotify Web Player on your PC. You have to log in with your Spotify account. Click on the drop-down menu located on the right side -> Account -> Sign in.

Account Overview:

Once logged in, head over to the account overview page. There you will find an option, Recover Playlists. Click on it and you will see a list of all you deleted Playlists. Each playlist will be displayed with the songs number and deleted date.

Recover Playlist:

Now it is time to restore the delete playlist. Right next to each playlist you will find a green restore button. Click on it and one playlist is restored, you will see that playlist is highlighted green. Moreover, it will be labeled as restore.

Check Playlist:

Head over to library now and look for the restored playlist.

Conclusion:

So, this is how you can easily recover any deleted Spotify Playlist. All you have to do is heed the instructions provided above and you are good to go.