Follow this guide to download and sideload Unc0ver Jailbreak using Cydia Impactor. This is the method to Jailbreak using your Windows or macOS-powered computer. Furthermore, this guide is for the latest Unc0ver 4.0.2 to Jailbreak iOS 13-13.3.
Unc0ver 4.0.2
At the time of writing this post, the latest version of the Unc0ver is 4.0.2. The newest version brings some more bug fixes and improves the stability of Unc0ver Jailbreak for iOS 13 – 13.2.3. With this tool, you can Jailbreak any iPhone or iPad which is using the A12 or A13 chipset and is powred by the iOS 13 – iOS 13.3.
If you have been eyeing a method to Jailbreak your iPhone with the minimum amount of hassle, this is your way to go. Unc0ver is undoubtedly the most popular Jailbreak method to remove the limits from your iOS device in the modern days. The Unc0ver will achieve a semi-untethered Jailbreak on your iPhone. The only downside is the repitition of Jailbreak process everytime you restart your device. Other than that, this is the sweetest Jailbreak method available right now.
To install the Unc0ver 4.0.2 IPA, you can use the Cydia Impactor or the AltStore. The AltStore method is relatively convenient and I have explained it already in a different post. If you still want to use the Cydia Impactor to sideload Jailbreak, this guide is for you. Take a look at the requirements and then install the Unc0ver 4.0.2 using Cydia Impactor.
Select your device in the Cydia Impactor, enter your computer’s password if it asks.
Now drag the Unc0ver IPA and drop it on to the Cydia Impactor.
It will ask for app-specific password. Open your Apple ID on the computer, go th Security Settings, get the app-specific password and enter it into the Cydia Impactor.
Unc0ver will be sideloaded on your iPhone now.
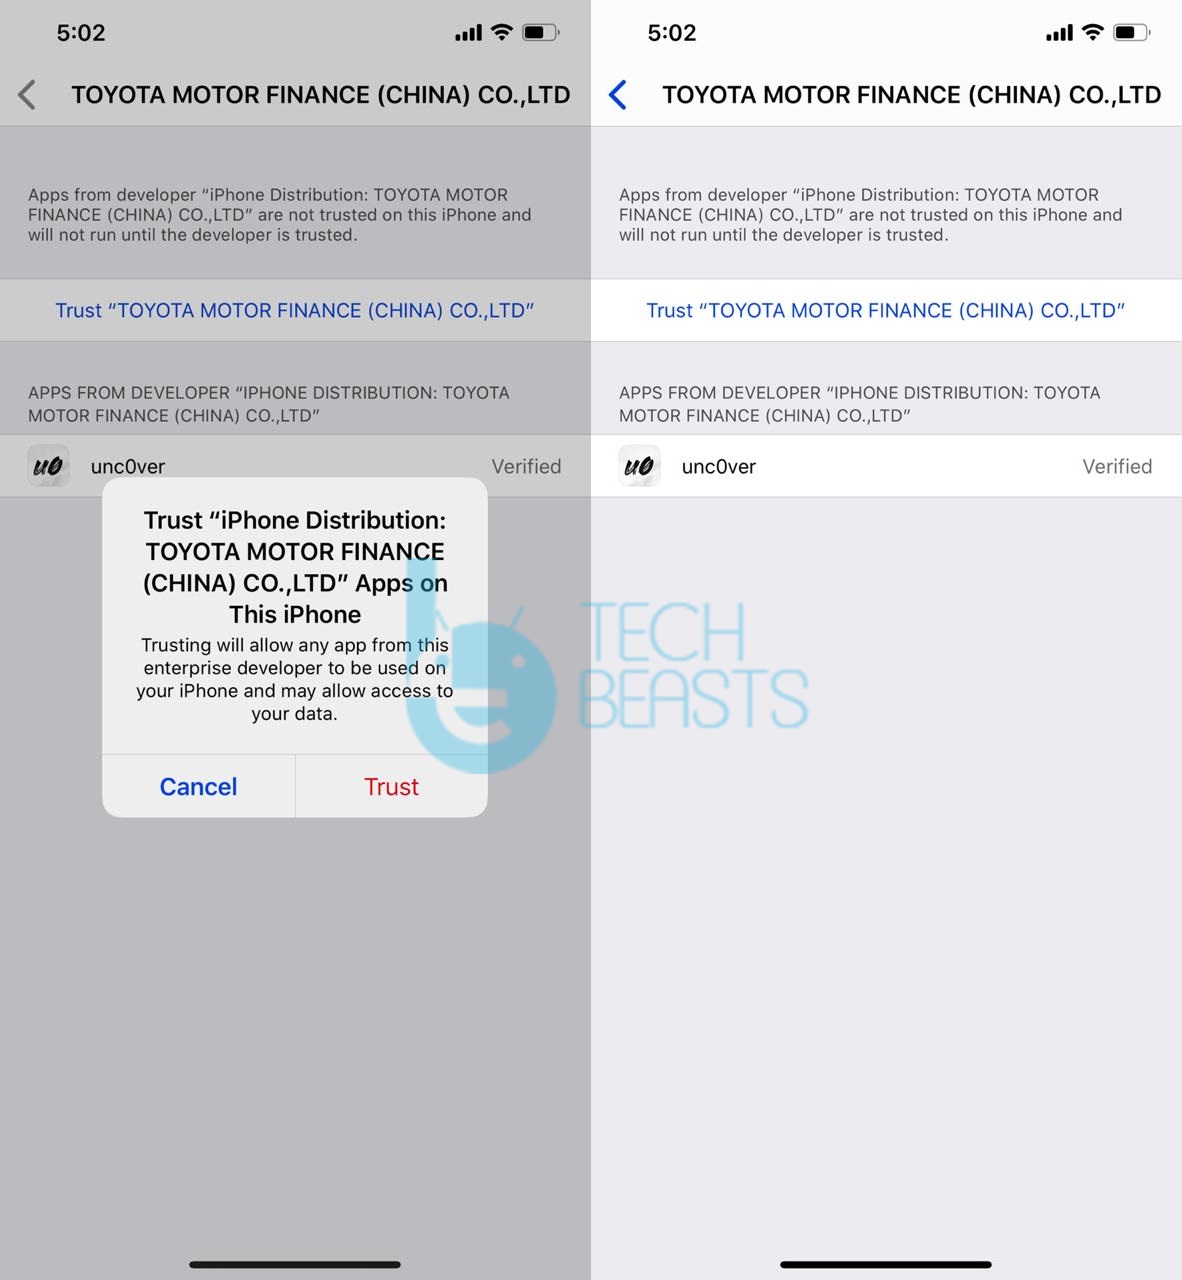
On your phone, go to Settings > General > Device Management > Click on your Apple ID > Click on Trust and Trust it.
Now go to Settings > General > Storage > Delete any pending iOS updates.
Restart the iPhone now.
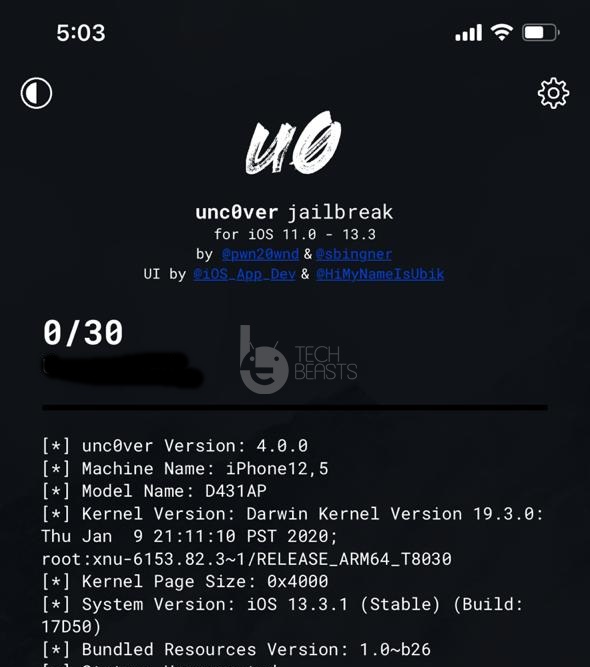
Open the Unc0ver tool now and click on Jailbreak. Wait for Unc0ver to do its magic.
Once the Jailbreak process succeeds, you will get the Cydia app in your iPhone. Open it and start tweaking!
Everytime you restart the iPhone, you will have to open the Unc0ver app and click on the Jailbreak button again. To unjailbreak your iPhone, you will open the Unc0ver tool and click on un-jailbreak.
For any questions, feel free to use the comment box below. I will try my best to get back to you as soon as possible.
AltStore is the official means of Unc0ver installation on iOS 13 – iOS 13.3. If you are currently looking forwarding to Jailbreaking your iPhone or iPad via Unc0ver 4.0.2, you should find this guide handy. Down below in this guide, you will find the steps to install Unc0ver Jailbreak via AltStore. This guide is valid for Unc0ver 4.0.2 installation on iPhone XR, Xs, Xs Max, iPhone 11, 11 Pro, and 11 Pro Max.
Unc0ver 4.0.2
The Unc0ver tool was updated to its latest version 4.0. This was a big update as it enabled Jailbreak support Apple latest chipsets including the A12 and A13. This means that all the A12 and A13 iPhones and iPads including the iPhoene 11, 11 Pro, 11 Pro Max, and iPad Air 3rd gen can now be Jailbroken. The Unc0ver was immediately updated to the 4.0.1 and then 4.0.2 version in order to fix some bugs.
AltStore
The AltStore is an alternative to the Cydia Impactor. This is among the best Cydia Impactor alternatives because once its configured, you don’t always need to hook up your iPhone to the computer. AltStore and your iPhone, while connected to the same WiFi, can communicated wirelessly and hence, you can install the apps. Furthermore, AltStore allows direct signing of the apps through your iPhone, unlike the Cydia Impactor tool.
The Unc0ver developer, pwn20wnd, officially mentioned AltStore as the official source to install Unc0ver 4.0.2 in his tweet. Since this is the most convenient method to install Unc0ver and Jailbreak your iPhone, we are about to explain this in baby-steps. Take a look at the guide to Jailbreak using Unc0ver 4.0.2 via AltStore.
Requirements
Go through this whole guide at least once before following this procedure.
Windows or Mac Computer.
iPhone 11, iPhone 11 Pro, iPhone 11 Pro Max, iPhone XR, iPhone Xs, iPhone Xs Max, iPad Air 3rd Gen.
Mac users can unzip to get the AltStore setup file and drag/drop it on to the Apps to install it.
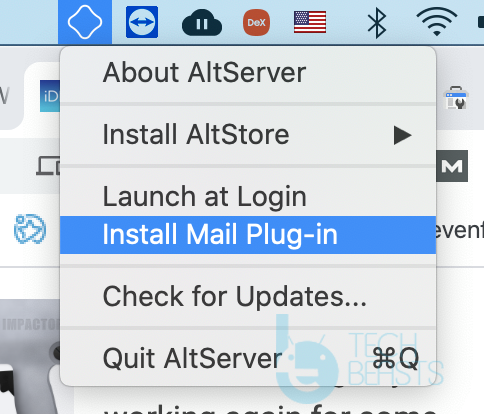
Launch AltStore now and click on the AtlStore icon on the top-menu bar.
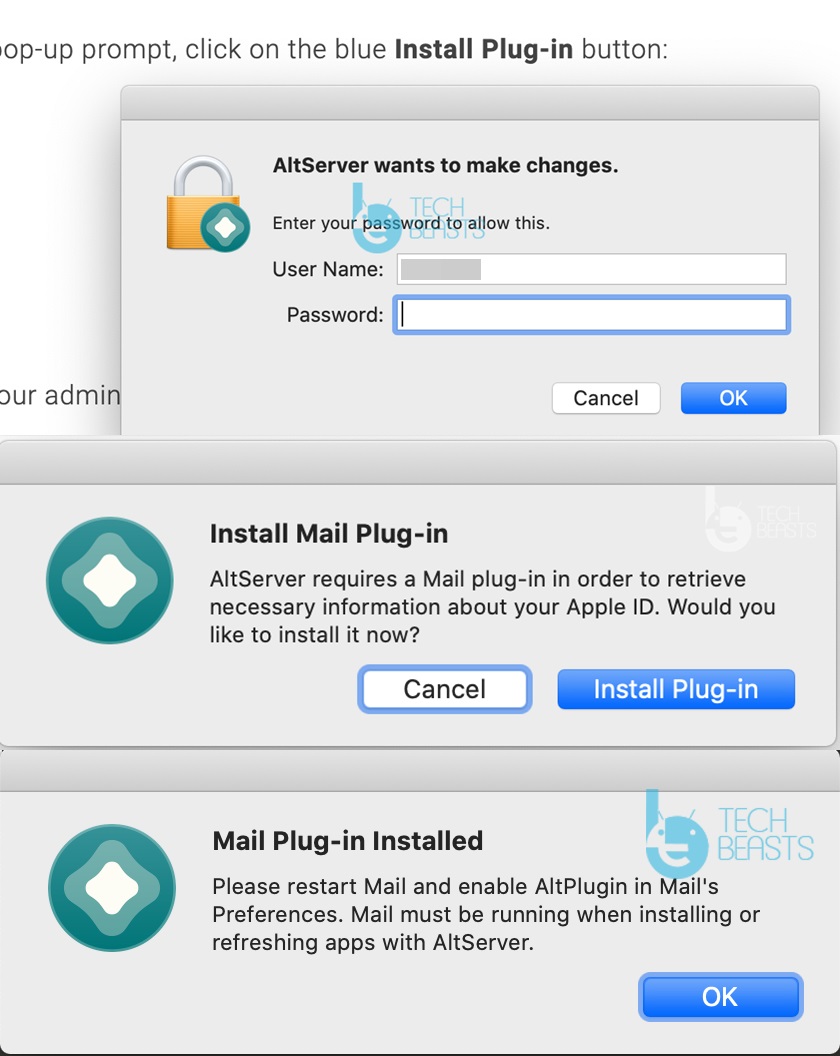
Now click on “Install Mail Plug-in > Install Plug-in”.
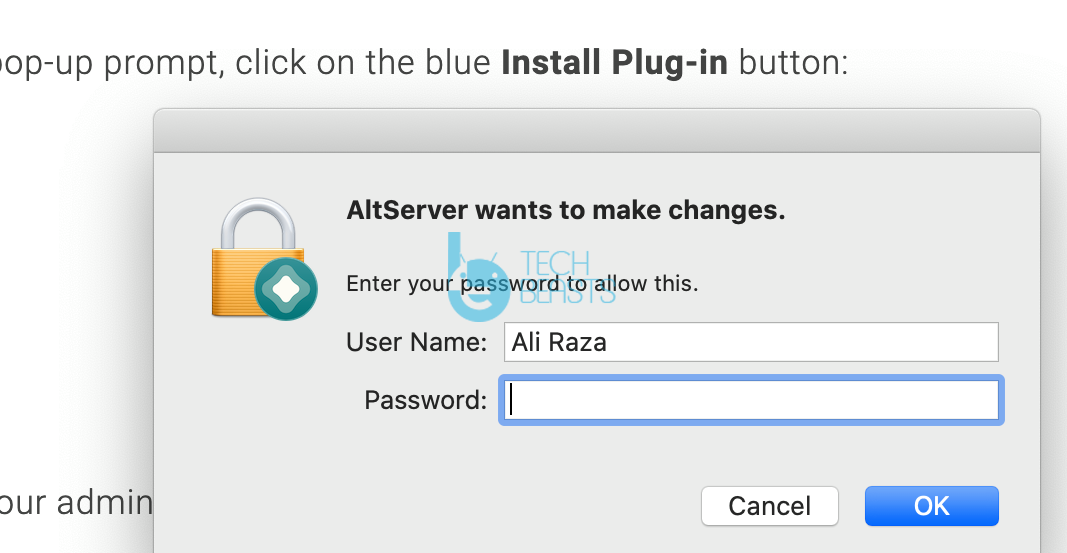
It will ask for your computer’s password, enter to begin installation.
After the plug-in installation, open the Mail App and go to Preferences.
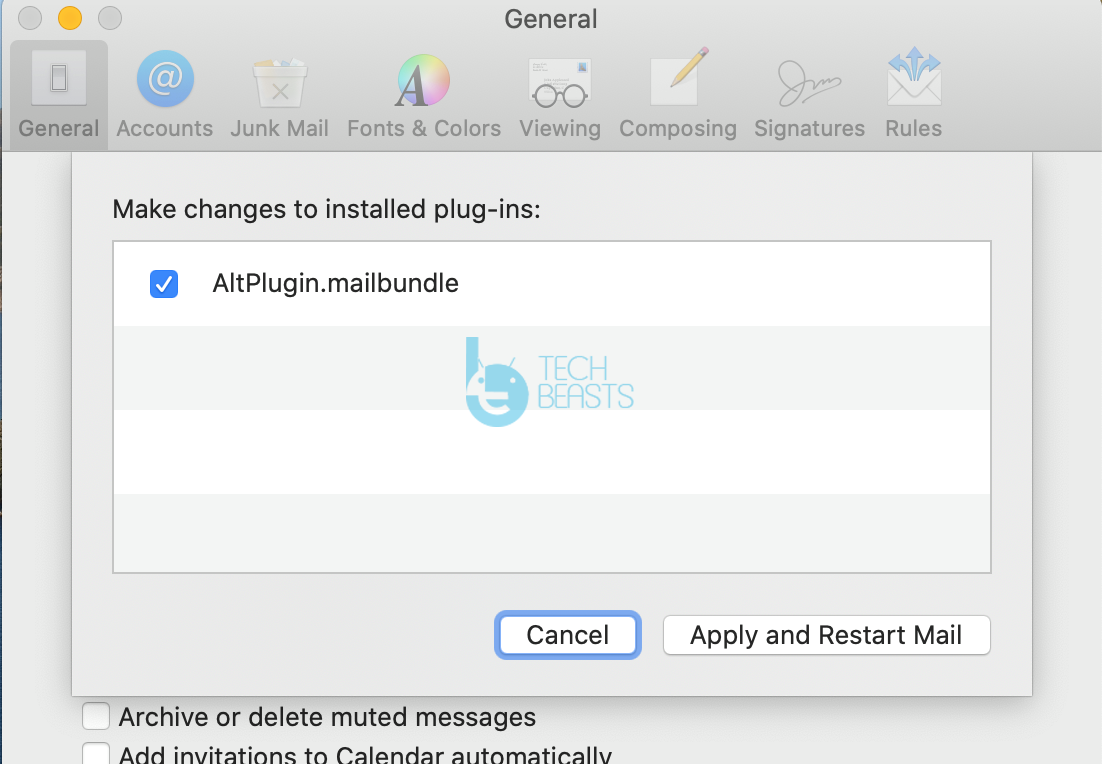
From the Mail App’s Preferences, launch the General tab and then click on the “Manage Plug-ins” button.
Now click on the checkbox appearing besides AltPlugin.mailbundle and click on Apply and the Restart Mail.
Connect your iPhone to the computer using the USB to Lightning cable.
Click on the AltStore icon on the top-menu bar again > Install AltStore > Select your connected iPhone > Enter your Apple ID and Password > Let the AltStore install AltStore app on your iPhone. That’s all.
AltStore Installation on Windows 10
First of all, download and install iTunes from the website. Do not install iTunes using Microsoft Store, that will not work with AltStore.
Download the AltStore for Windows 10 from here.
Unzip the file and run the AltStore setup.
Once done, go to Windows 10 search and find AltServer and launch it.
Now connect your iPhone to the Windows powered computer.
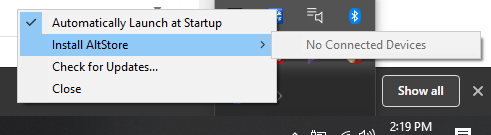
Click on the more-icons button on the lower-right-corner of your computer’s task bar > Click on the Diamond icon > Install AltStore > Select your device and install it.
If the AltStore asks for Apple ID & Password or the App-Specific Password, enter it. AltStore will be installed on your iPhone now.
Setting up AltStore on the iPhone
Do not launch the AltStore on the iPhone before following these instructions.
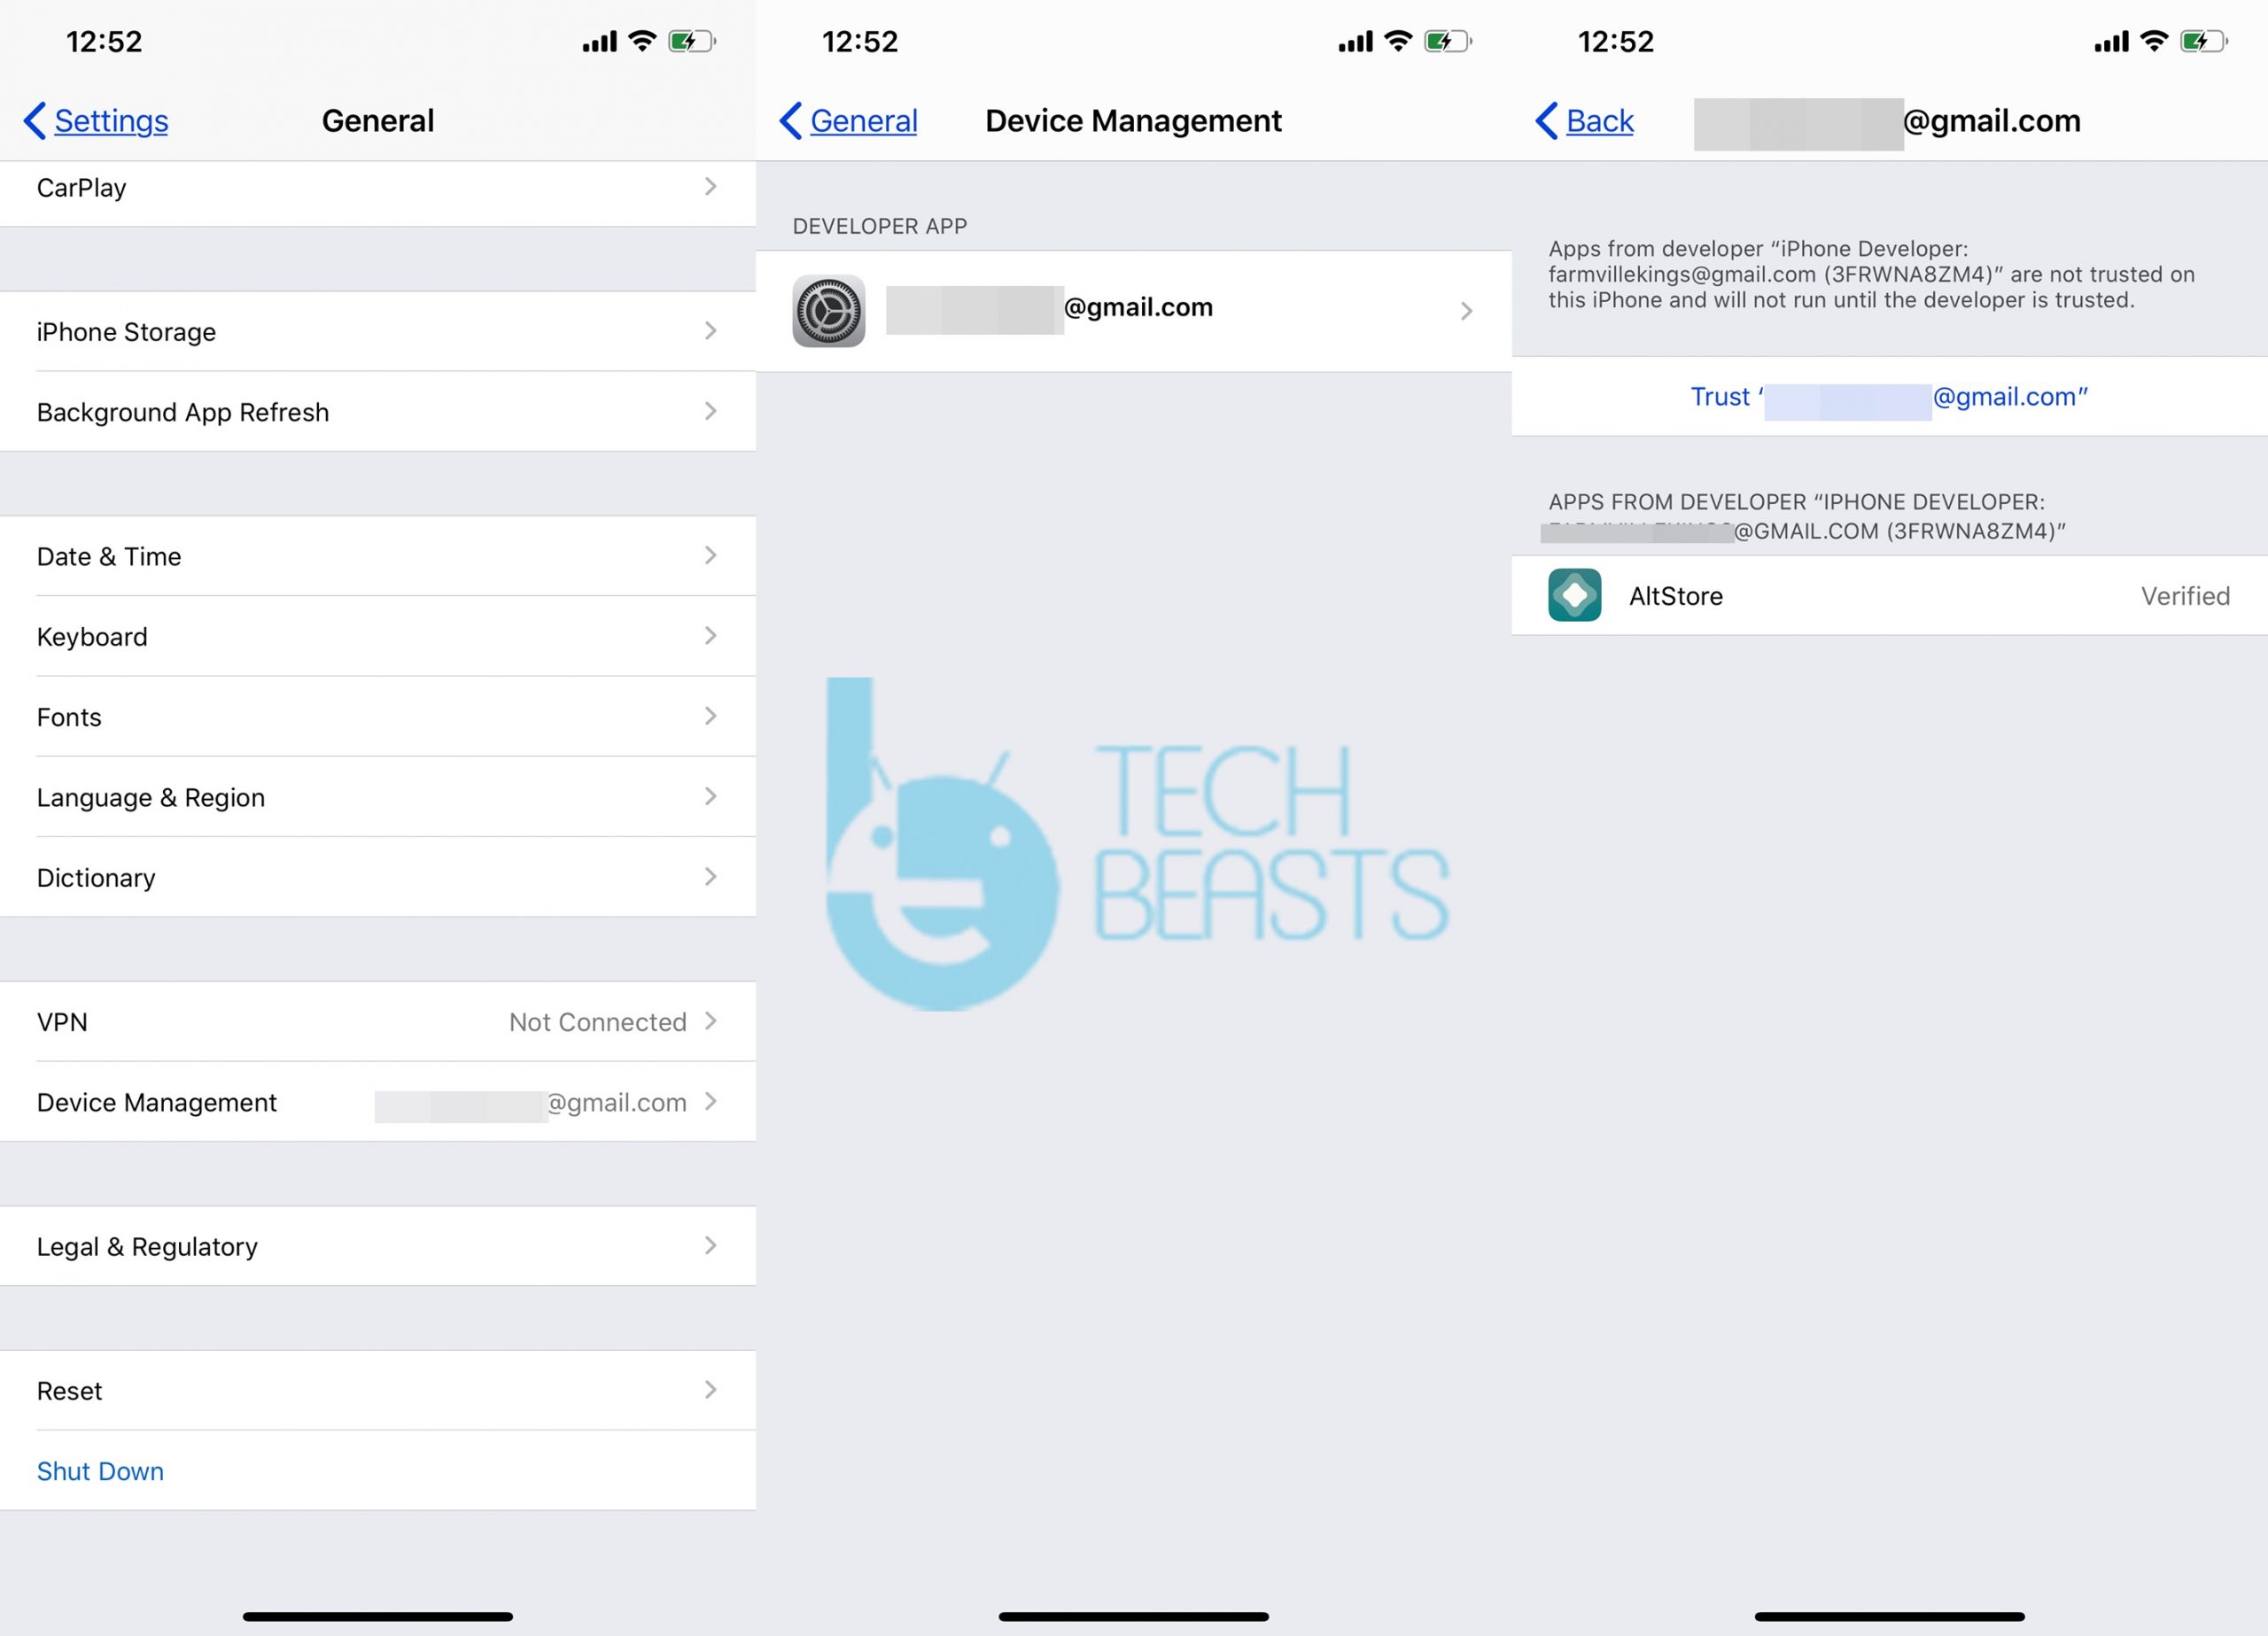
On your iPhone, go to Settings > General > Device Management > Click on your Apple ID > Trust.
AltStore is now fully set up. We are all set to install the Unc0ver Jailbreak now.
Install Unc0ver Jailbreak via AltStore
Open Safari browser on your iPhone.
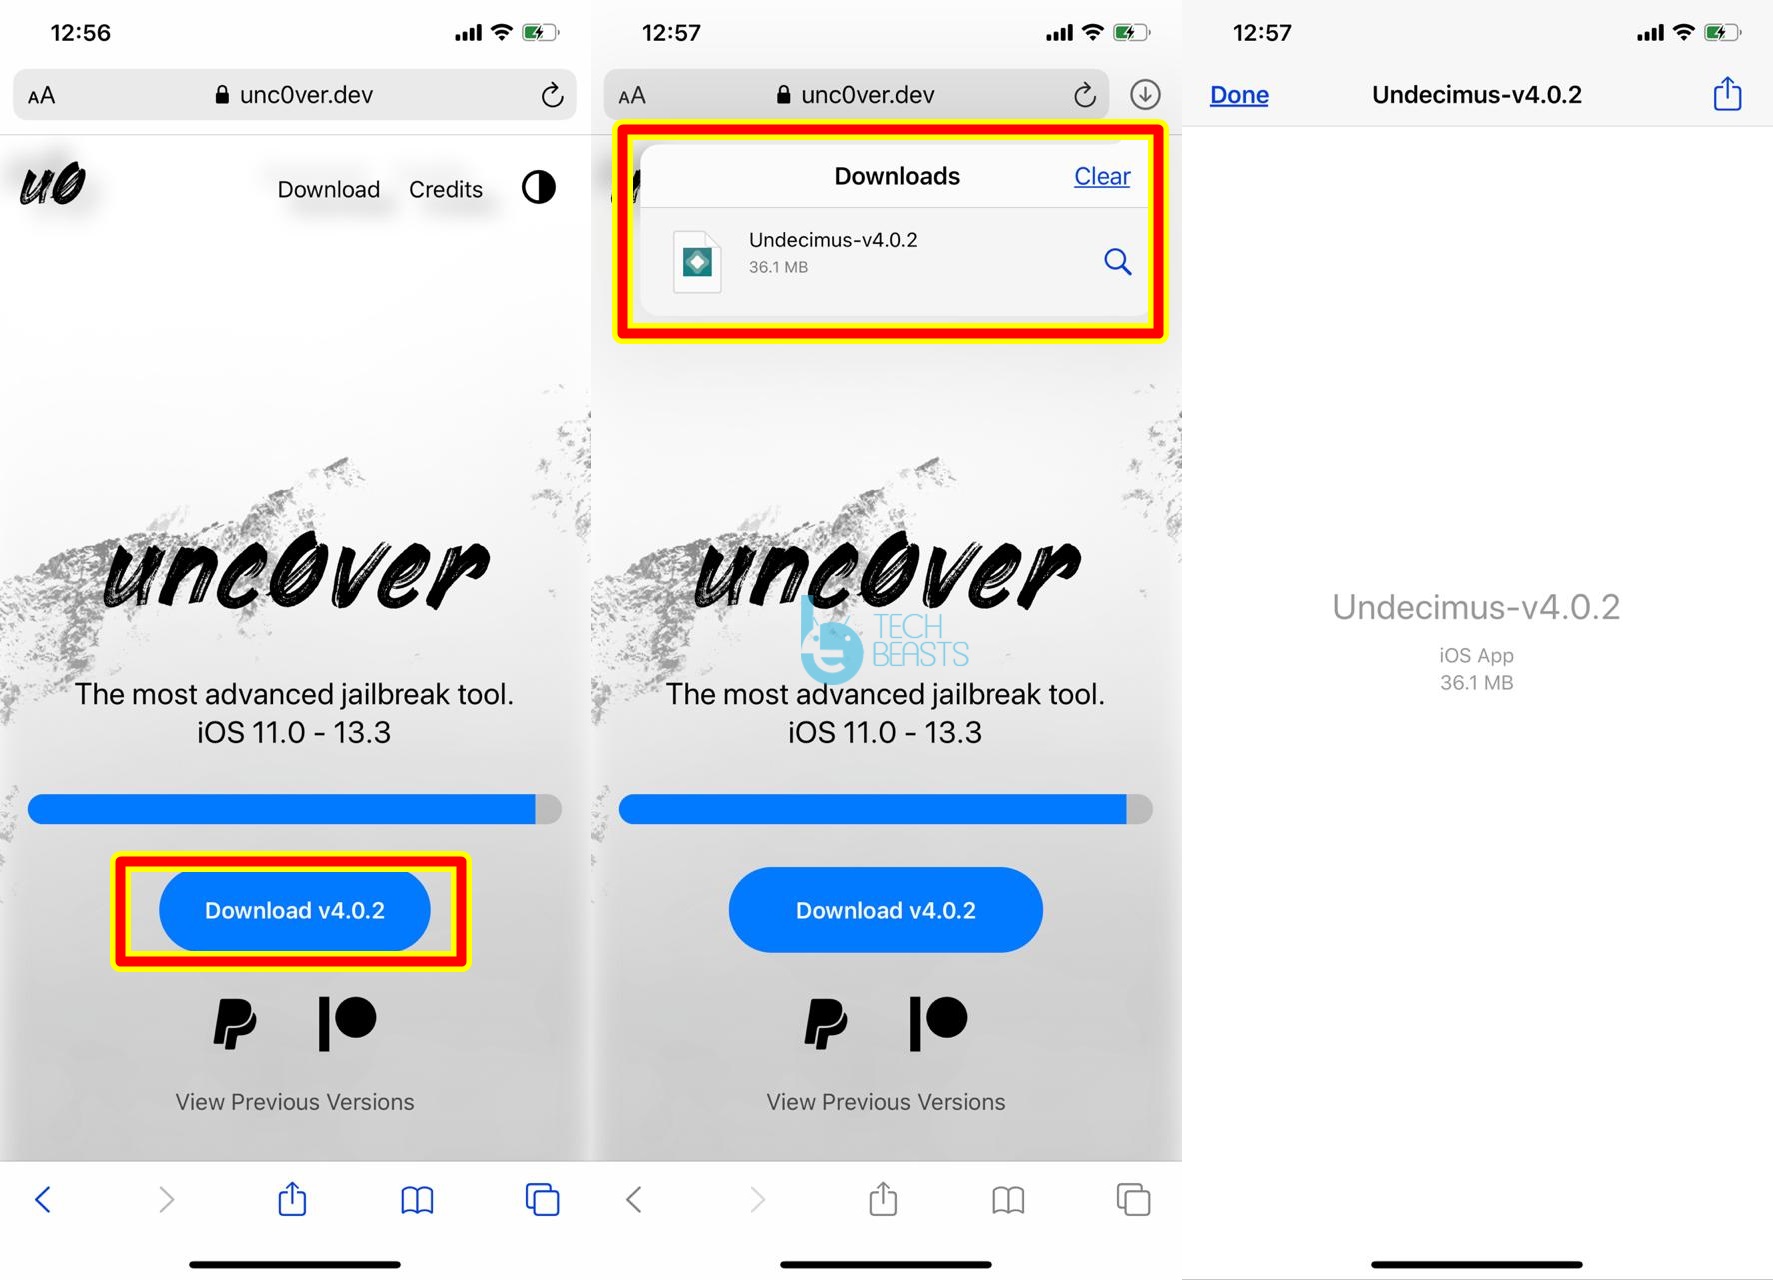
Go to this address: Unc0ver.dev
Once the Unc0ver page opens up, click on Download.
Unc0ver 4.0.2 IPA will be downloaded now.
Now click on the Download Manager of Safari and then click on the Unc0ver.ipa file to open it in the File Viewer.
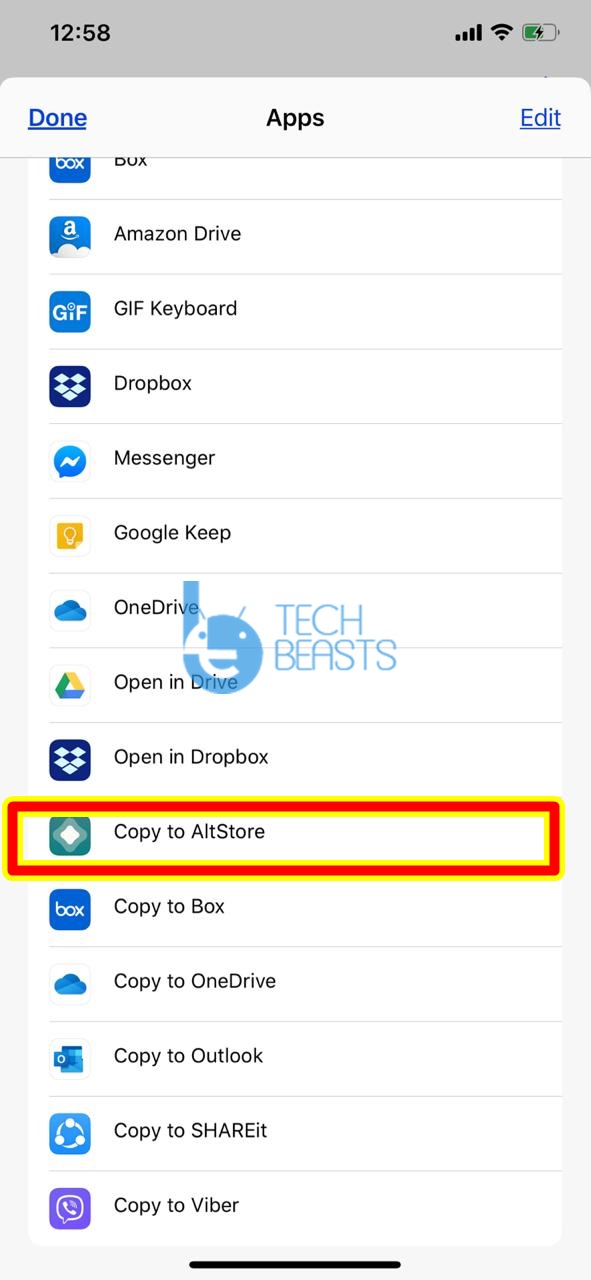
Click on the Share button and then click on “Copy to Altstore”.
AltStore will open up, enter the same Apple ID and Password that you used to install the AltStore and proceed.
Unc0ver will be installed in your sideloaded apps.
Open Unc0ver and click on the Jailbreak button to Jailbreak now. Thats all!
This is a semi-untethered Jailbreak. Everytime you restart your iPhone after Jailbreaking, you will lose the Jailbreak. You will have to repeat the Unc0ver steps again to Jailbreak the iPhone. This is the only downside of this method, the rest of the things remain intact.
To Unjailbreak your iPhone at any given time, just open the Unc0ver app and go to its preferences and click on Un-Jailbreak. You can also install a new software using iTunes or even restore your previously backed up iPhone.
Conclusion
That’s all with this method. I hope this guide was useful and easy-to-understand for all of you. If you have any questions regarding the Unc0ver tool or the Jailbreak process, feel free to drop them in the comment section down below. I will try my best to get back to you as soon as possible.
This is the tutorial to Jailbreak iOS 13.3 without computer. You can Jailbreak iPhone X, XR, Xs, Xs Max, 11, 11 Pro, and 11 Pro Max using this tutorial. We will use the Unc0ver tool to Jailbreak iOS 13.3.
Jailbreaking without computer – Unc0ver 4.0.1!
Unc0ver 4.0.1 has made it possible for new iPhone owners to Jailbreak their devices without a computer. The Unc0ver tool was updated to its latest version a couple of days back with the support for iOS 13. You can now achieve a semi-untethered Jailbreak on any Apple A12 and A13-powered iPhone/iPad. This is the world’s first iOS 13 Jailbreak available for public.
Previously, a tool named Checkra1n allowed iPhone X and prior users to Jailbreak their iOS 13, but that method required a computer, and a Mac to be specific. With the Unc0ver tool, you don’t even need a computer. You can directly sideload the Unc0ver tool on the computer and press the Jailbreak button.
Here is a list of devices that the Unc0ver 4.0.1 supports.
iPhone XR
iPhone Xs
Apple iPhone Xs Max
iPhone 11
Apple iPhone 11 Pro
iPhone 11 Pro Max
iPad Air 3rd Gen
Apart from this, any other Apple devices that are using the A12 or A13 chipset, all those can be Jailbroken using the Unc0ver 4.0.1 tool. The tool works with iOS 13, iOS 13.1, iOS 13.2, and the new iOS 13.3. If you are running on a latest version of iOS, you may consider downgrading to the iOS 13.3 before Apple stops signing this update.
For those who don’t know, by Jailbreaking your iPhone, you can sideload the apps and features that you normally can’t get on an iPhone. You can make dozes of UI customisations, change the behaviour of certain featuers of the phone, tweak the functionality of the stock features and whatnot. Jailbreak is like opening a world of unlimited customisations for your iOS device.
Requirements to Jailbreak iOS 13 without computer
Apple iPhone or iPad [iPhone XR, Xs, Xs Max, 11, 11 Pro, 11 Pro Max, iPad Air 3rd Gen]
iOS 13.1 / 13.2 / 13.3
Internet Connection
Backup your iPhone’s data
Jailbreak iOS 13.3 without Computer
On your iPhone or iPad, open the Jailbreakapp page.
Now click on the “Download Unc0ver” button.
Unc0ver’s installation will begin, wait for it to end.
Now on your iPhone, go the Settings > General > Device Management > Click on the appearing profile and then trust it.
Now go the Settings > General > Storage > Delete any pending software updates and then restart your phone.
Open the Unc0ver app now and click on Jailbreak.
Once the Jailbreak succeeds, open Cydia and start installing the tweaks.
Remember that this is an untethered Jailbreak method. Everytime you Jailbreak the iPhone and restart it afterwards, you will have to repeat the Jailbreak process again to achieve the Jailbroken status. This is the only caveat with this method, rest of the things will run smooth for you.
Anytime you want to unjailbreak your iPhone, you can just open the Unc0ver App, go to its options and click on un-jailbreak. Alternatively, you can install a new software update or restore the software to fully remove Jailbreak too.
That’s all for now. If you have any questions/queries, feel free to reach out to us through the comment section below. I will try my best to get back to you as soon as possible.
With the help of this guide, you will be able to learn how to send a GIF on WhatsApp on Android & iOS.
Gifs are the best way to express your reaction and a solid way to deliver a message or statement. Now while using WhatsApp we have tons of options to express or feelings or emotions but they are not as good as GIFs.
WhatsApp added GIF support in late 2017 but still, there are some restrictions when sending a GIF on WhatsApp. It’s not that you just select a GIF and send it to someone. There are some things you need to follow as per their rules. However, with the help of this guide, you can easily send a GIF on WhatsApp without any restrictions.
Let’s start with the smartphone first and heed the instructions below to find out how you can send top tier GIFs on WhatsApp.
Android & iOS:
#1: To begin with, there are three options on WhatsApp through you can send a GIF. The first one is simple, you need to save a GIF from the Web and send it as you send an image. It more likely sends a photo on WhatsApp.
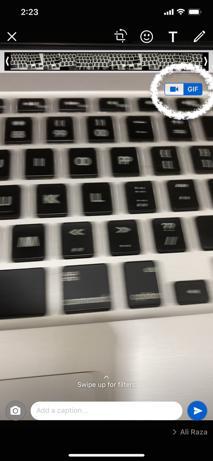
#2: The second one is a bit different, WhatsApp gave you an option to convert a video into GIF. I am sure you have seen this same feature on many Android devices. The same goes for WhatsApp when you are sending a video you can convert a small part of your video into GIF.
Open WhatsApp and choose a contact to whom you want to send a GIF.
Now create a Video using WhatsApp and when you are done, you will see the following icon as shown below.
All you have to do is Tap on the GIF option and your video will be converted in GIF.
#3: The third one is by using GIPHY. WhatsApp integrated the GIPHY search option and with that, you can easily search for the GIF you are looking for.
Tap on the sticker icon located in the text filed where you type text. To make things more clear, check out the screenshot below.
When you will tap on the sticker button you will see the following screen. Either you can choose from the trending or you can use the categories located above. Moreover, you can also use the search feature and find the one you are looking for.
Type in a word and you will be presented with a number option to choose from.
WhatsApp Web:
Sending a GIF using WhatsApp Web is the same, all you have to do is click on the smiley icon. First, you will see your recent emojis and at the bottom left side of the screen, you will see the following options.
Click on the GIF and you will see trending GIF and also at the top you will see the categories. Moreover, you can also use the search feature on WhatsApp Web too.
That’s all. These are options you can choose from to send a GIF on WhatsApp. However, if you share any GIFs from the Web, WhatsApp will only send a link or embedded image. There is no direct way to send any GIF from the Web on WhatsApp.
Chameleon Run for PC is now available and can be easily installed on a desktop PC/Laptop running Windows XP/7/8/8.1/10 and MacOS/OS X. Let’s learn a little bit about this all new app and then have a look on the installation method via BlueStacks or BlueStacks 2.
Download Chameleon Run for PC, Laptop Windows-Mac:
Following are the two methods from which you can download and install Chameleon Run for PC, Laptop Windows-Mac. Let’s start the method to download Chameleon Run for PC Windows.
Once you’ve installed BlueStack, launch it from your desktop. You have to add your Google Account to use Google Play on BlueStack. Goto->Settings->Accounts-Gmail.
When BlueStacks screen loads up, Click on the Search icon.
Now you have to type in the app name. I am looking for Chameleon Run so, in the search bar, I’ll type Chameleon Run and hit enter.
On the next screen, you’ll see the list of all the apps containing Chameleon Run name, Click on the first one which is developed by Noodlecake Studios Inc.
Now you’ll be at app page, here you have to click on install. It will start downloading the app and once the downloading is complete, Chameleon Runwill be installed.
Keep that in mind this game is paid so you have to add payment method in your account settings in order to install this game
Before moving on you have to give permission to Chameleon Run in order to access your system information. Click on Accept when you’ll see the pop-up.
Now, wait for the installation process to be complete, once the Chameleon Run is download and installed, you’ll see a notification as you do on your Android devices. Goto BlueStacks homepage and there you’ll see the Chameleon Run logo in your apps. Click on the Chameleon Run logo to start using it.
DOWNLOAD Chameleon Run FOR PC ON WINDOWS 8.1/10/8/7/XP/VISTA & MAC LAPTOP:
With the help of this guide, you will be able to learn how to Share Real-Time Location on Google Maps & WhatsApp.
I have seen many people talking that sharing our live location is creepy and insecure. In many ways it’s but you cannot deny the fact that it’s also really helpful and handy at times. Suppose you are traveling alone, walking home alone and there is a chance something bad might happen. At such a time real-time location comes in very handy.
At least you will feel secure that someone knows where are you and he/she is keeping an eye out for you. So believe me sharing real-time location features is very useful but not all the time.
There are tons of apps that will allow you to share your location but I don’t think we need to use such apps. Since we have WhatsApp and Google Maps, so why go for others. We use both of these apps on a daily basis and both of these apps are secure.
Let’s get started now and I will show you how you can Share Real-Time Location on Google Maps & WhatsApp.
There is a 100% percent chance most you know how to share real-time location on WhatsApp. However, I am in doubt that not all of us know how to share our real-time location on Google Maps.
How To Share Real-Time Location on Google Maps:
Before I start, let me tell you one more thing. You can use these same instructions and apply them to iOS devices. Because both of these apps work in the same manner on Android & iOS.
Google Maps is a must have app and there is no doubt that Google Maps is not pre-installed on any Android & iOS smartphone.
Now in order to share your real-time location on Google Maps. Open the app on your Android or iOS device.
You will see a blue dot with your exact location. When you do that will be your current location. Tap on it.
On the next screen, you will see three options.
See Nearby Places.
Share your Location.
Save your Parking.
Tap on Share your Location and follow the instructions below.
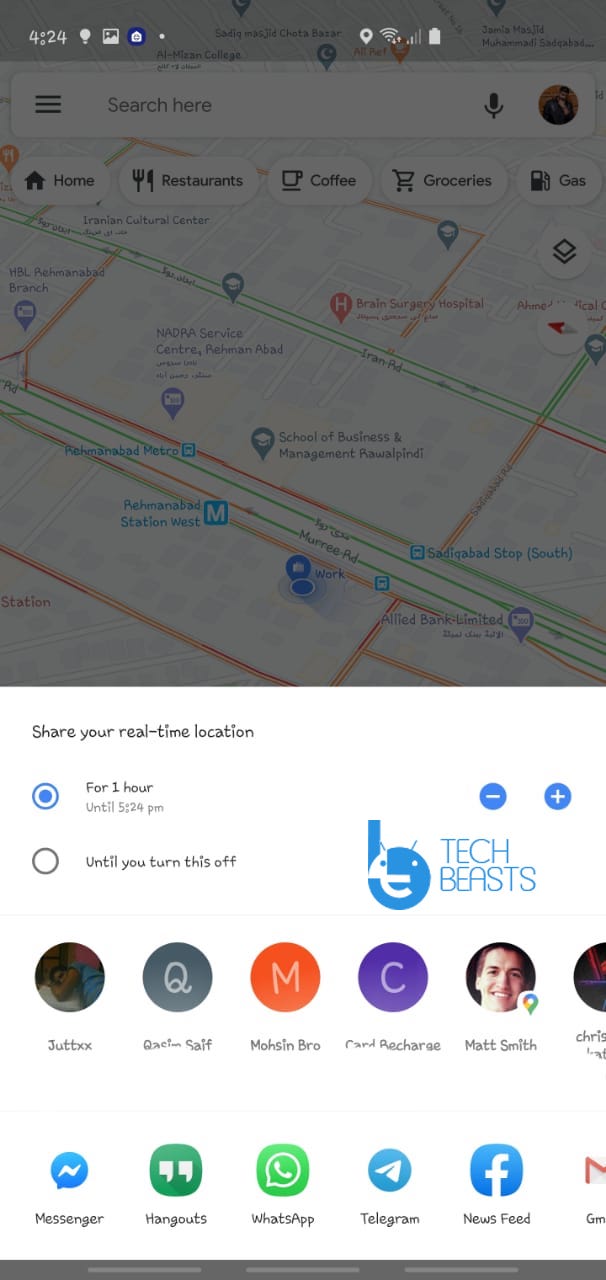
When you will tap on Share Your Location.
You will get a time frame option. Choose a specific time or Until you turn this off.
Below these options, you will see your contacts and a number of apps on which you can share your real-time location.
Once you have selected the time frame, all you have to do is either select a contact or select an app.
It’s also pretty simple if you didn’t choose a time frame then you have to manually stop it. Heed the instruction below.
Tap on the link that you have shared with someone. Next, choose Sharing via link.
A new pop-up will show up, Toggle Off the switch and Google Mapswill stop sharing your location.
Share Real-Time Location on WhatsApp:
As I said before I am 100% sure that everyone knows about this. I mean WhatsApp is the most used app from all the smartphone users on a daily basis. Sharing a live location on WhatsApp is pretty simple.
Open WhatsApp and choose the contact with whom you want to share the real-time location.
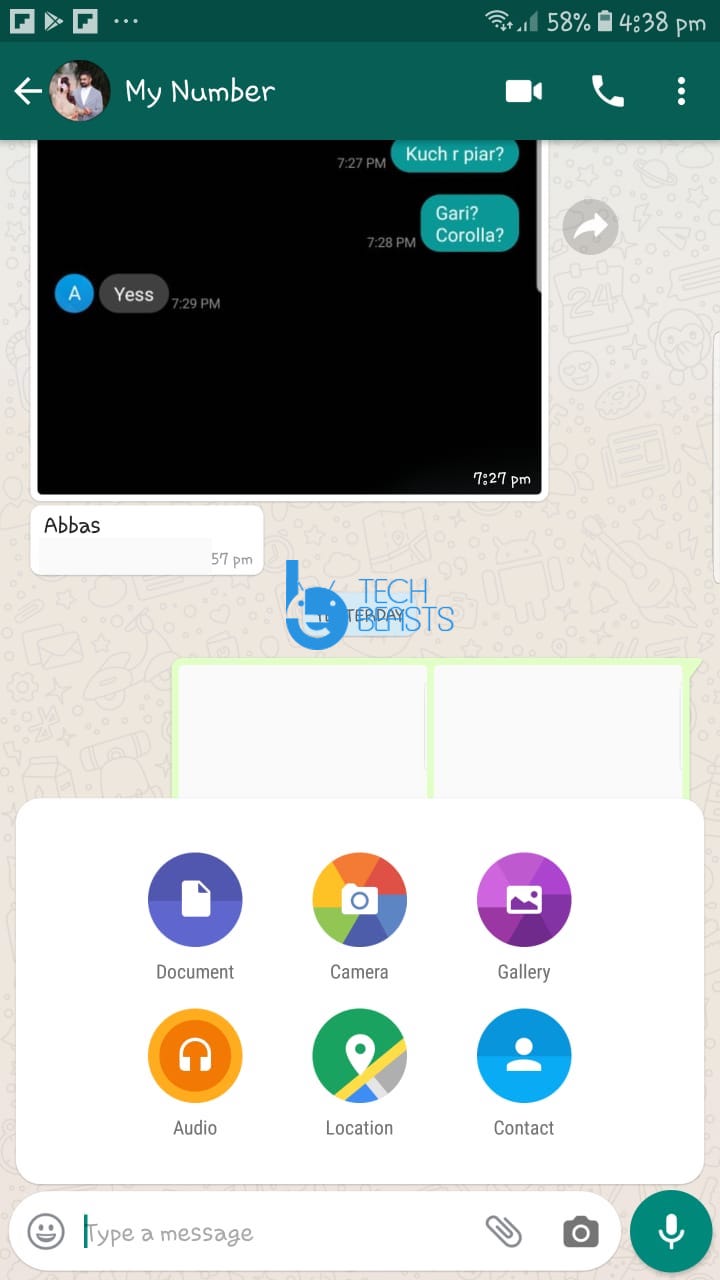
Tap on the attachment icon right next to the text field. You will see different options, Tap on location.
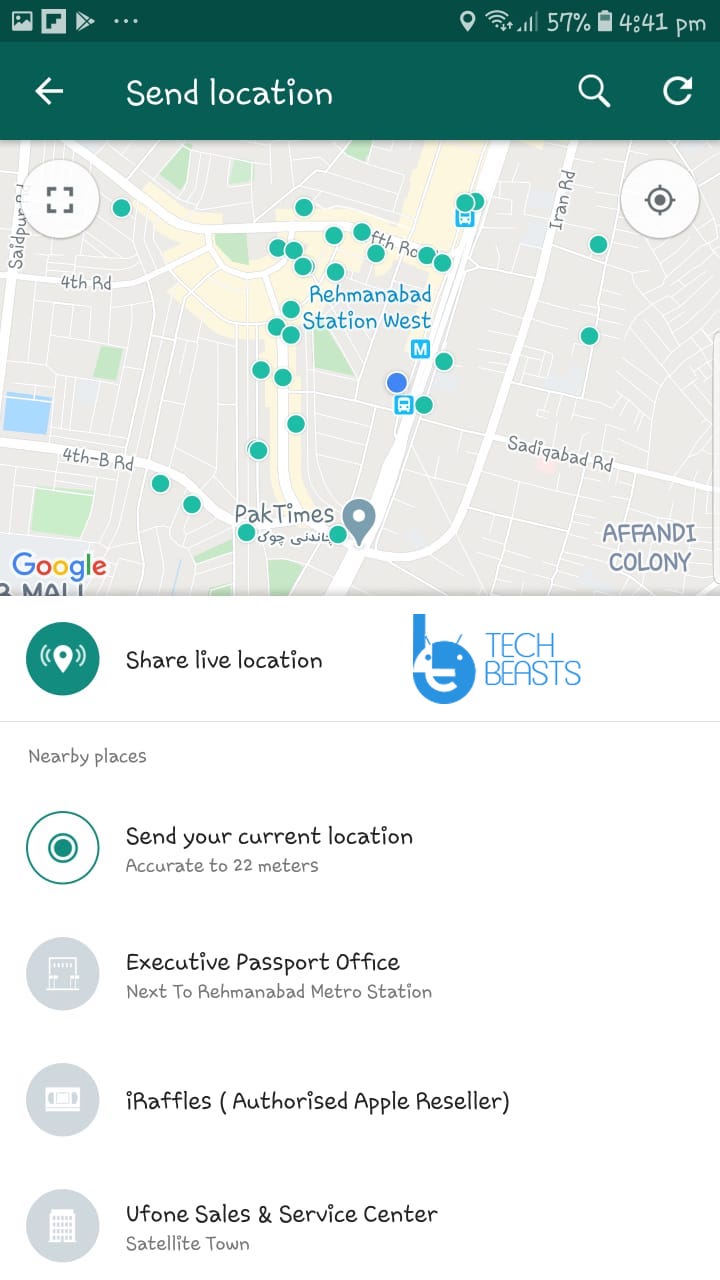
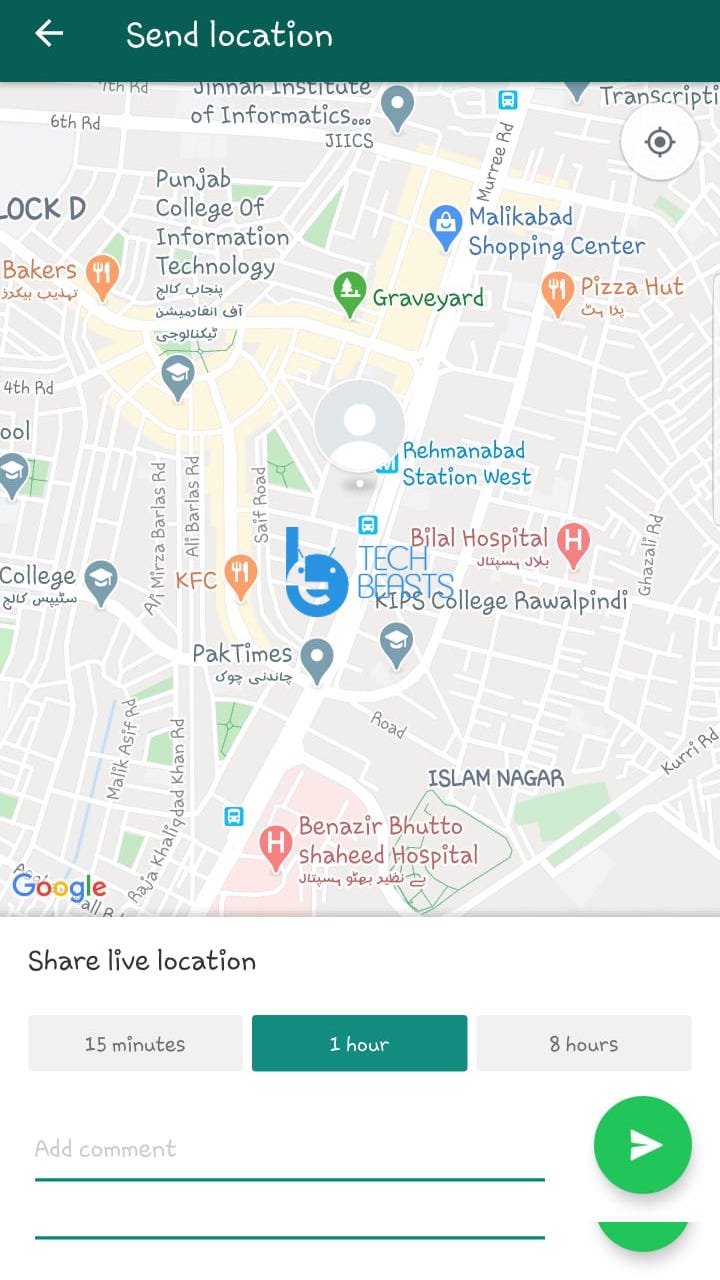
On the next screen, you will get two location sharing options.
Share Live Location.
Send your current location.
Tap on Share live Location. A pop-up message will with a waring, Tap on continue.
Next, you have to set the Time Frame. You need to choose from the following.
15 Minutes.
1 hour.
8 Hours.
Tap on your desired Time frame and then tap on the send button.
That’s how you can easily Share Real-Time Location on Google Maps & WhatsApp. Try it and let me know how was your experience.
A simple tutorial in which I will guide you on how to Create a Telegram Group on Android, iOS and Desktop.
Creating Groups on Telegram is very easy and just like the other messaging apps. Telegram provides the same options when it comes to group chat. I am sure you are well aware of the Groups, like why chat groups are created. IF not then let me shed some light.
A community created for like-minded people, a place where a number of people with the same interest share their thoughts. The same goes for Telegram Groups but not like all others, Telegram provides to option when it comes to groups.
One is a regular Group and the other is a supergroup. In regular Groups, you can add up to 100,000 users but believe it’s very hard to manage if you really do have such a number of users in your group. That is why to put things under control Telegram launched SuperGroups. Where you can easily create polls, Add managers, even add bots to manage your group.
Now you know what is Telegram Group and it’s time to tell you how to create a Telegram Group.
How To Create a Telegram Group:
Telegram gave you three options to create a Telegram Group and I will share all three options with you. Just keep reading and you will get to know all the options or methods.
All of these options are the same if you see it on a technicality. But since not all of us are pro smartphone users. That’s why I said you can create a Telegram Group using three options.
Since Telegram interface is different on Android, iOS, and Desktop. That’s why creating groups on these will be a bit different from another.
Android:
In order to create a Telegram Group on Android, heed the instructions below. Try this only on Android devices.
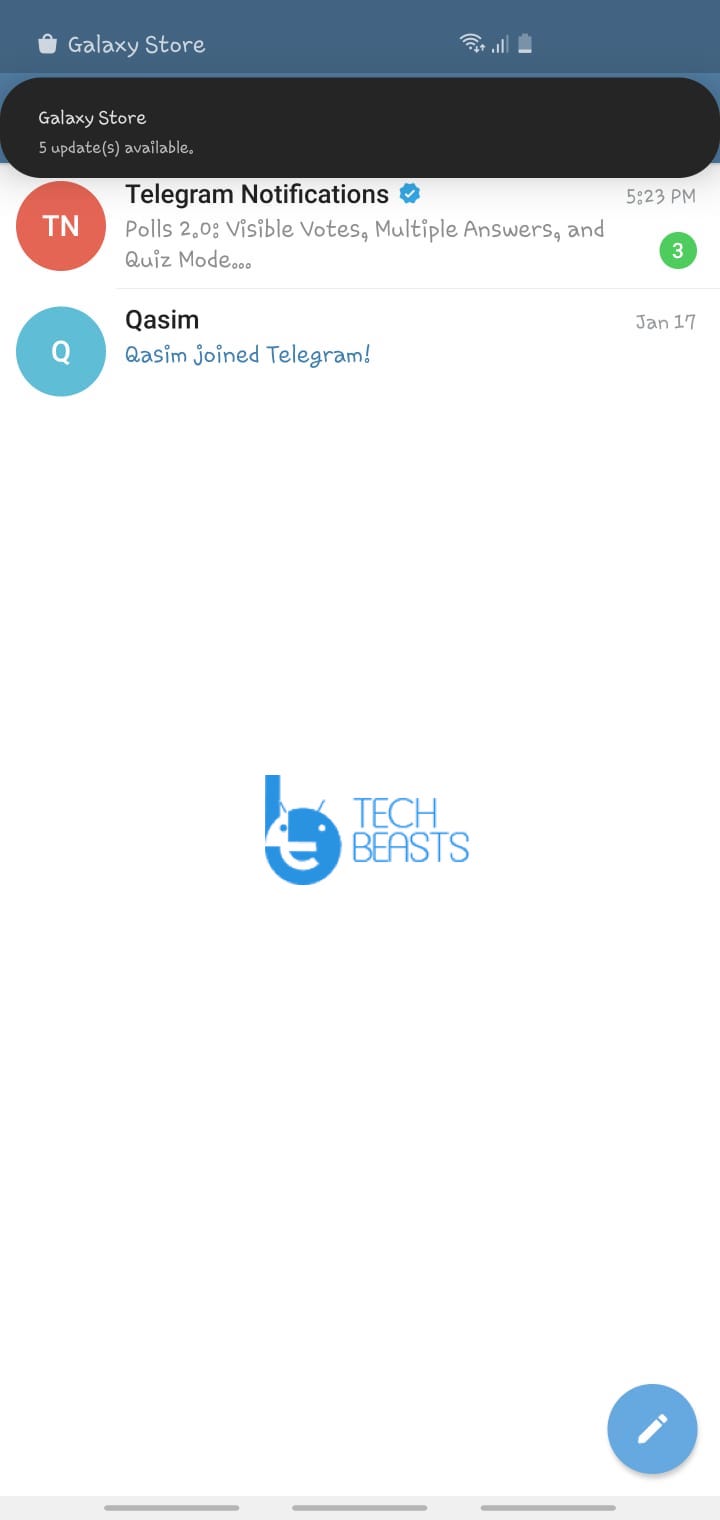
Launch the Telegram app on your Android device.
Tap on the Pencil icon located at the bottom right side of the screen.
Next, you will see all of your contacts and on top of them. You will see three options.
New Group.
The New Secret Chat.
A New Channel.
All you have to do is Tap on the New Group. Next, you have to add the members you want to join this group of yours. After that tap on the arrow button located at the bottom of the screen.
Once you have added the member, you need to enter your Group name, Tap on the Tick icon at the bottom of the screen.
There you go, you have created a brand new Telegram Group on your Android device.
iOS:
Heed the instructions below to create a new Telegram Group on iOS devices. The telegram iOS app interface is a bit different from Android. Other than creating Group on the Telegram iOS app is the same.
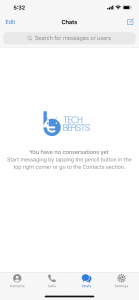
Ope up the Telegram app on your iOS devices.
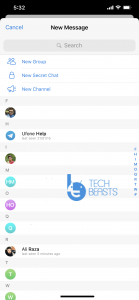
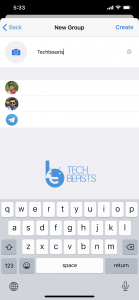
Tap on the pencil icon located on the top left side of the screen.
Tap on New Group.
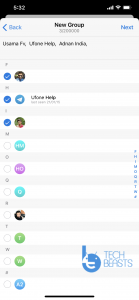
Add a bunch of members.
Give your Group a name.
Tap on Create.
There you go, you have successfully created a brand new group on the Telegram app.
Desktop:
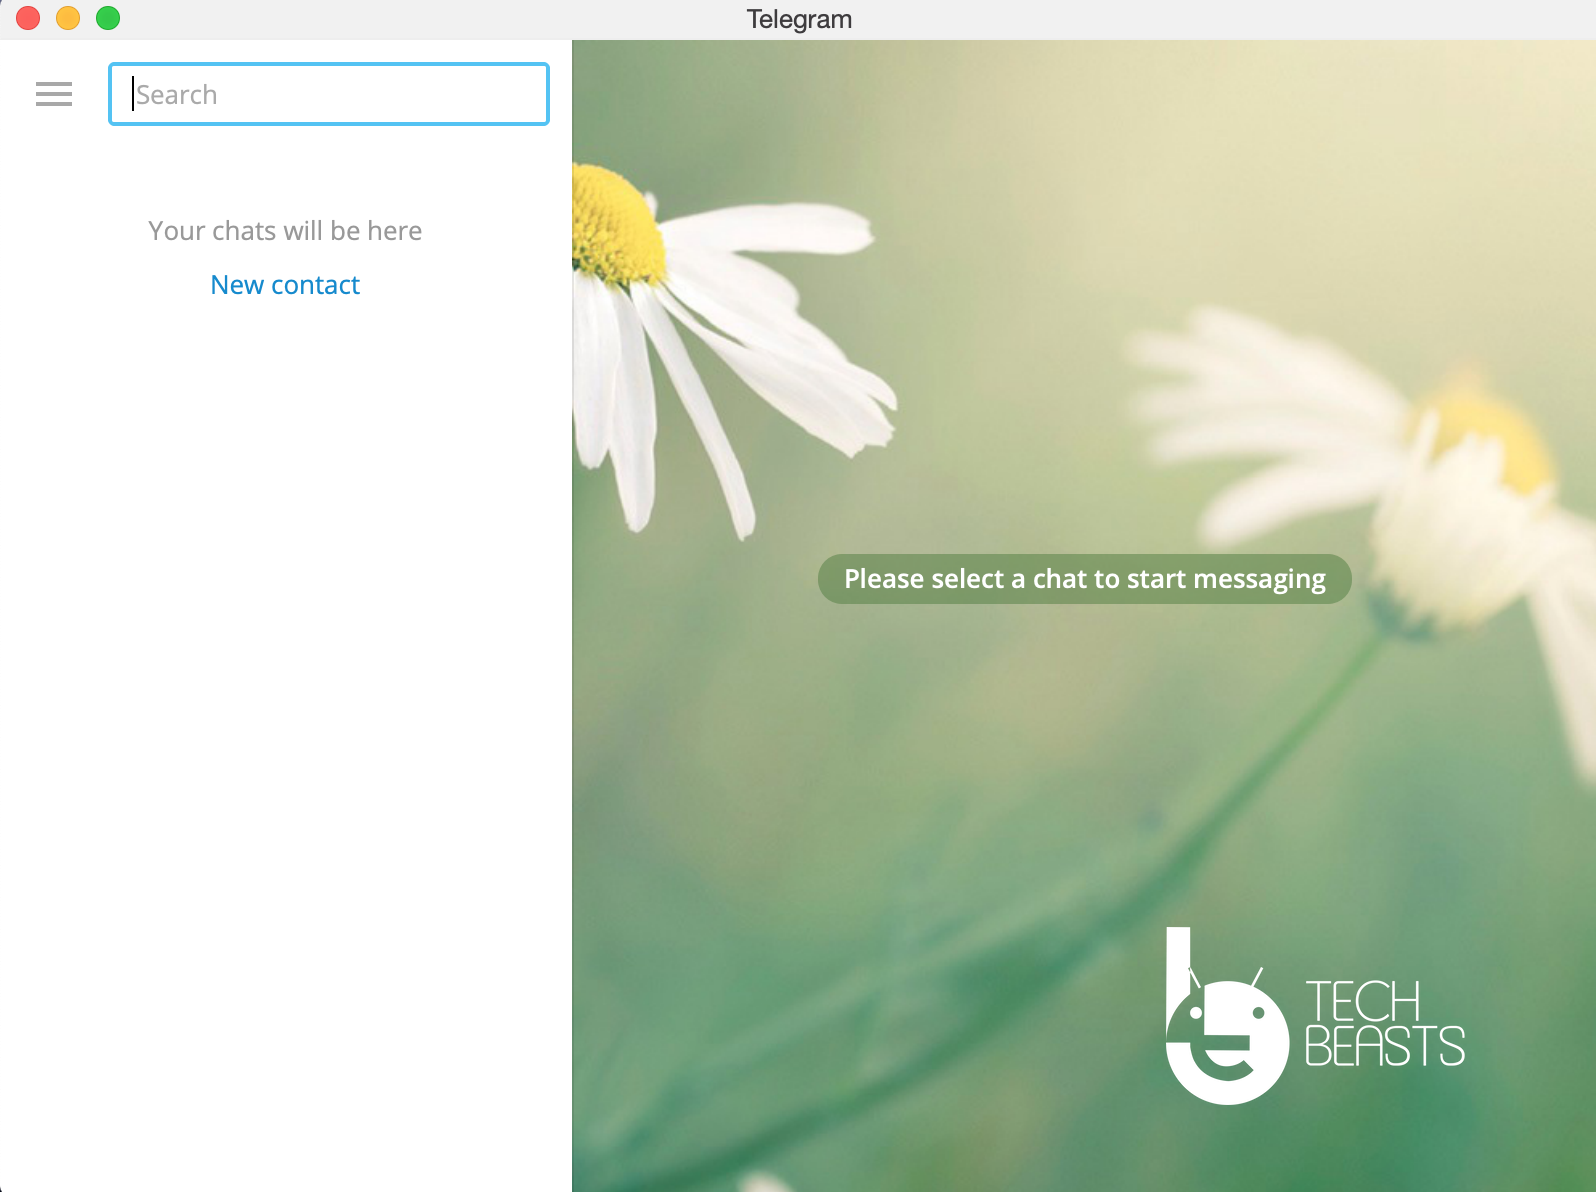
Launch the Telegram Desktop app on Mac or Windows 10.
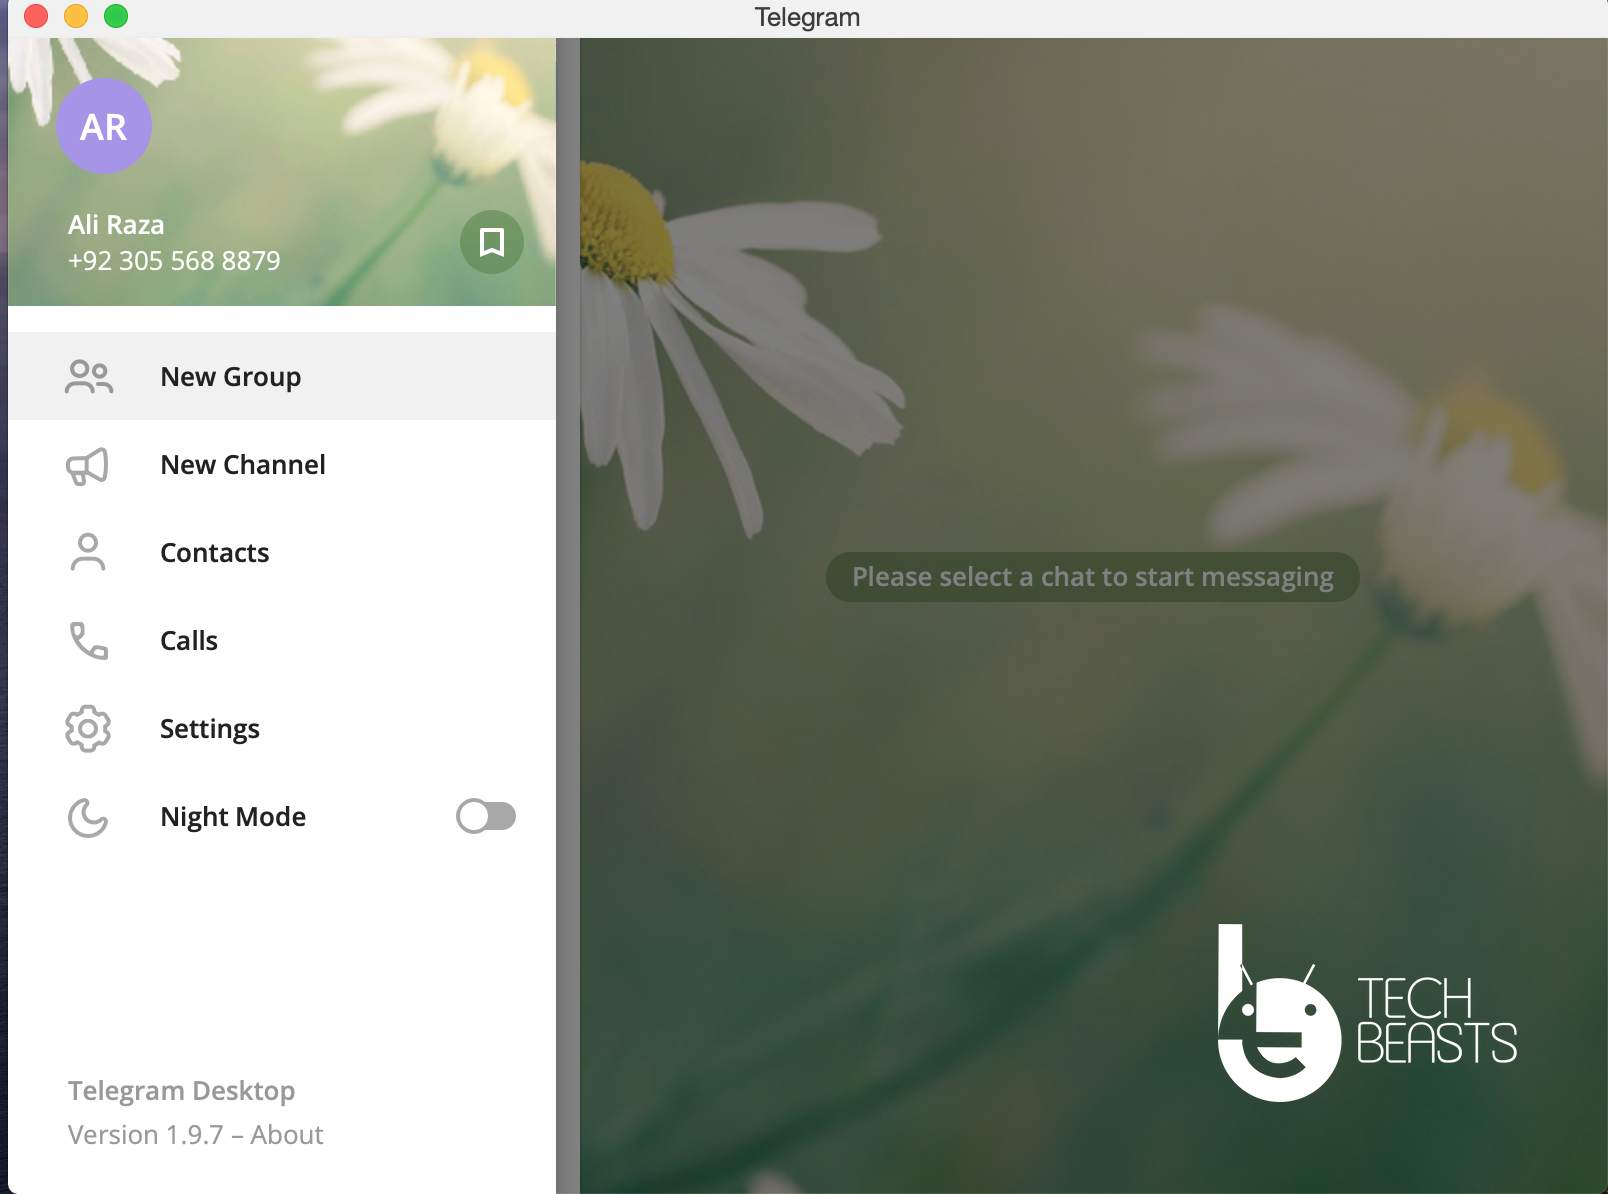
Click on the Hamburger menu button located on the top left side of the screen.
Next, you will be presented with options, click on the create group.
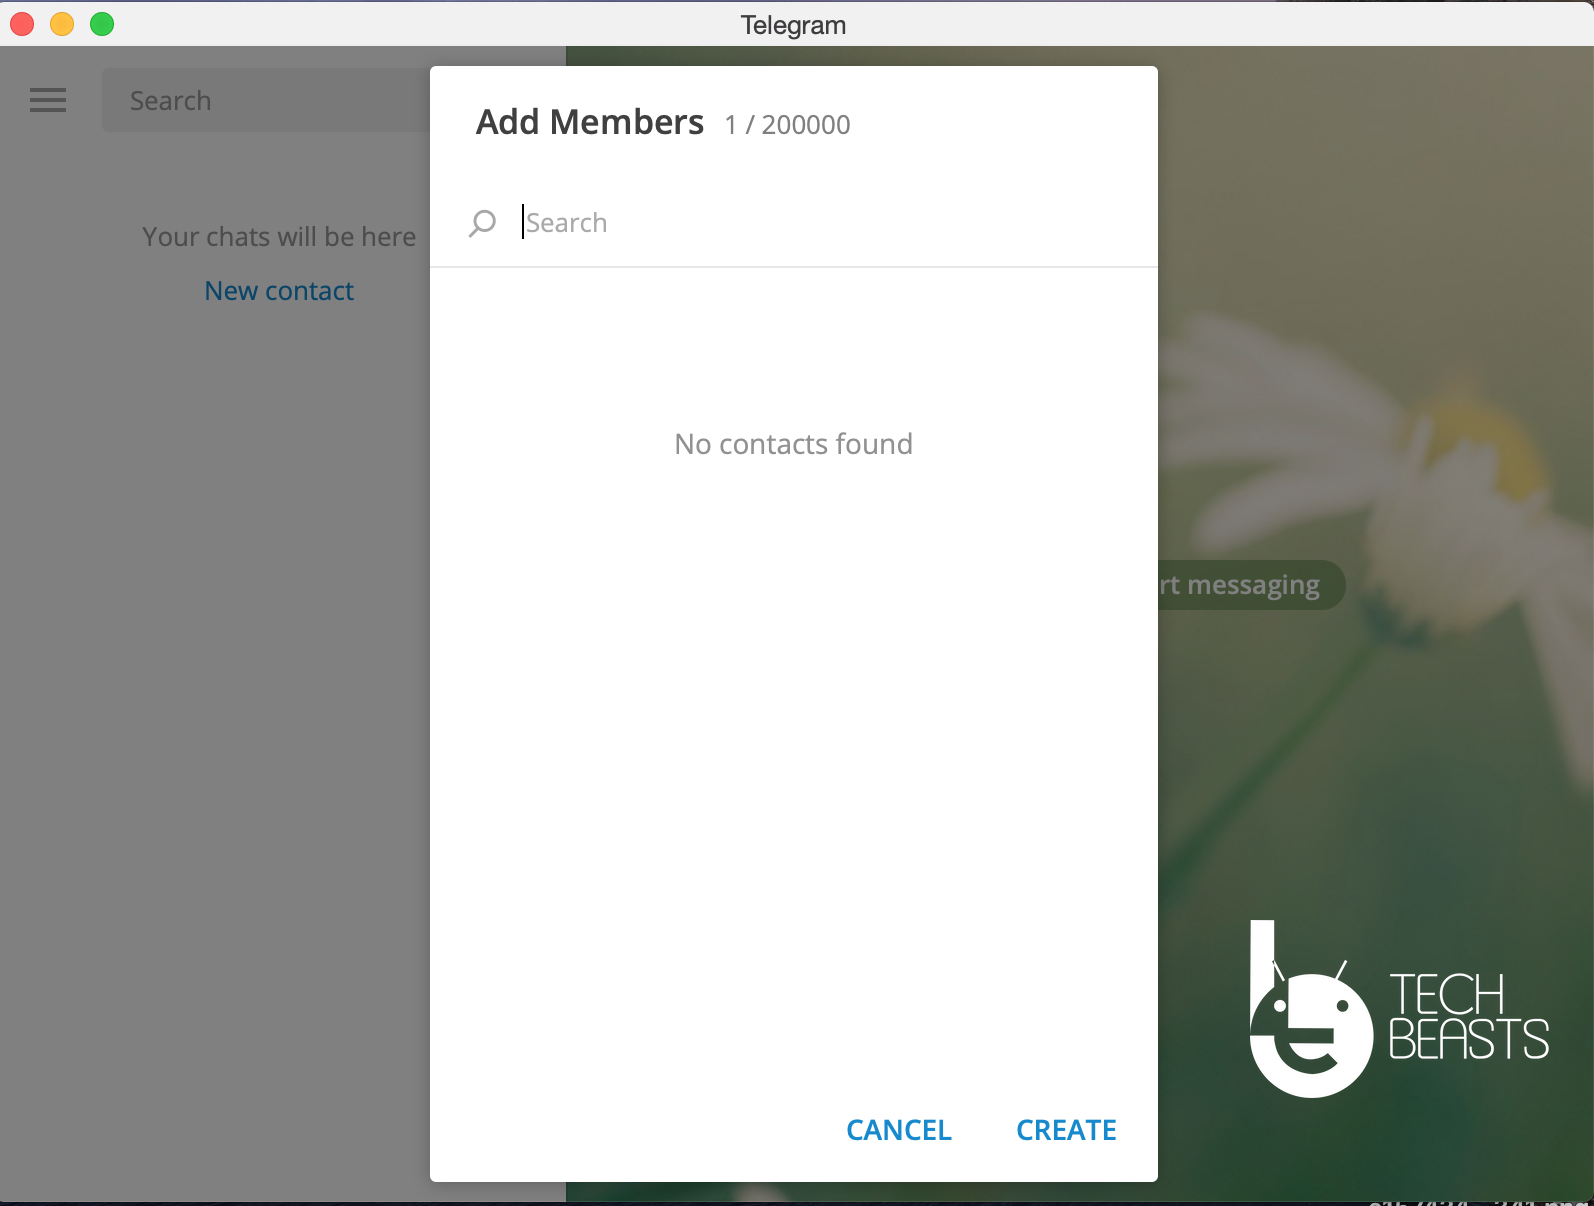
Add a name to your Telegram Group.
Once done, add members to your group and click on create.
That’s all, This is how you can create a Telegram Group on your Android, iOS, and Desktop. Please do share this guide with others.
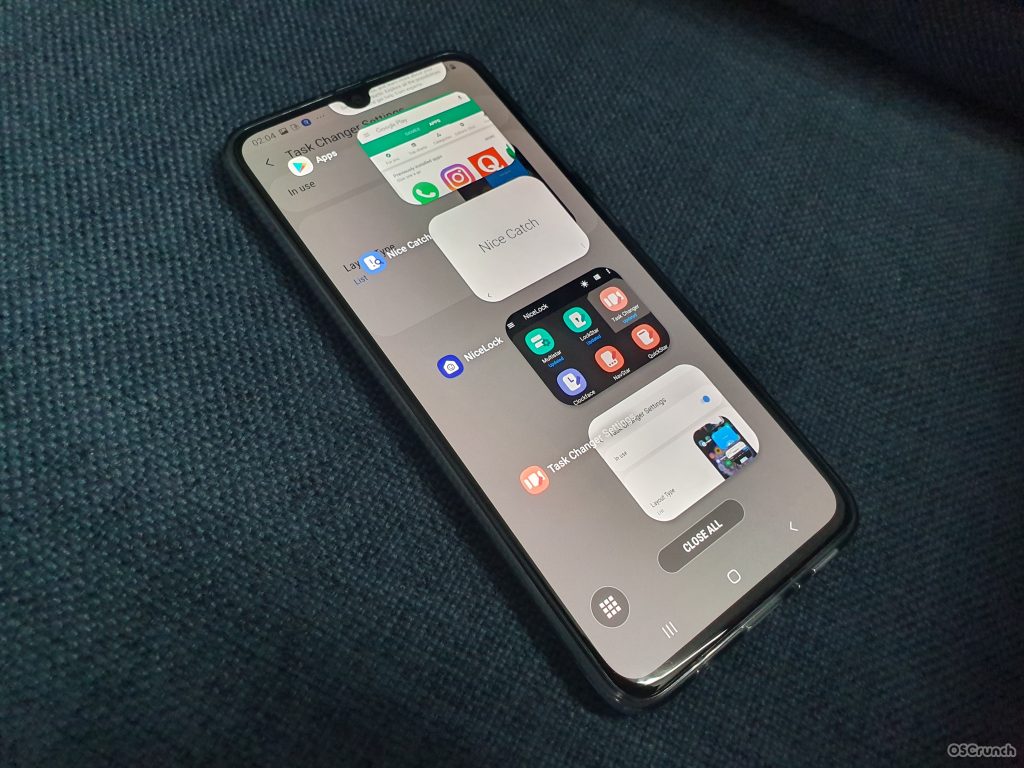
Samsung has just updated the Good Lock app for Android 10. The new Good Lock 2020 is now available in the Galaxy Store. Those of you who cannot find this app in the Galaxy Store can download it from here. Now download Samsung Good Lock 2020 APK & Plugins. You can find ThemePark, NotiStar, Task Changer, Nice Shot, and all other Good Lock 2020 Apps here.
Good Lock 2020
For those who don’t know, Good Lock is Samsung’s UI modification application. Every year, Samsung introduces a new version of the Good Lock app with the features that it plans to launch in the near future. For example, the features we saw in the Good Lock 2019 turned out to be a part of the One UI 2 in the Android 10 update. Similarly, the UI customizations we are about to find out in the Good Lock 2020, will be a part of the Android 11 on Samsung phones.
The purpose of Good Lock customizations is to allow users to get a glimpse of what Samsung is about to do. Samsung collects the feedback, listens closely to the users and introduces the most wanted features only.
The Good Lock app was first launched in 2016. Since then, we have seen 4 iterations of this app. The Good Lock 2019 was among the most popular Good Lock apps as it gave the users an idea of the One UI 2. We are not sure if the Good Lock 2020 imitates the One UI 3 or even if there will be a One UI 3, but it definitely gives us an early look of Samsung UI features from Android 11.
The Good Lock 2020 brings massive changes. The page-long changelong lists all new features. Take a look below.
Common
Dark Theme support.
Follow the One UI 2 principle.
We have also updated the profile information to the new version in the information of Goodlock.
I put the splash screen of Good Rock main APP
Lockstar
The biggest change is internally.
Added the ability to automatically arrange elements to match the background.(On-Device AI Technology)
Added a notification detail view that was requested by many users.
Provides a lock screen auto-off time setting.
Starting with One UI 2.1, FaceWidget has been resized.
Other settings UI has been improved.
QuickStar
Improved coloring segmentation and visibility
Clock central position (except for Hole or Notch challenges) is supported.
Taskchanger
As Google’s OS changes, the most work has been done.
Vertical style is added
Provides an internal VI queue to distinguish between quickswitch and gesture actions.
Notistar
Added custom function for lock screen entry point handle
Multistar
Finally, press and hold the Recent button (Recent) to quickly launch the app to the split screen or pop-up menu.
Popup screen execution You can adjust the size of the gesture area.
You can set it to keep certain apps even if you delete them from recently used apps.
As soon as the pop-up screen closes, it remembers the last position and runs it there again.
Multi Sound moves to Sound Assistant.
NaviStar
Unfortunately, NaviStar has a late problem and will be looking for it a bit later.
Please note that the menu may be displayed depending on the SW update of the terminal.(Sequential progress)
Implemented navigation hide feature that was deleted by policy.
ThemePark
You can create a theme for dark mode.
We added a lot of requests for manual color settings instead of auto.
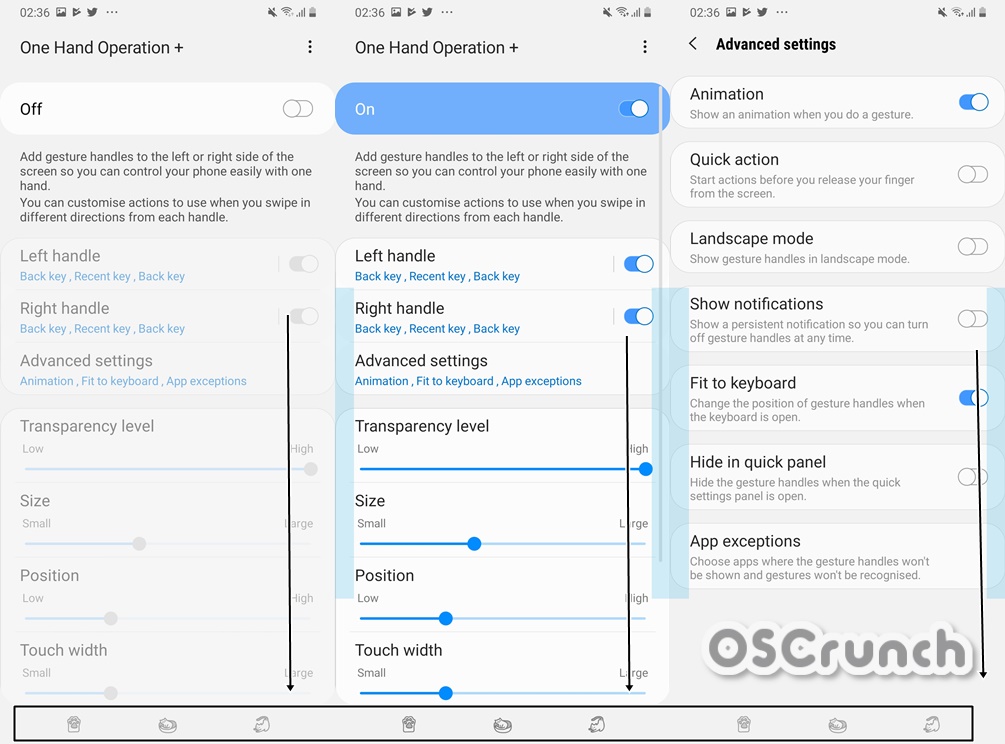
One Hand Operation
Auxiliary handle can be added.You can experience a variety of experiences on the big screen like a tablet.
Added a quick toolbar function (Mobile Data, Game Booster).
You can execute various activities by expanding the home screen shortcut function.
Added vibration feedback setting.
Color change of animation is now possible
Sound assistant
Internal implementation remains and will be available with new features at the end of February.
Provides a menu to provide a vertical style of the volume UI.
Moves MultiStar’s multisound function and provides it with the Volume add-on.
Download Good Lock 2020 APK
Good Lock 2020 itself is a dashboard application. It handles all the plugins such as the NotiStar, Nice Shot, Task Changer, LockStar, ThemePark, etc. Before you install any Good Lock plugin, you will need the parent application to handle all the plugins.
Theme Park is the latest addition to the Good Lock. This app allows users to create themes to resonate with the Dark Mode of the phone. Users can also set custom colors for all the UI elements. Theme Park application wasn’t a part of the Good Lock 2019. This is also one of the most exciting features for the upcoming UI version.
The Task Changer application changes the look of the recent application panels. Task Changer has a number of styles for the recent app panels. You can set it to tiles, bars, lists, grids, and many other styles are there. If you are not liking the current style and animations of the recent apps menu, you can change it using the Task Changer.
QuickStar can change the look and feel of the notifications panel and the toggles section. You can change the entire color of the notifications panel. It also adds the pop-up view button to the notifications. You can also decide what indicator icons you want in the status bar. You can disable them all, or activate a few of them to keep the status bar neat and clean.
The navigation gestures are already here, but they are difficult to use with one hand. The One Hand Operation + is basically a version of Navigation Gestures for one-handed use. These gestures are enabled anywhere on the screen. You can swipe in or out from the right and left to perform your desired task.
Edge-phones look cool, but they have a problem. The edge is sensitive to touches. Your phone can detect touch while it’s in your pocket or it is lying around. To get rid of this problem, you can get the Edge Touch. It gives the option to specify the areas where you don’t want the touch to be detected.
The basic purpose of routines is to set automated tasks on the phone. For example, you want your phone to tell you when to watch a movie, when to play or pause the songs, when to call someone, or when to take a picture, you can do this all by setting up routines. By default, you do get the Routines as a part of the Samsung Bixby platform, but these Routines make it much more easy to set up because you get the pre-built templates.
Edge Lighting+ is only for the edge-powered handsets. This adds a very beautiful lighting effect around the edges of phones. If you have a phone like the Galaxy S10 or S10 Plus, you can add a lighting effect around the camera cutout with the help of this app. Edge Lighitng+ does not work on Samsung phones that have flat displays.
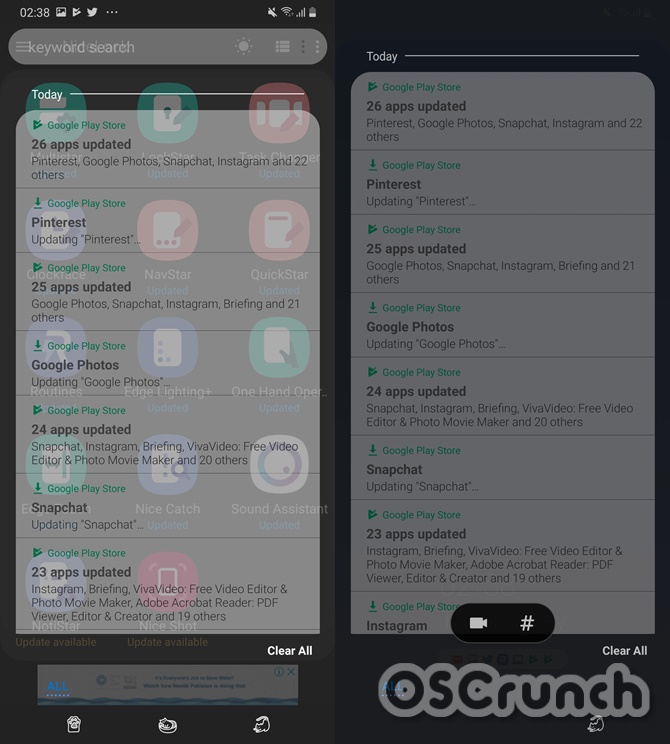
NotiStar was released very recently. It is, in fact, a part of the Good Lock 2019. The NotiStar adds a filter to your notifications. You can quickly search through your cluttered notifications using a specific keyword. You can also choose what apps should send you the notifications. The UI used by NotiStar is really easy-on-the-eyes.
The Multistar plugin is built for enhancing the multi-windows and multitasking features of the Galaxy phones. This app will let you use multi-windows without pausing one of the windows now. The pop-up view action brings the old diagonal-swipe to launch multi-windows back to the phones. You can change the split-screen color too. Another great use of the Multistar app is to enable multi-windows for all the apps.
The last plugin in this list is the Nice Shot. It is the screen capture plugin with extended features. For example, you can change the quality and format of the screenshots. It also adds a native video recording button to the screenshots. Whenever you take a screenshot, a video recorder appears which can record the screen in high quality. It also records the audio.
In this post, you will learn how to disable Telegram account link in forwarded messages. This may not seem important for all of us but to be honest it does. How? Well, when someone forwards your message to others, that message carries a link and upon opening that link, anyone can access your profile.
That’s not all, anyone means, whether the person is in your contact list or not. He/She can easily access your profile by using that link. Telegram is no doubt loaded with best privacy settings but this single thing should be taken care of. Believe it or not, it is a major concern. One can easily check your profile, even he/she is not in your contacts.
By the time I thought the Telegram team will look into this matter, unfortunately, they haven’t. Well, no worries, we can still Disable Telegram account link in forwarded messages through app settings. Let’s get started now.
Disable Telegram account link in forwarded messages:
When you send a text or message on Telegram to someone it doesn’t add any link. However, when they forward the same text to someone else, Telegram automatically adds a link back to your account. It is only helpful in one way, the original user gets the due credit, other than that it’s no help.
The main concern here is since your profile link is getting out for no reason. Anyone can easily poke into your profile and which is not comfortable at all. The best you can do is to disable link forward messages settings. Since there is no word about this from the Telegram team, all we can do is disable this option.
Follow the instructions provided below and you will be able to disable Telegram account link in forward messages.
Total Time:5 minutes
Open Telegram App:
First, Launch Telegram App on your device and Tap on the menu button located at the top left side of the screen.
Access Settings:
Now from the main menu, Tap on Settings -> Privacy and Security.
Open Forwarded Message:
From the Privacy and Security settings, Tap on Forwarded Message option. Now from here, you can choose whatever option you want to go with it. If you simply want to disable it, select Nobody.
This is how you can easily disable the Telegram account link in your forward messages. However, if you want to customize it forwarded messages option, you will get a clear picture below.
There are three options to choose from when you will enter into the Telegram forwarded messages option.
Nobody: As the name says all. Once selected there is no option left to access your profile. Because after selecting nobody, whoever forwards your message to anyone, there will be no link to your account.
My Contacts: If you want to let others know about you but the ones you choose. You should try My Contacts option and choose the ones with whom you want to share your profile link.
EveryBody: This option is selected by default and there is nothing to it. If you go with this option, anyone who receives your messages will be able to forward it and along with your account link in it.
Now it’s totally up to you. What do you want? Please do try this and let me know if you need any help regarding this guide.
Here’s how you can install Google Camera APK for Galaxy S7/S7 Edge. The latest version comes with the support of Portrait Mode and we are providing you the latest Google Camera APK.
When it comes to taking awesome photos, the Google Camera app is best among all. We have seen brilliant photos taken through Google Camera by Google Pixel devices. Also, you all are very well aware of the fact that Google Pixel devices are the best in the market when it comes to the camera department. Moreover, behind all those breathtaking photos of Google Pixel is Google Camera. This is where all process is done, so that’s why I made that post.
Now you can take mind-blowing pictures on your Galaxy S7 / S7 edge using Google Camera. All you have to do is heed the following instruction and you will be able to download Latest Google Camera APK for Samsung Galaxy S7 & S7 Edge.
Thanks to XDA Member ( miniuser123 ). We get to use the famous Portrait Mode of Google Pixel 2 on our Galaxy S7/S7 Edge. He made it possible to install Google Camera on Galaxy S7 Edge Exynos models. Moreover, you will be happy to know that you can download the latest Google Camera APK on S8 and Note 8.
It would be better to directly download Google Camera APK on your device or you can download it on your PC. But then you have to connect your device to your PC and then transfer the APK file.
Install Google Camera APK on Samsung Galaxy S7 & S7 Edge:
First, you need to download Google Camera 8.2 APK on your Samsung Galaxy S7 & S7 Edge.
Once you downloaded it, head over to the file manager and tap on downloads.
From there find the Google Camera APK file. Tap on it and follow the on-screen instructions.
In no time, you will be able to install Google Camera on Galaxy S7 Edge.
Once the Google Camera is installed on Samsung Galaxy S7/S7 Edge. You can open it form apps drawer and start using it. You don’t have to change any settings.
That’s all. Now you can easily use Google Camera with Portrait Mode on your Samsung Galaxy S7 & S7 Edge. Please do try our guide and let’s know-how was your experience. Moreover, if you face any issue please do tell us about that too. So we can help you.
In this tutorial, you will learn how to Fix Delayed Gmail Notifications on Samsung One UI 2.0.
Samsung One UI 2.0 is based on Android 10 and we have seen a ton of new features with this new update. Samsung has improved a lot and added quite a lot of features that were missing in the previous updates.
Apart from all the new features that we have got in the latest One UI 2.0 update. There are some issues that required attention. We all know a new update brings a number of improvements and bugs fixes. However, it also brings new issues which at the time of release doesn’t seem to show up or triggered. But as we start using the new update, we start to notice these issues. Same goes with the One UI 2.0, from the last few days my Gmail app is behaving abnormally and I am unable to get the new Email notifications as I receive them.
It took me some time to figure out what was the problem and also it took some time to find a solution. I tried a few workarounds and they all seem to add up. Now I am sharing these solutions with you. Let’s get started.
Fix Delayed Gmail Notifications on Samsung One UI 2.0:
Heed the instructions below to easily Fix Delayed Gmail Notifications on Samsung One UI 2.0.
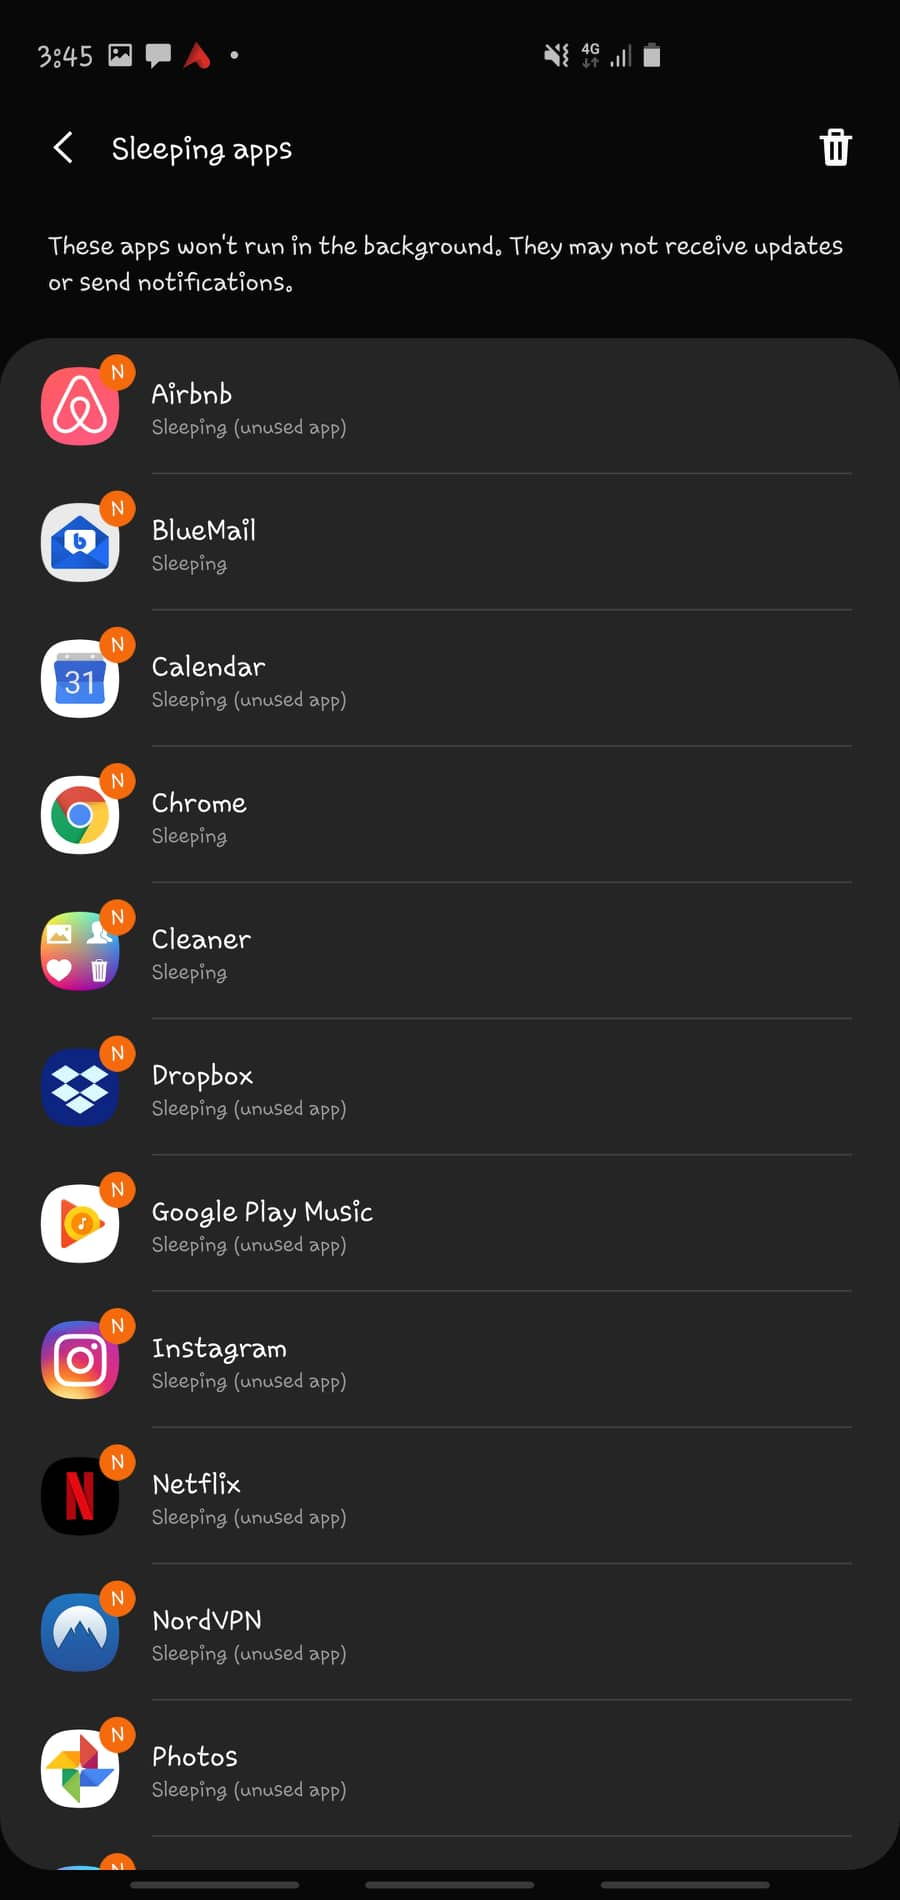
Delayed Gmail Notifications on Samsung:
Open Settings on your Samsung device and make sure you are running the One UI 2.0.
Look for Device Care Settings, Tap on Battery.
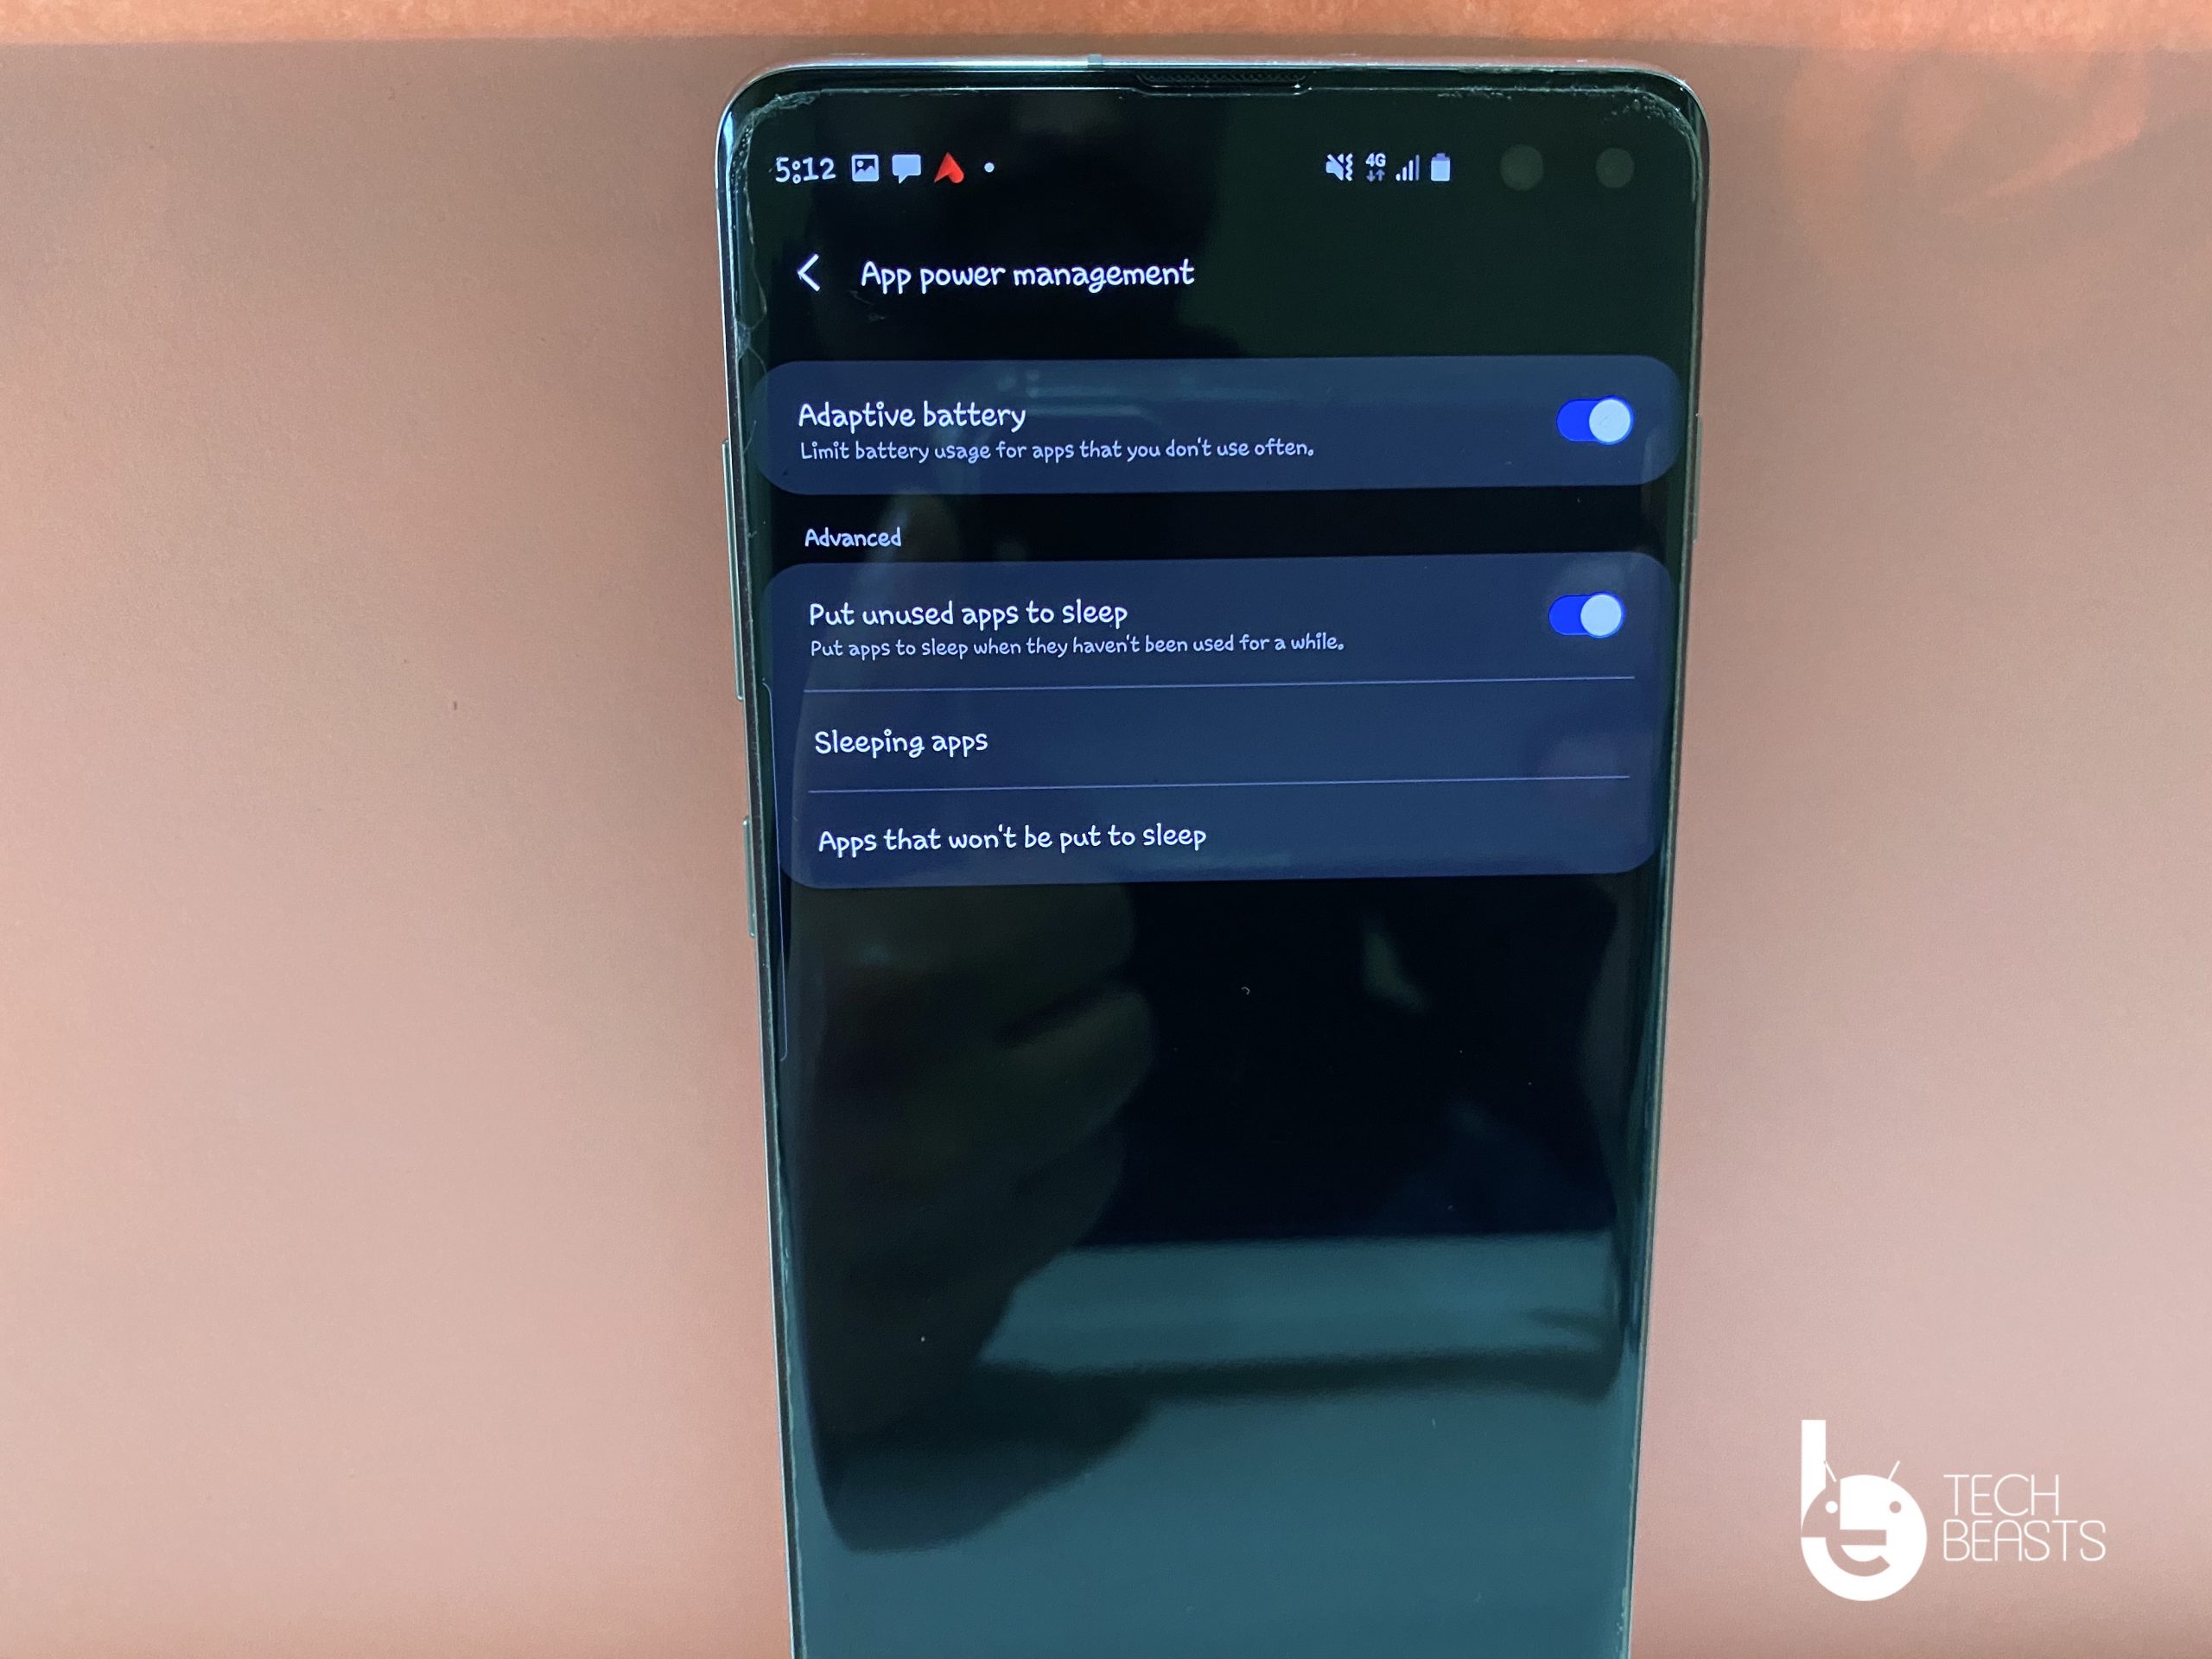
There you will see a number of options, you need to find App Power Management.
When you will be in App Power Management, you need to head over to the sleeping App section.
In the Sleeping App section, you need to make sure Gmail is not added. If it does, you need to remove Gmail from the sleeping App section.
This will help you Fix Delayed Gmail Notifications on Samsung One UI 2.0. Now if you want to make sure Gmail never gets added to Sleepings apps, you can use the following settings. It can be done through the same settings and if you are still not sure. Let me tell you.
Open Settings on your Samsung device and make sure you are running the One UI 2.0.
Look for Device Care Settings, Tap on Battery.
There you will see a number of options, you need to find App Power Management.
When you will be in App Power Management, you need to head over to the sleeping App section.
Tap on Apps that won’t be put to sleep. Tap on “+” icon, from here you can select the Gmail app and tap on add.
Once done, you won’t be facing any notification delay issue on Gmail again. However, there is another solution you can try, if still, you are facing notification issues on Gmail.
In-App Gmail Notifications Fix:
Open Gmail App on your Samsung device.
Tap on the menu button located at the top left side of the screen.
Now select settings that will be at the end of the menu. Now from there Tap on Notification section.
Make sure all the notification settings are turned on.
That will be all, this is how you can Fix Delayed Gmail Notifications on Samsung One UI 2.0. Please do try these workarounds and let me know if they were any help to you.
Periscope for PC is now available and can be easily installed on a desktop PC/Laptop running Windows XP/7/8/8.1/10 and MacOS/OS X. Let’s learn a little bit about this all-new app and then have a look on the installation method via BlueStacks or BlueStacks 2.
Download Periscope for PC, Laptop Windows-Mac:
Following are the two methods from which you can download and install Periscope for PC, Laptop Windows-Mac. Let’s start the method to download Periscope for PC Windows.
Once you’ve installed BlueStack, launch it from your desktop. You have to add your Google Account to use Google Play on BlueStack. Goto->Settings->Accounts-Gmail.
When BlueStacks screen loads up, Click on the Search icon.
Now you have to type in the app name. I am looking for Periscope so, in the search bar, I’ll type Periscope and hit enter.
On the next screen, you’ll see the list of all the apps containing Periscope name, Click on the first one which is developed by Twitter.inc.
Now you’ll be at app page, here you have to click on Install. It will start downloading the app and once the downloading is complete, Periscope will be installed.
Before moving on you have to give permission to Periscope in order to access your system information. Click on Accept when you’ll see the pop-up.
Now, wait for the installation process to be complete, once the Periscope is download and installed, you’ll see a notification as you do on your Android devices. Goto BlueStacks homepage and there you’ll see the Periscope logo in your apps. Click on the Periscope logo to start using it.
DOWNLOAD Periscope FOR PC ON WINDOWS 8.1/10/8/7/XP/VISTA & MAC LAPTOP:






![How to send a GIF on WhatsApp [ Guide ]](https://techbeasts.com/wp-content/uploads/2020/02/send-GIF-on-WhatsApp3.jpeg "How to send a GIF on WhatsApp [ Guide ]")



![Create a Telegram Group [ Android, iOS, Desktop ]](https://techbeasts.com/wp-content/uploads/2020/02/Screen-Shot-2020-02-06-at-5.53.07-PM.png "Create a Telegram Group [ Android, iOS, Desktop ]")