Home Blog Page 20

Free Download FFMPEG on Windows 10

0
Free Download FFMPEG on Windows 10
Running FFMPEG on Windows 10

If you are a video creator looking for a best free video conversion tool, you have landed at the right place. Download FFMPEG on Windows 10 now. FFMPEG converts videos and audio from any format to a format of your choice within a few seconds.

download ffmpeg on windows 10
Running FFMPEG on Windows 10

FFMPEG

If this is the first time you’ve heard about FFMPEG, let me tell you a little about this tool. FFMPEG is an open-source video converter tool. It uses a command-line UI and it’s built for pro-users only, but don’t worry. We have a guide to convert videos using FFMPEG which will help beginners too.

So what can the FFMPEG do? Well, it’s versatile nature can decode, encode, transcode, mux, demux, stream, filter, and play almost every single format of audio and video files that exist to date. Even the formats that have become obsolete and no player supports them, the FFMPEG will treat those the way you want. 

To keep things easy, we will not indulge too much into the technical functionality of the FFMPEG. The tool is mainly used to convert extremely large video files from one format to another. For example, if you have shot an mkv video file and you are unable to convert it using any converter, the FFMPEG will come to the rescue. It can convert mkv files of 4K resolution into MP4 within a few seconds. No matter how big your file is, you will be completely surprised once you see how fast FFMPEG works. 

Not only the formats, but you can also change the resolution of videos through this tool. Furthermore, you can enforce a different frame rate on a video file. The bit rate of audio/video files can be changed via FFMPEG too.

This tool seems very simple at first, but it’s huge. The applications of FFMPEG are unlimited. Even the most expensive media conversion tools do not offer the kind of features this tool has. Obviously, you have to master it first. It’s not that simple to use and you would need tutorials.

Even downloading this tool is not that simple which is why I’m going to show you how to download FFMPEG on Windows 10. Take a look below and then find our tutorial below as well.

Download FFMPEG on Windows 10

  1. Go to the Zeranoe FFMPEG page.
  2. Select your Windows architecture i.e. 32-bit or 64-bit.
  3. Select “Static” linking.
  4. Click on Download.
  5. FFMPEG will be downloaded in the form of a zip file.

How to install FFMPEG on Windows

  1. Extract the zip file, rename the extracted folder to FFMPEG only.
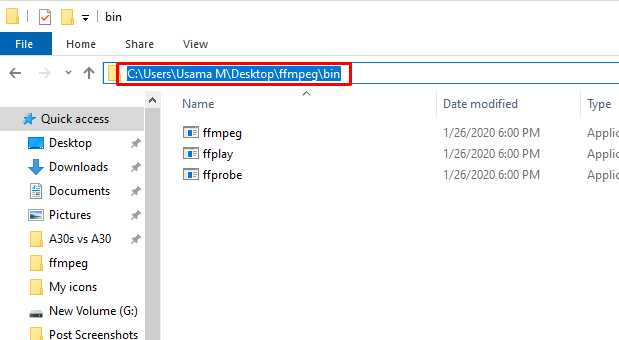
  2. Open the FFMPEG folder > bin > Copy the path of this folder.
  3. Now go to the start menu > type “env” > edit the system environment variables.
  4. Click on Environment Variables.ffmpeg on windows 10
  5. Click on Path > Edit > New > Paste your FFmpeg bin location that you just copied.ffmpeg on windows 10ffmpeg on windows 10
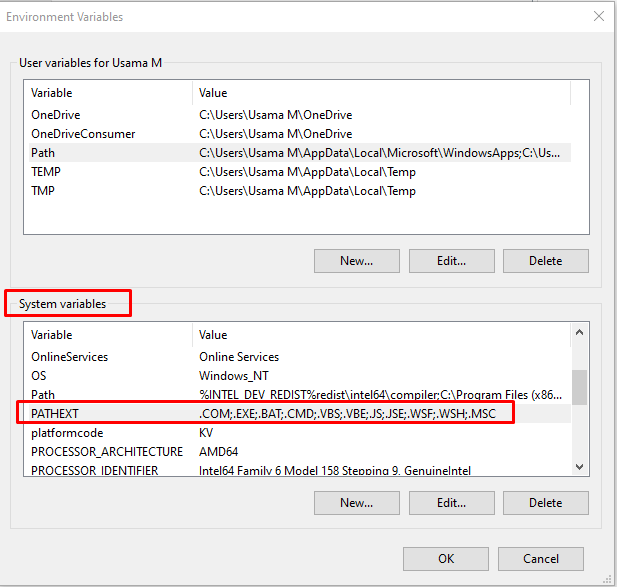
  6. Now within the System Variables, check the PATHEXT and make sure .exe is added there. If it’s not there, add it just like other variables are added.ffmpeg on windows 10
  7. Open a command window on the PC now.
  8. Type “FFmpeg” and hit enter.
  9. You will get the FFmpeg version details pointing towards a successful installation.ffmpeg on windows 10


At this point, you have installed the FFMPEG and now you are all good to convert videos between different formats, codecs, and resolutions. Check out our detailed guide on how to convert videos using FFMPEG. If you have any questions in mind or need any help regarding the FFMPEG, reach out to us using the comment section below or our contact page. Our team of experts will get back to you in time.

Download Delta Emulator for iPhone & iPad in 2020

0
Download Delta Emulator for iPhone & iPad in 2020

This is the tutorial to Download Delta Emulator for iPhone & iPad in 2020. Delta Emulator runs on any iOS version & any iPhone or iPad. Before you download it, let tell you what this app is all about.

Download Delta Emulator for iPhone & iPad

Delta Emulator for iPhone & iPad

It is the successor of the famous GBA4iOS emulator. Delta Emulator is the top choice for the fans of good old Nintendo gaming consoles. The Emulator emulates consoles like Game Boy, Game Boy Advance, Game Boy Color, Nintendo DS, and Super Nintendo on your iPhone and iPad. It supports all iPhones and iPads that have released to this day. It also runs smoothly on almost all versions of iOS including the latest ones.

To run the games in Delta Emulator, you would need the ROM files of the games. The ROM files like the game installation files. These are very small files are and are vastly available. The emulator doe not have any pre-loaded games/ROMs.

The installation of Delta Emulator for iPhone & iPad is not very simple. You have to use a tricky method to sideload it on your device. This is not available in any store other than the AltStore, so I’m going to show you the steps to download Delta Emulator via AltStore.

First of all, I will show you the steps to install and setup the AltStore on your macOS or Windows-powered PC.

Download and install AltStore on your PC

Requirements

  • Go through this whole guide at least once before following this procedure.
  • Windows or Mac Computer.
  • All old and new iPhones including iPhone 11, iPhone 11 Pro, iPhone 11 Pro Max, iPhone XR, iPhone Xs, iPhone Xs Max, iPad Air 3rd Gen.
  • iOS 13 – iOs 13.3 and all other versions of iOS/iPadOS.

AltStore installation & configuration on MacOS

  1. Get AltStore on your Mac PC from here.
  2. Mac users can unzip to get the AltStore setup file and drag/drop it on to the Apps to install it.
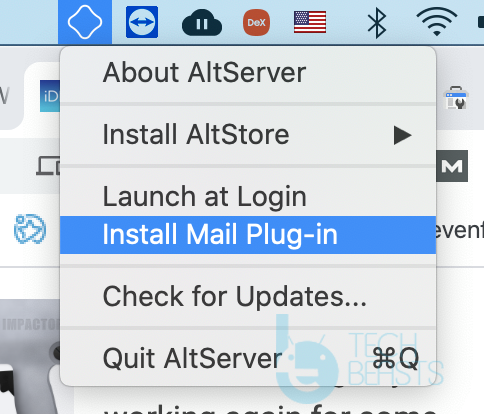
  3. Launch AltStore now and click on the AtlStore icon on the top menu bar.
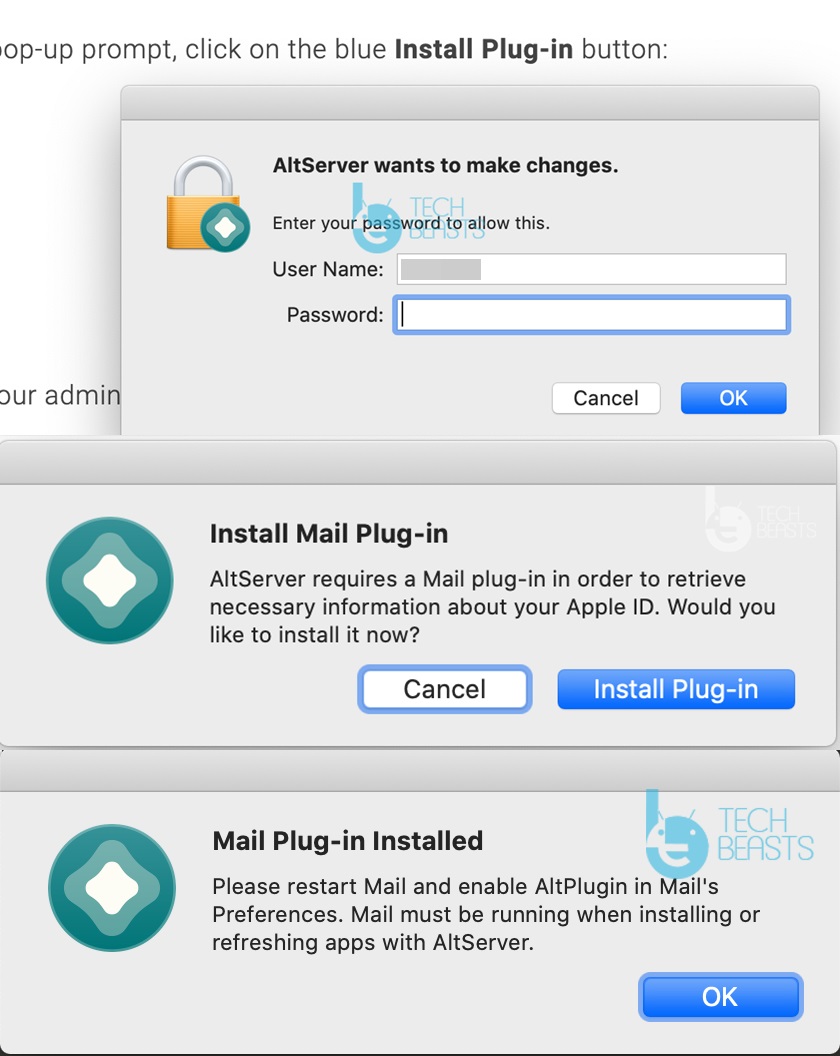
  4. Now click on “Install Mail Plug-in > Install Plug-in”.
    install altstore mail plug-in
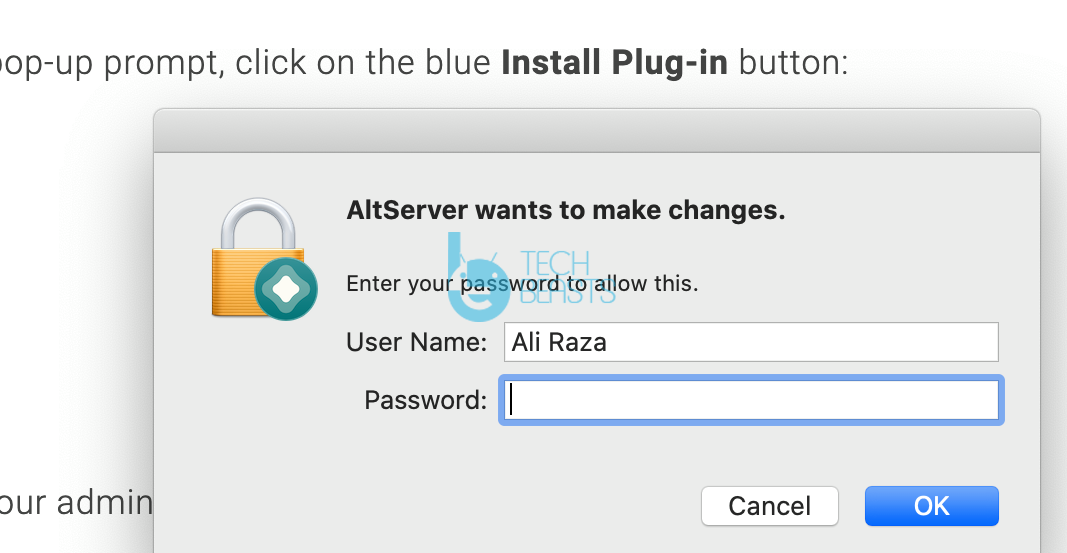
  5. It will ask for your computer’s password, enter to begin the installation.
    configuration of altstore
  6. After the plug-in installation, open the Mail app and go to Preferences.
    mail preferences
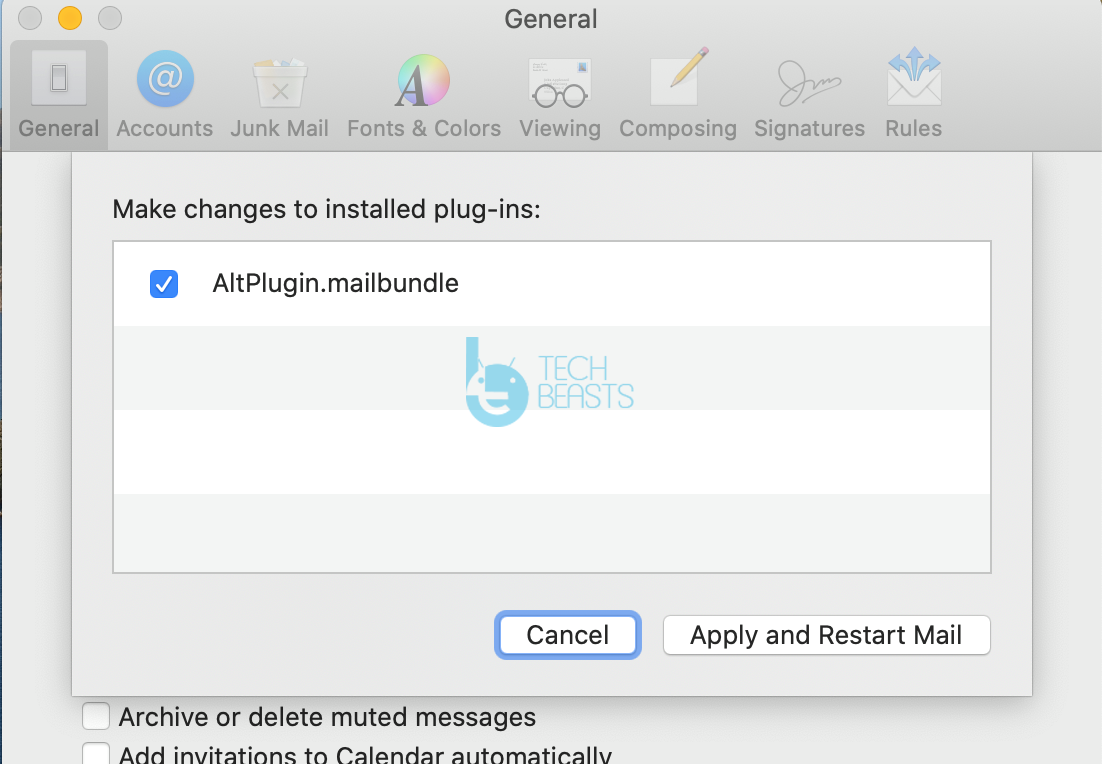
  7. From the Mail App’s Preferences, launch the General tab and then click on the “Manage Plug-ins” button.
  8. Now click on the checkbox appearing besides AltPlugin.mailbundle and click on Apply and then Restart Mail.
    setting up altstore
  9. Connect your iPhone to the computer using the USB to Lightning cable.
  10. Click on the AltStore icon on the top menu bar again > Install AltStore > Select your connected iPhone > Enter your Apple ID and Password > Let the AltStore install the AltStore app on your iPhone. That’s all.
    altstore installation

AltStore Installation on Windows 10

  1. First of all, download and install iTunes from the website. Do not install iTunes using Microsoft Store, that will not work with AltStore.
  2. Download the AltStore for Windows 10 from here.
  3. Unzip the file and run the AltStore setup.
  4. Once done, go to Windows 10 search and find AltServer and launch it.
  5. Now connect your iPhone to the Windows-powered computer.
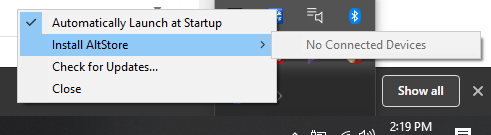
  6. Click on the more-icons button on the lower-right-corner of your computer’s taskbar > Click on the Diamond icon > Install AltStore > Select your device and install it.
    altstore via windows 10
  7. If the AltStore asks for Apple ID & Password or the App-Specific Password, enter it. AltStore will be installed on your iPhone now.

Setting up AltStore on the iPhone

  1. Do not disconnect the iPhone and do not launch the AltStore on the iPhone before following these instructions.
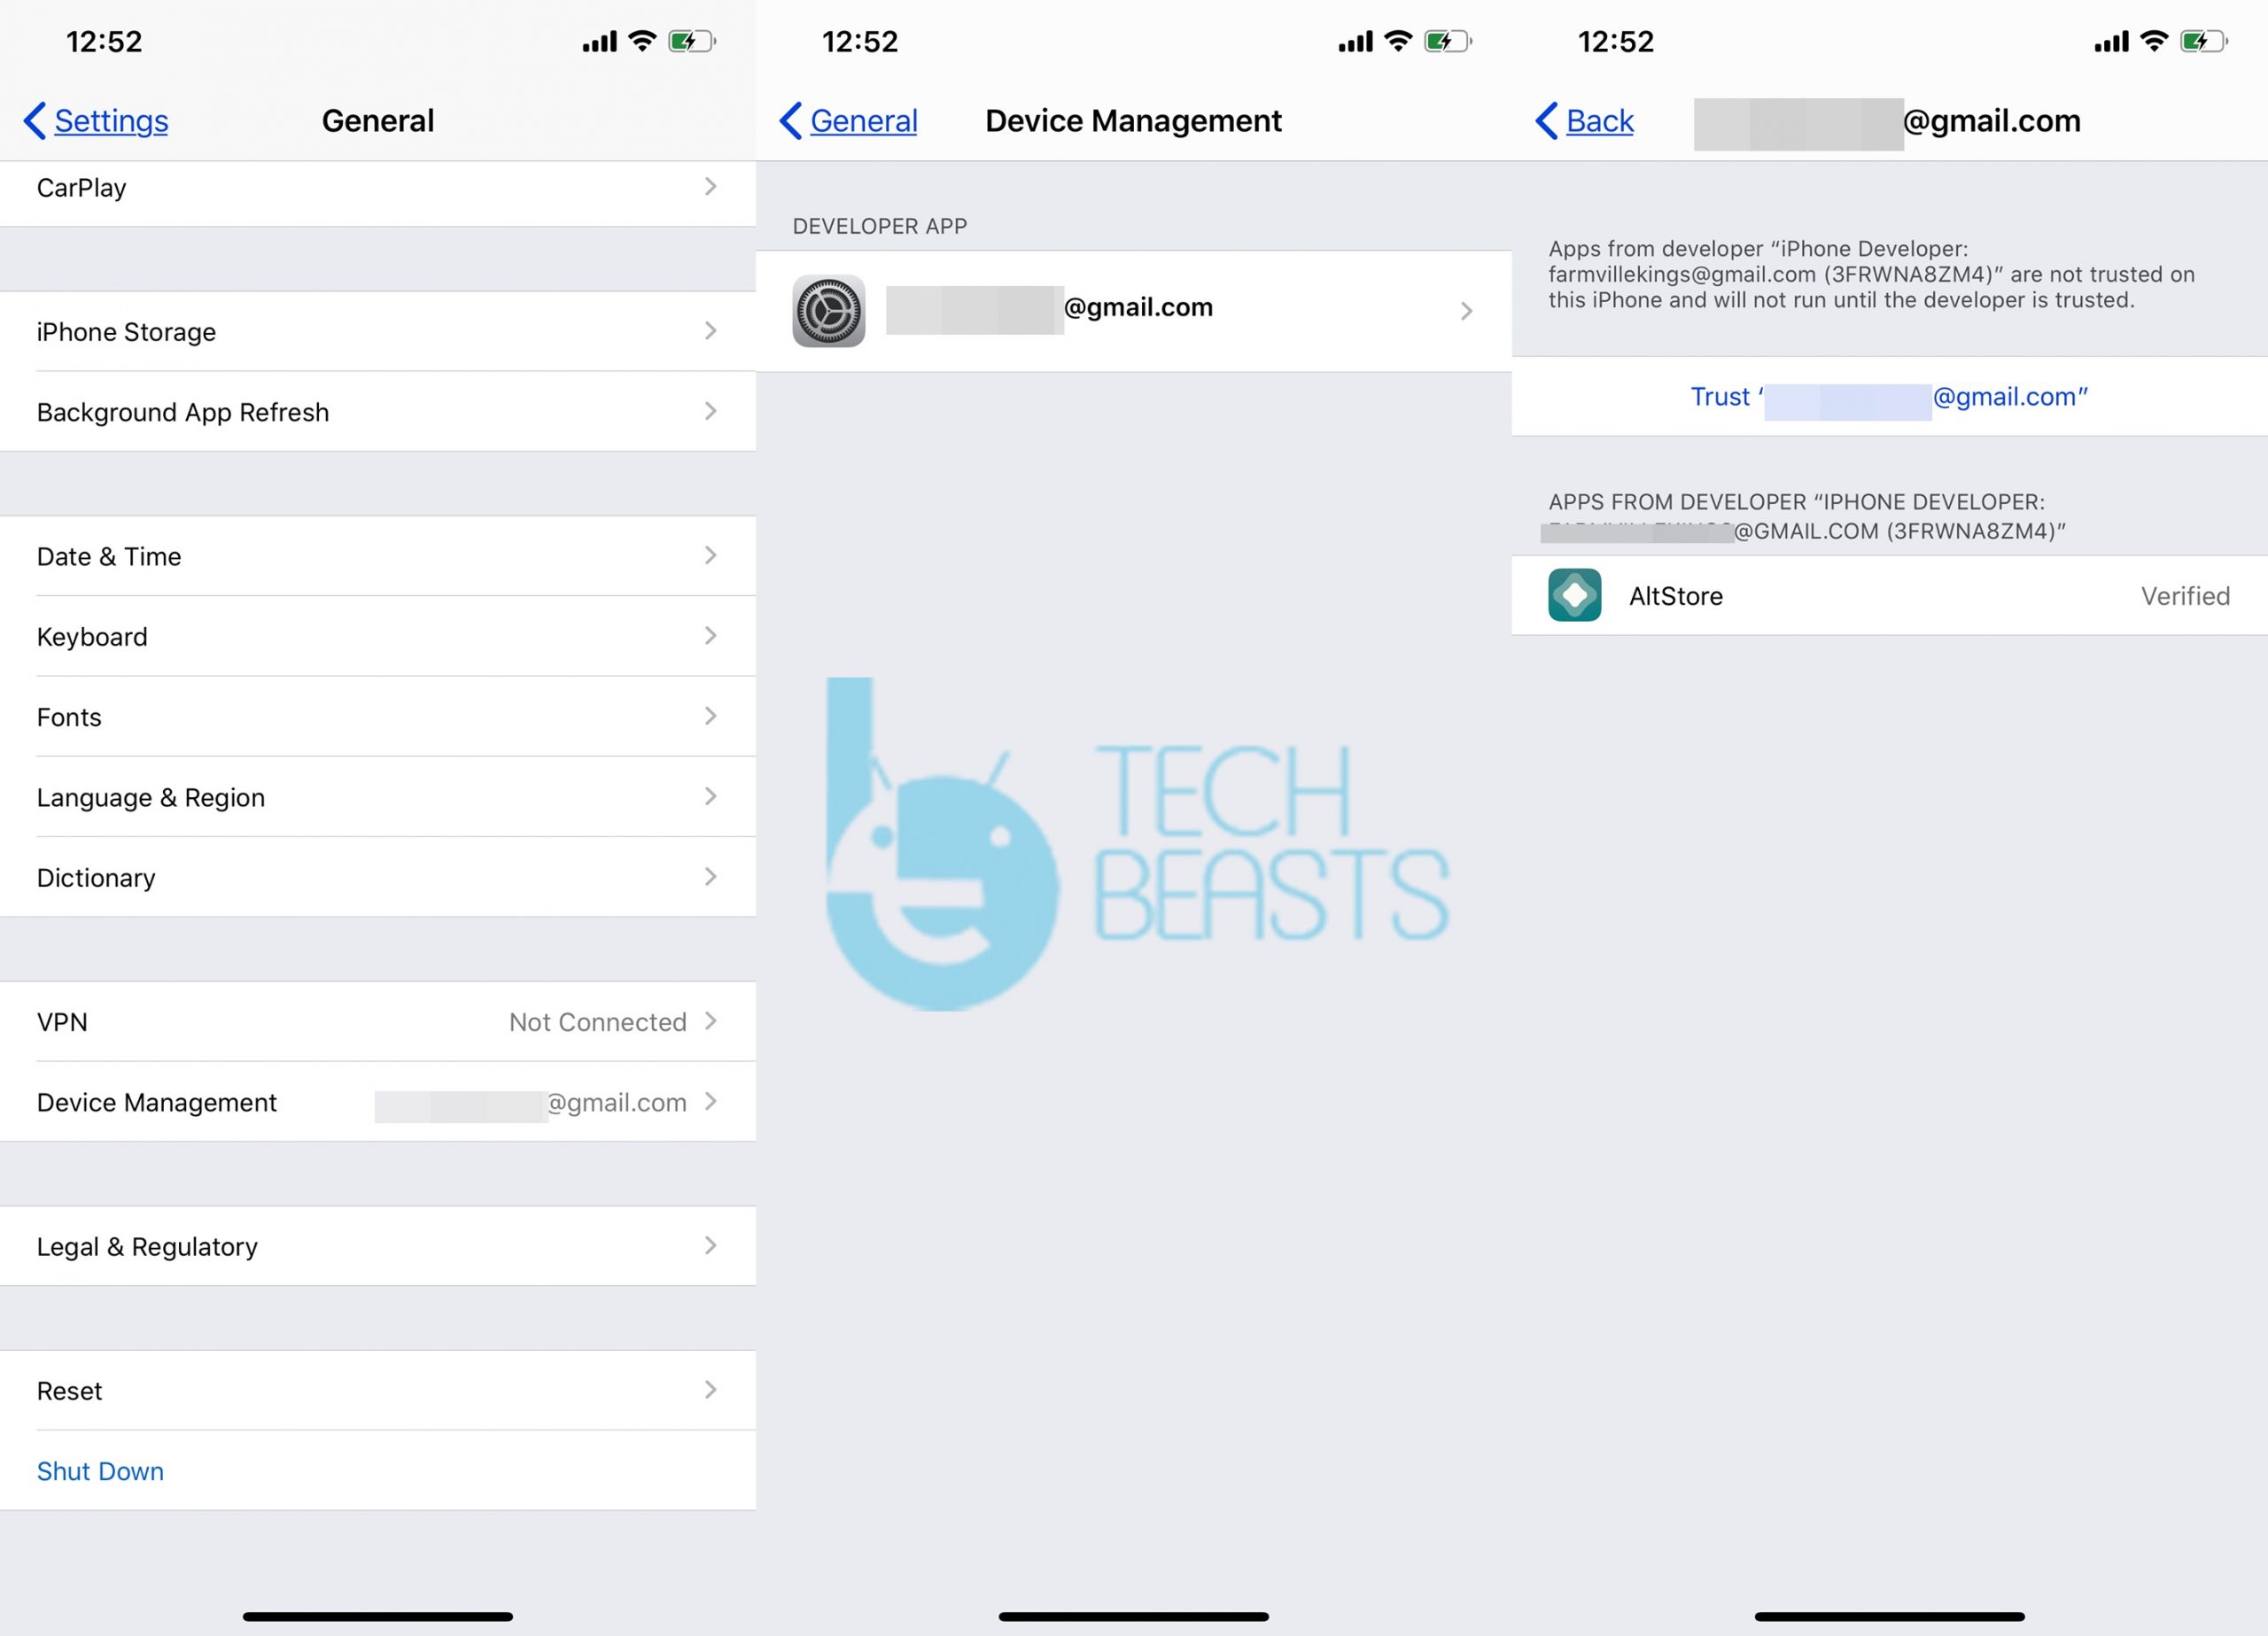
  2. On your iPhone, go to Settings > General > Device Management > Click on your Apple ID > Trust.
    AltStore on iPhone 11 Pro Max
  3. AltStore is now fully set up. We are all set to install the Delta Emulator on iOS 13 now. Do not disconnect the iPhone yet.

Download Delta Emulator for iPhone & iPad

  1. Open AltStore on your iPhone or iPad.
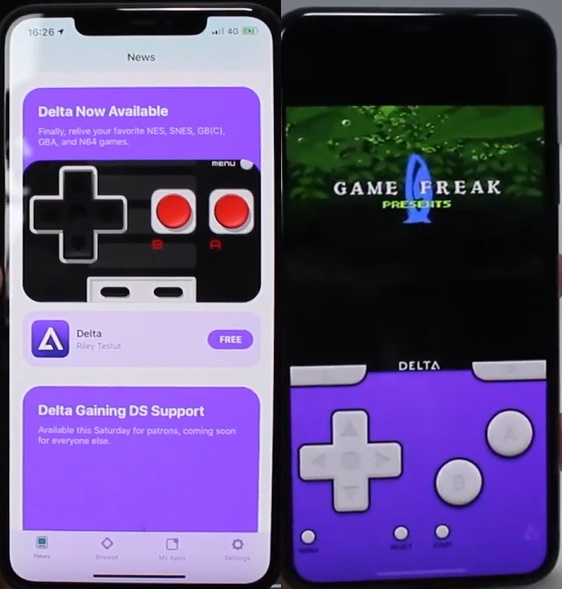
  2. Now find the Delta in the AltStore, it should be on the home-page.
  3. Install the Delta Emulator, launch Delta, it will show an empty screen, you can disconnect your iPhone from the computer now.
  4. Open Safari or Google Chrome on your iPhone, go to this page and download the Game ROM files.
  5. Open Delta after downloading the ROM, click on the 
    “+” button and click on Files.
  6. Select the ROM and the game will start working, that’s all.
Image credits: Daniel About Tech

Conclusion

That’s all with Delta installation on iOS 13. You are now free to run any games of your choice in this emulator. It will support the games from all the Nintendo classic gaming consoles. If you find it difficult at to install the AltStore or the Delta at some point, feel free to reach out to us using the comment section below. Our team of experts will take care of your queries.

Also, check:

5 Free Best GBA Emulators for Android

5 Free Best GBA Emulators for Android

Looking forward to reviving your childhood memories of the Gameboy Advance classic games? Well, while everything is shut and you are home-bound, use this time to go through the good old days. Find out the Free Best GBA Emulators for Android. These best GBA Emulators will let you play all Nintendo Gameboy Advance games on your phone.

Game Boy Advance Flashback and GBA Emulators

If you don’t already know, Game Boy Advance was one of the most innovative consoles back in the day. It was introduced by Nintendo in 2001 as a successor of the Game Boy Color. This was a 32-bit handheld device launched as a part of the 6th generation gaming consoles. Game Boy had a small screen in the middle surrounded by buttons on both sides. Nintendo sold millions of Game Boy Advance devices before it finally launched the Nintendo DS to replace it.

Best gba emulators for android

Game Boy Advance used the Game Boy Advance Software to run the games. This software has been ported now into virtual devices which are called Game Boy Advance Emulators or better known as GBA Emulators. All the games of GBA are available in the form of ROM files. A file for each game is of a few KBs or MBs only. Users just have to download the GBA ROM file and sideload it using the GBA Emulator either on their PC or on the phone. We have already published our list of best GBA Emulators for PC and now we are going to share our top picks for the GBA Emulators for Android.

Best GBA Emulators for Android

My Boy Free GBA Emulator

Best gba emulators for android

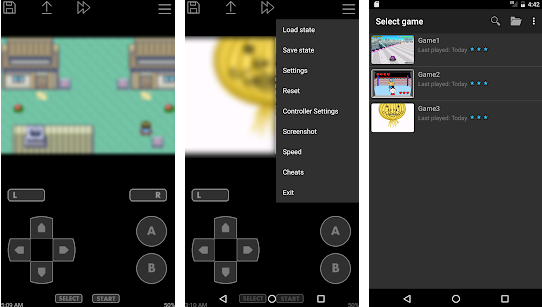
This is the most popular GBA Emulator for Android phones. One of the reasons for its popularity is being completely free. My Boy supports most of the Game Boy titles including Castlevania, Super Mario, and the Pokemon series. The emulator does not include any games by default. Users have to download the GBA ROMs from credible sources and copy them to their phones. The ROMs can be loaded using the load options in the My Boy GBA Emulator. It’s not available in the Play Store for unknown reasons, so you will have to download the My Boy Free GBA Emulator APK instead.

John GBA Lite Emulator

Best gba emulators for android

While My Boy GBA Emulator is a basic emulator, the John GBA Lite is feature-rich. Its development is currently active means it still gets updated which makes it a better choice. John GBA Lite incorporates the original GBA engine. It has support for Raw, GameShark, and CodeBreaker codes. Like the My Boy emulator, you need the GBA ROM files for this one too. It has the ability to automatically detect the GBA ROMs stored on your phone. John GBA further brings a virtual keypad on the screen. The keys/controls are customizable. It has a screenshot, fast forward, and turbo buttons feature too. Furthermore, it has the MOGA Controller support. John GBA Lite is available in the Play Store and runs on all phones with Android 4.1 or higher.

GBA Emulator

Best gba emulators for android

The third one on our list is the GBA Emulator by ITakeApps. This emulator has a rating of 4.5 and over 1 Million downloads. It doesn’t do anything different than the first two I mentioned above, however, it is one of the very few working emulators. It supports a huge range of GBA games including the Minish Cap, Sonic, Super circuit, Fire Man, and many others. Players would need the GBA ROMs/game files for this emulator too. It’s also available in the Play Store and gets frequent updates.

VinaBoy Advance Emulator

Best gba emulators for android

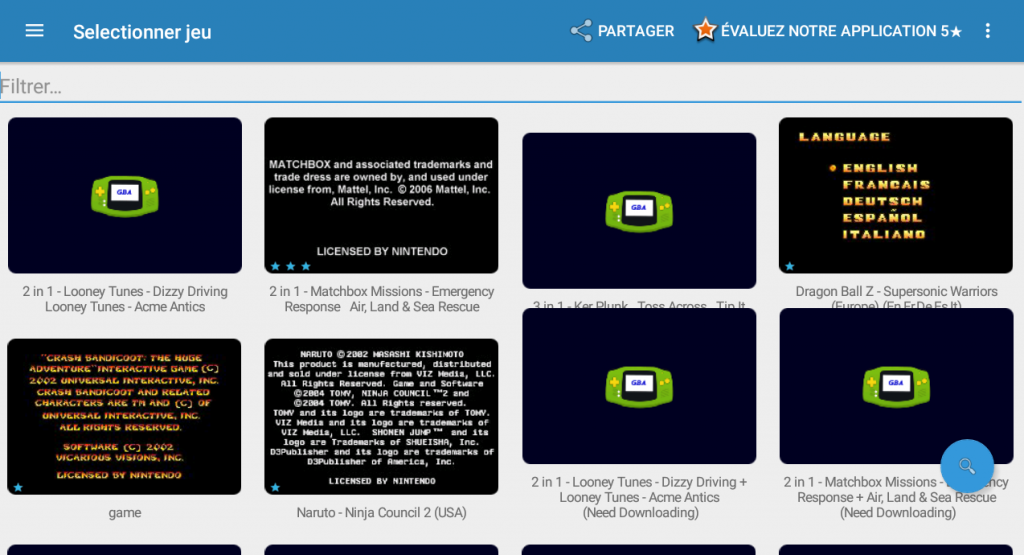
VinaBoy Advance Emulator emphasizes the most on its search engine. No matter how many GBA ROMs have you placed on your phone, it will quickly list them all and you can just tap a button to play a game on-the-go. It supports the .gba, .gbc, .sgb, .zip, .7z, and .rar format of the games. It also brings better graphics to the table. Support code codes is also present. The emulator also has an auto-save option which will prevent the game’s data loss upon closing it accidentally.

MegaGBA Emulator

Best gba emulators for android

MegaGBA falls in 5th place because of having only 50,000 downloads. All the emulators listed above have millions of downloads. Having fewer downloads doesn’t mean this is not a good emulator. It, in fact, has a rating of 4.0 and many positive reviews. The MegaGBA Emulator delivers a flawless GBA gaming experience with extended controls. In terms of features and functionality, it was very similar to the GBA Emulator.

Pizza Boy GBA Emulator

Best gba emulators for android

Pizza Boy is a relatively new and also the most updated GBA Emulator. It introduces the features that you will not find in any of the emulators listed above. The reason for this emulator to fall at 6th (Bonus) place is its popularity. This is the only GBA Emulator that supports 60FPS. No pop-ups appear in this one at all. It’s written in the C and Assembly language for the sake of better performance and also consumes a very little amount of battery. It runs on all Android phones with Android 5.0 or higher.

FireRed GBA Emulator

Best gba emulators for android

FireRed is a rather colorful GBA Emulator. Its features are no different from any of the ones listed in this post. The FireRed GBA Emulator supports almost all GBA games, provided that you have the GBA ROMs. It has been officially tested with the Poke Series, DB Fighting, Soni Blue Jungle, and Bros Jungle games. FireRed carries a rating of 3.8 only.

Conclusion

Finding the ROMs of the GBA games will be very easy. There are over a dozen sources that provide free GBA ROMs in the various formats and you can easily find them. All you have to do is to copy the files to your phone’s internal storage and let the GBA Emulators do the rest. These emulators were hand-picked after personally testing and were found working. If you face any problems with any of these, feel free to reach out to us. Also, if you have any other emulator to add to this list, drop its name below as well.

Download Nexus Dock for Windows 10

0
Download Nexus Dock for Windows 10

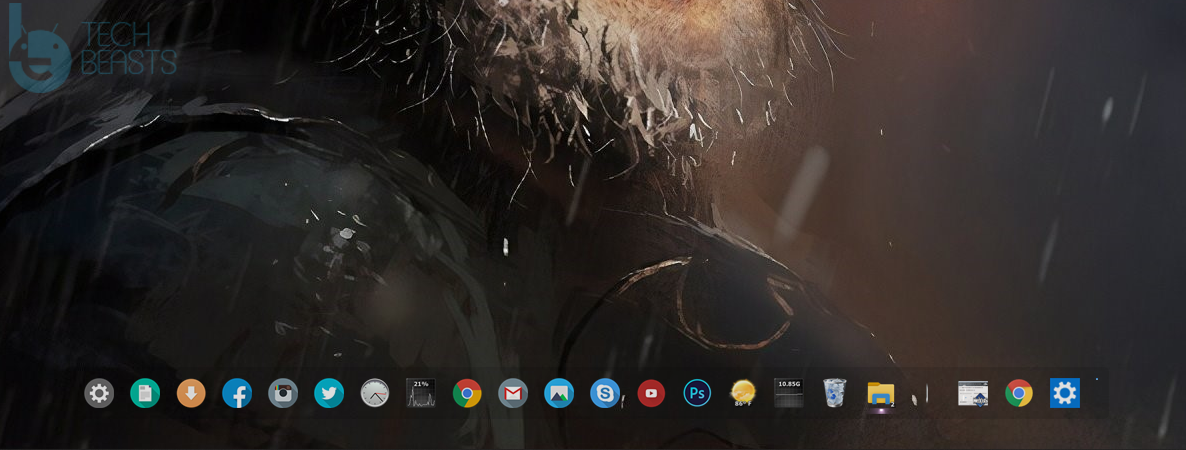
From here, you can download Nexus Dock for Windows 10. Furthermore, I have also explained how to easily set up Nexus Dock & Icons on your PC.Nexus Dock for windows 10

Nexus Dock

Nexus Dock comes from Winstep technologies. If you are looking forward to replacing your Windows PC’s task bar with something more beautiful and interactive, Nexus Dock is all you need. It takes the Desktop Customisation to a whole new level. If you have ever used a Macbook, you must have noted how icons appear in its dock that sticks to the bottom of the screen. Nexus Dock seems to be providing a similar experience, but of course, with a lot of customisation options.

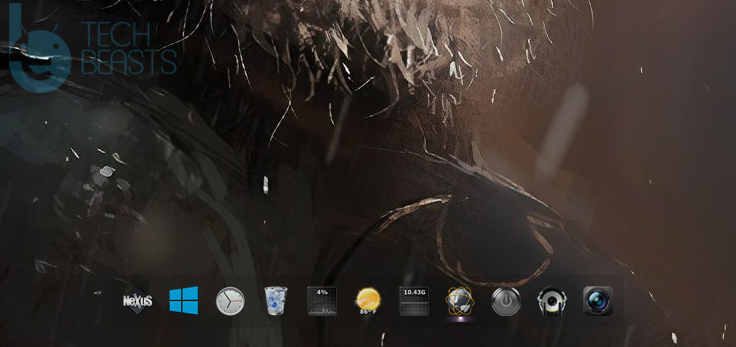
The Nexus Dock brings a set of basic icons by default. Users will get the Start Menu, Clock, Recycle Bin, CPU Meter, RAM Meter, Weather, Browser, Media Player, and Screen Capture buttons. These buttons will perform the actions that your computer normally does. Remember that the Nexus Dock is just a UI skin, its functionality is pretty basic.

The Dock will impress you at the very first glance, but that’s not it. Clickin on the Nexus button will take you to its options and that’s where the real fun begins. Using the settings, you can change every single element of the dock starting from the icon size to number of icons, an then replacing the icons with your favorite icons.Nexus Dock for windows 10

When you go into the settings of Nexus Dock, the very first option you will find is the Modules Section. This is the section where the pre-installed options/icons of the Nexus Dock appear. You can select what modules you want to display in the Dock. All elements of a particular module can be customised from this menu.

Next is the Position option. You can make the Nexus Dock appear on the top, bottom, left, and right. You can either hide your taskbar or just use the Nexus Dock as an addon like I have done. I am using Nexus Dock on the right side in addition to my Taskbar. 

Also check out: Best Free Rainmeter Skins for Windows in 2020

The Behaviour of Nexus Dock can be changed too. Whether you want to hide the Nexus Dock when you move the mouse away, or you want it to pop-out or pop-in, all that can be done using the Behaviour settings. You can also change the opening/closing effects of the icons. Nexus Dock produces sounds too and these sounds can be controlled using the Sounds section. The Dock further has a number of pre-loaded themes and you can also make your own themes too.Nexus Dock for windows 10

Nexus Dock is huge and quite overwhelming. The best way to master this incredible piece of UI customisation is to use it and learn it yourself. It’s very easy to understand.

Go ahead, download the Nexus Dock for Windows. I have also written a tutorial to use custom icons with Nexus Dock to give it a more appealing look.

Download Nexus Dock for Windows

Nexus Dock Latest 2020 – Download

  1. Launch Nexus Dock setup on your computer.
  2. Follow on-screen information to finish installation.
  3. After installation, the Nexus Dock will appear on the top of your screen.
  4. Click on the Nexus icon to access its settings.
  5. Follow the next part to set-up Nexus Dock with custom icons now.

Nexus Dock Recommended Settings

  1. Open Nexus Dock settings.
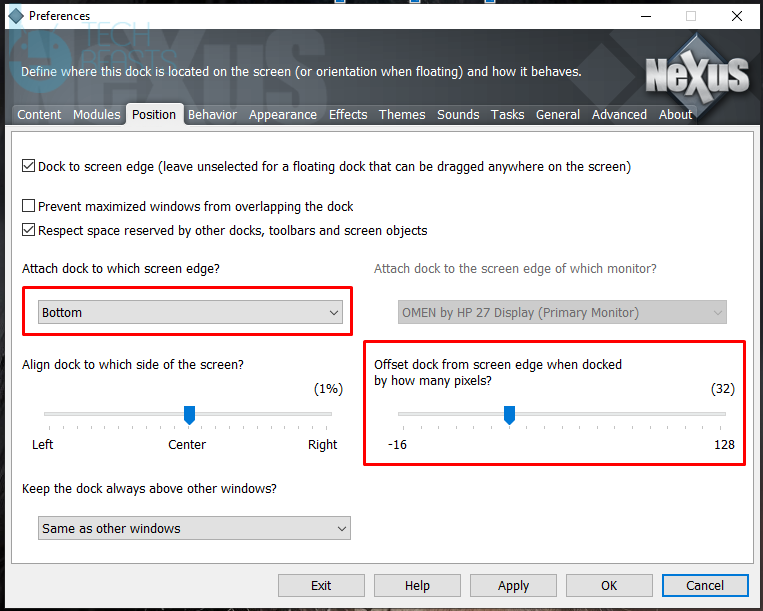
  2. Go to Postition > change the position according to your own liking. Bottom or Right is recommended.
  3. Set Offset Dock settings to 32 px.Nexus Dock for windows 10
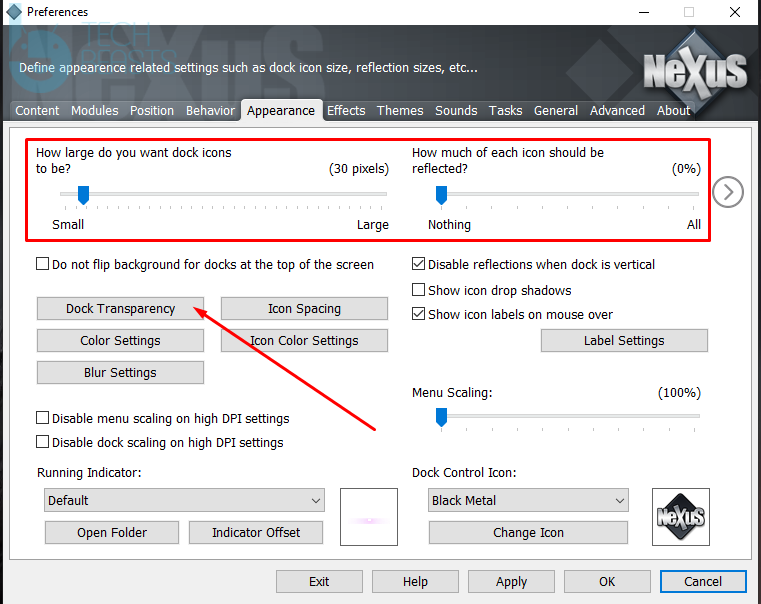
  4. Go to Appearance > Set the icon size to 32 if you are using a laptop, set it to 38 – 40 if you are using a big monitor.Nexus Dock for windows 10
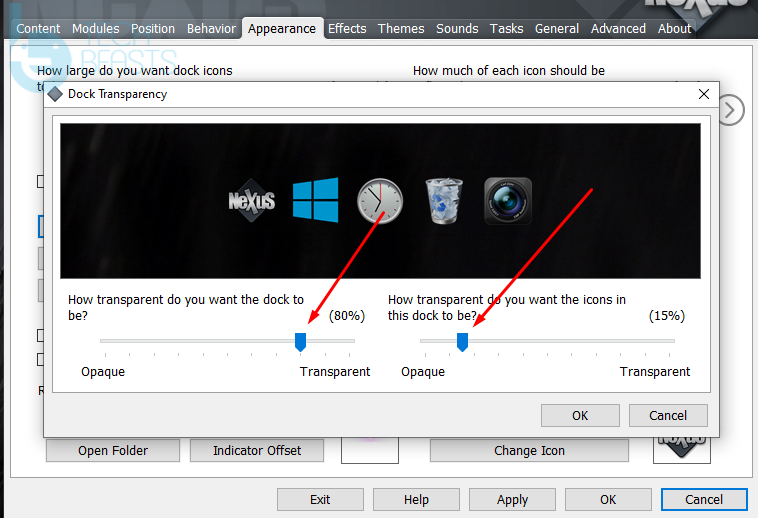
  5. Click on Dock Transparency > Set Dock Transparency to 80% and Icon Transparency to 15%.Nexus Dock for windows 10
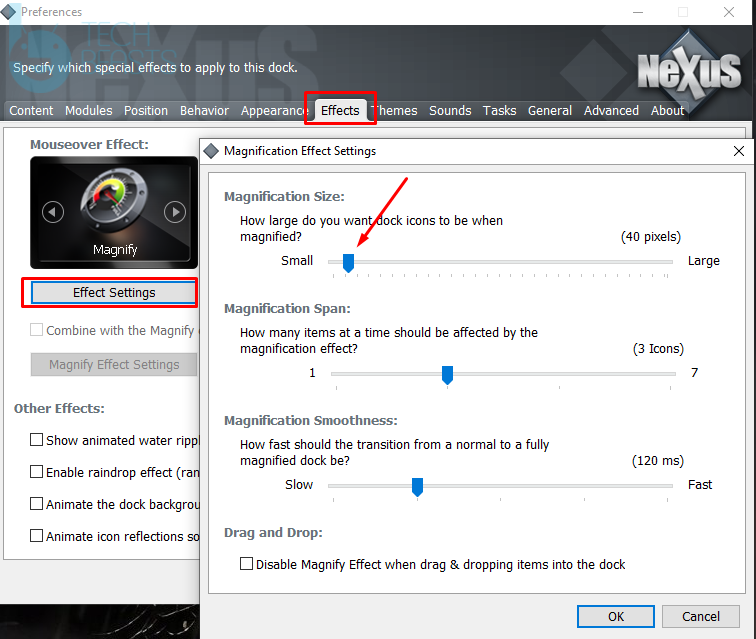
  6. Go to Effects > Effects settings > Set the magnification size to 40.
  7. Go to Themes and choose any theme you want.
  8. Set the Sound effects according to your own choice.
  9. Go to Tasks and check “Show running apps & combine dock apps with running apps”. Turn on other options as per your preference.
  10. General and Advanced settings are self-explanatory, set them up accordingly.

Nexus Dock Icons

Custom Nexus Dock Icons Pack – Download

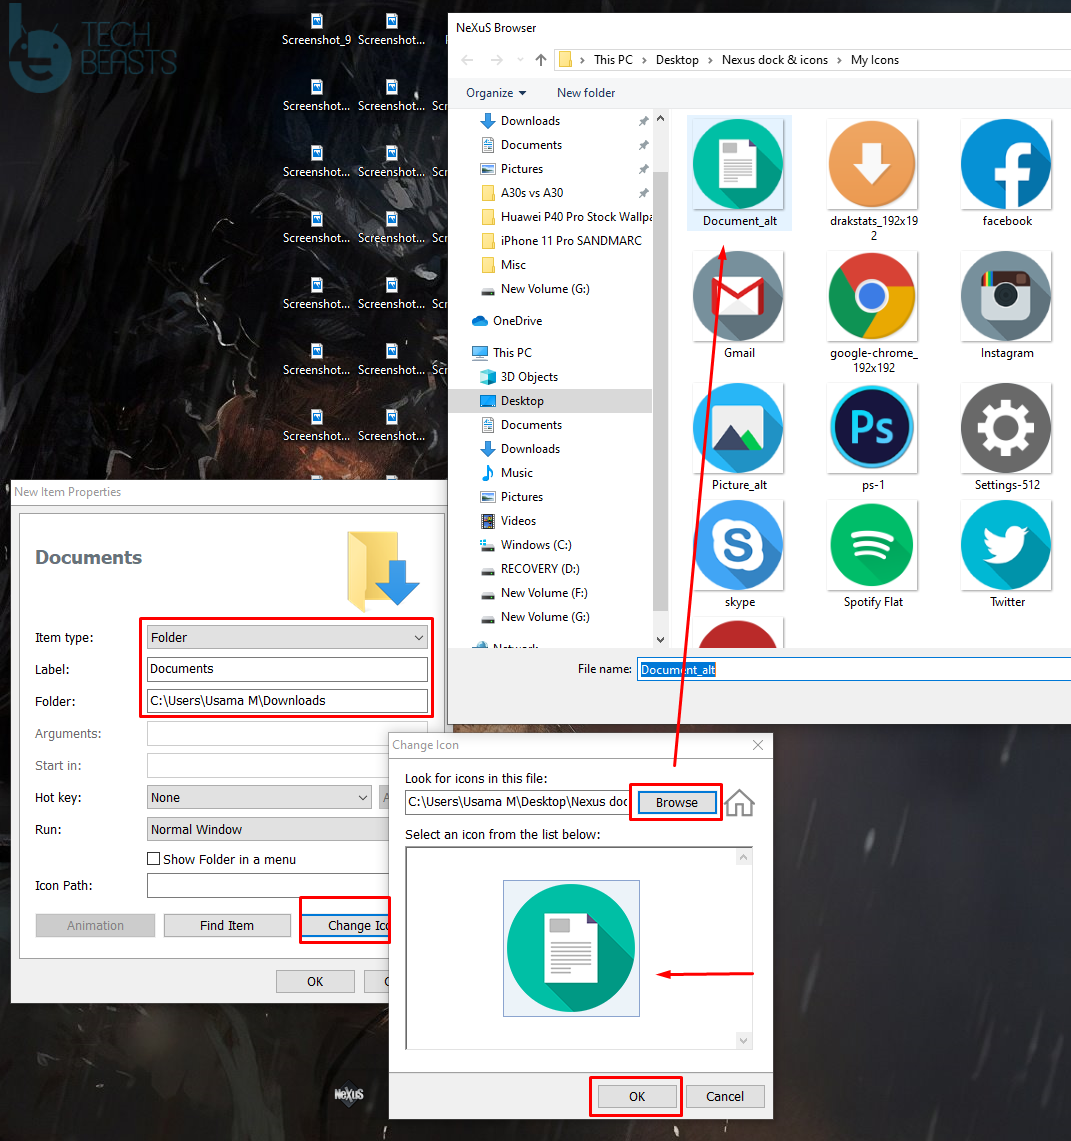
  1. Right click on the icons in Nexus Dock one by one and remove them from Dock if you want, leave them there otherwise.
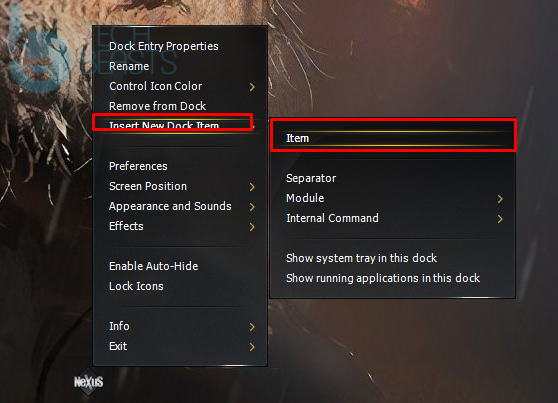
  2. Right clicon on the Nexus icon > Insert New Dock Item > Item.Nexus Dock for windows 10
  3. Now let’s say we want to add Facebook/Instagram/YouTube icons, you will select URL in Item type.Nexus Dock for windows 10
  4. Enter the name in the Label field and enter the URL in the URL field.
  5. Click on change icon and select your desired icon from the icons you downloaded from above.
  6. Click on Ok and the icon will appear in the dock.
  7. To add a software like Chrome/Photoshop/Skype, you will select Program in Icon type, enter the Program name in Label, and .exe filename in the Filename.
  8. Add all icons one by one and set up the Nexus Dock. That’s all.Nexus Dock for windows 10

Conclusion

That’s it for now, but that’s not all. Nexus Dock is huge and it needs futher explanation, but doing so will confuse many users. If you are installing the Nexus Dock on your PC, feel free to ask any questions in the comments below. Also, make sure to share your favorite Nexus Dock setup and Nexus Dock pro-tips for other users below. Our team of experts will take care of your queries.

Download TikTok Videos on Any Platform [ Free ]

0
Download TikTok Videos on Any Platform [ Free ]

With the help of this guide, you will be able to download TikTok Videos on Any Platform. 

Well all know that TikTok is one app nowadays everyone uses and believe me, age doesn’t matter when I say, everyone. Moreover, not only this, we have seen many articles on how TikTok is effecting teenagers and adults. Where people are making informative content, there are others who are doing the opposite of that and it’s alarming that is the very reason we have seen many red flags about TikTok.

Download TikTok Videos

However, if we put aside this one fact, there are tons of videos that are very good and they are worth watching and also sharing. But as we all know that downloading videos from TikTok is not an easy task especially for those who are basic users.

Read more: Delete Musically Account Permanently Without Login [ TikTok ]

In this guide, I will tell you how to download TikTok Videos on Any Platform either it’s Android or iOS. All you have to do is follow the instructions provided below.

Download TikTok Videos on iOS:

Let’s start with iOS first. You will be surprised to know that downloading TikTok videos are very easy. Open the TikTok app on your iPhone or iPad. Now head over the specific video you want to download.

Tap on the share the button located at the right sidebar, next you will see a number of options on which you can share the TikTok videos. But we are not here to share a video, we want to download one.

So, find the option that says, Save Video. Tap on it and since it will be your first time the app will ask for accessing the storage permission, grant it. That will be all, your downloading will begin and in no time, TikTok video will be downloaded on your iOS device.

Top 9 YouTube Downloader Apps for Android

Download TikTok Videos on Android:

TikTok functionality is same on both Android & iOS. The downloading video on an Android device won’t be different. Open up the video you wanted to download, tap on the share button and look for the save video button. Keep that in mind, the video you want to download must be available publically. Otherwise, you won’t be able to find the save video button.

Now after finding the save video button, tap on it and allow the app to access your storage. Your downloading begins and once downloaded you will be notified. You can play the TikTok downloaded video from the gallery.

Download TikTok Videos Without Watermark (Android):

As far As I know, now you know how to download videos from TikTok on Android & iOS without using anything party downloader. However, there is one drawback if you are downloading TikTok videos using the official app.

The app automatically adds a watermark on all the videos which are downloaded using the TikTok app. It’s okay for some users, but not for everyone.

So if you are among those users who want to download TikTok Videos without Watermark. You can but with the help of another app, this is why I find Android the best because there is always a solution for everything.

You need to Download Video Downloader for Social Media on your Android device. Once downloaded, open the TikTok app and tap on the share button, copy the link of the video.

Open Download Video Downloader for Social Media app and paste the link in the given filed. Tap on download to start the downloading process. That will be all now the video will be downloaded without watermark.

Download TikTok Videos Without any app or Tool: 

All the methods and tools that I have told you until now will work. But not all the time, sometimes piracy comes in-between because there are some limits set by the TikTok user, whose video you are about to download.

If a user has set privacy on his/her videos, you won’t be able to download then and all the tools and apps will show you an error message. If you try to download such user videos. So, if you are in a situation just like that, Tap on the share button and share the video using WhatsApp or Email.

Once you have shared a video using WhatsApp or even Email, you can easily save a video on your Android & iOS devices.

Download TikTok Videos Using on Any Platform:

Okay, What is everything else fails and you are not able to download TikTok Videos using any of these tricks that I have told you. Now, what to do? Well, there is always something if everything else fails. You can always use screen recorders, nowadays, all the devices are coming with a built-in screen recorder. However, if you don’t have one by default, you can always use third-party apps available on both Google Play and App Store.

Start the screen recording and play the TikTok, once you have recorded a video you can easily crop and trim it using stock editors.

That’s all. These were the best and effective workarounds to Download TikTok Videos Using on Any Platform.

Download Huawei P40 Pro Plus Stock Wallpapers

Download Huawei P40 Pro Plus Stock Wallpapers

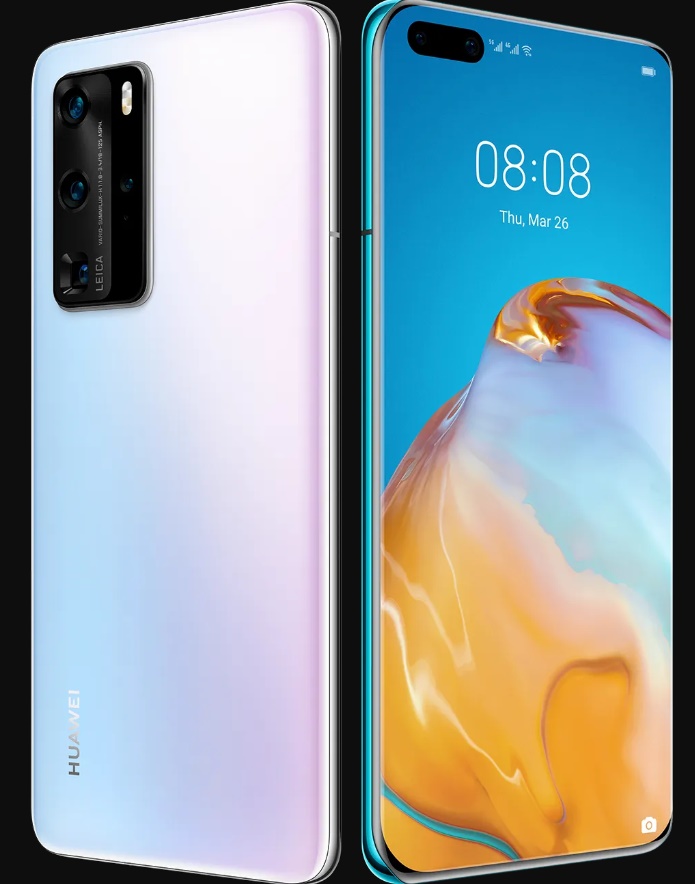
Huawei has just announced the P40 series and its official stock wallpapers are out as well. From here, you can download Huawei P40 Pro Plus stock wallpapers. The wallpapers are available in QHD resolution and fit all compatible screens. Before you download the Huawei P40 stock wallpapers, let me tell you about these new handsets.

Huawei P40 Pro Plus Stock Wallpapers

Huawei P40, P40 Pro, P40 Pro Plus

As usual, Huawei has released three phones in this series with the P40 Pro Plus being the top-notch variant and the P40 being the regular variant while the P40 Pro falls in the middle. All these phones have a few things in common with some key differences.

P40

The P40 comes in with a 6.1-inches OLED screen with a resolution of 1080 x 2340 pixels and 422 PPI. This is a 60-hertz screen. The aspect ratio of this screen is 19:9. P40 weighs at 175 grams. This variant has 3 cameras at the back with the main camera being the 50 megapixels sensor, 8 megapixels telephoto lens with 3x optical zoom, and 16 megapixels ultrawide shooter. It has a 32-megapixel camera on the front along with a TOF sensor. P40 is not water and dust resistance. This phone has a battery of 3800mAh with 22.5W Fast Charging.

P40 Pro

P40 Pro has a 6.58-inches 90-hertz display with a resolution of 1200 x 2640 pixels. The aspect ratio of this phone is also 19:9 and the screen PPI is 441. It weighs at 209grams. P40 Pro has 4 cameras at its back with the main camera being 50 megapixels, 40 megapixels ultrawide, 12 megapixels telephoto, and a 3D TOF sensor. On the front, it’s got a 32 megapixels shooter with a TOF sensor. The P40 Pro also has IP68 water and dust resistance. It’s got a 4200 mAh battery with 40W fast charging and 27W wireless/reverse charging.

Huawei P40 Pro Plus Stock Wallpapers

P40 Pro Plus

P40 Pro Plus also has a 6.58-inches 90 Hz 1200 x 2640 pixels display with a 19:9 aspect ratio and 441 PPI. This one weighs at 226 grams and that’s probably because of a bigger battery. The P40 Pro Plus is also water and dust resistant. This phone has a main 50MP shooter, 8MP periscope camera with 10x optical zoom, 8MP telephoto shooter, and a 40MP ultrawide shooter. On the front, it also has a 32MP camera with a TOF sensor. It’s got a 4200 mAh battery with 40W Fast Charging, 40W Wireless, and 27W Reverse Wireless charging.

All Huawei P40 phones come equipped with 5G. All these phones run on the Android 10 themed by Huawei’s EMUI. The P40 phones are using Huawei’s in-house Kirin 990 CPU. The P40 comes in at about EUR800, P40 Pro for EUR1000, and the P40 Pro Plus for EUR1400.

Huawei P40 Pro Plus Stock Wallpapers

The P40 series introduces 19 brand new and beautiful stock wallpapers. Wallpapers are common among all the Huawei P40 phones, so these are basically the Huawei P40 stock wallpapers, Huawei P40 Pro stock wallpapers, and the Huawei P40 Pro Plus stock wallpapers. These wallpapers can be used on the screen of any Android phone or even on an iPhone’s display. You can either download these wallpapers one-by-one or download them all using the all-in-one source below.

All Huawei P40 Pro Plus Stock Wallpapers – Download

Huawei P40 Pro Plus Stock

That’s all. Check out more stock wallpapers on our site.

How to play Free Fire on PC – Complete Guide

0
How to play Free Fire on PC – Complete Guide

Playing video games is becoming one of the common interests of a large population around the globe. While keeping in view the engagement of the audience with games, many video game companies are creating fantastic content. The internet and the market are full of both stunning and cheap games. No doubt, it is quite tricky for the newbies to go for the best game. If you are also new to the gaming world and looking for a good game, so now you are in the right place.

Today, we are here with a game that comes up with a great storyline, eye-catching graphics, a variety of features, and much more. Well, not only are we going to share the name of the game, but we will also share a complete review of it.

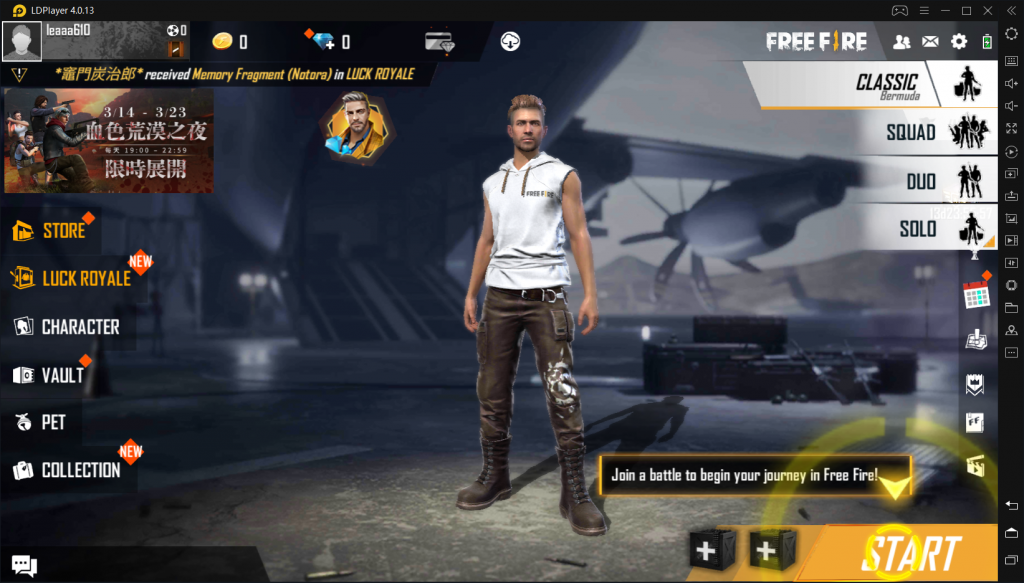
play Free Fire on PC

Free Fire is a multiplayer action game that was published and developed by Garena studios. This renowned action game was released on December 4, 2018. Before the official launch of the game, the beta version already put the whole industry on the Fire.

According to some reports, the Free Fire was having more than 400 million users in November 2019, and no doubt, the number would be increased now by many millions. Well, that was the only basic intro of the game, now it’s time to go in-depth of the game details.

Gameplay and Features

The gameplay of Free Fire is one of the best games like PUBG and Fortnite. It is an online battle royale game that is played in the perspective of a third person. This game has multiple maps and an extensive collection of player skins and weapons. When you join any game, you will found your character inside a plane that will be flying over the island, where you have to continue the rest of your journey. You can jump from the aircraft at any point on the island. You will land with the help of a parachute. 

Right after a safe landing, you have to search for the weapons and health kits to survive in the game. Different staying places are designed in the game where you can keep yourself safe until and unless an enemy catches you. It is the last person standing match, which means a person who lefts alone by killing enemies will be rewarded a title of a winner.

Well, the gameplay of the Free Fire is quite similar to the other action games, but here are some of the main features that make it unique as compared to the other games.

play Free Fire on PC
  • Solo or Co-Op Mode: You can play Free Fire as a solo or a small team of four players. There is also an option of audio chat through which you keep your team reported with the situation of the game. This mode is one of the preferable ones because many family members and friends love to spend an action time together. Start knocking out people today with your squad.
  • Customization of a character: In some of the online action games, the option of customizing a character is not available, but by switching to Free Fire, you can create your game character according to your needs. There is a large inventory of the game where various kind of outfits, currency, and pets are available that follows your character around the game. You can purchase any of the items at a very affordable price.
  • Extensive PvP battle: In player versus player mode, you will be provided with a fantastic environment where you have to fight with other 49 players. By killing each player, you can loot their garment, weapons, medical kits, and other precious items. By continuing through this mode, you will be left on an island where you have to start killing your enemies. If you are a good striker, then you should be attempting this mode rather than Co-Op mode.
  • 10+ extraordinary characters: There are more than ten characters in the game that have their superpowers. The characters are available in both genders, for example, a character of a nurse whose power is to restore the ally HP and an athletic girl who has great sprinting speed.
  • Vehicles: If your enemy is sitting in a remote area of the map, you can reach them quickly through the vehicle that is present in the various area of the map. The vehicles are usually a truck and a jeep.
play Free Fire on PC

Graphics

Graphics are one of the main elements of the game. Actually, the graphics keep the player engaged with the game. If we talk about the free Fire, the developers of the Garena studios have designed it exceptionally. Whether it is a character, a weapon, a garment, a building, a pet, or any other game element, everything is designed by the usage of the perfect shape and beautiful colors. Due to the following features, free Fire won the title of the best popular voted game in 2019.

How to play Free Fire on your Windows-based PC?

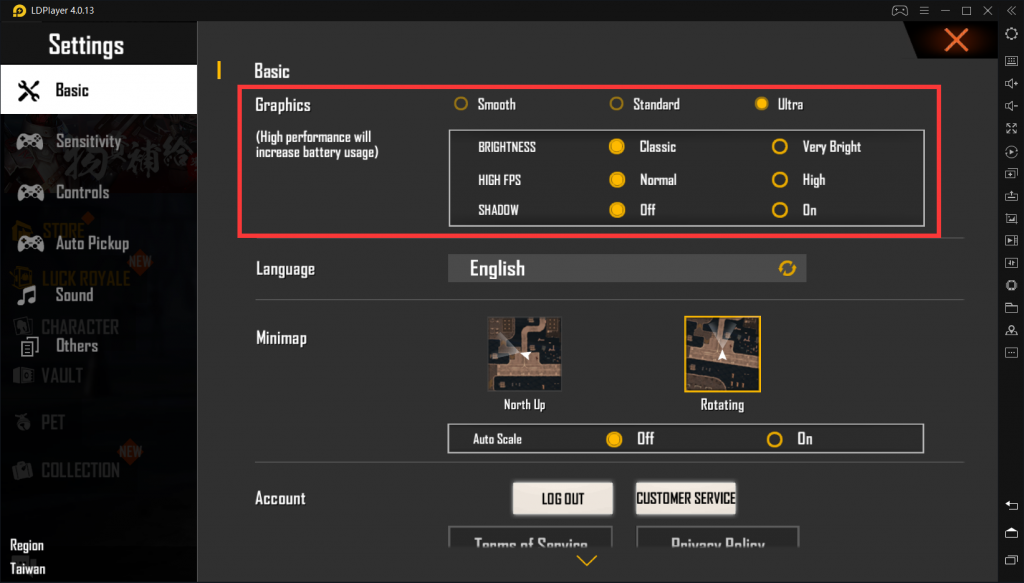
A good smartphone with high specifications is not accessible to many people, and most people don’t like to play games on the smartphone because they prefer PC. How can these kinds of people enjoy the free Fire on PC? There is a solution for people who love to play games on a personal computer. If you also come in the same category, then here we are with an excellent tip for you. Not only the Free Fire, now you can play any of the Android-based games on your Windows PC by using an LDPlayer emulator.  

What is an LDPlayer Emulator and for which purpose it is used?

play Free Fire on PC

LDPlayer is a renowned emulator through which you can run android games on PC. By choosing this software, you don’t need to worry about the charging of the device or the controlling system because you are going to have a great gaming time on your PC. LDPlayer was designed by a Chinese software company that uses a virtualization machine to connect the android operating system with your personal Windows-based computer. It is effortless to download LDPlayer from the internet. Several different websites are offering complete setup of this emulator, but if you don’t want to face any kind of problem, then you should be downloading it from the official website.

The complete procedure to start playing Free Fire on PC

  • Simply download and install the LDPlayer on your PC.
  • Open LDPlayer and download the free Fire from a built-in Google Play S
  • Install that game right after getting download.
  • Now, open the game and start knocking out people.
  • If you are switching from smartphone to the PC, then make some changes before playing the game.
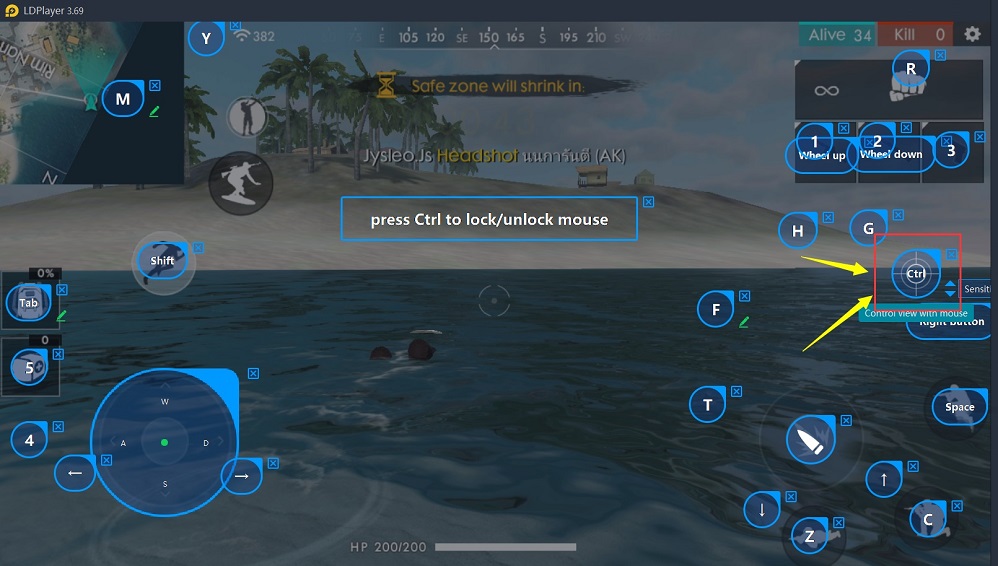
  • Before starting the match, adjust your mouse sensitivity because there is a massive difference between playing on the PC and playing on a smartphone.
play Free Fire on PC

System Requirements for installing LDPlayer

  • Intel or AMD CPU Processor x86 / x86_64
  • Windows XP XP3 / Win7 / Win8 / Win8.1 / Win10
  • Windows DirectX 11 / Graphics driver with OpenGL 2.0
  • Minimum 4GB of system memory (RAM)
  • Minimum 36GB of free hard disk space
  • Last and the most common requirement that virtual technology should be enabled in the BIOS.

Which PC is perfect for using an LDPlayer?

As you have read the system requirements of the LDPlayer, now we are going to recommend a PC on which this emulator will run smoothly. Your PC should have the following specifications to run LDPlayer accurately:

  • CPU: Intel i5 7500 and better
  • RAM: 8GB and above
  • Disk Space: Over 100GB
  • Graphics Driver: NVIDIA GeForce GTX 750 Ti and better

Conclusion:

Many new gamers are looking for the best action or shooting game in the market. To fulfilling their gaming desire, we have provided a complete review of a renowned action game, Free Fire. This article is divided into two parts. In the first part, we have explained the details of the Free Fire, including its graphics, gameplay, and other special features. In the second part of the article, we have shared the details of useful software, LDPlayer.

LDPlayer is a light emulator that can help you out to play android based applications on your Windows PC or smartphone. By using an LDPlayer on your PC, you can enjoy Free Fire. In last, we have shared a complete procedure of playing Free Fire on PC along with the installation of an LDPlayer.

Fix Play Store This app is not compatible with your device error

0
Fix Play Store This app is not compatible with your device error

This app is not compatible with your device, it is an annoying error that you can encounter while installing an app from the Play Store. This error also appears as “Your device is not compatible with this app”. Whatever error you are facing out of these two, we are going to fix it here. Let me tell you I got this error and how I quickly fixed it.

App is not compatible with your device – Your device is not compatible with this app

Earlier today, I was trying to install Apps on my Galaxy A50 in order to make a Galaxy A51 vs Galaxy A50 Android 10 speed test. While trying to install the apps, I got the error “App is not compatible with your device”. At first, I was trying to install Instagram. After failed attempts, I tried to install WhatsApp and got the same error. At this point, I knew that there was something wrong with the Play Store and not the phone. I had not fully set up the phone, so I attempted to install the essential Google Apps, but the installation of those apps failed too. I started looking on the internet and found a number of solutions with some basic setups and some being very complex including root and all that stuff. As an average Android user, you would want to go with the basic feature and that’s what I wanted to find out as I had the idea of this post in the back of my head already.

Long story short, I ended up fixing the “App is not compatible with your device” error and within a few minutes, I had all of my apps running on my Galaxy A50 once again. I am going to share the steps here. If you are facing this error on your Android phone, follow the steps below and fix it right now.

Fix Play Store This app is not compatible with your device

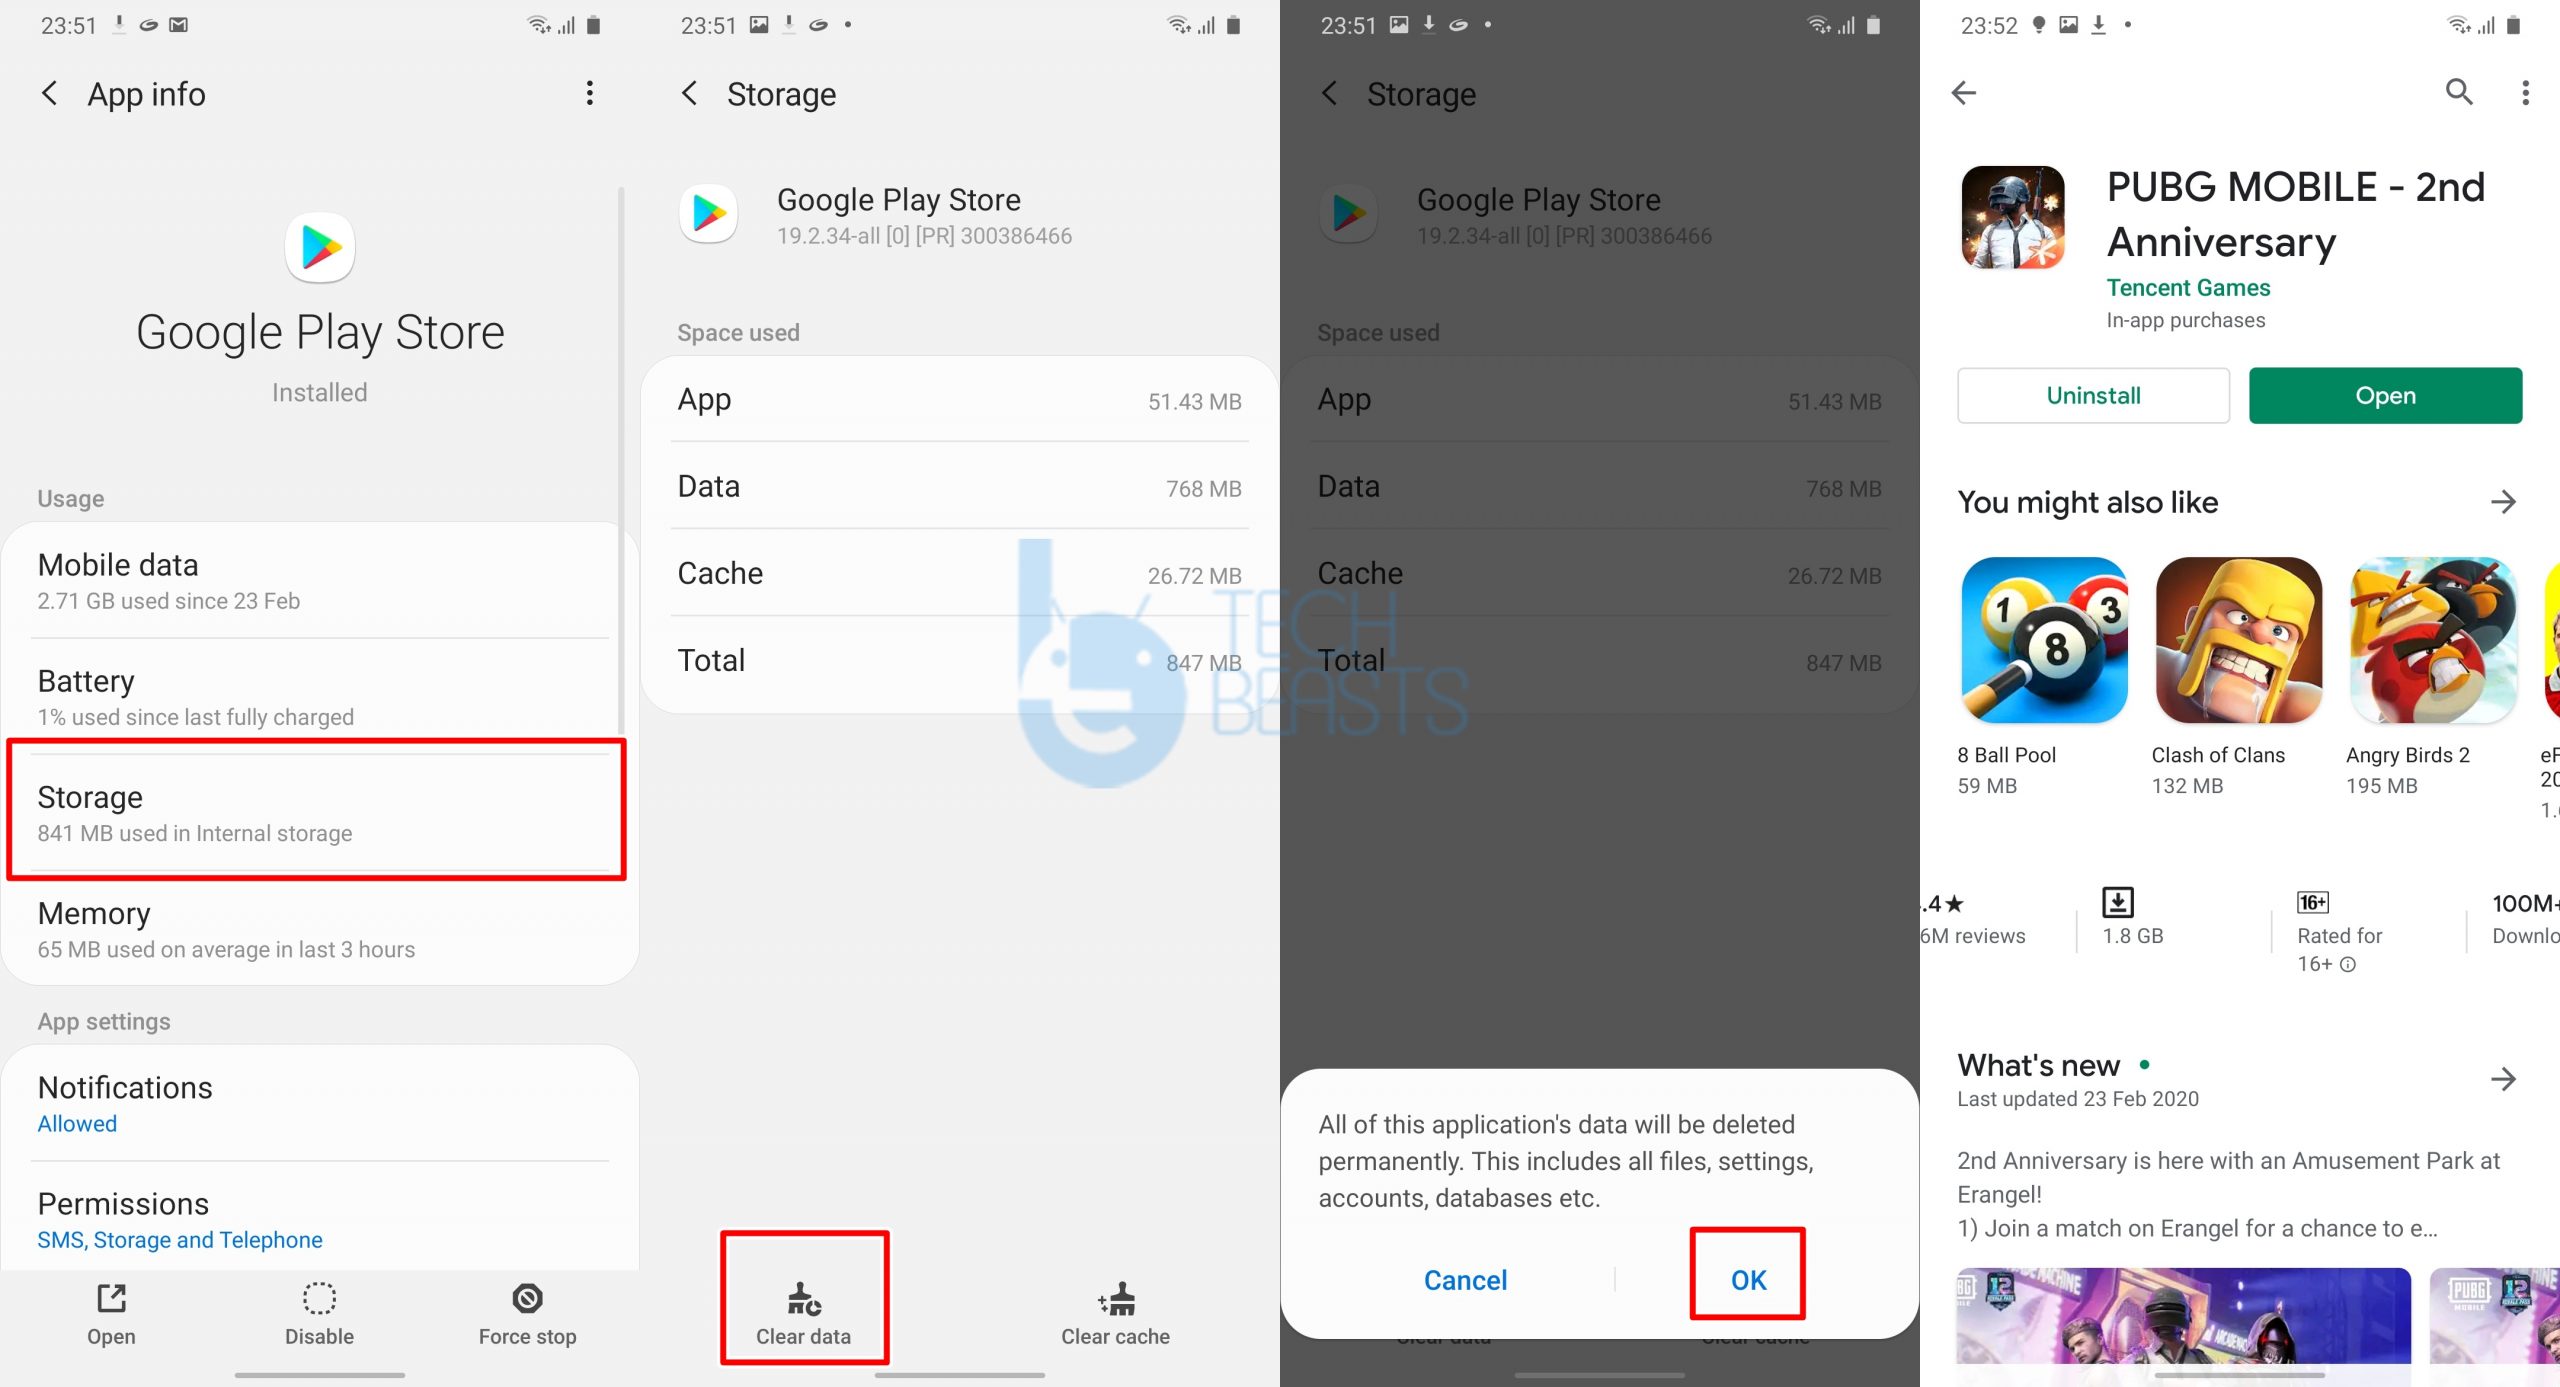
  1. Go to Settings on your Android phone.
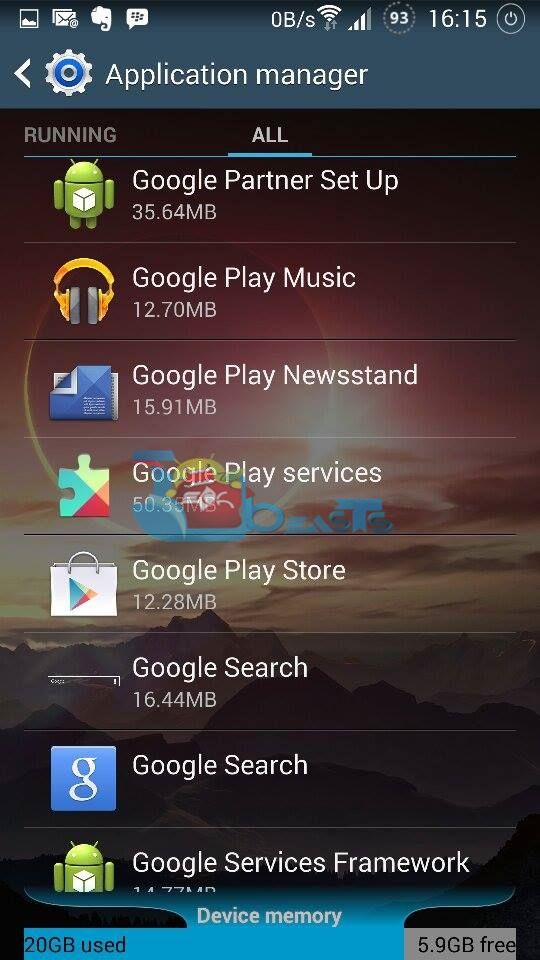
  2. Go to Apps or Application Manager > Find the Play Store in the list.
  3. Open the Play Store’s settings in the App Manager and click on Storage.
  4. Now click on Clear Data.
  5. Restart your phone now.
  6. Launch Play Store and install the apps, it will be working fine.
Play Store This app is not compatible with your device error

Don’t worry, you will not lose any of your Play Store data. This method will not even log you out of the Play Store. This error basically occurs because of some misconfiguration between your Google Account and the Play Store. So, when you clear the data, the Play Store re-configures itself with your Google Account and picks up the compatibility. This method helped me and I believe that it will help you as well. If you are looking for a Play Store Alternative, take a look here. To fix any other errors of the Play Store, go here.

For any further queries/questions, feel free to reach out to us using the comment section below. I will try my best to get back to you. Also, make sure to subscribe to my YouTube channel, I make in-depth reviews of phones.

Download Google Play Apps Without WiFi

0
Download Google Play Apps Without WiFi

Having trouble while downloading apps & games from Google Play Via WiFi? Heed the instructions below to learn how to Download Google Play Apps Without WiFi.

Download Google Play Apps Without WiFi

Android users know that Google Play is official source to download apps and games. All you have to do is connect to a WiFi or Mobile Data, you can download any app or game. But there are times when you cannot download anything from Google Play when connected to WiFi. When you are in this situation my solutions will get you going, even if you are not connected to a WiFi you will be able to download Google Play App.

How To Download Google Play Apps Without WiFi

First, I will tell you the alternative to WiFi so that you can understand how you can download Google Play Apps Without WiFi. After that, I will provide you with a number of solutions to fix such problems. Where you are unable to download apps from Google Play.

Download using Mobile Data

Mobile is the best alternative to WiFi when it comes to downloading apps from Google Play. Everyone switch to Mobile data if WiFi is not working. By default, your Android device prefers WiFi over mobile data.

Since you are having issues while using WiFi, so in order to download Google Play Apps without WiFi. First, you need to turn off WiFi on your device. Once WiFi is turned off, Google Play will automatically switch over to the mobile data. However, after switching to mobile data, Google Play isn’t downloading apps. You need to change settings from Google Play settings.

  • Google Play.
  • Settings.
  • App Download Preference.
  • Select Over any Network.

Now after switching to mobile data and still you won’t be able to download Google Play apps, you need to try the following solutions:

Troubleshooting   

Restart Your Device

Sometimes when the Google Play Store is acting strangely, it’s not loading, not downloading the applications and giving the force close error, the easiest and the very first thing to try out is restarting your device. Restarting it will end all the processes in your device and help the Google Play Store to work again. If this doesn’t work, you may head towards the next solution.

Google Play Store Errors:

Forget your WiFi network and add it again

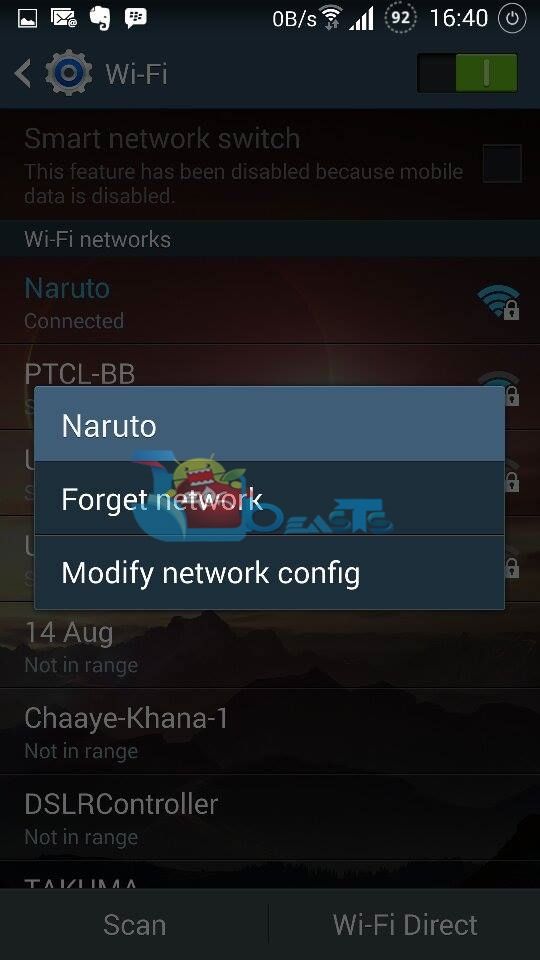
Connection issues sometimes can be fixed using by removing and forgetting your WiFi connection from your Android device and then re-connecting it. To do so, go to Settings > Networks and Connections > WiFi > Long press your WiFi and forget it and then add it again.

WiFi

Clear Google Play Store Cache

Clearing the Google Play Store Cache can sometimes fix the errors with Google Play Store. This cache basically holds the temporary data from the Google Play Store that helps it to load quickly without taking any extra time. Clearing the cache will wipe all this data and result in fixing the loading issues with the Google Play.

To clear the Google Play Store Cache, go to Settings > Applications / Application Manager > All > Google Play Store > Clear Cache and also Clear Data.

Clear Google Play Store DataApp Manager
Play Store

Google Play Store also saves the necessary data on your Android device. This data may include your searches, information regarding the applications installed on your phone and other files. Clearing the data is proved as the best solution for fixing the “Google Play Store not responding” and the force close errors.

To clear the Google Play Store data, go to Settings > Applications / Application Manager > All > Google Play Store > Clear Data.

After you clear the data, you will find that the Play Store will start as giving you a pop up for accepting the terms and conditions and it will act as a fresh application. In short, it will refresh your Play Store.

App ManagerDownload Google Play Apps Without WiFi

Uninstall & Re-install Play Store Updates

Play Store update itself as soon as an update arrives. Sometimes a new update can result in causing some difficulties for your Play Store to work properly. To get rid of this problem, you can uninstall the updates. This will uninstall the most recent update and revert your Play Store back to its previous state that probably will be working.

To uninstall the Play Store updates, go to Settings > Applications / Application Manager > All > Google Play Store > Uninstall Updates.

Clear Cache of the Google Play Services

In case you don’t know, Google Play Services is the essential part that keeps all the Google Apps running on your Android device. If your device is missing the Play Services or Play Services aren’t working properly, using any Google App will give you the Play Services error. When the Play Store is acting weird, clearing the cache of the Play Services can also act as a solution.

App ManagerDownload Google Play Apps Without WiFi


To clear the Google Play Services Cache, go to Settings > Applications / Application Manager > All > Google Play Services > Clear cache.

Make sure that the Download Manager is enabled

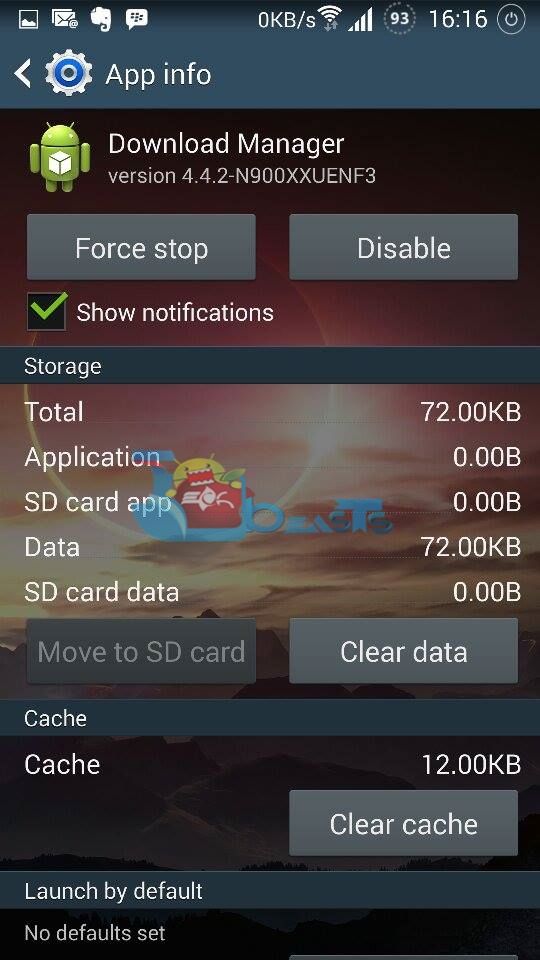
If your Google Play Store is having difficulties downloading an application, you need to check that your Android device’s download manager is working properly or not, and is it enabled or disabled. The error caused in this situation will keep the process bar for the app download running and it won’t show any progress.

To check that Download Manager is enabled or not, go to Settings > Applications / Application Manager > All > Download Manager > Enable it if it’s disabled.  Also, consider clearing Download Manager cache and data.

Download Google Play Apps Without WiFi

Remove and restore Gmail Account

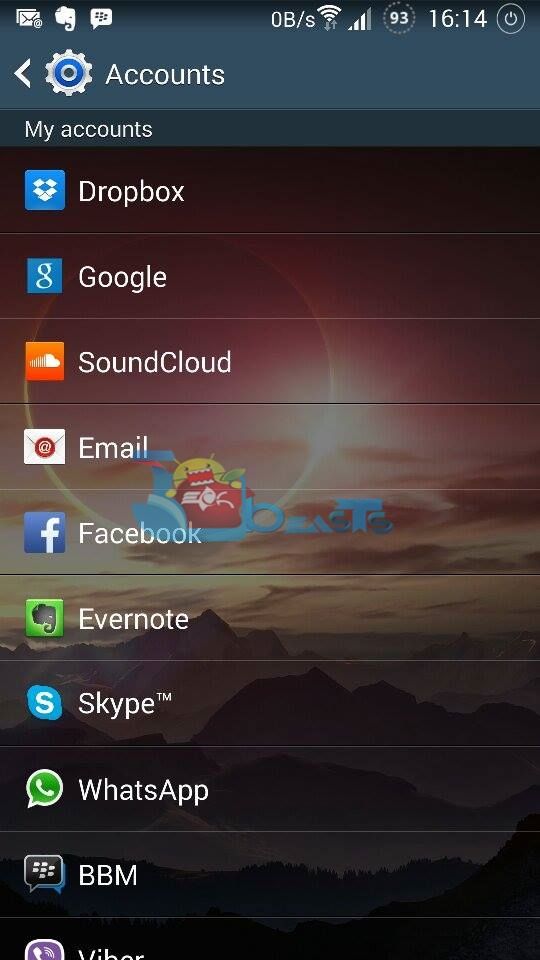
Removing and putting the Gmail account again on your Android device can sometimes fix the issues you’re experiencing with the Android app store. To do so, Settings > Accounts > Google > Tap your current account > Remove account.

After removing the account, go to the same settings and add your account from scratch.

Account SyncDownload Google Play Apps Without WiFi


Clear Cache of your phone

The Play Store problems do not entirely depend on the Google Play Store application or any other Google Application. The culprit may be your phone sometimes, there may be some processes or some applications store in the cache memory of your phone that are refraining the Play Store from working properly. Clearing your device’s cache can fix it in this case.

To do so, reboot your device into the recovery mode and clear its cache.

Download Google Play Apps Without WiFi

Wipe Factory Data / Reset

The last thing if all of the solutions listed above fail. Although it is not recommended, but there’s no other choice. You may simply backup each and everything on your Android device and perform a factory data reset using the recovery mode.

Remove Cookies From iPhone [ How To ]

0
Remove Cookies From iPhone [ How To ]

With the help of this guide, you will be able to Remove Cookies From iPhone. I made a complete tutorial, in which I will tell you step by step what you have to do.

Remove Cookies for iPhone

Whenever we visit a Website on our smartphone or on a PC, they store tiny pieces of data, which are called cookies. The basic purpose of cookies is to identify the visitors, cookies collect data in order to analyze what a user is viewing or seeing on a website.

Cookies come handy in many ways such as your login information is stored on your device and next time when you visit the same website you don’t need to add your credentials. Moreover, all your session are stored on your device using cookies, you can start where you left off.

Read more: Clear Cache, Cookies and History on Samsung Galaxy

There are a number of factors that make cookies very useful but at the same time cookies can be vulnerable and a hacker can easily steal your personal information. It would be very wise to Remove Cookies from your device.

That’s the very reason I made this guide, heed the instruction below and you will learn how to Remove Cookies from iPhone.

How to Remove Cookies from iPhone.

Before we move on let me clear one more thing. Not only cookies store information, but they also speed up the loading process of a webpage. Cookies and Cache both do the same job, they load a webpage faster, once both of them are stored on your device.

Did you ever notice, when you visit a webpage where you were previously logged in, you are taken directly to the logged-in Page, right? Well, this is all because of the cookies stored on your device.

Still, I would suggest clear cookies & cache is recommended, whether you like it or not. We need to take precautionary steps to avoid data stealing. So let’s proceed and clear Cookies From iPhone.

  • Settings.
  • Safari.
  • Advanced.
  • Website Data.
  • Edit or Remove all Website Data.

Block Cookies on Safari.

If you don’t want your device storing cookies every time you visit a website. You can block all cookies on Safari. But before you do that, you need to know one thing. Once you have blocked cookies on Safari, there will be no data storing on your iPhone. That means you need to log in the same website every time you visit.

Try: Clear the Cache in Google Chrome [ Tutorial ]

Blocking cookies on your browser will affect your browsing experience. But if it comes to privacy, I think that is a small price to pay.

Let’s get going and block cookies on Safar:

  • Settings.
  • Safari.
  • Block All Cookies

Delete Cookies on Chrome on iPhone.

Heed the instruction below to learn how to Delete Cookies on Chrome on iPhone. Deleting cookies on Chrome is very easy but still you the result will be the same. Your browsing experience won’t be as smooth as it was.

Things are a bit different when it comes to Chrome. Both on Android & iOS clearing or deleting cookies on Chrome is very easy.

But there is one thing that Android users can do but not the iOS users. Android users can easily block all cookies using in-app options. Now let me tell you How to Remove Cookies From iPhone on Chrome.

  • Open Google Chrome on your iPhone.
  • Tap on 3dots to access the menu.
  • Next, Tap on Settings.
    • Privacy.
    • Clear Browsing Data.
    • “Cookies, Site Data” and “Cached Images and Files.”
    • Tap “Clear Browsing Data.”

That’s all. This is how you can easily Remove Cookies From iPhone on Safari & Chrome. Please do try this and tell how was your experience.

Download Samsung Galaxy A50 Android 10 via Odin

Download Samsung Galaxy A50 Android 10 via Odin

Samsung has finally started rolling out the Android 10 update for Galaxy A50. The update first rolled out in the South Korean region and it’s rolling out in India today. If you fancy a Galaxy A50 with the model number A505F or A505FN, you have a chance to upgrade your phone right now. Follow this tutorial to download Samsung Galaxy A50 Android 10 via Odin. We will download the Android 10 for Galaxy A50 using a tool and flash it using the Odin3 tool.

Download Samsung Galaxy A50 Android 10

Samsung Galaxy A50 Android 10

Galaxy A50 came out last year with the Android 9 running on it. At that time, the phone supported the Samsung One UI. As promised, Samsung sent out the Android 10 update for the phone starting today. The new Android 10 is the biggest update for this phone so far. This update brings numerous changes in terms of features and UI. Galaxy A50 users can finally enjoy the all-new Samsung One UI 2 now. Here is what’s new in this update.

Samsung One UI 2

First of all, One UI 2 brings brand new animations. The animations are much more fluid now and they do not feel laggy now. Samsung has added a native screen recorder which can be found in the toggles. The Night Mode has been renamed as Dark Mode now. Users will also find the side key settings. The power button can be configured to either launch the Bixby or use it as the power key. The settings to make brightness bar appear on top have moved under the quick panel settings now. Samsung has changed the app-manager settings UI. You will find the install/uninstall and cache/data clearing options at the bottom of the screen now. Volume slider’s UI has changed too. Galaxy A50 owners can also enjoy the new Dynamic Lock Screen wallpapers now. 

The overall performance of the phone has improved a lot. The battery life of the A50 is also better than before.

At the moment, those are the only new features introduced. I hope Samsung will add more features in the near future.

Take a look at the requirements/preparations to flash Android 10 on your Samsung Galaxy A50.

Requirements & Preparations

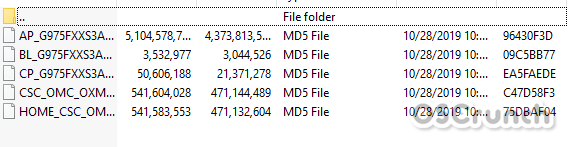
When you extract the firmware, you will get five files including the BL, AP, CP, CSC, and Home_CSC files. You will add the BL file to the BL tab in Odin, AP to AP, CP to CP, but in the CSC tab, you will add CSC file if you want to factory reset your phone, otherwise, you will add the Home_CSC file.

Firmware Files downloaded via SamFirm

Download Samsung Galaxy A50 Android 10 via Odin

These are the simple and easy steps to install Android 10 on Galaxy A50.

Total Time: 10 minutes

Open Odin 3.13.1 and add the files.

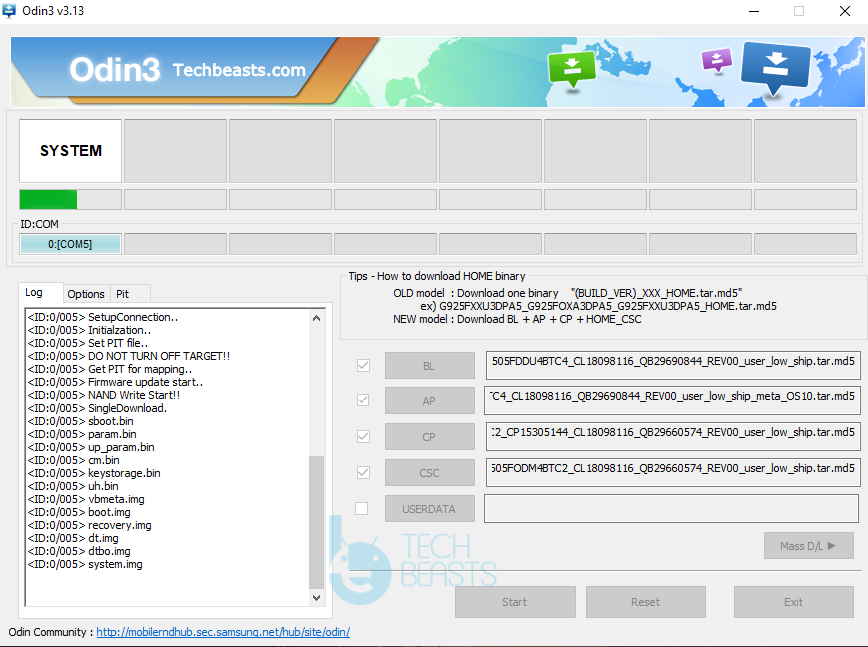
Open Odin and add all the firmware files to Odin as mentioned above next to the requirements. Go to the Options tab in Odin and make sure the only selected options are Auto Reboot and F.Reset.Time.Galaxy A50 Android 10

Restart your phone in the Download Mode.

Turn off your A50. While the phone is off, press and hold Volume Up + Power button, as the phone goes into recovery, select “Reboot to bootloader” and press the power button to enter “Download” mode.

Connect your Galaxy A50 to the computer.

While your phone is showing “Downloading” on the screen, connect it to the computer. The Odin should show “Added” and also show a blue light in the ID:COM box.

Click on the Odin Start button and flash the firmware

Making sure everything is all set, click on the Start button in Odin.Galaxy A50 Android 10

Wait for the firmware flashing to end.

Firmware flashing will start and show you the progress throughout. Closely watch it and make sure no errors occur.

Disconnect your phone and let it reboot.

Once the flashing ends, your phone will restart, disconnect it and set it up on the Android 10 now.Galaxy A50 Android 10

The first boot can easily take up to 10 minutes, so don’t worry if it’s taking that much at your end. If you used the CSC file, your handset will be completely reset and you will set it up all ove again. If you used the Home_CSC file, it will take you to the home screen directly. In case of any problems, feel free to reach out to us through the comment section below.

Galaxy A50 Android 10 Review – Video

A video review of the Galaxy A50 running Android 10 will be out on my YouTube channel soon. Stay tuned for that!

Download Frija Tool [ Firmware Downloader for Samsung ]

0
Download Frija Tool [ Firmware Downloader for Samsung ]

Looking for a tool to download Samsung Firmware? I think you should Download Frija Tool. A simple yet very effective tool to download Samsung firmware.

Download Frija Tool

Samsung is the top of the smartphone world, they have devices for all the classes, either it’s elite, Upper Middle class, lower-middle-class working class, etc. From flagship to Mid-range, budget phones, low budget phones, and tablets. Samsung is covering every class, everyone has an option when it comes to buying Samsung smartphones. That’s the main reason behind the success of Samsung.

Not only they provided smartphones for everyone, but they also provide top-notch technology and quality. Moreover, they provide excellent after-sales services, you will get new and latest Android updates for your devices. That’s also the main reason Samsung is famous among the developer’s communities. We have seen tons of Tools for Samsung smartphones to manage them.

Among all these Tools there is one which will help you download your firmware and its name is Frija. This means you if you haven’t received an update through OTA, you can use Frija and download the latest update for your device. Also, you can download old firmware in order to go back to some old version of Android.

Now before I get to how to use and download Frija Tool, let me tell a bit about Frija Tool and what it is.

What is Frija Tool?

Frija tool is designed for PC, the basic purpose of this tool is to download firmware for Samsung smartphones. If you have heard or used SamFirm then you can easily understand Frija Tool. I can say that Firja is the best alternative to SamFirm, using this tool is very simple, UI is clean and user-friendly. All you have to do is download the  Frija Tool on your PC and start using it, this tool doesn’t require any installation.

In order to download any firmware for Samsung, all you need to do is enter your model number and country. Frija Tool will provide you the latest firmware of any Samsung smartphone.

You can easily search manually, select manual search, type in the required details and you will get the firmware you are looking for. If we talk about the download speed, I have used Frija Tool and downloading speed was good because this tool directly downloads from Samsung’s main server. However, still downloading speed depends on your internet connection too.

These are the core features of the Frija Tool and also you know what is the main purpose of this tool. I think it’s time to move and tell you how to Download Frija Tool for Windows.

Download Frija Tool for Windows

Frija Tool can be used for many purposes. There are times when we face issues like Bootloop, Rebooting, Stuck on Samsung Logo, or device bricked. At such times Frija tool will be very helpful. Not only this, but you can also download Frija tool and update your device manually since OTA updates take time to arrive.

Frija is a small tool and you don’t need to install it on your Windows PC. Moreover, it won’t be taking a chunk of space on your computer. Since Frija Tool is only of 6MB in size. You can use the following link to download the latest Frija tool for your computer. But before that, you need to make sure you have the following requirements fulfilled.

Prerequisites

  • Microsoft Visual C++ 2008 & 2010.
  • The model number and region code.

Download

Once you’ve downloaded Frija Tool on your Windows, heed the following instructions to learn how to use Frija Tool on your PC.

How To Use Frija Tool on Windows

Step1: Download the Tool from the link given above on your Windows PC. Extract it on your desktop.

Step2: Make sure you have installed Microsoft Visual C++ on your PC. Otherwise, you won’t be able to use Frija Tool.

Step3: Run the Frija Tool and it would be better to go with Auto option. Enter the following.

    • Model Number.
    • Region Code.

Step4: Once you have entered the details, click on check updates.

Step5: Next you will see the Frija Tool will provide the details of the firmware such as version, file name, size, and OS.

Step6: Click on the Download button, it will ask you for the location where you want to save the firmware. Select the location and your downloading will begin.

That’s all. Once your firmware is downloaded, you can use Odin to flash it. Please use Frija Tool and download the latest firmware for your Samsung devices.