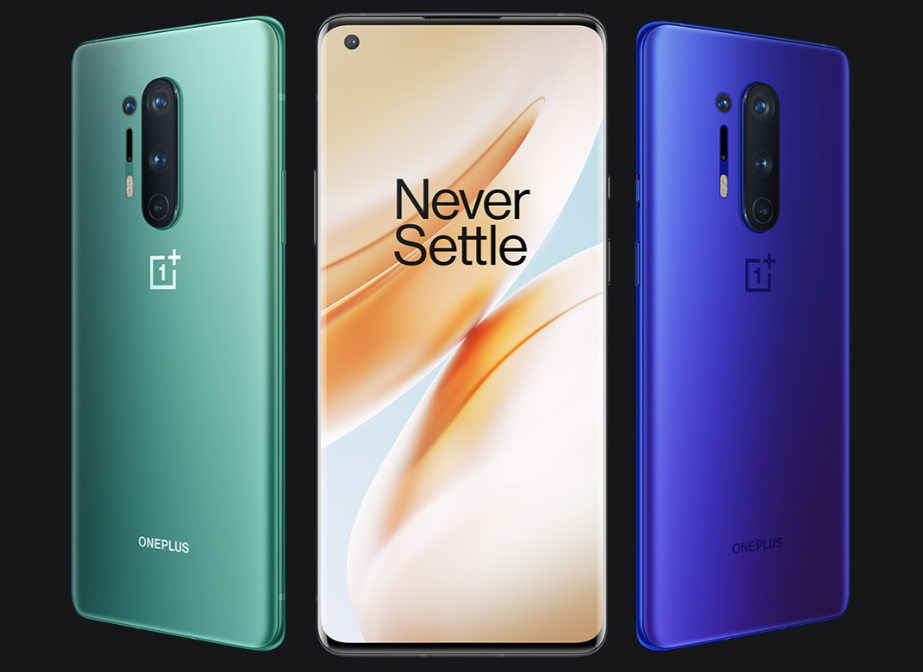
Just a couple of days back, OnePlus officially revealed its newest flagship, the OnePlus 8 Pro. Now, OnePlus 8’s Stock Wallpapers are also out. From here, you can download OnePlus 8 Pro Stock Wallpapers in 4K resolution. These are also the OnePlus 8 stock wallpapers.
OnePlus 8 Pro Stock Wallpapers
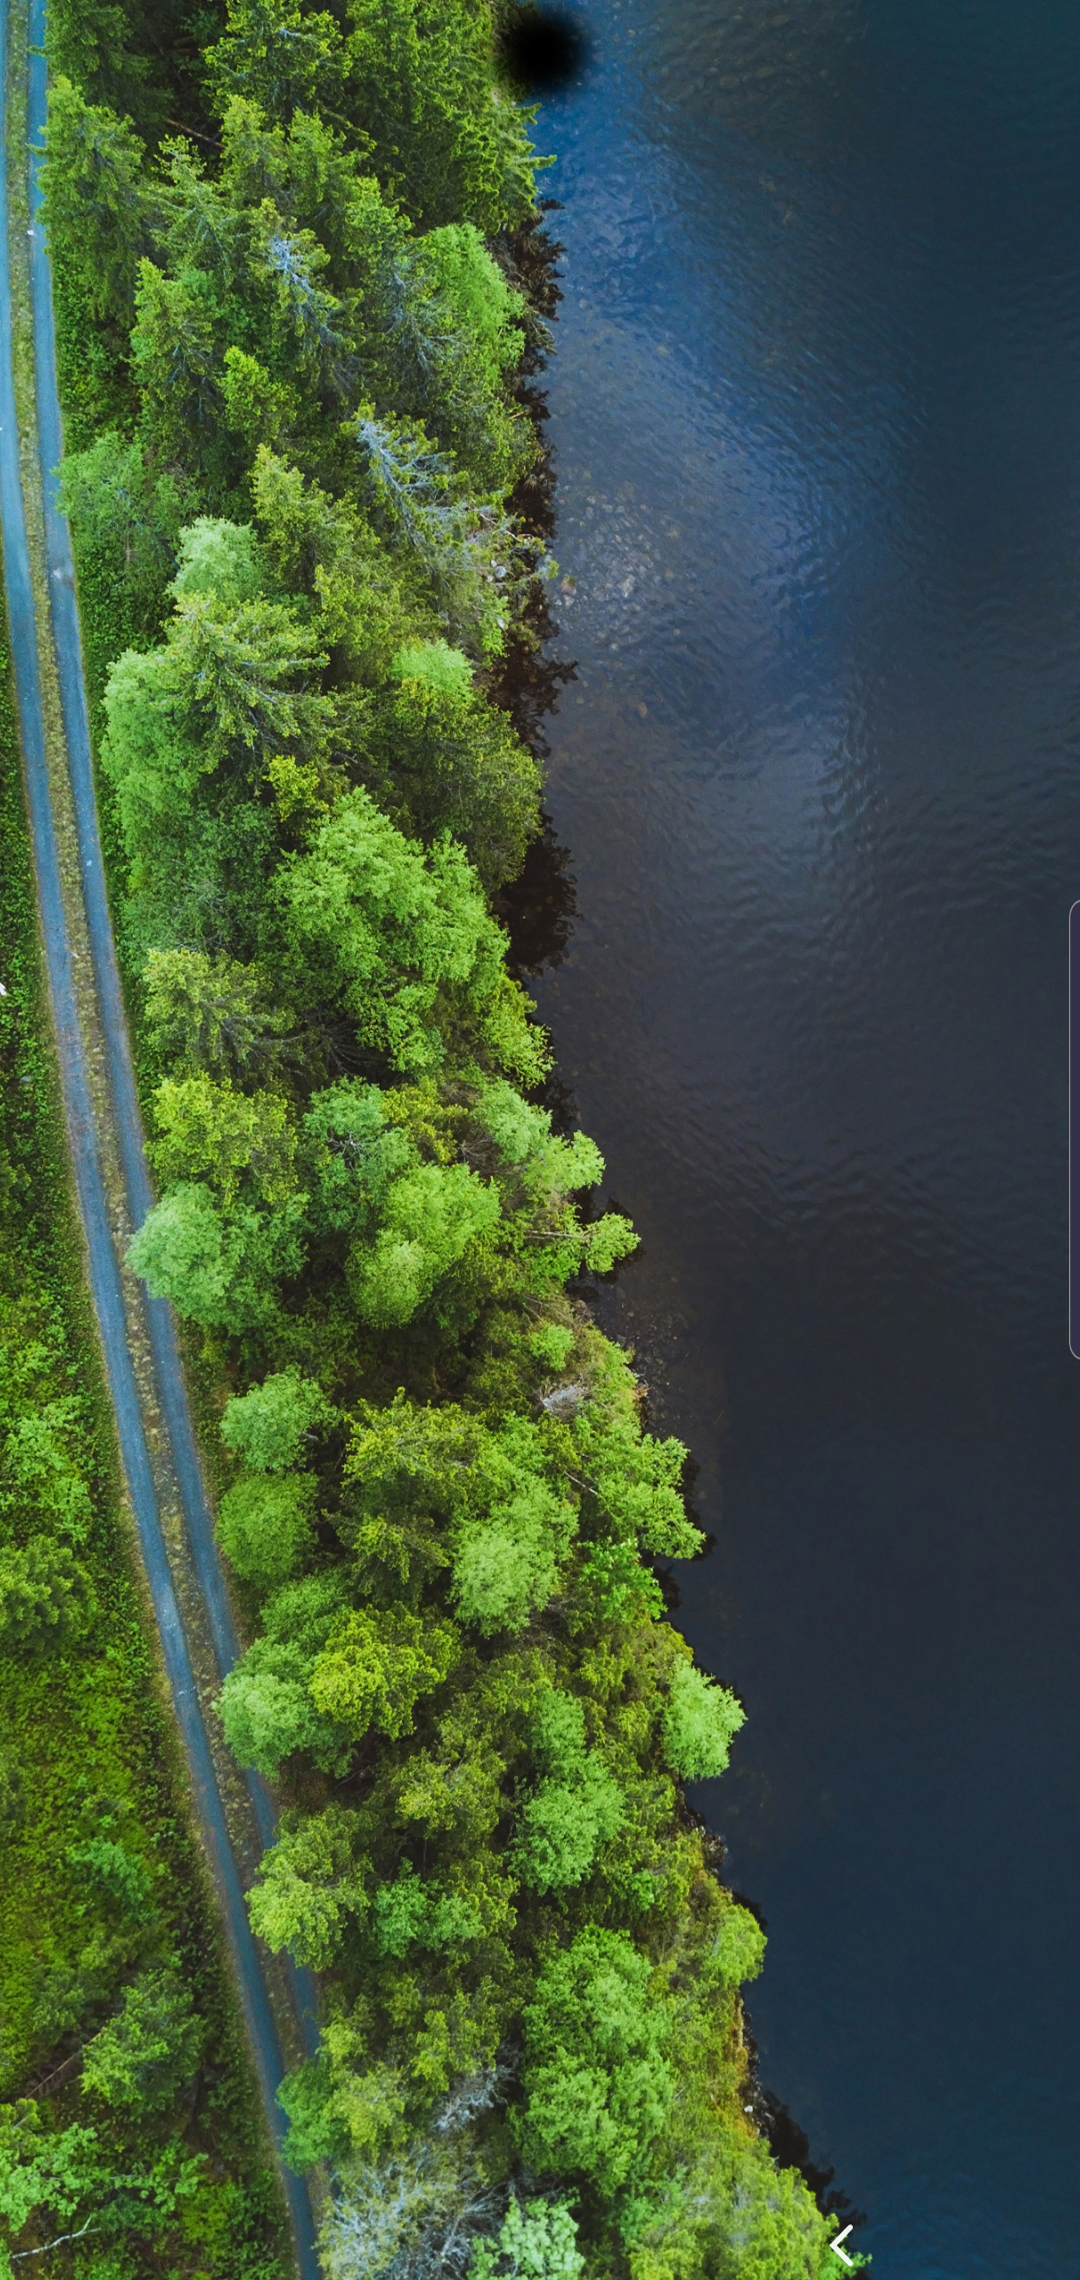
OnePlus 8 and OnePlus 8 Pro bring 14 new wallpapers. Out of these 14, 4 are the Never Settle wallpapers. If you are a fan of the OnePlus slogan, you have got yourself covered on the wallpapers-end. There are 4 non-Never Settle wallpapers while the remaining 6 are entirely different wallpapers. All wallpapers carry a resolution of 1440 x 3168 pixels, which means these are ideal for a Quad HD display. But you can also use these wallpapers on a lower resolution screen i.e. FHD or HD. Whether you carry an Android phone or an iPhone, these wallpapers can be used on both. Either pick up your favorite official OnePlus 8 Wallpaper from below or download them all using the all-in-one button.
Download OnePlus 8 Pro official wallpapers one-by-one
To download the wallpapers separately, right-click on your desired image and click on “Save image as…”. To download on phone, long-press the image and tap on the download option.
OnePlus 8 Pro & OnePlus 8
Both the OnePlus 8 Pro an OnePlus 8 are the successors of the OnePlus 7T and 7T Pro. The new phones take a leap ahead of the previous OnePlus models. These phones bring all the features that none of the OnePlus phones previously had to date. The OnePlus 8 Pro is the superior variant with a flagship price while the OnePlus 8 is a little less powerful.
OnePlus 8 Pro
OnePlus 8 Pro is equipped with a 6.78-inches QHD screen having a resolution of 1440 x 3168 pixels. The PPI is 513. This screen has a 120Hz refresh rate which works with all the resolutions. The display is protected by Gorilla Glass 6. This phone has a 48 megapixels main camera, an 8 megapixels telephoto, 48 megapixels ultrawide, and a 5 megapixels depth sensor at its back. On the front ith as a single 16 megapixels camera. OnePlus 8 Pro is powered by Qualcomm Snapdragon 865 SoC with Adreno 650 GPU. There is a RAM of 8GB or 12GB with an internal storage of 128GB or 256GB. It has a battery capacity of 4510 mAh. OnePlus 8 Pro uses 30W fast charging, it supports 30W wireless fast charging, and 3W reverse wireless charging. This phone is being offered in Glacial Green, Ultramarine Blue, and Onyx Black colors.
OnePlus 8
The OnePlus 8, on the other hand, brings a 6.55-inches 1080 x 2400 pixels screen with 402 PPI. This one is also powered by Snapdragon 865 and Adreno 650. It also has an 8GB or 12GB RAM with 128GB or 256GB internal storage. The OnePlus 8 has a main 48 megapixels camera, 16-megapixel ultrawide camera, and a 2 megapixels depth sensor. There is no telephoto lens on this phone. It also has a 16-megapixel camera on the front. OnePlus 8 has a 4300 mAh battery inside. It also supports 30W fast charging, but lacks wireless and reverse wireless charging. This phone is being offered in Onyx Black, Glacial Green, Interstellar Glow, and Polar Silver colors.
Both phones use a new punch-hole camera bumping the screen to body ratio to 20:9.
This is the guide to download Eclipse Emulator for iPhone on iOS 13 or below. Eclipse can run all Gameboy Advance and Gameboy Classic games. This is a no-revoke Emulator.
Eclipse Emulator
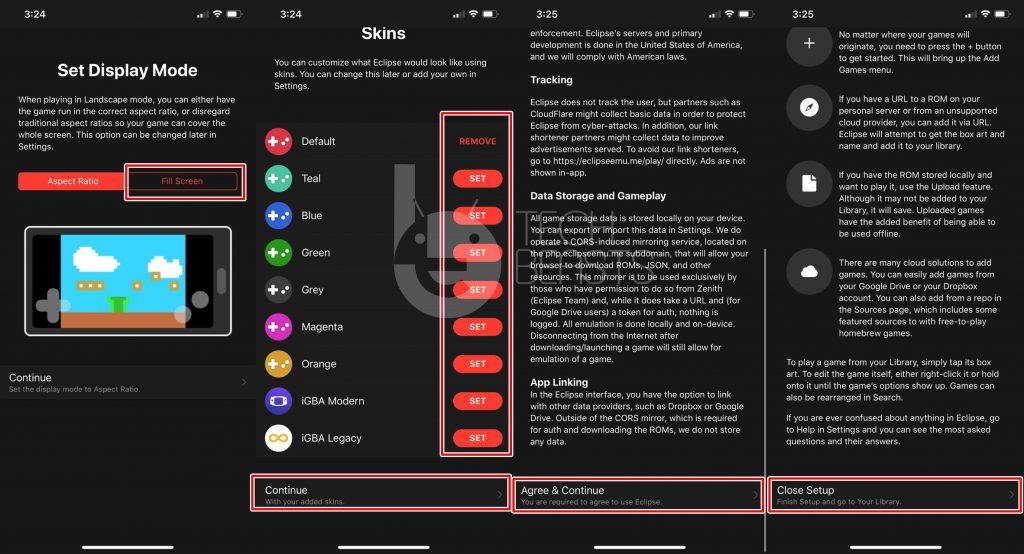
Playing Gameboy Advance and Gameboy Classic games couldn’t be easier. Eclipse Emulator changes the way you look at the emulators. Unlike the Delta, iNDS, Happy Chick and other Emulators, Eclipse doesn’t get revoked. One of the most annoying things about an iOS emulator is the frequency of getting revoked. It merely takes a day after an emulator’s release to get revoked. Such things do not happy with the Eclipse Emulator, thanks to its unique installation and unique method of picking up the GBA and GBC games.
Eclipse is sideloaded from a webpage. To add the GBA or GBC ROMs, you have to upload the files to Google Drive first. Eclipse is then linked to Google Drive in order to pick up those ROMs. Nothing takes place on your iPhone technically, and that’s probably the reason this app escapes Apple’s revoke attacks.
While Eclipse Emulator will continue working for a good amount of time, there is a big downside too. The Emulator cannot produce audio at the moment. You will play soundless games until the developer rolls out an update to fix it. Given the fact that Eclipse might be the only working emulator right now, the audio issue might not be that big of a deal for some users.
So, if you want to revive your love for Gameboy Advance and Gameboy classic, go ahead, take a look at the steps to download Eclipse Emulator for iPhone on iOS 13 and below.
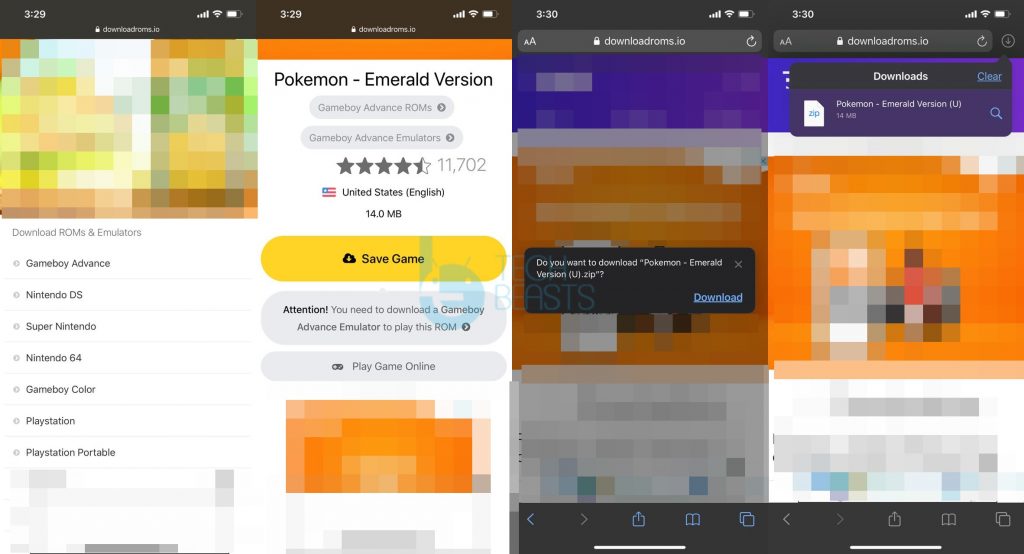
One-by-one, open the ROMs that you want to download.
Now at the top of the ROM page, you will find the ROM/Game thumbnail, long-press the photo > click on Add to photos.
Scroll down on the same page and then download the ROM.
Repeat steps 2-3 for all the ROMs that you want to download.
#2: Extracting ROM Files & Setting up Google Drive
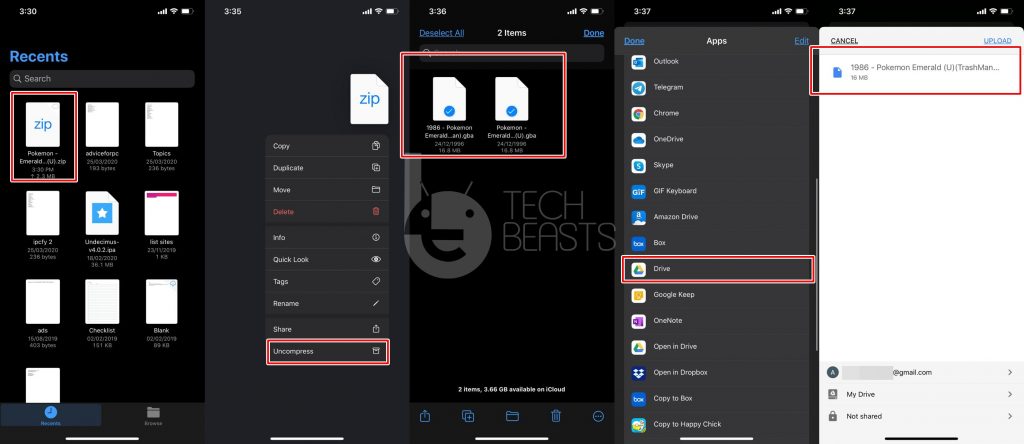
Open the Files app now.
Tap on any downloaded ROM zip file to unzip it to get .gba/.gbc files, you will get the main ROM files now.
Now click on “Select” at the top-right corner and select all the .gba/.gbc files.
Now click on Share and select Google Drive.
Click on the Upload button now, let the files upload.
#3: Adding ROMs to Eclipse
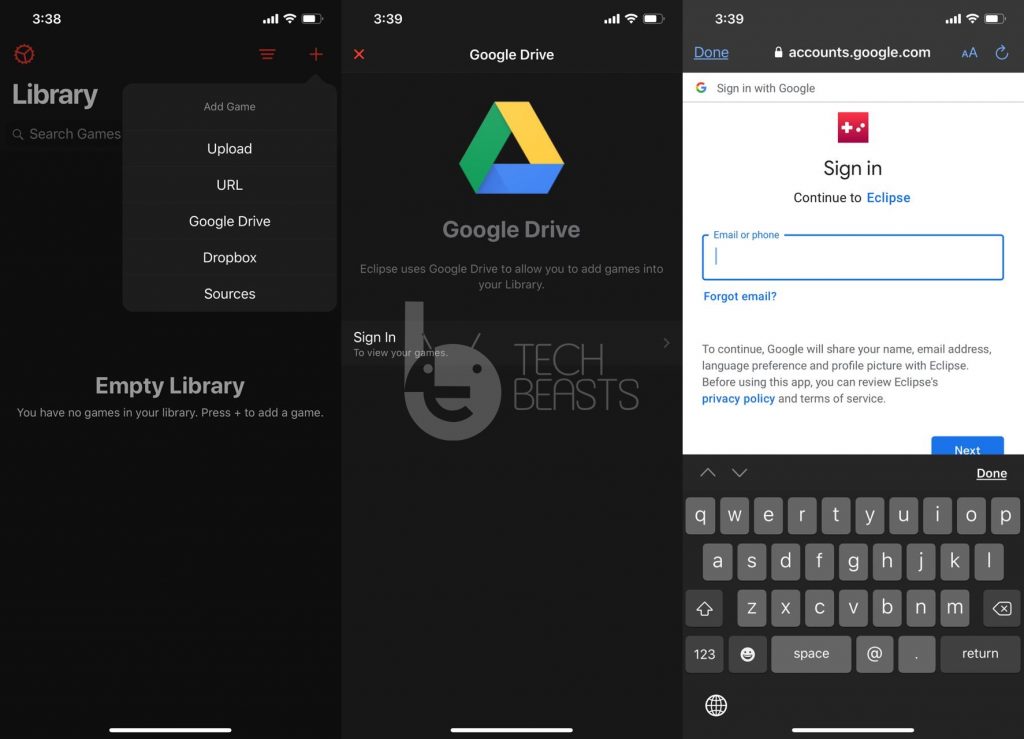
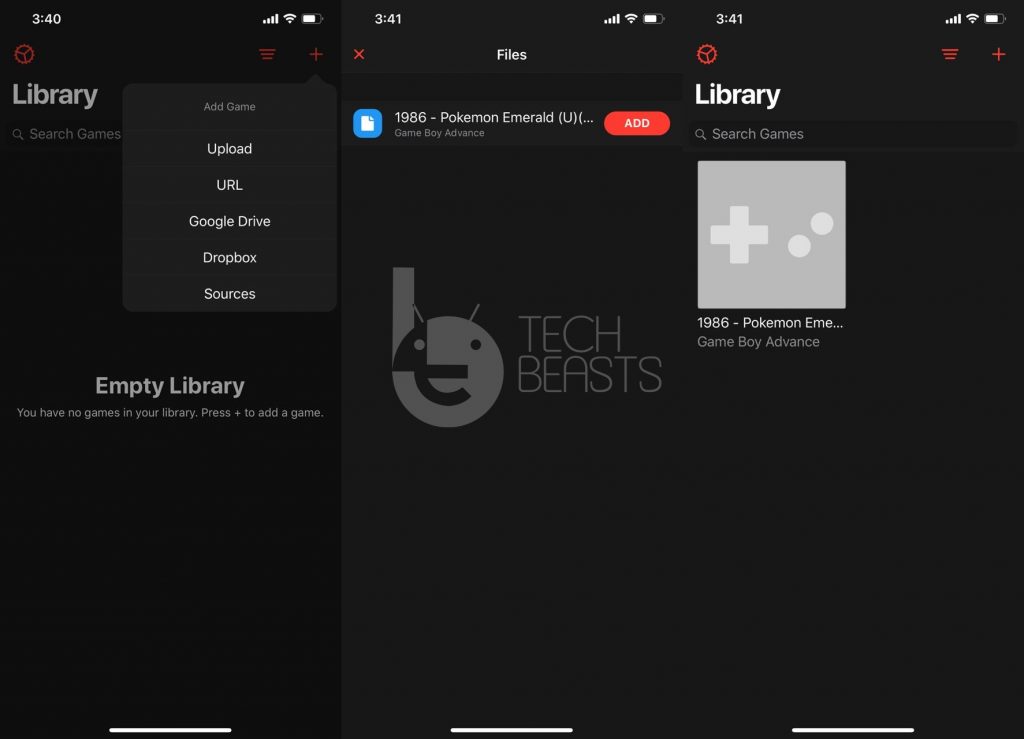
Open Eclipse emulator now and click on the “+” button on the top-left corner.
Add your Google Drive account that you just uploaded the .gba/.gbc files to.
Click on the + button again > select Google Drive, you will get a list of all your uploaded .gba files.
Add these files to eclipse one-by-one.
After adding the files, close Eclipse from the recent apps.
#4: Adding ROM Covers to Eclipse & Playing the game
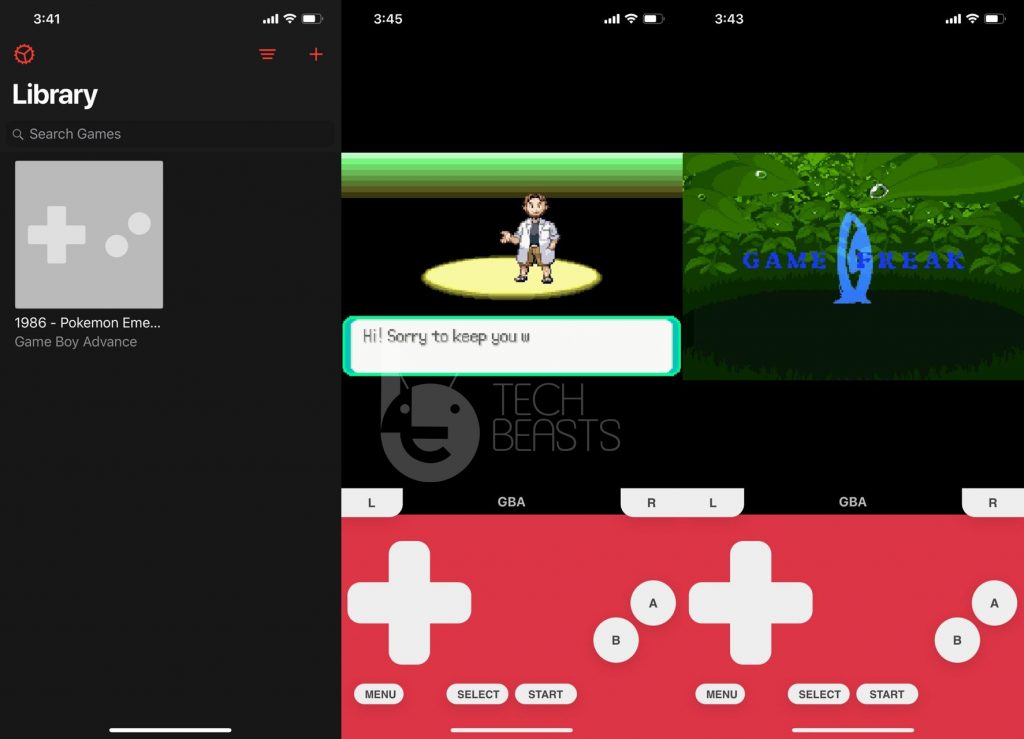
Open Eclipse again, your ROMs will appear without any cover.
Long-press the ROM file and click on Edit.
Now click on “Upload box-art” > Photo Library > Find & select the cover photo that you downloaded in step 3.
Close Eclipse and open it again.
Your ROM will have its cover too, you can do the same for remaining ROMs.
Now open any game in order to play it. That’s all.
Final Words
You have now successfully installed and set up the Eclipse Emulator. This Emulator will never get revoked as it uses an entirely different method of installation. Eclipse is one of the best emulators without a doubt. Let us know how your experience is going on with this emulator. In case you run into any kind of problem, feel free to reach out to us using the comment section below. We will try our best to get back to you as soon as possible.
Follow this tutorial to download Happy Chick Emulator for iPhone and iPad. Happy Chick is a PSP, NDS, GBA, GBC, & SNES Emulator. Before you download Happy Chick Emulator for iPhone, let me tell you what this app is all about.
Happy Chick Emulator
There are a plethora of Emulators available for iPhones and iPads. All these emulators serve a different purpose. For example, if you want to run Nintendo DS games on your iPhone or iPad, you will find emulators like iNDS and NDS4iOS. If you want to play GBA or the GBC games, you will find the Eclipse Emulator, and if you want to run the GBA games only, Delta Emulator is going to be your choice. But, if you want to have one application to run NDS, GBA, GBC, PSP, ARCADE, MAME, SFC, FC games, Happy Chick Emulator is going to help you out.
This is an all-in-one package. You get all the emulators under one umbrella of Happy Chick. Once you have the Happy Chick Emulator, you don’t have to install any other emulator to play any specific games. This one emulator can handle pretty much any classic gaming console’s games. Like other emulators, Happy Chick also uses the ROMs of the relevant emulators. You can easily find the ROMs using the Happy Chick app or even an external source. Thousands of old-school ROMs are available for emulators like Happy Chick.
Happy Chick shows you the controls on the screen. The app offers enough customization to experience smooth gameplay. This is not a 100% perfect application, but it can easily perform the task it is built for. While you download the Happy Chick Emulator on your iPhone or iPad, keep in mind that this app is built to have fun only. Do not expect wonders from it.
Another thing to keep in mind is that apps like Happy Chick keep getting revoked every now and then. As of April 2020, this app is still working and the method you are going to take a look at has been verified to be working.
Requirements to download Happy Chick Emulator for iPhone & iPad in 2020
Happy Chick uses a nifty trick to download the games on your iPhone. While the trick doesn’t really make a technological sense, you still have to follow it as Happy Chick won’t let you install any games without that. Take a look at the requirements and proceed with the instructions to download Happy Chick Emulator for iPhone or iPad.
iPhone with iOS 13 or below.
iPad with iPadOS 13 or below.
Twitter app installed on your device with a Twitter account logged in.
Click on Categories > Select your desired emulator from the list.
Now click on the game you want to play.
Skip the ID pop-up and proceed.
Happy Chick will now give you a set of instructions in order to download a game, the instructions are as follows.
Copy the code appearing on the pop-up.
Open Twitter and find “GameSir”.
Follow GameSir and send the copied code to GameSir in a DM.
Get back to Happy Chick now.
The pop-up with instructions will vanish now.
Download your desired game.
Run the game and start playing.
Conclusion
That’s all, by now you should have the Happy Chick running well on your device. No Jailbreak is needed in order to run Happy Chick. If you run into any problems while using the Happy Chick or if you find it difficult to follow the instructions given above, feel free to reach out to us using the comment section. We will try our best to get back to you in time.
This is the tutorial to download Panda Helper for iPhone iOS 13. As of now, the Panda Helper is working on all iOS versions and on all iPhones. No Jailbreak is needed. You can install Panda Helper on both Jailbroken/Non-Jailbroken devices. Before you download Panda Helper for iPhone, let me tell you a little about this application.
What is Panda Helper?
Panda Helper is a Cydia alternative to install unverified & tweaked apps on iPhone and iPad. This is a third-party store with all the third-party apps listed. On Panda Helper, you can find modified versions of games and apps. Unlike Cydia, it works on non-Jailbroken devices too.
Panda Helper has been around for a while but the app keeps getting revoked every now and then. It’s working once again and the tutorial that you are going to find in this guide stands valid as of April 2020.
While Panda Helper’s options fascinate and average iOS users, it does have its risks too. For example, the apps on Panda Helper are not verified by Apple. When you are installing any such application, you are basically taking full responsibility for everything you are about to do.
Panda Helper has a huge user-base and the opinions about this app are not negative. Most of the users find it a great source to install apps like Unc0ver and Phoenix without a computer. One of the biggest advantages of the Panda Helper is that you don’t need to sideload any applications using a computer. With Panda Helper installed on your iPhone, you can directly install any applications on the go.
Tweaked Apps & Games on Panda Helper
The modified versions of social media and entertainment apps are also available at Panda Helper. You can find apps like YouTube++, WhatsApp++, Instagram++, Music++, PokemonGo++, Snapchat++ and the “++” versions of many other apps. It has a separate tab where it shows the advanced versions of the apps and games.
Panda Helper Legality & Safety
While Panda Helper claims itself to be a completely legal and safe platform, we still advise all the users to proceed with caution. Even though I am writing down this tutorial to download Panda Helper for iPhone on iOS 13, I still recommend you guys to understand all the risks involved and proceed at your own risk. Apparently, none of the users have faced any problems with this app, but you can never be sure of what’s coming your way.
Requirements to download Panda Helper
iPhone or iPad with iOS 13 or iPad OS 13.
Internet Connection.
Follow this tutorial using your iPhone/iPad.
Works on non-jailbreak/jailbreak devices.
No computer needed, just your iPhone/iPad is needed.
Download Panda Helper for iPhone
Using Safari Browser, open this Panda Helper download page.
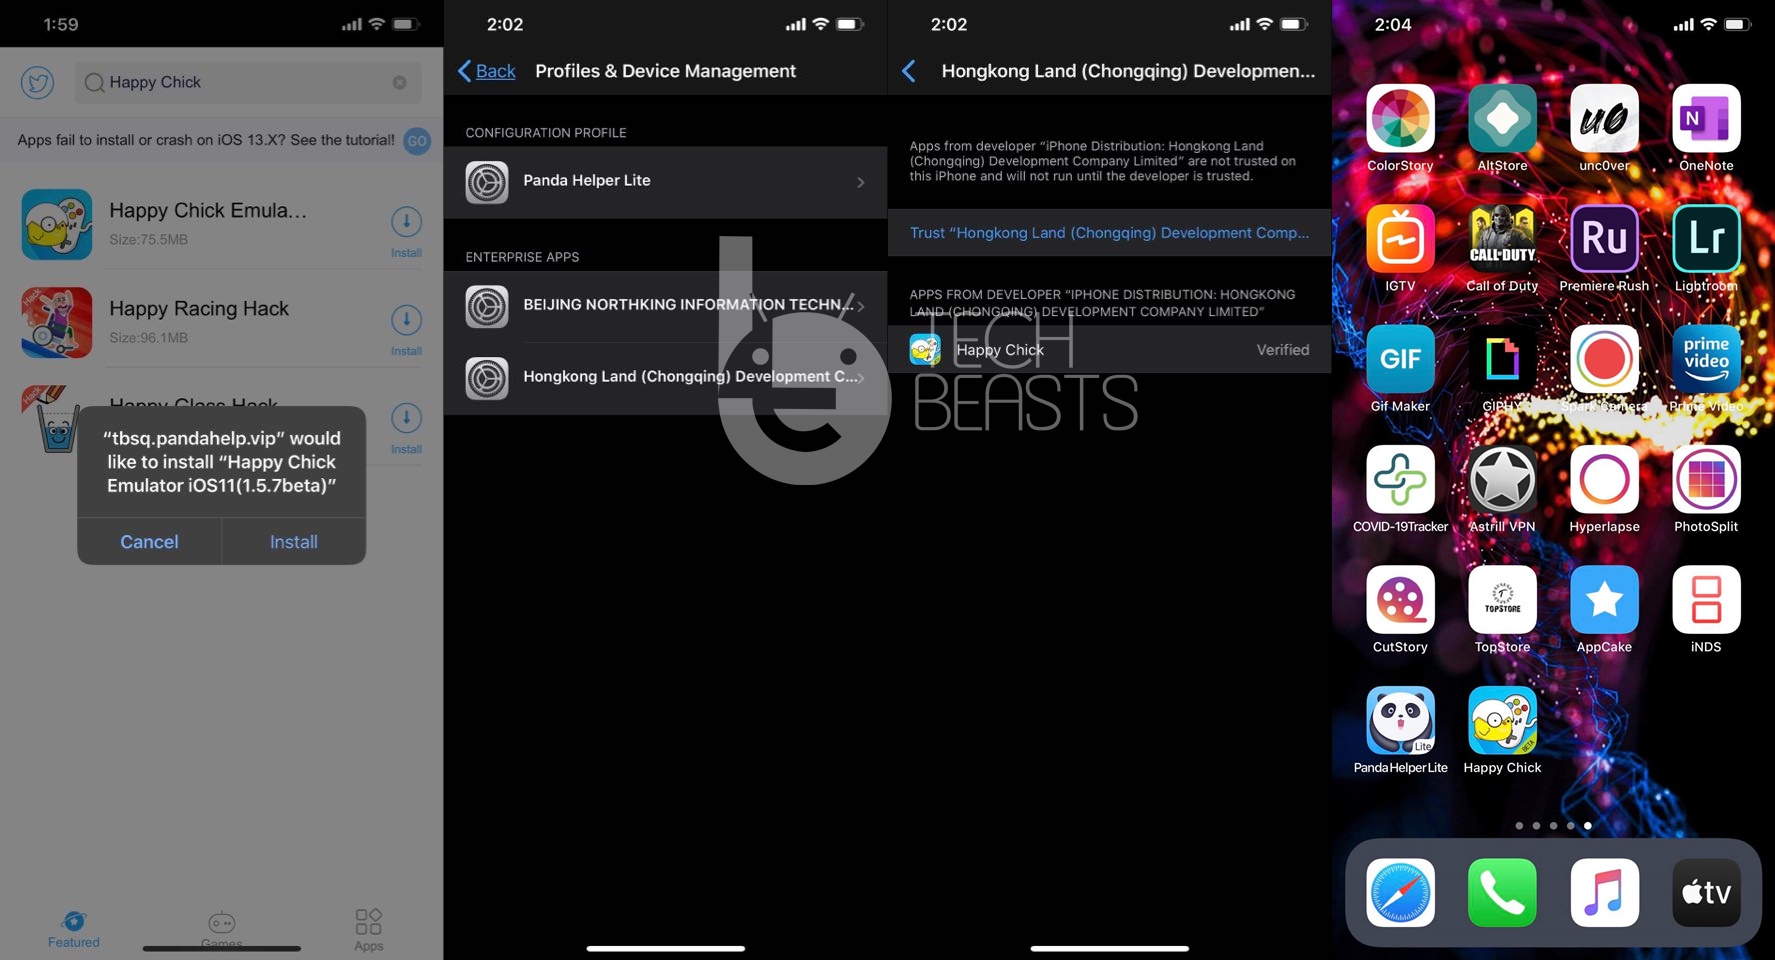
An installation message will appear on the screen, click on install.
Panda Helper’s profile will be installed, do not open the app yet.
Go to Settings > Profile downloaded > click on Install > Install.
Now open the Panda Helper from the app drawer.
You are all good to install any applications.
Installing Apps/Games via Panda Helper
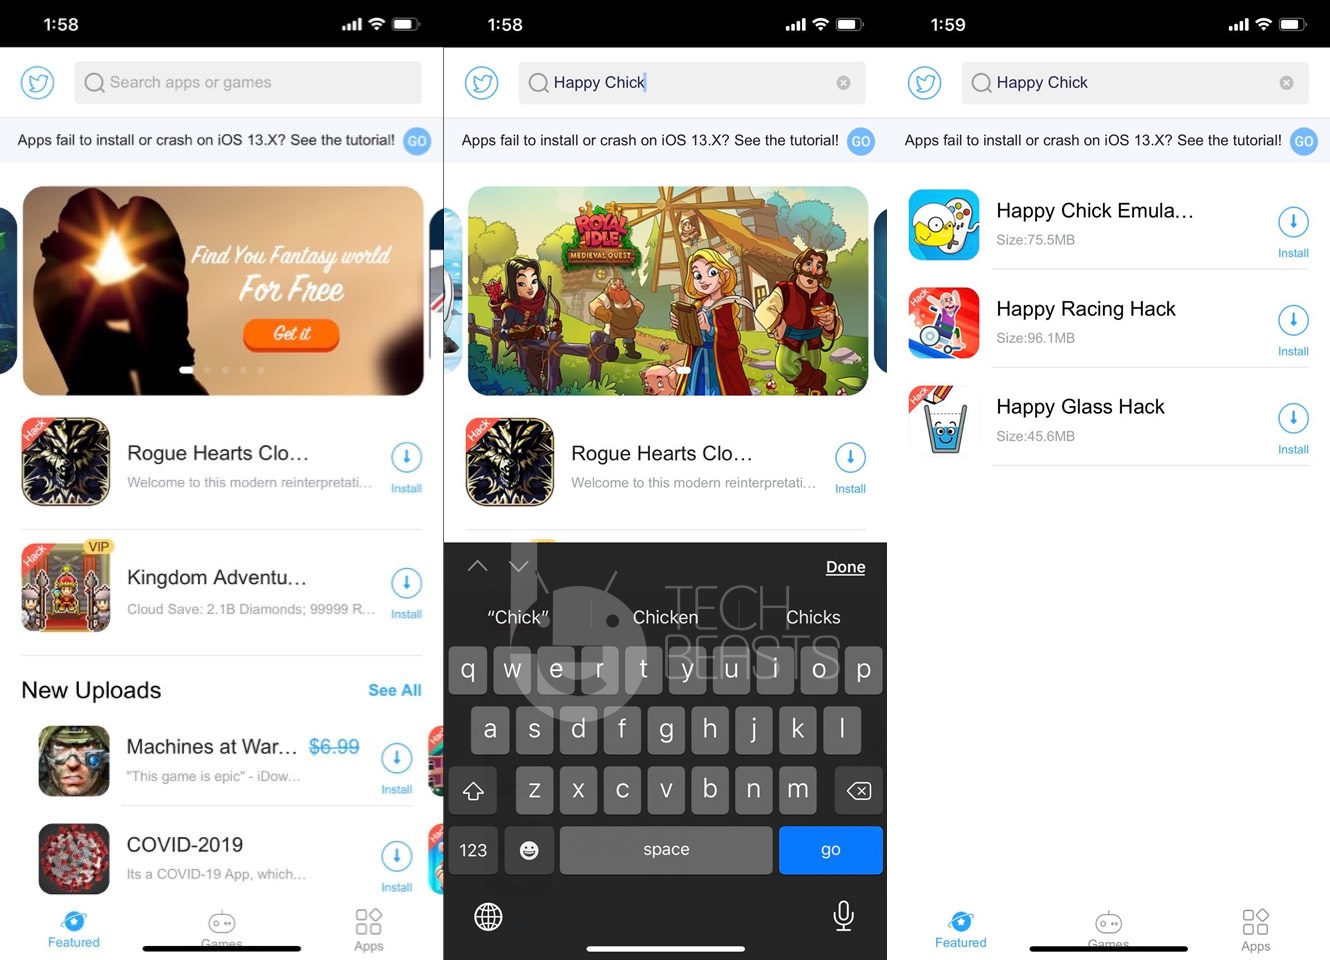
Open Panda Helper.
Navigate through the app and download the app you need.
Panda Helper will ask you to follow it on twitter, you can ignore the pop-up.
As you download the app, Panda Helper might ask you to install the app’s profile, if it does, install its profile from settings as shown on the screen.
In case it doesn’t ask for a profile installation, just proceed with the app installation.
Launch your installed app an enjoy it!
Open Revoked Apps via Panda Helper
App installed via Panda Helper will often get revoked. But don’t worry, you can un-revoke such apps with a little-neat trick. This method works on all iPhones and iPads on all iOS versions including the latest iOS 13.
Turn on Airplane Mode on your iPhone.
Open Safari Browser and go to its settings.
Clear History & Website Data in the Safari Browser.
Open the Revoked Application now.
Turn off the Airplane Mode.
Get back to the Revoked App and it should be working fine.
Conclusion
As of today, Panda Helper is working fine on all iOS devices. We are not sure how long this app will keep working. So, while you can still use it, install all the apps you want. If you run into problems while following the steps listed above, feel free to reach out to us using the comment section below. We will try our best to get back to you as soon as possible.
Follow this tutorial to download Nintendo DS iNDS Emulator for iPhone. You can download iNDS Emulator for iPhone on any iOS version. This is not for iPads, so keep that in mind before you proceed. Before you download it, let me tell you what this app is all about.
iNDS – Nintendo DS Emulator for iPhone
iNDS is one of the only few working Nintendo DS Emulators for the iPhone. If you have some very good childhood memories with the Nintendo DS, it’s time to revive them with the help of the iNDS app. The famous childhood gaming-console may have become obsolete, but it’s games are still alive and thanks to the developer’s community, who have pulled out all the Nintendo DS and Gameboy classics for the Android and iOS devices.
The gaming consoles like Nintendo DS, Gameboy, PSP, and others used a specific operating system. This operating system, for example, the Nintendo DS OS has been ported into the emulators. The emulators are developed for iOS and Android devices, and these emulators can run any Nintendo game. Games are available in the form of ROMs. These ROMs carry the DS format for the Nintendo DS emulators. You can sideload these ROMs into any Nintendo DS emulator manually.
The iNDS is built to serve the same purpose. It’s a feature-rich emulator which can give you modern-day controls for the old-school games. If you are a fan of Super Mario Bros, Pokemon, Animal Crossing, or any other popular title, it’s time to play it once again now.
At the moment, there is only 1 method to install the iNDS Emulator on your iPhone and I am going to list down the steps in this post.
To download Nintendo DS iNDS Emulator for iPhone, we will first install the App Cake on the iPhone. App Cake will allow the installation of iNDS. So follow the steps carefully and get the iNDS Emulator for iPhone.
It is highly recommended to follow these steps on your iPhone. Remember this will not work on the iPad, but works on all iPhones running any iOS version.
Download Nintendo DS iNDS Emulator
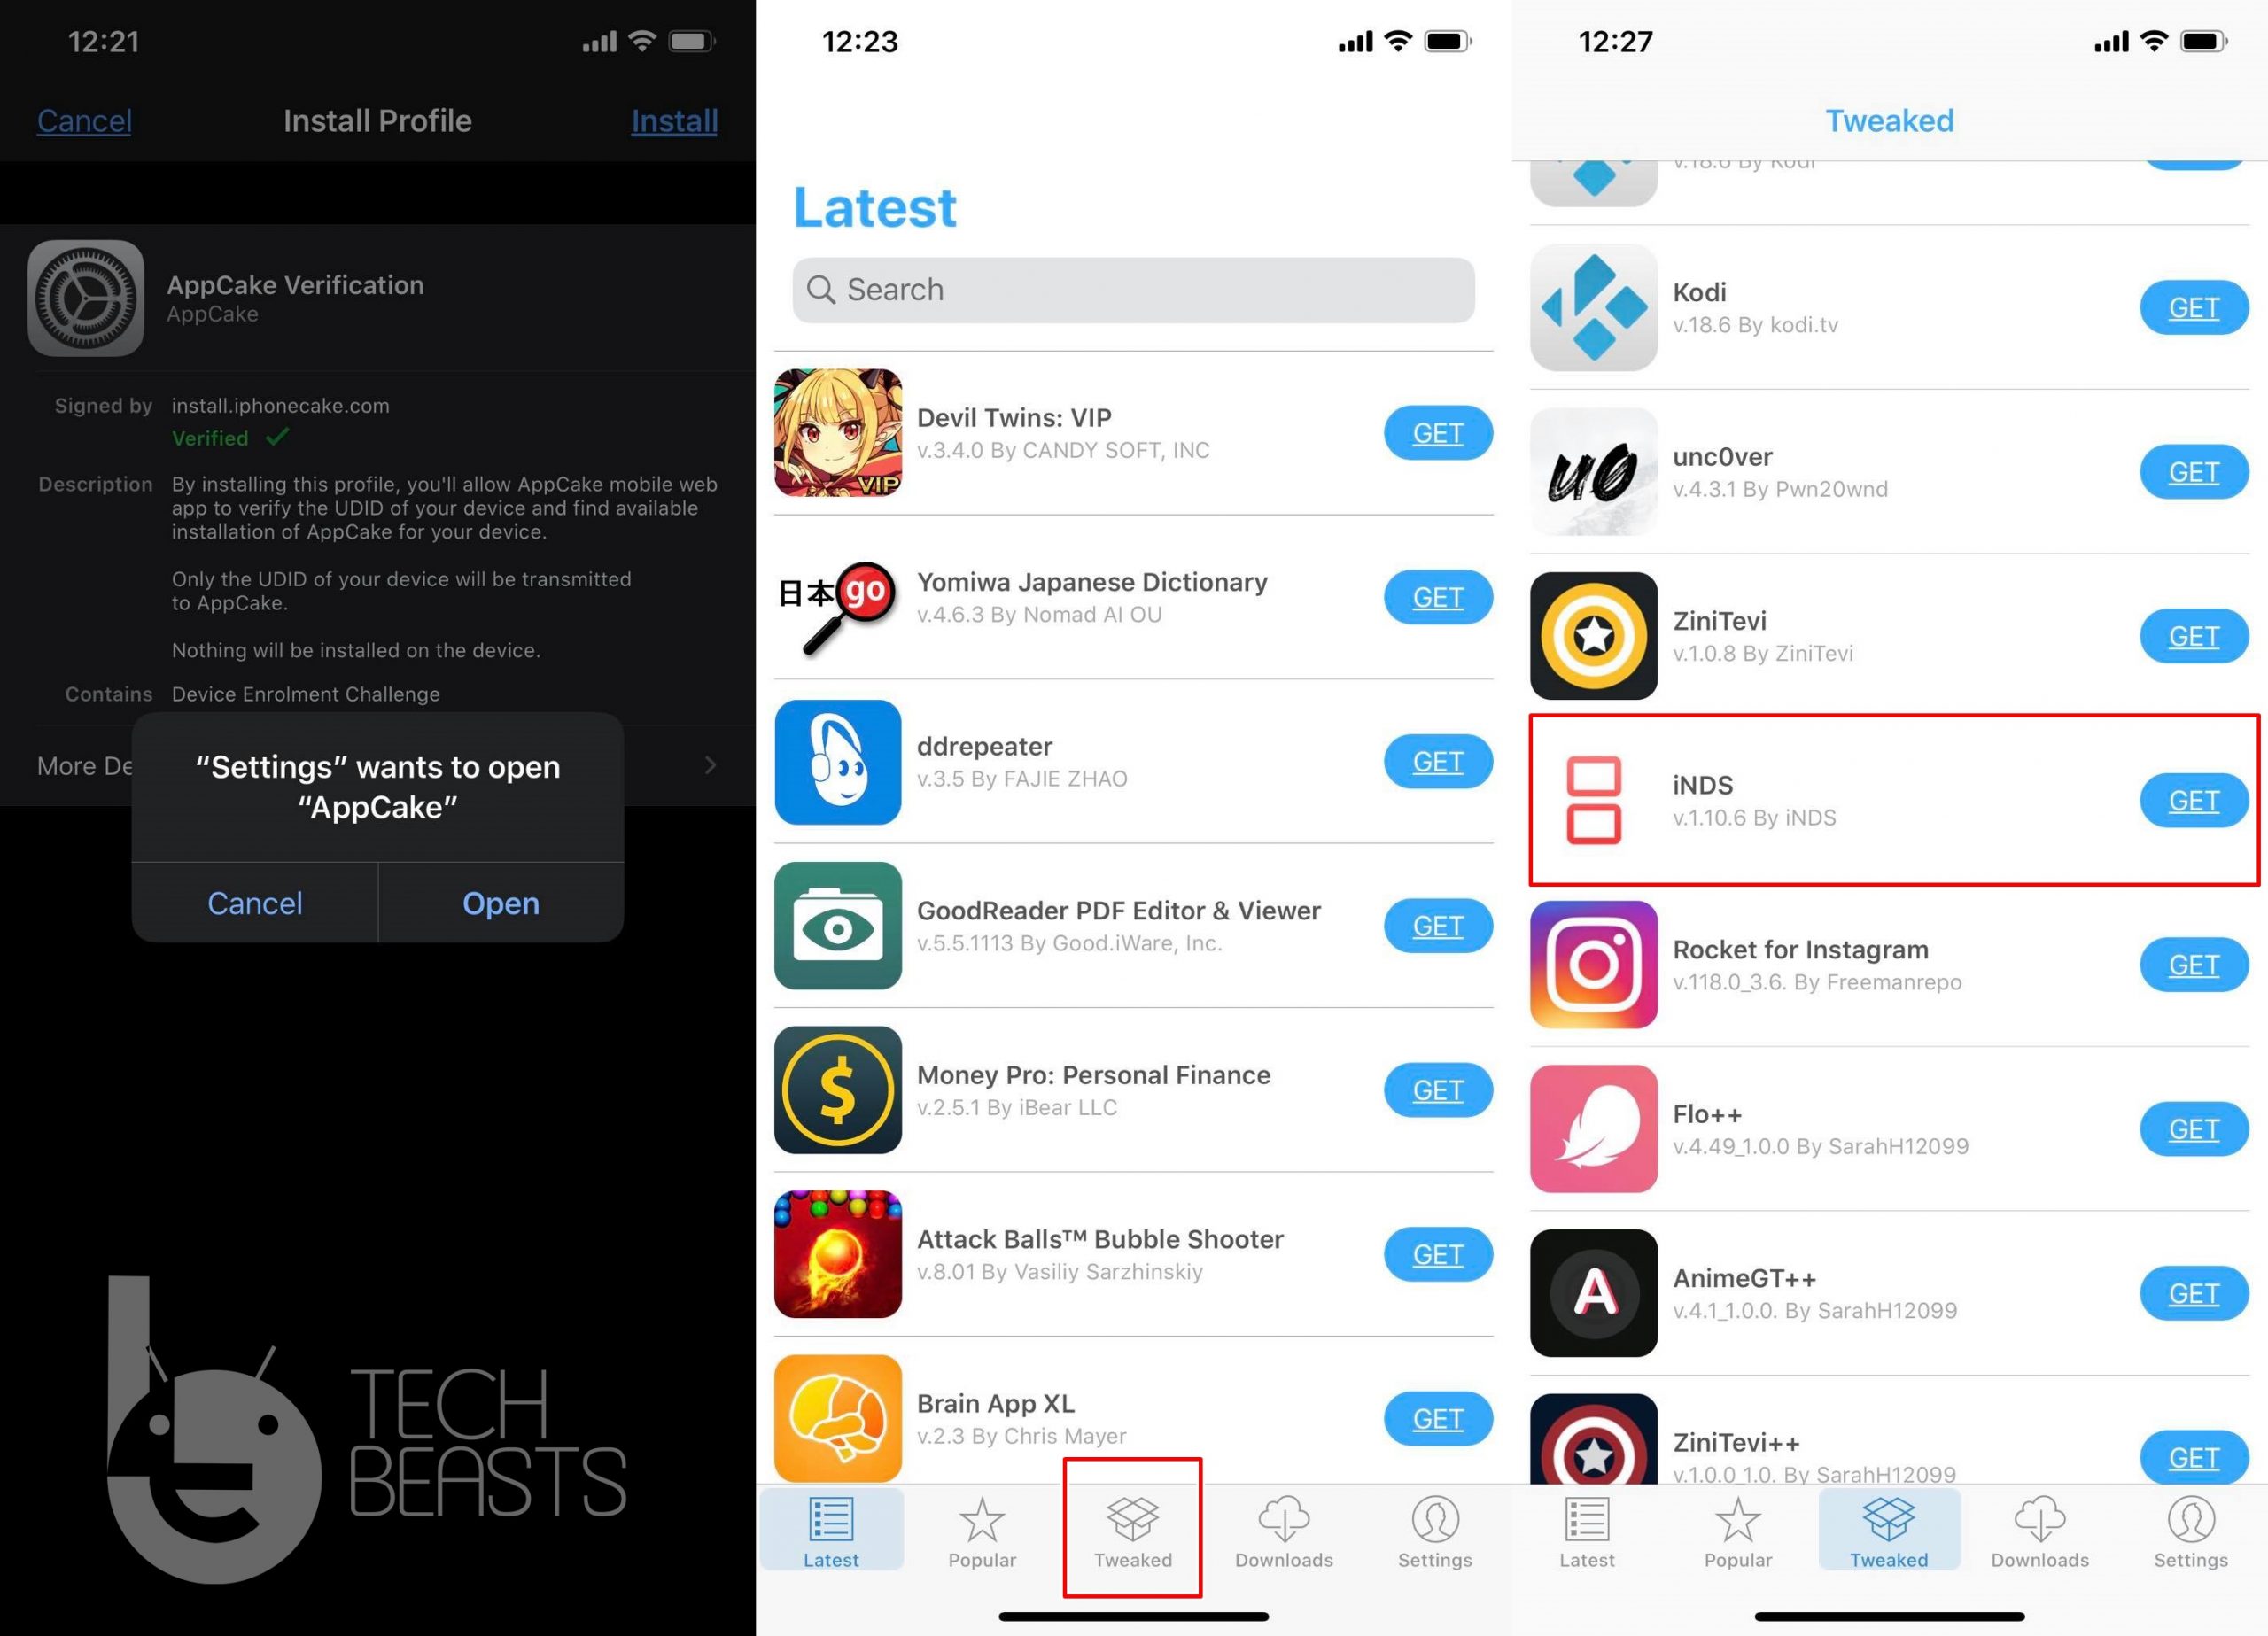
First of all, go to the App Cake installation page(open this in Safari).
Now click on “Install App Cake”.
Do not open App Cake yet, go to Settings on the iPhone > General > Device Management > Click on the Profile with App Cake inside > Click on Trust and trust it.
Launch the App Cake App.
App Cake will ask you for some permission and then ask to download a profile, download the required profile.
Go back to Settings > General > Device Management > Click on App Cake Verification > Click on “Install” at the top-right corner and install it.
After installation, the App Cake store will open up.
In the Store, click on “Tweaked” at the bottom.
Now find iNDS Emulator in the list and download it.
It will take a while to download iNDS and then install it.
Now open the iNDS Emulatoron the iPhone.
Go to its settings and turn on Full Screen & FPS meter.
How to add & play Nintendo DS Games via iNDS on iPhone
Using the Safari browser, download the NDS ROM from a good source.
After downloading the ROM, click on it extract and get the NDS file.
Click on the NDS file now and then “Share > click on More > Scroll down to find “Copy to iNDS” and then copy it”.
As soon as you copy to iNDS, the game will launch inside iNDS.
Play the game and enjoy it!
Final Words
As of today, this is a working method and thousands of users have been enjoying it. As long as Apple doesn’t revoke the App Cake and the Indus, this tutorial will keep working. You can also find many other emulators like the iNDS in our Emulators section. If you run into any problems with the iNDS installation on iPhone, feel free to reach out to us using the comment section below. We will try our best to get back to you as soon as possible.
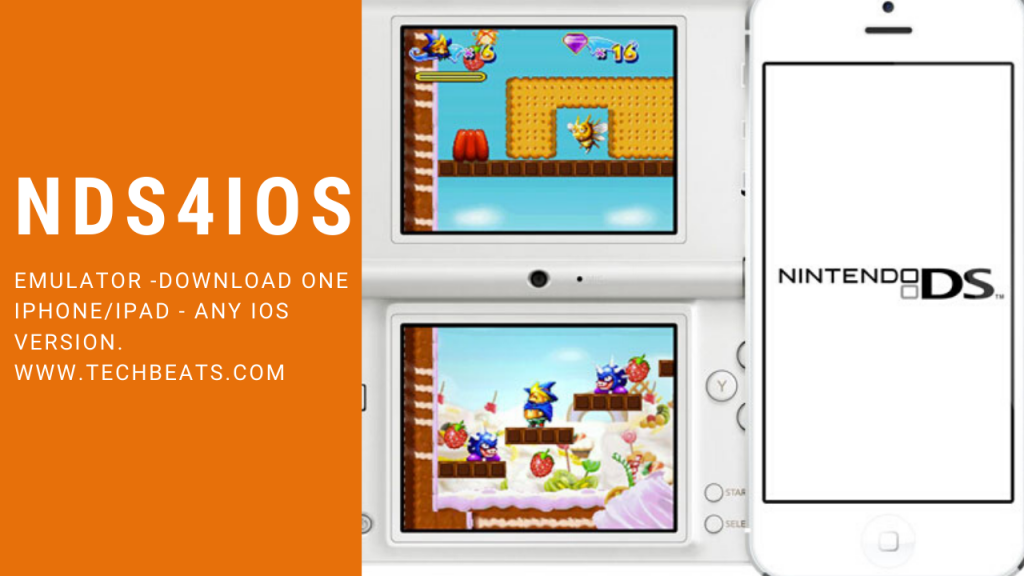
This is the tutorial to download NDS4iOS Emulator via Tweakbox. You can download NDS4iOS Emulator on any iPhone/iPad running any iOS version
Nintendo DS
Nintendo DS was the best selling gaming-console by Nintendo. It was the successor of the Gameboy Advance. Nintendo released it back in 2004. If you are a late 90’s kid, you must have some very good childhood memories with the Nintendo DS and its games. It was a dual-screen handheld console with a clamshell design. The bottom screen had the buttons surrounding it. Nintendo used the Nintendo DS OS, which was its own operating system to power the Nintendo DS console. It supported the Nintendo DS WiFi and a card slot to handle the Nintendo DS cards for the games. The console had backward compatibility with the Gameboy Advance games. Some of the most popular Nintendo DS games include the Super Mario Bros, Mario Kart DS, Animal Crossing, Pokemon HeartGold, Pokemon Platinum, and the Nintendodogs.
NDS4iOS
NDS is the short form of Nintendo DS and NDS4iOS stands for Nintendo DS for iOS. This is an Emulator to emulate the Nintendo DS on any iPhone or iPad powered by any version of iOS. The NDSiOS emulates the Nintendo DS firmware on your iOS-powered device. All of the NDS games are available in the form of ROM files which are also called cartridges. These ROM files can be manually loaded into the NDS4iOS emulator. This way, you can enjoy your favorite childhood games on a newer device like an iPhone once again.
NDS4iOS is not a plain and simple Emulator. It in fact gives you complete control over all features of the Emulator. Using the Emulator’s settings, you can change the interface, choose to show the FPS, update the icons, and reset the emulator. You can also change the controls of the emulator.
NDS4iOS Emulator
Installation of the NDS4iOS Emulator on the iPhone or iPad is a bit tricky. You can either install its IPA file via the Cydia Impactor or you can download NDS4iOS Emulator via Tweakbox. The latter method is relatively easy as it doesn’t involve the use of a computer, so I am going to explain that first in this guide. Take a look at the steps below to download NDS4iOS Emulator via Tweakbox now.
Download NDS4iOS Emulator via TweakBox
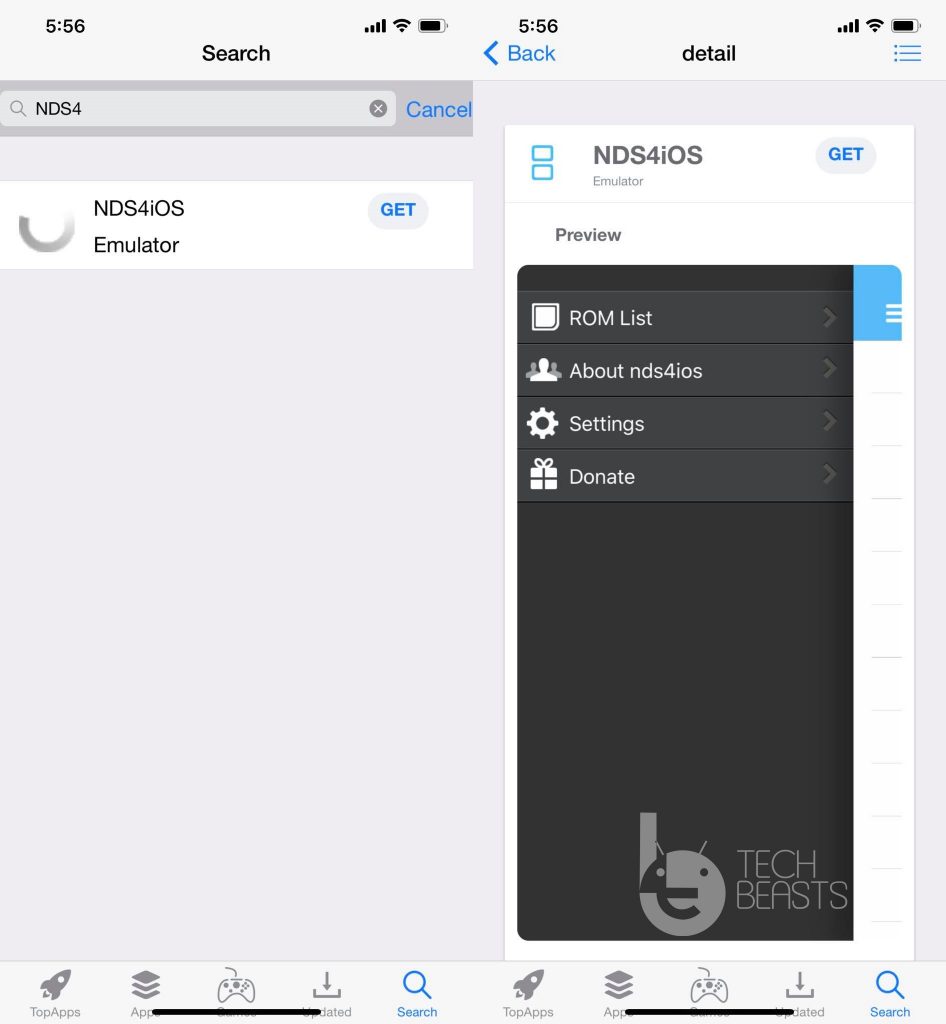
Open the TweakBox page on your iPhone and download the TopStore.
Now on the iPhone, go to Settings > General > Device Management/Profiles > Click on TopStore > Trust.
Open the TopStore from the app drawer.
In the TopStore, click on TweakBox Apps.
Search for the NDS4iOS app now.
As you find the app, install it.
NDS4iOS will now appear in the App Drawer.
Requirements to download NDS4iOS via Cydia Impactor
Download NDS4iOS Emulator using IPA File via Cydia Impactor
Open Cydia Impactor and connect the iPhone to the computer.
Select your device in the Cydia Impactor.
Drag the NDS4iOS IPA file and drop it onto the Cydia Impactor.
Cydia Impactor will ask for an app-specific password now, get it from your Apple Account’s Security Settings and enter it.
NDS4iOS will be installed after this.
On your iPhone, go to Settings > General > Device Management/Profiles > Click on NDS4iOS and trust it.
NDS4iOS is now ready to be used.
How to sideload ROMs in NDS4iOS
Download NDS ROMs.zip files from this pageusing Safari Browser.
Click on the Downloaded file > More > Copy > Copy it to the NDS4iOS.
Launch the NDS4iOS Emulator now.
You will find the sideloaded ROM there.
Start playing now, that’s all.
Final Words
That’s all with the installation of the NDS4iOS Emulator on an iOS device. You can sideload almost every single title that’s released for the Nintendo DS to date. There are many credible sources that provide authentic NDS4iOS or NDS ROMs. If you are looking for an emulator to play Gameboy Advance games, take a look at the Delta Emulator for iPhone. In case you end up facing problems while installing the Emulator or with the ROM installation, reach out to us using the comment section below. We will try our best to get back to you in time.
Looking for some amazing Galaxy A51 and A71 HD Wallpapers? You have landed at the right place. I have collected over 100 HD wallpapers for the Galaxy A51 and Galaxy A71. Go ahead and download Samsung Galaxy A51 and A71 HD Wallpapers now.
Galaxy A51 and A71 HD Wallpapers
Both the Galaxy A51 and A71 have punch-hole in their displays. This punch-hole can be put to use with the help of some amazing wallpapers. If you remember, Note 10 and Note 10 Plus also had a punch-hole right in the middle of the screen. At that time, a number of wallpaper designers showed their creativity and brought dozens of wallpapers to give this punch-hole a cool look.
I did a little experiment with the A51 and A71. I applied the Note 10 and Note 10 Plus wallpapers on these phones and to my surprise, it looks as if those wallpapers were built for these handsets. They take very good care of the punch-hole. Down in this post, I am going to put the wallpapers that I previously used on the Note 10 phones. If you have any Note/Note+ wallpaper, you can use it on your A51 or A71 without any hassle.
You can also apply all these wallpapers to the screen of the Galaxy S20, S20 Plus, S20 Ultra, Galaxy Note 10 Lite, and the Galaxy S10 Lite.
HorrorSuper ManIron Man
SharkFunnyNerveBatmanGodzilla
ColorsUPAndroidJordanGalaxy S3 VibesZeldaFrogJokerCaptain AmericaPhone InternalsMeshCityscapesCameraSpidermanSpider man 2Eiffel TowerSuperManchipIron Man 2L.A. Kingsblack waterStarlord
That’s all. I hope you guys liked these wallpapers. Let us know which one is your favorite out of these. Also, what phone are you applying these to? If you are facing issues while downloading any of the wallpapers, reach out to us using the comment section below. We will get back to you as soon as possible.
Hangouts Meet is the need of the hour. If you are a teacher looking for a way to teach your students online, this is going to be one of the best solutions. In the following guide, I will show you the steps to download Hangouts Meet for PC. You can run the Hangouts Meet for PC on Windows or macOS.
Hangouts Meet
Hangouts Meet is a Google application built for the corporate and education sectors. The world is closed right now and all of the work has shifted to online mediums using the work-from-home strategy. In such crucial times, applications like Hangouts Meet are playing the most useful role. If your job requires you to attend online meetings or presentations, the Hangouts meeting app is going to let you do that.
Several users can join an online meeting session at the same time. The host of the meeting has full control of the environment. Users can share their screens through the app too. Hangouts Meet allows users to talk privately as well. The host can also control the mics and speakers of the attendees. In simple words, this is a video chat application, but it’s not built for private video chat sessions. The app is for online meetings or if you just want to have a video chat session with a group of friends.
Hangouts Meet does not require everyone to have a Google Account. Only the meeting host needs to sign up for the app through their free Google Account. The hosts can share code with others to join a meeting. Others can join the meeting from anywhere using any device for free. There is no other third-party app or a plugin required to run the Hangouts Meet app. It’s a super-fast and easy-to-use application.
Recently, the popularity of this app increased when the COVID-19 left everyone home-bound. Schools, universities, and colleges turned their heads towards the Hangouts Meet to provide online teaching solutions. In fact, we wrote about the Hangouts Meet in our list of best online teaching apps. It’s giving an opportunity for kids to continue learning while they are still at home. Hangouts Meet, for personal use, can be downloaded for free. It has an Android app and a web app which is also a part of Gsuite. For corporate use, the companies can acquire the G-suite subscription.
Hangouts Meet for PC
The Hangouts Meet does not have a desktop app for Windows or macOS. For such operating systems, you can either use the Hangouts Meet online in a browser, or you can follow this tutorial to download its Android version on a PC. I will show you the steps to install Hangouts Meet for PC using an Android emulator.
Preparations to download Hangouts Meet on PC
It will work on any Desktop PC or Laptop with a Webcam or Front Cam respectively.
Windows 7/8/10 or macOS.
A Google Account is needed, if you don’t already have one, create one for free.
You need an Android Emulator – Download BlueStacks 4.1 and set it up using an old/new Google Account.
Follow the remaining steps now.
Download Hangouts Meet for PC
These are the simple steps to finally download Hangouts Meet on computer.
Total Time:10 minutes
Open BlueStacks on your computer.
Launch BlueSacks, if you have not already set it up, set it up now using old/new Google Account.
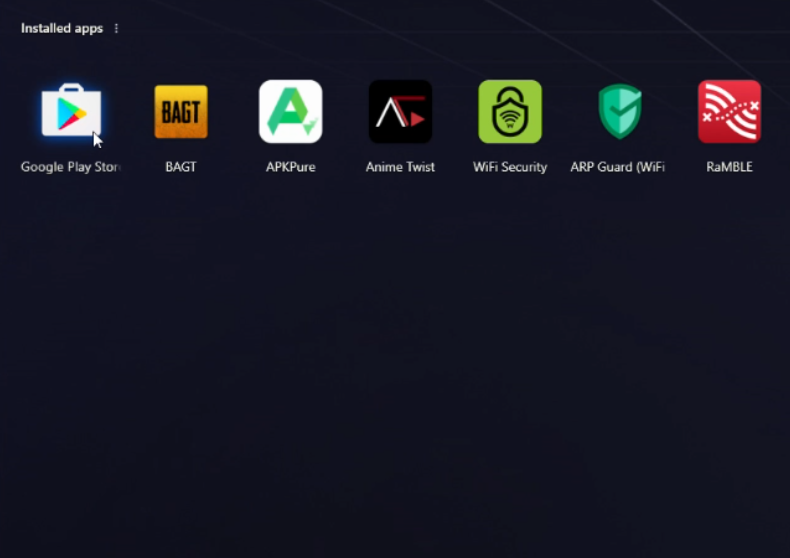
Open Play Store in the BlueStacks.
Now open the Google Play Store in the BlueStacks.
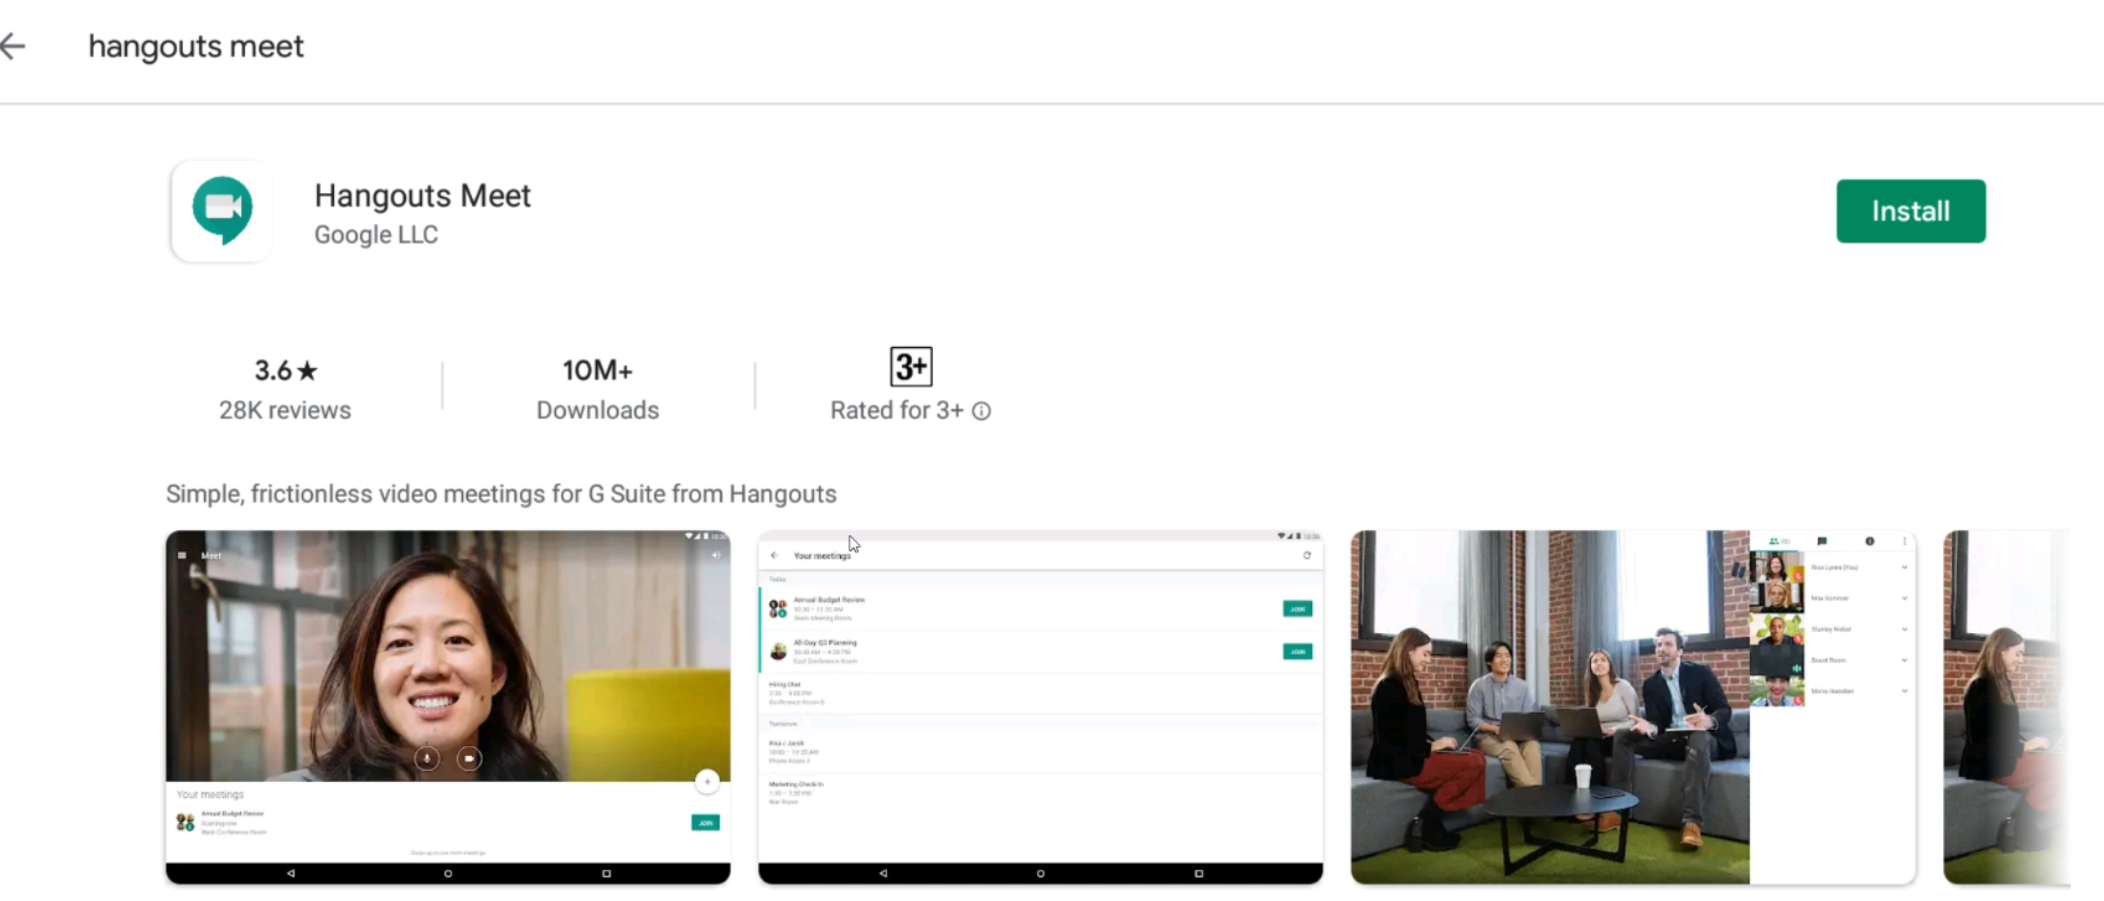
Find Hangouts Meet in the Play Store.
Using the search bar in the Play Store, type “Hangouts Meet” and find it.
Install Hangouts Meet and launch it.
As you find the app, install it and then open it after the installation ends.
Log in to the Hangouts Meet.
As suggested on the screen, use the Google Account to log in or sign up for the Hangouts Meet.
Start a Meeting or Join a Meeting.
Now either start a meeting or simply join a meeting by entering the meeting code.
Final Words
Hangouts Meet for PC will maintain a list of your meeting logs in a separate tab. The app works just like a normal phone application. You can set alerts in the app in order to not to miss an upcoming meeting. You can also send notifications to others regarding an upcoming meeting. In case you run into any problems while using the app, feel free to ask your questions in the comments below. I will try my best to get back to you ASAP.
Apple has acquired the Dark Sky weather application, leaving the Android users in a disarray. The app is no longer available in the Play Store. From now on, it will only work on iOS devices. But wait, you can still install the Dark Sky using its APK. Down in this post, you can find the last APK of Dark Sky, the version 3.3.1. Download Dark Sky APK for Android now and install it manually.
Open the File Manager, find the Dark Sky APK and open it.
Install the app by following on-screen instructions.
Now go to your app drawer and open Dark Sky.
Set your location in Dark Sky.
Start viewing the world’s weather now.
About Dark Sky Weather App
There are many weather applications for both Android and iOS, but the Dark Sky stands out for a few reasons. The very first thing is Dark Sky’s accuracy. If you want to know the most accurate details of the weather, this is the application you need to take a look at. It provides all the weather metrics based on every single hour of a day. Dark Sky has one of the most explanatory UIs. Only one single main screen of the application has so much explanation that you won’t have to take a look at any other page or get any other application to know about a particular aspect of the weather.
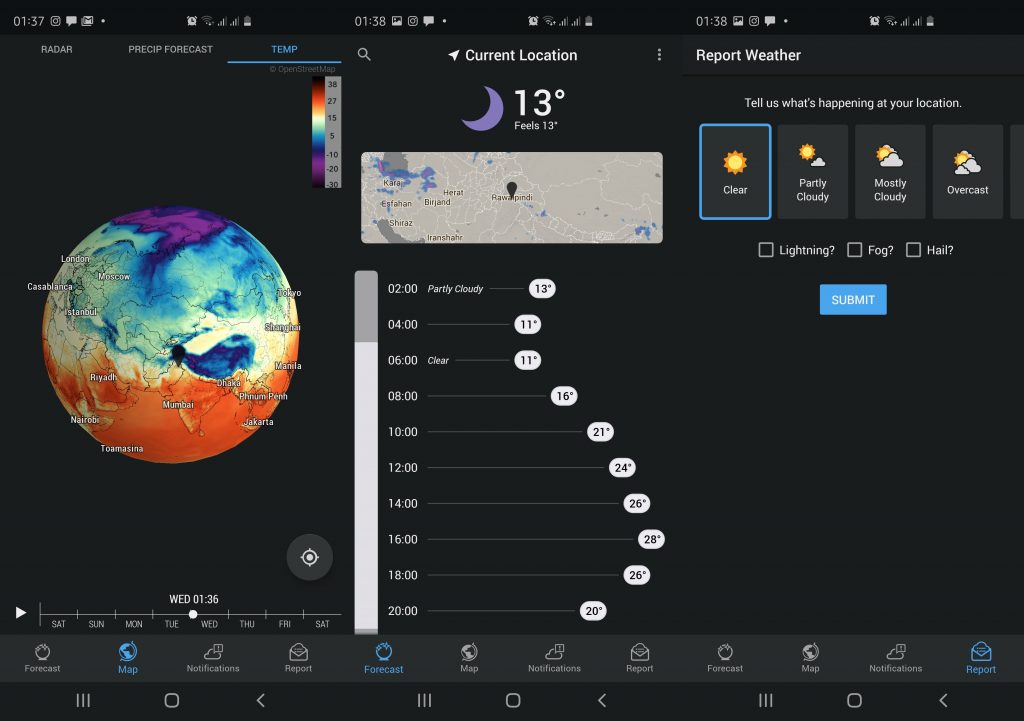
Dark Sky shows the weather of the entire world by labeling temperatures on the Earth’s globe. You can simply tap a region’s name on the glove to explore the weather of the cities falling in that region. On the main page, the Dark Sky shows a 24-hour forecast. The app has tabs for all metrics. or example, you will find the Pressure in MBs, Cloud Cover, UB Index, Dew Point, Wind Gust in KPH, Humidity, Wind in KPH, Precip rate in CM/HR, Precipitation probability percentage, Feels-like temperature, and the main Temperature appears on the home-page of the app by default.
There is a “Map” tab at the bottom that shows a 15-day forecast of the whole world. You double any part of the world to access the weather of the particular region. At the top of this screen, you can find the RADAR, Precip Forecaster, and the Temperature tab. The app identifies temperature on the globe with the help of colors. For example, the countries with high temperatures will have a black color on the globe, normal temperature will have red color, below normal yellow, low 5, cold black/purple, extremely cold dark purple.
Users can further report the weather of their country using the “report” feature of Dark Sky. The app also has a notification feature. You can set personalized alarms to notify when there is a sudden change in the weather.
Dark Sky originally launched as a weather application for iOS and Android platforms. It didn’t take long before the Dark Sky company transformed itself into a weather prognosticator.
FFMPEG is the most powerful video editing solution, but it uses a command line interface. To operate FFMPEG, you need to learn about the basic FFMPEG commands. Here is the list of all useful FFMPEG commands for video and audio file editing.
FFMPEG
Those of you who don’t know, FMPEG is an open-source video editor. It’s a free-to-use tool and it can do pretty much anything. At first, FFMPEG supports 100s of video and audio formats. It supports almost all the codecs that exist to date. Even the formats and codecs that are now obsolete, the FFMPEG will let you handle those. It uses a command-line interface which means you will be editing your videos and audio files using commands.
FFMPEG can be used to crop a video or change dimensions of a video. It can be further used to split a video clip or join multiple clips together. You can convert video and audio files from any format to another format. For example, you can transform the .wav audio files into .mp3 format and vice versa. Similarly, you can transform .mkv video file into .mp4 and vice versa. There is two-way support for all audio & video formats.
Furthermore, you can create a video clip by joining photos, a video slideshow to be specific. It can also speed up or slow down a video clip. One of the best features of FFMPEG is its ability to extract audio from a video file. If you like the music behind a video at a specific time, just run the FFMPEG and extract that favorite part of yours. Anything that works for the videos, that also works for the audios.
FFMPEG is such a versatile tool, with this one tool, you won’t have to use any other video/audio conversion or crop tool. This tool can treat your audio and video files in almost all ways. Of course, it’s not a tool like Adobe Premiere Pro, Filmora, or the iMove. It’s only meant to change the video/audio size/dimensions/length/formats. The best thing about FFMPEG? Well, it’s the fastest video editing tool you will ever use. It merely takes a few seconds to perform a specific operation using FFMPEG.
As far as the FFMPEG compatibility is concerned, it’s available for Windows, macOS, and Linux.
Now all the operations that I have mentioned above, can be performed with the help of FFMPEG commands only. Down below, I am going to list over 20 useful FFMPEG commands. The purpose of each FFMPEG command is written next to it. Take a look and find out your desired FFMPEG command.
Before you take a look a the FFMPEG commands, here are the important sources:
This command can convert video from any format to any other format. Replace the inputvideo.mkv with your source video and format and outputvideo.mp4 with your output video and format.
Just like the video files, you can convert any audio from one format to another. Replace the inputaudio.wav with your source audio and format, and the outputaudio.mp3 with your output audio name and format.
First of all, go to your source video’s properties > details and note down its dimensions i.e. 1920 x 1080 or if it’s a 4K video, note down its dimensions. Run the above command by replacing testvid.mp4 with your input video and format, use the -vf scale to define the output video resolution i.e. 1920 for 1080p or 2160 for 2K video, libx264 is the codec, convertedvideo.mp4 is the output file, replace it with your desired output name.
Go to your video’s properties > details and find out its original frame rate. Change the inputvideo.mp4 with your source video name and format, change fps=30 to any frame rate you want, and change the outputvideo.mp4 to your desired output name and format.
Change input.mp4 to your source video and format, use -ss parameter to set the clip’s starting time, use the -t to set the clip duration and change output.mp4 to your desired output name and format.
Change video.mp4 with your source video and format, use -t to set the clip duration, change the small-1.mp4 to set clip-1’s name and format, use the -ss parameter to set the starting time of the 2nd clip and small-2.mp4 will be the name of the 2nd clip.
Replace the input.mp3 and output.mp3 with your source and output file name, atempo-2.0 is the clip speed, 2.0 will speed up by 2x, set it to whatever you want. You can use any number from 0.5 to 2.0.
Replace input.mp4 with your source video name and format, use setpts=0.125*PTS to set slow down or speed up a video. 0.125 makes your video slow. Set the output.mp4 to your own output name and format.
Put the source video and subtitles file in the same folder. Replace the movie.mp4 and subtitles.srt with the original file names and formats and change the output.mkv to your own output file name and format. Remember that FFMPEG supports a large number of subtitle formats.
Put your video and audio clips in a folder. Create a text file and put the sources of those audio/video clips in that text file. Run FFMPEG with the concat command, replace the file-list.txt with your .txt file and output.mp4 with your output name and format.
Replace video.mp4 with your video and format, set the GIF scale according to your own choice, -t is the duration and -r is the framerate while image.gif is the output file name.
Extract Audio from a Video
ffmpeg -i video.mp4 -vn -ab 256 audio.mp3
Change video.mp4 to your source video and format, 256 is the bitrate of audio while audio.mp3 is out output audio name and format. You can change all this for yourself.
This command can extract images from a video. Use the parameter -ss to set the time of image capture, video.mp4 will be your source video, the scale is the size/dimensions of the image and image.jpg is the output image name.
Convert video into images
ffmpeg -i movie.mp4 -r 0.25 frames_%04d.png
An entire video can be converted into images with FFMPEG. Replace the movie.mp4 with your source video and frames_0%4d.png will be your output images name.
The above two commands can join an audio and video clip, this will actually add background music to your video. Replace the video.mp4 and audio.mp3 with your source files and output.mp4 with the output file name and format.
You can create a slideshow out of images. Parameter -r 1/5 defines the duration of each image i.e. 5 seconds, img%03d.png is the name of image, use names such as image001.png, image002.png, image003.png, slideshow.mp4 is the output name, you can change it accordingly.
Quickly change the resolution of a video. Replace input.mp4 with your source name and format, set the 480×320 to any dimensions of your choice i.e. 1920 x 1080 or 1280 x 720, change the output name and format accordingly.
Ever seen that poster while playing an mp3 song in a music player? Well, you can add that on your own too. Replace the image.jpg with the name and format of your source image, audio.mp3 is your source audio file with its format, 192k is the bitrate and the output.mp4 is the audio output file name and format.
To convert an image into a video, replace the image.png with your image and format, set the -t 30 to any number, this is the duration of the video, and set the video.mp4 to your output name and format.
This is the command to crop any audio file using FFMPEG. -ss is the starting time of an audio clip, -t is the duration, inputfile.mp3 is the source file and outputfile.mp3 is the output. Replace the names and formats accordingly.
Change audio volume level
ffmpeg -i input.wav -af 'volume=0.5' output.wav
To change the default audio level of a clip using FFMPEG, use this command. Input.wav is your source file, 0.5 is the volume level, change it to any level of your choice and output.wav is the output file name and format.
Mute a video
ffmpeg -i video.mp4 -an mute-video.mp4
This command will remove the audio from a video. This will actually mute the clip using FFMPEG. Replace the video.mp4 with your source video name and format.
Final Words
That’s all with the most common FFMPEG commands. These also happen to be the most popular FFMPEG commands, but that’s not it. There are hundreds of other commands that you can find on the official FFMPEG page. If you run into any problems while using these commands, feel free to reach out to us. We will try our best to help you out.
You can download the latest Resso Music APK File for Android from here. You can express yourself with the help of the Resso music app.
Yes, you’ve heard it right. Resso will allow you to stream free songs on your Android and not only that, but you can also add, animations, lyrics, gifs to your favorite track. Once added you can easily share it with others.
The best way to describe Resso, an app that lets you connect with others and express your feelings with others through your favorite tracks.
Everyone love listing to music and it’s said that music can easily interact with the brain. It does help you relax, you can feel different emotions, and music can lighten up your mood.
There are tons of streaming apps available on Google Play but they don’t allow you to download free music. But there are other apps that are not available on Google Play but they allow you to download free music. You can count Resso Music as one of these apps which lets you stream free music and also let you download it.
Resso Music is not available on Google Play, you need to download Resso Music APK file on your Android device from the following links. But before that let me tell you the main features of the Resso Music.
Main Features of Resso Music
As I told you before, you can add gifs, images, and videos on your favorite tracks.
You can easily select lyrics from your favorite and share it with others on social media.
Once you made a playlist on Resso you can share it with others.
Just Like SoundCloud, you can also listen to songs and leave comments.
Resso has two versions, one is paid and one is free. There is more to it, Resso has a feature which is called Vibes. Vibes is a pre-recorded video whose duration is 6 seconds. It will play in the background of a song.
Download & Install Resso Music APK
Heed the instructions below and you will be able to download and install Ressoo Music APK on your Android devices.
Step1: Download the Resso Music APK & Config Archi APK file from the following links.
Looking for a way to convert videos for free? Well, FFMPEG is here to help you out. Take a look at how to convert videos using FFMPEG for free. FFMPEG is an open-source media converter for Windows and macOS.
FFMPEG
Being a YouTuber, I can’t stress enough upon the importance and utility of a tool like FFMPEG. This tool has helped me so much that I couldn’t resist talking about it here and finally writing this tutorial. FFMPEG is the best in business when it comes to converting your audio or video media files. This tool is huge, its applications are unlimited. No matter what use case you have to convert a media file, you will find FFMPEG helpful. The tool supports unlimited video and audio formats. You can convert almost any format to another format. You can convert any bitrate to another bitrate. Also, you can convert from any resolution to another resolution. The framerate of the videos can be changed. You can also change the codec using FFMPEG. Videos can be cut into smaller parts via FFMPEG. A video can be split into multiple parts too.
Running FFMPEG on Windows 10
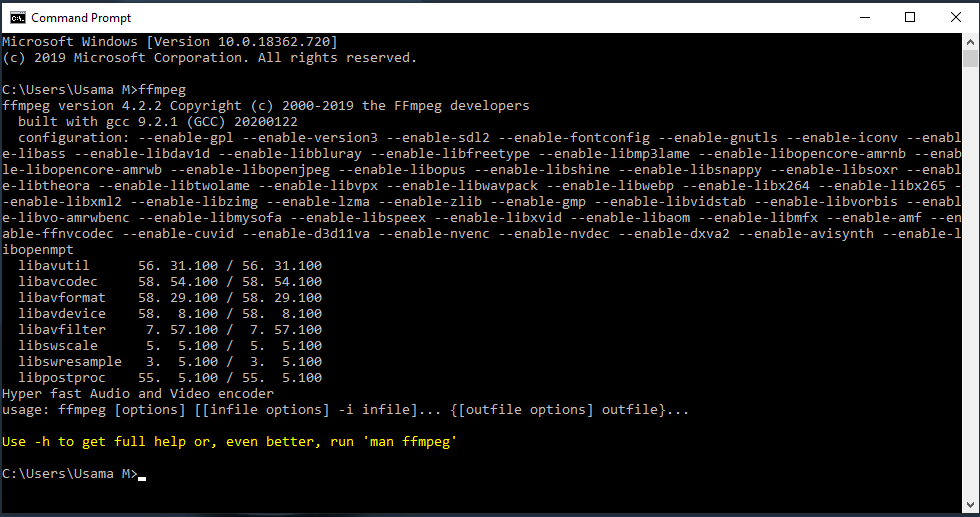
FFMPEG can do pretty much anything. It can decode, encode, transcode, mux, demux, stream, filter, and play all the video and audio formats that exist to date. Even the formats that have become obsolete and no media player supports them, the FFMPEG will support those.
What’s the best thing about FFMPEG? Well, there are two things I’d like to talk about. No.1, it’s a 100% free tool for Windows and macOS. No.2, it’s super fast. Unlike the ordinary media converters, the FFMPEG takes an entirely different approach. It uses hardware acceleration to perform your desired operation. It literally takes a few seconds to convert a file of GBs from one format into another or from one resolution into another.
I personally found FFMPEG when I was screen-recording on my computer for camera comparisons and those videos were recorded in the MKV format. The Adobe Premiere Pro did not support MKV files so I had to convert those files into MP4. I tried countless tools, and all tools either added their watermark to my videos or the tools just didn’t support the MKV to MP4 conversion. That’s when I came across FFMPEG and I was amazed to see how it works. Since then, I have been using FFMPEG for a number of other operations.
This tutorial is only about converting videos from one format to another or one resolution to another using FFMPEG. To know what else it can do, take a look at our list of useful FFMPEG commands. For now, continue towards the tutorial showing how to convert videos using FFMPEG.
First of all, download FFMPEGon your computer and set it up.
Now take a look at the steps below.
Convert videos using FFMPEG for free
Convert videos from one format to another via FFMPEG
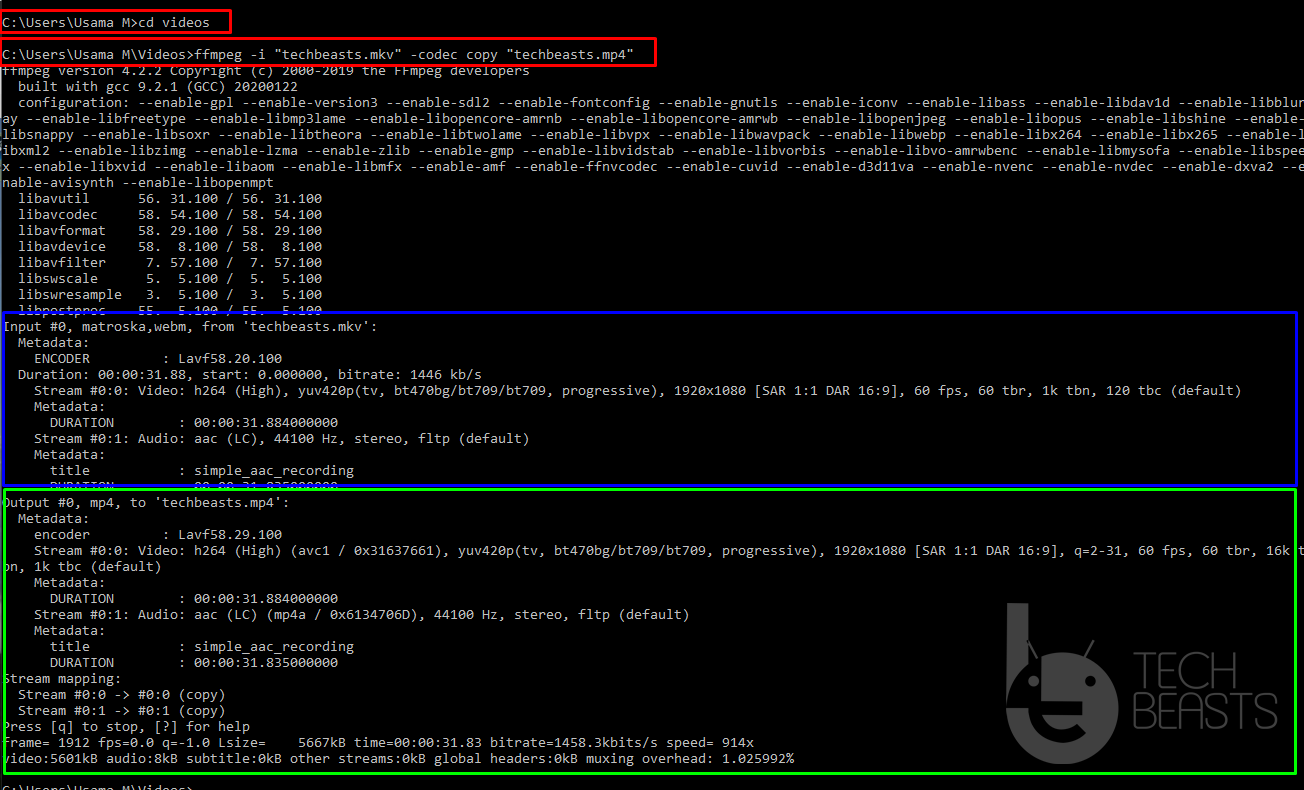
First of all, rename your video file to a very simple name, for example, I have renamed sample video to “techbeasts” only.
Now open a command window on your computer.
Navigate to the folder where the video is placed, for example, my video is in the “Videos” folder so I’ve just entered “cd videos” in command window to access it.
Alternatively, just open the folder where your video is placed. Press and hold Shift Key + Right-click > open command window here.
In the command window, enter the following command
Replace the filename and format with your filename and format i.e. FFMPEG -i “inputfile.inputformat” -codec copy “outputfile.outputformat”
Hit enter.
FFMPEG will run, detect input file, create output file and convert it.
Convert video resolution via FFMPEG [4K to 1080p and vice versa]
Rename the video file to a simple name.
Go to video properties > details > note down the resolution. Remember this doesn’t have to be 4K necessarily, it can be any resolution you want to convert.
Now open the command window and navigate to the location where the video is placed.
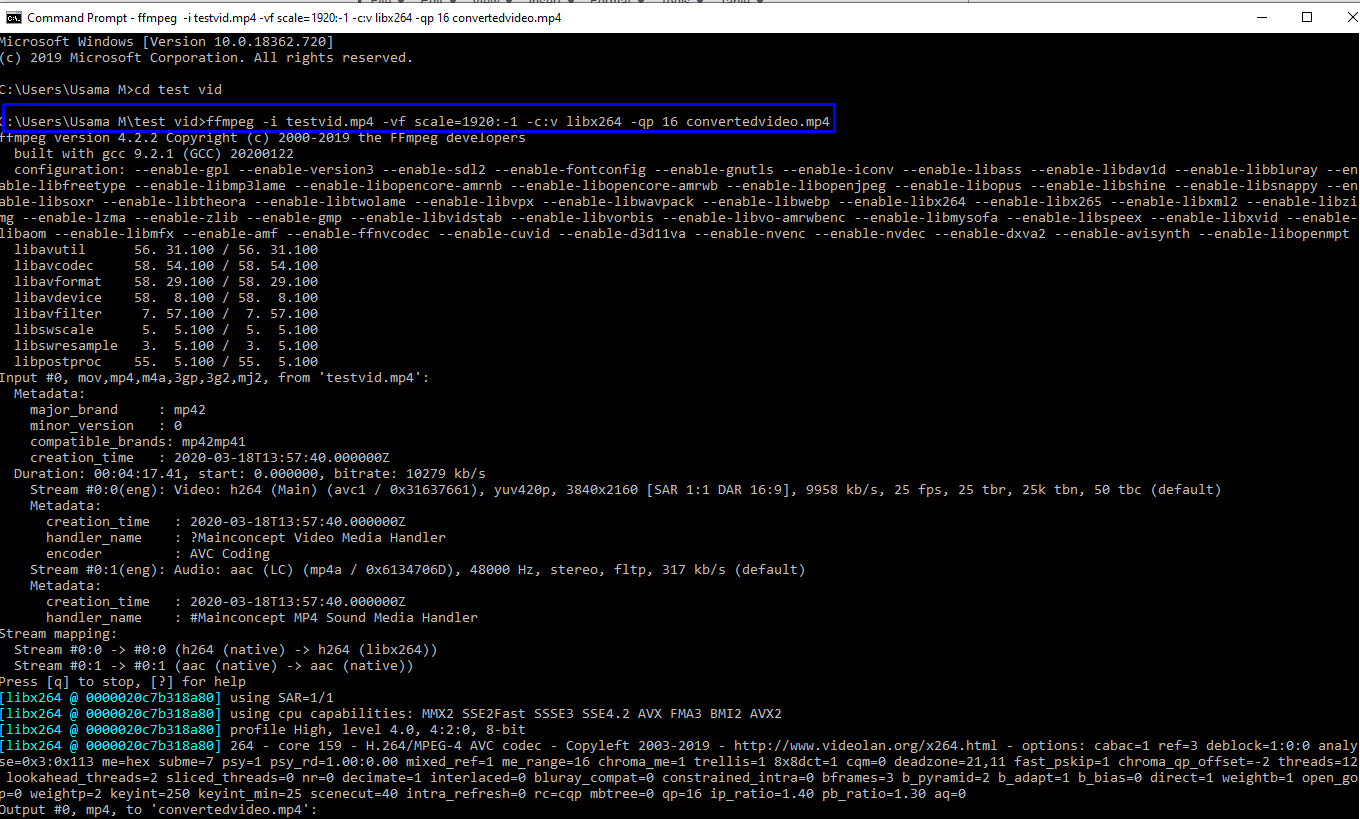
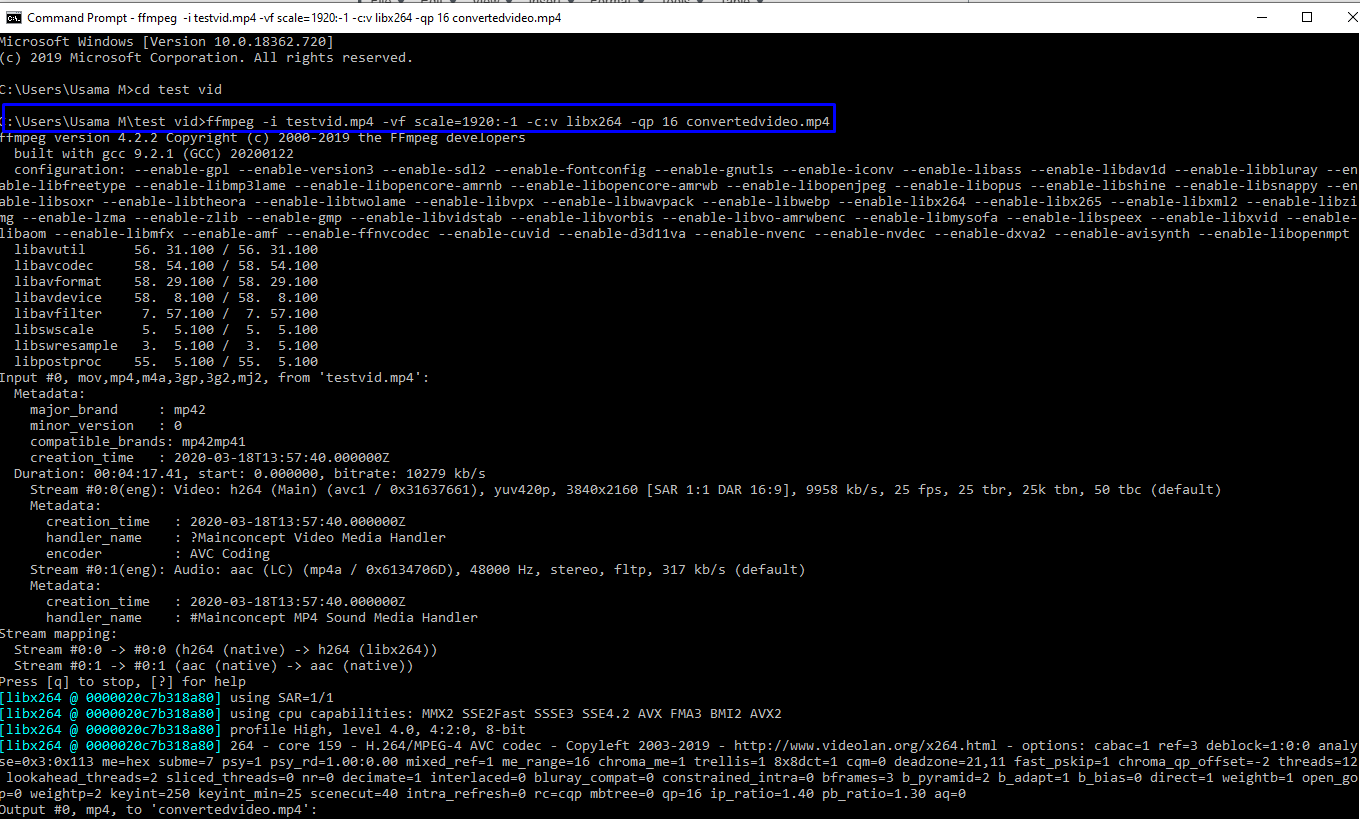
In the following example, I am converting a 4K video to 1080p and the file name is testvid with mp4 format. The command is for 4K to 1080p, you will change this command according to your filename and your desired resolution.
Replace testvid.mp4 with your filename, replace 1920 with your desired resolution, and replace convertedvideo.mp4 with your output filename.
Conclusion
That’s all with the two basic functions of FFMPEG. You can discover all of its functions and commands here. If you run into any errors while trying to convert videos via FFMPEG, feel free to reach out to us using the comment section below. If you have discovered some other use of FFMPEG, make sure to share it with everyone.













![Download Eclipse Emulator for iPhone iOS 13 [No Revoke]](https://techbeasts.com/wp-content/uploads/2020/04/Black-Yellow-and-Green-Nostalgia-Games-Collection-YouTube-Thumbnail.png "Download Eclipse Emulator for iPhone iOS 13 [No Revoke]")


![Download Panda Helper for iPhone iOS 13 [No Jailbreak]](https://techbeasts.com/wp-content/uploads/2020/04/Blue-Office-Hacks-YouTube-Thumbnail-1.png "Download Panda Helper for iPhone iOS 13 [No Jailbreak]")






































































![Download Resso Music APK File for Android [ Free ]](https://techbeasts.com/wp-content/uploads/2020/04/Screen-Shot-2020-04-07-at-4.31.47-PM.png "Download Resso Music APK File for Android [ Free ]")