

Samsung Galaxy Note 8 was updated to Android Pie almost a week back. The phone has got tons of new features. After updating to the latest Android Pie, Galaxy Note 8 owners have lost root on their phone. This is the guide you need to root your Galaxy Note 8 on Android Pie. By following the easy steps laid down in this post, you will be able to root Galaxy Note 8 on Android Pie and install TWRP. Before I tell you how you are going to be able to root Galaxy Note 8 on Android Pie, let’s take a look at the goodies brought in by Android Pie.

Samsung Galaxy Note 8 Android Pie
The Android Pie update first of all moves the version number to Android 9. This is a major update. Android Pie for Note 8 brings the biggest changes till date. The update carries a brand new UI, updated features to enhance battery life and performance, and features to make the device more useful for the users.
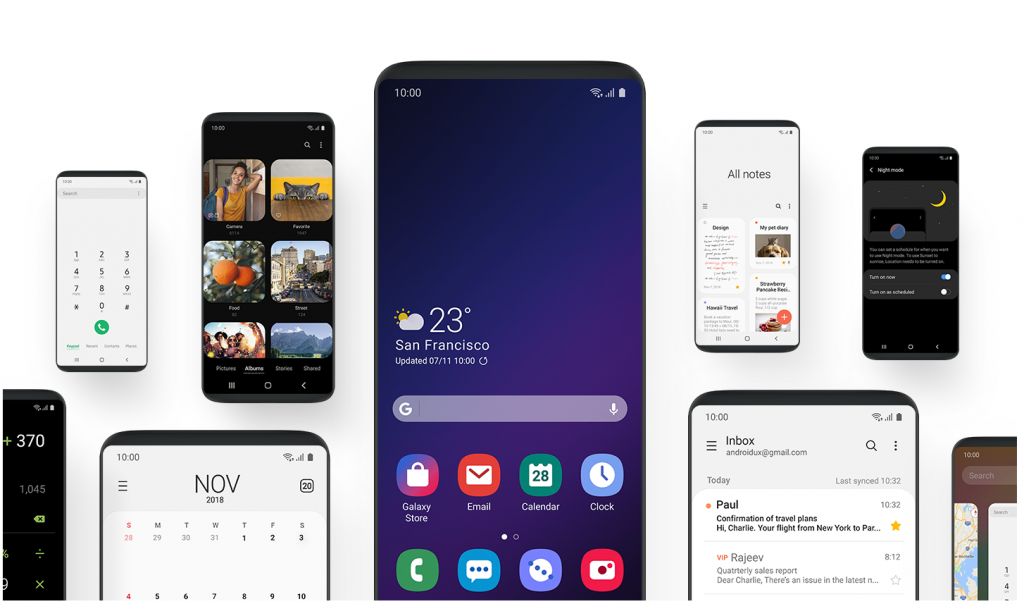
The UI updates include the One UI. This is Samsung’s brand new UI and it replaces the Samsung Experience UI. The One UI is designed to make the phone easy to use with one hand. The icons and elements are now round. For example, all the icons are round and the recent apps menu is round too. Samsung has added new icons in the toggles section. The notifications area and status bar have been completely revamped.
Check out: Guide to install Android Pie on Galaxy Note 8
Settings application has a new UI too. Samsung has shuffled some of the options. For example, the location of information view under the lock screen settings has been changed. Samsung has also changed the look of the main menu of the applications.
The native Dark Mode has been added to the Samsung phones. Samsung has named this feature as “Night Mode”. This will definitely give the users a battery time boost on their Super AMOLED smartphones.
Samsung has also added the native private DNS mode in this update. Users can now use a private DNS to block ads without using a third-party application.
The Android 9 Pie update for the Note 8 also brings navigation gestures. If you are not a fan of the navigation buttons, you can enable the navigation gestures to navigate through your Galaxy Note 8.
There are several other improvements like the addition of Adaptive Battery Mode. Samsung has enormously increased the performance of its 2017 flagship with the help of this update.
That’s all about the Android 9 Pie for the Galaxy Note 8. It’s time to take a look at the steps to root Galaxy Note 8 running on Android Pie. Before following the procedure, pay attention to the note written below.
Note:
Rooting your device or installing a custom recovery is something that the phone manufacturers do not recommend. This isn’t recommended by the root and recovery discoverers/developers either. Before rooting your Galaxy Note 8, make sure that you have a great idea of what you are going to do. Understand all the risks involved before going ahead. If you are a newbie, you need to pay extra attention to all the steps given below to avoid a mishap.
Preparations to Root Galaxy Note 8 and install TWRP
- This guide is only for Galaxy Note 8 running Android Pie. Check your phone’s details under Settings > About phone section.
- You need an External MicroSD card to root the phone.
- Charge your phone’s battery up to 50% to avoid power loss.
- Back up all of your messages, call logs, and contacts. This process may wipe your phone.
- Enable OEM Unlocking and USB Debugging Mode from Developer Options.
- Use the original data cable to connect Note 8 to the computer.
- Follow the remaining steps with full attention.
Required Downloads
- TWRP Recovery for Galaxy Note 8:
twrp -3.2.3-0-greatlte.img.tar Magisk + OEM Issue Fix File for Note 8:Magisk +N950F_PIE_DS_N_PIE_Root_for_OEM_issue_devices_V5.zip- Copy the
Magisk OEM issue.zip file to your External SD Card.
- Copy the
- Odin 3.13.1 to Root Note 8: Download Odin 3.13.1
- Extract to get Odin3.exe file.
How to Root Galaxy Note 8 on Android Pie and Install TWRP
Open Odin3.exe and add the TWRP Recovery.img.tar file.
First of all, open Odin.exe on your computer. In Odin, click on the AP tab and select the TWRP.img.tar file. Now go to Options tab in Odin. Make sure that the only option checked is “F.Reset.Time”. All other options should be UNCHECKED.
Boot your Galaxy Note 8 in Download Mode.
Power down your Galaxy Note 8. Now press and hold Volume Down + Home + Bixby buttons simultaneously to boot up. As your phone shows a warning, press Volume Up to continue.
Connect Note 8 to the computer and flash TWRP.
Now connect your phone to the computer. As Odin shows a Blue light in the ID:COM box and “Added” in the log box, click Start. This will flash TWRP. After TWPR flashing ends, DO NOT REBOOT your phone. Disconnect it.
Reboot your Galaxy Note 8 into the TWRP Recovery to format it.
After disconnecting your phone, press and hold Volume Up + Bixby + Power button for a while to boot into the TWRP Recovery. TWRP will now ask if you want to allow modifications. Swipe the screen and go ahead. Now in TWRP, click on Wipe > Format Data. This will wipe the data from your phone.
Reboot into Recovery again, flash Magisk.
Now go back to main menu in TWRP. Click on Reboot > Recovery. As your Note 8 reboots into the recovery, click on Install > Install Zip > Choose the OEM Fix Magisk.zip file from the external SD card. flash the file.
All done. Reboot into the System now.
After flashing the file, go back to the main menu again and tap Reboot > System. This will reboot your phone into the system now. You will have the Note 8 rooted with TWRP installed. That’s all. Enjoy!

Don’t have an SD card? Here’s what to do
In case you do not own an SD card, you can skip copying files to the external sd card. Follow all the steps from Step 1 to Step 4. After step 4 when your phone is in the TWRP recovery, connect it to the computer. As the mount is working now, you can copy the OEM Issue Fix file directly to your Note 8. Just copy the file, disconnect the phone and follow step 5 and 6.
Wrap Up
By now, you should have a Galaxy Note 8 with a TWRP Recovery and Magisk installed. You have opened a world of endless possibilities now. Feel free to install any root application or flash any custom ROM. You can enhance the performance of your device with the help of best root apps. If you need any help regarding this guide, feel free to reach out to us. The best way to contact us is to leave a comment below.
Thanks to our friend Dr.Ketan for developing the OEM Fix + Magisk file.


")


Will this work with Sprint Note 8 Snapdragon model SM-N950U
Magisk + OEM Issue Fix File for Note 8: Magisk +N950F_PIE_DS_N_PIE_Root_for_OEM_issue_devices_V5.zip
Update these links please!
This work t-mobile note 8 android 9