Let’s tell you what to do when your Instagram Search History Won’t Clear. Every day on Instagram we searched for many things, even stalk some people. In a good way, not in a creepy way. Everybody does that, there is no need to guilty for that. But maybe you don’t know that Instagram keeps records of your search history. I don’t see why that is important, not only that, Instagram also shows same profiles or peoples in under suggestions section.
However, they should stop doing this, but on the other hand. Instagram gives us the option to clear our search history, you can do it through settings. It is great, right? Not always, although Instagram has this feature but sometimes no matter how hard you try, Instagram search history won’t clear.
It will make you think that your search history is cleared but it doesn’t. As soon as you type anything in the search bar, suggestions start popping up. That’s why we have created this post, we will tell you what to do when Instagram Search History Won’t Clear.
But before that, we’ll tell you how to clear search history. Let’s get started.
Fix, Instagram Search History Won’t Clear:
First, let’s start with clearing Instagram Search History. Since Instagram doesn’t clear it automatically so we have to do it manually.
Clear Instagram Search History:
How to Clear Instagram Search History
✩ Open up the Instagram app on your device. Tap on your profile icon. You can find the profile icon at the bottom of your screen. This goes for both iOS & Android.
✩ Tap on 3 Lines located at the top right side of the screen. From here Tap on the gear icon located at the bottom of the screen.
✩ Scroll down and Tap on Search History. On the next screen Tap on Clear Search History.
✩ A pop-up will show up, Tap on Yes, I’m Sure.
Normally, it will clear all of your Instagram search history. However, if it doesn’t then follow to steps below to fix Instagram Search History Won’t Clear.
Restart Device:
As I said before that, Restarting your device is the ultimate solution for all the problems on a smartphone. We have tried this solution every time, surprisingly it works most of the time.
Logout:
Another way to fix Instagram Search History Won’t Clear. Is to log out from your Instagram account and restart your device. To do so, follow the instructions below.
How to Logout from Instagram
✩ Open up the Instagram app on your device. Tap on your profile icon. You can find the profile icon at the bottom of your screen. This goes for both iOS & Android.
✩ Tap on 3 Lines located at the top right side of the screen. From here Tap on the gear icon located at the bottom of the screen.
✩ Scroll down to the end of the page, Tap on Log out.
✩ Restart your device and log in again.
Clear App Cache and Data:
Clear Instagram Cache & Data
✩On your phone, go to Settings.
✩Navigate to Application Settings or Application Manager.
✩Under the App Manager, navigate to “All Apps”.
✩From the list of apps, find Instagram.
✩Tap Instagram and then tap the Clear Cache/Clear Data button.
✩If you’re using Android Marshmallow or higher, you will tap Storage option and then tap Clear Cache/Clear Data button.
Uninstall Instagram App:
This method worked for us a number of times. All you have to is Uninstall Instagram app and the Re-install it again. To do so, heed the instructions.
Android:
Open Settings -> Apps -> Tab on Instagram -> Tap Uninstall.
Now open Google Play and download the Instagram app again.
If you have no luck so far or you don’t want to clear your Instagram search history. There is another way around, you can delete Top Suggested Search. To do so heed the instructions below.
Tap on the Search Tab located at the bottom of your screen.
When you are on the search screen. You will see “X” icon right next to the profile icon. Tap on it and it will be removed from the suggested search.
You have to this to all the profiles you want to hide from the suggested search. These are possible best workarounds to Fix Instagram Search History Won’t Clear.
Downgrade Galaxy S9/S9 Plus to Android Oreo from Android Pie
This is the guide to downgrade Galaxy S9/S9 Plus to Android Oreo from Android Pie. All those users who recently updated to Android Pie and are not liking it now, they can use this guide. This guide will use Odin to downgrade Galaxy S9/S9 Plus to Android Oreo. The method is completely safe and sound. It will not void the warranty of your phone. Before you begin to downgrade Galaxy S9/S9 Plus to Android Oreo from Android Pie, let us take a look at the reasons that have forced the S9 and S9 Plus owners to take this decision.
Downgrade Galaxy S9/S9 Plus to Android Oreo from Android Pie
Android Pie for the Galaxy S9/S9 Plus – A Turmoil!
3 days ago, Samsung Galaxy S9 and S9 Plus owners started getting the official Android Pie update. Galaxy S9 and S9 Plus owners have been waiting since forever to get this update. While Google is already working on the next version of Android, Samsung could only roll out the Pie update for its most recent flagship smartphone. There is no doubt that Samsung is slower than a turtle when it comes to software updates. The slow updates may not hurt the users that much, however, when the updates do not work up to the expectations, they really hurt.
For example, it took ages for Samsung to roll out Android Pie, and when it finally came out, it is full of bugs. Android Pie for the Galaxy S9 and S9 Plus was in beta stages for over 2 months, even then Samsung couldn’t just make it right. All Samsung has to show off is the new One UI. Samsung does not care for all the broken features, the bugs, the performance lag, and the battery drain problems on the Android Pie update. This has caused disruption among the Galaxy S9and S9 Plus owners. A huge number of S9/S9 Plus owners are now looking for the ways to downgrade their phone back to Android Oreo. In case you don’t already know, let us take a look what’s not right in the latest Android Pie update.
What’s wrong with the Android Pie update?
In this latest update, the shortcuts on the home screen disappear on their own after a while or after a reboot. The shortcuts are not just sticking to the home screen. Samsung has shifted some settings under new menus. For example, the location of lock screen content has now changed. They appear under view-style in the lock screen settings now. It is now much more difficult to disable Google Assitant. The navigation gestures, which are a new feature, do not have the haptic feedback. Samsung Bixby has gotten worse. Samsung has also removed the dot that appeared in the navigation bar. This dot was used to make the navigation bar stick or non-sticky.
One UI is not worth all those issues!
The camera application has a brand new UI which most of the users are not liking. Samsung has changed the split view as well. Switching between the applications is not less than a disaster now. Animations on the Android Pie are an absolute wreck. The battery life of the Galaxy S9 and S9 Plus has gone lowest. All these problems cannot be traded off for One UI. Having a cool UI with these serious issues does not make any sense at all.
So keeping these problems in view, and seeing the number of users willing to downgrade to Android Oreo, I decided to make this guide. It’s time to take a look at the steps to downgrade Galaxy S9/S9 Plus to Android Oreo.
Downgrade Galaxy S9/S9 Plus to Android Oreo from Android Pie
Preparations
This guide is for the Galaxy S9 and S9 Plus that is running on Android Pie. Do not try on any other phone.
Back up all your data as this process can factory reset your phone.
Enable OEM Unlocking and USB Debugging from the developer options.
Use original data cable to connect your phone to the computer.
Disable Samsung Smart Switch, Windows Firewall, and Antivirus if you have one while using Odin.
This process is completely safe and sound to follow. It will not void your phone’s warranty.
Note: Download the firmware with the PDA ending in BRJ6. This is important to perform a safe downgrade.
After downloading, extract the firmware to get the AP, CP, BL, and CSC files.
Odin Files – Reference Only – TechBeasts.com
Downgrading from Android Pie to Android Oreo
Open Odin3.exe file on your computer.
In Odin, go to Options > Ensure that only options checked are Auto Reboot and F.Reset.Time. No other option should be checked.
Now click on the AP tab in Odin and load the AP file. Click on the CP tab and load the CP file. In the BL tab, add the BL file, and in the CSC tab, add the CSC file. We want a clean installation, so do not add the Home_CSC file.
Put your S9 or S9 Plus in Download Mode now. To do so, shut it down first. Press and hold Volume Down + Bixby + Power button to boot up. As you see the warning on the screen, press Volume Up to continue. Connect your phone to the computer now.
Odin will now show a Blue light in ID:COM box, and also show “Added” in the log box.
Everything is set now. Hit the Start button now.
Odin will flash the Android Oreo firmware on your S9/S9 Plus.
As the firmware installation ends, your phone will reboot.
Disconnect the phone and enjoy the old Android Oreo now. That’s all.
Conclusion
Your phone is back to the old stable version of Android now. Downgrading does not mean that you should stick to the old firmware forever. The Android Pie update is very new now and it does take a lot of time for OEMs to fix the issues. Samsung will definitely fix all the annoying bugs, but it will probably take a lot of time. The only option you have right now is to stick to the Android Oreo for a while and wait it out for the stable/bug-free Android Pie update. If you have any queries related to this guide, feel free to reach out to us. We will try our best to get back to you as soon as we get your query.
This is the comprehensive guide to change CSC on Galaxy S9/S9 Plus. The CSC can be changed simply by flashing a combination firmware and using RealTerm. The guide is divided into three parts. In the first part, you will flash the combination firmware. In the second part, you will use RealTerm to change the CSC. And in the third part, you will flash the firmware of the CSC that you just changed to. Before changing CSC on Galaxy S9/S9 Plus, let us take a look at what is CSC and why people change it.
Change CSC on Galaxy S9/S9 Plus
What is CSC and why people change it?
CSC stands for Consumer Software Customization or Country Specific Code. CSC is responsible for region and carrier specific features on a Samsung Galaxy handset. Samsung Galaxy smartphones all across the world share most of the common features. However, there are some regions that have a few extra features enabled on the Samsung phones. For example, the WiFi calling feature on Samsung handsets is available in some regions and it is not available in a number of regions. The WiFi calling feature can be enabled on a phone by changing the CSC to the region which has this feature. Similarly, there are many other software features that are available in some specific regions. To get any such features of another region, users tend to change the CSC of their phone.
Changing CSC is also one way to get faster updates. For example, Samsung rolls out the Android updates faster in regions like Poland, Germany, and Turkey. Users can change the CSC of their device to Germany or Poland and get the future Android updates faster. There are many other uses of changing the CSC, it totally depends on your need and purpose. In this guide, we are going to take a look at the method to change CSC on Galaxy S9 and S9 Plus.
Changing CSC on Galaxy S9/S9 Plus
Changing CSC on the Galaxy S9 and S9 Plus is quite easy. All the Samsung Galaxy S9 and Galaxy S9 Plus variants that have their combination files available on different platforms, you can change their CSC. If the combination file is not available, it is going to be impossible for you to change the CSC. The combination file is sort of an experimental firmware that you can flash to perform testing on your device. In this case, the combination file will lay the basis for you to change the CSC. I have explained the method in laymen terms below. All you have to do is to pay full attention to the steps to avoid a mishap.
Change CSC on Galaxy S9/S9 Plus
Preparations
This guide is for the Galaxy S9 and Galaxy S9 Plus only. This is applicable to all the models that have the combination files available.
Backup each and everything from your phone beforehand.
Flashing the combination firmware before using RealTerm is necessary.
Enable OEM Unlocking and USB Debugging on your phone.
Use the original data cable to connect the phone to your computer. Using any other cable can cause issues.
This is a custom method and it requires flashing expertise, if you do not have an idea about anything prior to this procedure, make sure that you follow each and every step with extra precautions.
If you are afraid of something, it is advised to stay away from this procedure.
Links to all the necessary files are given below for your ease. Download the files carefully for your phone’s model number.
You can flash the CSC of the same model on your phone. Do not flash the CSC of a different model as it can cause extreme trouble. For example, if you have a Galaxy S9 G960FD, flash the CSC of another G960FD only.
Go ahead now and follow the steps carefully.
Note: This is a custom process which is absolutely not recommended by Samsung. If something goes wrong, TechBeasts may not be held responsible. You must take full responsibility before trying to change the CSC of your phone.
Unzip the Combination Firmware file on your computer. You will get the COMBINATION file that has .tar format.
Download Odin 3.13.1 and extract it. Open Odin3.exe file.
Open Options in Odin and make sure that the only option checked is F.Reset.Time. Uncheck all other options.
In Odin, click on the AP tab and select the COMBINATION.tar file that you got after extracting the Combination Firmware.
Combination Firmware Galaxy S9/S9 Plus
Now turn off your Galaxy S9 or S9 Plus.
Press and hold Volume Down + Bixby + Power button.
Your phone will show a warning, press Volume Up to continue.
You are in the download mode now.
Connect your Galaxy S9 or S9 Plus to the computer now. Odin will show “Added” in the log box and also show a blue light in the ID:COM box.
Click on the start button. It will flash the combination firmware on your phone.
Disconnect your phone and reboot it. Your phone should show you the model number now. Proceed to the next part now.
Change Galaxy S9/S9 Plus CSC via RealTerm
First of all, decide the CSC that you want to change your current CSC too. You must download the firmware of the same CSC as well. The firmware download links are given in the next part. You can just go to that part, download the firmware of your desired CSC and then follow this procedure.
Download and install RealTerm on your computer. Download Link.
Open RealTerm on your computer and then go to the “Port” tab.
Now set Baud to 230400, select Port to ssudmdm0000.
Open Send tab now and enter “AT” and then click on “Send ASCII”.
You will now get a response which will look like this
+USB READY
BOOTING COMPLETED
AT
or AT or OK or COMPLETED AT
Now go to the next number in RealTerm.
In case you were unable to get a response, click +CR and then send again.
If you get a response showing “ERROR”, go to the next number.
If you did not get the response even now, check the connection of your phone and ensure that it is connected fine.
Making sure that everything is normal, proceed to the next number.
Now enter “AT+PRECONFIG=1,0” and then click on Send ASCII.
This time, the response will be something like this:
AT+PRECONFIG=1,0 + PRECONFG:1, XXX
OK
The XXX here is your current CSC.
Now once again, enter “AT+PRECONFG=2,XXX” and click on Send ASCII.
Enter the CSC (XXX) that you want to switch to. This is the new CSC you are changing to.
You will get the response:
AT+PRECONFG=2, XXX+PRECONFG:2,OK
OK
XXX is your changed CSC
Now enter “AT+PRECONFG=1,0” and click on Send ASCII.
You will get this response:
AT+PRECONFIG=1,0+PRECONFG:1,XXX
OK
XXX is your changed and current CSC.
Now proceed to the next part and flash the changed CSC’s firmware.
Extract the firmware on your computer to get the AP, BL, CP, and CSC file.
Open Odin3.exe on your computer.
Click on Options in Odin and make sure that the only options checked are F.Reset.Time and Auto Reboot. No other option should be checked.
Click on AP tab and add the AP file. Click on the BL tab and add the BL file. Now click on the CP tab and select the CP file. In the CSC tab, select the CSC file.
Put your Galaxy S9 or S9 Plus in download mode.
Connect your phone to the computer.
As Odin detects your phone, click on the start button.
Let Odin flash the firmware.
Galaxy S9 CSC Flashing
Once done, disconnect your phone.
As the phone boots up, check its CSC. It should be the CSC that you wanted on your phone. That’s all.
That’s all with the CSC guide for the S9 and S9 Plus. You are now free to enjoy the features of another region on your phone. If you have any queries or anything to add to this guide, feel free to reach out to me. I will try my best to get back to you as soon as I get your query. Thank you all. Stay connected.
Honor is the sub-brand of Huawei. Huawei has previously released Honor devices under the Huawei brand. It makes sense to use the Honor name for this new brand as it already has some awareness amongst our audience. They share the technology used in the smartphones, both are in high quality. However, there is a difference in their communication strategies. It is in the fortunate position of being able to benefit from the extensive hardware and software experience and global footprint of the Huawei parent company, but it is run by a dedicated team and is run as a separate business. Huawei and its sub-brand Honor have released stable Android 9 Pie updates for 8 devices and beta updates for 14 devices. Follow this guide on how to download/update EMUI 9 Android Pie on HuaweiHonor Phones.
Features
The firm manufactures its own processor Hisilicon Kirin. And the recent among them is the new Kirin 980. It is the world’s first 7nm process mobile phone SoC chipset, firstCortexx-A76 architecture chipset, first dual NPU design & the world’s first chipset to support LTE Cat.21. It combines multiple technological innovations and leads the AI trend to provide users with an impressive mobile performance and to create a more convenient and intelligent life.
The processor uses four off the shelf ARM Cortex A76 CPUs, two clocked at 2.6GHz, and two clocked at 1.9 GHz. The Cortex A76 is a major overhaul to the Cortex A75 design, this time with a 4-wide front end instead of 3 for the predecessor. The Kirin 980 also comes with 4 Cortex A55 cores clocked at 1.8GHz for the low power tasks. kirin has a dedicated Neural processing Unit which extensively helps the chip in machine learning and AI capabilities so you can expect better AI features followed by some machine learning.
Android 9 Pie focuses on the user experience, which will change dramatically with new gesture controls to quickly navigate between apps. However, the main driving force will be its AI. Intuitive new technology learns how users go about their day. Huawei and its sub-brand Honor have released stable Android 9 Pie updates for 8 devices and beta updates for 14 devices. The firmware includes EMUI 9.0, the latest upgrade to the company’s skin over Android. A sorted list about EMUI 9 Android Pie on Huawei Honor Phones is given down in this article.
If your phone didn’t receive the notifications. Please try to use HiCare to upgrade to EMUI 9.0.
EMUI 9.0
EMUI 9.0 stable has already been rolled out in China and the beta program is over in India. This December the First of the Honor Phones to receive EMUI 9.0 will be The Honor Play, Honor 10 & Honor View 10. Honor 8x will be getting pie in the second phase of the update rollout. Huawei uses machine learning-supported memory optimization under the hood. Based on your behavior, the most frequently used apps are kept ready for quick access. This makes the smartphone just as snappy as when you first started using it, even after several months of use.
The EMUI 9.0 was born with a minimalist natural design to harmonize technology with humanity. This upgrade enables quality life and gives you an immersive experience with nature. The new upgrade provides system speed enhancements, greater AI capabilities and new ways to improve your everyday life.
List of EMUI 9 Android Pie on Huawei Honor Phones
Honor 10
COL-L29
9.0.0.159(C185E2R1P11)
9.0.0.159(C432E4R1P9)
9.0.0.159(C636E2R1P12)
9.0.0.160(C10E3R1P12)
Honor Play
COR-L29
9.0.0.156(C432E1R1P9)
Honor View 10
BKL-L09
9.0.0.159(C432E4R1P9)
9.0.0.159(C636E3R1P12)
9.0.0.160(C10E2R1P12)
How to Update?
One is the general method to update the firmware given directly from the company side to your device.
To do this open your phone settings, navigate to System>About Phone/Device>System Update/Software Update.
On clicking this one can directly download the new firmware Android 9.0 Pie. If your phone didn’t receive the notifications. Please try to use HiCare to upgrade to EMUI 9.0.
The Second method is by using Firmware Finder. It is used to manually find a firmware to sideload, but you have to be sure that you’re flashing the right firmware. Users opting this method cannot flash the unauthorized firmware which hasn’t been approved to your device.
Open the Firmware Finder link given in downloads section, find the correct firmware regarding your model name, download and flash it.
The last method uses FunkyHuawei.club site. FunkyHuawei lets you rebrand i.e change the region of your device, unbrick or flash the latest updates on many recent Huawei mobile phones and devices. FunkyHuawei provides the information on unreleased devices, but we don’t benefit from any sales of their service.
The site seeks for SignUP permissions. Later some instructions will be displayed to handle the site.
Navigate to Click here to choose from a list of all available firmware, click on it.
Find the correct firmware regarding your model name, download and flash it.
For the methods 2 & 3, you should unlock the bootloader first.
Fix Galaxy S9 Plus Problems after Android Pie Update
A couple of days back, Samsung started the official rollout of the Android Pie update for the Galaxy S9 Plus. The update first made it to Germany and then slowly made it to 3-4 other countries. Galaxy S9 Plus was running on the Android Pie beta for the past couple of months. Everyone was waiting for the stable Android Pie update since the Beta firmware had quite many bugs. When the official update started rolling out, the Galaxy S9 Plus owners were quite happy at first. The only reason was that this update was supposed to be bug-free. Unfortunately, the opposite happened. The stable Android Pie for Galaxy S9 Plus does not seem to be very stable.
Fix Galaxy S9 Plus Problems after Android Pie Update
The update, in fact, has forced a handful of Galaxy S9 Plus owners to move back to Android Oreo. If you have updated your Galaxy S9 Plus to Android Pie and you are now facing issues, it is better to try resolving the issues rather then moving back. So here is the guide you need to fix Galaxy S9 Plus problems after Android Pie update. Before going through the Android Pie Problems after Pie Update, let us take a look at the new features.
Galaxy S9 Plus Android Pie Update – New Features
One UI
The Android Pieupdate is a major update. This is not just a software version upgrade, the update brings everything new. For example, the moment you turn on your phone on Android Pie, you will find a whole new UI. Samsung has revamped its Samsung Experience UI and it is now called One UI. The One UI is inspired by the looks of stock Android. Samsung has made everything rounded in this UI. There is the new recent applications menu. The icons, the elements, the UI of all stock applications is new. One UI also brings navigation gestures, which were missing so far on Samsung Galaxy handsets. This latest update adds a plethora of new features to the phones.
Android Pie – One UI
New Features
When it comes to the new features, you will find the Night Mode in the phones first of all. This Night Mode is something that the OnePlus and Huawei users have been enjoying for quite a while. The Night Mode basically turns the entire UI black. The purpose of this mode is to provide a better viewability in the night and also to save a little bit of battery. Samsung has also added the Adaptive Battery mode which learns about your usage and then optimizes the battery based on your use.
This update also adds the Dex support without the Dex station. Another new feature is the pop-up notifications. Any notification will pop-up, you will be able to respond to it and continue doing whatever you were doing previously. There is native private DNS support in this update. You can now track the battery percentage of your Bluetooth device. The update improves the overall performance of the phone. The bugs of Android Oreo have been fixed. This update moves the version number of Android to Android 9.0.
There are many other features that we can discuss, but it will take way too long to do that right now. I have highlighted the major changes above only. It is the time to take a look at the Galaxy S9 Plus Problems after Android Pie and fix them. Let us get back to the guide now.
Fix Galaxy S9 Plus Problems after Android Pie Update
This guide is divided into two parts. In one part, I am going to list all the Galaxy S9 Plus problems after Android Pie update and their solutions. In the second part, I am going to explain the methods to apply those solutions. The reason to explain the methods separately is that a single method fixes multiple problems. It is not a good idea to write it again and again and end up confusing the Galaxy S9 Plus owners. So, read this guide carefully to fix your Galaxy S9 Problems that is acting up after flashing Android Pie.
Galaxy S9 Plus Randomly Reboots after updating to Android Pie
Galaxy S9 Plus owners took it to Reddit to report the random reboot issue after the Android Pie. The phone starts rebooting on it again any time of the day. There are various methods to fix the random reboot issue that the S9 Plus owners have used to fix it. Here are all the possible solutions. Try these solutions one by one in numerical order to see which one works for you.
First of all, clear the cache of your Galaxy S9 Plus. Clearing cache is like one medicine for 100 diseases. Check your phone after clearing the cache.
If clearing cache does not work, boot your Galaxy S9 Plus in the Safe Mode and check if it works fine. If the phone is working fine in the Safe Mode, it would mean that an application was causing an issue. Go through all of your recent installations and delete the application that you think is causing trouble.
Safe Mode did not work? Go ahead and perform a factory data reset on your phone. If the factory data reset doesn’t work either, your last option is to flash a new update. Make sure that you make a clean installation this time.
Lock screen notifications vanished after Android Pie – how to get them back
You will find that after updating to Android Pie, the notifications on the lock screen are not showing the details anymore. This is the default setting in the Android OS. You have to enable the full view for content in notifications under the lock screen settings. When you will open the settings to enable the detailed view, you will not find the content settings where they used to be. Here is how to get the detailed notifications back in Android Pie.
Open Settings and go to Lock Screen.
In Lock Screen settings, click on Notifications.
Now click on View Style > Detailed.
You will get the notifications with content now. That’s it.
Galaxy S9 Plus stuck in the boot loop right after installing Android Pie
You just flashed the Android Pie or updated via OTA, and the phone is now stuck in boot loop. What to do now? First of all, you do not need to panic. Here are your options to get out of this situation.
The very first thing is to try clearing the cache. Clear the cache and reboot the phone. See if it works.
If the cache thing doesn’t work, go ahead and perform a factory data reset.
If the factory data reset doesn’t work either, go ahead and flash a new firmware. Perform a clean installation to get rid of the issues.
Night Mode on the Galaxy S9 Plus does not stay on all the time – It turns off automatically
When you turn on the Night Mode from the developer options, it goes off on its own. In order to keep the Night Mode on all the time, you must enable it from the Night Mode settings and not from the developer options. So, if the Night Mode on the Galaxy S9 Plus does not stay on all the time, here is what to do.
Open Developer Options > Night Mode > Switch it off.
Galaxy S9 Plus started lagging after updating
For some users, the Galaxy S9 Plus started lagging right after the new update. The lag happened mostly while switching between the applications through the recent applications panel. To fix this problem, here is what you can do.
Note: Try these solutions one by one.
First of all, make sure that you have not changed any animation settings under developer options. If you have, then revert them back.
Clear the Cache of your Galaxy S9 Plus and check the performance afterward.
You can also try clearing the cache of the particular application that is having an issue.
Boot your phone in the Safe Mode, check the performance of applications in Safe Mode. If they work fine, you must find the application that is slowing down all other applications.
Perform a factory data reset if all the options given above do not work.
Your last option is to wait for a new update. As soon as Samsung releases a more stable update, perform a clean installation of that.
How to disable Google Assistant on Android Pie-powered Galaxy S9 Plus
In the earlier version of Android, there was an option to hold the home button, open the Google Assistant and then disable it completely. The same is not possible on the Android Pie. Here is how you can disable the Google Assistant on the Android Pie.
Go to Settings and open Apps.
Click on the three-dotted (hamburger) icon on the top-right.
Now tap Default Apps > Device Assistant > Choose None.
This will completely disable the Google Assistant.
How to disable Bixby on Galaxy S9 Plus after updating to Android Pie
To disable Bixby on Galaxy S9 Plus powered by Android Pie, you have to install the BxActions application. Using BxActions, you can remap the Bixby Button tor completely disable it too. It is a nice application to get rid of the annoying Bixby.
Battery drains faster on S9 Plus after Android Pie
So the battery on your Galaxy S9 Plus is draining faster despite having the Adaptive Mode. Here is what you can do to fix the battery drain problem on the S9 Plus.
First of all, turn on the Adaptive Mode. Let the Adaptive Mode run for a few days. Adaptive Mode an take a good 2-3 days to learn your usage.
If this does not fix the problem, you can calibrate the battery manually. To do this, discharge your phone to 0% and let it go off. Once it goes off, charge it to 100% and disconnect the charger. Do not charge the phone in between. Let it drain to 0% again, charge it back to 100. Repeat this process thrice to calibrate the battery.
Calibration did not work? Try wiping the cache of your phone.
Open battery stats and check if a particular application is consuming more battery. Delete any such applications.
You can also try booting your phone in Safe Mode to see how the battery performs without all the third-party applications.
If the solutions given above fail to work, go ahead and perform a factory data reset.
If you think that something is wrong with the firmware itself, wait it out. Let Samsung release a more stable update and perform a clean installation once an update is out.
Unable to turn off Battery Saver on S9 Plus
Some users were unable to turn off the Battery Saver on the latest firmware. To disable the battery saver, open Settings and enable the High-Performance mode. Now enable the Optimized Mode once again. This will disable the Battery Saver.
Galaxy S9 Plus charges slowly after Android Pie
If your phone has started charging slowly all of a sudden, these are your options.
Use OEM data cable to connect your phone to the charger.
Use original charging brick that came with your phone.
Check your electric connection if it is giving proper output.
Verifying everything listed above, clear the cache of your phone.
WiFi not working fine after the recent update
If the WiFi is not working, first of all, you need to diagnose the problem. Here are the possible fixes.
Open Settings > Connections > WiFi > Choose your connection > Forget it.
Connect to the network again and see if it works fine.
If it still does not work fine, check your router on another device. If the other device is having the same issue, you need to fix the router. Try restart the router or completely resetting it.
Make sure that your Mobile Data is disabled while you try to connect to WiFi.
Enable Airplane Mode and disable it and then see the WiFi.
Galaxy S9 Plus showing not registered on network error
If you are getting the “Not registered on network error” after updating your S9 to Android Pie, you may check your network settings for this Here is what you can do.
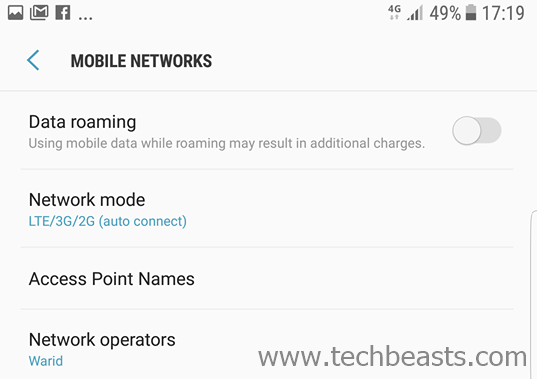
Open Settings > Connections > Mobile Networks > Network Mode > It should be set to “Auto Connect”.Galaxy S9 Plus Network Mode
The second option is to choose your network. Open Settings > Connections > Mobile Networks > Network Operators > Search Network Operators > Choose your operator from the list.
Galaxy S9 Plus Network Operators
The last option to fix this problem is by resetting the network settings. To do this, go to Settings > About phone > Reset > Reset Network Settings > Reset Settings. Done.
How to apply the solutions
Clear Cache
How to clear cache on Galaxy S9
First of all, power down your Galaxy S9 Plus.
Press and hold Volume Up + Bixby + Power button to turn on the phone.
Keep the keys pressed until you see the screen.
Once you are in the recovery mode, press the volume down key to highlight “Wipe cache partition”.
Press the Power button to enter.
Now press the Volume Down button to highlight “Yes” and press Power button to wipe it.
Reboot the phone now.
The cache has been wiped.
Enter Safe Mode
How to enter Safe Mode on the Galaxy S9 Plus
First of all, turn off our Galaxy S9 Plus.
Now turn on the Galaxy S9 Plus while pressing and holding the Volume Down button.
As you see the home screen, let the Volume Down button go. You will see the Safe Mode watermark on the lower left corner of the screen.
Your phone is now in the Safe Mode.
All Apps have been disabled.
Clear App Cache
How to clear application cache on Galaxy S9 Plus
Open Settings on your phone and go to Apps or Application Manager.
Now select All Apps from the drop-down shown at the top.
This will show all the applications installed in your phone.
Now select the application who’s cache you want to clear.
Click on Storage > Clear Cache and Clear Data (If needed).
Factory Data Reset
How to perform factory data reset on Galaxy S9 Plus
Shut down your Galaxy S9 Plus completely.
Press and hold Volume Up + Bixby + Power button to get into the recovery mode.
Once you see the recovery, let the keys go.
Now in the recovery, use Volume Down key to highlight “wipe factory data reset”.
Press the power button to make a selection.
In the new screen, press Volume Down to highlight “Yes” and then again press the Power button to make a selection.
Your phone will perform a factory data reset, reboot it afterward. That’s all.
Clean Firmware Installation
How to perform clean software installation on S9 Plus
Now follow this guide to install the firmware from scratch.
While selecting the files, select the CSC file in the CSC tab. The CSC file will factory reset your phone.
Selecting the Home_CSC file does not wipe the phone, so to perform a clean installation, you have to select CSC file.
Flash the firmware now.
This installation will go clean. That’s all.
Conclusion
That is pretty much it with the Galaxy S9 Plus problems after Android Pie and their solutions. If you have anything to add to this guide, or if you are facing any problems that are not listed here, please feel free to reach out to us. We will make sure to get back as soon as we get your query. Stay connected.
Samsung Galaxy Note 8 is a premium and one of the best Android device which comes with lots of features. Note 8 was unveiled in August 2017. The device came with Samsung Experience 8.5 build over. Gone are the days when Samsung UI used to lag, with the latest flagship of Samsung it feels fast and responsive. Samsung experience has really gone better with time. Samsung Galaxy Note 8 Snapdragon users can now Install the closed Android Pie based One UI Beta on Snapdragon Samsung Galaxy Note 8.
The Galaxy Note 8 features 2960 x 1440, 18:5:9 Infinity Display, but with the Note 8, the screen is point 1 inch taller than S8 Plus and has curved edges at a steeper angle to impart more writing space. It sports a 6.3 inch OLED display with 18.5:9 ratio and the display is HDR capable. S-Pen hardware on Note 8 might not have seen advancements since Note 7, but with Live Message and able to write 100 pages long Screen-off Memo features added, this is enough for now. Wireless charging is another great feature that Samsung has provided, Though it is slow as compared to wired charging but seem to be a step in the right direction. The device is powered by Exynos 8895 Octa (10 nm) /Qualcomm MSM8998 Snapdragon 835 (10 nm) chipset coupled with 6GB RAM & comes in 3 storage variants 64/128/256 GB.
One UI
The Samsung took the wraps off of a new Android skin for its phones going forward. The new skin is called One UI and apart from the sweet visual aspects it has on offer, it could make using your phone that little bit easier. There are numerous new features and visual improvements in One UI. The One UI build is based on Android 9 Pie. The bottom half of each app is for interactive elements. Once you swipe down twice to reveal all the quick settings, the top half of the screen shows the time and date while the bottom portion shows your quick settings. This not only makes it easier to reach things with one hand it also makes each app look much cleaner.
One UI helps you focus on what really matters to you. With hardware and software working together in harmony, see only what you need, using and viewing your phone with an experience that feels second nature. Because it’s the small details that make a big difference.
Overview
The bottom half of each app is for interactive elements. Once you swipe down twice to reveal all the quick settings, the top half of the screen shows the time and date while the bottom portion shows your quick settings. This not only makes it easier to reach things with one hand it also makes each app look much cleaner. The recent apps menu has been overhauled. It now scrolls horizontally as most other Android Piebuilds, and it’s quite fast. You also get a search bar at the top if you want to quickly type out the app you’re looking for. The focus from Samsung for One UI has been on showing what really matters on the screen and eliminating the distractions.
A dark theme is given to almost all customizable settings and apps. gives apps a black background to make it easier to read elements on the screen in the dark without straining your eyes. Parallel to this, you can save some battery life. A gesture navigation option has already loaded in this build. Basically, the new gestures remove the navigation buttons and replace each one with a swipe up from the bottom of the screen. If you need to go back, swipe up from the left side. Similarly, you can use this for the home button and recent apps.
In One UI, Samsung seems to be prioritizing being able to use your phone with one hand. Most of Samsung’s apps had the majority of their controls at the bottom of the user interface, with other information that you might not want or need to interact with being found at the top.
Features
New Interface
System-Wide Night mode
Re-designed apps
Refreshed Home & Bixby
Smarter camera
Always On display
Dockless DeX
Navigation Gestures
Without any ado lets see how to download and install One UI Beta on Snapdragon Samsung Galaxy Note 8.
How to download One UI Beta on Snapdragon Samsung Galaxy Note 8
Download the Odin 3.13.1, One UI beta update zip, and Odin files respectively for Galaxy note 8.
The zip files will automatically be downloaded to internal storage. Users having access to SD card should copy the zip to SD card.
Now open the Odin files containing zip named as SM-N950U_1_20181126150901_ouxwmh265r_fac.zip. Six files will be displayed.
Switch off the device and hold Power + Volume Down + Bixby button to enter in Odin mode.
Open the Odin and click on BL, AP, CP, and HOME_CSC only (which might erase all the device’s data) and click on the start button.
The device will flash the new firmware and reboot.
Once again switch off the device and enter into recovery mode by holding Power + Volume Up + Bixby.
First, flash the One UI Zip File given in the downloads section.
Navigate to the location of One UI zip file and swipe to flash the zip.
If the device doesn’t have the SD card navigate to ‘apply update from adb’. Connect the device to PC, Open command prompt and enter the following command
adb sideload <file location of update.zip>
Don’t panic as the update takes nearly 5-10 minutes.
Reboot the device once the file flashed.
That’s all! You can now enjoy the new One UI features on your device.
Redmi Note 6 pro is a more of a Redmi Note 5 pro with minor modifications as there are no huge differences between those two mobiles. The device took its wraps off in September this year. The device runs on MIUI 10 out of the box and optimized brilliantly for the phone. In Android terms, it is android oreo 8.0. Now the users can upgrade their devices with a small update program Android 8.1. The ROM coming as unofficial Lineage OS 15.1 ROM. Follow this simple guide on how to install Unofficial Lineage OS 15.1 ROM on Redmi Note 6 Pro.
Capable camera, Well-optimised software, Improved display quality are shining specs of this device. Xiaomi Redmi Note 6 Pro sports 6.26-inch Full HD notched display featuring 403 PPI pixel density and Corning Gorilla Glass protection. It is powered by Snapdragon 636 (14 nm) chipset coupled with 4/6 GB RAM options along with 64/128 GB storage configurations. The device runs on MIUI 10 out of the box and optimized brilliantly for the phone. It has a 12MP rear camera with dual-tone LED Flash, f/1.9 aperture, 1.4μm pixel size, Dual Pixel Autofocus, EIS, secondary 5MP camera and 20MP front-facing camera f/2.0 aperture, secondary 2MP camera. A massive 4000 mAh battery will meet your needs good enough.
Unofficial LineageOS 15.1 ROM on Redmi Note 6 Pro
The Lineage OS 15.1 is an extremely stable ROM. It’s heavily skinned & tweaked for better performance. It has got all those features a common user needs. LineageOS ROMs are quite stable. They are ROMs just ported from the CM branch. No major changes are there between the initial LineageOS builds and the last CM builds. If you observe Google’s vanilla Android OS and Lineage OS, you’ll find a lot of granular settings in the latter. You can customize your device to your own taste and have more security options as well. You might experience random reboots and minor glitches in the functionality but its splendid customizations drop shadow over them.
Working
Boots
RIL (Calls, SMS, Data)
VoLTE
Fingerprint
Wi-Fi
Bluetooth
Camera
Camcorder
Video Playback
Audio
Sensors
Flash
FM
LED
GPS
IR
OTG
Issues
Double tap to wake screen (DT2W)
In call loudspeaker doesn’t work
SELinux status: Permissive
Install Android 9.0 Pie Based LineageOS 15.1 ROM on Xiaomi Poco F1
Preparations
This ROM is only for the Redmi Note 6 Pro.
Charge your device at least 50% before flashing the ROM.
Backup your device to make sure you’ve all the important data if something doesn’t go as per the plan.
How to Install Unofficial Lineage OS 15.1 ROM on Redmi Note 6 Pro
Make sure you have the TWRP recovery installed on your phone.
Also, ensure that you have copied the Gapps and LineageOS 15.1 ROM files after installing TWRP.
Power down your smartphone.
Press and hold Volume UP + Power button for about 5 seconds. Release the Power key when Mi logo appears and continue holding Volume Up button until the recovery mode appears.
Make a nandroid backup of your device in TWRP recovery. To do this, navigate to Backup option, select the partitions available and swipe right to make a backup.
Format your device, once the backup is completed.
In TWRP recovery, click on Wipe »Advanced Wipe. Select data, system, cache and, Dalvik-cache on this page and wipe them.
In the TWRP, click on Install » Install Zip » Locate and select the LineageOS ROM file. Swipe screen to flash this file.
Similarly, flash the Gapps for Android Pie.
In the end, get back to the main menu in TWRP and click on Wipe » Advanced Wipe » Select Cache & Dalvik Cache » Swipe screen to wipe.
After wiping, reboot your device.
That’s all. Let us know how you like the ROM in the comments section below.
Samsung Galaxy Note 9 Android Pie is out and available for everybody. At the time of writing this, it is the most certainly the final beta build. Therefore, it is safe to say that it is pretty stable to use. The purpose of this article is to help enthusiast fans update their Note 9 to Android Pie and One UI manually. Since the beta update is limited to certain countries and regions, therefore, it is the only option.
Note that this guide caters to two main variants of Note 9. These are SM-N960F (Exynos Note 9) and SM-N960U (Snapdragon Note 9). The major difference between these two devices is the chipset used. Therefore, the firmware for both of these devices is different. Make sure to check your phone’s model number before starting the update process.
What’s new in Note 9 Android Pie Update?
Android Pie is also known as Android 9.0. It is the latest update in the market and it packs a ton of cool features. These include the likes of navigation gestures, improved do not disturb mode, adaptive learning, and battery optimizations. These are the base Pie upgrades but it is not all.
The most notable upgrade is the brand new One UI update for Note 9. It is based on and basically merged with the 9.0 update. To be honest, these actually complement each other. Let’s go through some of the major changes in the latest update.
The most notable feature in One UI is one-handed usage. Galaxy Note devices are notoriously large and pretty hard to use with one hand. Even though this is the main selling point of these phones, but sometimes we need to use it with just one hand. Therefore, Samsung has made special efforts to make sure that all apps and interfaces can now easily be handled with just one hand.
Another key improvement is the Phone-wide Night mode. While some may mistake it for dark mode but it is not quite the same. See, there are plenty of third-party apps for activating night mode on phone but none of these actually work well. Since these are not fully compatible with the system. The new Night Mode in One UI for Note 9 is a massive and much-needed upgrade.
The last noteworthy update is the new Samsung keyboard. Now it supports a floating keyboard in all apps. Moreover, it is made more pleasing aesthetically. The keyboard will change colors based on the accents of whichever app it is opened in. This feature is pretty similar to how Chrome Mobile’s address bar changes color.
Last but not the least, Samsung has to implement a scene optimizer in the Camera app. It is an AI-based upgrade that automatically detects the scene and tries to optimize camera settings for the hotshot.
Put this zip file on to SD Card. Copy it to the root of the SD Card. If your phone does not have an SD Card, then skip stepping 9.
Turn off the phone and wait for 10 seconds.
Hold Volume Up + Bixby + Power buttons together until you see the recovery logo.
Use the volume buttons to navigate inside the recovery menu and the power button to select the “apply update from SD card” option.
It will pick the update zip you put in the SD card in step 2.
Do not touch anything until the phone updates.
It will restart after the update.
If there is no SD Card, then put the update zip anywhere on your PC.
Unzip the ADB tools you downloaded before anywhere on your PC. The folder should be named platform-tools.
Enter recovery mode on your phone using steps 3 and 4.
Select the “apply update from ADB” option from the recovery menu.
Connect the phone to PC via USB cable.
Inside the platform-tools folder, hold the shift key on the keyboard and right-click on the mouse. Select “Open command window here”.
Type “ADB sideload
” and press enter.
The update process will take a few minutes. Wait until it is done and the phone will restart automatically.
That’s it! Snapdragon Note 9 N960U is updated to Android Pie 9.0.
Final Words
Android Pie is an awesome update for Note 9. It’s been quite long since it is pending. This guide is for Snapdragon Note 9 N960U and Exynos Note 9 N960F only. Therefore, do not attempt it on any other model.
Moreover, before updating to Android 9.0, make sure that your current firmware is the same as mentioned here. Follow the pre-requisite methods to make sure that you install correct firmware before updating it to Pie.
That’s pretty much it! Feel free to leave your feedback and queries in the comments below.
Xiaomi refreshed it’s best-selling offering in a short span of time, improving upon the usability with new software-based features while leaving out a notable hardware upgrade. The Xiaomi Redmi Note 6 Pro came just eight months after the launch of its predecessor, the Redmi Note 5 Pro. Recent news about this device is that an unofficial TWRP successfully tested & ported to it. This guide will help you out on how to Install unofficial TWRP on Redmi Note 6 Pro.
Capable camera, Well-optimised software, Improved display quality are shining specs of this device. It features a 6.26-inch FullHD plus display with a notched design and an aspect ratio of 19:9. Redmi Note 6 Pro is powered by Snapdragon 636 (14 nm) chipset coupled with 4/6 GB RAM options along with 64/128 GB storage configurations. The device runs on MIUI 10 out of the box and optimized brilliantly for the phone. It packs dual shooters on both sides dual 12MP + 5MP main camera & dual 20MP + 2MP selfie camera. A massive 4000 mAh battery will meet your needs good enough.
TWRP for Redmi Note 6 Pro
TWRP is a recovery-level UI packed with powerful features that will make your rooted life easier. It also tries to stand out by giving users extra features not found in ClockworkMod Recovery, as well as an attractive interface. It offers hardcore Android smartphones users quite a few features, including a way to flash custom ROMs, install ZIP-file-based updates, create and restore backups of ROMS and much more.
The manufacturer provided stock recovery is literally of no use if you’re planning of big things. The stock recovery only has options to flash an update zip which you can do through OTA and an option to factory reset. This is where a custom recovery like TWRP shines.
The custom recovery will assist you in wiping partitions, executing shell commands, installing custom ROMs, kernels, and mods. TWRP is one of the most popular custom recoveries for Android smartphones. It is a touch-based custom recovery with an intuitive interface and a lot of useful functions.
TWRP has an intuitive touch interface with a lot of useful options. You can take Nandroid backups, restore the backups in case your device stuck at bootloop, flash custom ROMs, mods and any flashable ZIP file. Apart from that, you can wipe individual partitions on your device, run custom scripts and much more. In this tutorial, we will see how to unlock bootloader and install TWRP on Mi 8 Lite. But before we proceed, make sure you have a backup of important files on your internal storage. The installation process is quite easy but the bootloader unlock will wipe your internal storage. So, if you’re ready to go, let’s get on with the installation.
Prerequisites
This guide is only for the Xiaomi Redmi Note 6 Pro variant only. Do not try this on any other phone.
Charge your phone good enough so that it doesn’t go dead during the installation process.
Backup your call logs, contacts and SMS messages. Also backup your media content. This is important since unlocking the bootloader will completely wipe your phone.
Download the latest TWRP image file. Rename this file to recovery.img and copy it to the ADB and Fastboot folder.
How to Install unofficial TWRP on Redmi Note 6 Pro
Navigate to the folder where you have installed ADB and fastboot files on your computer.
Connect your device to the PC using a USB cable.
Open a command prompt window from the ADB and Fastboot folder [Press shift key + right-click on any blank space of the folder] and then select “Open command window here” from the context menu.
Execute the below command to reboot to bootloader.
adb reboot bootloader
Make sure the “recovery.img” file is in the fastboot folder and execute the below command to flash it on your device.
fastboot flash recovery recovery.img
It will take a couple of seconds for the TWRP recovery image to flash.
Once the flashing process is complete, reboot the device.
That’s all. You can now try flashing any kind of zip files.
Huawei is a networking and telecom giant. Honor is a subsidiary of Huawei, Huawei bought this brand and became the 3rd largest phone vendor. Honor and Huawei are just different product lines set up by the mother company, to spread the risk as it is said. The honor was meant to be more premium than other phones from Huawei. It is common among Chinese cellphone makers to have a lineup of different sub-brands. Huawei is targeting high-end, the social elite, fashion, while Honor is born for digital natives, young and young at heart people. The Huawei focuses more on the offline channel, while Honor is more e-brand and pay more attention to the online channel. Huawei and its sub-brand Honor have released stable updates for 8 devices and beta updates for 14 devices. Follow this guide on how to download/update EMUI 9 Android Pie on Huawei Phones.
Features
The firm manufactures its own processor Hisilicon Kirin. And the recent among them is the new Kirin 980. It is the world’s first 7nm process mobile phone SoC chipset, firstCortexx-A76 architecture chipset, first dual NPU design & the world’s first chipset to support LTE Cat.21. It combines multiple technological innovations and leads the AI trend to provide users with an impressive mobile performance and to create a more convenient and intelligent life.
The processor uses four off the shelf ARM Cortex A76 CPUs, two clocked at 2.6GHz, and two clocked at 1.9 GHz. The Cortex A76 is a major overhaul to the Cortex A75 design, this time with a 4-wide front end instead of 3 for the predecessor. The Kirin 980 also comes with 4 Cortex A55 cores clocked at 1.8GHz for the low power tasks. kirin has a dedicated Neural processing Unit which extensively helps the chip in machine learning and AI capabilities so you can expect better AI features followed by some machine learning.
Android 9 Pie focuses on the user experience, which will change dramatically with new gesture controls to quickly navigate between apps. However, the main driving force will be its AI. Intuitive new technology learns how users go about their day. Huawei and its sub-brand Honor have released stable Android 9 Pie updates for 8 devices and beta updates for 14 devices. The firmware includes EMUI 9.0, the latest upgrade to the company’s skin over Android. A sorted list about EMUI 9 Android Pie on Huawei Phones is given down in this article.
If your phone didn’t receive the notifications. Please try to use HiCare to upgrade to EMUI 9.0.
EMUI 9.0
A good UI is that which lets you use your phone exactly the way you want to. It should provide you with fewer gimmicks and more useful features and at the same time be less resource intensive. Probably EMUI 9.0 Pie is one among it. EMUI 9.0 stable has already been rolled out in China and the beta program is over in India. Huawei uses machine learning-supported memory optimization under the hood. Based on your behavior, the most frequently used apps are kept ready for quick access. This makes the smartphone just as snappy as when you first started using it, even after several months of use.
The EMUI 9.0 was born with a minimalist natural design to harmonize technology with humanity. This upgrade enables quality life and gives you an immersive experience with nature. The new upgrade provides system speed enhancements, greater AI capabilities and new ways to improve your everyday life.
List of EMUI 9 Android Pie on Huawei Phones
Huawei Mate 10
ALP-AL00
9.0.0.110(C00E80R2P19)
9.0.0.125(C00E81R1P20)
9.0.0.156(C00E84R1P20)
ALP-L09
9.0.0.159(C69E4R1P9)
ALP-L29
9.0.0.159(C185E2R1P12)
9.0.0.159(C605E2R1P11)
9.0.0.159(C636E2R1P12)
Huawei Mate 10 Pro
BLA-AL00
9.0.0.110(C00E81R2P14)
9.0.0.125(C00E83R1P15)
9.0.0.156(C00E86R1P15)
BLA-L09
9.0.0.159(C25E5R1P11)
9.0.0.161(C432E4R1P11)
BLA-L29
9.0.0.119(C636E2R1P11)
9.0.0.159(C185E2R1P13)
9.0.0.159(C636E2R1P13)
9.0.0.159(C721)
9.0.0.161(C432)
9.0.0.161(C432E4R1P11)
Huawei P20
EML-AL00
9.0.0.110(C00E75R1P20)
9.0.0.125(C00E76R1P21)
9.0.0.156(C00E79R1P21)
EML-L09
9.0.0.159(C25E4R1P11)
9.0.0.159(C69E3R1P11)
9.0.0.160(C432)
EML-L29
9.0.0.159(C185E2R1P12)
9.0.0.159(C636E7R1P12)
9.0.0.160(C432)
9.0.0.161(C605E2R1P12)
EML-TL00
9.0.0.110(C01E75R1P20)
9.0.0.125(C01E76R1P21)
9.0.0.156(C01E79R1P21)
Huawei P20 Pro
CLT-AL00
9.0.0.156(C00E54R1P15)
CLT-AL01
9.0.0.156(C00E54R1P15)
CLT-L04
9.0.0.159(C69E3R1P9)
CLT-L09
9.0.0.161(C605E2R1P9)
9.0.0.168(C781E6R1P9)
9.0.0.168(C782E3R1P9)
CLT-L29
9.0.0.159(C185E4R1P11)
9.0.0.159(C636E2R1P12)
9.0.0.161(C10E2R1P9)
9.0.0.163(C432)
9.0.0.168(C636E2R1P12)
Porsche Design Huawei Mate RS
NEO-AL00
9.0.0.125(C786E81R1P13)
9.0.0.156(C786E84R1P13)
NEO-L29
9.0.0.159(C721E5R1P9)
How to Update?
One is the general method to update the firmware given directly from the company side to your device.
To do this open your phone settings, navigate to System>About Phone/Device>System Update/Software Update.
On clicking this one can directly download the new firmware Android 9.0 Pie. If your phone didn’t receive the notifications. Please try to use HiCare to upgrade to EMUI 9.0.
The second method is by using Firmware Finder. It is used to manually find a firmware to sideload, but you have to be sure that you’re flashing the right firmware. Users opting this method cannot flash the unauthorized firmware which hasn’t been approved to your device.
Open the Firmware Finder link given in downloads section, find the correct firmware regarding your model name, download and flash it.
The last method uses FunkyHuawei.club site. FunkyHuawei lets you rebrand i.e change the region of your device, unbrick or flash the latest updates on many recent Huawei mobile phones and devices. FunkyHuawei provides the information on unreleased devices, but we don’t benefit from any sales of their service.
The site seeks for SignUP permissions. Later some instructions will be displayed to handle the site.
Navigate to Click here to choose from a list of all available firmware, click on it.
Find the correct firmware regarding your model name, download and flash it.
For the methods 2 & 3, you should unlock the bootloader first.
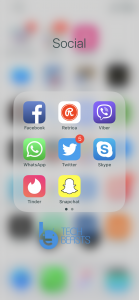
Using simple tricks, learn how to Hide Apps on Android or iPhone. Those who don’t want anyone to see what apps they use on their smartphones. This is the post, you should be reading, we will tell you a number of methods both for Android and iPhone users.
I am not a fan of preloaded apps and also I don’t want someone poking into my smartphone. Among many other reasons to hide apps on smartphones, these two are the most common. Everyone wants privacy, that is why they look for solutions to hide apps on their smartphones.
Before things were not that advanced, the only methods people used were Rooting on Android and Jailbreaking for iPhone. After that, they get to hide or remove pre-loaded apps. But now things are changed, Rooting or Jailbreaking is not only resort to hide apps.
Moreover, now you don’t need to uninstall and reinstall an app, all you have to do is follow the instructions provided below and you will learn how to Hide Apps on Android or iPhone.
Hide Apps on Android or iPhone
Hide Apps on Android or iPhone:
When it comes to bloatware or pre-loaded apps on Android, it’s a shame that they have a large number of pre-loaded apps. However, iPhone is not like that, they have few but not like Android. Normally, people don’t like such apps, because they eat up all the space. Now the first thing comes to everyone’s mind is to uninstall them. However, there are few which cannot be uninstalled because they are the part of UI.
Hide Apps on Android:
No Issue What so ever, heed the instructions provided below and you will able to hide those apps on your device. If you cannot uninstall them.
Stock Launcher:
First up is Stock Launcher. I am pretty sure that very few of you know about this. You can hide apps on your Android device using the stock launcher. It means you can don’t have to install any third-party app. Let’s get started.
Basically, what we are doing here is, we are using the device setting hide the app or you can say preventing it from appearing.
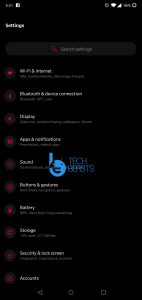
Open Settings on your device. Look for Apps Tab. Once you do, select the app now.
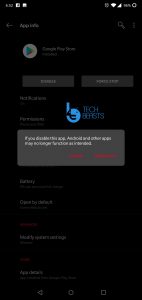
You will see all your apps in a list. After selecting the app, Tap on it, Tap on Disable option.
Tap on proceed when the pop-up shows up.
That’s is good for all Bloatware and pre-loaded apps. Moreover, also keep that in mind. Once you have disabled an app, it will be restored to its factory state. Now let’s take things to next level.
Using Third-Party Launcher:
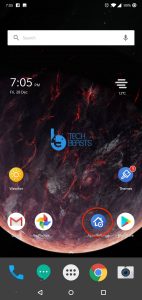
Stock Launcher has limited resources that is why you can only hide a number of apps. But if you use a third-party launcher like Apex Launcher, you can do it with more ease. Apex Launcher is among the best third-party launcher for Android. Moreover, it allows you to customize your device in many ways. But we are not here to customize Android, we here to hide Apps on an Android device.
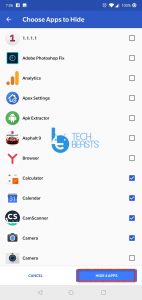
Once there, look for Drawer Settings option, Tap on the Hidden apps options. If you haven’t hide any app before, you will see a Hide Apps button at the bottom of the screen, Tap on it.
Now from there, select the apps that you want to hide. To do so, select thecheckbox right next to the app.
After selecting all the apps you want to hide, simply Tap on the save button.
Hide Apps on iPhone:
When it comes to iPhone, First, there aren’t any pre-loaded apps which we need to hide. However, if you want to then keep one thing in mind. It won’t be as easy as Android. iPhone ecosystem is bit complex from Android. So, if there is no Jailbreaking or hacking is involved. You are left with very little, let’s get started now.
Create a Folder for Apps:
It may not seems like a proper solution but it is worth trying. All you have to do is create a folder.
Once it is done, start adding apps in that folder. Also, add the apps you want to hide.
After you are done adding apps into the folder. Drag the app you want to hide and put it on the last page of the folder.
Make sure you have to scroll a number of pages to access that app.
Hide App From Spotlight:
Once the app is not available in the app drawer, there is only one option left to access that app. Anyone can access that app through Spotlight. Let’s fix that too.
Open Settings on your iPhone.
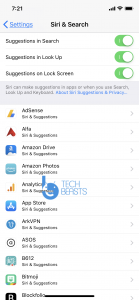
Scroll down and look for Siri & Search. Tap on it.
From there, scroll down and you will see a list of apps that can be accessed through Spotlight.
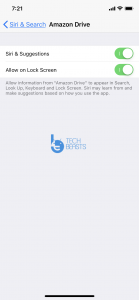
Tap on the desired app and disable the Siri & Suggestion option.
That’s all. This is how you can Hide Apps on Android or iPhone. Please if you have any query regarding this guide, tell us in the comments.
Fix Galaxy S9 Plus Problems after Android Pie Update
Samsung updated the Galaxy S9 to official Android Pie a couple of days back. For over a month, the Android Pie firmware was in beta stage. The stable build was supposed to fix all the issues that users reported on the beta build. However, the opposite happened. The stable Android Pie for Galaxy S9 is not free from issues. In fact, it has so many issues that some users have considered going back to the Android Oreo firmware. The latest Android Pie brings a new UI named One UI. Many users are currently in love with the One UI and they do not want to go back to Android Oreo. If you are one such user, you must have the fixes to all the Galaxy S9 Problems after Android Pie update. Here is the detailed guide to fix Galaxy S9 Plus problems after Android Pie. Galaxy S9 owners can follow all the steps to get rid of the issues on their Android Pie phone. Before taking a look at the fixes, let us learn a little bit more about the Android Pie update.
Fix Galaxy S9 Plus Problems after Android Pie Update
Android Pie One UI for the Galaxy S9
As mentioned above, this is a major update that brings a whole new UI. Samsung has packed a number of new features in this latest software update. The Android Pie update for Galaxy S9 adds the new adaptive battery mode which improves the battery life of your phone. This update also brings the much-awaited night mode for better UI visibility in the night. The Android Pie for Galaxy S9 also brings navigation gestures.
One UI Samsung Galaxy S9
Samsung has changed the functionality of quite many features in this update. For example, the users do not get a separate home-screen in the secure folder anymore. While Samsung has changed the complete UI of the settings application, it has also moved some options here and there. For example, the location of lock-screen notification settings has changed. The quick toggles in the notifications area have been changed as well. The update fixes the bugs that existed on the Android Oreo firmware.
This firmware promised a performance and battery boost, but not all the users have been able to experience the same. Especially, the Exynos Galaxy S9 owners are not completely satisfied with this update. So, if you think that there are things that need further improvement, and you want to improve them on your own, then this the guide you need. Go ahead now and start fixing the problems on your Galaxy S9 after Android Pie firmware update.
Galaxy S9 Problems after Android Pie Update
Galaxy S9 Randomly Reboots after Android Pie Update
A few Galaxy S9 users reported that the phone randomly reboots after flashing the Android Pie update. Now there are multiple solutions to fix the random reboot problem. First of all, you can give a try to clearing cache on your phone. If clearing cache does not work, you can proceed with the other solutions. Here is how to clear cache on your Galaxy S9.
Shut down your phone completely.
Press Volume Up + Bixby + Power button to boot into recovery.
As you see recovery, let the keys go.
Use Volume Down to highlight “Wipe cache partition”.
Press the power button to clear cache now.
Reboot the phone after this.
See if the phone still reboots. If so, then check the other solutions given below.
If the solution given above did not work, you have to make sure that there is no application installed on your phone that may cause intermittent reboots. For this purpose, you can boot your phone into the Safe Mode. Here is how to do so.
Turn off your phone.
Now turn on the phone.
As soon you see the Samsung Logo, press the Volume Down button. Keep Volume Down pressed until you see home-screen.
Now when you see home-screen, you will find “Safe Mode” on the lower left corner of the screen.
Now all apps are disabled.
Check your phone if it reboots again.
If it does not, it would mean that you need to check all your apps and delete the one causing trouble.
Safe Mode did not help either? It means that you did not perform a clean installation. Clean installation means completely wiping your phone during the software update. For firmware upgrades, it is always recommended to perform a clean installation. To perform a clean installation, open this guide to update Galaxy S9 to Android Pie.While updating, select the CSC file in the CSC tab instead of Home_CSC file. The Home_CSC file does not wipe your phone while the only CSC file wipes your phone. A clean installation should fix the problem.
S9 stuck in boot loop after flashing Android Pie
So you flashed the software on your phone and now it is stuck in a boot loop. What to do? Well, there are two solutions. The first is that you should try clearing the cache and the second is to perform a clean firmware installation. Here is how to do both.
Power down your S9. Press and hold Vol Up + Bixby + Power button. Keep the buttons pressed until you see the recovery.
In recovery, use Volume Down to highlight “Wipe cache partition” and press Power button to select.
Wipe cache and reboot.
Check if the phone boots up now.
In case, clearing cache does not work, you can go ahead and flash the stock firmware once again. Here is the guide to install Android Pie on Galaxy S9. While selecting files in Odin, select the CSC file in the CSC tab as you want to wipe your phone for clean installation. Remember that selecting Home_CSC file will not wipe the phone. so you must select the CSC file. A clean installation will definitely fix the boot loop problem.
How to get lock screen notifications back after Android Pie
The lock screen notifications have moved under a new menu now. They are not at the same place where they used to be in Android Oreo. Here is how to get lock screen notifications back after Android Pie.
Open Settings.
Now go to Lock Screen.
Under Lock Screen, click on Notifications.
Now click on View Style > Detailed.
Lock the screen now and find the notifications there.
Night Mode does not stay on all the time
Samsung has added a new Night Mode in this update. The Night Mode, if enabled from the developer options, turns on automatically and then goes back off. If you want to keep using the Night Mode all the time, you must have it disabled from the developer options and turn it on from the Night Mode settings in the phone.
Open Developer Options > Night Mode > Switch it off.
It will now stay on for as long as you do not turn it off by yourself from the Night Mode settings.
Disable Google Assistant on Android Pie
On Android Oreo, you could simply hold the Home Button to open assistant and then disable it. Things are not the same on Android Pie. Here is how to disable Google Assistant on Android Pie-powered Galaxy S9.
Open Settings > Apps.
Click on the three-dotted menu button on the top-right.
Now click on Default Apps > Device Assistant > Choose None.
The Google Assistant has been disabled now.
Unable to turn off Battery Saver
Another bug unearthed in the recent Android Pie is the ability to turn off the Battery Saver. If you are also unable to turn off Battery Saver, here is how to get rid of it.
On your phone, open settings and enable the high-performance mode.
Now go back to the optimized mode once again.
You will see that the battery saver has gone off now. That’s all.
Slow Charging Problem
So your Galaxy S9 is charging slowly after Android Pie update? Here are the best possible solutions.
First of all, try clearing the cache of your phone. If clearing cache does not work, move on to the second option.
Boot your phone in Safe Mode and check the charging speed. If the phone charges fast, find the culprit application and delete it.
Your software installation must be clean. If you dirty flashed Android Pie, go back and perform a clean installation after wiping your phone.
Always use OEM data cable to charge your phone.
Use the original Fast Charger to charge the Galaxy S9.
Make sure that there is nothing wrong with your electricity output.
Galaxy S9 Battery drains faster after Android Pie
Some users reported that the battery of their Galaxy S9 on Android Pie drained much as compared to the Android Pie. There is the new Adaptive battery mode in the Galaxy S9, even that did not help some users. The Adaptive mode should work well, however it looks like Samsung failed to deliver an up to the mark feature. Here is what you can do to fix the Battery Drain problem.
Try these solutions one by one.
Clear the cache of your phone and check battery performance.
Boot phone into the Safe Mode and check if an application was draining the battery. If the phone performs well in Safe Mode, go through your recent installations and delete the messy application.
The very first stable updates can have bugs at times, you can wait for another new build to come out and perform a clean installation.
Try using Adaptive battery mode for a couple of days so that it learns your usage to optimize the battery accordingly.
Use the battery saver to see the battery output.
Phone lags after installing Android Pie
Galaxy S9 users have reported a lag while switching between applications through the recent applications panel. The animations lag, the applications stutter. To fix this problem, the Galaxy S9 owners first need to make sure that they have not touched the animation scale on their device. If you have changed the animation timing, you need to switch it back to stock by going into the developer options.
The second possible solution is to clear the cache. Clearing cache will clear out the temporary files to fix the phone. Also, you can boot your phone in the Safe Mode to see if the lag has to do with one of your recently installed applications.
If none of this works, wait it out. Let Samsung released a few more stable builds and flash a new build later on. The initial software updates can have bugs, it is absolutely normal.
Disable Bixby after Android Pie update
Bixby seems to have gotten worst after the Android Pie update. A huge number of Galaxy S9 fans are looking forward to disabling it. You can simply install the BxActions application from the Play Store to remap the Bixby button or completely disable Bixby.
WiFi not working fine
Owners of the Galaxy S9 also reported that their WiFi keeps dropping every now and then after the Android Pie update. This problem also has a number of fixes and here is how you can fix them.
First of all, check your router. You can try connected WiFi on another device and see if it drops there as well. This would mean that something is wrong either with your internet connection or the router. In this case, your phone is not at fault. Fix your router. You can start by restarting your router or by completely resetting it.
If the phone is refusing to connect to your WiFi network, open Settings > Connections > WiFi > Long-press your WiFI name and forget it. Connect to the same WiFI again.
While you are trying to connect to the WiFi, make sure that your Mobile Data is turned off. Turn it off by pulling down the notifications panel and pressing the Data toggle.
The last solution would be to completely reset network settings. To do so, open Settings > About phone > RESET > RESET Network Settings > RESET > RESET. Restart your phone after this. Check if the WiFi is working fine now or not.
Not registered on network error
If you are getting the “Not registered on network error” after updating your S9 to Android Pie, you may check your network settings for this Here is what you can do.
Open Settings > Connections > Mobile Networks > Network Mode > It should be set to “Auto Connect”.
The second option is to choose your network. Open Settings > Connections > Mobile Networks > Network Operators > Search Network Operators > Choose your operator from the list.
The last option to fix this problem is by resetting the network settings. To do this, go to Settings > About phone > Reset > Reset Network Settings > Reset Settings. Done.
Conclusion
That is all with the Galaxy S9 problems and their solutions. So far, I was able to find only these problems and their fixes. As you can see that the solution that works for most problems is to clear the cache of your phone, so always clear cache after flashing a new firmware. If the problems are not coming to an end, you can downgrade Galaxy S9 to Android Oreo. If you have anything to add to this guide, feel free to reach out to me through the comments section.



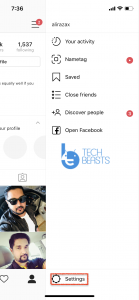
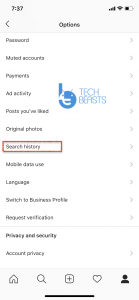
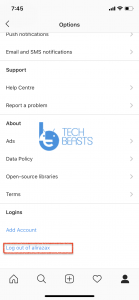
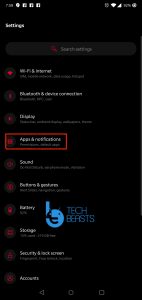
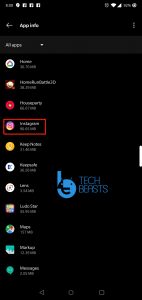
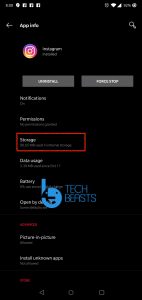
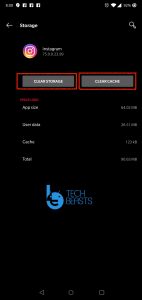

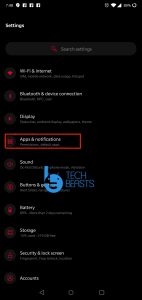
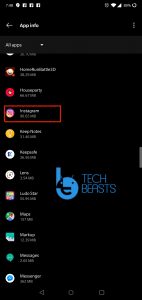
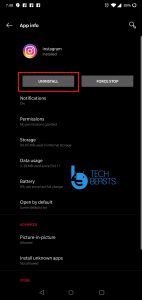

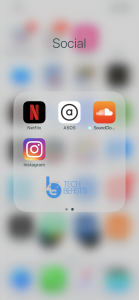
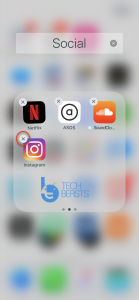







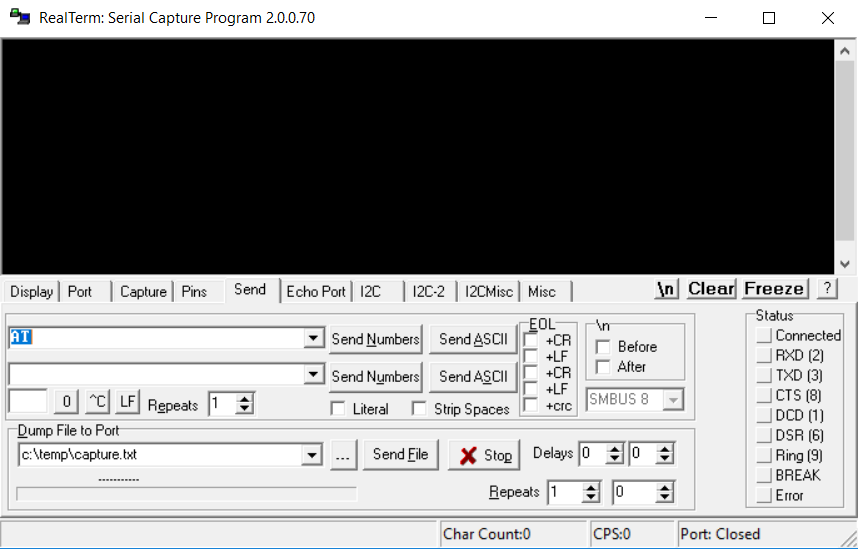


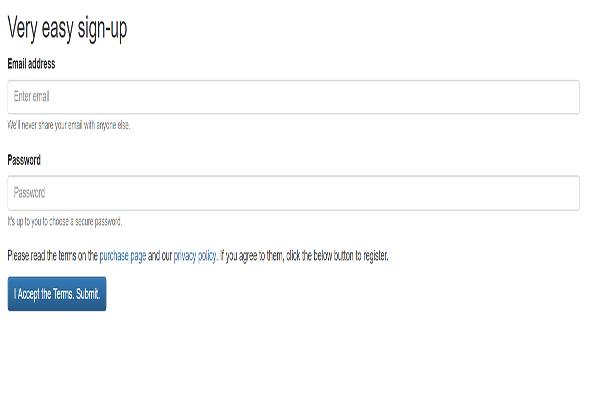
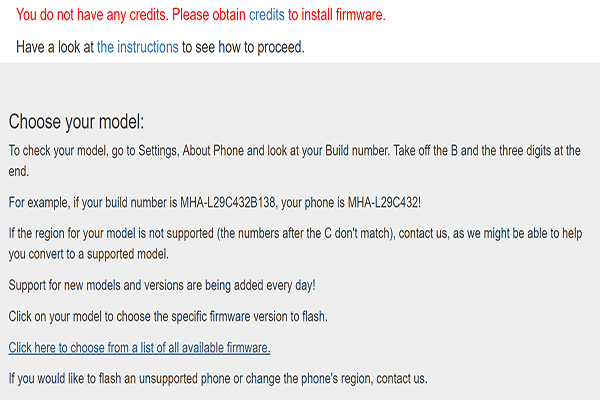
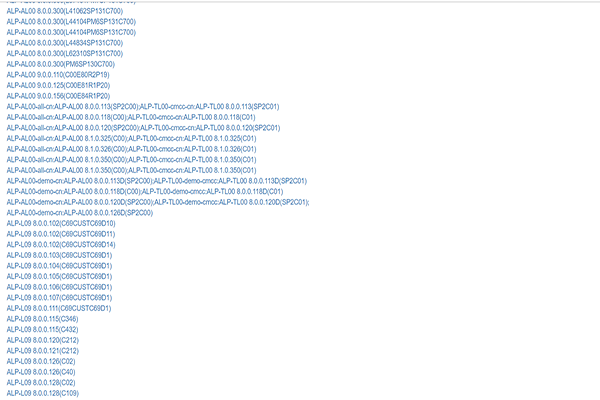
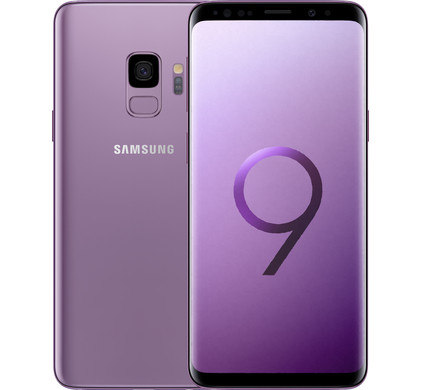
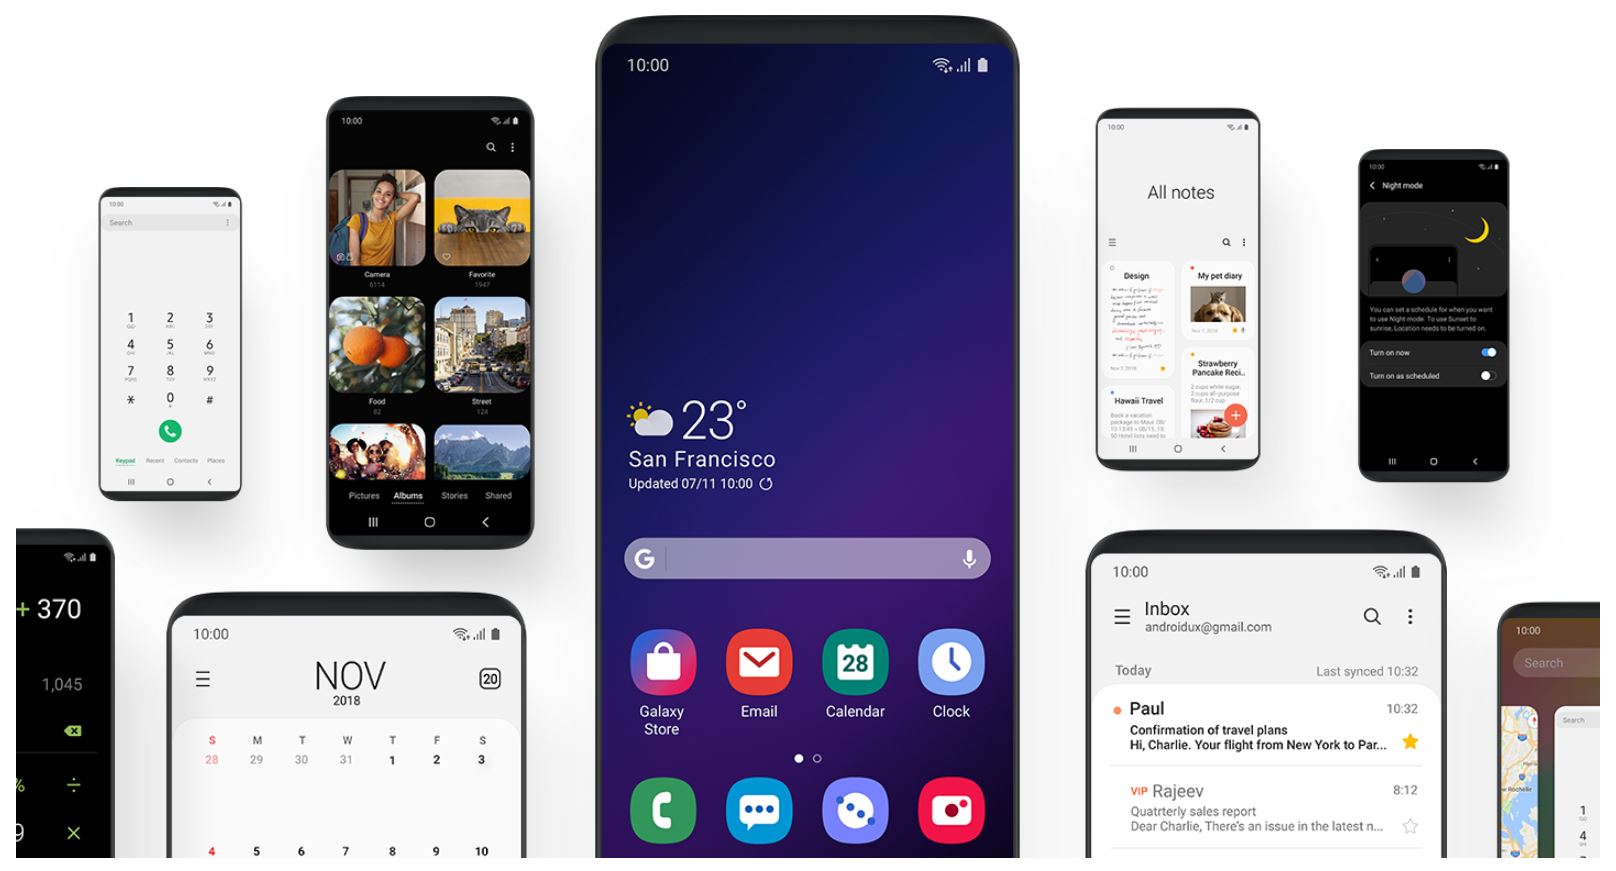
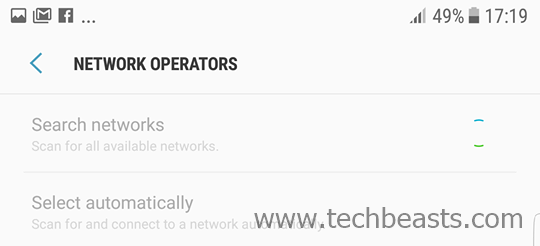

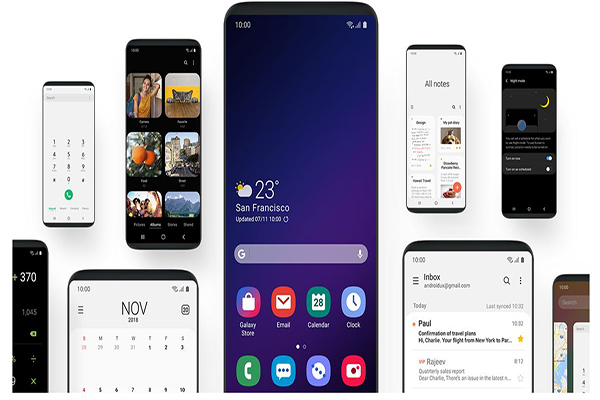


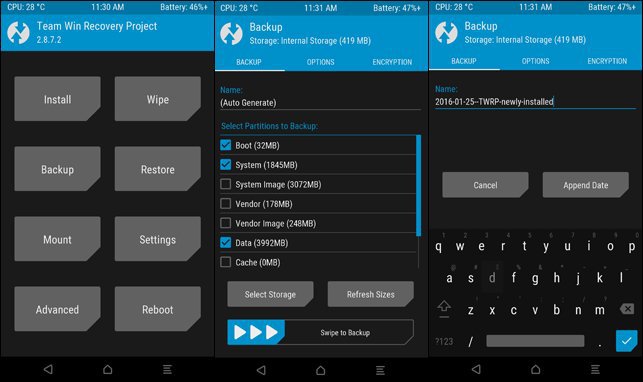
![Hide Apps on Android or iPhone [ No Root & Jailbreak ]](https://techbeasts.com/wp-content/uploads/2018/12/1_nLfL7gf364f4HWkiM4jXWA.png "Hide Apps on Android or iPhone [ No Root & Jailbreak ]")