Home Blog Page 53

30 Best Avengers Endgame Wallpapers Full HD & 4K Ultra HD

0
30 Best Avengers Endgame Wallpapers Full HD & 4K Ultra HD
Avengers Endgame Wallpapers

Who is going to make it through the endgame? Is Thanos going to get away? Will the Avengers be able to take him down? What are the chances for the Avengers to survive Thanos’s might? Well, you will find all this out in the Endgame. We are just a day away, and the hype is at its peak. Marvel movies have definitely given us the best possible entertainment to date. With the Endgame, a whole interesting era of movies will come to an end. Marvel fans all around the world are showing their love for the movies. People are pulling out their Marvel T-Shits, some are coming out with the play cards. We have something to add to your love for the Marvel Avengers. Here in this post, we have collected 30+ best Avengers Endgame Wallpapers in Full HD & 4K Ultra HD resolution. 

Avengers Endgame Wallpapers

The Avengers Endgame Wallpapers below include wallpapers of almost all the characters. You can find wallpapers of The Hulk, Captain Marvel, Iron Man, Captain America, Doctor Strange, and all other characters. Thanos wallpapers are there too. All Avengers Endgame Wallpapers have been handpicked to best match the screens of your devices. These wallpapers are in the Ultra HD resolution and you can apply them on the screen of any computer, Android phone, or an iPhone with a compatible display.

Before you download Avengers Endgame Wallpapers, Let me give you a detailed idea about the series if you haven’t already watched it.

The Avengers began with the very first movie “Captain America” back in 2008. In the first movie, a lab experiment turns a skinny guy into a superhuman. At the same time, the extraordinary powers of the tesseract stone fall into the wrong hands. This is when the superhero Steve Roger’s responsibility to save the world begins. After Captain America, we saw the Iron Man series. So far, over 18 movies have been released in the Avengers series. If you haven’t watched any Avenger movie before, watching the Endgame will not make any sense. Here are the 8 Marvel movies that you must watch before Avengers Endgame.

Movies to watch before Avengers Endgame

  1. Captain America
  2. Captain Marvel
  3. Iron Man
  4. The Avengers
  5. Guardians of the Galaxy
  6. Captain America: Civil War
  7. Black Panther
  8. Avengers Infinity War

Best Avengers Endgame Wallpapers – Full HD & 4K (Ultra HD)

To download the wallpapers, right-click on your desired image and then click on “Save image as..”. You can download the wallpapers to your computer and copy to a phone, or you can download them directly on a phone by long-pressing > Download image.

That’s all. I hope you guys like these wallpapers. Drop your feedback in the comments section down below.

Download Avengers Endgame Wallpapers (Full HD & 4K)

1
Download Avengers Endgame Wallpapers (Full HD & 4K)

What started from a genius playboy stuck in a cave back in 2008, is finally come to a conclusion. Avengers Endgame is one of the most anticipated movies of all time. When first Iron Man came out in 2008, nobody could really anticipate that how good the Marvel Cinematic Universe is going to be. To celebrate the perfect ending of this series, we present to you the best Avengers Endgame wallpapers. Below are the wallpapers in both Full HD and 4K resolution. Moreover, you can browse the wallpapers by your favourite characters from this universe.

Avengers Endgame Wallpapers

Below is the biggest collection of Avengers Endgame HD, Full HD and 4K Wallpapers. It contains combined graphics for all characters like Thanos, Iron Man, Captain Marvel, Thor and others. Click on any of the thumbnails below and then click on Save Image to save it on either PC or mobile.

Avengers Endgame Iron Man Wallpapers

Iron Man is the main character of this series and the one who started it all. We are all hoping that he is the one to end it all too. Thanos considered Tony Stark as one of his biggest threats. There is a good reason for this. Tony is a genius and despite the limitations that come with being a human, he’s still managed to outsmart superheroes. 

We love Iron Man and he’s probably the best superhero in Marvel universe of all. Download best Iron Man wallpapers from below. These are in HD, Full HD and 4K resolution. In order to download any image, click on any thumbnail and then click on save image as on right-click.

Avengers Thanos Wallpapers

In the history of Super Villains, Thanos from MCU is up there with the best. Like him or hate him, Thanos is one of the finest characters to ever appear in a superhero movie. Some even agree that his theory of eliminating half the population may be right actually. However brutal it may be. Click on any thumbnail below to download Avengers Endgame Thanos Wallpapers in HD, Full HD or 4K resolution.

Rest of Characters 

Other notable characters from this movie include Captain Marvel, Captain America, Thor, Rocket, Black Widow, Ant-Man, Hawkeye and Hulk. We have collected the best wallpapers for these characters. In order to download any wallpaper, just click on its thumbnail, right click on image and then click on Save Image.

Conclusion

Make sure leave a comment if you loved these wallpapers. Also we’d like to mention that none of these wallpapers are owned by OSCrunch.com. We have gathered the best possible wallpapers from internet and compiled them all into one accessible way. And please, no spoilers in the comments!

Galaxy S10 Google Photos Background Backup Sync Problem – FIXED

Galaxy S10 Google Photos Background Backup Sync Problem – FIXED

Galaxy S10 owners, here is the guide to fix Galaxy S10 Google Photos background sync problem. This simple and easy tutorial will enable backups in the background for Google Photos once again.

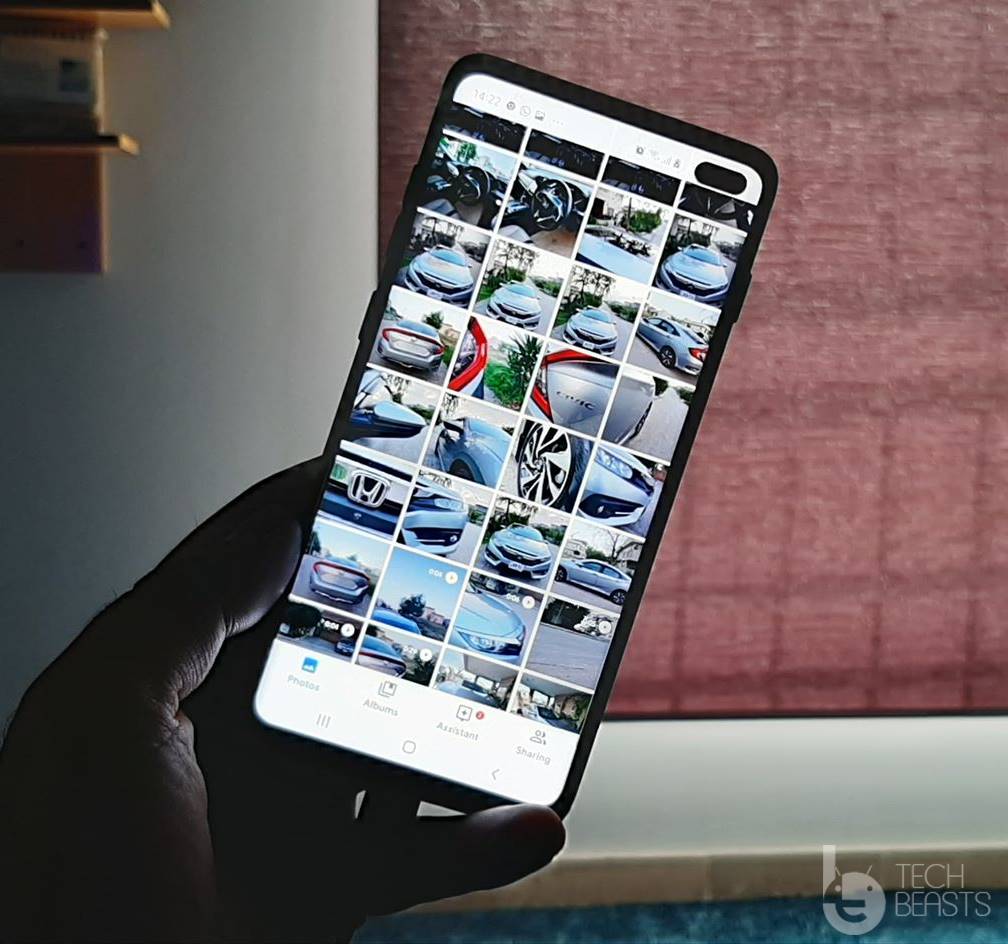
Google Photos is one of the best applications under Google’s umbrella. The Photos application is used by non-Google phone owners to replace their stock Gallery application, thanks to a bunch of its useful features. A huge number of Samsung Galaxy S10 owners have recently switched to Google Photos too. While using the application, a Galaxy S10 owner noted that the main feature of this application was not working. This is in regards to the Backup feature of the Google Photos. The Backup feature is the reasons why 90% of users switch to the Google Photos ditching their phone’s default Gallery. If the backup feature doesn’t work fine, it is totally useless to have this application on your phone.

Gallery to Google Photos on Galaxy S10
Google Photos on Galaxy S10 Plus

Google Photos Backup-sync problem on Samsung Galaxy

The problem with Google Photos on the Galaxy S10 was with the Backup Sync. The photos application did not backup photos while the application was shut down or in the idle mode. It only backed up photos when a user physically opened the app. Ideally, the Photos application should always be backing up photos without having the need to open the app. Since the application worked well while it was open, it quickly points towards the app going in the sleep mode when its shut down. The user who noted this problem quickly came up with the solution too. This was happening because of the changes made by Samsung.Galaxy S10 Google Photos Background Backup Sync Problem

The One UI comes with an enhanced battery optimization mechanism. It optimizes battery usage for all running apps on your phone. The battery optimization is turned on for the Google Photos app by default. The moment you close the Google Photos app, it goes into deep sleep mode. Which is why the application fails to back up any photos in its idle mode. Simply disabling the battery optimization for the Google Photos app made it work. If you don’t know how to do this, I am going to show you the steps to do so down below.

Fix Galaxy S10 Google Photos Background Backup Sync Problem

  1. On your Galaxy S10, go to Settings.
  2. In Search, type “Optimise”.
  3. Now click on “Optimise Battery Usage”.
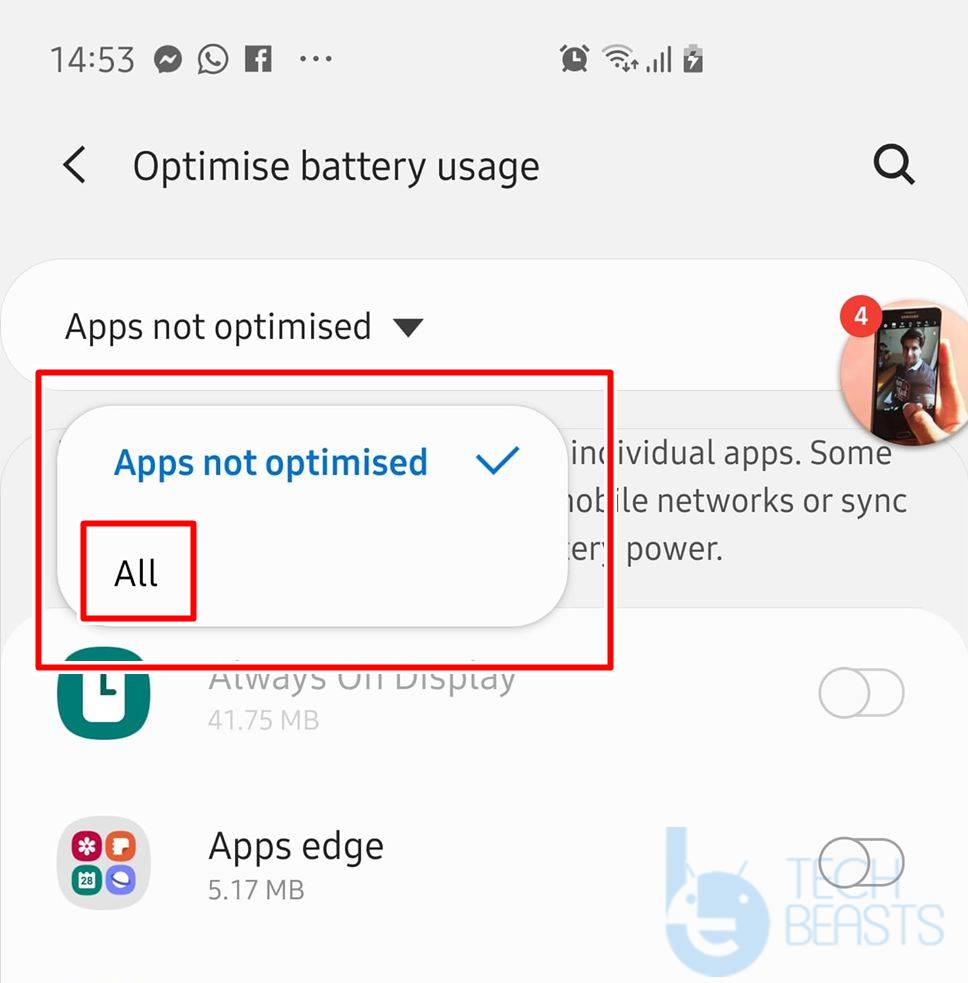
  4. Click on Apps not optimized> All.
  5. Find “Photos” in the list and disable the optimization.
  6. The backup and sync feature of Photos will now start working in the background. That’s all.


Switch from Gallery to Google Photos on Galaxy S10 – How To

Switch from Gallery to Google Photos on Galaxy S10 – How To
Google Photos on Galaxy S10 Plus

This is the guide to switch from Gallery to Google Photos on Galaxy S10. You can find complete steps to make this switch right away.

Google Photos is among the best photo solutions to manage pictures on an Android phone. The usability and feature-rich nature of Google Photos have urged users to ditch the stock Gallery apps of their phones. This is seen mostly with the Samsung Galaxy phone owners. A major percentage of Samsung phone owners switch from Gallery to Google Photos.

Gallery to Google Photos on Galaxy S10
Google Photos on Galaxy S10 Plus

Recently, Samsung released the Galaxy S10 lineup. I did see a lot of users deciding to switch from Gallery to Google Photos on Galaxy S10. As a Galaxy S10 Plus owner, I personally decided to switch to Google Photos too. I took this decision after being impressed by the UI and efficiency of Google Photos. It brings a plethora of options under one roof. In this guide, I will show you the steps to switch from Gallery to Google Photos on Galaxy S10. Before you learn it, let me give you a few good reasons to opt for Google Photos.

Google Photos over Gallery – But Why?

Google Photos comes with a default backup option synced with Google Drive. You can back up as many photos as you want using Google Photos. Initially, most of the Gallery users preferred Google Photos because of this backup option. There is definitely a backup option in the Gallery app. The Gallery app uploads all of your images to the Samsung Cloud, but, unfortunately, the Samsung Cloud was not accessible on PC easily. The Google Drive, however, can be accessed on any device. The cross-platform support of Google Drive is one of its best features. As of today, there are methods to access Samsung Cloud on PC, but it looks like most of the users still don’t know about it.

While the Samsung Gallery application is aesthetically pleasing, the Photos comes with a cleaner UI. Its UI is basically inspired by the UI of Vanilla Android. The photos application can organize your photos the way you want. It also sorts them out in their own folders. When you install Google Photos in parallel to the Gallery app on your phone, it does sync and shows all photos. If you delete a photo from the Google Photos, it gets deleted from the Gallery too. In case you have the backup & sync turned on in the Google Photos, deleting a photo from Google Photos will delete it from your device, but it will keep it safe on the cloud. This is how this application can massively help you with saving storage on your device.

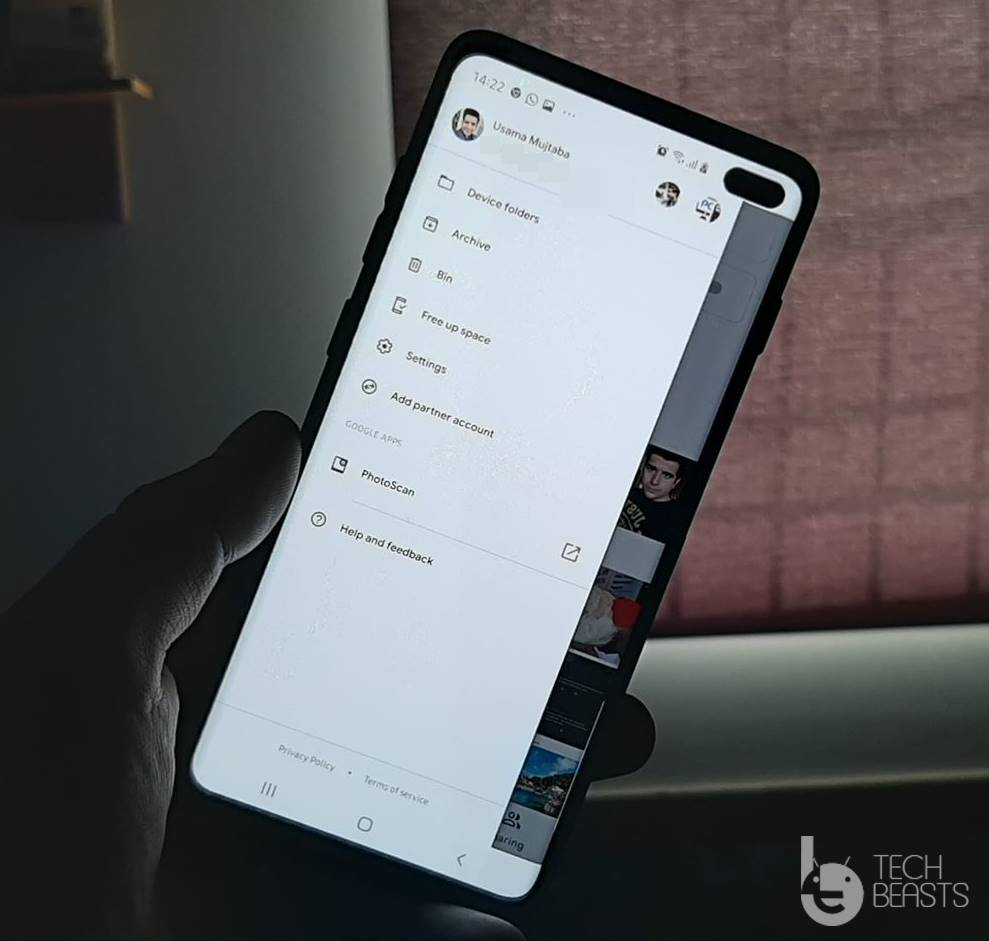
One of the best features of this application is the “Free Space” option. If you press the Free Space button, it deletes all the pictures which are backed up in the Google Drive. It does not delete the photos locally stored on your device. Also, if you are using the GCam on the Galaxy S10, you are definitely going to need the Google Photos app as it is the best one for GCam.Google Photos Free Space

Assuming that you have a better idea of Google Photos now, let us take a look at how we are exactly going to make this switch.

Switching from Gallery to Google Photos – How?

First things first, there is actually nothing like purely switching from the Gallery to Google Photos. We will just set the Google Photos as the default gallery application on the Galaxy S10. Using it as default will take all your back up worries away. As you move forward, I will show you the steps to get it done quickly.

Steps on how to Switch from Gallery to Google Photos on Galaxy S10

  1. Download and install Google Photos on your phone if you don’t already have it.
  2. Open Google Photos now and turn on “Back up and sync”.
  3. Now on your phone, go to Settings > Apps > Gallery > Set as default > Clear Defaults.
  4. Go back to Apps > Photos > Set as Default.
  5. Go back to app drawer on your phone. Long-tap the Gallery icon > Disable.
  6. Keep using Google Photos now. It will work as your default Gallery app. That’s all.

Final Words

This method works fine in theory. You definitely have to get used to the Photos application if you want to fully stop using the Gallery application. Since the Photos automatically syncs everything, you can just keep using this application without touching any settings on your phone too. I hope that you guys like this guide. If you have any queries or questions, feel free to reach out to us through the comments section below.

More:

Apps open on their own on Samsung Galaxy S8 and other phones – FIXED

0
Apps open on their own on Samsung Galaxy S8 and other phones – FIXED
Image Credits: BGR

Are the apps opening on their own on the Galaxy S8 or any other Samsung phone? Well, if so, you have reached the right place to fix it. Recently, a user reported on Reddit about his Galaxy S8 opening the apps on its own. Soon after the post, a handful of other users reported the same problem on their phones. It turned out that it was a common issue and it was very easy to fix too. So, before you fix the apps open on their own on Samsung Galaxy S8, it’s important to know what’s causing this problem.

Apps open on their own on Samsung Galaxy S8
Image Credits: BGR

Apps keep opening on Galaxy S8 – What’s causing this?

All the Galaxy S8 owners who reported this problem, they had one thing in common. All of them had their phones paired with the Samsung Galaxy Watch. The Samsung Galaxy Watch comes with a smart relay feature. The purpose of this smart relay feature is to show you details for a notification that just popped up on your Galaxy Gear. For example, you just got a message on WhatsApp and you saw it on your Galaxy Watch. When you will pick up your phone after that, the Smart Relay feature will show you that WhatsApp message’s details on the screen of your phone. It basically automatically expands the details for the notifications. This Smart Relay feature was the culprit behind opening the apps on their own every few minutes. The users had to turn off Smart Relay on their phones to get rid off this feature.

Apps open without my asking from r/GalaxyS8

At this moment, Samsung has not given any appropriate solution to this problem. Yes, the Smart Relay’s functionality will be lost by turning it off, but if you don’t want the apps to keep popping up, this is the only solution you have got right now. As you move forward in this post, you will find steps to turn off Samsung Smart Relay. This will fix the apps open on their own on Samsung Galaxy S8 right away.

Apps open on their own on Samsung Galaxy S8 – How to fix

On your phone, open Galaxy Wearable application on your phone.

  1. Go to Settings > Notifications > Smart Relay.
  2. Turn off Smart Relay.
  3. Restart your phone.
  4. The apps will not open without your permission now. That’s all.

Download PUBG Mobile Vietnam APK [PUBG Mobile VN]

0
Download PUBG Mobile Vietnam APK [PUBG Mobile VN]

Vietnamese fans of PUBG Mobile can download the game in their own language now. PUBG Mobile lovers from Vietnam can download PUBG Mobile Vietnam APK aka PUBG Mobile VN from here. We have attached the latest version of PUBG Mobile VN here.

PUBG Mobile Vietnam APK

The most popular battleground game at the moment is PUBG Mobile. The mobile variant of PUBG is even more popular than its desktop variant. PUBG Mobile is famous for a number of reasons. Not only this game brings interesting and engaging gameplay, it, in fact, laid a foundation for a whole new genre of games on smartphones. We saw a huge number of games coming right after the announcement of PUBG Mobile. All these games tried to put forward the concept of PUBG Mobile, but they massively failed. Not a single PUBG Moble ripoff actually matches or beats what PUBG Mobile has to offer. One of the reasons for PUBG Mobile to be so much popular is the number of languages and variants it comes in. For example, if your phone doesn’t support the full version of PUBG Mobile, you have its Lite version. If you are living in Korea, you can find PUBG Mobile Korean which will be in the Korean language. Similarly, users living in Vietnam have the PUBG Mobile VN. The developers of PUBG have put in a lot of efforts to cater to their audience all across the globe.

PUBG Mobile Vietnam APK

Before you download PUBG Mobile Vietnam APK, I would like to give you a recap of this game’s concept.

PUBG Mobile

PUBG Mobile is a battleground FPS game. In this game, over a 100 players jump off from a C130 plane onto an isolated Island. After reaching the ground, the players have to start looking for items and supplies like clothes, weapons, energy drinks, etc. The idea is to equip yourself with everything useful and then look for the enemies. If you are playing this game as a single player, you have 99 enemies on the Island. If you are playing in a team, you have 95 other enemies as you have 4-5 players in your team. The goal is to survive until the end. The one standing till the end gets a chicken dinner.

PUBG Mobile VN APK

The action is taking place between abandoned buildings. You can break into houses, hospitals, and offices to find weapons and supplies. After you kill your enemies, you can loot their boxes and bags. Keep your inventory filled with all the needed items so that the chances of your survival are higher. You can drive around in cars and trucks. Find safe places to hide from the enemies. Wear a bulletproof west to get through a rain of bullets. You have to play this game carefully to avoid your enemies. You never know who finds you when and you will not be able to even see the direction the bullet is coming from. PUBG Mobile seems easy at the start, but the game gets really tough as you level up. If you are looking forward to spending a good 4-5 hours of playing an interesting game, PUBG Mobile may be the best choice at the moment.

That was a glimpse of what PUBG Mobile is all about. Download PUBG Mobile VN APK from below and follow the instructions to install it.

PUBG Mobile Vietnam APK

  1. Download PUBG Mobile VN (0.11.0) – APK Link
  2. Copy the APK to your phone.
  3. On your phone, using a file manager, open PUBG Mobile VN APK.
  4. If the APK asks for installation permission, allow it.
  5. Complete the installation now.
  6. Launch the game from the app drawer.
  7. The game will take some time to download its data.
  8. Enjoy the game in your language. That’s all.

Check out:

Root Galaxy A50 and Install TWRP Recovery

Root Galaxy A50 and Install TWRP Recovery

Samsung Galaxy A50 has received an unofficial build of TWRP custom recovery. The already-powerful-A50 is about to get more power now. Galaxy A50 owners can get TWRP custom recovery with the help of this tutorial. The guide also has a method to root the Galaxy A50. So, follow the steps given here to root Galaxy A50 and install TWRP Recovery.

Root Galaxy A50 and Install TWRP

Before you jump up to the guide to Root Galaxy A50 and Install TWRP, let me share some details of this phone with you.

Samsung Galaxy A50

If there is any phone offering the best value-for-money at the moment, that is the Galaxy A50. The millennials have finally found a Samsung phone under a competitive budget with great specifications. Samsung Galaxy A50 is equipped with a 6.4-inches Super AMOLED screen. It has a waterdrop notch bumping the screen ratio to 19:9. Galaxy A50 has three cameras at the back including 25MP main camera, 8MP ultrawide camera, and a 5MP depth sensor. On the front, the Galaxy A50 has a single 25MP camera. This phone is powered by Exynos 9610 CPU. It has RAM of 4GB or 6GB and it has the internal storage of 64GB or 128GB. It definitely has a microSD card slot too. The Galaxy A50 has a 4000 mAh battery inside. Its features also include a fingerprint scanner under the display. Galaxy A50 runs on Android 9 Pie out of the box.

TWRP Recovery and Root for Galaxy A50 – What does it mean?

If you already know what TWRP is and what you can do with root, you can skip this paragraph. Those of you who have no idea about these terms, let me put it down in simple words.

The TWRP Recovery is a custom recovery interface for Android phones. By default, all Android phones have a recovery with options like a reboot to bootloader and system, wipe cache, and factory reset. The recovery is capable of much more than these options, but the phone makers have locked them all down. To unleash the real use of recovery interface, we have custom recoveries like the TWRP. When you install TWRP Recovery on Galaxy A50, it will replace the stock recovery of your phone.

In the TWRP recovery, you will find options like Install, Wipe, Backup, Restore, Advanced, and some other options. The Install option will let you install ZIP files, IMG files, and any other custom file you want. Using the Backup option, you can create a backup of all partitions of your phone. This includes the Nandroid and EFS partitions too. Through the Wipe option, you can wipe cache, Dalvik cache, and any partition separately. The Advanced option has the ADB terminal.

While the TWRP runs in the bootloader, the root works across your device. If you want to add new features to your phone, add something new to the UI, or just boost its performance, you will find root useful. There are thousands of applications that use root access to modify an Android smartphone. Check out the best root Apps for Android here. Here are some reasons to root an Android phone in 2019.

Who is this process for?

Anyone who wants to check the full potential of their Galaxy A50 can root and install TWRP. Newbies have to be extra careful while following the instructions. As long as they follow the procedure with full attention, they will get it done successfully. However, if you are not sure of this, you should not go ahead.

Another thing to keep in mind is that flashing custom recoveries or rooting the devices is not recommended by the phone makers. This procedure can void the warranty of the phone. It will also trip the Knox counter. In case something goes wrong, TechBeasts or the device manufacturer may not be held responsible. Make sure that you understand all the risks.

Root Galaxy A50 and Install TWRP Recovery

Preparations

  • This guide is only for the Galaxy A50.
  • Do not try to flash this recovery on any other phone.
  • Charge your phone’s battery up to 50% before following the steps.
  • Backup each and everything on your Galaxy A50.
  • You need an external microSD Card for this.
  • Enable OEM Unlocking and USB Debugging Mode on the phone.
  • Disable Samsung Smart Switch while using Odin. If you do not have Smart Switch, skip this step.
  • Follow the instructions with full attention.

Required Downloads

  • TWRP Recovery for Galaxy A50.
    • Note: All recoveries come with Magisk pre-patched. This means that your phone will be rooted in the recovery installation.
  • Encryption Disabler.zip File.
    • Copy this file to an external microSD card. The SD card should be in your phone.

Before you go ahead…Unlock the Galaxy A50 Bootloader

Samsung has started locking the bootloader of its devices. Usually, enabling the OEM Unlock simply unlocked the bootloader, but things have changed a bit now. The OEM Unlock option is still there on a few variants of the A50 phones, but some variants have a slightly different unlocking method. This can be checked by only going into the Download Mode on the phone. Here is what you have to do in such a case.

  • Turn off your phone.
  • Press and hold Volume Up + Bixby + Power button to boot into recovery.
  • In the recovery, select “Reboot to bootloader” and press Power button.
  • This will boot your phone into the Download Mode.
  • The Download Mode will show you “Press Volume Up for bootloader unlock”. Long pressing this key will unlock the bootloader and wipe your phone.
  • Boot up your phone and immediately connect it to the internet. It will enter the rmm prenormal state otherwise. We don’t want the rmm prenormal.
  • Skip the Google account part. We do not need the Google Account.
  • Now power down your phone after setting it up.
  • Press and hold Volume Up + Power + Bixby key to boot into Recovery.
  • In the recovery, select “wipe factory data reset”, press Power button and wipe the phone.
  • Go back to the main menu in recovery and select “Reboot to bootloader”. Enter the Download Mode and follow the remaining instructions.

If your phone does not show anything called “Bootloader Unlock” in the Download Mode, you may skip the above process. Your phone will work simply with the OEM Unlock option.

Finally, here is the method to install TWRP and Root your Samsung Galaxy A50.

Guide to install TWRP Recovery on Galaxy A50 and Root it

  1. Open Odin 3.13.1.exe on your computer.
  2. In Odin, go to Options > Make sure the only checked option is F.Reset.Time. No other option should be checked.
  3. Come back to the main menu in Odin and click on AP tab.
  4. Select the TWRP Recovery.tar file for your A50 in the AP tab.
  5. Now boot your Galaxy A50 in the Download Mode. While your phone is in the Download Mode, connect it to the computer.
  6. Odin will show “Added” in the logs and also show a Blue light in the ID:COM box.
  7. Click on Start button in Odin. Odin will flash the Recovery with Pre-patched Magisk in only 2-3 minutes.
  8. Disconnect the phone after it ends, do not restart the phone.
  9. On the phone, press and hold Volume Up + Bixby + Power button for a few seconds. It will take you into the TWRP Recovery directly.
  10. Click on Install in TWRP. Now click on Install Zip > Locate Encryption Disabler.zip file and flash it.
  11. Reboot your Galaxy A50 into the system now. That’s all.

Congratulations. Your Samsung Galaxy A50 has been rooted. It also has the TWRP recovery now. To manage root, you can install the Magisk Manager on the phone. If something goes wrong with the phone, immediately clear its cache and reboot the phone.

In case you are not satisfied with the TWRP recovery and root, here is the guide to Install Stock Firmware on Galaxy A50.

If you have any queries or questions, feel free to drop them in the comments section below. I will try my best to get back to you as soon as possible.

Guide to Install Stock Firmware on Galaxy A50 (Back to Factory)

Guide to Install Stock Firmware on Galaxy A50 (Back to Factory)
Install Stock Firmware on Galaxy A50

This is the guide to install stock firmware on Galaxy A50. By installing stock firmware on the Galaxy A50, you can reset it back to factory settings. In this guide, I have explained two different methods to install or restore stock firmware on the Galaxy A50.

Install Stock Firmware on Galaxy A50

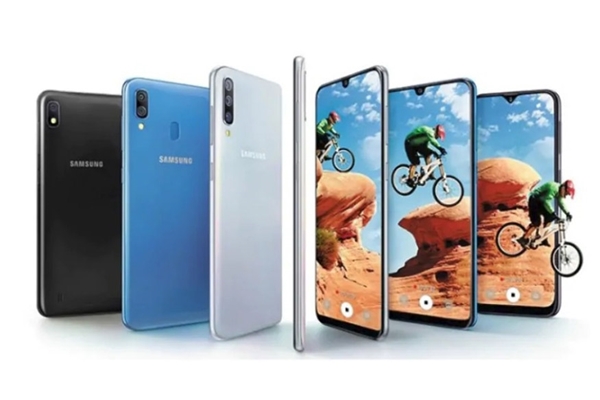
Samsung Galaxy A50 has become the most popular mid-range phone by the South Korean giant. The phone comes with a powerful combination of hardware and software. Samsung’s plan to take on its competitors like Xiaomi and Huawei seems to be going pretty well so far. The Galaxy A50 is gaining traction among the value-for-money customers. At the time of writing this post, Samsung has sold over 2 Million Galaxy A phones in India only. The highest percentage of phones in this 2 Million is of the Galaxy A50. Since the Galaxy A50 has now become a mainstream device, it’s very important for its existing and upcoming owners to master it. One part of mastering the Galaxy A50 is to learn how to install stock firmware on it. Before you learn how you can install a stock ROM on the Galaxy A50, let me share the details of this phone with all of you.

Samsung Galaxy A50

The A50 comes with a screen 6.4-inches. It has a waterdrop notch on the front holding the front camera. The screen-to-body ratio here is 19:9. Galaxy A50’s display is Super AMOLED and it has full HD resolution. This phone is powered by Exynos 9610 Octa-core processor. This is a 10nm CPU and it has quite impressive performance. A50 comes with a RAM of 4GB or 6GB and internal storage of 64GB or 128GB. It does have an external card slot too.

Samsung Galaxy A50
Image of Galaxy A50 – UsamaM – Techbeasts

The Galaxy A50 is equipped with three cameras at the back. The main shooter is of 25MP. There is an 8MP ultrawide shooter and then a 5MP depth sensor. On the front, it has a single 25MP camera. It has a whopping 4000 mAh battery. Galaxy A50 hosts a fingerprints scanner underneath its display. It runs on Android Pie themed by Samsung One UI out of the box.

Let’s head back to the guide now. So, why exactly are you going to need a guide to install stock firmware? There are going to be a number of scenarios enforcing you to flash a new stock ROM. I will jolt them down in a list below.

Why install stock firmware on Galaxy A50?

These are a few reasons.

  1. Your Galaxy A50 has a new update available, the update is not available in your region through OTA and you want to install it manually. You can download the firmware and then install it manually using this guide. This is one of the best methods to update Galaxy A50.
  2. The Galaxy A50 you are using has malfunctioned or it is having performance issues. Its software is acting up and a factory reset is not working. Now you want to fix it by flashing a new stock ROM. This is the guide you need to flash stock ROM on the A50.
  3. Samsung Galaxy A50 has soft-bricked, stuck in a bootloop, or it is randomly rebooting, whatever the problem is, you can fix it by re-installing the software.
  4. Your Galaxy A50 was rooted. Now you want to unroot it. The only way to unroot Samsung Galaxy A50 is by installing a stock firmware.
  5. You don’t like the current version of Android on your phone, you want to go back to the previous update. You can downgrade Galaxy A50 by following the steps below.
  6. And many other reasons.

Guide to Install Stock Firmware on Galaxy A50

Before you jump up to the steps, let me tell you about the methods we have. Basically, we have two procedures to install the update. The first procedure is through Samsung Smart Switch. It is Samsung’s official PC Suite. The Smart Switch comes with firmware installation, backup, and some other tools. It can find an update for your phone online and install it. It also has the emergency software recovery which helps in case your phone shows a problem. Since the Smart Switch method is easy and good for an average user, I will share its guide first. After this, I will show you the Odin method too.

Another thing to remember here is that the firmware guides below use official Samsung firmware only. Given that you follow all instructions carefully, these guides will not harm your phone at all. Your warranty will stay intact. Go ahead without worrying about anything.

Steps to install Galaxy A50 Stock Firmware via Smart Switch

  1. Connect your Galaxy A50 to the computer.

    First of all, use the USB Type-C cable to connect your S10 the computer. If the phone asks about trusting the computer, click on Allow/Trust.

  2. Open Smart Switch on the computer now.

    Open Samsung Smart Switch on your computer now. It will detect the phone.

  3. Backup your data via Smart Switch.

    Before performing a recovery or install new firmware, backup each and everything from your phone.

  4. Now go to Emergency Software Recovery & Initialization > Software Recovery or Device Initialization.

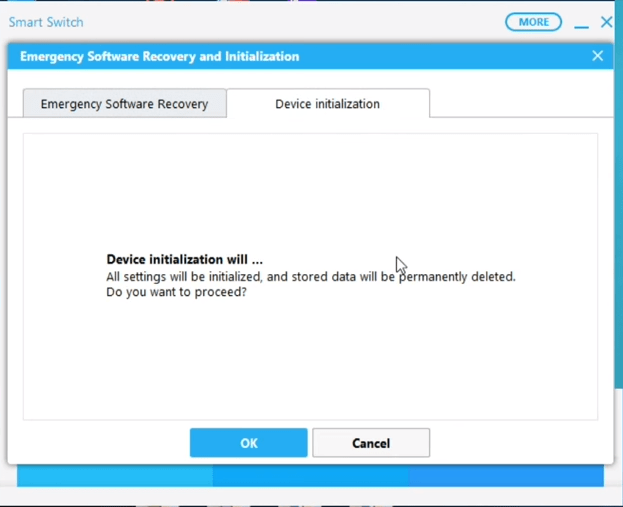
    Now click on the settings gear icon and then click on Emergency Software Recovery & Initialization. Under this menu, you will click on Emergency Software Recovery if you want to fix your phone. If you just want to install a new update, you will click on Device Initialization.

  5. If you are in Recovery, you can perform software recovery as mentioned on the screen.

    The software recovery screen is self-explanatory. Just follow the on-screen options to finish it.

  6. If you are in device initialization, let Smart Switch find an update and then you can flash it.

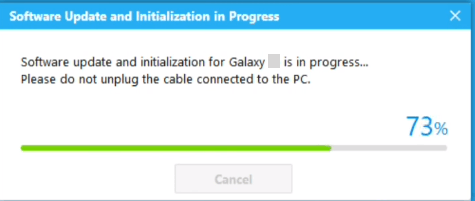
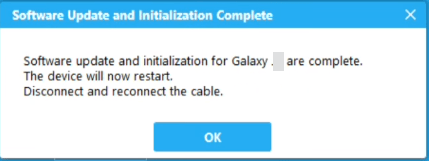
    If you are in the device initialization process, it is going to ask you about a number of things. First of all, it will show you the disclaimer, after this, it will show you the software version number and then it will ask you about creating a backup. Go through all the screens one by one to perform device initialization. This process will factory reset your phone with the help of new firmware.

Method to install Stock Firmware on Galaxy A50 via Odin

This method is slightly complex, so you need to pay attention.

Preparations

  • This guide is valid for all models of Galaxy A50. Do not try on any other phone.
  • Backup all the data from your phone.
  • Charge your phone up to 50% to ensure power backup.
  • Use original data cable to connect your A50 to the computer.
  • On your phone, go to Settings > About Phone > Software Information > Tap the build number for 7 times. This will enable Developer Options. Now go the Developer Options in settings and enable USB Debugging and also enable OEM Unlocking.
  • Follow remaining steps carefully.

How to boot Galaxy A50 into Download Mode
Turn off Samsung Galaxy A50. While the phone is off, press and hold Volume Up + Bixby + Power button to boot into recovery. As your phone vibrates, let the keys go. You will see the recovery now. In the recovery, using Volume Down, highlight “reboot to bootloader” and press Power button to reboot. Your phone will now reboot in the Download Mode now. Press Volume Up to continue.

Required Downloads

  • Open this page and enter your device model number. Download the latest firmware for your phone.
    • Extract the downloaded firmware to get the AP, CP, BL, CSC and Home_CSC files.

Image used for reference only

  • Odin 3.13.1 for PC – Download and Extract
  • Samsung USB Drivers for Windows – Download and install.

Install Stock Firmware on Galaxy A50

  • Open Odin3.exe on your computer. In Odin, go to Options. Make sure that the only options checked are F.Reset.Time and Auto Reboot. No other option should be checked. Get back to the main menu in Odin now.
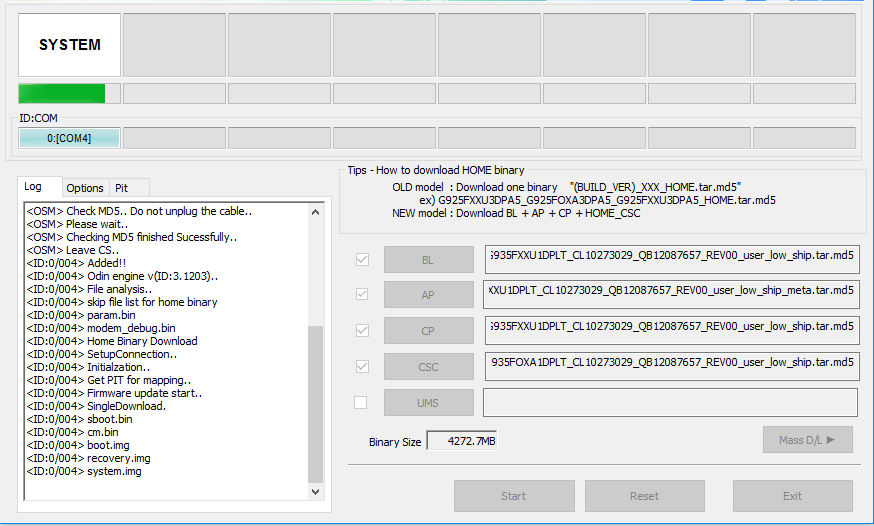
  • In Odin, click on the AP tab and select the AP file. Add the BL file to the BL tab. Now add the CP file to the CP tab. In the CSC tab, add the CSC file if you wish to factory reset, add the Home_CSC file otherwise.
  • Put your Samsung A50 in Download Mode now.
  • Odin will show “Added” in the logs and it will also show a Blue light in the ID:COM box.
  • You are all set now. Click on the Start button in Odin. The firmware installation will begin.
  • It will take about 7 minutes for the new software to be installed. Once it ends, the phone will reboot.
  • Disconnect the phone and enjoy all new firmware.

Image used for reference only

The first boot after Odin can take easily up to 10 minutes so keep patience. If you think that there is something wrong, you can immediately boot into recovery mode and clear the cache of your phone.

Wrap Up

That’s all with the stock firmware installation on the Galaxy A50. I hope that you guys found this guide useful. If you have any questions, feel free to ask them in the comments section down below. I will try my best to get back to you as soon as possible.

How to Play YouTube in Background without YT Premium

0
How to Play YouTube in Background without YT Premium

YouTube is one of the internet’s biggest hubs for music videos. Most of YouTube’s traffic is on music videos. It is most widely used because of how easy it is to find new songs and it offers good enough quality. However, when using the normal YouTube app, we cannot play the music in background. This feature is only available with YouTube premium. Moreover, the PIP mode of YouTube works in selected regions only. Therefore, follow this guide to learn how to get YouTube Background Play feature without YouTube Premium. It is totally free to use and works flawlessly. Also note that this guide is for Android devices only.

Play YouTube Music Videos in Background

The background playback is one of the most desired features for YouTube. However, it is not available for free users. The reason is obvious. Google wants its users to watch ads. Otherwise, pay for the premium membership to get background playback on YouTube.

In this guide, we are going to use a modified version of YouTube’s Android app. Although, it offers a number of most-wanted features, we are currently going to focus on YouTube background playback only. This special app is known as “YouTube Vanced”. It is released by a group of enthusiastic developers. Both rooted and non-rooted versions are available. 

How to play YouTube in Background [Android]

This method does not work on the official YouTube app. You need to install another app and it is not available on Play Store. Therefore, follow the installation method below to download YouTube Vanced APK and install on Android phones and tablets.

  1. Download YouTube Vanced APK from HERE. 
  2. Get the latest version. Moreover, check whether you want the app with basic theme or dark theme. 
  3. Put this APK on your phone or tablet.
  4. Then open the file manager on phone and navigate to the folder where your put APK in last step.
  5. Tap on and it and then tap on Install in next window.
  6. If the system asks for permission to Install from Unknown Source, allow it. System asks for this permission whenever you want to install an App from a source other than Play Store.
  7. Once the app is installed, tap on Open button in bottom right.
  8. That’s it! You’ve successfully installed it. 

[Optional] Guide to add Google Account in YouTube Vanced

If you just install the app and try to add the account, it will show an error. Therefore, follow the steps below to add a Google account. It is especially useful if you want to access personal playlists and personalized home feed in this app too.

  1. Download MicroG APK from HERE.
  2. Copy this APK to phone.
  3. Open the file manager on phone and navigate to the folder with APK in it.
  4. Tap on APK and then tap on Install button afterwards.
  5. Give it the install permission if system prompts for it.
  6. Once done, just open the YouTube Vanced app from app drawer.
  7. Tap on avatar icon in top right.
  8. Select the Add account option from here.
  9. It will open Google’s Account login form.
  10. Enter your login details and that’s it!

[Final] Steps to enable Background Playback on YouTube Android App

Once installed, follow the steps below to enable Background Playback in YouTube App on Android.

  1. Open YouTube Vanced App.
  2. Tap on profile avatar in top right corner.
  3. If you’re not logged in then it will open the Settings page directly. Otherwise, tap on the Settings tab in profile window.
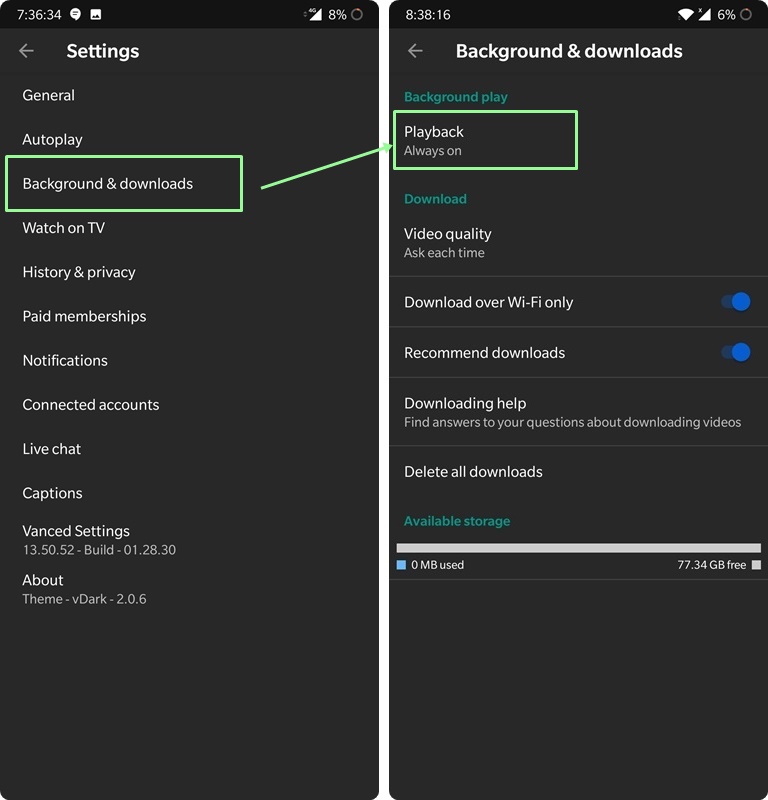
  4. From here tap on General. Enable the “Picture-in-Picture” option from here.enable background playback youtube android
  5. Now go back and open “Backgrounds & Playback” tab. Tap on “Playback” here. It will show three options. Either select “Always on” or “Headphone or external speakers” option. It depends on how you want to use it. Always On option will play YouTube music videos in background even on phone speakers. The second option is self-explanatory.play youtube in background android

That’s pretty much it! Now you can listen to YouTube songs in background.

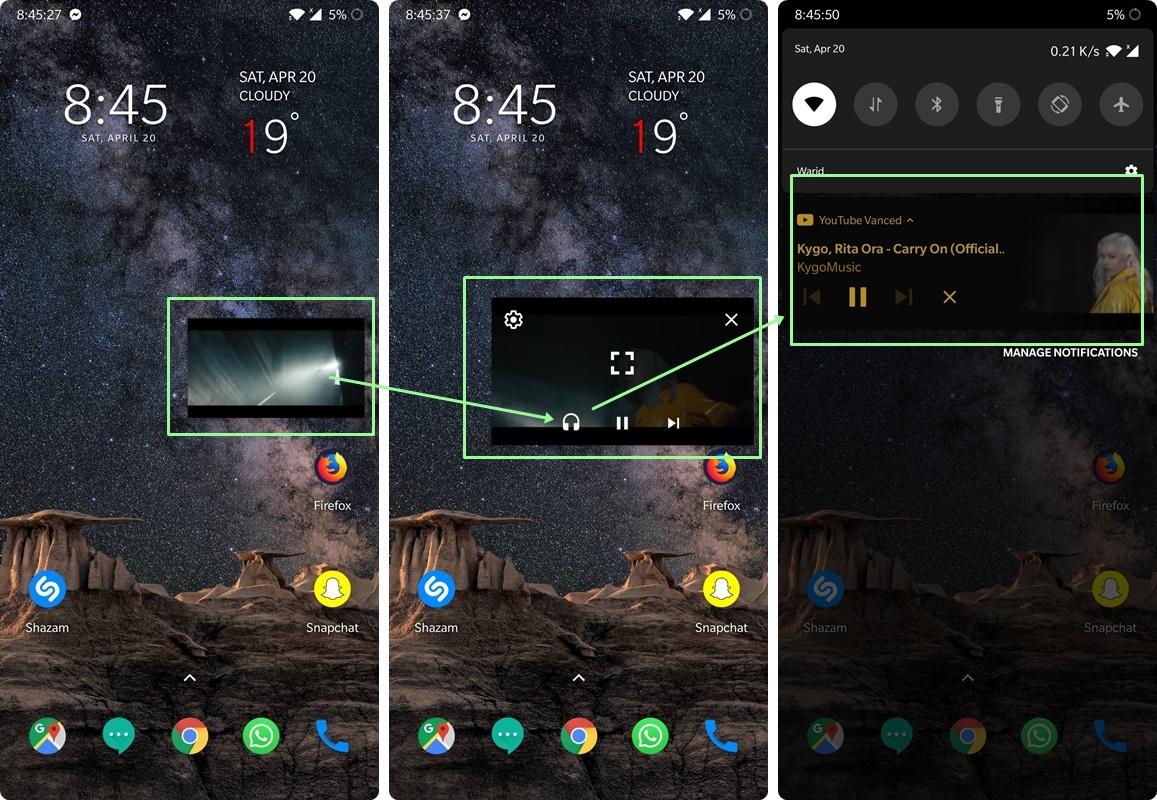
The settings shown above enable Picture-in-Picture mode with Background Playback. This means that when you press the Home button on YouTube, a mini player will pop up. If you want to get rid of mini player and just use background playback, then do not enable Picture-in-Picture option as shown in step 4 above.

Tip: When watching Picture-in-Picture, tap on the mini player once and then tap on Headphones icon to remove mini player. The video will just play in background now. Previous, next, pause, play controls are available in notification bar.

play youtube music videos in background screen off

Some extra Useful Features

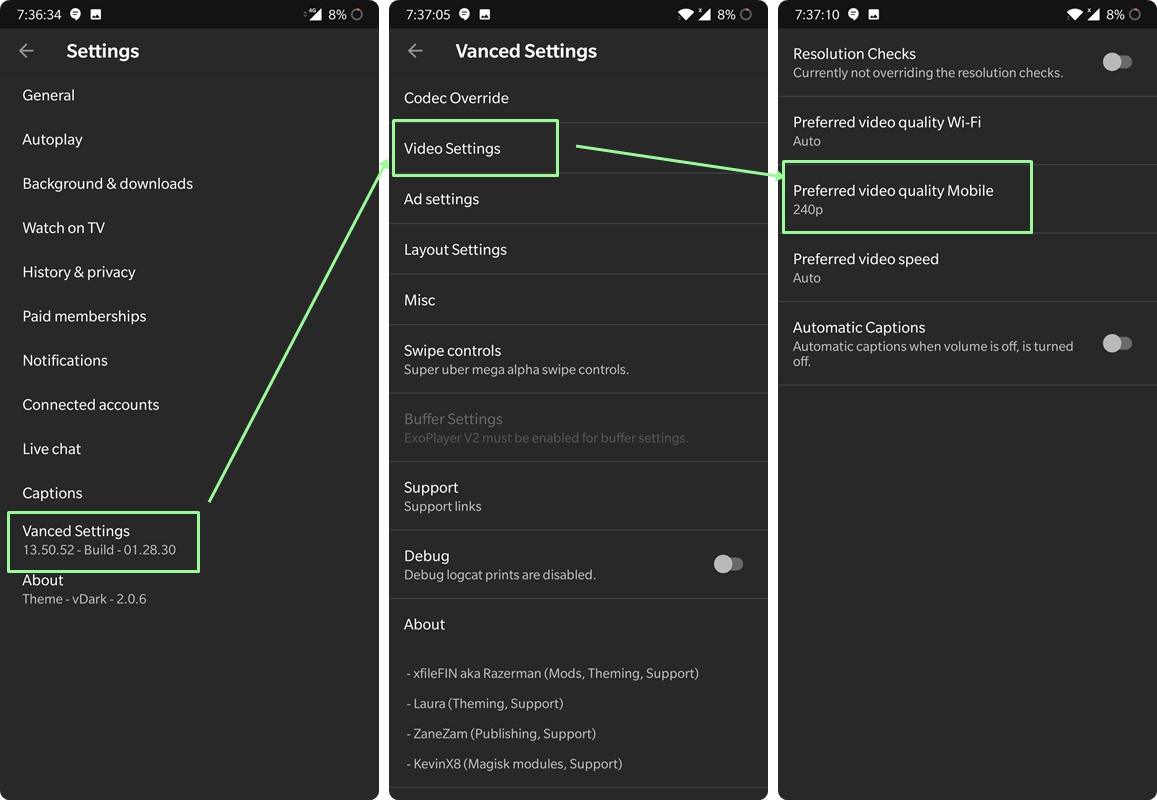
  1. Set the video quality low on Mobile data and high on WiFi automatically. Enable this feature in Settings > Vanced Settings > Video Settings > Preferred Video Quality Mobile.change youtube quality on mobile data automatically android
  2. Enable Swipe controls for brightness and volume like MX Player. Enable it from Settings > Vanced Settings > Swipe Controls.
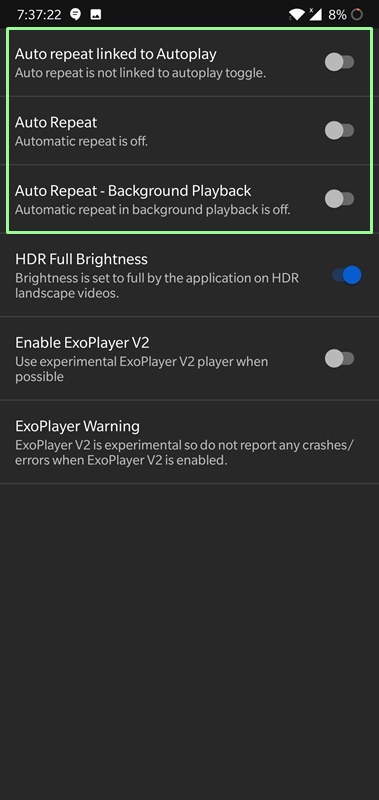
  3. Enable repeating videos on YouTube Android App. Enable this feature from Settings > Vanced Settings > Misc. Set the “Auto Repeat linked to Autoplay” as on. Now, if you disable the autoplay toggle under any video, it will keep playing repeatedly. Alternatively, use the Auto Repeat mode in which you have to manually skip a video. Auto Repeat – Background Playback option enables auto repeat only if video is playing in background. Choose whichever option suits your style of use.play youtube music video on repeat android
  4. The default Android YouTube app does not have an option for repeating. Follow the step 3 to enable repeat mode on YouTube Android.

Conclusion

I myself listen to music on YouTube a lot. Whether driving or at home. Therefore, it was really annoying to not have a feasible background playback feature on YouTube Android app. Although it is still possible via some unconventional methods, none is as convenient as Vanced app.

YouTube Vanced solved three of my major issues. Now I can listen to music on YouTube with screen off or using other apps. Secondly, it automatically changes the video quality to 240p on Mobile Data. Since I do not watch videos while driving, and it saves data, it is a wonderful option. Thirdly, the repeat mode for YouTube. Even on desktop browser, this feature is hidden. Therefore, it is good to have this feature and how easy it is to use.

Huge shoutout to folks over at Vanced for developing this amazing app. 

Feel free to leave your feedback and queries in the comments section below.

How to install Official Android Pie 9.0 on OnePlus 3/3T

1
How to install Official Android Pie 9.0 on OnePlus 3/3T

OnePlus 3 and OnePlus 3T are finally receiving official Android 9.0 Pie update. This is the best stable Android version to date. It offers great speed improvement in addition to slightly improved battery life. Follow this guide to install the official Android 9.0 Pie firmware on OnePlus 3 and OnePlus 3T. This is not a custom ROM. The firmware that we are using in this guide is actually the official OnePlus 3/3T Android Pie 9.0 Firmware update. 

Requirements for Android Pie 9.0 on OnePlus

Before continuing, make sure that complete the following requirements. Some of these are precautionary measures while others are necessary.

  1. The bootloader must be locked. (Don’t know how to check, read next heading of this post)
  2. Charge your phone above 50%.
  3. Make a backup of all data.
  4. This update works for both the 181206 stable builds and 180712 Open Beta build for OnePlus 3 or OnePlus 3T.
  5. Check the build number in Settings > About Phone.
  6. Flashing Android Pie Update on OnePlus 3/3T with the open beta build will wipe all data. Making a backup is mandatory.

How to check Bootloader status on OnePlus 3/3T

Since OP3  and OP3T are some of the most powerful user-friendly devices, therefore, a lot of users may unlock the bootloader to install custom recoveries and ROMs. Moreover, this is useful for installing custom zips, apps, and features. However, for the sake of this update, you need to make sure that the bootloader is locked. Here is how to check is bootloader is locked or not.

  1. Turn off the phone.
  2. Press and hold Volume Up + Power keys until phone vibrates and Fastboot logo shows up.
  3. On this screen, the last line shows phone status as “locked” or “unlocked”. This status should be “locked”.
  4. Now press the volume key until you see the Turn Off option at the top.
  5. Press the power button to turn off the phone.
  6. Now turn it by just holding the power button.

How to re-lock the OnePlus 3/3T Bootloader

If you’re one of those people who have unlocked the bootloader to root the device with a custom recovery, then follow the steps below to re-lock it. 

  1. Install ADB tools on your PC. 
  2. Download and install Android SDK from HERE. Click on “Download Options”, scroll down to “Command Line Tools” and download Windows SDK tools from there. Mac and Linux users should download their own version.
  3. Next up, download ADB tools from HERE and extract in any drive (C, D, E).
  4. Enable USB Debugging on your phone. To get developer options, go to Settings > About Phone and tap on Build number 7 times. Next up, go to Settings > System > Developer Options and enable USB Debugging. Allow USB Debugging permission from the phone as well.
  5. Also, make sure that your phone is on stock recovery. Flash the stock recovery image for your phone. It is available in OnePlus forums.
  6. Now connect the phone to the PC via USB Cable.
  7. Open Command Prompt.
  8. Type cd <Drive Letter>:/extracted folder title. (For example cd C:/Android).
  9. Now type “ADB reboot bootloader” and press Enter.
  10. When the phone reboots into bootloader mode, type “fastboot OEM lock” and press Enter.
  11. The bootloader will now be locked. Just reboot the phone now.

Downloads

  • OnePlus 3 Android Pie 9.0 Firmware Update zip – HERE
  • OnePlus 3T Android Pie 9.0 Firmware Update zip – HERE

Guide to install Android Pie 9.0 Firmware on OnePlus 3/3T

Before continuing, once again make sure that the bootloader is locked. Moreover, make a backup of any data on phone. The update process may wipe all of the data.

Steps to install Android Pie 9.0 update zip on OnePlus 3 and OnePlus 3T.

Copy downloaded update zip to root of internal storage.

Either download the update zip from link provided above directly to phone or PC. Then put the file in root of your device’s storage. It means that the file should not be inside any folder.

Open Settings > System > System Update > Local Update.

Access the Local update from settings using path above. The System Update option may be available right in main menu. Also access Local Update by tapping on settings button on top right of System Update screen.

Choose the downloaded update zip from here.

If you have properly put downloaded update zip in local storage’s root, then it will appear here.

Tap on it and wait for the update to complete.

The phone will update automatically. And reboot afterwards.

Alternatively, enter Recovery Mode.

This is a conventional method to install update zips on Android.

To do so, turn off phone. Press and hold Volume Up and Power buttons together until Fastboot screen shows up.

Use the specified button combination to enter Bootloader / fastboot mode of your phone.

Use the volume button to navigate until header shows Recovery Mode. Press power button to enter recovery mode.

The touchscreen does not work here.

Here, use volume button to scroll down and select “Install Update from internal storage”.

This option accesses the update file you put in internal storage root in step 1.

Select the downloaded zip and select Yes option afterwards.

Use the power button to select update zip file.

Wait till the phone installs update and reboots itself. That’s it! You’ve done it.

The first reboot will take a bit longer than usual since cache is building up.

What’s new in OnePlus 3/3T Android Pie Update (Changelog)

According to official forums, below is the changelog for the latest update.

  • System
    • Updated system to Android™ 9 Pie™
    • Brand new UI for Android Pie
    • Updated Android security patch to 2019.4
  • Do Not Disturb mode
    • New Do Not Disturb mode with adjustable settings
  • New Gaming mode 3.0
    • Added text notification mode
    • Added notification for 3rd party calls
  • Phone
    • Deep integration with Google Duo
  • Camera
    • Integrated Google Lens mode

Conclusion

Android Pie is one of the best versions of this OS. The biggest winner in this OS is the adaptive battery optimizer. This works with integrated AI to maximize battery life. If someone uses YouTube lets say for a long time, it will basically cut power for other apps so that phone runs longer. Similarly, it optimizes battery life in sleep mode.

The improvement to UI is not as significant since the overall tone is pretty similar to before. However, the phone should feel faster and more responsive.

OnePlus Official Forum

Feel free to leave your feedback and queries in the comments section below.

Download Galaxy S10 Night Mode – Get Camera Night Mode Right Now

Download Galaxy S10 Night Mode – Get Camera Night Mode Right Now
Galaxy S10 Night Mode

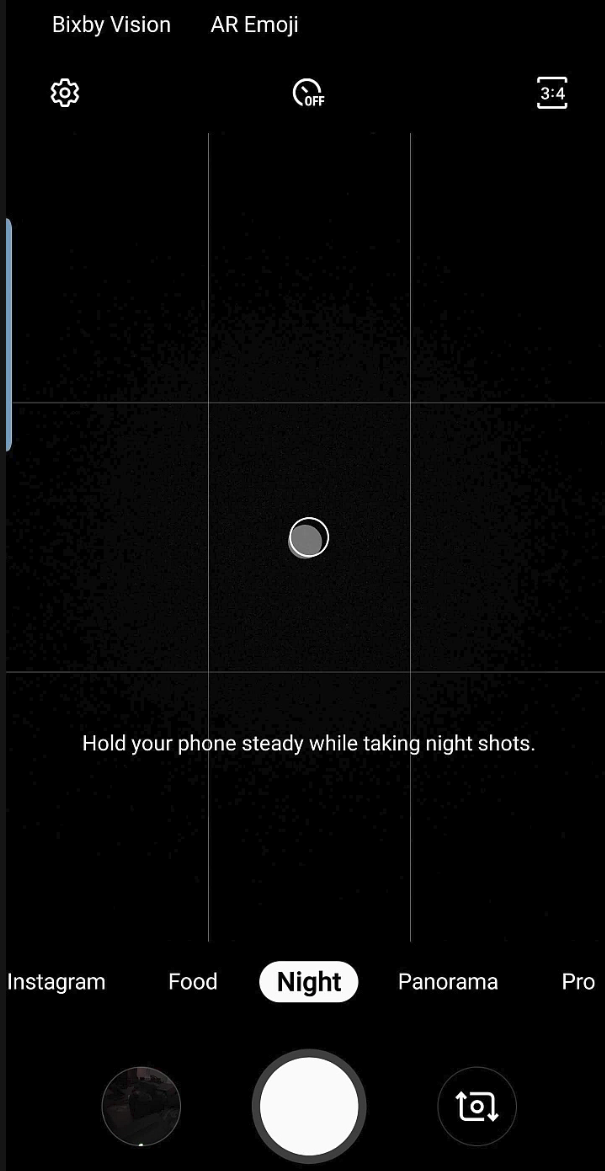
Big day for Galaxy S10 owners. Samsung has rolled out a new software update packing the dedicated Night Mode. It has been very long since the Galaxy S10 owners have been waiting for Night Mode. Samsung took a while, but finally, it has it there. As they say, it’s better late than never. In this guide, I will show you the steps to download Galaxy S10 Night Mode. By following the simple steps given in this guide, you can get Galaxy S10 Camera Night Mode right now. Before you get too excited for this Night Mode, let me share some details of this update.

Galaxy S10 Night Mode

Samsung Galaxy S10 Dedicated Camera Night Mode

While all other flagships today are coming with a super efficient Night Mode, Samsung has just deliberately ignored this segment. Google’s Pixel 3XL set new Night Mode standards and then the Huawei P30 set the bar high. Samsung, despite having the best flagship on the selves, lacked this very important feature. In an effort to tackle its competitors, Samsung released the dedicated Night Mode starting from Switzerland today. The OTA update comes with the April Security Patch and adds this Night option to the camera. Now apparently, this looks like very good news, but upon finding the details, I was disappointed too. Let me tell you why.

The Galaxy S10 phones already have a Bright Night Mode. When you capture photos in the Night, the Bright Night turns on and takes long-exposure shots. Now, this Bright Night Mode is also there on phones like Galaxy A50 and Galaxy A70. So what new Samsung has done basically or how its Night Mode takes over the Bright Night? Well, the answer is, Samsung has done nothing except for renaming the Bright Night as Night Mode and adding it as a dedicated option.

It’s just that you cannot access this mode on your own. It only pops up when you are taking shots in the Night or somewhere in the dark. Let’s suppose, you just want to take a long-exposure shot to add more light to a picture, you cannot simply turn on the Bright Night without having darkness around you. It means that you can add more light to your pictures at any given time of the day. The camera will now be working according to the way you want. It will definitely turn itself on in the Night, but then it’s going to be in your control.

If you are interested in adding the Night option to your Galaxy S10 right now, you just have to follow the simple steps given below.

Note: This guide will work for all models of Galaxy S10, Galaxy S10 Plus, and Galaxy S10E.

Download Galaxy S10 Night Mode right now

Before following the manual update method, go to Settings > Software Update > Download and install. Your phone will now check the latest update. If it shows you an update with the April 2019 security patch, install it and you will get the Night Mode. If this works, you don’t need to follow the procedure given below.

  1. Galaxy S10 April Security Patch Firmware – Download [Enter your phone model number and find April Security Patch]
  2. Extract the firmware files to get AP, CP, BL, CSC, and Home_CSC files.
  3. Now follow this guide to install stock firmware on Galaxy S10.
  4. While installing the firmware, select AP, CP, BL, and Home_CSC file as we do not want to factory reset the phone.
  5. After installation, open the Camera App and you will find the Night Mode there.

Galaxy S10 Camera Night Mode

More: 

PrimeWire Alternatives: Similar Websites and Apps

0
PrimeWire Alternatives: Similar Websites and Apps

Today, I will be giving you the best PrimeWire Alternatives. These alternatives include similar websites and some apps. If you like to watch movies online, I would suggest, you should try PrimeWire, Why? Because it has a huge library. Moreover, since PWire doesn’t host any videos on their server, you won’t be facing any lag and downtime.

PrimeWire

PrimeWire makes the streaming experience amazing. You can search through hundreds and thousands of movies using the on-site search feature. Moreover, all the content is categorized, filtering the listing option is available and more. You will find a number of mirrors for a single movie, as I told you before that they provide video hosting links on PrimeWire. They don’t host any movie or video on their server.

However, PWire is undoubtedly famous but with pros come cons. The worst thing about PW.ag is the dangerous pop-ups under pop-up ads. These ads can affect your PC or smartphones, that is why you must use AD Blocker while using Primewire-ag. Now you’ll get the idea why I am posting about the best similar websites or Alternatives to Primewire.

PrimeWire Alternatives: Similar Websites and Apps:

PrimeWire.li:

This website is the same in every aspect if you compare it with Primewire-ag. But this website has no harmful ads and you will find the best collection of full free movies on Primewire.li. Moreover, you can download full movies & TV Shows for free.

PrimeWire

Movies123.top:

You can say that, Movies123.top is the best option if you don’t want to watch movies on PW. You can watch all kind of movies & TV shows on Movies123, all the content is categorized. They also allow visitors to rate and review the movies, that would help others to learn more about the movies. The site interface is user-friendly and they have good servers which make video loading speed fast even in 1080p.

Geeker:

This website is not only for watching movies online, they also provide you with music, PDFs, and e-books. You can say that Geeker is the ultimate entertainment source on the web. The interface of Geeker is neat and clean, you can easily find what you are looking for. All the content provided on Geeker is in HD Quality. Moreover, you can download an unlimited amount of music for free. Also, PDFs and e-books.

Best Streaming Websites of 2019

Putlocker:

The Putlocker needs no introductions, this website can be the alternative to all of the online moving website. Over the years we have seen many websites using the Putlocker name with a number of extensions. Apart from that, there is no denying that Putlocker has a huge collection of movies. However, their interface is laggy and you will face tons of Ads.
When it comes to finding a movie, you won’t be disappointed. Putlocker has it all, you will find such movies which are not even available on any other service. They provide the latest movies but in Cam Quality, once the movies get old you will be able to find the HD version.

Ice Films:

They have a wide range of music, documentaries, movies, and TV shows. With the help of user-friendly interface you can easily access the content you are looking for. One more thing I would like to add, they update their website daily. Also, you will find the latest episodes, shows, and movies links on the homepage.

Solar Movies:

If you watch movies online then Solar Movies need no introduction. They provided the latest and updated movies & Tv shows in HD quality. The interface of the Website is user-friendly and you can easily search for any movie or TV shows by using the search feature. Moreover, they have categorized all the contents in different menus.

At the top you will see different sections, starting with Featured, All Movies, Movie Genre, TV-Series, TV Genre, Country, Top IMDb Movies, and Top IMDb TV. Thus anyone can get their favorite movie without any hassle.

Fmovies – Watch movies Online:

Fmovies stands top of the list when it comes to watching movies online for free. You will enjoy an amazing user experience while watching movies on Fmovies. All of their videos are in HD quality, they have movies & TV shows in different languages. Moreover, they have an extension of Fmovies in which they have included Fmovies.io, & Fmovies.is.

If by any means the Fmovies website is down you can always use the extension. One thing I would like to add more, they have added 13 different languages so you can choose the one you can understand.

Niter – Watch Movies Online

The best available Rainiertamayo & PrimeWire Alternative. Why? Because it is ditto copy of Rainiertamayo, they have the same interface, same architecture, and same database. You can easily find the movies and shows you were looking for.


On the homepage, they have featured movies section where you will find the best-rated movies of all time. The search feature of Niter is very good, you can find movies by genre or year. Moreover, you can also search for movies & Tv shows by using the actors and directors name. They also have a news section where you find all the latest happenings from the world of entertainment.

Putlocker9:

Watch Movies and TV Shows for free in HD quality. Putlocker9 allows you to watch the latest movies, TV Shows, Cartoons, Anime series with English subtitles. If you want sites similar to PrimeWire, Putlocker9 is the one for you.

GoMoviesHD:

As the name says it all, you can watch the latest movies in HD. They also allow us to download movies and tv shows for free. You will find all the popular & Top rated movies on GoMoviesHD. Moreover, this website has no Ads or pop-ups.

ololo.to:

ololo.to is the work as a free streaming link search engine. You will be able to find hundreds on streaming links of all the latest and new movies. Most of these links are from openload and its child sites. Also ololo.to provides paid accounts for premium users, you only have to pay a one time fee.