Home Blog Page 69

Create a New Email ID Step-by-Step [ Tutorial ]

0
Create a New Email ID Step-by-Step [ Tutorial ]

With the help of this guide, you will be able to Create a New Email ID on Gmail, Yahoo, Outlook, and ProtonMail. Nowadays, the Email address is the most imperative modern world. Not only we use the Email address to communicate with our clients, but we also use Email to stay in contact with our friends and family. There are a number of options available to create a new Email ID.

We will help you create a new Email ID on all the famous Email Service providers. Heed the instructions below to create an Email ID.

create a new Email ID


Create a New Email ID Step-by-Step:

Let’s start with the Gmail, follow the steps below and in no time you will Create a New Email ID on Gmail.

Give it a try:  How to Troubleshoot Comcast Email

Create Email ID on Gmail:

Time needed: 10 minutes.

Heed the instructions below, with the help of these. You will be able to create a new Gmail ID with ease. As you all know that Gmail is free Email service offered by Google. Once you have created a Gmail ID, you will be able to use that same Email ID withGoogle Drive, Google Docs, Google Sheets and more. Let’s get started.

  1. Open Gmail:

    First, Open your Browser, Type accounts.google.com. When the page loads up, click on ” Create Account ” Button.

  2. Fill in the details:

    You will be presented with a form. Type in all the required details such as First & Last name, Username, Email ID, & Password. Make sure your password meets Google requirements. Otherwise, you won’t be able to create a Gmail ID.

  3. Follow On-Screen Instructions:

    Once you are done with the information page. You will be redirected to the Gmail Inbox, now follow the on-screen instruction to proceed.

Create Email ID on Yahoo:

Yahoo Mail is also a free Email service provider. The best thing about Yahoo Mail is that it provides 1TB storage limit to all users. Moreover, same as Gmail, you can use Yahoo Email ID across the service provided by Yahoo.

Must Read: How To Fix Phone not connecting with your AOL Mail 

  • Open login.yahoo.com on your browser.
  • Click on the Sign-Up button, you will find it right next to “Don’t have an account?
  • Start by filling out all required information. Such as First & Last Name, Your desired Email Address. In order to create a Yahoo Email ID, you must choose a unique Email Address.
  • Your Password must fulfill Yahoo requirements.
  • Once you are done with the password and all. You need to complete the signup by the process by typing in your phone number and DOB. Click continue.

Create Email ID on Outlook:

Outlook is a free Email Service provided by Microsoft. Moreover, Outlook is mostly used by organizations, banks, etc. Like Gmail & Yahoo, Once you have created an Outlook email address. You can use it on all the service provided by Microsoft including Office 365, One Drive, Xbox etc. To create a new Email ID on Outlook, heed the instructions below.

Quick Guide: Transfer iPhone Notes to Google Keep [ Tutorial ]

  • Open Outlook.com on your browser.
  • Click on “Create free account”.
  • Type in your unique Email ID. If you get a “Someone already has this email address” error message. You need to change the current Email ID.
  • After that Type in your Password and make sure in order to make your password strong. Include, numbers and symbols.
  • Once you are done with all these, Click Next to complete the registration process.

Create Email ID on ProtonMail:

ProtonMail is getting popular day by day. Even it is now considered an alternative option to all the big Email service providers. The best feature we have found so far using ProtonMail, It provides free encrypted email accounts. Making it more secure from all the other Email services. Now let’s tell you how to Create a New Email ID on ProtonMail.

  • Open protonmail.com on your browser.
  • Click on Get Your Encrypted Email Account” button. After that click “Select Free Plan”. If you want to know more about ProtonMail Plans visit official Website.
  • Now type in your desired username, also make sure it should be unique. After that add type in your password, try letters and numbers to make your password strong.
  • You need to provide a Recovery Email address. If you want to, it is optional.
  • Once you are have provided everything, click “Create Account”. That’s all.

Download Wallpapers & Pictures [ How To ]

0
Download Wallpapers & Pictures [ How To ]

With the help of this guide, you can learn how to download Wallpapers & Pictures on your PC. Whenever we purchase a new computer, the first thing we do is to customize it. There are many ways to do so but the one which is most common, setting up a desktop background. Now there are several ways to set a Wallpapers on your desktop. Moreover, every computer comes pre-loaded with stock Wallpapers.  

However, to be honest, the stock Wallpapers comes pre-loaded are limited and boring too. But if you go online, there are hundreds of Websites which will offer you free Wallpapers and Pictures for your desktop PC. You can download these awesome Wallpapers for your Computer. In this post, we will guide you how you can download Wallpapers form the Web. Moreover, we’ll also tell you how to set these Wallpapers as your Desktop Backgrounds.

Download Wallpapers & Pictures

Download Wallpapers & Pictures:

We have broken this article into two steps, in the first step, you will learn Downloading Wallpaper and in the next, we will tell you how to set up.

Downloading Wallpaper:

  • Open up your browser, head over to the Website from which you want to download the Wallpaper.
  • Now choose the desired Wallpaper, Animation, GIF you wish to download. Select the Wallpaper and simply right click on the image, click download. Or right click on the image and click Save.
  • Some sites provide animated pictures. Once you have downloaded the animation. It will be a .exe file. Double Click on the file and select Run. When the installation starts, you need to select, Install Add-on.
  • Once you are done with the installation. Right-Click anywhere on the desktop and select Properties. On the Next page, Click on Desktop Tab. All you have to do is locate the recently installed Wallpaper. In the End, click on Apply.

Downloading Pictures:

  • Head over to the Website, select the picture you wish to download.
  • Right click on the picture, ” Save this image as …” or “Save picture as “.
  • Now select the location on your computer you wish to save the picture.
  • After you have downloaded the picture, right-click on the picture and select “Set as desktop background.”

That’s all.

Galaxy M Series for India – Prices, Specs & Details

0
Galaxy M Series for India – Prices, Specs & Details

India is the fastest and potentially largest market in the world right now. Young people in India are always on the lookout for best-value smartphones. The most suitable price bracket for millennials is up to 20,000 Rupees. Until now, this lower price bracket market is dominated by Xiaomi. It offers high-quality products with killer specs at a low price tag. Galaxy M series is the latest invention specifically designed for Indian millennials. The main motivation behind the development of this product is to penetrate this section of the market and provide the best value-for-money smartphones out there.

In an interview with Samsung spokesperson for India, it was indicated that all of the phone falling in brand new Galaxy M Series would sport a minimum of 6.02 inches display. All of these displays offer one of the best possible screen-to-body ratios. Moreover, these phones are rumored to be powered by batteries as large as 5,000 mAh. This would make it the first official Samsung phone to sport such a large battery. Another minimum spec on Galaxy M Series is the dual camera. The high-end model in this series is supposed to come out with triple camera setup.

galaxy m series price release date

By going through all the reports and speculations, it is very clear that M Series is clearly meant to be the best budget smartphone out there. Until now, this market is mainly dominated by Xiaomi and some other brands in this category. However, we could see some real turbulence in the consumer market with these brand new devices. Lets dig deeper and check out all the rumours and details on all smartphones in Samsung Galaxy M Series.

List of devices in Galaxy M Series

Since these phones are not officially launched yet, therefore, there is not official confirmation. However, according to several reports by respectable sources, two of the models are confirmed. These are Galaxy M10 and Galaxy M20.

From what we can gather, these two will be the cheapest of the lot. An important thing to note here is that all phones in Galaxy M Series are made in India. It would seriously reduce the overall prices. Therefore, the company is able to sell these phones are such low prices. It allows young customers to get the best bang for buck.

Whether it is for studying, regular use, social media, vlogging or any other possible use, we are sure that people are going to love these.

Launch date

The official launch date of Samsung’s Galaxy M Series is 28th January, 2019. The initial release would include at least 3 models. The model on top of the line would also sport a triple camera setup. All of these devices will be powered by Exynos chipset and hefty batteries.

The entire design of these phones is based on the daily needs, budget requirements and expectations of Indian millennials.

Prices

According to official Samsung Spokesperson in India, the prices of phones in Galaxy M Series are capped at 20,000 Rupees. One of the phone is priced even lower than 10,000 Rupees.

Moreover, each of these devices comes with various options for RAM and storage. This indicates that we are not just getting some devices made with compromises. It is a full-fledged lineup with variety of options. These options are supposed to make the buying choice even easier and more optimal for consumers.

According to some reports, the actual price of Galaxy M10 would be 8,990 Rupees and for Galaxy M20, it would be 12,990. This is not the final price and the actual numbers could vary on final release.

Specifications breakdown

While no specific details are given at this time, we can still outline some of the specifications based on the reports.

Processor: All the phones in this series are powered with Exynos processors. The potential model in some of the devices could be Exynos 7870. Note that each of the devices will have a different processor based on price-tag.

Display: The minimum size of display in any phone from M Series should be 6.02″. Moreover, these devices offer best possible screen-to-body ratio and notch designs. Ssmsung are calling these Infinity V and Infinity U designs. We’ll have to wait for what they actually look like once released.

The display panel used in all of these devices would be Samsung’s AMOLED technology. However, the best model in this series will come with Super AMOLED display. It is no secret that AMOLED is currently the market leader in terms of screen quality. Therefore, we only expect the best results in this section.

galaxy m series display

RAM & Storage: The storage options on these devices would be mainly three: 16GB, 32GB and 64GB. It is possible that a high-end model may offer better storage option. In terms of RAM, it is rumored to have at least 3GB of RAM.

Considering these specs, we are pretty sure that these phones are not going to fall short of performance in games like PUBG Mobile and keep the device fluid when using apps like Facebook, Instagram, Snapchat and more.

Battery

One of the key selling points for M Series is the “Large Battery”. Note that this phone is specifically designed after researching the consumer needs of Indian Millennials. We think that everyone in world deserves this kind of improvement but it surely is a step in right direction. The biggest battery in one of these phones is supposed to be 5,000 mAh. Galaxy M10 is rumored to come with 3,400 mAh battery. it is still impressive considering the price tag.

On top of large battery packs, all of these phones come equipped with fast-charging and USB-C ports. Since this is becoming the modern standard, it is good to know that even budget phones can sport this option.

Camera Setup

The minimum camera setup in any of mobile in Galaxy M Series would be a dual-lense on the back. This is especially important for taking those amazing portrait mode photos. Whether someone is looking to use their phone for personal use or start an Instagram following, it has got it covered. The purpose of this series is to serve as the entry point for young people in India who are looking for best possible experience coupled with best value for money in one place.

galaxy m series camera dual

One of the high-end phones in this series is supposed to come out with a triple-camera setup. However, we are not really sure what the setup is going to look like on the front.

Check out our Galaxy S20 FE Stock wallpapers

Final Words

To put it simply, this is a great move by Samsung. Even though there are plenty of “cheap” Galaxy phones in the market already, none of these can stand a chance against Xiaomi phones at the same price. In order to capture such a large market sector, something like this had to be done.

The Samsung Galaxy M Series looks very promising and we are looking forward to its release. It is yet to be seen how these devices are going to fare once they do come out.

Feel free to leave your feedback and comments below

How to Forward Rediffmail to Gmail [ 5 Steps ]

0
How to Forward Rediffmail to Gmail [ 5 Steps ]

Learn how you can Forward Rediffmail to Gmail with the help of these simple steps. Everyone knows that we can forward our Rediffmail messages to Gmail. But not everyone knows how? Those who use Gmail more than other accounts including Rediffmail account. 

This method is so simple, even a layman can do it. All you have to do is enable forwarding in your Rediffmail account. Once you are done with it, you will start receiving Rediffmail emails at your Gmail address. Let’s get started now.

Forward Rediffmail to Gmail

How to Forward Rediffmail to Gmail [ 5 Steps ]:

Heed the instructions below to learn how to Forward Rediffmail to Gmail. Remember you have to enable forwarding on Rediffmail account. We will not use any third-party app or service. If someone tells you to use anything other than that, you must know that there is no need.

Read more: Schedule Email Messages in Gmail with a Google Sheet

Rediffmail to Gmail:

Step1: 

First and foremost, you need to log into your Rediffmail account. Once you are through, head over to the ” My Settings ” Tab.

Step2:

Look for the “Auto Forward” or “Forward Your Emails” option. If you are using the classic view then you will find Forward Your Emails. However, if you are using the standard view you will see Auto Forward.

Step3: 

Upon finding the Auto forward option, type in your Gmail ID in the given field. The Label of the field will be “Enter the email address to which you would like your Rediffmail forwarded”.

Step4:

After you have added your Gmail Address to the Email forwarding settings. You can set a few things more, such as whether you want to retain a copy of the Email or not. If you check this option, that means you a copy of your Email will be saved on Rediffmail account.

Step5: 

Once you have set up everything, click on the “Start Forwarding My Emails” button. That’s all. Now you will start receiving your Rediffmail messages on your Gmail inbox.

That’s all.

GBWhatsapp Apk 7.70 Download Latest Version 2019 (Updated)

0
GBWhatsapp Apk 7.70 Download Latest Version 2019 (Updated)

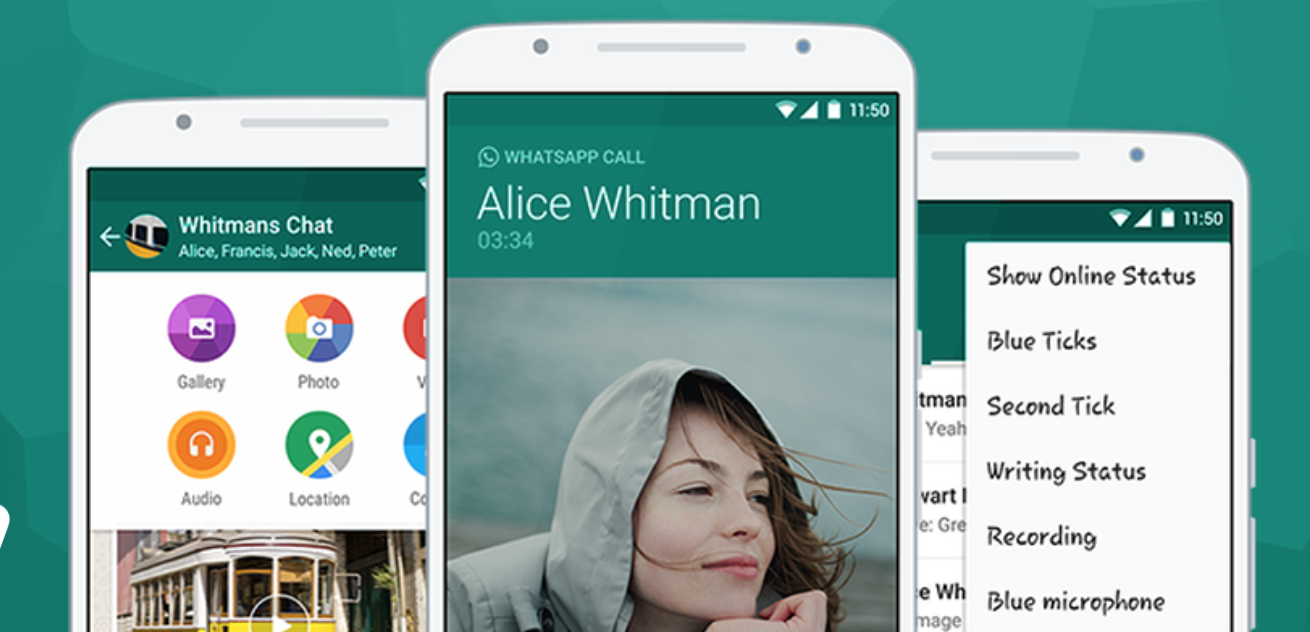
WhatsApp is the most used cross-messaging platform around the world. I mean there will be very few people who have not installed WhatsApp on their devices. Like who don’t like free messages, free voice call, free video calls with the best reception you can get. Not only that you can now share files with your contacts. But we always ask for more, Today I have an amazing Mod for All those who want to get more out of WhatsApp. An application called GBWhatsapp, a modified version of WhatsApp, but this app has a lot more than the original stock app. In this Post, I’ll tell you all the main features of GBWhatsapp and how to Download GBWhatsapp APK latest version. Let’s start with the main features of GBWhatsapp.

GBWhatsapp APK

GBWhatsapp Features:

  • Hide Online Status.
  • Hide Blue Ticks
  • Hide Second Tick
  • Hide Writing Tick
  • Hide Recording Status
  • Hide Blue Microphone
  • Hide View Status
  • You can send Files up to 50MB in Size.
  • 50MB for Video and Pictures.

These are the main features that I think are worth mentioning. You can check all the awesome features on GBWhatsApp official site.

GBWhatsApp Latest Versions 2019 (Info):

Version Name7.70
App Size56 MB
App NameGBWhatsApp
Root Required?No
Main TaskWhatsApp With Extra Hidden Features

Download and Install GBWhatsapp APK v7.70 Latest Version:

  1. Download the Latest version of GBWhatsApp APK. [ Click Here ]
  2. Download the file to your phone straight away, or copy it to your phone from your PC.
  3. Now on your phone, go to settings > security > allow unknown sources > check this.
  4. Now using a file manager, locate the APK file that you just copied or downloaded.
  5. Tap the APK file and finish installation using the on-screen instructions.
  6. Once the installation process is completed, you need to activate your GBWhatsApp account same like the way you did on the official WhatsApp.
  7. Once installed, access the newly installed application through the app drawer.

You might like:

Snapdragon 855 vs Apple A12 Bionic vs Huawei Kirin 980

0
Snapdragon 855 vs Apple A12 Bionic vs Huawei Kirin 980

The leading giants of smartphone industry are all doing their best to stay ahead of the never-ending competition. In 2018, we saw extensive implementation and integration of AI in phones. In includes stuff like Scene Optimizer in camera apps, AI Assistance and more. Therefore, in order to stay ahead of the curve, the top mobile manufacturers have to make sure that they get every new piece of technology and there is enough power to fuel these. In 2019, we are going to see phones powered mainly by three chipsets: Snapdragon 855, Apple A12 Bionic and Kirin 980. The common feature among these three main SoC’s is 7nm process design. This new architecture provides significant improvements over previous generations. Moreover, these are coupled with new and powerful GPUs to support the system.

Which phones will have these? Well, one of the first main phones to come with Snapdragon 855 would be Galaxy S10 and S10 Plus. Apple will release next generation iPhone and its variants with A12 Bionic chip under the hood. Kirin 980 however would be handled with the responsibility of powering Huawei flagship devices like Mate 20, Honor Magic 2 and Mate 20 Pro. A very important mention in this list of OnePlus 7. This phone will also sport 7nm Snapdragon 855 SoC. We can be pretty sure about the fact that OP7 would be the cheapest handset with these kind of specs.

Snapdragon 855 Specs vs Apple A12 Specs vs Kirin 980 Specs Comparison

All of these chipsets have adopted the 7nm process design. Mind you, this is a new technology and requires whole new set of tools to build. Therefore, it is not as common. However, since these big companies always want to stay ahead of the curve, it is necessary to build their latest flagships with best possible technology available.

When we go into minor details and and benchmarks, the results can be surprising. Currently, Apple’s A12 Bionic chip seems to be a better performer compared to Qualcomm’s Snapdragon 845 chipset. The performance of Huawei’s chipsets is not always up to the mark. One the paper, it seems pretty good. However, when it comes to real-life scenarios and intensive tasks like gaming, these can fall short of the competition.

Below is a detailed spec comparison for Snapdragon 855, Apple A12 Bionic and Kirin 980. This table lays out the technical configuration of these chipsets. Note that actual performance cannot be predicted from just the numbers. We need to check on benchmarks later on for this.

Snapdragon 855 Specs Apple A12 Bionic Specs Kirin 980 Specs
CPU 1 Kryo 485 ‘Prime’ (ARM Cortex-A76-based), up to 2.84GHz

3 Kryo 485 (ARM Cortex-A76-based), up to 2.42GHz

4 Kryo 385 (ARM Cortex-A55-based), up to 1.8GHz

6-core processor (2x Performance cores + 4x Efficiency cores) 4 ARM Cortex-A76, up to 2.60GHz

2 ARM Cortex-A76, up to 1.92GHz

2 ARM Cortex-A55, up to 1.80GHz

GPU Adreno 640 Apple Designed 4-core GPU Mali-G76MP10
Memory 4x 16bit, 2133MHz LPDDR4X 4GB (Geekbench leak) 4x 16-bit, LPDDR4X-4266
Design Process 7nm 7nm 7nm
Architecture 64-bit 64-bit 64-bit

In terms of raw specs, all three of this chipsets seems pretty similar. However, this is not actually the case. Below we are going to discuss the unique details and performance boosts for each of these SoC’s. You’ll be surprised by how unique these all are.

Qualcomm Snapdragon 855 Full Review

snapdragon 855 vs apple a12 bionic vs kirin 980

Lets be very honest here. SD 855 is going to feature in most of the high-end flagships in 2019. Except of course Huawei and Apple. Qualcomm claims that the CPU performance of Snapdragon 855 is 45% better than Snapdragon 845. Moreover, the GPU performance is improved by 20%. These numbers are quite staggering considering how much difference just one year has made.

Snapdragon 855 ISP (Spectra 380)

Just like GPU and CPU, there is a Image Signal Processor that defines which kind of camera lenses and qualities it can process. Therefore, it is a very important part of the deal and indicates what can we expect in upcoming smartphones. The details of SD 855’s ISP are:

  • Dual 14-bit Spectra 380 ISP
  • 48MP Single Camera, 22MP Dual Camera
  • 4K 60FPS HDR video with real-time object segmentation (portrait mode, background swap)

Now these specs are pretty impressive. Note that these are just the base specs and the actual implementation vary from device to device. It depends on the phone manufacturer to make the most use out of it and produce best possible quality. We can expect crisp and smooth 4K video recording at 60fps alongside very high FPS slow-motion videos in 1080p in upcoming phones.

The new Spectra ISP comes with new fancy features like Bokeh Video and 4K HDR Video Recording in Portrait mode. How crazy is that! Spectra 380 is a CV-ISP. CV here stands for Computer Vision. It is first of its kind for mobile phones. It massively improved object recognition, segmentation and real-time background swapping. Overall, this new addition will make scene recognition and optimization much better than its previous generation.

Snapdragon 855 Modem

Most users do not pay attention to this part of the chipset, and honestly we didn’t either. But this year there is a massive increment in technology. Snapdragon 855 now supports 5G band. Even though this technology is not yet prevalent or available for that matter. It shows that the time is near when we will be using super fast 5G networks on our handheld devices.

The detailed specs of SD 855 Modem are:

  • Snapdragon X24 LTE
  • 2000Mbps DL (Cat. 20), 316Mbps UL (Cat 20)
  • Snapdragon X50 (5G Modem)
  • 5000 Mbps DL

It supports top-notch LTE and 5G speeds. According to the spec sheet, this chipset will support 2000Mbps download speed and up to 316Mbps upload speed.

Snapdragon 855 Processor (CPU)

In order to improve the efficiency as well as performance, it sports three main type of cores. The first cluster includes 4 Kyro 385 clocked at 1.8GHz. This cluster will be most used since it is going to handle low power consumption tasks. It makes it possible to have a more efficient use of battery-life.

The 3 core Kyro 485 clocked at 2.42GHz is there for power-hungry tasks. It involves stuff like AI Processing, Neural networks and so on and so forth.

Lastly, we have got one Kyro 845 Prime core clocked at 2.84GHz. This is the most powerful core and it will most likely be activated during benchmark tests and in games like Fortnite and PUBG Mobile (On high settings). These 8 cores make up the new efficient and 45% more power-delivering CPU compared to previous generation.

Snapdragon Elite Gaming Experience

This is the first chipset that will supporte true HDR gaming apparently. By now HDR is a pretty common term. This means that the blacks are as dark as they could get. Basically, the color depth in each scene increases immensely.

The motivation behind gaming optimization is the rise of titles like Fortnite, PUBG Mobile and other Battle Royale games. Unlike regular games, these require faster rendering to avoid frame drops and to have best vision in-game. Therefore, we would love to see how the new gaming optimizations in SD 855 really work out.

Apple A12 Bionic Full Review

a12 bionic vs snapdragon 855

The products in Apple’s catalogue are always going to be expensive. It is an argument for another day whether these are worth it or not. However, there are some things that Apple does right. The performance on iPhone always feels buttery smooth. This is because of using optimized chipsets and applications. Unlike Android, its ecosystem is pretty limited and defined, therefore, optimization is more manageable.

Apple’s A12 Bionic chipset is also following the 7nm design trend. Moreover, it is based on 64-bit architecture just like its main competitors. The main points of this chip is improving performance by 15% and more importantly decreasing the power usage by a whopping 50%. Moreover, the GPU used in A12 Bionicc is supposed to be 50% faster than A11 chipset. These are some massive improvement figures.

Hexacore CPU & GPU

Unlike main competitors Snapdragon 855 and Kirin 980, it sports 6 cores in total. While this may sound disappointing to some, note that numbers do not tell whole story. This CPU is actually a good performer and it can outshine others in some cases.

There are no exact numbers available. However, we know that out of 6 cores, only 2 are for performance. These increase the performance by 15% as mentioned before. Rest of the cores are low power consuming cores and massively increase the efficiency. While it is not clear if A12 Bionic is better than 855 or not, it is certainly on par with Snapdragon 845. Considering it has got 6 cores and 4 of these dedicated to power efficiency, this is actually impressive.

It sports a 4-core GPU that delivers impressively. It can easily handle the most demanding mobile titles to date.

Neural Engine

Apple’s Face ID is probably the market leader in its genre. This technology is one of the best. The speed and accuracy of Apple’s neural network and real-time machine learning is highly optimized for A12 Bionic chipset.

HiSilicon Kirin 980 Full Review

kirin 980 vs snapdragon 855

On the surface, it seems like Kirin 980 will match its top 2 competitors. However, the real-world case is not as expected. It is pretty far behind in terms of performance considering the specs it is rocking. In fact, its performance is even worse than Snapdragon 845.

If we talk about Snapdragon 855 vs Kirin 980, then former chipset is the clear winner by miles. However, we’ll go through the features that it has to offer.

World’s first 7nm Process Design

Even though it is easily outperformed by other chipsets in same league, it was the first to introduce 7nm process design for a mobile chipset. Moreover, it was also the first chipset to offer LTE Cat.21 band.

Performance Improvements

This chipset is definitely an improvement over its predecessors. To put the performance jump in perspective, lets visit some numbers.

According to Huawei’s official site, its 7nm process is 20% more powerful than 10nm process design. Moreover, it is up to 48% more power efficient. These are impressive numbers. Especially if someone is just a fan of Huawei handsets, this is a major improvement and was much needed.

Its 8 cores are divided into 4 chunks. It includes 2 power cores for power-hungry tasks, 2 large cores for medium to light-heavy tasks and finally 4 small cores for light tasks. Kirin 980 achieves high power efficiency by switching to low power consuming cores when possible.

Artificial Intelligence

In 2018, we saw a major increase in AI integration, especially in phone cameras. Therefore, chipset manufacturers have optimized these SoCs for maximum performance boost. Kirin 980 is no different. It delivers amazing performance on tasks like scene recognition, real-time tracking, machine learning and neural network computations.

Conclusion

We initially thought that this is going to be a very tight affair. However, this is not the case. The results are pretty clear. When it comes to Android, Snapdragon 855 is better than Kirin 980. It beats it in raw performance, gaming performance and overall efficiency. Therefore, we have a clear winner here.

When it comes to Snapdragon 855 vs A12 Bionic, there is no definitive answer. If someone is either Android or iPhone fan, then the choice is pretty obvious. However, if someone has to decide between these two, then Snapdragon is definitely better because of some key features like Qualcomm Quick Charge support. However, when it comes to camera quality, A12 Bionic may beat some of the Android handsets. This function however comes down to specific implementation. Google Pixel 3 XL currently has best smartphone camera.

At end of the day, it all boils down to personal preference. In terms of raw power and more features, Snapdragon 855 is the winner. If you want a more device oriented and optimized experience, then use an iPhone with A12 Bionic chip. Kirin 980 is definitely an upgrade for Huawei users but it cannot compete with other two mentioned here.

How to Exit Out of Pandora on Android Phone

0
How to Exit Out of Pandora on Android Phone

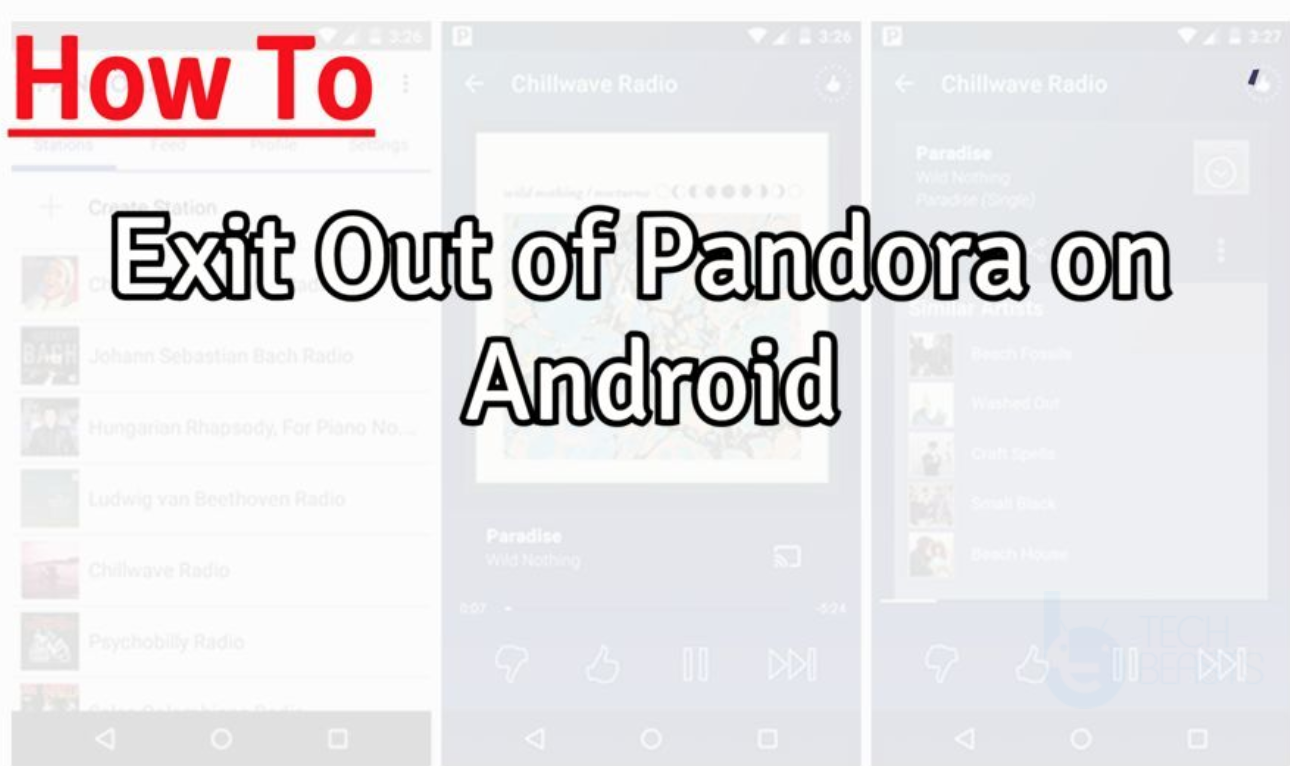
Below are the 5 steps through which you can Exit Out of Pandora on Android Phone. Pandora app is top notch free music streaming service for Android. There are many apps just like Pandora on Google Play but no other app lets you listen to music from your favorite stations. Moreover, not only this, you can easily switch stations, create a new station and only add your favorite songs.

Since Android lets you multitask, you can listen to songs on Pandora while using other apps. However, the one and only bad thing about Pandora is that it continues to run. Even if you close it and start using another app, it will continue running in the background. It means if Pandora is still running, it is still using your internet. In order to avoid this situation, you need to quit Pandora completely.

We’ve found some potential workarounds to Exit Out of Pandora on Android Phone. Let’s get started now.

Exit Out of Pandora on Android

How to Exit Out of Pandora on Android Phone:

Heed the instructions provided below. Once you’ve followed all the instructions you will be able to Exit Out of Pandora on Android Phone.

Download Pandora App for Android:

Best Offline Music Apps to Listen to Music without Wifi

Step1:

Download and Install Pandora app on your Android. Once you are done, Launch it. Tap on “I Have A Pandora Account” and log in with your credentials.

Step2:

Once you are logged in. Tap on a station form the station list. The selected station will start buffering and after that, it will start playing. Now in order to switch to another station. Again Tap on Station lits from the Now Playing Screen, then tap another station.

Step3:

After Pandora app starts playing songs. Press the home button to head back to the home screen. Now Pandora app will be running in the background, while you are listing to the Songs. You can perform other tasks as well.

Step 4:

Now comes to main part. Drag the notification bar down to access the Pandora app. Tap on the Pandora entry and it will take you to Pandora Now Playing screen. From the Press the menu button, Tap Quit to properly close the Pandora app.

That’s all. This is how you can completely close Pandora app on an Android device.

Best Offline Music Apps to Listen to Music without Wifi – 2020 (Offline Music for Android)

0
Best Offline Music Apps to Listen to Music without Wifi – 2020 (Offline Music for Android)

Here are the 8 Best Offline Music Apps to Listen to Music without Wifi on Android. What if you could listen to your playlist without having to rely on WiFi? This article includes a list of all the best music streaming services that do not require an internet connection to play your music. It surely makes a lot easier when we can stream and play music offline because it is not all the time that we have access to WiFi.

Another reason why users want a music app that lets them listen to music offline is that streaming music on mobile data is not an option everyone can afford. Not all of us have unlimited data package plans so where can we listen to our songs and tracks when we are out for a walk?

Google Play Store is full of so many music apps. With the ease of availability due to smartphones, we have access to almost any app and service. Whatever our need be, Android apps are there to help us complete the tasks. Not only that, due to our phones being with us, we can hardly get bored.

I remember the time when we music lovers had to walk around with walkphones. Now that we have our smartphones we can listen to the radio, watch movies on YouTube and even listen to our favorite music in the background while working. You must have heard about popular music streaming apps like Soundcloud, GooglePlay Music, Soundhound and so many more. All of these best music streaming apps have their own amazing and unique features that make them so popular for streaming music.

One problem with some known music streaming apps is that they want an active internet connection to play your music. So, what do you do when you want to listen to music offline when you do not have access to WiFI? Read on to find out the best offline music apps to listen to music without WiFi. Let’s give you the Best Offline Music Apps for Android devices 2020.

Jump To:

Best Offline Music Apps

How to listen to music without WiFi?

Let me explain how it is possible to stream music without WiFi. There are offline music streaming apps that allow users to either download music in the cloud or on local storage as well as within the app. These apps support offline mode and with offline music downloaders and other such features, they allow users to listen to music offline even when you do not have internet connectivity.

How these apps work is pretty simple; some of these will actually let you download music. They use cloud storage on your device or they can use your phone’s local storage as well. Some streaming apps use app cache to make streamed songs available to be listened to in offline mode as well.

Best Offline Music Apps to Listen to Music without WiFi on Android:

The following are the best offline music apps for Android. These apps will allow you to stream music offline and you won’t be needing an Internet connection.

GooglePlay Music:

One authentic and reliable music streaming app comes from Google itself. Google Play Music is immensely popular and it comes pre-installed in most of the Android devices.

YouTube Music
Price: Free+

Deezer – Songs & Music Player:

Deezer is smart music streaming app. When you start using Deezer, it will ask you to choose the music genres that you interest you and based on those you will get tons of new tracks to listen to every day. Sort out the tracks into playlists and shuffle to get rolling. The app also gives access to several international radio stations.

If you think you will be going without the internet for a long period of time, just download your tracks and playlists and you are good to go.

SoundCloud – Music & Audio:

You might not know but as you play songs on Soundcloud, the streaming music is stored in the app cache. That is why you are able to listen to your recently played songs even when you are offline. Soundcloud was initially designed as an app for the new DJs. However, there is a huge amount of users that are registered as listeners.

Although it is not for original tracks and you will mostly find mixes and remixes, the app is excellent when it comes to exploring music based on your likes and your favorite genre. You can even create a playlist to sort music, follow music artists and other people as well as get followed back.

Spotify Music:

This is one the best-ranked music streaming sites that lets you keep your playlists private as well as share music with your friends. The app has a catalog of 20 million songs and editors’ picks as well as BBC Playlist service.

iHeart Radio:

Another free app with some subscription charges for premium services that give you access to over 800 radio station across the US. You can have your custom station and save stations that follow your likes. You can listen to live radio whenever you want.

Heart Radio App
Price: Free

Evermusic:

Evermusic is a neatly designed offline music streaming app. It actually lets you search for your favorite songs and then lets you download them. The app arranges your music in playlists and uses your cloud storage including Dropbox or Google Drive to save music. This is great because saving on cloud storage lets you have free storage on your phone.

Groove:

This music streaming app has topped Canadian app charts as well as has millions of users from around the world. The app has gained so much popularity within absolutely no time at all. And most importantly, Groove is completely offline and you can even listen to music in airplane mode. So next you are on a long flight, Groove will keep you happy and entertained.

Microsoft Groove
Price: Free

Pandora:

Pandora is available for Android and iOS devices. The app has some really cool features like an alarm clock that will let you wake up to your favorite music. The app is great for discovering new music and you have to do absolutely nothing; just choose an artist or track and the app will create a station for you with similar tracks lined up.

Bonus Offline Music Streaming Apps:

Saavn Music & Radio
Price: Free+

Transfer Google Play Music Playlists to Apple Music (iCloud Music)

0
Transfer Google Play Music Playlists to Apple Music (iCloud Music)

Despite being the two major platforms for mobiles, it often proves to be difficult to move stuff between Android and iOS. In this article, we are going to tackle the issue of transferring Google Play Music to Apple Music or iCloud Music Library. This guide accounts for both playlists and the songs that you own and downloaded into personal library.

google play music to apple music icloud library

Play Music and Apple Music are two of the biggest music distributors thanks to their integrations with respective operating systems. For a small fee, users get access to nearly every new song out there. Moreover, intelligent services make it easier to find and explore more songs that you may like. These algorithms match songs based on previous choices. This and many other features have made these two services very popular.

Read: How to transfer Passwords from iPhone to Android

While most users love to stay loyal to their current ecosystem because of ease, there are always people who decide to completely switch sides. Because of deep integrations of Android and iOS with their proprietary services, tools, devices, and apps, it is not possible to partially use one. Users have to make a complete switch for it.

Therefore, this guide helps the users switching from Android to iOS. Nobody wants to lose their years of collected music and playlists. Therefore, learn how to transfer music from Play Music to iCloud Music Library or Apple Music. This works for all latest Android and iOS versions.

Google Play Music vs Apple Music

Whether someone is moving from Android to Apple or vice versa, it is important to highlight the key features. It can help many make the right decision.

move playlists from google play music to apple music

Well, in terms of pricing, both of these services are pretty much the same. However, Apple music can provide some discounted prices to students. Of course, you need to prove your academic status in order to avail it. So, it is a plus point for Apple Music here.

The availability of Play Music is generally better compared to its competitor. It is supported on more devices like Chromebook, Android TV, Google Cast and more. Since these are not directly Apple’s products, one could argue that it is not supposed to work. Therefore, if someone is making a complete switch to Apple ecosystem, they should be okay using it.

Play Music has a larger library compared to Apple music but it does necessarily mean that its better. It mainly depends on the choice of songs or music that one wants. Moreover, long-term users claim that Apple music has better recommendation system compared to its opposition. Therefore, it all comes down to personal preference and what services you expect from a music subscription.transfer music from google play music to apple music icloud

Play Music works better on Android, you get added subscription for YouTube Red (Ad-Free YouTube). Apple Music has its perks too. But our conclusion is that Play Music takes the prize. It has more user-friendly features compared to Apple Music.

How to Move Play Music to Apple Music (iCloud Music Library)

Even though these are two different music subscription services, it is quite easy to move all the songs and music from Google Play Music to Apple Music. There are two main scenarios. Either someone owns the music and have it downloaded on their devices. Or they have just made playlists of their favorite songs online and listen to them via streaming. Most users use both of these methods. We download the most favorite songs while stream others to save space on phones and tablets.

If you own the Music (Upload to iCloud Music Library)

What do we mean by “owned music”? Well, note that if you download songs from Google Play Music, these are stored as cache. If you check the download location of Google Play Music on Android, it will only show encrypted .mp3 files. Copying these files anywhere will not play them. These are not owned by you. By subscribing to the service, you could just stream these. And play the downloaded (cached) music from Play Music app only.

The real owned music is what users have uploaded to Play Music library themselves. Whether this is from bought CDs, or anywhere else. If you have this music lying around, then do the same process for Apple Music. Follow the steps below in precise order.

  1. Install iTunes on PC and set up Apple Music account.
  2. Go to Settings > General Preferences and enable “iCloud Music Library“.
  3. Go back to main menu > My Music, click icon in top left, then click on “Add file to Library”.
  4. Browse the PC, select the file/s and click OK. It will sync the files.
  5. Next up, right-click on any music file and select “Add to iCloud Music Library” option.
  6. Sync all your songs to Apple Music using this method.
  7. One done uploading, you can access this music from any device using this account.

Note that iTunes will automatically process the songs for suitable format. However, the original files will remain unaffected.

Move Play Music Playlists to Apple Music

The playlists are made of the music that we stream on these services. These playlists are similar to the likes of YouTube, Spotify, Tidal etc. Since it is not actual music and just the titles and organization, therefore, it’s rather simpler to move. However, there is no official way of doing it. In order to shift playlists from Play Music to Apple Music, we are going to use STAMP service. It allows moving playlists among various music subscription services including the ones we are concerned with right now. Below is the brief outlook of how to do this. Good thing is that STAMP has its own dedicated apps therefore it is pretty easy to use.

  1. Download and install STAMP on your PC. Get it HERE.
  2. Open the app, select Google Play Music as source and Apple Music as your destination.
  3. Login to respective accounts to access playlists.
  4. Once done, let the app do its magic and you sit back and relax.

move from play music to apple music stamp

Note that, the free version of STAMP has limit on how many playlists to move per session. Therefore, if it suits you, buy the subscription to speed up process.

Conclusion

Shifting from Android to iOS can be pretty lengthy process. We have managed to cut down on one of the main concerns. Use the guide above to easily move music from Google Play to Apple Music. Upload the owned music to iCloud Music library while use STAMP to shift playlists from Play Music to Apple Music.

Feel free to leave your feedback and queries in the comment section below.

How to Troubleshoot Comcast Email [ 5 Steps ]

0
How to Troubleshoot Comcast Email [ 5 Steps ]

Let’s tell you how to Troubleshoot Comcast Email. Although Comcast Email is the best Email service provider. But, we have seen many users reporting about different sorts of problems while using Comcast Email.

Good thing is that most of the Comcast Email problems can be solved by basic troubleshooting. Such as, check your computer network connections. Make sure your Comcast Email account is properly configured. Try accessing the Comcast Email through its officail portal etc.

Below we have explained all of this basic troubleshooting in detailed. Moreover,  We’ve found some more potential workarounds to Troubleshoot Comcast Email. Let’s get to it now.

Troubleshoot Comcast Email

How to Troubleshoot Comcast Email:

Heed the instructions provided below. You will be able to solve all sorts of problems while using Comcast Email.

Perform Basic Troubleshooting:

  • Before we proceed any further, let us perform some basic troubleshooting. Start with your computer and your network connections. The best bet is to restart your router and computer.
  • Once both of your devices are rebooted. Open up a web browser and to check your connection is working. Try opening a website. If still you are offline and the webpage is not loaded. Head over to the network connection settings.
  • From there select your Comcast XFINITY network, Click Connect and enter your password.

Check Your Comcast Equipment:

  • Let’s start with the modem or router. Make sure both of them are properly connected. Also, make sure that cables are properly inserted.
  • If you don’t know how to connect cables with your modem or router. It is best to check the Comcast XFINITY equipment manual.
  • Sometimes we haven’t paid all the bills for our services. This is the reason your connection is not active.
  • Moreover, sometimes network is facing downtime or they have some technical problems. It can also affect your Email services.

View Your Current Email Settings:

  • In order to check your current Email settings. Head over to your Email Client and open Settings. Make sure you have entered all the details correctly.
  • Every Email has a different set of settings, you need fill-in all the requirements to access your Comcast Email.
  • If you are using Comcast Email on Windows. Head over to the Mail app -> Settings -> Select Comast -> View Configurations.
  • For Outlook, Click File -> Account Settings -> Again select Account Settings -> Click on Comcast email account -> Change.

Verify Email Account Configuration:

Once you are in the settings of your Email application. You need to verify that you have configured everything properly. Your full Comcast Email Address, incoming and outgoing server details need to be correct.

Use Comcast Webmail:

Last but not least, you can always use Comcast’s XFINITY web portal to use your Comcast Email. This is the best option if all the other Email client apps are not working for you. In order to use Comcast Webmail all you have to do is enter your full Comcast email address and password.

Moreover, if you want to reset your password, this portal will help you do it with ease. Click on ” Don’t know your email or password “, If you forget both Email ID and Password. However, if you remember your Email ID but can’t remember your password. Click on the “Forgot Your Password?” Follow the on-screen instructions to proceed.

That’s all.

Search Facebook Without an Account [ 4 Methods ]

0
Search Facebook Without an Account [ 4 Methods ]

Learn how you can Search Facebook Without an Account. Not everyone knows about it. In general, everybody knows that in order to search for anything on Facebook, you need to have an account. As per reports, it is said that Facebook has over 2.2 billion active monthly users. In the light of these stats, Facebook is the largest social media network around the globe. With the number that large, Facebook is also the biggest people search engine. Not only that, you can search for anything on Facebook.

But the fact remains, you cannot search Facebook Without an Account. Let me show you how you can do it, there is no need to have a Facebook account.

Search Facebook Without an Account

Search Facebook Without an Account:

As you all know that on Facebook you can search people by their names, Email address, and Phone numbers. However, the search results are totally depending on the user’s privacy settings. IF the user you are looking for has set his privacy to not show any information. It is not possible to find that person using anything.

Now if you want to do a quick search and you don’t have time to log in, you can do so easily. There comes a time when we are in hurry and want to do a quick background check on a person or a public organization. Moreover, we also don’t have the time to log in, but you don’t know how to search Facebook without logging in. This is where these tips will help you avoid all that hassle. Let get started now.

Google Search Query:

Google stands top when it comes to search engine category. Maybe you are not aware of some advanced search queries, that can be used find specific files. We bloggers use these search queries to find all the results of a particular site.

site:yoursitehere.com query

Now Google index everything that means you can search for your profile in Google. It will save a lot of time, also you can use this same search query to find anyone profile. Type the following search query in Google.

site:facebook.com aliraza.ace

Search Facebook Without an Account

There you go, through this search string, you will be able to find someone’s profile. However, you may need to work your way through a number of search results.

Read more: Disable Facebook Notifications on Android

Facebook Directory:

Google Search is no doubt very powerful in terms of many aspects. But I think it would be better to go with Facebook own Facebook Directory.

It will be easier as compared to the first method. Although you may have to enter the captcha, it is a standard procedure to ensure that you are a human. Once you are through with it, you will see the results in a list.

As I said it is way easier than the Google search strings. You can easily search for people, pages or places. All you have to do select the relevant tab and enter the desired query.

Facebook People Search:

Facebook People Search take things one step further from Facebook Directory. Not only you can search for people profiles, but you will also get all the relevant information about that person. Including, DOB, City, School, Workplace etc. If it is available for public view.

This feature makes thing much easier when it comes to profile searching on Facebook. Moreover, it will also allow you to use filters while searching.

✳ The bad news is that this feature now required you to log in before you start searching.

Social Search Engines:

Nowadays, search media is the best tool to spread a word. Because of that Social search engines came into being. These services provide you with the public data gathered from social media websites such as Facebook, Twitter etc. There are hundreds of such services claiming that they provide accurate data but we always go for the best. Pipl and Social Searcher are the best among others.

Pipl is the best social search engine so far. In order to search for a profile, you need to provide the name and their location. It will narrow down the possibilities and you will get the accurate results.

Social Searcher does the same job but with more advanced features. Not only it lets you search for profiles and page, but you can also search for conversations using hashtags. Moreover, it also includes result from other social media websites.

That’s all.

How to download YouTube Videos on iPhone and iPad

0
How to download YouTube Videos on iPhone and iPad
download YouTube Videos on iPhone and iPad
Download YouTube Videos on iPhone and iPad

Downloading YouTube Videos on Android phones and Windows PCs is incredibly easy. It is not the same when it comes to iPhones and iPads. You cannot simply download YouTube videos on iPhone and iPad via an application. For Android, there are thousands of applications that can perform this job for you. Apple does not let any such application stay in its app store. To download YouTube Videos on iPhone and iPad, you need to follow a different approach. You will find the steps to download YouTube Videos on iPhone and iPad in this guide. Before we start downloading YouTube videos on iOS devices, let us learn a little bit about the growing trend of videos and the need to download them.

YouTube Videos – The trend that surged in 2017-2018

YouTube has been around since 2005. It has been popular since the day of its birth. In the last 2 years, the popularity of YouTube soared more than ever. YouTube today has millions of YouTubers who have millions of subscribers. Every day, we see a new YouTuber popping up. There are music companies, celebrities, music labels, vloggers, and many others having their YouTube channels. They post the videos that we love to watch every now and then. YouTube today has become a platform that people are using to make their life, get entertained, and to support their favorite celebrities/personalities.

People prefer to watch videos on YouTube rather than watching the TV. YouTube has provided the platform to independent content creators to create web series. It is easy for companies to reach out to their audience via YouTube. It has over 1.9bn logged in users per month. Over 400 hours of videos are uploaded to YouTube every single minute. 8 out of 10 adults watch YouTube today. Over 1 billion hours of YouTube videos are watched by users every day. On average, a mobile user spends nearly 40 minutes on YouTube every day.

So by now, you must have got an idea about the popularity of YouTube. At times, the videos on YouTube are so touchy that we love to save them on our iPhone. Sometimes, we want to download the MP3 version of our desired song from YouTube. The educational videos are so good at times that we want to keep them on our iPhone for use later on. In short, you can feel the need of saving YouTube videos any time anywhere. This is why we are here going through this guide today. Go ahead, follow the steps to download YouTube videos on iPhone and iPad without any further ado.

Note: This guide is valid for all iPhones (iPhone XS Max to iPhone 3) and iPads that have been released till date. This guide is all applicable to all versions of iOS that exist at the moment.

Download YouTube Videos on iPhone and iPad

  1. First of all, open App Store on iPhone/iPad.
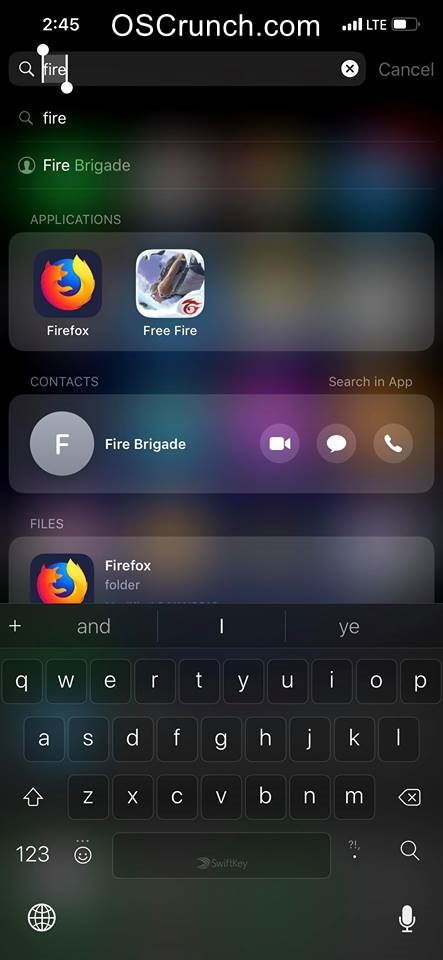
  2. Search “Firefox Browser” and install it.
    Download YouTube Videos on iPhone and iPad
    Firefox on iPhone/iPad
  3. After installation of Firefox, open YouTube on your iPhone or iPad.
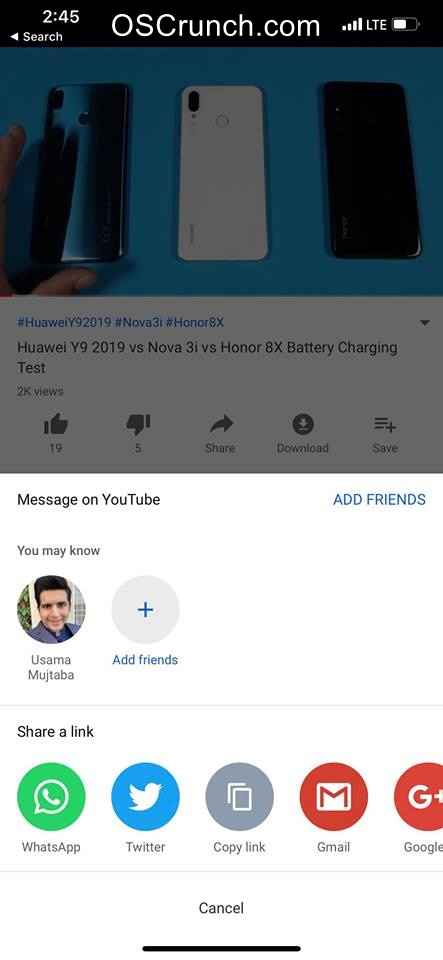
  4. Open your desired video and click on its Share button > Copy Link.
    Download YouTube Videos on iPhone and iPad
    Copy YouTube Link
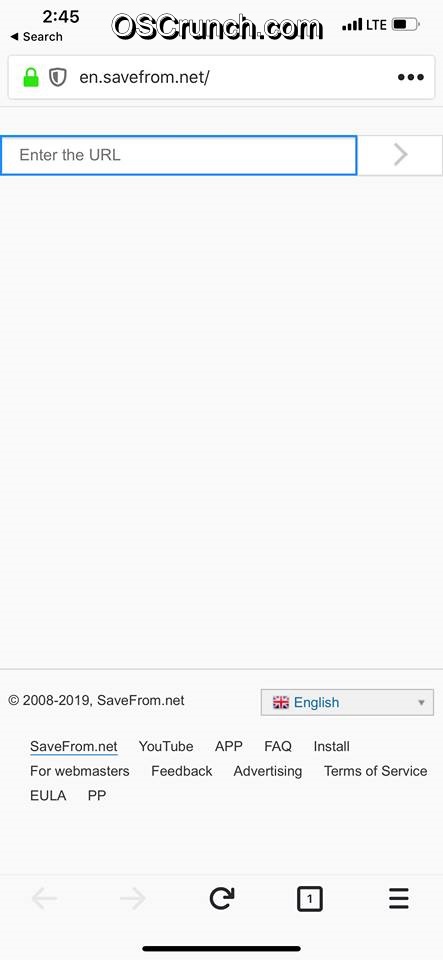
  5. Now open Firefox and open this site: Savefrom.net
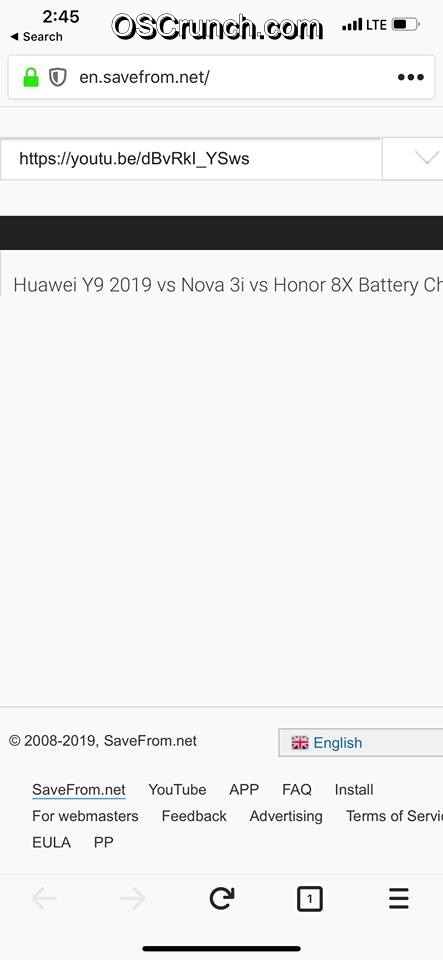
  6. On Savefrom homepage, you will find a URL bar. Long-press this bar and paste the copied URL.
  7. Click on the download button next to the URL bar.
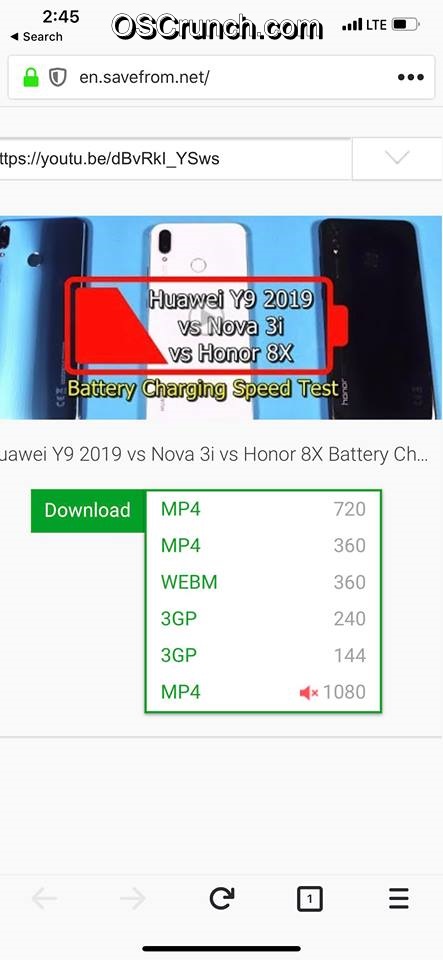
  8. The download options will appear now. Chose the resolution or format that you want to download.
    Download YouTube Videos on iPhone and iPad
    Resolution/Format Options
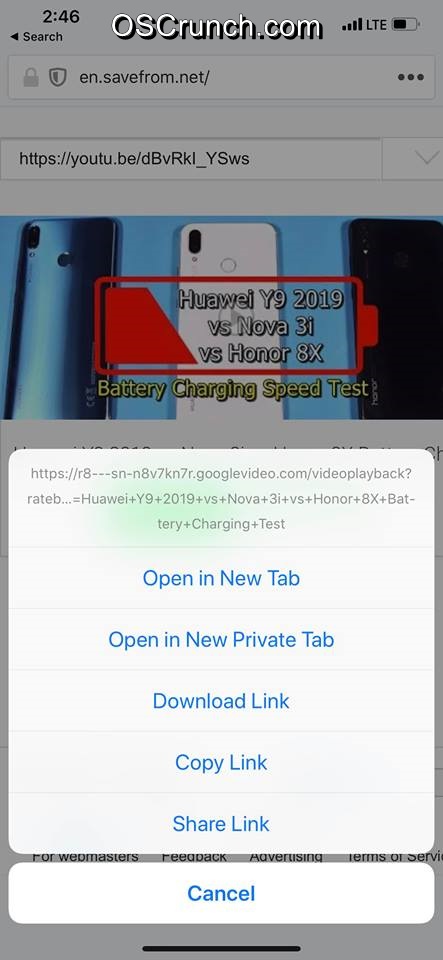
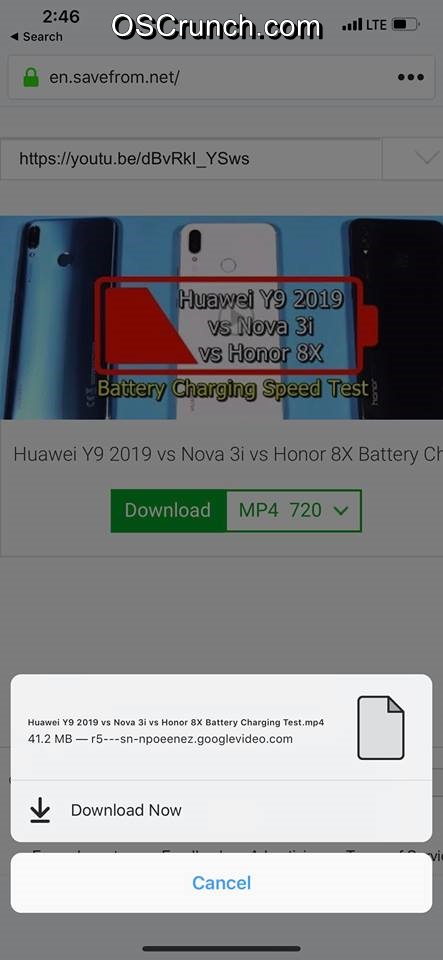
  9. Now long-press the Download button, options to copy/download Link will appear.
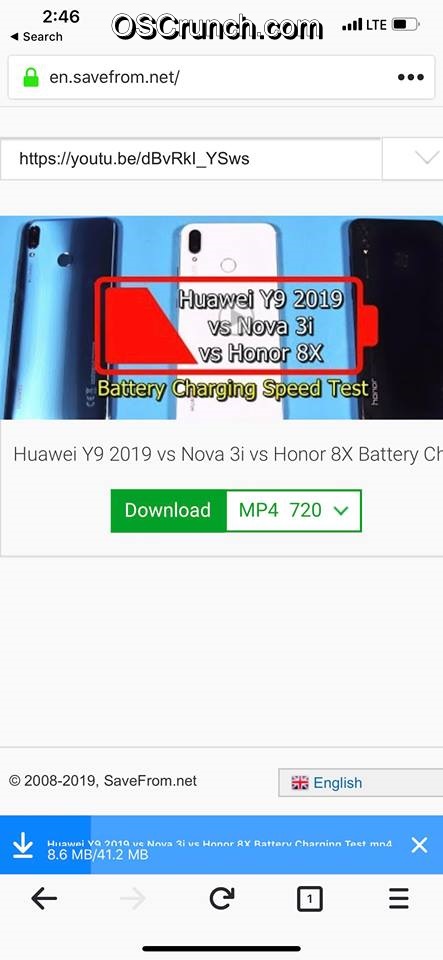
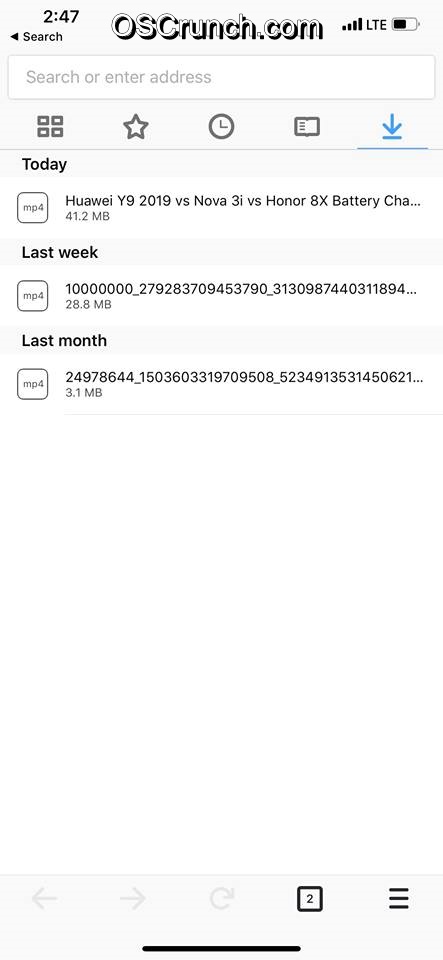
  10. Click on “Download Link > Download Now”. The download will start now.
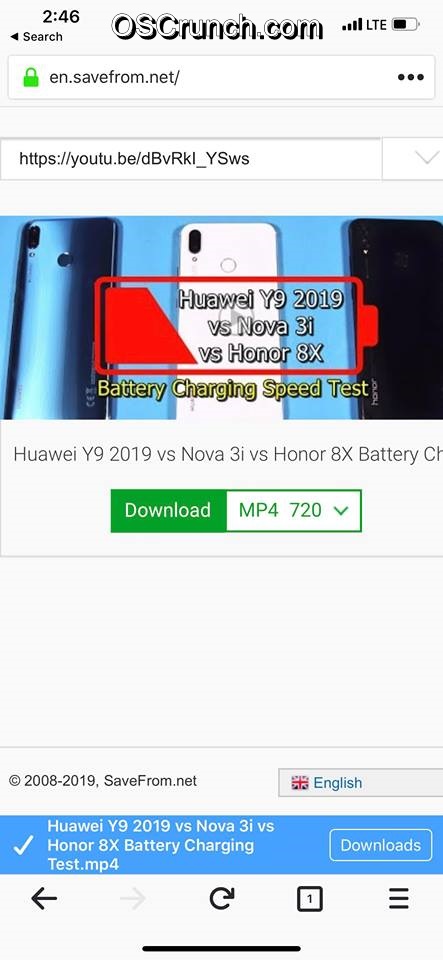
  11. Once the download ends, “Downloads” path will appear next to the downloaded file. You can click this option or navigate to downloads by clicking on the “Download Arrow” appearing at Firefox homepage.
    Download YouTube Videos on iPhone and iPad
    Download Finished
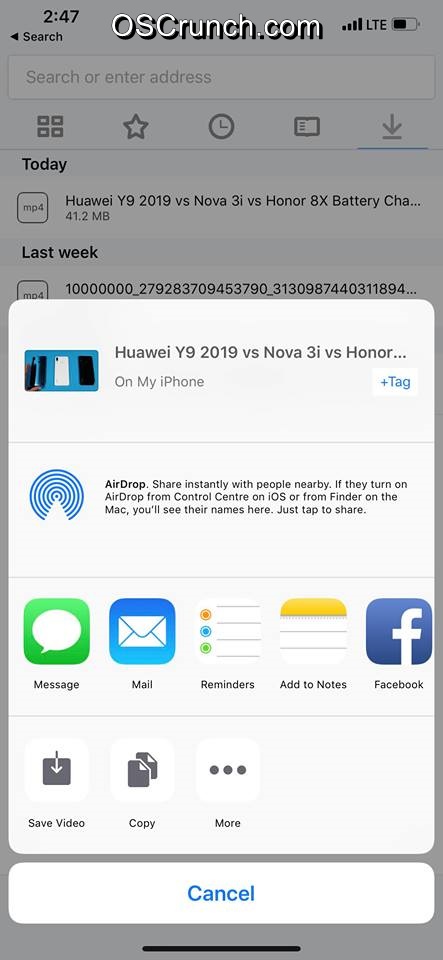
  12. You will find the downloaded video there. Click on the video and then click on “Save Video”.
  13. The video will now appear in the Photos and Files application. That’s all.

Disclaimer: We at OSCrunch do not support any kind of piracy. Before downloading any video, make sure that you are doing it on your own. The wish and will should be your own. We always support video publishers and independent content creators. Try to download the videos that have no copyright problems.

Conclusion

That is all folks. I hope that you are enjoying downloading YouTube videos on your iPhone or iPad now. If you face any kind of difficulties while following these instructions, feel free to reach out to us. I will try my best to get back to you as soon as I get your query. We are also open to all the suggestions and recommendations. If you have anything to add to this guide, feel free to let us know.

Do check: Download Facebook Videos on iPhone and iPad