Home Blog Page 38

Here’s How to Loop Part of YouTube Video [ Tutorial ]

0
Here’s How to Loop Part of YouTube Video [ Tutorial ]

Did you know that there is a way through which you can Loop Part of YouTube Video? Well, it’s true and today I will tell you ho how to Loop Part of YouTube Video. Loop a part means whenever you are watching a YouTube video, especially, a tutorial and you need to practice a part of it. What will you do, go back and start watching it again and again?

Loop Part of YouTube Video

Every time you miss a thing, you need to go back and play the video again. So to make things easier for you, it’s better to Loop Part of YouTube Video. Rather than go back and start it all over again. To help you learn from a YouTube video with getting irritated, I have found some solutions that I would love to share it with you.

Download YouTube Videos on iPhone/Save to Camera Roll

How to Loop Part of YouTube Video:

After testing a number of plugins, Add-ons, and Apps. I have found there of them which are perfect for this situation. These apps and add-ons have the function to loop the YouTube videos. It totally depends on you, whatever suits you. For instance, try browser Add-ons if you like or you can use apps. Let’s start now.

Auto Replay for YouTube – A Firefox Add-on:

The first Add-on I would recommend you is Auto Replay for YouTube. This Add-on is available for FireFox browser and the core purpose of this add-on is to provide loop functionality for YouTube Videos. Open YouTube and play video, now in Auto Replay Add-on you can add a time range and it will start playing that part in the loop.

Using Auto Replay for YouTube is very easy. Once you have installed it, you will see a new toolbar at the top. Whenever you want to turn off the looping, use the quick settings in the toolbar. I am afraid, Google Chrome doesn’t have the  Auto Replay for YouTube. However, instead of this, it has Lopper and rather than providing a toolbar, it adds a loop button on the video.

Play Youtube Videos Having Your Android Phone’s Screen Turned Off

Greasemonkey User Script:

Greasemonkey add-on allows us to run small users scripts and it is the best Add-on for developers who use firefox. However, when it comes to Chrome you can run Greasemonkey User Scripts on Chrome without installing the Greasemonkey extension.

There is a user script called better loopy for Youtube, it is the perfect tool to Loop Part of YouTube Video. All you have to do is install it. Enter the timing of the Video part which you need to loop, in the settings of the script. Afterward, click the loop button and there you go.

Infinite Looper:

Infinite Looper is a free Web app which lets you loop YouTube videos. But in order to do so, you need to fetch the YouTube video by using the search feature provided on the web. Once done, you need to select the clip from the video you need to loop and it will start playing the part. Moreover, you can share this clip with your friends.

That’s all. This is how you can Loop Part of YouTube Video. Please try these solutions and share them with friends.

How to enable Call Recording on Galaxy Note 10

7
How to enable Call Recording on Galaxy Note 10

This is the guide to Enable Call Recording on Galaxy Note 10. Note 10 has in-built call recording that you can easily enable.

enable Call Recording on Galaxy Note 10
Call Recording on my Galaxy Note 10 Plus

Call Recording

The call recording feature is something that Android users have been utilizing for almost a decade. Unlike iOS, Android’s diverse nature allows call recording. Many phone makers have often tried to kill the call recording feature keeping in view the privacy concerns, but the number of users looking at the Call Recording feature as a utility is higher than those seeing it as a privacy concern.

Phone manufacturers like Huawei and Samsung have introduced call recording as an in-built feature in their phones. Huawei has its own Call Recorder that users can even install on other Huawei phones. Samsung, on the other hand, has the call recording in the call settings of its phones.

The availability of this feature, however, totally depends on what region you are in. In a number of countries, call recording is seen as a serious privacy concern and those countries do not legalize it. In countries like India, Call Recording is completely legal. If you own a Samsung phone in India or other countries where it is legal, you can easily enable the feature.

Many users do not even know that the Call Recording exists in their phones. This is why they keep on missing it for years.

Today, in this guide, I will show you how you can enable call recording on Galaxy Note 10. The same call recording guide can be used to enable call recording on any other Samsung phone too.

Enable Call Recording on Galaxy Note 10

Follow these few steps to Enable Call Recording on Galaxy Note 10.

Total Time: 2 minutes

Open the Phone application on Galaxy Note 10.

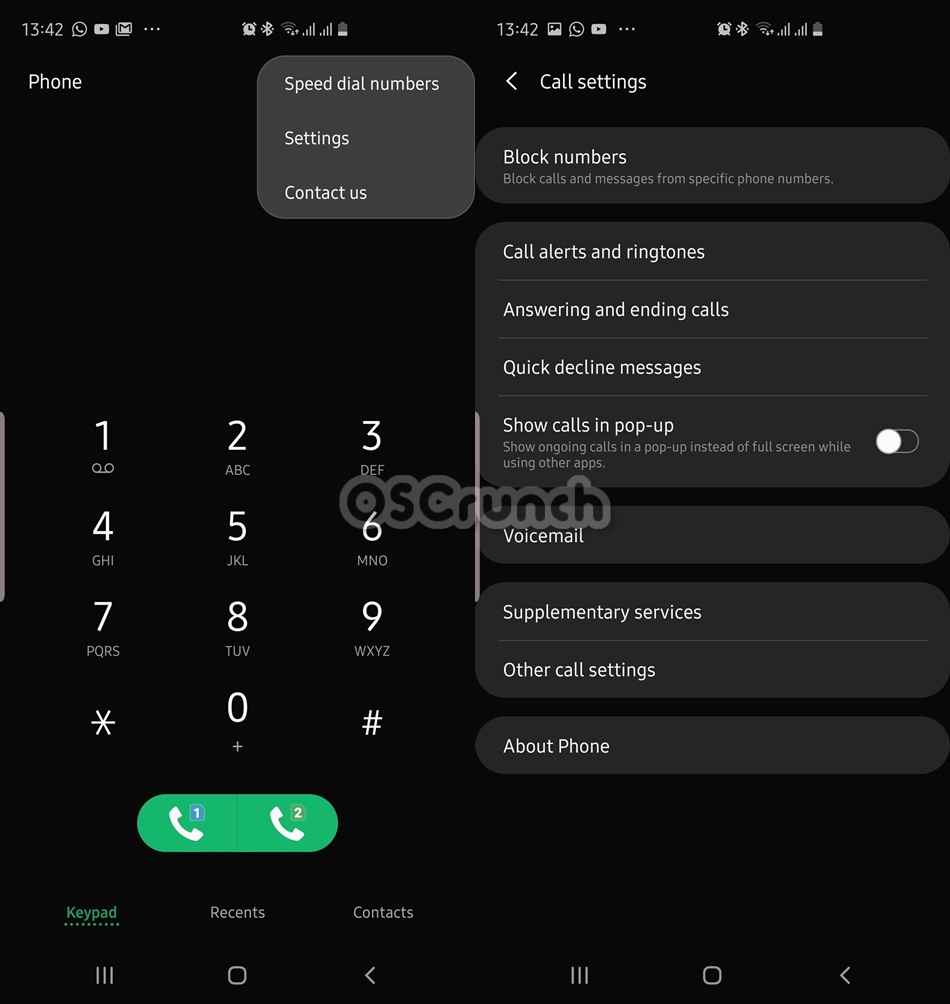
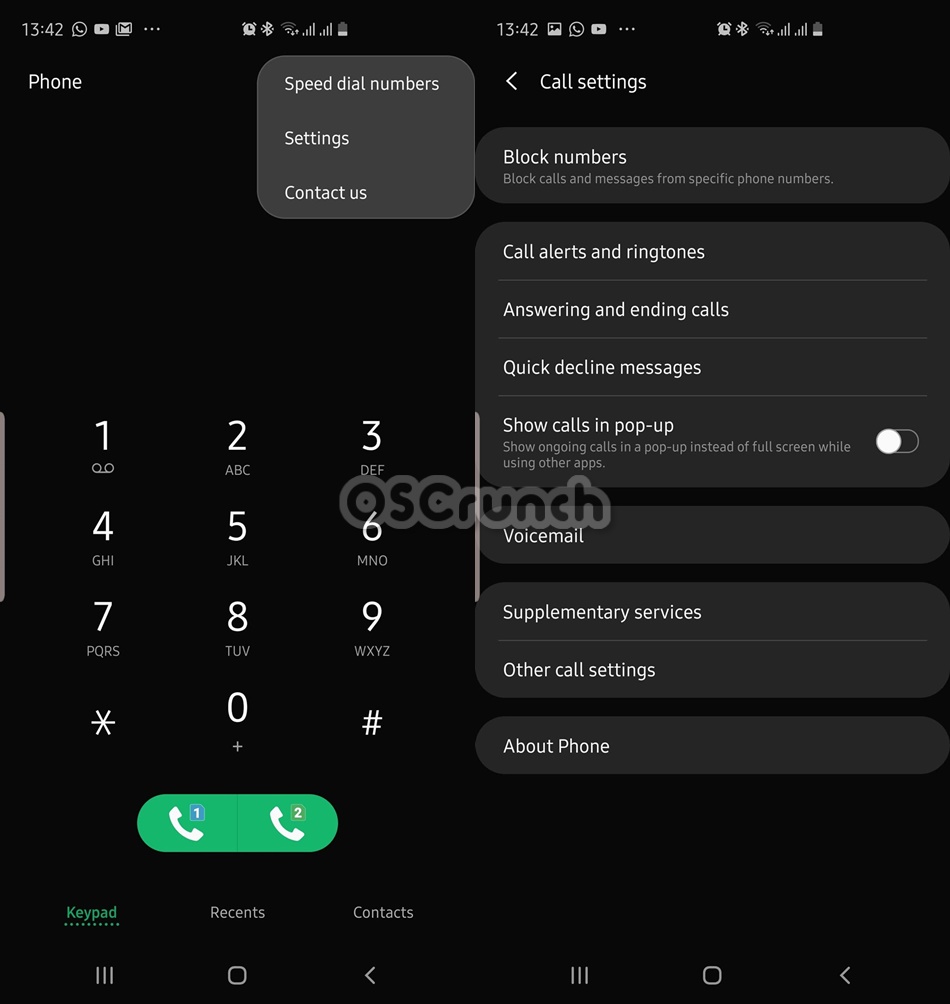
First of all, open the Phone/Dialer on the Note 10. Navigate to the Keyboard and click on hamburger-icon > settings.

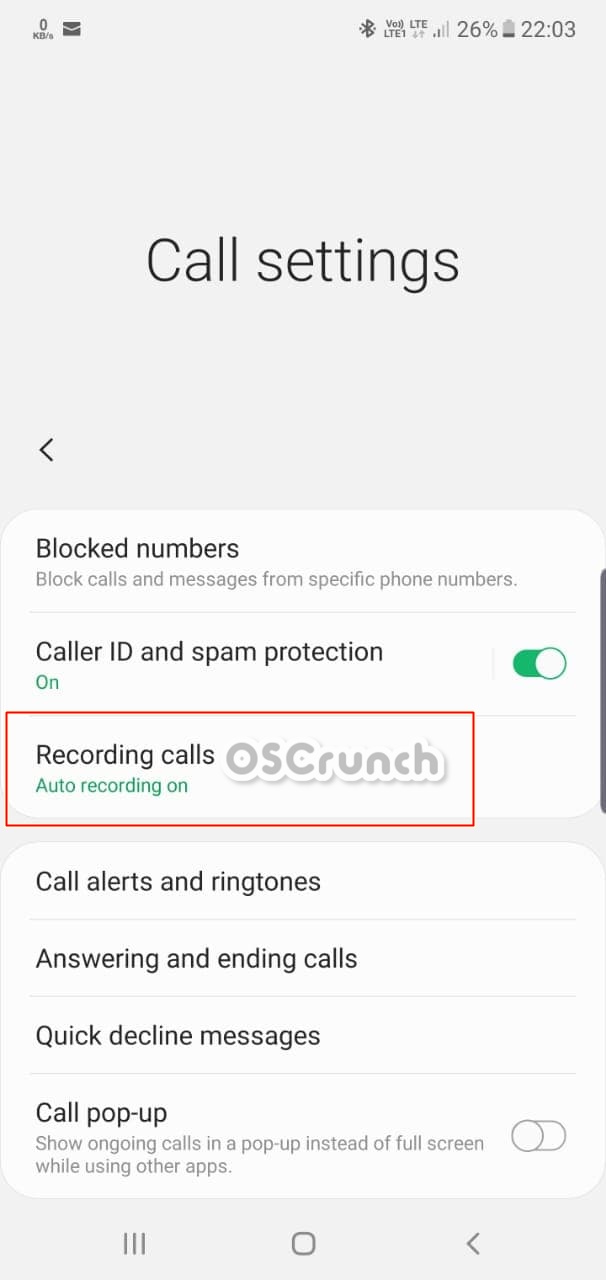
In the call settings, find “Call Recording”.

You will be in the call settings now. There is a list of options here. You have to locate Call Recording and click on it.Call recording on galaxy note 10

Enable Call Recording.

Turn on the Call Recording from the available preferences now. The call recording is now on and works when you make a call.Call recording on galaxy note 10

Make a call and record it.

Dial any number on your phone. You will see the Record button on the dialer. It will appear for incoming calls too. You can choose to record the calls.

Find the recording in the recorded calls folder.

The recorded calls will appear under the recorded calls folder in the internal storage of your phone. That’s all.

That’s all. Once again, I’d like to emphasize on the legality of call recording which completely depends on your region. If you are recording someone’s call in a country where its illegal, it can land you in serious trouble. The guide above is only for educational purposes.

If you have any questions/queries, feel free to reach out to us. I will try my best to get back to you as soon as possible.

More Galaxy Note 10 Guides:

Last Updated: 26th October 2019

How to enable/disable Call Forwarding on Galaxy Note 10

0

This is your quick guide to enable/disable Call Forwarding on Galaxy Note 10. By default, the Call Forwarding is enabled on some phones and its disabled on some.

Call Forwarding on Galaxy Note 10

Before I take you through the guide, let me tell you a little bit about the Note 10 and 10 Plus.

Note 10 & 10 Plus

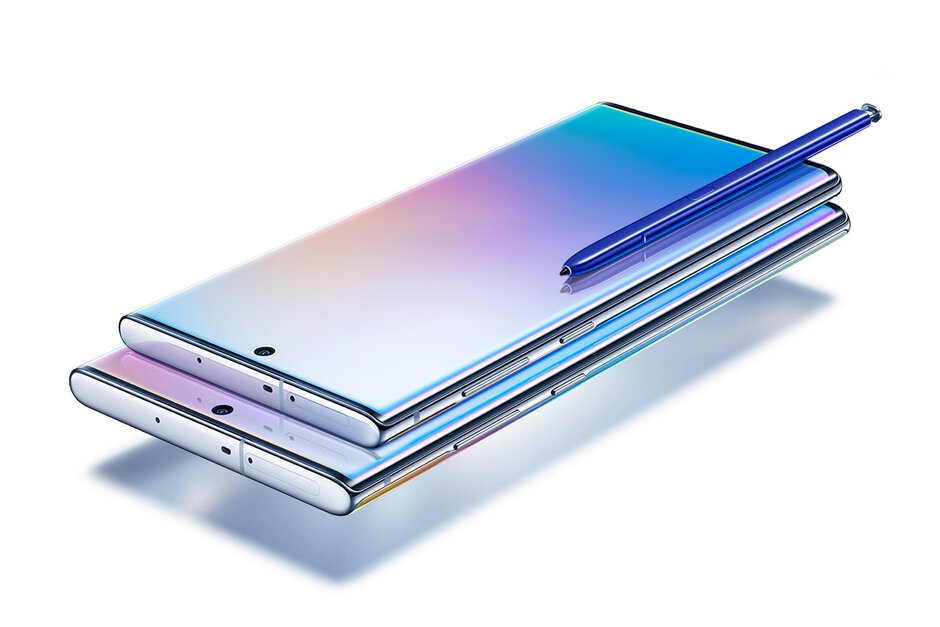
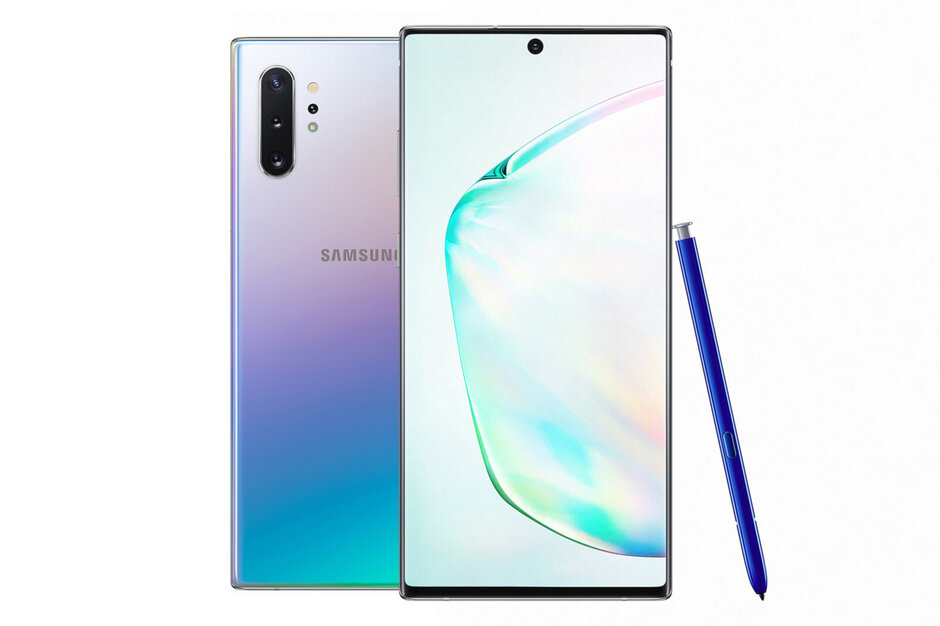
These handsets were released back on August 7. Samsung has introduced 2 variants of Note handsets for the very first time. Galaxy Note 10 is the lighter version and the Note 10 Plus is the top-notch/high-end variant. Note 10 and 10 Plus come with industry-altering design and features.

Samsung is using the Qualcomm Snapdragon 855 or the Exynos 9825 CPU inside. There is a RAM of 8GB on the Note 10 and 12GB on the Note 10 Plus. Both handsets start off with base storage of 256GB which goes up to 1TB. These phones have no headphone jack. There is a 3.5mm headphone jack.  Samsung has added a 3500 mAh battery in the Note 10 and a 4400 mAh battery in the Note 10 Plus. There is a fingerprint scanner (ultrasonic) underneath the screens of these phones. The iconic S-Pen is also there. The Note 10 and 10 Plus both have same triple camera shooters (12MP + 12MP + 16MP) at the back and as single 10MP on the front.

Those were a few highlights of the Note 10. Let’s me tell you what call forwarding is and how it works.

Call Forwarding on Galaxy Note 10

Call Forwarding is a part of supplementary services on a phone. This service is controlled by your network carrier. The purpose of call forwarding is to forward an incoming call to another number when the call goes unanswered or if your phone is busy. Call Waiting is also a part of these supplementary services.

One of the biggest drawbacks of default-enabled call forwarding on Galaxy Note 10 is, whenever someone calls you and you don’t answer the phone after 4-6 tunes, the call cuts off. That is because you have not set up the forwarding to another number.

This can really get you scratching your head because typically, the call should cut off if it goes unanswered after 10-12 tones. This happened to me on my S10 Plus and I was really, really worried about it. At first, I thought there was something wrong with my phone, but then I found that it was call forwarding in the play.

If you are facing any such problem on your phone, or you just want to utilize the Call Forwarding, you must learn how to handle it. You will now take a look at the steps to enable or disable Call Forwarding on Galaxy Note 10.

Enable/disable Call Forwarding on Galaxy Note 10

These are the few simple steps to activate and deactivate call forwarding on Galaxy Note 10 or 10 Plus.

Total Time: 1 minute

Open the Phone App on your Note 10.

Open the Phone application on the Note 10 and navigate to Keypad. In Keypad, click on the three-dotted menu button and open Settings.call forwarding on note 10

Open Supplementary Settings now.

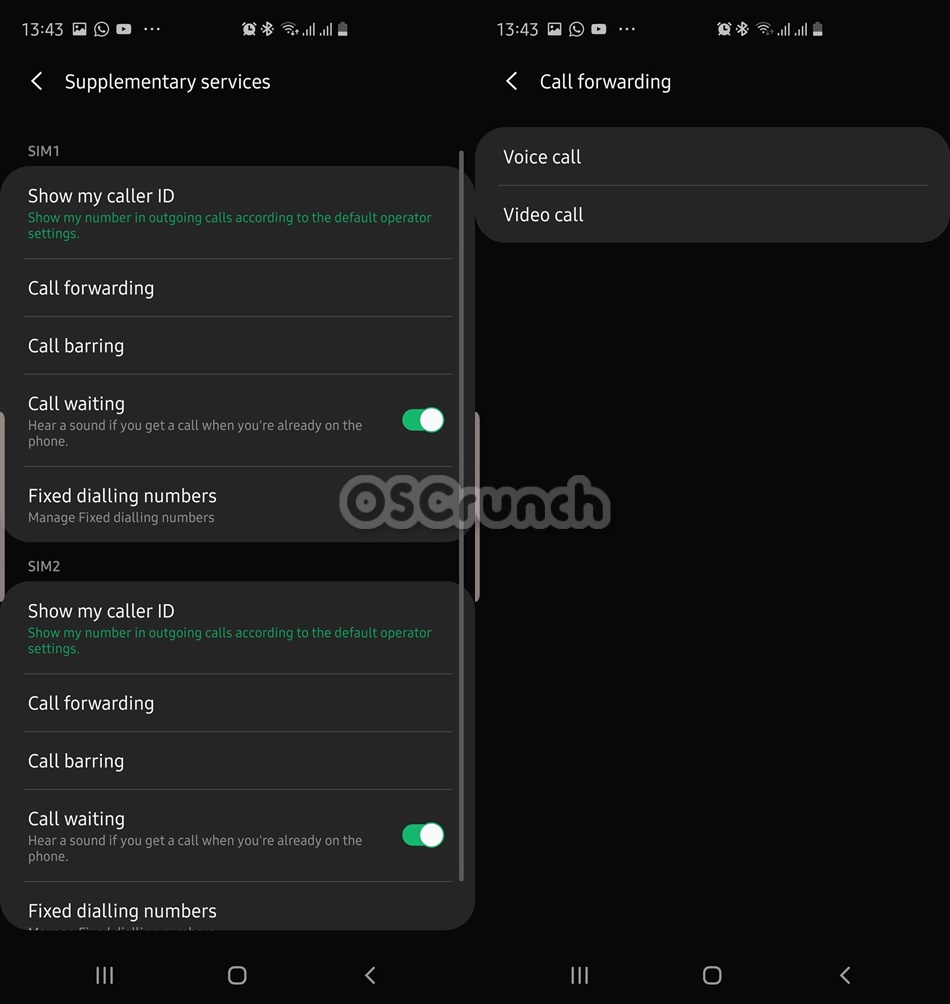
In the settings, open Supplementary Settings now. You will see Call Barring, Call Forwarding, and Call Waiting.

Under the Supplementary Settings, click on Call Forwarding.

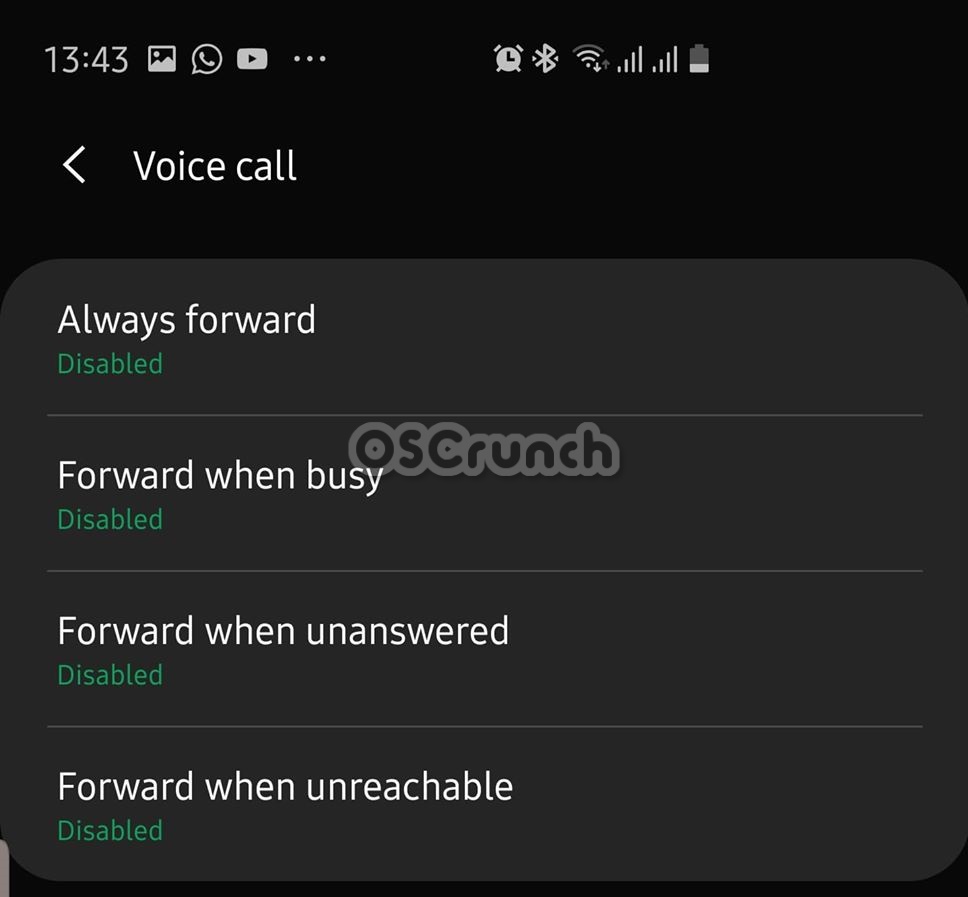
Now you have to open Call Forwarding settings. You will see options for Voice and Video calls.enable or disable call forwardig on galaxy note 10

Choose Voice or Video Calls.

Depending on your preference, choose the voice or video calls. Remember that call forwarding is different for voice and video.

Enable or Disable Call Forwarding now. That’s all.

You will now see all the conditions to turn on or off call forwarding. For example, you can always forward calls or forward when busy, or like me, you can disable the call forwarding for all preferences. That’s all.call forwarding on galaxy note 10

Similarly, you can turn on Call Waiting as well. Call Waiting option will make an incoming call wait when your phone is busy on another call. Although this is controlled by your network, to make it work, you must have it turned on beforehand.

That’s all. If you have any questions/queries, feel free to reach out to me. I will try my best to get back to you as soon as possible.

More Galaxy Note 10 guides:

How to delete Galaxy Note 10 Cache without losing data

0
How to delete Galaxy Note 10 Cache without losing data

This is the guide to delete Galaxy Note 10 Cache without losing data. You will learn how you can delete the phone’s cache, app cache, and internet cache.

Note 10 and Note 10 Plus

Samsung Galaxy Note 10 was released earlier this month. For the first time in Note’s history, Samsung launched two Galaxy Note handsets. We got a chance to see Galaxy Note 10 and the Note 10 Plus. Just as the names suggest, Galaxy Note 10 is the lite version and the Note 10 Plus is the high-end version of this year’s Note. A couple of days back, Samsung started shipping out the Galaxy Note 10 handsets. According to the early reviews, the new Note devices have impressed masses.

delete Galaxy Note 10 Cache

To start off, Note 10 and Note 10 Plus come with Dynamic AMOLED screens with a hole-punch camera fixed right in the middle. This helps the phone to achieve a very high aspect ratio for the screen. The Note 10 uses a full HD screen and the Note 10 Plus uses QHD+. Both handsets come with 256GB base storage and a RAM of 8 or 12GB. The storage of Note 10 Plus further goes up to 512GB.

Samsung has used the Exynos 9825 or the Snapdragon 855 processor. The Note 10 has a 3500 mAh battery, Note 10+ has a 4400 mAh battery. Both handsets have an ultrasonic fingerprint scanner. There is no headphone jack. These support 25W USB Type-C fast charging. The iconic S-Pen with a lot of advanced features is also there.

The capabilities of the Note 10/10+ cannot be undermined. The added power of the Galaxy Note phones urges its owners to experiment. The experiments can lead to the need for wiping the cache of the phone. This is the very reason I’m writing this guide. Not only the experiments, but there will also be many scenarios in which clearing cache of the phone, of an app, or the internet browser will happen to be a life savior. 

What clearing cache does?

When you are running various processes on your phone, a copy of all those processes is recorded in the cache memory of the phone. This is done in order to perform the same process faster next time. For example, when you launch an app for the first time, it will take a little bit of time. When you will launch the same app for the 2nd time, it will open up quickly. This is because the app’s processes were saved in the phone’s cache. The same goes for every single task/process running on the phone.

When your phone’s performance starts going down, or it comes up with some errors, clearing cache helps. Clearing cache is like one medicine for a hundred diseases. It can often fix battery life, heating, and charging issues of the phone. By this, I mean that the issues that are software-related only.

Other than the phone cache, there is the app cache. This cache is responsible for processes of a particular app. If an app isn’t performing well or it has some errors, you can clear its cache.

And lastly, there is the Browser cache. This cache takes care of all of your internet browser-related activities. It has to do with the website and webpages loading speed. If you want to refresh everything in your internet browser, you can clear its cache.

So, without delaying it further, let me show you how to delete Galaxy Note 10 cache without losing data.

Delete Galaxy Note 10 Cache

This is how you can clear the Cache of Galaxy Note 10. This is also known as wipe cache partition.

Turn off Galaxy Note 10.

First of all, press the power button of your Note 10 or 10 Plus for about 2 seconds. Click on “Power off” now. Wait for the phone to shut down.

Boot into Recovery Mode.

On the phone, press the Power/Side Key + Volume Up simultaneously for about 10 seconds. As the phone vibrates and turns on, let the keys go. You will see “Recovery Mode” in a bit.
Select “Wipe cache partition”.

Using the Volume Down button, highlight “wipe cache partition”.

Wipe the cache now.

At this point, wipe cache partition should be selected. Press the Power button to enter. Now use Volume Down to select “Yes” and press power button again.

Reboot the Galaxy Note 10. All done!

After clearing the cache, you will be on the main screen of recovery again. Select “reboot into the system” and press Power button to reboot. That’s all.

Delete Galaxy Note 10 App Cache

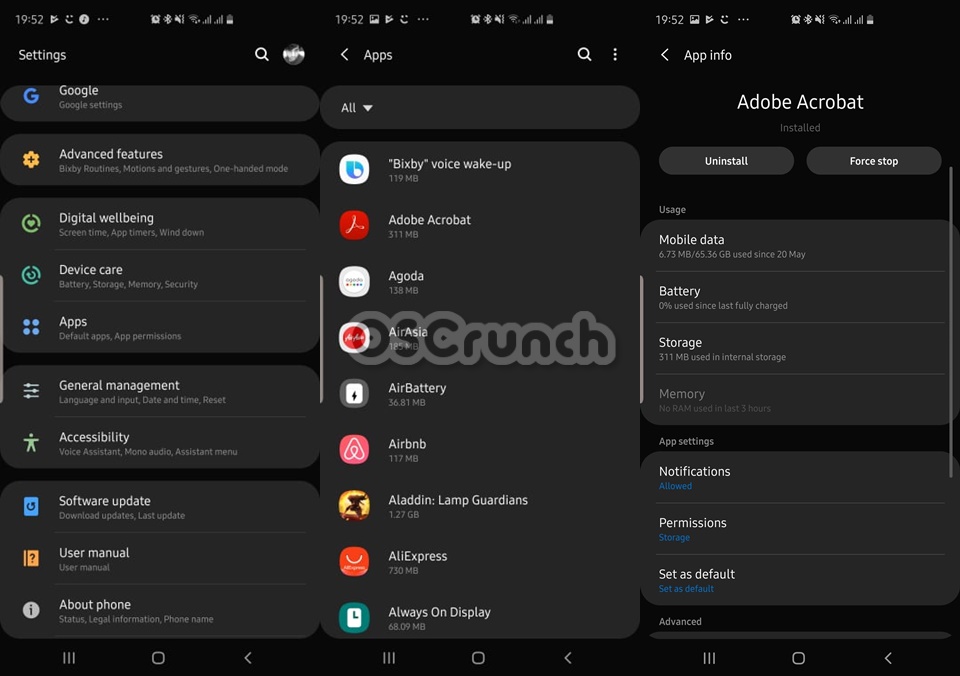
  1. First of all, note down the app who’s cache you want to clear.
  2. Now on the Note 10, open Settings.
  3. In settings, go to Apps.
  4. From the top, select “All” apps.
  5. From the list, open the app whoes cache you want to clear.delete galaxy note 10 app cache
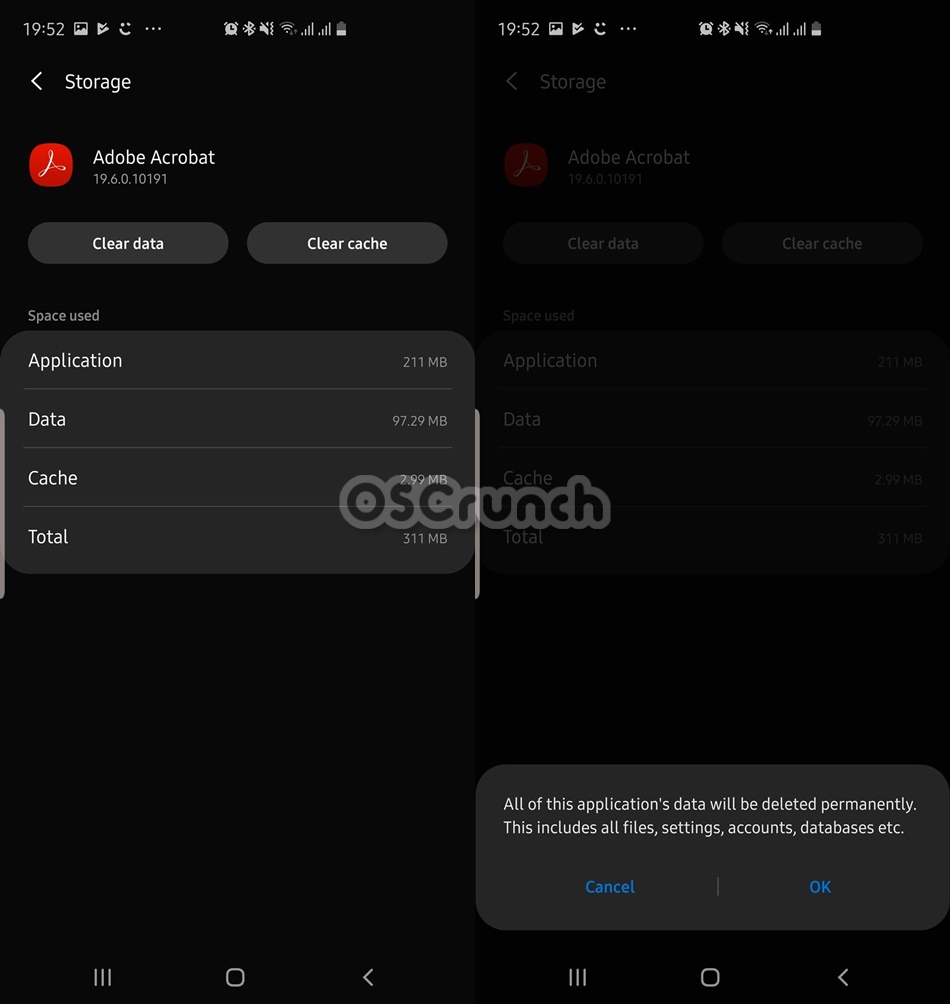
  6. Now click on Storage.
  7. Clear data and clear cache.delete galaxy note 10 app cache
  8. Reboot your Note 10 or 10+. That’s all.

Delete Galaxy Note 10 Browser/Internet Cache

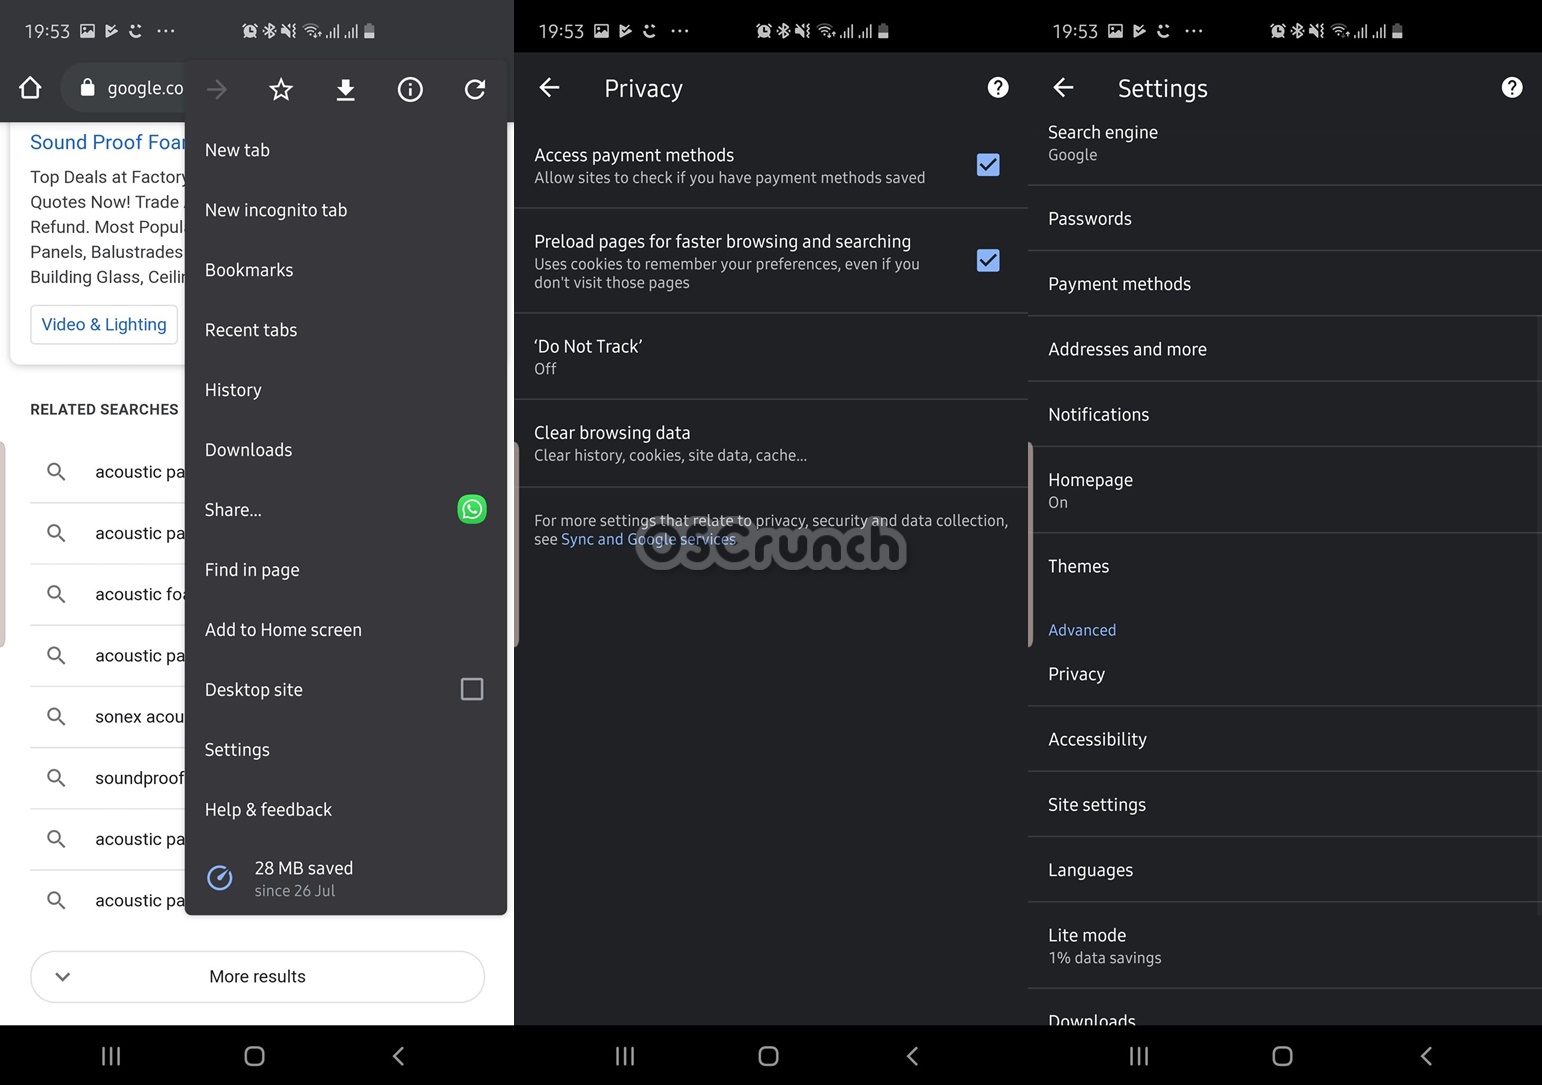
  1. On the Galaxy Note 10, open the stock browser or Google Chrome.
  2. Click on the hamburger Menu button on the top-right corner.
  3. Now open Settings.
  4. Go to Privacy Settings.delete galaxy note 10 browser cache
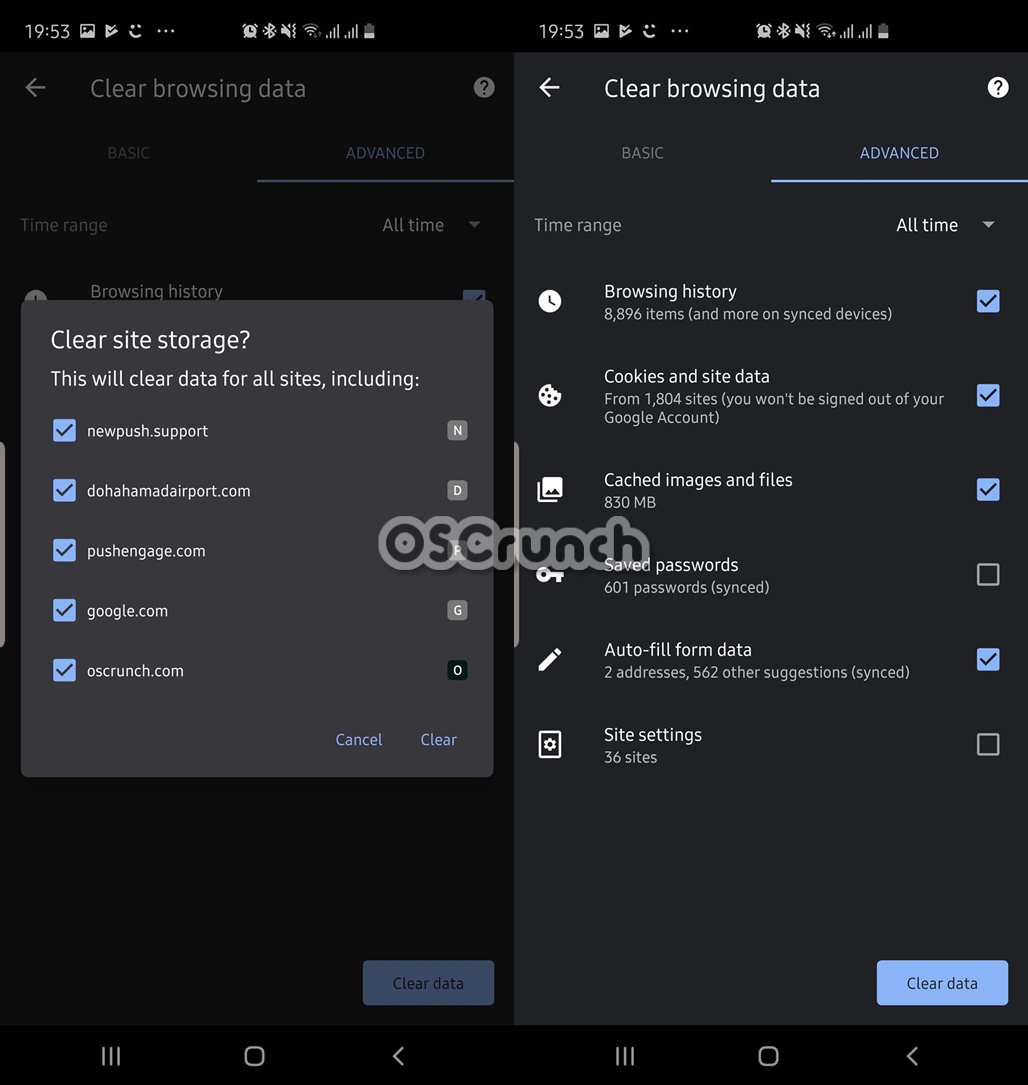
  5. Click on “Clear browsing data”.
  6. Now click on “Clear data” appearing at the bottom left”.delete galaxy note 10 browser cache
  7. Close the browser and open it again. That’s all.

That’s all. I hope you found this guide useful. If you have any sort of questions/queries, feel free to reach out to me through the comments box below.

More Galaxy Note 10 guides can be found here.

Clear search and location history in Google Maps on Android

0
Clear search and location history in Google Maps on Android

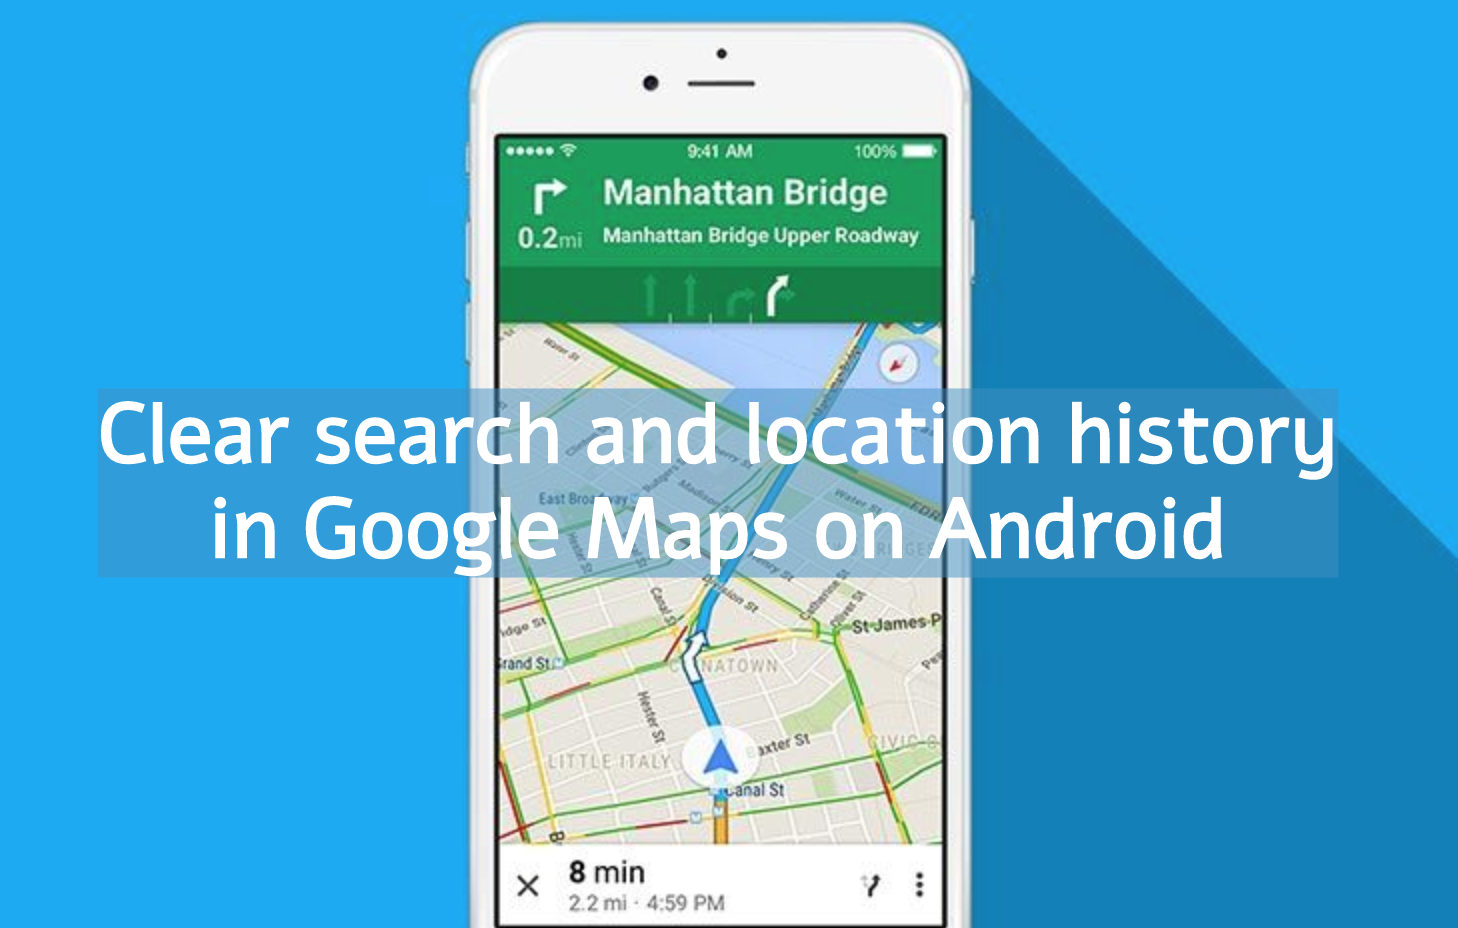
Google Maps is the best navigation source if it comes to smartphones. But there is an icky problem, Google Maps saves our search and location history. So If you are among them who wants to clear search and location history in Google Maps on Android. There is the right place for you.

As you all know that Google Maps is the best service if you are traveling or going someplace you don’t know. Also, you can find anything on Google Maps, it’s good for navigation, finding unknown locations, Petrol Pumps, Hospitals, Resturants and more. This doesn’t stop here, you can also get the live traffic report using Google Maps. It’s all good but I don’t like Google Maps having records of all our activities, it will be good for many users but not all of us are the fan.

So I think it’s time to stop wasting your time and get to the point. Heed the instructions below and you will learn how to clear search and location history in Google Maps on Android.

Read more: Clear Navigation and Search History in Google Maps

Clear search and location history in Google Maps on Android:

When you open Google Maps on your device, you will see your recent searches, history and all your previous searches. Now in order to clear them, you won’t be doing anything special, it’s just simple methods. Even a layman can do it by following my instructions.

Entire search, location, and navigation history on Google Maps:

Now you all be wondering why this is annoying right? Here is why. It seems to be the best part for most but sometimes it’s not. When you try to search in Google Maps, you start getting search and location suggestion based on our history. Even you are trying to find a new location, you will be presented with previous search results.

To prevent all this, Follow the instruction provided below and you will be able to clear Entire search, location, and navigation history.

Before I proceed, If you don’t want to clear the entire search and location history no worries. You can clear each of them individually. But let’s start with clearing the entire search and location history. It is easy and it will only take a few seconds. However, once you have cleared all the data, there is no way that you can get it back or retrieve it.

Step1: Launch Google Maps on your Android device. Swipe right, the Settings page will show up. Tap on “Personal Content” from the list.

Step2: On the next page, Tap on “Delete All Location History” -> “I Agree,” and then Tap on “Delete” button.

That will be all but keep that in mind by deleting all location history from Google Maps, will affect other apps too. Such as Google Now, Google Assistant, Google Search, etc.

Clear Individual Search/Location History in Google Maps:

So now you know how to clear all the Search/Location History in one tap. Let me tell you now how to Clear Individual Search/Location History in Google Maps. Before we proceed, you should know, you have to clear single entry Individually and repeat the same process of all each of them.

Step1: Open Google Maps, swipe right and tap on Settings. On the Settings page, Tap on Map History, you will be provided with a list of all the entries. Just Tap on “X” right next to an entry and it will be removed from your account permanently.

There you go, now in order to delete any single entry, follow these steps and you will be able to delete Individual Search/Location History in Google Maps.

Pause location history:

There is one more thing to it if you don’t want Google to save your location and search history. You need to turn off or pause the location history in Google Maps, that way Google Maps will not be able to save anything. Heed the instructions below to do so.

Step1: Open Google Maps -> Settings -> Personal Content, then scroll down and tap on “Location History is on”.

Step2: Now toggle off the “Use location history” and that will be all.

This is how you can clear search and location history in Google Maps on Android. Do let me know how’d it go for you, Also, if you need any help use the comments section or our contact page.

How to turn on screen mirroring on Galaxy Note 10 and connect it to Smart TV

0
How to turn on screen mirroring on Galaxy Note 10 and connect it to Smart TV

Here is how to turn on screen mirroring on Galaxy Note 10 and connect it to Smart TV. This guide explains the process in easy steps.

turn on screen mirroring on Galaxy Note 10 and connect it to Smart TV
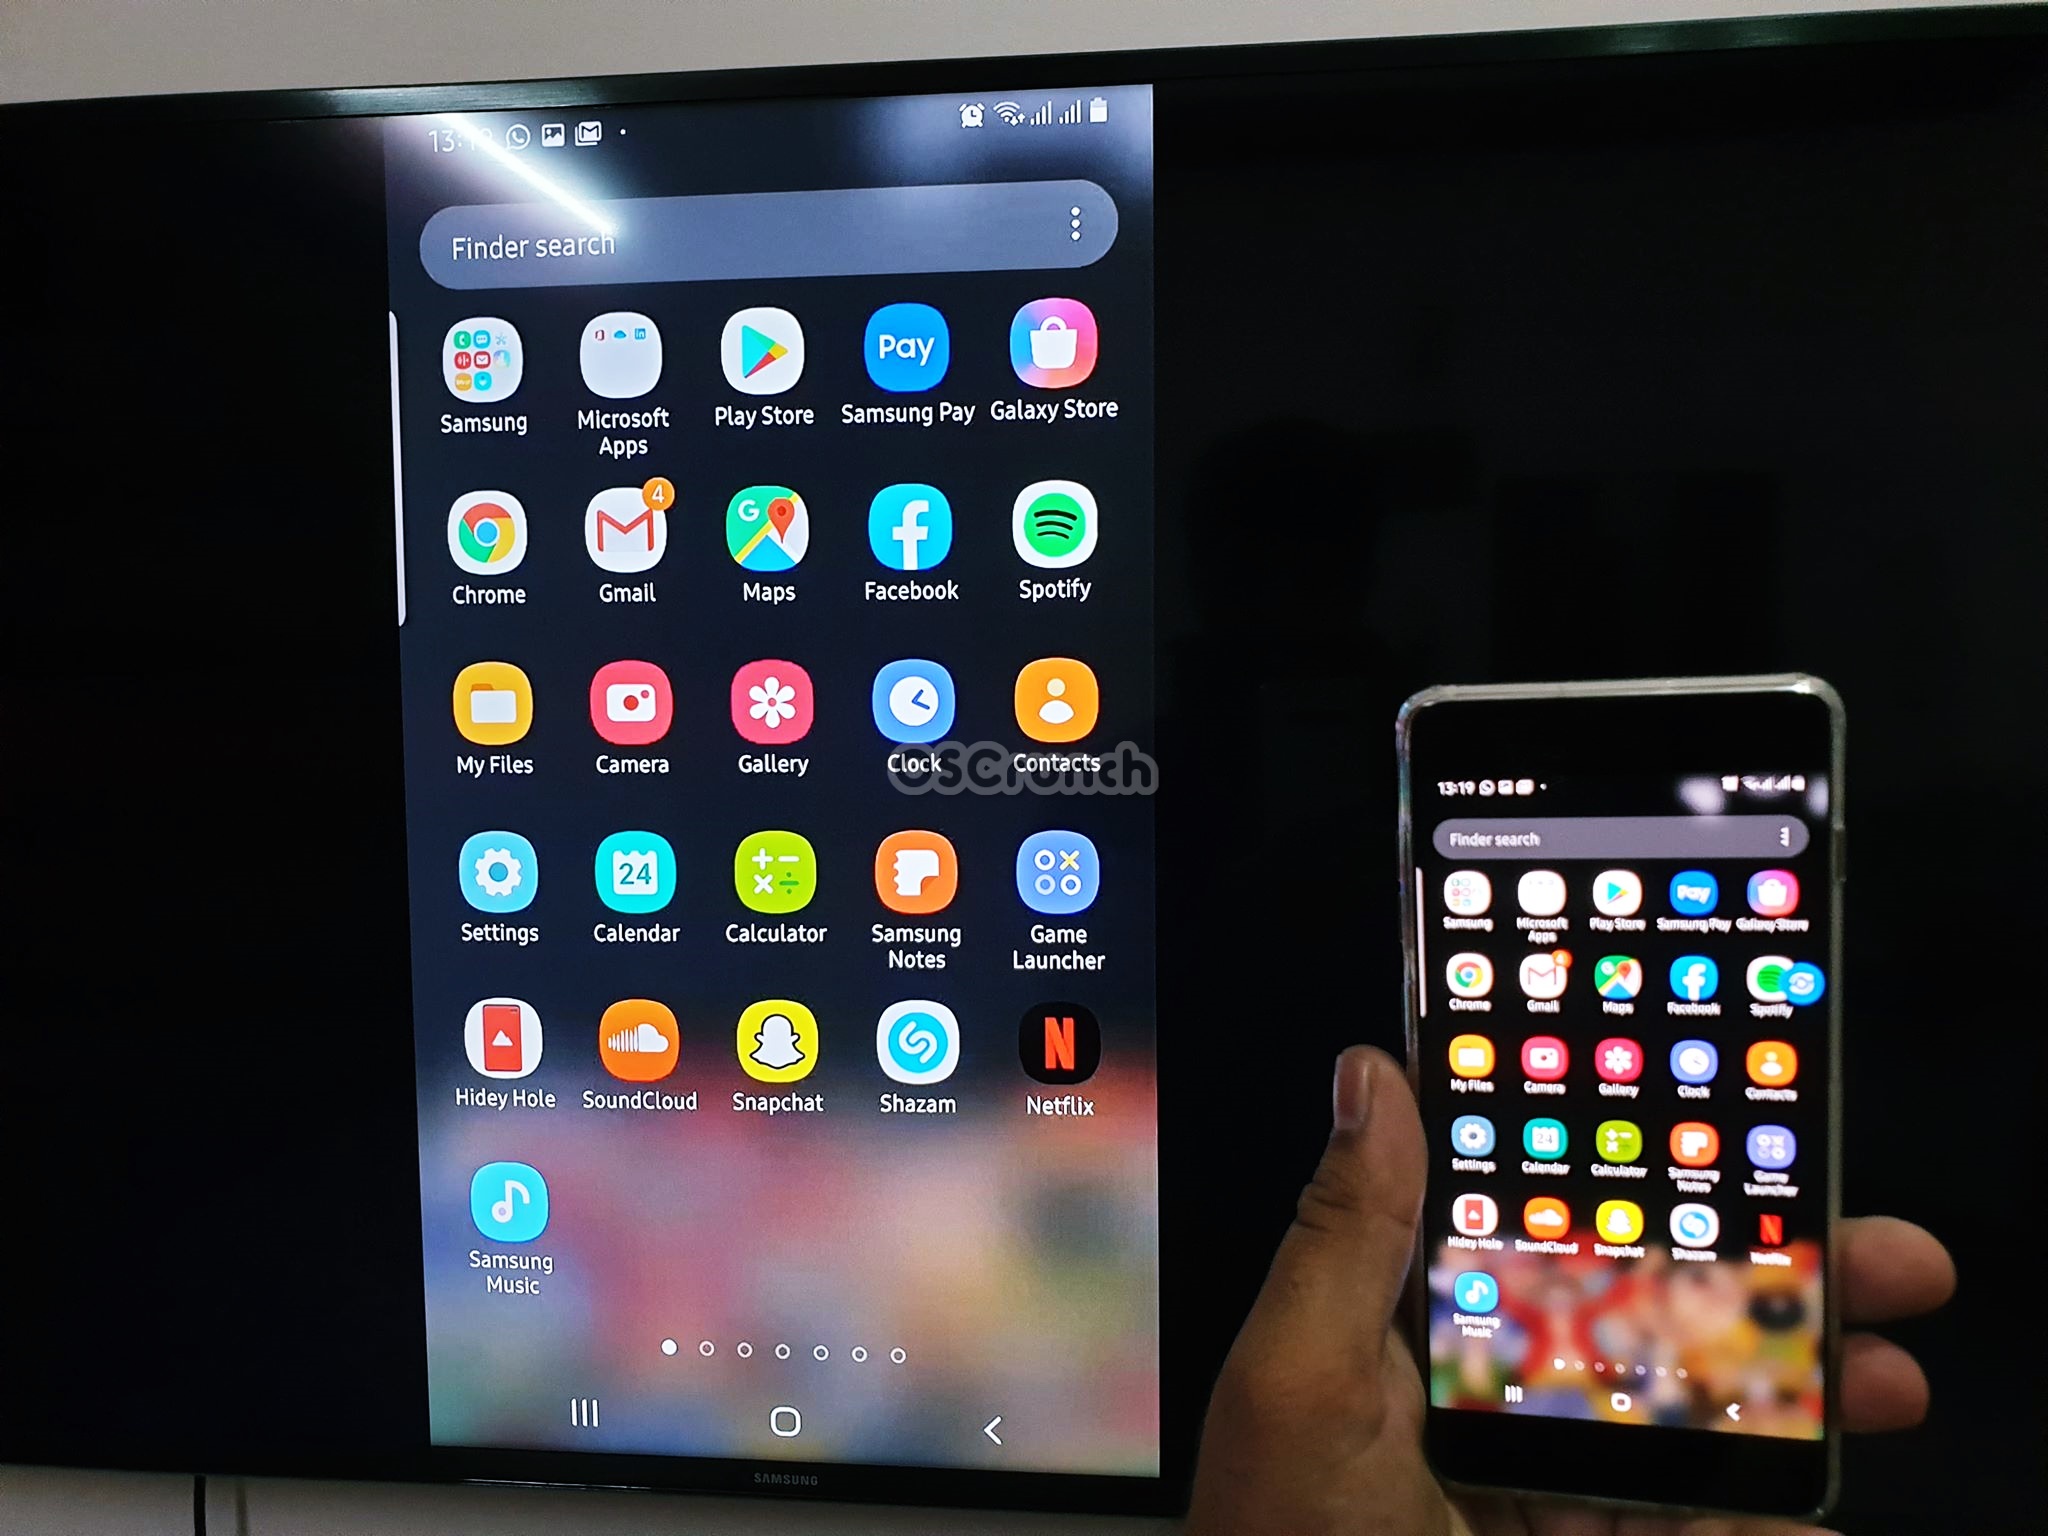
Galaxy Note 10 Screen Mirroring – Demonstrating on my S10 Plus, the process, however, remains the same for Note 10 & 10 Plus.

Samsung has started shipping out the Galaxy Note 10 and Note 10 Plus. The phones have made it to over 70 countries within yesterday. The Galaxy Note and Note 10 Plus are the two best flagship devices at the moment. Samsung has added a slew of unique features in these handsets.

Samsung Dex vs Screen Mirroring 

One of the most useful features of the Galaxy Note 10 phones is the Samsung DeX. The Samsung DeX allows using the phone as a Desktop PC. Users can use a USB Type-C to HDMI cable to connect the phone to an external monitor. Previously, the DeX worked only with the external monitors. With the Note 10, Samsung has made DeX compatible with Windows and Mac computers. To turn your Galaxy Note into a computer, you need a DeX software. Connecting your phone to the laptop launches an independent computer inside the DeX software.

DeX has a huge list of advantages, but it still doesn’t compete or replace the Screen Mirroring feature. The reason is the limited number of actions that DeX can afford. For example, DeX can be used to manage your documents, use your phone as a document editor or document creator. You can play only a few games of your Note 10 on the PC. DeX’s plus point is that you get to interact with your device’s content through the mouse and keyboard. 

DeX exists and you may opt for it, but if it doesn’t satisfy, you must know how to turn on screen mirroring on your Galaxy Note 10 and Note 10 Plus. Screen mirroring, as the name suggests, will mirror the screen of your phone on a Samsung Smart TV. You will control this screen using your phone only. Any action that you perform on the phone will be replicated on the screen of your Smart TV.

Screen Mirroring on Galaxy Note 10

Galaxy Note 10 or Note 10 Plus’s screen mirroring is a great utility if you want to show pictures to someone on a bigger screen, you want to screen-cast videos from the phone or youtube videos from the phone to your TV. Screen mirroring also mirrors the games you play on the TV.

While I show you the steps to turn on Screen Mirroring on Galaxy Note 10 and connect it to Smart TV, remember that it has got its limitations too. For example, do not expect screen mirroring to produce the graphics quality similar to your phone’s. Also, playing games through screen mirroring can stutter because it is a bit tricky for the phone to transmit the same graphics quickly on the other screen.

screen mirroring on Galaxy Note 10

Assuming that you have a very good understanding of Screen Mirroring on Galaxy Note 10, take a look at the steps to turn it on.

Here is what you need for Screen Mirroring to work.

  1. Galaxy Note 10 or Galaxy Note 10 Plus.
  2. Smart TV. It can be a Samsung, Sony, LG, or other smart TV and it must support screen mirroring.
  3. Your phone and TV must be connected to the same internet connection.

Turn on screen mirroring on Galaxy Note 10 and connect it to Smart TV

Follow these simple steps to turn on screen mirroring on Galaxy Note 10 and connect it to your smart TV.

Turn on your TV and connect to the internet.

First of all, turn on your Smart TV. If it’s a Samsung Smart TV, go to Smart Hub > Settings > Network > Network Settings and connect it to the WiFi. Go back to the main screen now.

Connect your Note 10 to the same WiFi network now.

Now connect the Note 10 or 10 Plus to the same WiFi that you connected your TV to. Remember that this cannot be a different connection.connecting TV and note 10 to same WiFi

On the phone, turn on Smart View.

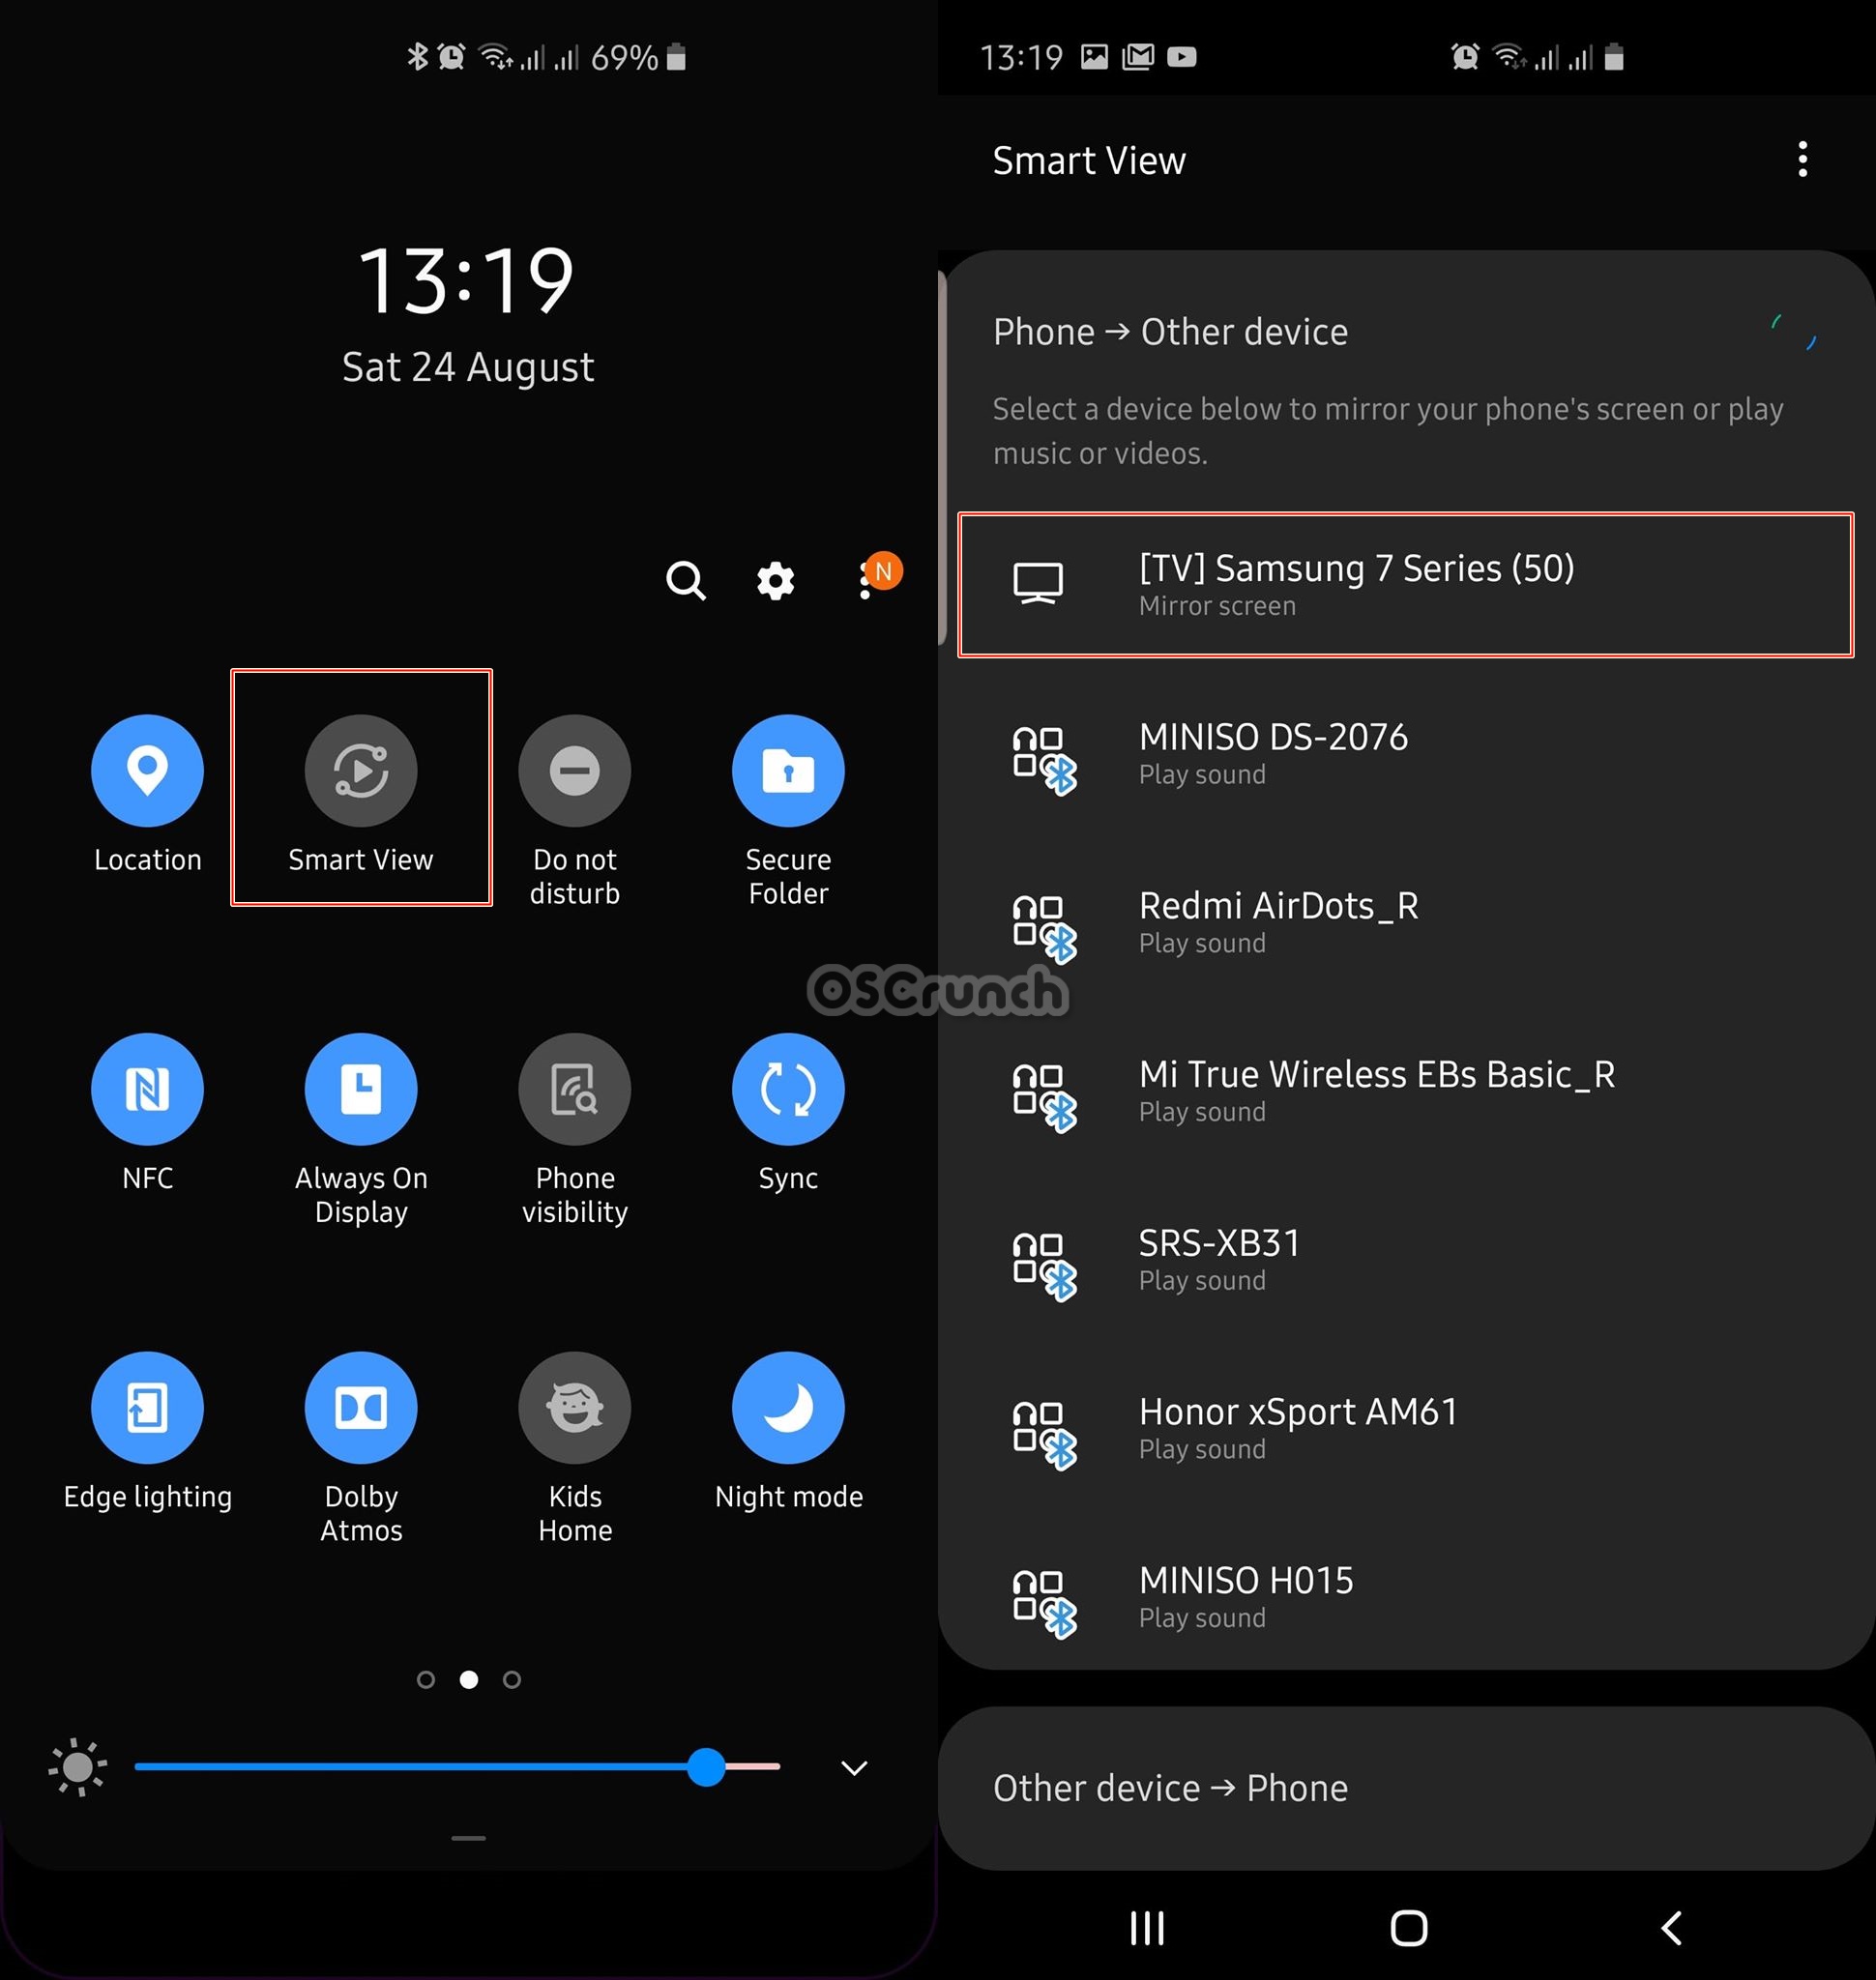
On the Note 10, pull the down the notifications panel and expand the toggles. Go to the 2nd page of toggles and click on “Smart View” and then turn it on. It will start finding all supported devices.

Click on your TV in Smart View on the Note 10.

Once Smart View finds devices, your Smart TV will appear at the top of the list and also show “screen mirroring” underneath. Click on the TV to start mirroring.turning on smart view on Galaxy Note 10

Allow the phone on TV and enjoy!

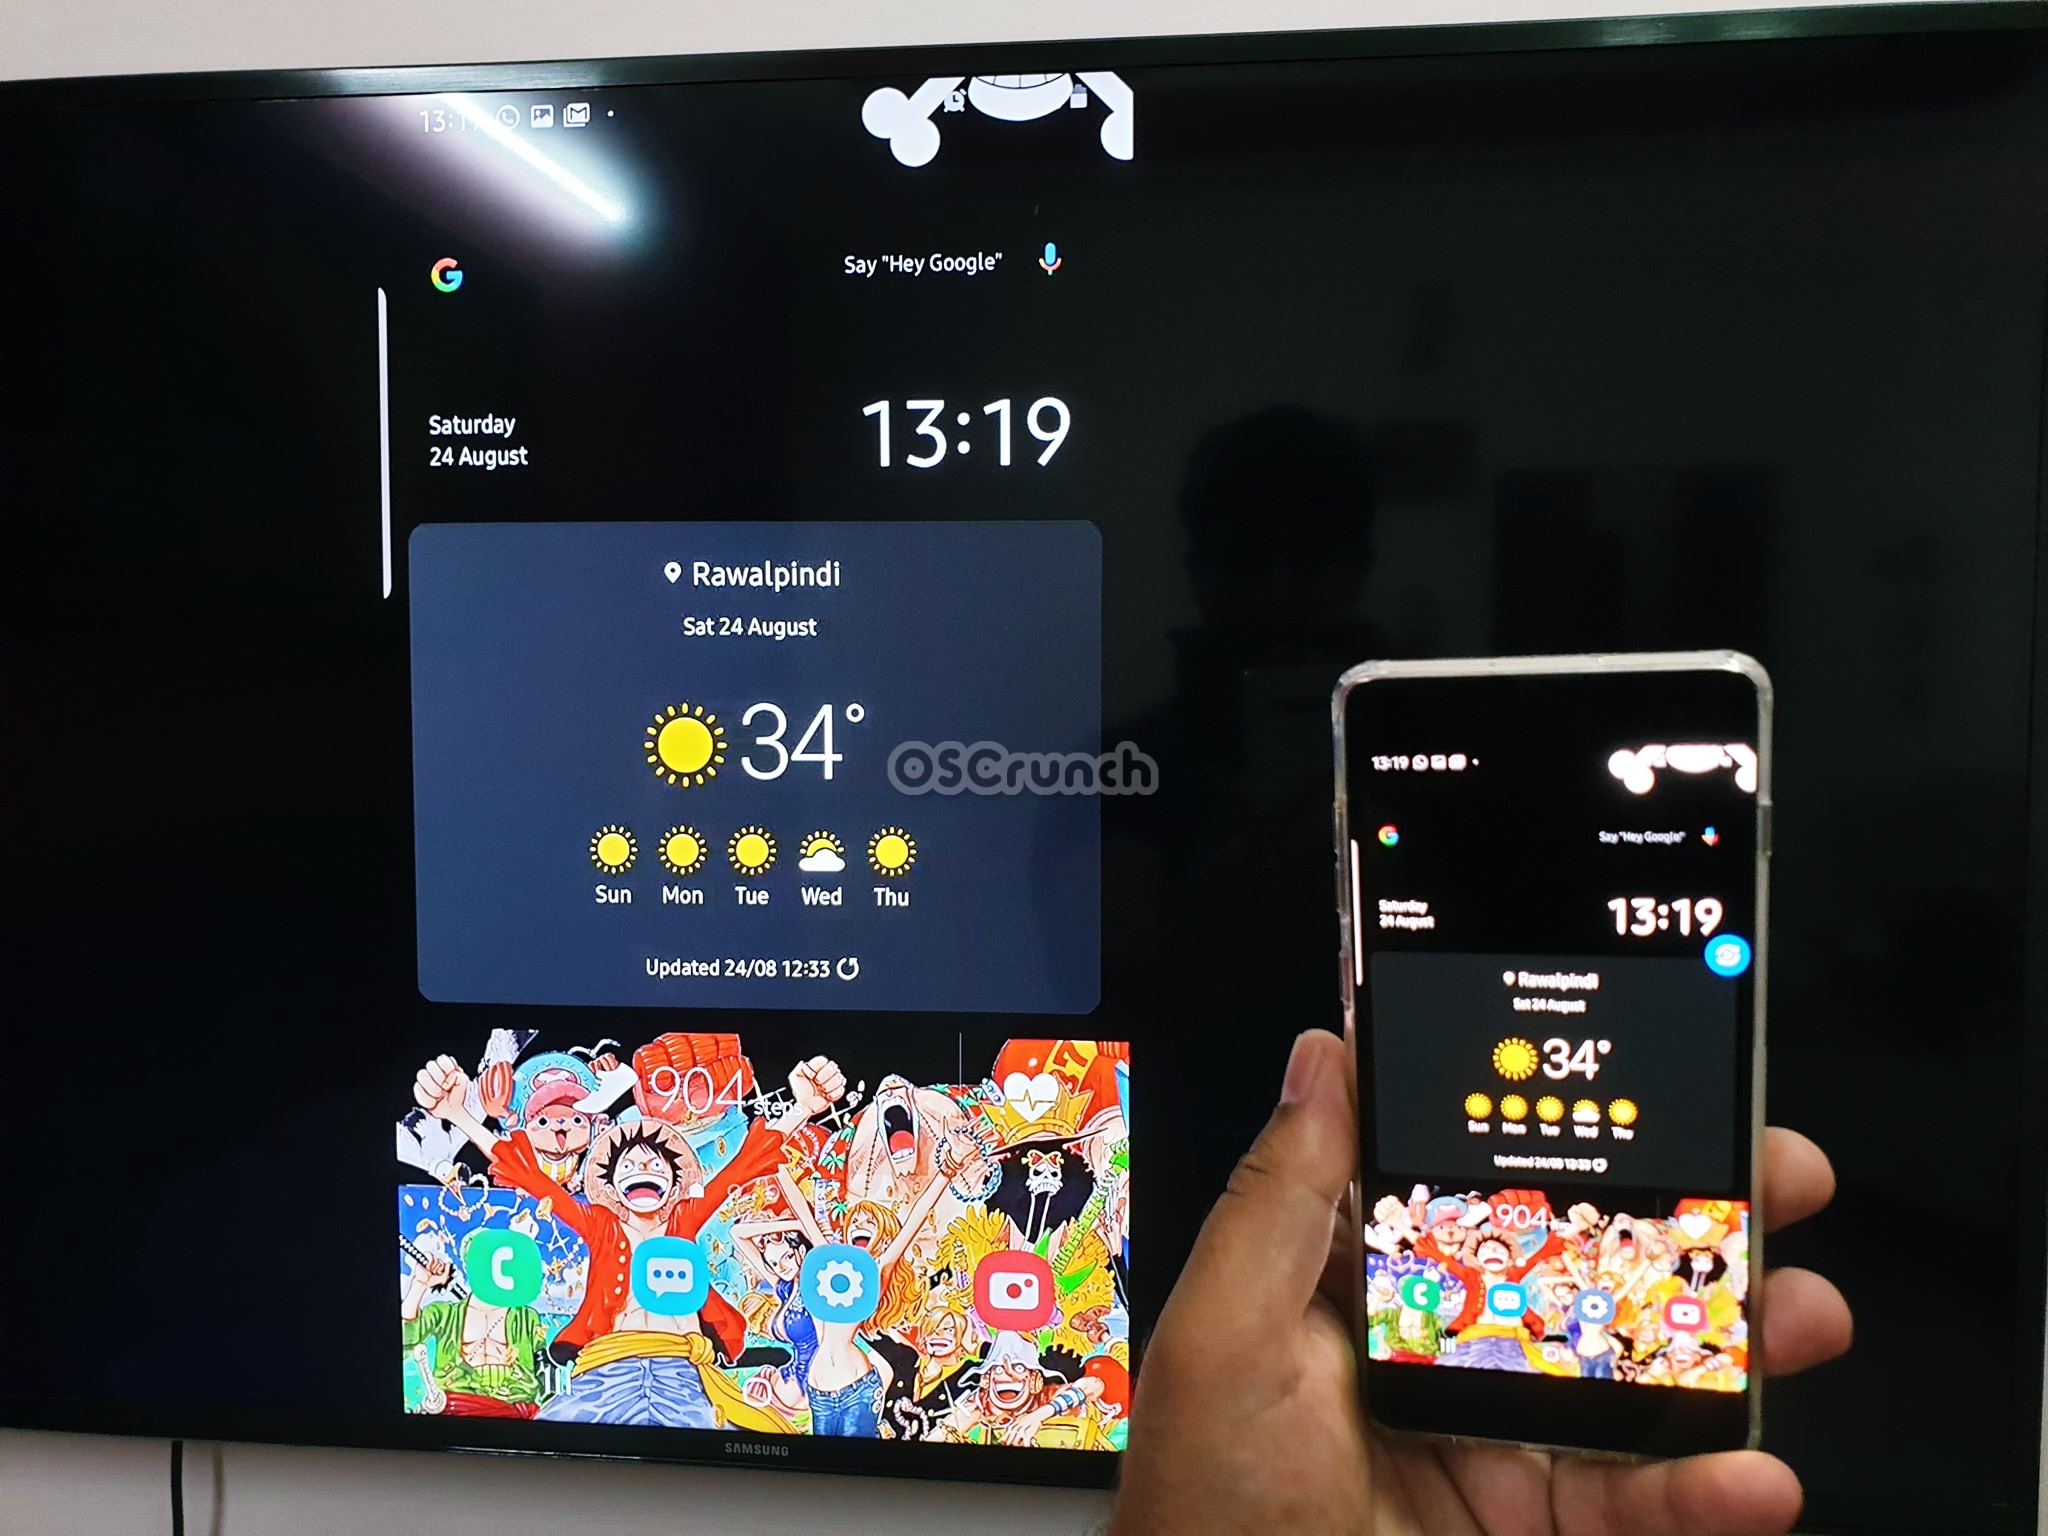
The TV will also whether or not you want to allow the phone. Click on Yes/Allow. The screen will be mirrored now. That’s all.Note 10 connected to Smart TV

To disconnect, simply turn off Smart View on your phone.

That’s all. I hope you guys found this guide helpful. If you have any questions, feel free to reach out to me through the comments section below. I will try my best to get back to you as soon as possible.

More Galaxy Note 10 guides:

Download Unc0ver 3.6.3 IPA – Jailbreak iPhone XR, XS, and XS Max

0
Download Unc0ver 3.6.3 IPA – Jailbreak iPhone XR, XS, and XS Max

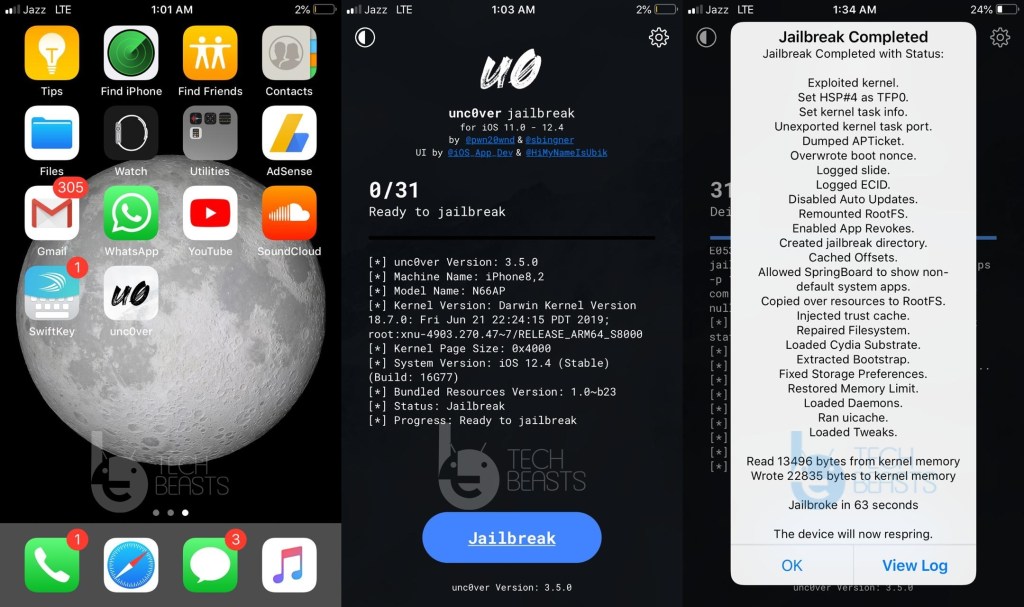
Here is the Unc0ver 3.6.3 IPA. Unc0ver 3.6.3 can Jailbreak iPhone XR, iPhone XS, XS Max and other devices powered by A12 Bionic soc. Remember that the Unc0ver 3.6.3 is compatible with iOS 12.4 and below only.

Update 9/10/2019: Unc0ver 3.6.2 and the latest Unc0ver 3.6.3 are out now. You can download the newest version from below.

Update 9/9/2019: Unc0ver 3.6.1 is now out. The new version fixes all the bugs that existed in Unc0ver till date. It makes the Jailbreak process smooth and more stable. The new version also brings a new interface.

Update: The latest Unc0ver 3.5.6 is out now. The new version supports iOS 12.4 on all A7 – A11 and A12/A12X devices. These fixes Read/Write issues for the File System as well.

Unc0ver 3.5 & 3.6

First of all, in case you are not familiar, the Unc0ver is the famous Jailbreak tool that installs Cydia on your device. A couple of months back, the Unc0ver 3.3.0 came out that Jailbroke iOS 11, iOS 12.1 and iOS 12.2 powered devices. That version of Unc0ver supported the devices powered by A7 – A11 chipsets. The latest version of iOS back then was iOS 12.3. Users who were already on the older version of iOS got a chance to enjoy Jailbreak. The iPhone XR, XS, and XS Max users were left out as their chipset wasn’t supported.

Unc0ver 3.5.5 IPA

A few days back, the Unc0ver 3.5.0 came out. The developer took it to twitter to announce the break the big news. The Unc0ver 3.5.0 was the biggest Unc0ver update ever as it supported the public stable version of iOS. After a number of years, a current active iOS version was Jailbroken for the first time. Unc0ver 3.5.0, with the help of SockPuppet3 exploit, supported iOS 12.4 Jailbreak on all A7 – A11 iPhones and iPads.

At this point, we were one more step close to getting the Jailbreak support for A12 Bionic-powered devices. This includes the latest iPhone XR/XS/XS Max and the new iPads as well. Pwn20wnd did release the Unc0ver 3.5.3 with partial support for iOS 12.4 on A12 devices, but partial support means no Cydia and it breaks a lot of other things.

Just today, the developer announced Unc0ver 3.5.5, which again is a piece of big news. The Unc0ver 3.5.5 now fully supports all A12 devices. It also fixes all previous bugs. It means that you can now Jailbreak iPhone XR, iPhone XS, and iPhone XS Max.

The Unc0ver 3.5.5 IPA is already there. You can download the Unc0ver 3.5.5 IPA from here and sideload it using Cydia impactor.

Update:Download Checkra1n 0.9.1 – Jailbreak iOS 13.2.2

Download Unc0ver 3.6.3 IPA

Download Unc0ver 3.6.2 IPA

Download Unc0ver 3.6.1 IPA

Download Unc0ver 3.6.0 IPA

Download Unc0ver 3.5.6 IPA

Download Unc0ver 3.5.5 IPA

Now you can follow this guide to Jailbreak iOS 12.4 using Unc0ver 3.5.5.

That’s all. If you have any questions or queries, feel free to reach out to us. I will try my best to get back to you as soon as possible.

Samsung Galaxy Note 10 Hard Reset, Download Mode, Recovery Mode, Safe Mode, USB Debugging & More

1
Samsung Galaxy Note 10 Hard Reset, Download Mode, Recovery Mode, Safe Mode, USB Debugging & More

Here is the guide to perform Samsung Galaxy Note 10 hard reset, enter download mode, recovery mode, safe mode, enable USB Debugging, OEM Unlocking & more.

Samsung Galaxy Note 10 Hard Reset, Download Mode, Recovery Mode, Safe Mode, USB Debugging & More

Galaxy Note 10 and Note 10 Plus are the two best flagship devices at the moment. The South Korean giant has once again managed to impress masses with the new devices. Note 10 and Note 10+ have a lot of industry-altering features. Samsung has indeed given a new challenge to all the phone makers out there to take innovation to a whole new level.

Note 10 and Note 10 Plus have started making it to the users today. The phones have been released in over 70 countries today. The moment Galaxy Note 10 owners got their hands on the devices, they started experimenting too. As a matter of fact, the Note 10+ has already been rooted by Dr. Ketan.

If you are a power user who can’t keep himself from unleashing the real potential of the device, you’re gonna have to master all the modes. Even if you’re not an advanced Android user, you still need to learn certain things about your phone.

Down below, I have listed the most important modes of the Galaxy Note 10 and Note 10 Plus. You will keep encountering the need for using one of these modes in your day-to-day use. These modes include the Galaxy Note 10 Download Mode, Recovery Mode, Hard Reset & Factory Reset, Safe Mode, USB Debugging, OEM Unlocking, and many other modes.

Take a look at all the steps one by one to learn about these features.

Update: I have added the video tutorials at the end of this post.

Turn on Power Button on Galaxy Note 10

  1. On the Note 10, pull down the notifications panel.
  2. Click on the Power button which is right next to the Settings icon.
  3. Now click on the Side Key settings.
  4. Set the Side key to Power menu.
  5. Your Side Key will act as Power button now.

Reboot Galaxy Note 10 into Recovery Mode

  1. Turn off Samsung Galaxy Note 10 completely.
  2. Press and hold Volume Up + Power button simultaneously for a few seconds.
  3. As the phone vibrates, let the keys go.
  4. You will see the phone boot into the recovery.
  5. Galaxy Note 10 or Note 10 Plus Recovery Mode will now show you all the options.
  6. In the recovery mode, you can use Volume Up & Down to move up/down and Power button to make a selection.

To get out of the recovery mode, simply select the “Reboot to system now” option, press Power button > select Yes and press Power button again.

How to Hard Reset Galaxy Note 10 & Note 10 Plus

  1. Reboot the Galaxy Note 10 into the Recovery Mode.
  2. Using the Volume Down button, highlight “wipe data/factory reset”.
  3. Press Power button to enter now.
  4. Use Volume Down to highlight “Yes” and press the Power button to wipe the data.
  5. After wiping the data, reboot to the system. Your phone will be hard reset and factory reset.

Factory Reset Galaxy Note 10 and Note 10 Plus

You can either use the Hard Reset method to factory reset or use the steps given below as well.

  1. On your Note 10 or 10 Plus, go to Settings > About Phone.
  2. Locate Reset option at the bottom of the screen and open it.
  3. Now click on “Factory data reset”.
  4. Read all the data contents that the Factory reset will wipe and scroll down to click on “Reset” again.
  5. The phone will ask for Pin or Password if you have set any.
  6. Enter the Pin/Password now to start the process.
  7. The data and settings will be wiped and your phone will restart on its own. That’s all.

How to wipe cache partition of Galaxy Note 10

  1. Reboot Galaxy Note 10/10+ into the Recovery Mode.
  2. Use Volume Down to select “wipe cache partition”.
  3. Press the Power button to enter.
  4. Press Volume Down to select Yes and Power button to wipe cache. That’s all.

Reboot Galaxy Note 10/10+ into Download Mode without a computer

  1. Reboot Galaxy Note 10 into the Recovery Mode.
  2. In the Recovery Mode, press Volume Down twice to select “Reboot to bootloader”.
  3. Now press the Power button to enter the bootloader.
  4. As the phone boots up and shows a warning, press Volume Up to continue.
  5. You will now see “Downloading” on the screen which means you are in the Download Mode. That’s it.

How to enter Galaxy Note 10 Safe Mode

  1. Turn off the Galaxy Note 10/10+ completely.
  2. Now turn on the phone.
  3. As soon as the phone vibrates and shows you Samsung animation, press and hold the Volume Down button.
  4. Keep the key pressed until you see the home screen.
  5. As you enter the home screen, let the key go.
  6. You will now find “Safe Mode” watermark on the lower-left corner of the screen.
  7. All the third-party apps are now disabled. 

To get out of the Safe Mode, just reboot the phone.

How to enable Developer Options on Note 10

  1. On the Note 10, go to Settings > About phone > Software Information.
  2. Tap the Build number for 7 times to activate the Developer Options.
  3. The Developer Options will appear below About phone in the settings now. That’s all.

Enable USB Debugging Mode on Galaxy Note 10

  1. Open Settings on the Note 10/10+.
  2. Scroll all the way down and open Developer Options.
  3. The 14th option in the Developer Options is the USB Debugging. It is the first option under “Debugging”.
  4. Tap the toggle next to USB debugging to turn it on. That’s it.

Enable OEM Unlocking on Galaxy Note 10/10+

  1. On the Note 10 phone, go to Settings > Developer Options.
  2. The 6th option in the Developer Options is OEM Unlocking.
  3. Tap the toggle next to OEM Unlocking to turn it on.

How to turn on Night Mode on Note 10

  1. Pull down the notifications panel on the Note 10.
  2. Expand the notifications panel now.
  3. Go to the 2nd screen of quick toggles.
  4. The last option on the 2nd screen of quick toggles is Night Mode.
  5. Tap the Night Mode button to turn it on. The same button will turn it off too.

How to Take Screen Shot on Galaxy Note 10

  1. Open any page whose screenshot you want to capture.
  2. Press the Power and Volume Down button at the same time to capture screen.
  3. Captured screenshots will go into the Screenshots folder in Gallery.
  4. Alternatively, you can swipe your palm on the screen to capture.
  5. To capture a scrolling screenshot, you must open a compatible page that is lengthy. Capture the screenshot and press the scroll down button take a scrolling screenshot. That’s all.

Here is my video on how to Soft Reset, Hard Reset, Boot into the Download, Recovery Mode & Wipe cache on Note 10.

Video demonstrating the guide written above.

Video on how to take screenshots on Note 10

Video on how to take screenshots on Note 10 & Note 10 Plus

Here over 30 Tips & Tricks for the Galaxy Note 10 & Note 10 Plus

That’s all with the quick Galaxy Note 10 and 10 Plus tips. I hope you guys found this guide useful. If you have anything to add to this guide, feel free to drop it in the comments below.

More: Guide to install stock firmware on Galaxy Note 10 Plus

Samsung Galaxy Note 10+ has already been rooted

0
Samsung Galaxy Note 10+ has already been rooted
Galaxy Note 10+ Rooted

Ladies and Gentlemen! The Samsung Galaxy Note 10 and Note 10+ have made it to the customers in over 70 countries today. It’s just been a few hours only since the Note 10 owners started getting their hands on the device. The famous XDA-Developer and our dear friend Dr.Ketan has already rooted the phone.

Galaxy Note 10+ Rooted

You heard it right. The Galaxy Note 10+ is already rooted. Dr Ketan has achieved the root with the help of System-as-root method. This method was put up by Topjohnwu, the developer of Magisk.

That being said, I have personally spoken to Dr Ketan asking about Magisk support. The Note 10+’s root comes with complete Magisk support right now.

As far as the TWRP custom recovery is concerned, there is no word about it. Samsung hasn’t released the Kernel Source Code for the Galaxy Noet handsets which means the custom recovery will be delayed for a while. As soon as the developers get their hands on the Kernal Source Code, we will get the TWRP recovery too.

Dr.Ketan is currently working on compiling the Galaxy Note 10+ root guide. The guide will be up in a bit and we will have it on our site too.

To know more about the Galaxy Note 10, check out the Note 10 section on our site. If you have anything to say, feel free to use the comment section below.

Guide to install stock firmware on Galaxy Note 10 Plus

2
Guide to install stock firmware on Galaxy Note 10 Plus

This is the step-by-step guide to install stock firmware on Galaxy Note 10 and Note 10 Plus. The guide discusses both the Odin and Smart Switch methods.

Samsung Galaxy Note 10 and Note 10 Plus are two incredible devices. In fact, if you go after the best Android smartphones right now, you should find these two at the top of the list. The Note phones originally started off as phablets, but the culture of bigger phones transformed note into a smartphone too. The iconic S-Pen is what helps Note series standout. 

install stock firmware on Galaxy Note 10

Its been a couple of weeks since Samsung released the new Note handsets. The Galaxy Note 10 and Note 10 Plus is all set to make it to the users starting today. Fortunately, the stock firmware files of both the Note 10 and Note 10 Plus are also up now.

Soon after getting your hands on the new Note 10, you may want to unleash the full potential of the device. There will be many situations when you will have to restore your handset to its factory settings or you may simply have to flash new stock firmware to restore the phone to a working state.

Samsung changes something with every new phone, which is why new methods have to be crafted to sideload firmware. Same goes for the Galaxy Note 10 and Note 10 Plus. Although nothing much has changed here, you still need a proper guide to install stock firmware on Galaxy Note 10.

This is exactly why I’m putting this guide together today. I’m going to show you the complete steps to install stock firmware on Galaxy Note 10 Plus and Galaxy Note 10. Before I begin with the guide, let me help you get familiar with other terms that people use for stock firmware.

Stock firmware is also referred to as a stock ROM. Some people call it Factory Firmware and many users call it the stock software of the device. The terms stock ROM, stock firmware, factory firmware, stock software all mean the same. There is no need to get confused with anything there.

Allow me to tell you all the situations that the stock firmware will help you with on your Galaxy Note 10/Plus.

The need for Galaxy Note 10 stock firmware

  • Install stock ROM on Galaxy Note 10 will factory reset it.
  • It can also fix performance and battery drain issues sometimes.
  • The stock software on Note 10 will unroot the device from a rooted state.
  • A bricked Galaxy Note 10 can be fixed by flashing the stock firmware.
  • If you want to update your phone manually to a higher version of Android, you can use this manual method. You would need the latest firmware file for this purpose.
  • In case your region is slow on getting newer Android versions, you can manually flash it with the help of the guide below.
  • If you are planning of hard-resetting your Note 10, you may find this guide useful.

Methods to install stock firmware on Galaxy Note 10

There are two different methods to achieve the goal of flashing stock software. 

The first method is the use of Odin, which is the Samsung Flashtool. This method is much better than the Samsung Kies method as it gives you the edge to perform all the operations listed above. The Odin method is a bit more complex and it is for advanced users. With the guideline given below, you can ignore the advanced part and follow the instructions properly to master this method.

The 2nd method is through Samsung Smart Switch. The Smart Switch is sort of a Samsung PC Suite for Windows and Mac. This method will help you to restore your phone from an emergency state or it will find OTA updates inside your region.

Let’s take a look at the first method. You need to make a few preparations for that.

Preparations

  1. This guide is only for Galaxy Note 10 and Note 10 Plus.
  2. Charge the phone up to 50% prior to flashing the firmware.
  3. Backup each and everything on your phone.
  4. Enable OEM Unlocking on the Galaxy Note 10.
  5. Also, enable the USB Debugging mode on your Note 10.
  6. Use the original data cable to connect your phone to the computer.
  7. Disable Windows Firewall or any Antivirus while you use Odin.
  8. Make sure the Smart Switch is not open when you are on the Odin screen.
  9. Follow the remaining instructions carefully.

Downloads

  1. Install Samsung Android USB Drivers – Download
  2. Extract Odin 3.13.1 to get Odin3.exe – Download
  3. Download Firmware for Note 10 or Note 10 Plus
    1. On the firmware page, enter the model number of your phone i.e. N970F/DS, N970U1, N97N or N975F/DS, N975U1, or whatever is the model number of your device.
    2. Download the latest firmware file for your region or any specific firmware you want.
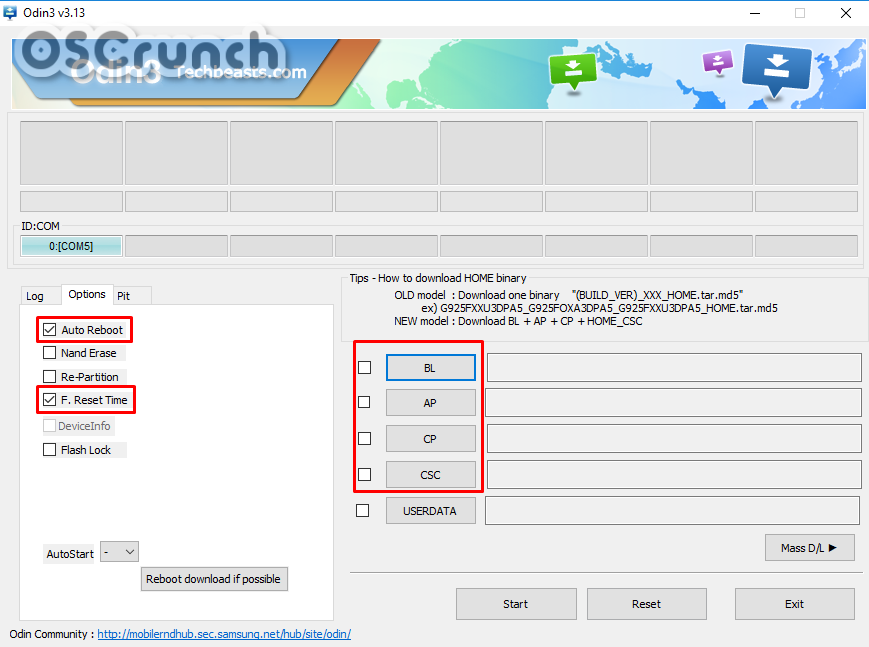
    3. Extract the firmware to get the BL, AP, CP, CSC, and Home_CSC files.
Firmware files – Image used for reference only.

Guide on how to install stock firmware on Galaxy Note 10

These are the steps to manually install stock firmware on Galaxy Note 10 and Note 10 Plus via Odin.

Total Time: 10 minutes

Open Odin3.exe on your computer.

From the extracted Odin files, open Odin3 v3.13.1.exe file to access the flash tool. You will see Tabs and Options now. Click on Options and make sure that only options selected are F.Reset.Time and Auto-Reboot.

Add BL, AP, CP, CSC or Home_CSC files to Odin.

In Odin, click on the BL tab and select the BL file. Add the AP file to the AP tab. In the CP tab, select the CP file. In the CSC tab, select the CSC file if you want to factory reset, select the Home_CSC file otherwise.Galaxy Note 10 Stock Firmware Setting Up Odin

Connect Galaxy Note 10 or 10 Plus to the computer.

Power down your Note 10/10+. Reboot Galaxy Note 10/10+ into Download Mode now and connect it to the computer. Odin will show a Blue light in the ID:COM and also show “Added” in the logs.install stock firmware on galaxy note 10

Click on Start and let it flash the firmware.

Now click on the Start button. The progress will show up in the logs and also in the very first box and a bar of Odin.

Disconnect the phone and set it up. That’s all.

In about 7 minutes, the flashing will come to an end and the phone will restart on its own. Disconnect the phone and set it up. That’s all.Note 10 Odin flashing ended

It’s time to take a look at the 2nd method i.e. the Smart Switch method. As mentioned earlier, this method is for updating the phone or for recovering the phone from an emergency state. For the most part, it’s a self-explanatory method, but let me give you an idea in a few steps.

Update Galaxy Note 10 or Note 10 Plus via Smart Switch

  1. Install Smart Switch on your Windows or Mac computer: Download.
  2. Open Smart Switch on the computer.
  3. Connect Note 10 to the computer.
  4. If the phone shows any permission, allow it.
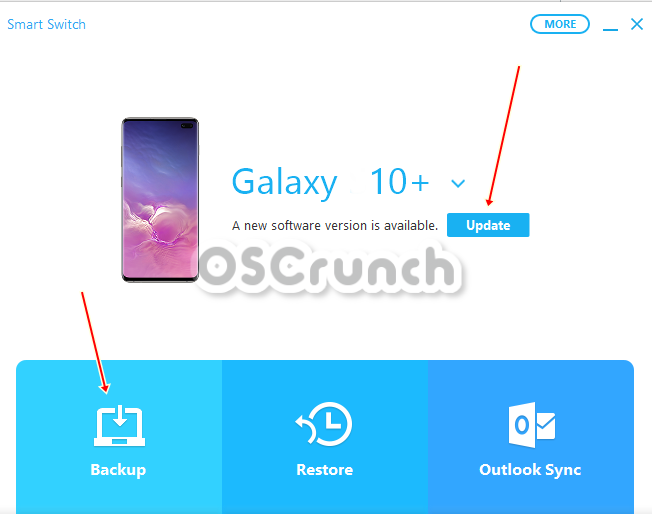
  5. Smart Switch will detect the phone and find latest software update.
  6. If there is an update available, click on update.Note 10 Software Update via Smart Switch
  7. The update process will show you a disclaimer, read it carefully, create all the backups and start it.Note10 update via Smart Switch
  8. The update will take its time. Grab a popcorn and watch it happen. That’s all.

Galaxy Note 10 Emergency Software Recovery via Smart Switch

  1. Open Smart Switch on the computer.
  2. Connect Note 10/10+ to the PC.
  3. Click on the Settings Gear icon in Smart Switch > Emergency Software Recovery.
  4. The tool will now detect if any previous update was failed and show you the recovery logs.Galaxy Note 10 Emergency Software Recovery
  5. You can also enter the recovery code to begin the recovery process. That’s all.

That’s pretty much it with the new firmware installation on the Galaxy Note 10 or Note 10+. I hope this guide helped many of you. If you have any questions or queries, feel free to drop a word in the comments section below.

Play DivX/XviD videos on Android device [ Best Players ]

0
Play DivX/XviD videos on Android device [ Best Players ]

Those who want to play DivX/XviD videos on Android devices. This the post you were looking for, we all know that all video and media files come in different formats. The makers have to be careful with formats so that it can be playable on different devices, that is why they use codecs like DivX, XviD, H.264 to compress such files.

DivX/XviD videos on Android

But smartphones don’t support such codecs, we cannot play DivX/XviD videos on smartphones particularly on Android. Moreover, our stock video players don’t support codecs like DivX, XviD, and H.264. However, there are some players that will allow you to play DivX XviD videos on Android. Following is the list of all Android Video Players which will allow you to play DivX, XviD, H.264 videos on Android.

Edit Videos Like A Pro With Wondershare Video Converter Ultimate

Play DivX/XviD videos on Android device:

I have tested a number of apps and after carefully reviewing all the apps. I have selected the top 3 video players which will let you play DivX/XviD videos on Android device. So let’s get going now.

VLC:

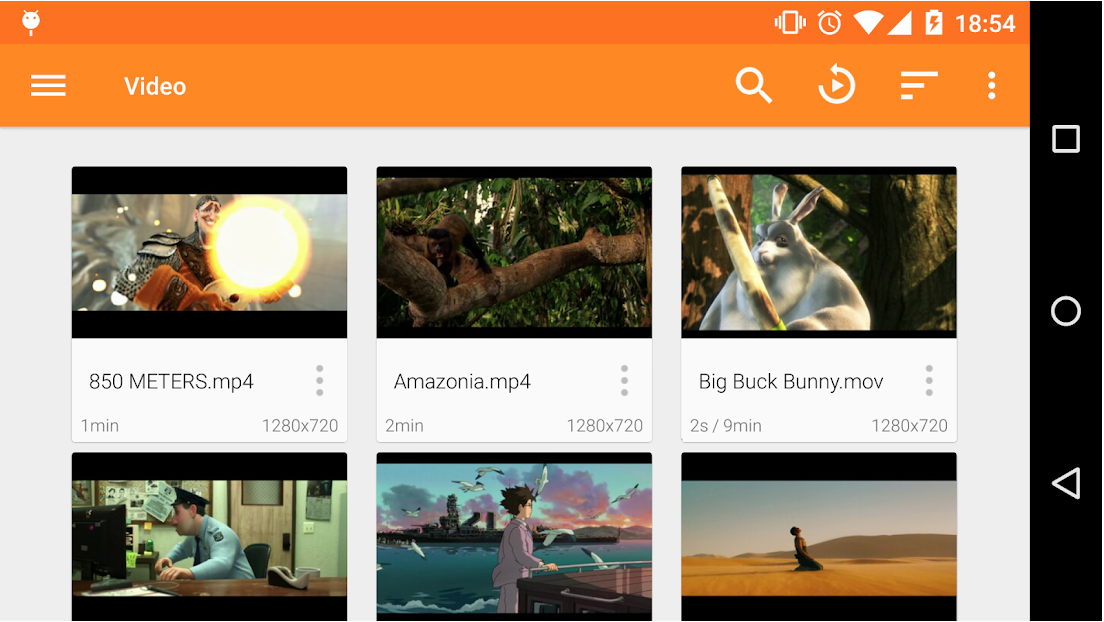
VLC is my best and first option when it comes to playing any special video format. VLC would the one which doesn’t require any special codec package installation. VLC is available for free, it supports all the Android versions and all the Android Platforms.

DivX/XviD videos on Android

Moreover, VLC comes with built-in support for DivX and XviD compressed videos. So all you have to do open VLC on your Andorid device and select the DivX/XviD videos. It doesn’t stop here, VLC provides you a variety of options, such as you can change the playback parameters, audio compression formats, codecs, etc.

VLC for Android
Price: Free

MoboPlayer:

Let’s get a bit technical now. MoboPlayer is my second option and this a full package. You will be surprised to know that MoboPlayer offers instant playback of any video format, that includes DivX/XviD. Not only that, it doesn’t convert the video, it simply plays them. It doesn’t matter which format you are playing.

com.clov4r.android.nil.noplug

MoboPlayer easily encodes and decode all the videos formats along with DivX/XviD. Moreover, this is not it for MoboPlayer, you can also stream videos for free, all you need is the feed URL of the stream. MoboPlayer is available on Google Play for free but it contains Ads, don’t worry they are not annoying.

MoboPlayer
Price: Free

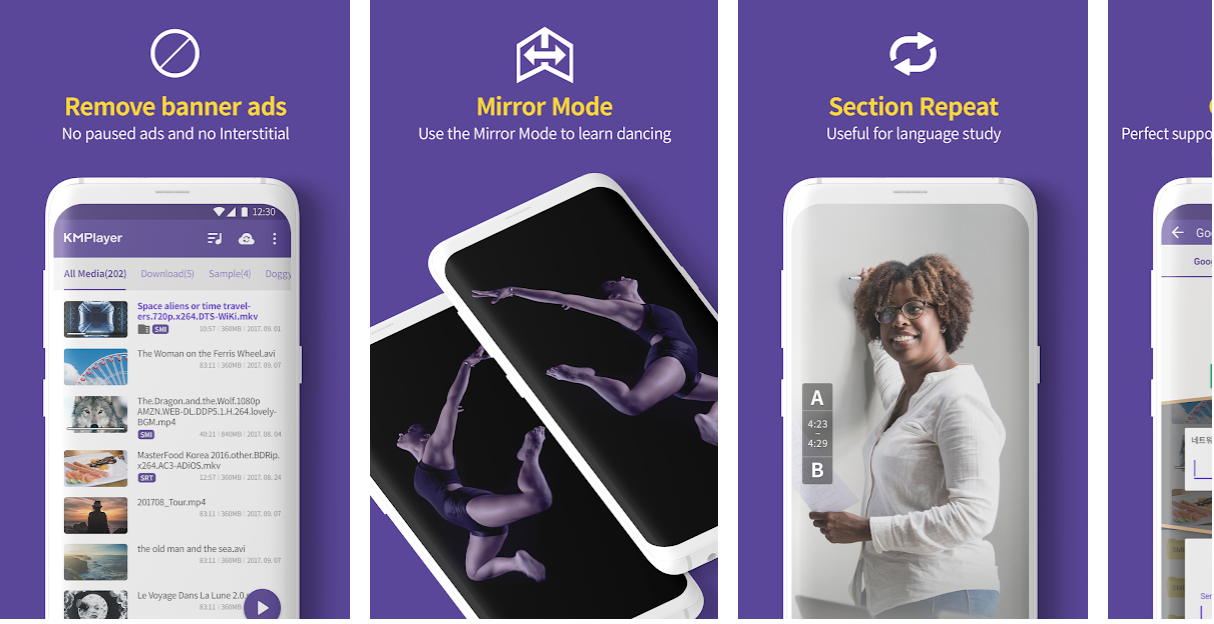
KMPlayer:

You all are well aware of KMPlayer which was available for PC and now you can download KMPlayer on your Android devices. Since I have used it on my PC and it worked flawlessly, I always recommend KMPlayer. Believe me, KMPlayer hasn’t disappointed me on Android too.

com.kmplayer

You can watch videos in any format, play DivX/XviD videos on Android, it supports all the formats. Also, it allows you to encode your video at the highest quality. But there is one and the only drawback, it contains Ads and they really mess up things while you are watching videos.

Other than that, KMPlayer does a pretty good job when you want to play DivX XviD videos on your Android phones. Like all the other player KMPlayer does offer playback speed, subtitle control, audio delay, etc. Moreover, KMPlayer has one really nice feature which is called PIP ( Picture-in-picture ) nowadays.

That’s all for today, I hope you will enjoy reading this article because now you have the best players to play DivX/XviD videos on Android device. Do let me know what you think.

How to unjailbreak iOS 12.4 – Remove Cydia/Sileo & Unc0ver/Chimera

9
How to unjailbreak iOS 12.4 – Remove Cydia/Sileo & Unc0ver/Chimera

This is the guide to unjailbreak iOS 12.4 and to remove Cydia/Sileo & Unc0ver/Chimera from your iPhone or iPad.

Its been 2 days since the release of Jailbreak for an active public version of iOS. The Unc0ver 3.5.0 and Chimera 1.3.3 have allowed users to Jailbreak iOS 12.4 powered devices. Jailbreak users have successfully Jailbroken devices as old as iPhone 5 and as new as iPhone XS Max. Jailbreak, to the advanced iOS users, is like a cherry on the cake. But that doesn’t mean the same goes for average iOS users. If you recently Jailbroke your iOS 12.4 iPhone or iPad and your device has been acting weird since then, it’s time to unjailbreak it.

unjailbreak iOS 12.4 - Remove Cydia/Sileo & Unc0ver/Chimera

Unjailbreaking an iOS 12.4 device is a very easy method. The method actually lies withing in the Jailbreak tools. New Jailbreakers don’t really have an idea of what they are up to which is why they sometimes find it a bit troubling to unjailbreak their devices. Your quest to unjailbreak iOS 12.4 powered iPhone/iPad should come to an end as soon as you land on our page. I’m going to show you the steps to unjailbreak iOS 12.4. I will also show you how you can easily remove Cydia/Sileo and also how to uninstall Unc0ve and Chimera.

In case you are interested, unjailbreaking your iOS device mans restoring the root file system. This restores each and every modification on your iPhone. When your iPhone is Jailbroken, it doesn’t allow OTA updates and certain other features can crash too. Unjailbreaking the device restores all stock code and settings. This will make your iPhone or iPad function in the normal way once again.

Another thing to note here is that many users opt for a new firmware installation via iTunes in order to unjailbreak. That lengthy method isn’t needed anymore. The new Unc0ver and Chimera tools give you the option to unjailbreak on the go. Things have become much more convenient today.

Without any further talk, let’s take a look at the steps now.

Update:Download Checkra1n 0.9.1 – Jailbreak iOS 13.2.2

Unjailbreak iOS 12.4 – Remove Cydia/Sileo & Unc0ver/Chimera

These are the few simple and easy steps to unjailbreak iOS 12.4.

Total Time: 2 minutes

Open Unc0ver or Chimera on the iPhone.

On the iPhone, open Unc0ver and go to its Settings (Gear icon on the top-right corner) and enable the “Root FS” option.
For Chimera, click on the “up-arrow” appearing at the bottom and click on Restore Root FS under “Having trouble”.

Restore Root FS on Unc0ver or Chimera now.

Open Unc0ver or Chimera on the iPhone and click on the “restore root FS or Restore FileSystem” options. The unjailbreak process will start.

Cydia and Sileo Apps will be gone now.

As the unjailbreak process comes to an end, your iPhone will restart on its own. After this, you will see that Cydia or Sileo apps have disappeared from the phone now.

Uninstall Unc0ver or Chimera now.

Go to apps and long-press the Unc0ver or Chimera icon and then click on uninstall. Restart your iPhone or iPad after uninstalling.

Congratulations, your iOS 12.4 is unjailbroken now.

You have successfully performed the iOS 12.4 unjailbreak processes. Your iPhone is back to its stock settings now. You can update it or perform any other activity that wasn’t previously working because of Jailbreak.

That’s all. I hope you guys found this guide helpful. If you have any questions/queries, feel free to reach out to us. I will get back to you as soon as possible.

Guides:

Last Updated: 26th October 2019