Deleting apps from Samsung Smart TV is a fairly simple process. Because the uninstall/delete option resides under settings of the apps, finding it can be a bit tricky. Owners can use this guide to delete Apps from Samsung Smart TV.
Delete Apps from Samsung Smart TV
These are the simplest steps to uninstall or delete Apps from Samsung Smart TV.
Total Time:1 minute
Turn on Smart TV and go to Smart Hub.
Plugin the switch of your TV and turn it on. Using the remote, enter the Smart Hub.
Open Apps in the Smart Hub.
In the Smart Hub, press the right button of the remote twice to select Apps and then press enter/ok.
Click on the Settings Gear Icon in the Apps.
Now highlight the Settings Gear icon appearing on the top-right corner and then press enter/ok to enter settings. You will see a list of all of your installed apps now.
Select the application you want to delete.
Using the arrow keys on your remote, highlight/select the application you want to remove from the TV.
Open App options and delete it. That’s all.
Press the arrow-down key to access options of that app. Highlight Delete and press ok/enter to delete it. That’s all.
That’s all with this quick tutorial. I hope you guys found this useful. If you have any questions or queries, feel free to reach out to us. Thank you.
This is the guide on how you can install Apps and Games on Samsung Smart TV. This guide is valid for all Samsung Smart TVs that run on the Tizen OS.
Samsung is the industry leader of the Display market. The company has been doing well in all of its display segments. Be it the smartphone display, displays of smart gadgets, or the screens of the TVs, Samsung tops all the segments.
The company has an impressive lineup of Smart TVs under its umbrella. Back in the day, the Samsung Smart TVs did not come with a properly operating system. The TVs didn’t support a large number of apps either. Samsung introduced its Tizen OS for smart devices. The Tizen OS later became the primary OS of Samsung Smart TVs only. As of now, the Tizen OS is a part of almost all new Samsung Smart TVs.
Tizen OS on Samsung Smart TVs has its smart hub. The smart hub has its app store. There are nearly 450 applications in the Samsung smart hub store.
The Samsung Smart TV apps include video apps, music & radio, entertainment, news, productivity apps, and there are dozens of games too.
Smart TVs do not allow side-loading of apps from an external source. If you own such a TV and you are on the lookout for a way to install apps, then let me tell you that you have very limited options.
Although the apps are very limited, there are some really good applications. For example, you can find the Plex app in the Smart Hub. Hulu app is also there. Netflix, Daily Motion, Vimeo, and many other streaming services are added to the Tizen store. You can take a look at the complete list of Samsung Smart TV Apps here.
For now, our goal is to install Apps and Games on Samsung Smart TV. Take a look at the steps below to get it done.
Install Apps and Games on Samsung Smart TV
These are the steps to install apps and games on Samsung Smart TV.
Turn on Smart TV and enter Smart Hub
Plug-in your TV’s switch and then press the power button on the remote to turn it on. As the TV turns on, select the Smart Hub and press the big ok/enter button in the center of the remote to enter.
Enter the Apps menu from the Smart Hub screen.
As you see options on the Smart Hub screen, press right-key of the remote twice to select Apps. Press the enter/ok button to access apps now.
Choose the category of apps you want to install i.e. Video/Games
You will see categories of apps now. Open the apps from their respective category, editor’s choice, or the games if you want to install them.
Open the application and click on Install.
Now choose the app/game you want to install and press ok/enter. Select Install in the app’s description and then press ok/enter to install it. If the TV asks for login, enter your Samsung ID details. You can create a new ID too if you don’t have an existing one.
Launch the installed app/game from the smart hub.
The installed app/game will appear on the home screen of the Samsung Smart TV’s smart hub. Open it and enjoy. That’s all.
That’s all. For any questions/queries, feel free to reach out to us through the comments section or through our contact us page.
Here is how to fix iOS 12.4 Jailbreak Unc0ver Crashing at Stages 8/31, 2/31, and Cydia Crashing.
Back in the day when hackers successfully Jailbroke iOS 12.2, Apple released iOS 12.3 patching the loopholes. Fortunately or unfortunately, Apple unpatched the same vulnerability in iOS 12.4. This loophole turned out to be a blessing in a disguise making iOS 12.4 the first public-facing iOS version to be Jailbroken in years. The developer of the famous Unc0ver tool, pwn20wnd took it to twitter to announce the successful Jailbreak of iOS 12.4. Later on, Chimera developers followed in the footsteps of Unc0ver and released Chimera 1.3.3 with support for iOS 12.4.
Unc0ver’s version 3.5.0 first Jailbroke all A7 – A11 iPhones and iPads on iOS 12.4. The tool was later updated to 3.5.1, 3.5.2, and then 3.5.3. The first two updates were all about bug fixes. Unc0ver 3.5.3 was a major update as it added support for A12 devices. The Unc0ver tool partially supported iPhone XR, XS, and XS Max along with a couple of new iPads. Jailbreak users warmly welcomed the Unc0ver 3.5.3, but unfortunately, it brought with itself a lot of trouble.
If you have been having trouble Jailbreaking your iPhone or facing issues with Cydia, it might have to do with the version of Unc0ver on your phone.
Unc0ver 3.5.3 crashes at Stages 8/31, 2/31. Furthermore, the Cydia application opens and closes on its own. The first two issues are completely related to the Unc0ver version and the last one can be fixed with the help of a simple solution. Let’s take a look at all the solutions one by one.
Unc0ver crashing at stage 8/31 Debugging Exploit Crash/Reboot
The 8/31 error pops up when you press the Jailbreak button in the Unc0ver app. When the process reaches 8/31, it comes encounters the debugging exploit crash which reboots the iPhone. Fixing this error doesn’t require any rocket science. All you have to do is to get the Unc0ver 3.5.2 IPA to install via Cydia Impactor. Uninstall 3.5.3 and then install 3.5.2. The Jailbreak process should go smooth with the previous Unc0ver version.
The Unc0ver 3.5.3 is a completely unstable version at the moment. The bugs have forced the developer to take this version down already. At the time of writing this, the latest stable version of Unc0ver is 3.5.2. The 3.5.3 also caused the 2/31 error during the Jailbreak process. This error also force reboots the iPhone. To successfully Jailbreak iPhone or iPad on iOS 12.4, uinstall the 3.5.3 Unc0ver and do it with 3.5.2.
Cydia opening and closing on its own
This is one of the most annoying problems with the new Cydia app. The tool gets stuck and then closes on its own. This happens when the phone is caught up in a non-jailbreak state. Fortunately, it’s quite easy to fix this problem. Whenever it happens, you need to perform a full reboot on your iPhone. After this, invoke the Cydia processes on the iPhone once more and then start all over again. The error should be dealt with this way.
That’s all. I hope you’ve gotten rid of all the Unc0ver errors. If you’re still having any issues, feel free to reach out to us. I will try my best to get back to you as soon as possible.
Everyone who uses smartphones and they are well aware of a fact that iCloud is only for Apple devices. You can use iCloud on iPhone, iPad, iPod Touch, Macbook, iMac and more. That being said, if you want to use iCloud you need to buy an Apple device and believe me nowadays they aren’t cheap. However, this may not be the issue, the issue is when we switch to an Android device. We cannot use iCloud and therefore we have to leave it like this. But what if I told you that you can Set up an iCloud account on Android and in this post, we’ll tell you how?
How to set up an iCloud account on Android:
It is established that there is no direct way to use or access iCloud unless you have an Apple device. But there always the way. We can manually set up an iCloud account on Android using the stock Email app or a third party Email client. Once you had set up the iCloud Account on Android, you can also transfer you can contact from iCloud account.
Follow the instructions provided below and you will learn how to set up an iCloud Account on Android device.
Step1: Open your device Email app or Gmail app on your Android device. If you don’t like any of these apps you can always go with the third-party apps there are hundreds of them. Launch the App, Tap on Add Account and then Tap on others. Since we are trying to manually set up an iCloud account on Android, that is why we have to go to others option.
Step2: Enter your iCloud Email ID and password, Hit enter. You will get an error, tap on manual setup. Next Tap on IMAP and add imap.mail.me.com for incoming server, set port number as “993”, for security type select SSL/TLS.
Step3: As for outgoing server add smtp.mail.me.com / Security: STARTTLS / Port: 587. Once you are done with the settings, add your username and password.
Step4: There you go now you can use iCloud Account on your Android device. You will be able to receive all of your iCloud Emails on Android device.
Also, don’t worry about a thing, nothing is gonna change in your iCloud Account, whether it’s on iOS device or Android. There is just one thing which will be different. On your iOS device, you can easily add or configure iCloud Account. However, on Android, you have to do a bit more. But in the end, you will be able to use iCloud Account on Android.
Let’s talk more about and tell more alternative methods which will lead you add iCloud account on Android device. Most of us are not comfortable using third-party apps to access our personal accounts. In such a scenario, the best bet is Gmail, it is secure and used by millions of users around the world. If not then keep reading and you will find methods and tips.
Not interested in using any Email Client for your iCloud Account. Open up a browser on your smartphone and type in icloud.com/mail, hit enter. Use iCloud Web to access your Emails.
Once the website loads up, enter your login ID & Password. After you are logged in you will be able to access, contacts, email, numbers, memos, notes, etc.
I would prefer desktop mode because the web version is having some problems and it stuck sometimes. So you should try desktop version and enjoy iCloud Account on your Android device.
Here is how to Jailbreak iOS 12.4 using Chimera. This guide will show you the methods to Jailbreak iOS 12.4 via Chimera with or without a PC. The PC method will use Chimera IPA while you the without PC uses direct-Chimera download method.
Chimera Jailbreak
Chimera iOS 12.4 Jailbreak is out now. The development took place right after Unc0ver 3.5 iOS 12.4 Jailbreak. For those of you who prefer Chimera over Unc0ver, it’s time for you to Jailbreak your iPhone/iPad now.
Chimera is not as popular as Unc0ver, which is why it is really important to understand this tool first. For the most part, Chimera and Unc0ver serve the same purpose, and to some extent, they both use the same techniques as well. What differentiates these tools is how they are build up.
Chimera is the first true iOS 12 Jailbreak. It uses a CoreTrust Bypass feature so that the binaries don’t need to be resigned again and again. Another thing that makes Chimera popular is its support for A12 chipsets since day 1.
Developers of Chimera have written this tool from scratch. This has been done in order to minimize any potential issues that a reused code would have caused. Chimera doesn’t affect the battery life of performance of your Jailbroken iOS device. The Chimera Jailbreak also doesn’t tamper with the system files of your iPhone or iPad which makes it a much safer alternative to Unc0ver.
Just like Unc0ver has its Cydia tweaks repository, Chimera uses Sileo. A large number of Jailbreak users still prefer Cydia because of the software being very very old and reliable, however, if you are into trying out new things, you may find Sileo a good option. The plus point of Sileo is its UI, which resonates with the UI of the latest iOS.
Chimera is backed by a team of well-known developers including CoolStar, Jamie Bishop, Tri’angle, and tihmstar.
Chimera 1.3.9 Jailbreak iOS 12.4 Device List
At the time of writing this post, the latest version of Chimera is 1.3.3. The Chimera 1.3.9. Jailbreak iOS 12.4 supports the following devices.
iPhone 5 and 5S
iPhone 6 and 6 Plus
Apple iPhone 6s and 6s Plus
iPhone 7 and 7 Plus
iPhone 8 and 8 Plus
Apple iPhone X
iPhone XR – Pending
iPhone XS – Pending
Apple iPhone XS Max – Pending
iPad 6th Gen
iPad Air
Apple iPad Air 2
iPad Mini 4
Chimera 1.3.9 replaces SockPuppet2 Exploit with SockPuppet3 Exploit. It adds support for all A7-A11 and some A12 devices. Furthermore, it supports the new iOS 12.4.
Jailbreaking iOS 12.4 with Chimera
There are two typical methods to Jailbreak iOS 12.4 via Chimera tool. The first is to download it directly on your phone and click the Jailbreak button. This is a relatively easy method and we will be discussing this one first. The 2nd method is to sideload Chimera 1.3.9 IPA via Cydia Impactor. For this method, you can use a Windows or Mac PC. Although this method is not complex, the only thing that makes it a bit time-consuming is the use of a PC.
Take a look at the steps to Jailbreak iOS 12.4 using Chimera and no PC.
Preparations
You need an iPhone or iPad running on iOS 12.4. If your device is running on iOS 12.3, you have to update it to iOS 12.4. If it’s running on iOS 13 Beta, downgrade it to 12.4.
Backup each and everything since Jailbreaking is always a risky process.
Charge the iPhone up to 50% to avoid power loss during the Jailbreak process.
You need a Windows or Mac PC for the 2nd method.
For the IPA method, you also need the Data Cable of your iPhone.
Remember that Jailbreaking is something that Apple strictly prohibits the users from. If you have finally decided to Jailbreak, make sure that you take full responsibility for what you are about to do. In case of a mishap, OSCrunch or the Tool developers may not be held responsible.
Jailbreak iOS 12.4 using Chimera – No PC
These are the steps to install Chimera 1.3.9 directly on your iPhone and then Jailbreak.
Delete iOS 12 OTA update files.
On your iPhone or iPad, go to Settings > Storage > Check if there are any iOS 12 OTA files. Delete the files if you find any, in case there are none, skip this step.
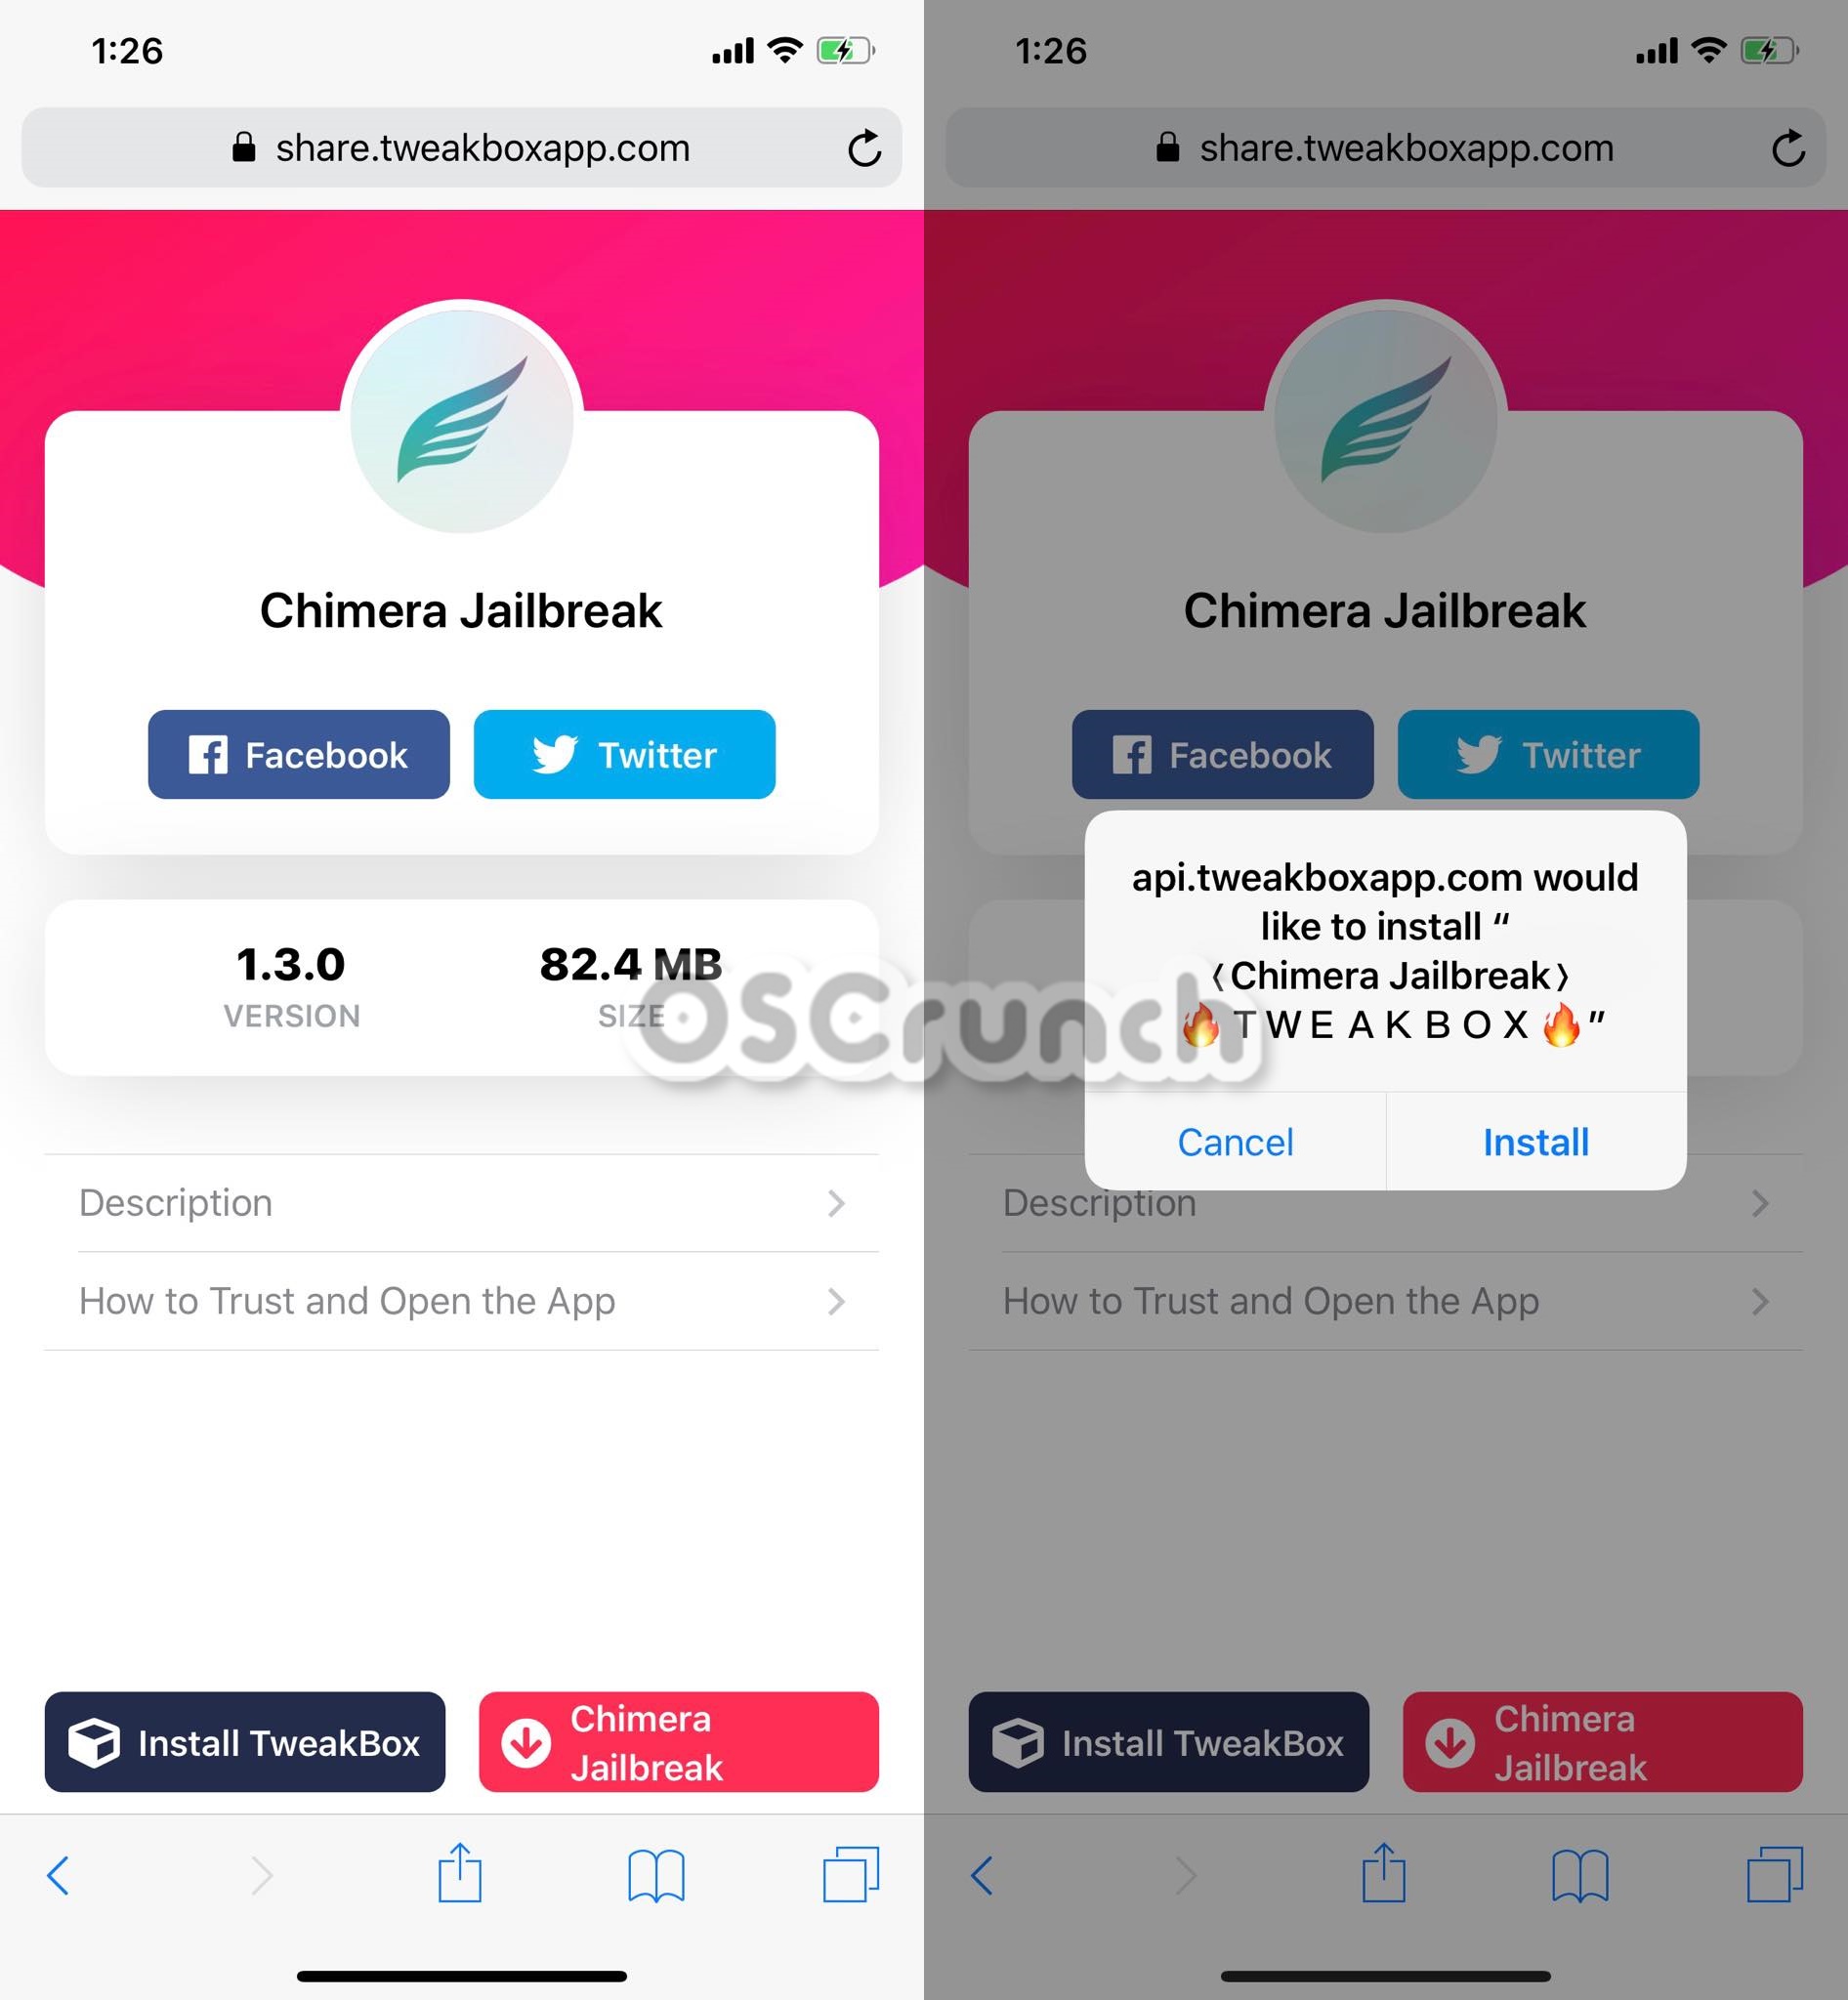
Install Chimera from Tweakbox page.
Now open this Tweakboxapp page on your iPhone and direct-download Chimera. When it asks for installation, click on install.
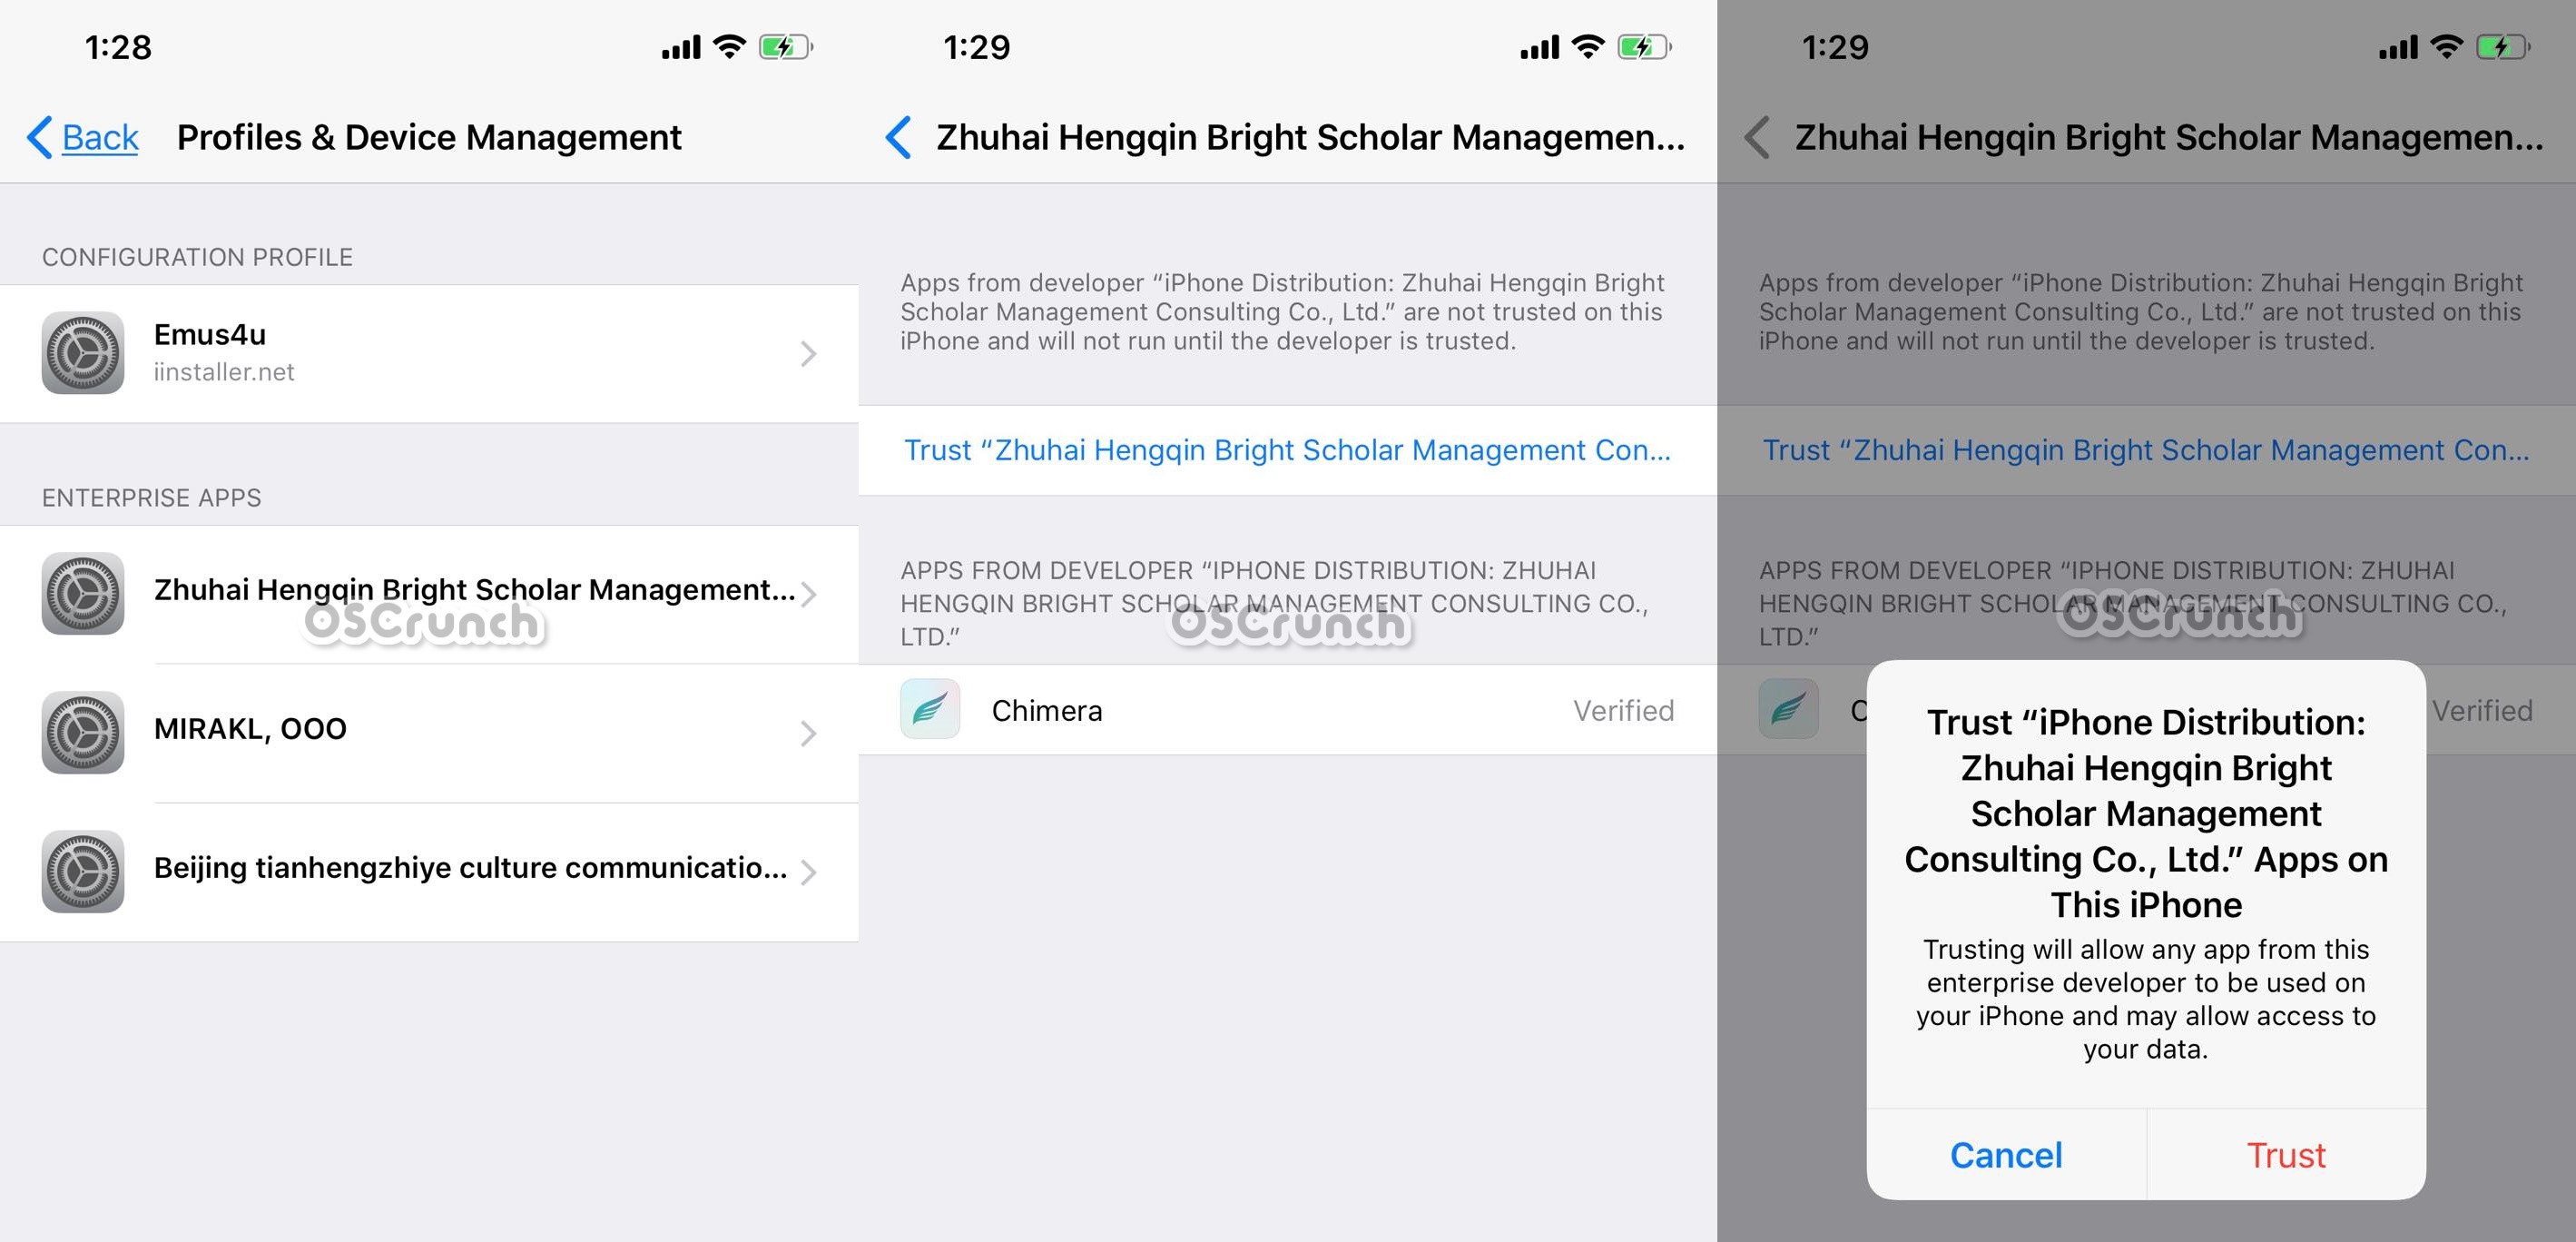
Trust Chimera under Device Management.
Don’t open Chimera yet. Go to Settings > General > Device Management & Profiles > Click on Trust <your apple ID> > Trust. This will give the permissions to Chimera to run smoothly.
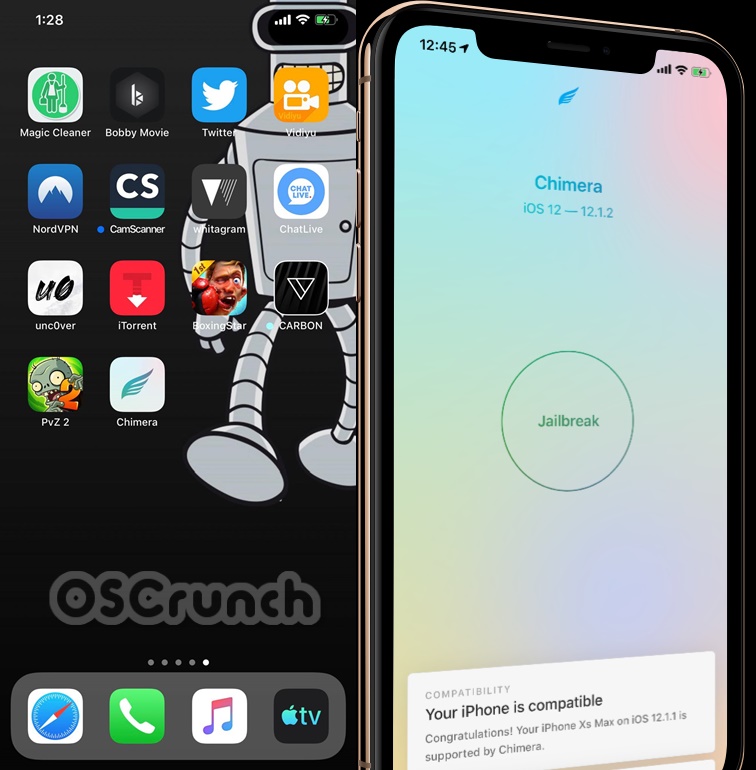
Open Chimera and Jailbreak.
Open Chimera from the apps screen now and click on Jailbreak. It will show you progress on the screen. Your device might restart during the process. It will also install Sileo on your device.
Open Sileo and start installing tweaks.
As Jailbreak ends, go to Apps and open Sileo. You can find a huge list of tweaks now. It’s time to unleash the power of your iPhone. Happy Tweaking!
Chimera for Cydia Impactor
This IPA is required for the 2nd method. You can download it from below and then follow the steps next to sideload it.
Install Chimera 1.3.9 IPA via Cydia Impactor – with PC
First of all, download and install Cydia Impactor on your computer: For Windows | For Mac.
Now connect your iPhone to the computer.
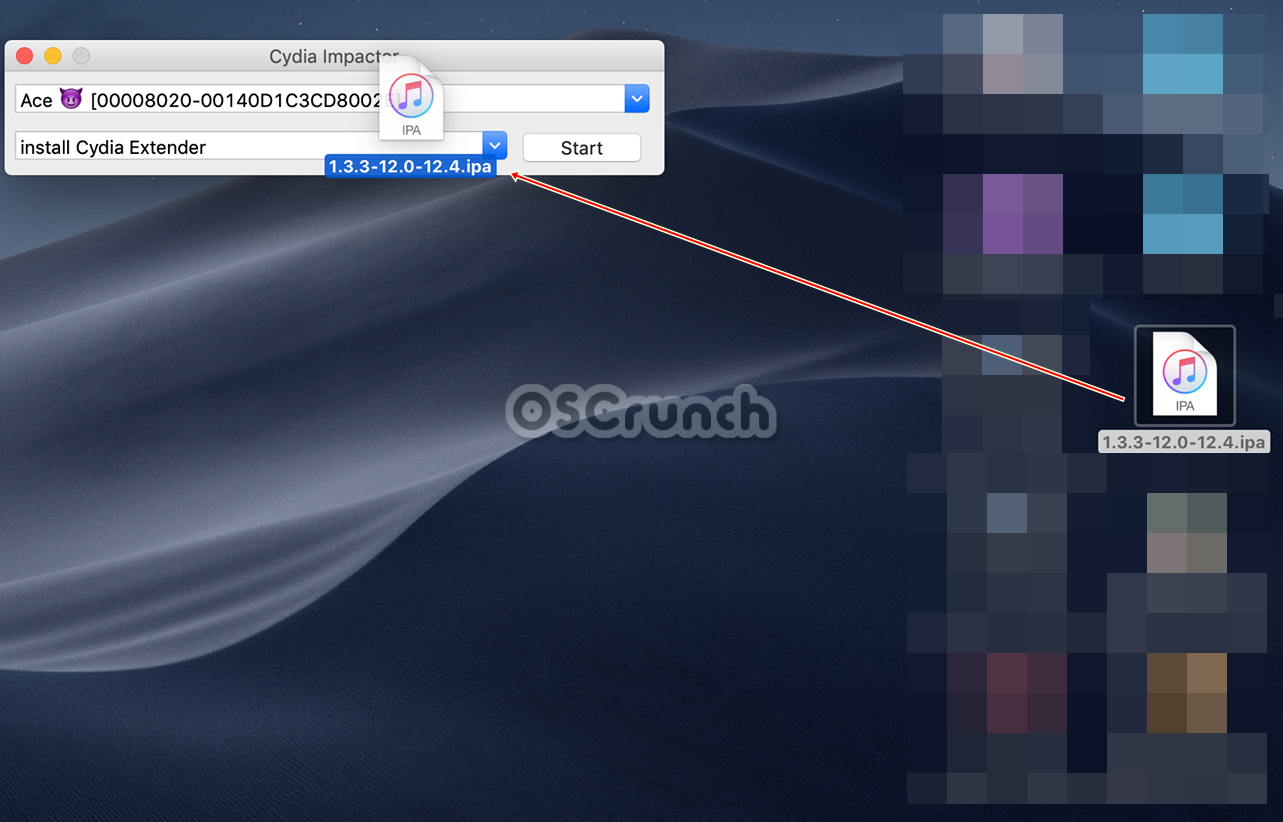
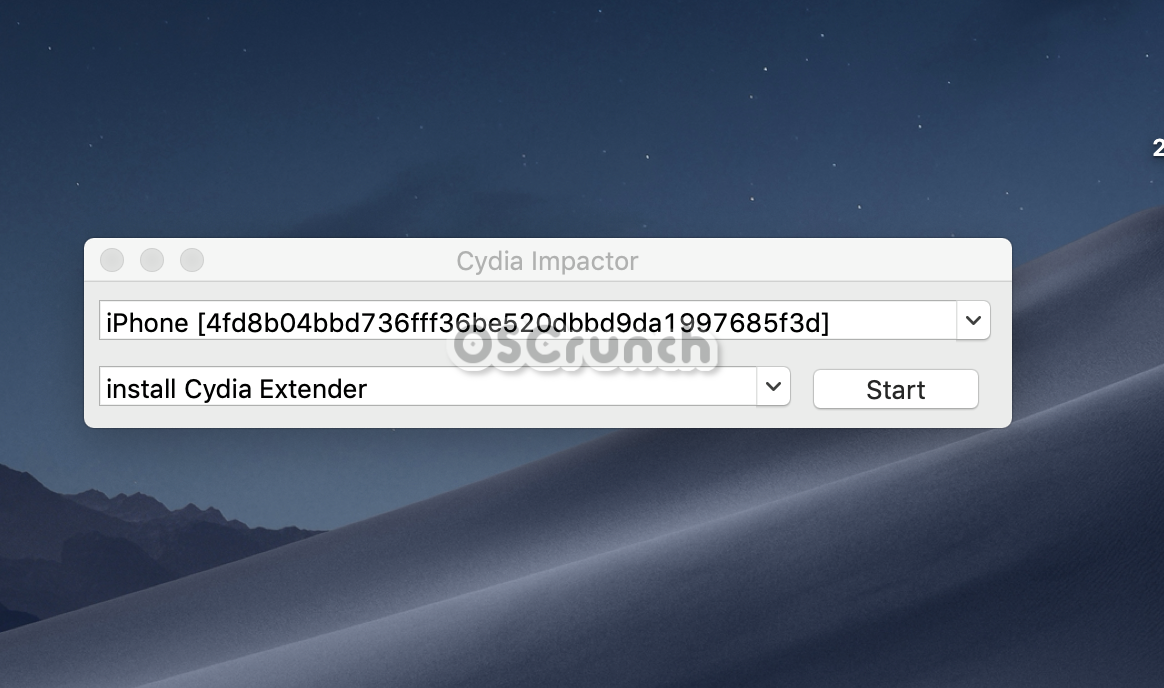
Select your connected iPhone in Cydia Impactor.
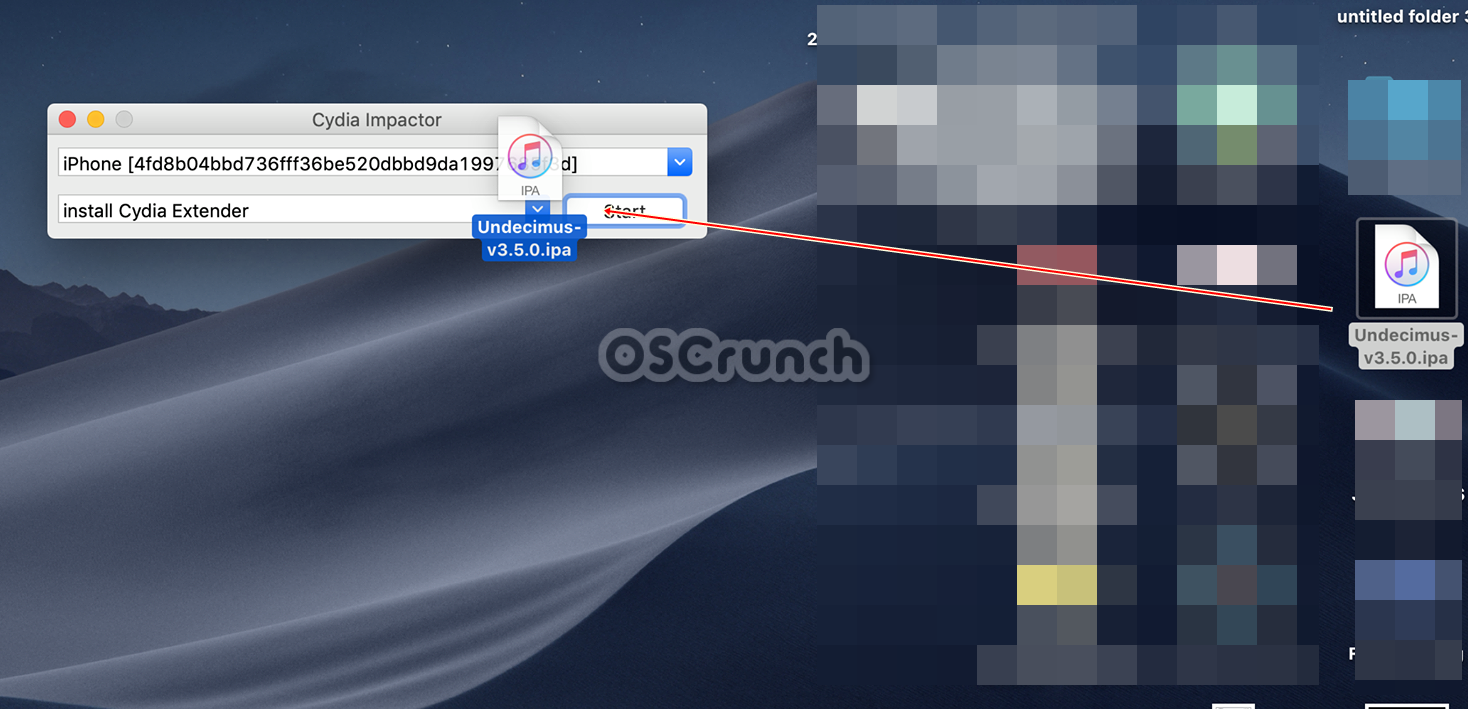
Drag and drop the Chimera 1.3.9. IPA file onto the Cydia Impactor.
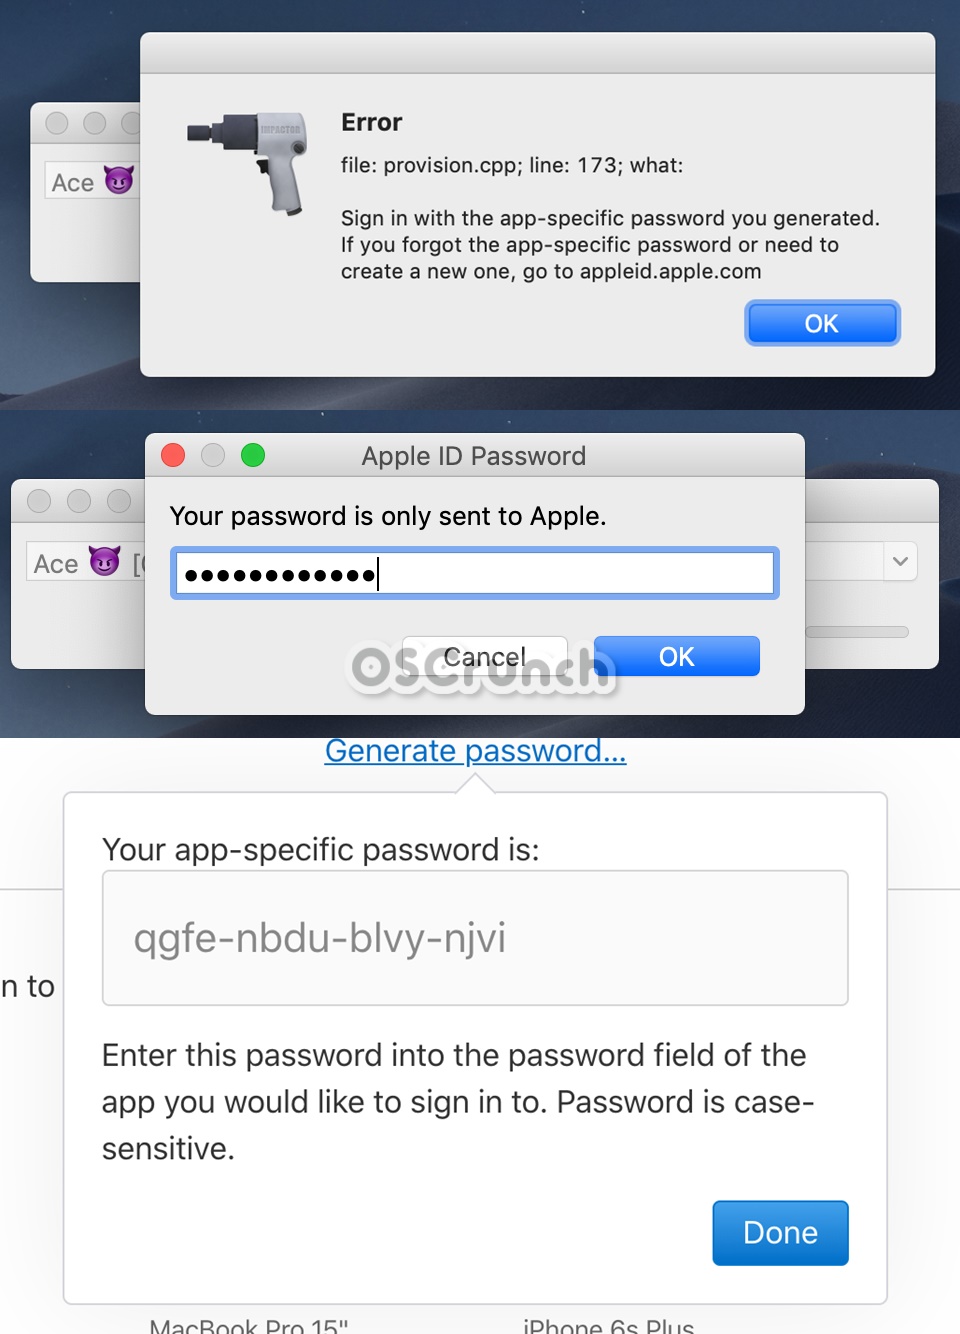
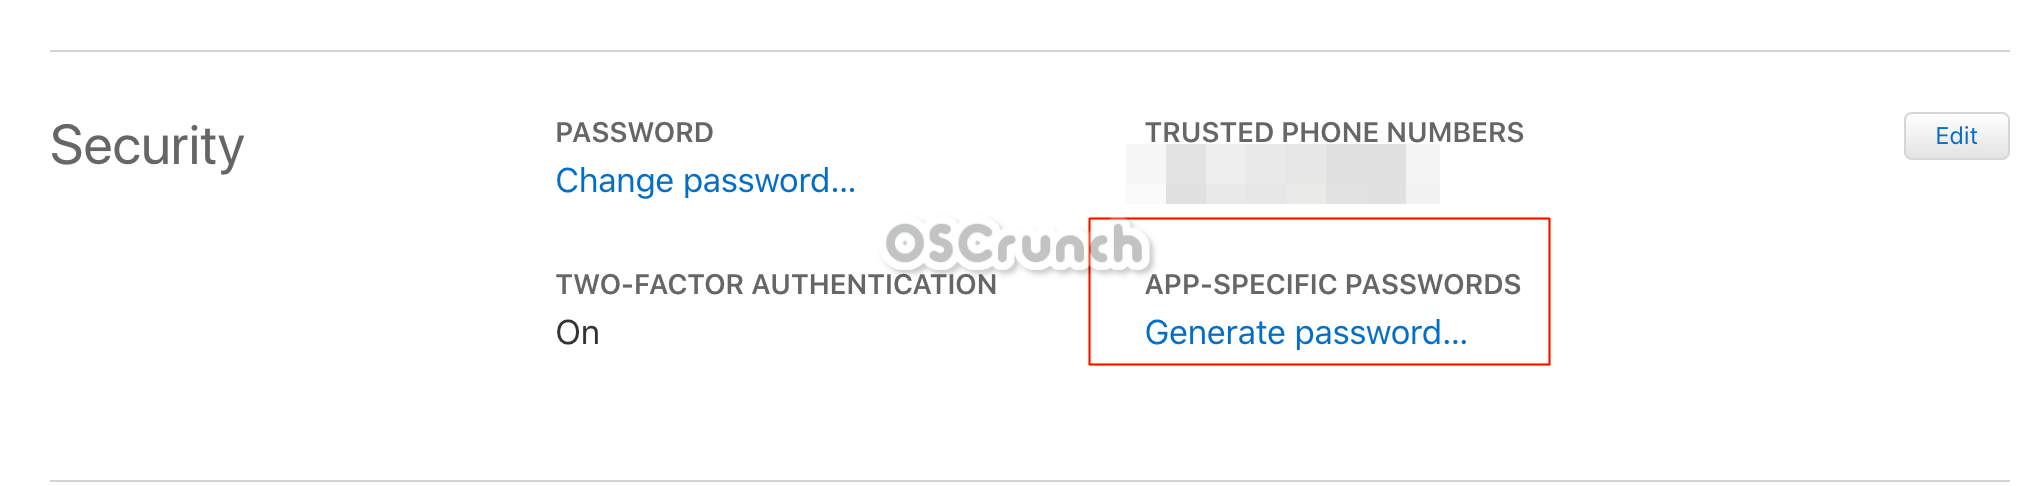
It will ask you for your Apple ID and password. Enter the details. If it asks for app-specific password, open your Apple ID on the PC and go to Settings > Security. Generate the app specific password and paste it in Impactor.
Now click on the Start button in Cydia Impactor. Chimera IPA will be sideloaded on the iPhone.
Disconnect iPhone from the computer now.
Follow step 3 to step 5 in the No PC method above to Jailbreak now. That’s all.
That’s pretty much it with the installation of Chimera and Jailbreaking iOS 12.4. If you plan on un-jailbreaking, you can use the same Chimera tool to do so or you can also install the stock iOS 12.4 using iTunes. In case you’ve got any questions/queries, feel free to reach out to us. I will try my best to get back to you as soon as possible.
Hopeless Land Fight for Survival is a new entry into the survival genre. The game follows the footsteps of games like Rules of Survival, Survival Royale, Free Fire Battlegrounds and other similar games. Like the traditional survival games, this game will also put you on the battlefront where you will have to fight for your survival. Over 120 players are already there on the ground. They have only one mission and that is to become the only survivor on barren land. What’s different about this game is the environment where the battle is taking place. This time, you will experience the Asian buildings instead of those typical castles and devasted buildings. The Asian buildings are put together keeping in view the real buildings.
Hopeless Land Fight for Survival – Gameplay
Players will make an entry to the Hopeless Land through a helicopter. The quest for life will start as soon as your feet touch the ground. There are places to hide, but they will be occupied by other players pretty soon. There’s a variety of weapons to choose from. Keep in mind that you will land on the ground without any kind of weapons or any other belongings. You will have to find the weapon for your safety first of all and then you will collect items to craft the necessities. You can even grab some vehicles to boost up the action in Hopeless Land. Everyone in the neighborhood is your rival. The moment you see someone approaching you, you should pull out the trigger. The game offers good graphics and the sound effects are also fine. If you are tired of playing other battle royale games, you should try this new one to check if it has got what you have been looking for.
Hopeless Land Fight for Survival comes for free on the Android OS. The game can be downloaded on computers as well. To download this game on a computer, an Android emulator is needed. In this guide, we will take a look at the methods to run Hopeless Land on a computer.
Hopeless Land Fight for Survival for PC can be played on Windows 7, Windows 8, Windows 8.1, Windows 10, macOS and Mac OS X powered computers. To download and install Hopeless Land Fight for Survival for PC, Windows users can get BlueStacks 3 and Mac users can get BlueStacks. Another easy way to run this game on a computer is the use of NoxPlayer. It’s time to go through the tutorial now.
Download Hopeless Land Fight for Survival for PC using Nox App Player – Windows/Mac
Click on the “Install APK” button located inside BlueStacks 3.
Locate and select the Hopeless Land Fight for Survival APK. Let BlueStacks 3 install it.
Once the installation comes to an end, Hopeless Land Fight for Survival will appear in the My Apps section. It will also appear as a shortcut on your computer’s desktop.
You can open Hopeless Land Fight for Survival now. Follow on-screen instructions to run it within BlueStacks 3.
Samsung Galaxy Note 10 series is out and this time they have released two variants. One is the smaller one which is Galaxy Note 10 and the is the bigger one which is Galaxy Note 10 Plus. Every time a new device is out from Samsung, We try to provide all the help we can to our readers. Today, In this very post, We’ll tell you how to Hard Reset Galaxy Note 10 Plus. But before we move on, let tell you a little about Galaxy Note 10 Plus specs.
Samsung Galaxy Note 10 Plus:
The Samsung Galaxy Note 10 Plus was Announced in 2019, August. The Phone came out with a screen of 6.8 inches, 114.0 cm2 having 1440 x 3040 pixels resolution. Samsung Galaxy Note 10 Plus was powered by Exynos 9825 (7 nm) – EMEA/LATAM and Qualcomm SDM855 Snapdragon 855 (7 nm) – USA/China with Adreno 640. It had internal storage of 256GB 12GB RAM, 512GB 12GB RAM. There are three cameras at the back of this phone, 12 MP, 12MP & 16 MP, and on the front, it is 10 MP. Inside this Phone, there was a 4300 mAh battery. The Phone originally ran on Android 9.0 (Pie); One UI.
*You can Wipe all of your Data Stored on your device.
*Easily fix all the performance issue.
*Bypass screen lock through hard reset.
*Bring the factory state.
*Fix all the firmware issues.
*Get rid of signal problems, loop issues, rebooting problems and power problems.
How To Hard Reset Galaxy Note 10 Plus:
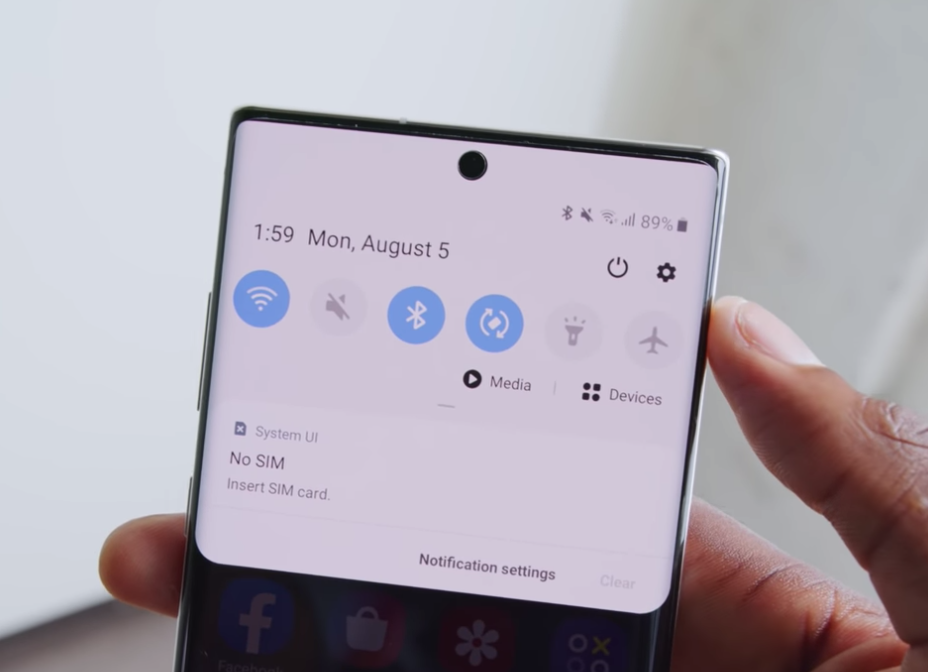
You need to Turn off the Samsung Galaxy Note 10 Plus by dragging down the notification panel. There you see the power off button. Tap on it and it will shut down your device.
Now that your device is turned off. Press + Hold Volume Up + Bixby + Power key together. If by any means, Upload Mode shows up, let go of all the buttons.
Again Turn off your device by holding down Power + Volume Down key.
After that, again press + hold Volume Up + Bixby + Power key together and when the Samsung logo shows up. Let go of all the buttons.
You will be now in the Recovery menu. Now use volume buttons to scroll and Power button to select. Select wipe data/factory reset and press the power button.
On the next screen, select Yes and then press the power button. Wait for the process to get completed. Once it is done, head back to the main menu, select Reboot system now and press the power button.
Unc0ver, the famous Jailbreak tool has received an update. The developer, pwn20wnd, took it to twitter to announce the version 3.5 of Unc0ver. Unc0ver 3.5 is one of the biggest releases as it Jailbreaks a new iOS version. This has happened for the very first time in a couple of years that a current stable version of iOS has been Jailbroken. Previously, the Unc0ver 3.3.0 allowed Jailbreaking of the iOS 12.2, 12.1 and prior. If you were stuck with the iOS 12.2 because you didn’t have Jailbreak for the latest iOS 12.4, it’s time to update your iPhone/iPad now.
The Unc0ver 3.5.x supports all iPhones and iPads powered by the Apple A7-A11 chipsets. One thing to note here is that this doesn’t support iOS 12.3. If your device is currently on iOS 12.3, you will have to update it and if it’s on iOS 13 beta, you will have to downgrade to iOS 12.4.
Here is a list of all the supported devices.
iPhone 5
Apple iPhone 6
iPhone 6 Plus
iPhone 7
Apple iPhone 7 Plus
iPhone SE
iPhone 8
Apple iPhone 8 Plus
iPad Air
iPad 6th Gen
Apple iPhone X
iPhone XR – Unc0ver 3.5.3
iPhone XS – Unc0ver 3.5.3
Apple iPhone XS Max – Unc0ver 3.5.3
iPad Mini 4 – Unc0ver 3.5.3
Jailbreak – a brief intro
For those who don’t know, Jailbreaking your iOS device allows modification of the operating system. On a Jailbroken device, you can install tweaks, change the UI of the phone, add new features, and change the behavior of existing features. The custom scripts can access the system files of your Jailbroken iOS device. While Jailbreak opens the doors for a limitless world of customization, it puts your device on risk at the same time. Jailbreak users have to be extra careful while installing tweaks. Apple does not recommend Jailbreaking an iPhone. If you have planned to finally Jailbreak your iPhone or iPad, you must take complete responsibility for what you are doing.
It’s time take a look at the steps to Jailbreak your iPhone now. It is recommended to create a backup of your device before you Jailbreak. No computer is needed for this method. The only thing you need is your iPhone and an internet connection. Pay attention to all the steps given below avoid any mishap.
These are the few simple steps to Jailbreak iOS 12.4 via Unc0ver 3.5.x.
Delete iOS 12 OTA files from the iPhone.
On the iPhone, go to Settings > Storage > Check if there are any iOS 12 OTA files > delete them. If there are no files, skip this step.
Download and install Unc0ver 3.5.x on the iPhone/iPad.
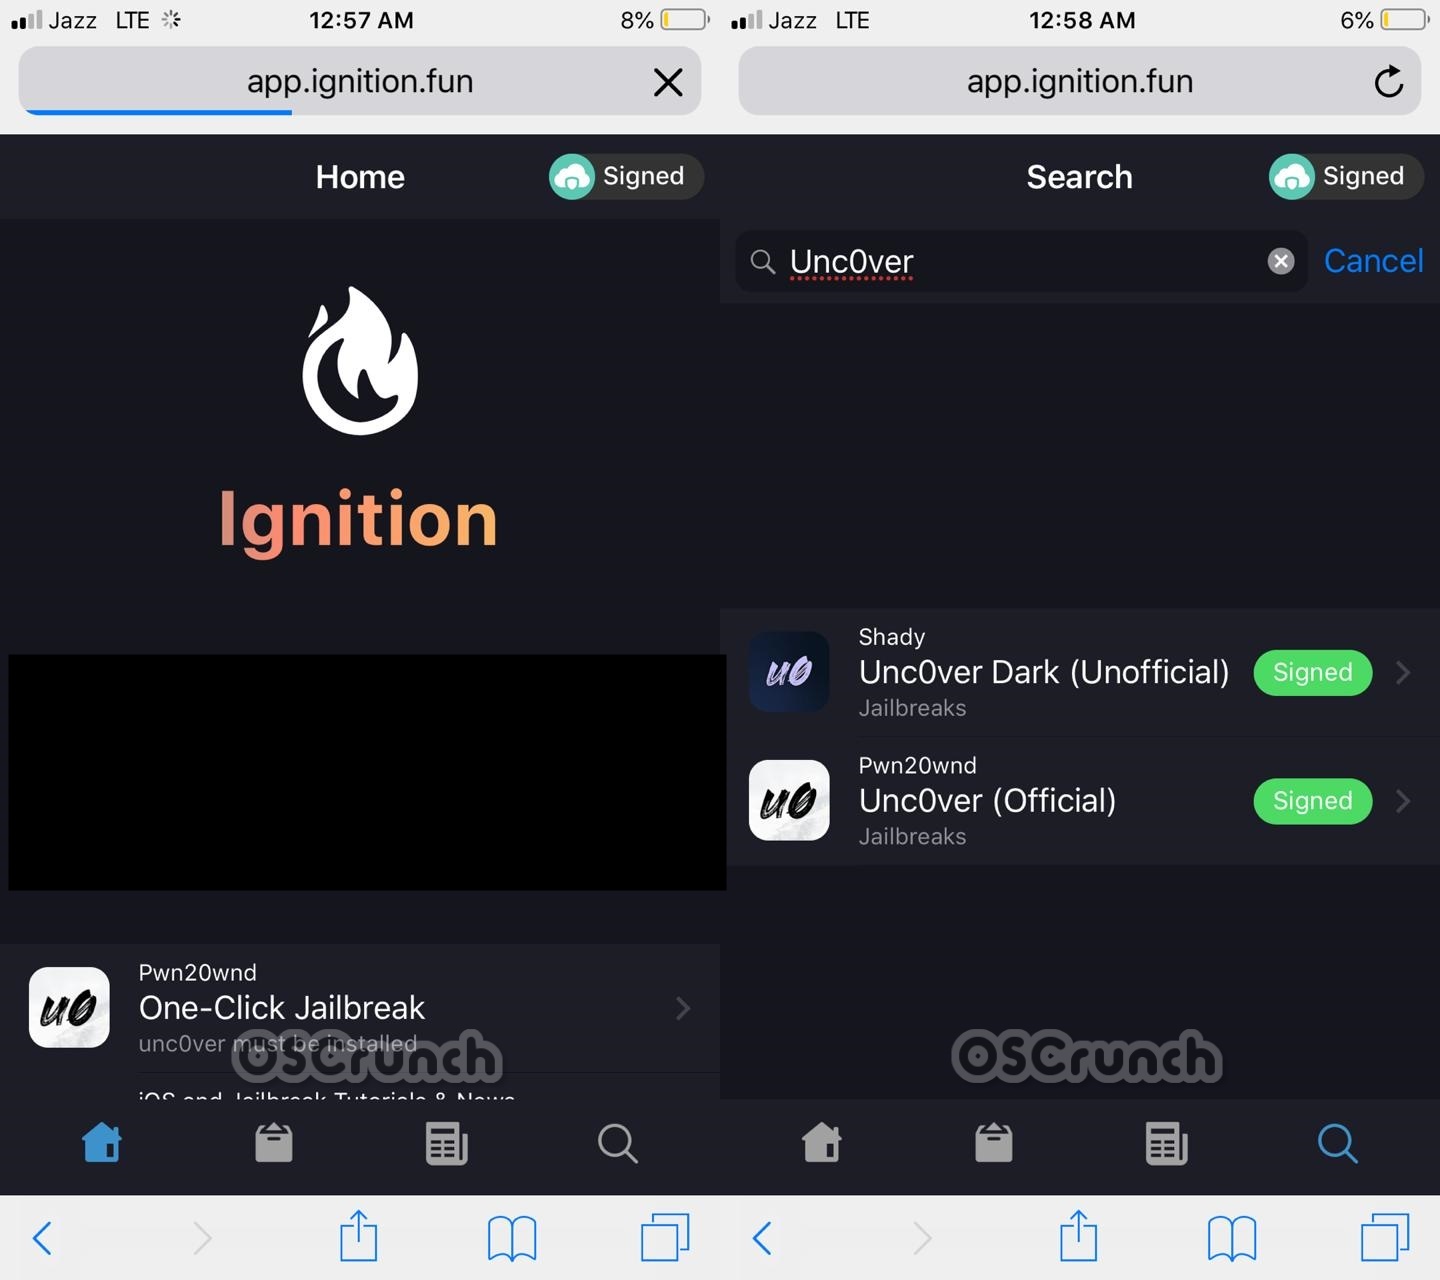
Open Safari or Chrome on your iOS device and then go to this site: ignition.fun > Search for Unc0ver here. Install the latest Unc0ver by pwn20wnd.
Trust Unc0ver in Device Management.
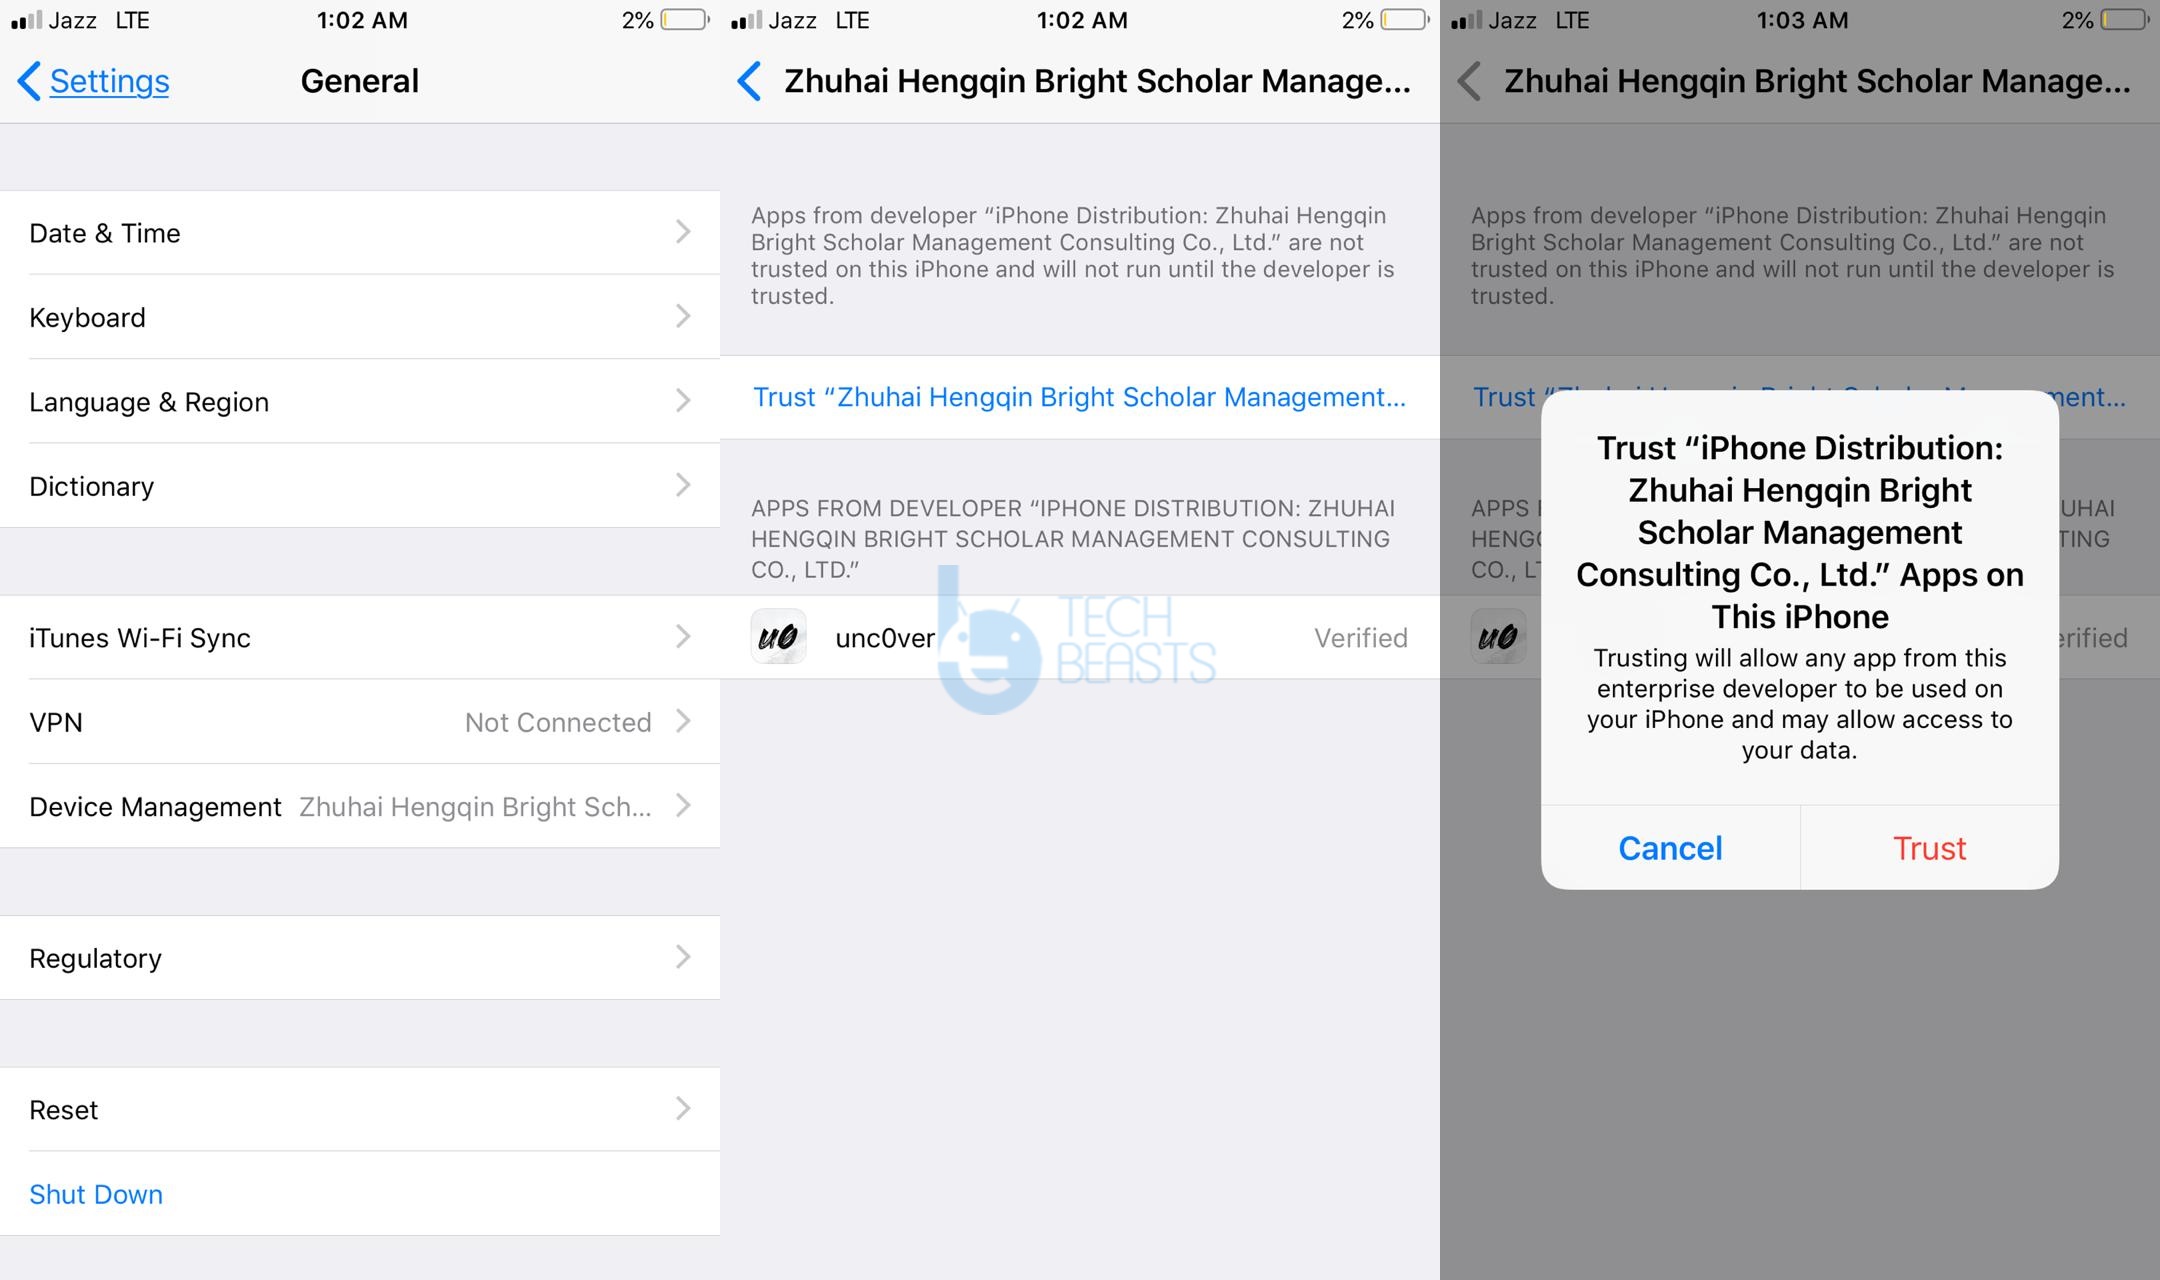
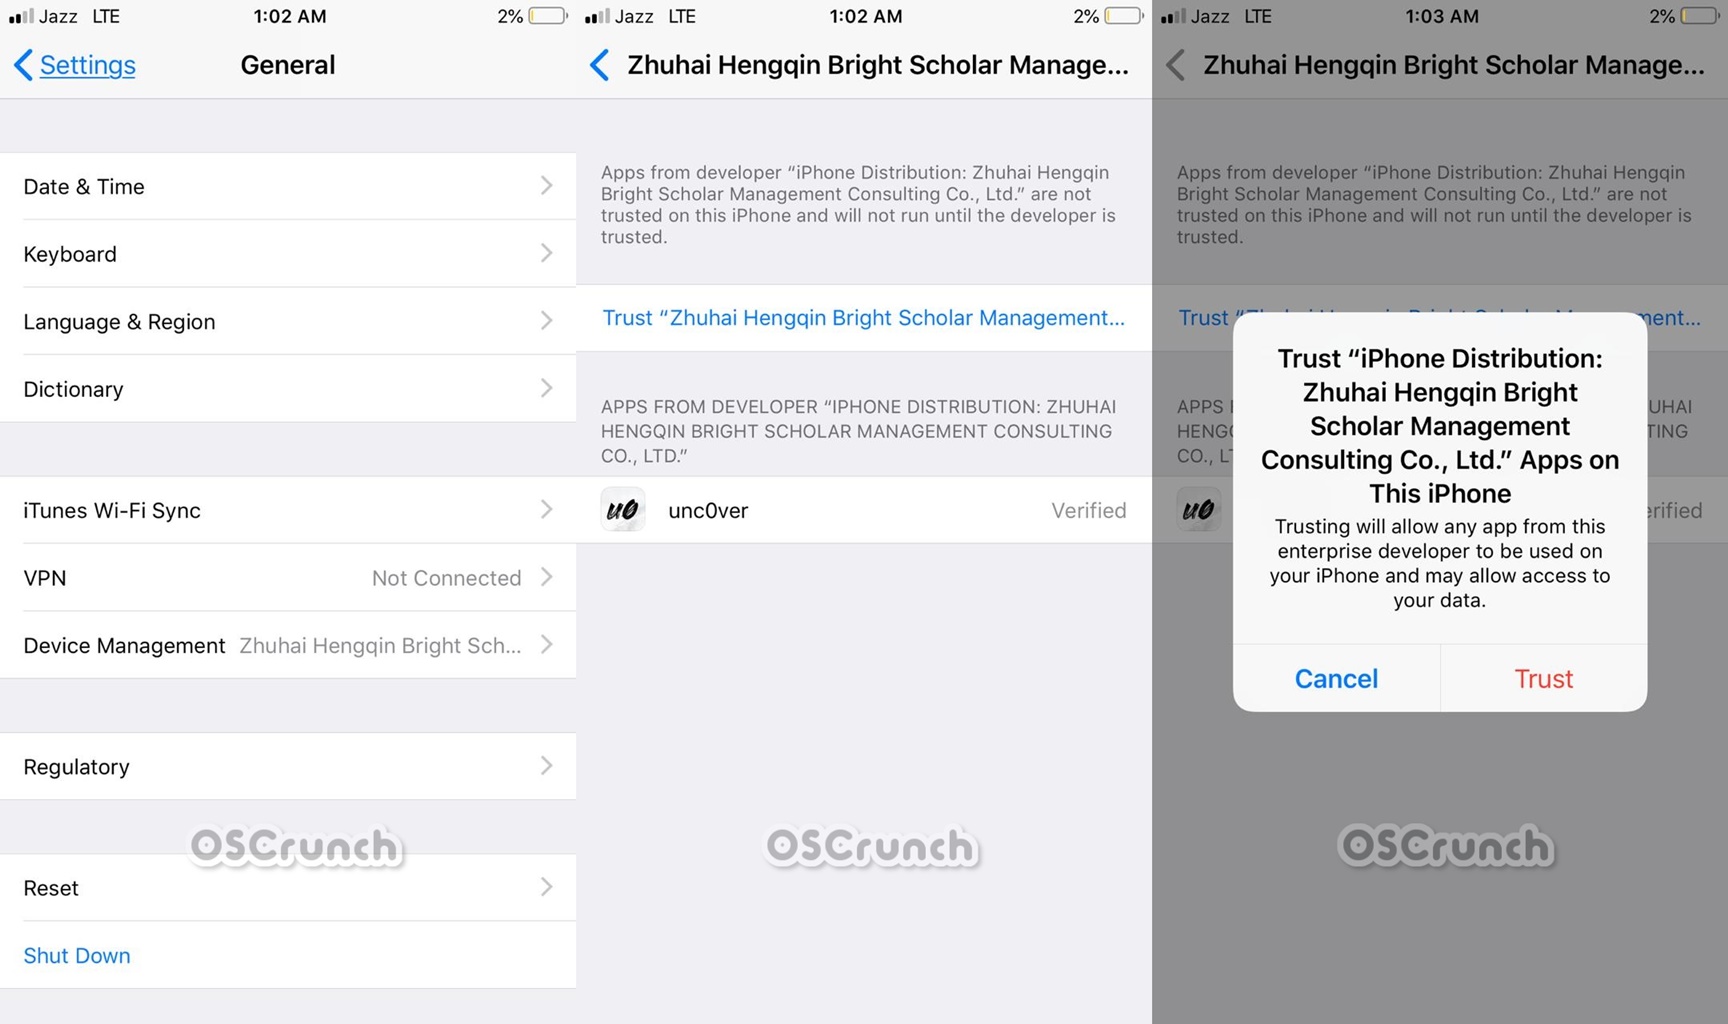
Now go to Settings > General > Device Management > Click on Trust <Apple ID> > Trust.
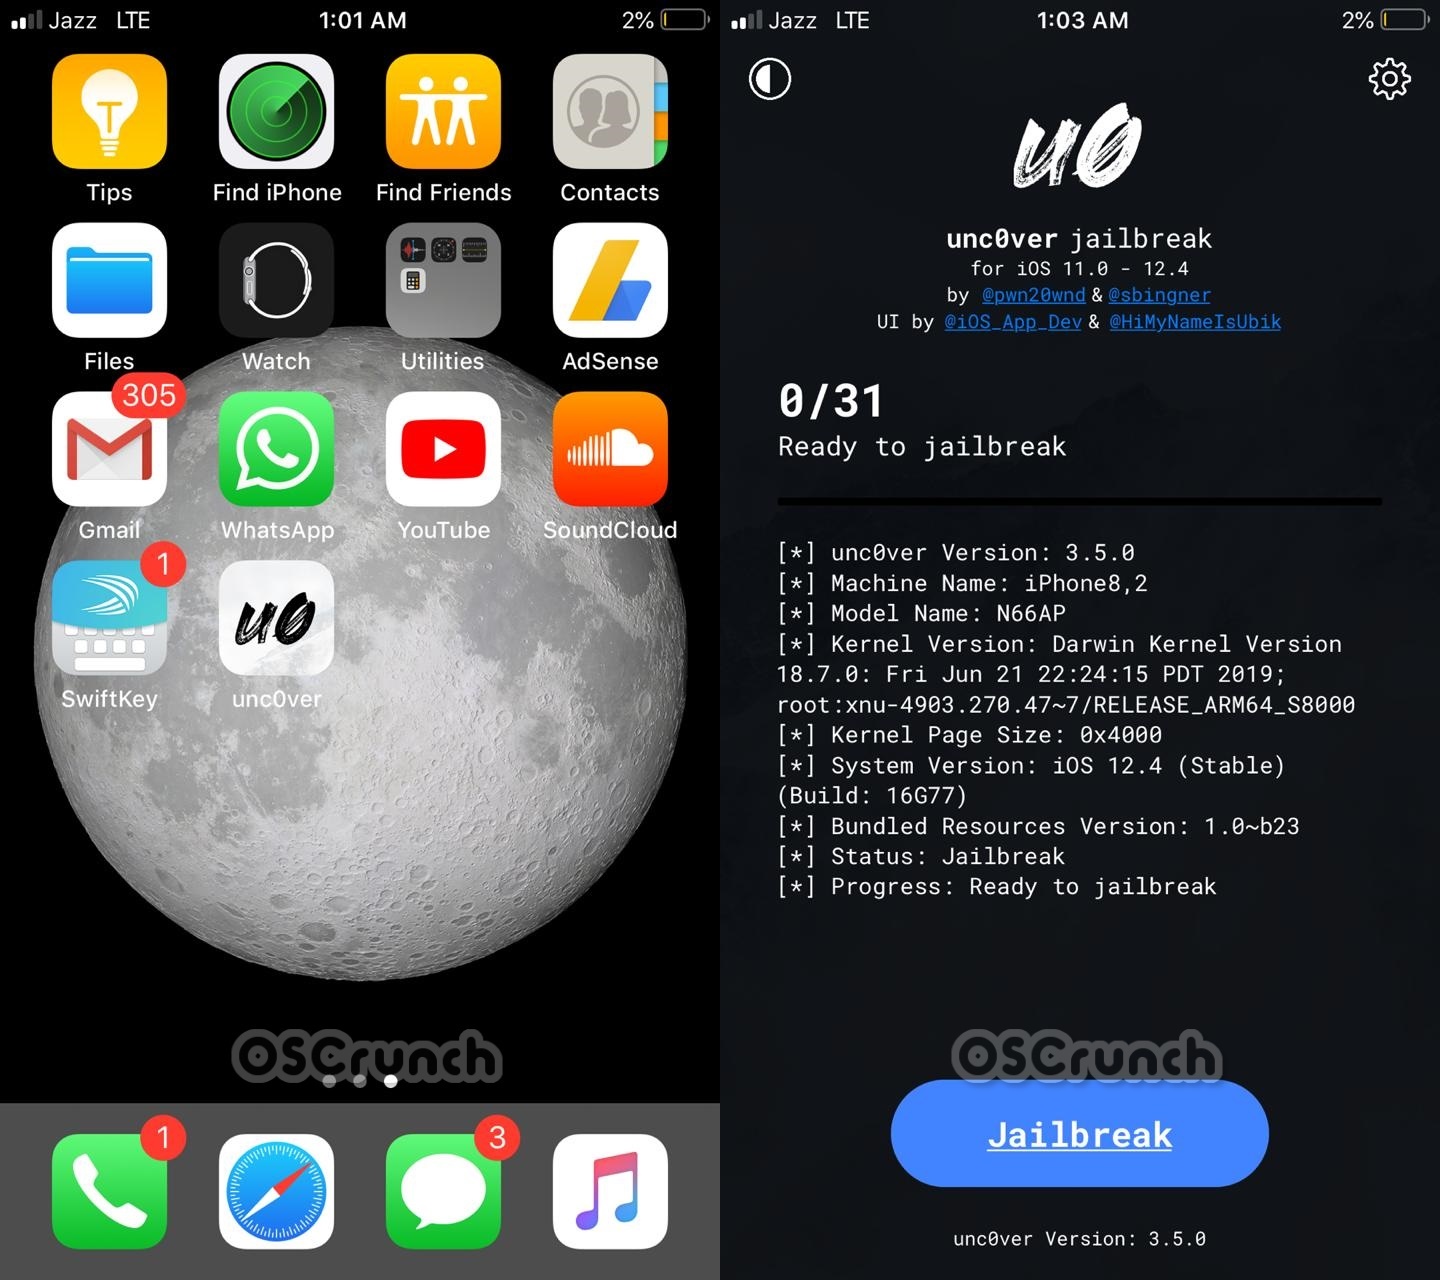
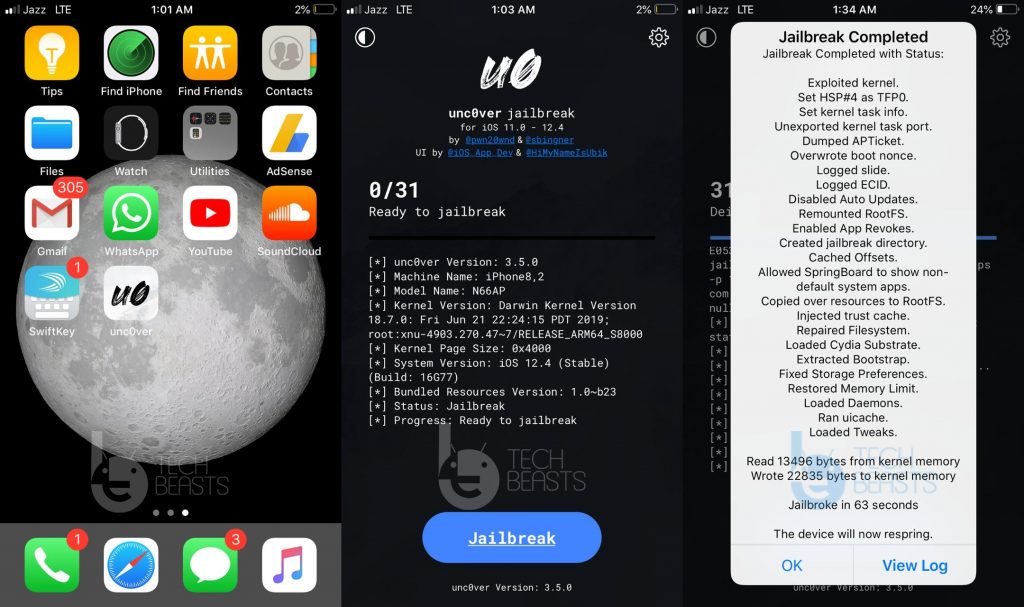
Open Unc0ver and click on Jailbreak.
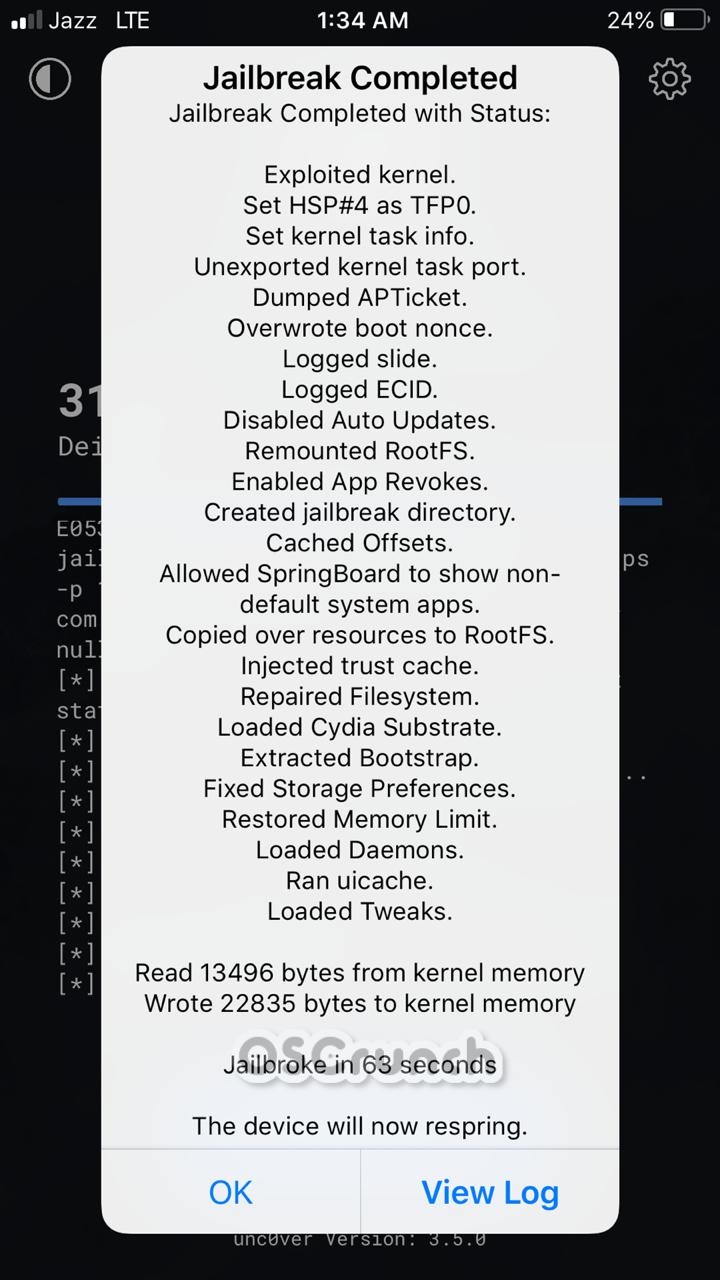
Get back to the apps screen now and open Unc0ver. In the Unc0ver tool, click on Jailbreak. The process will start and take about 63 seconds to end. The phone might restart while it Jailbreaks.
Open Cydia to start installing Tweaks!
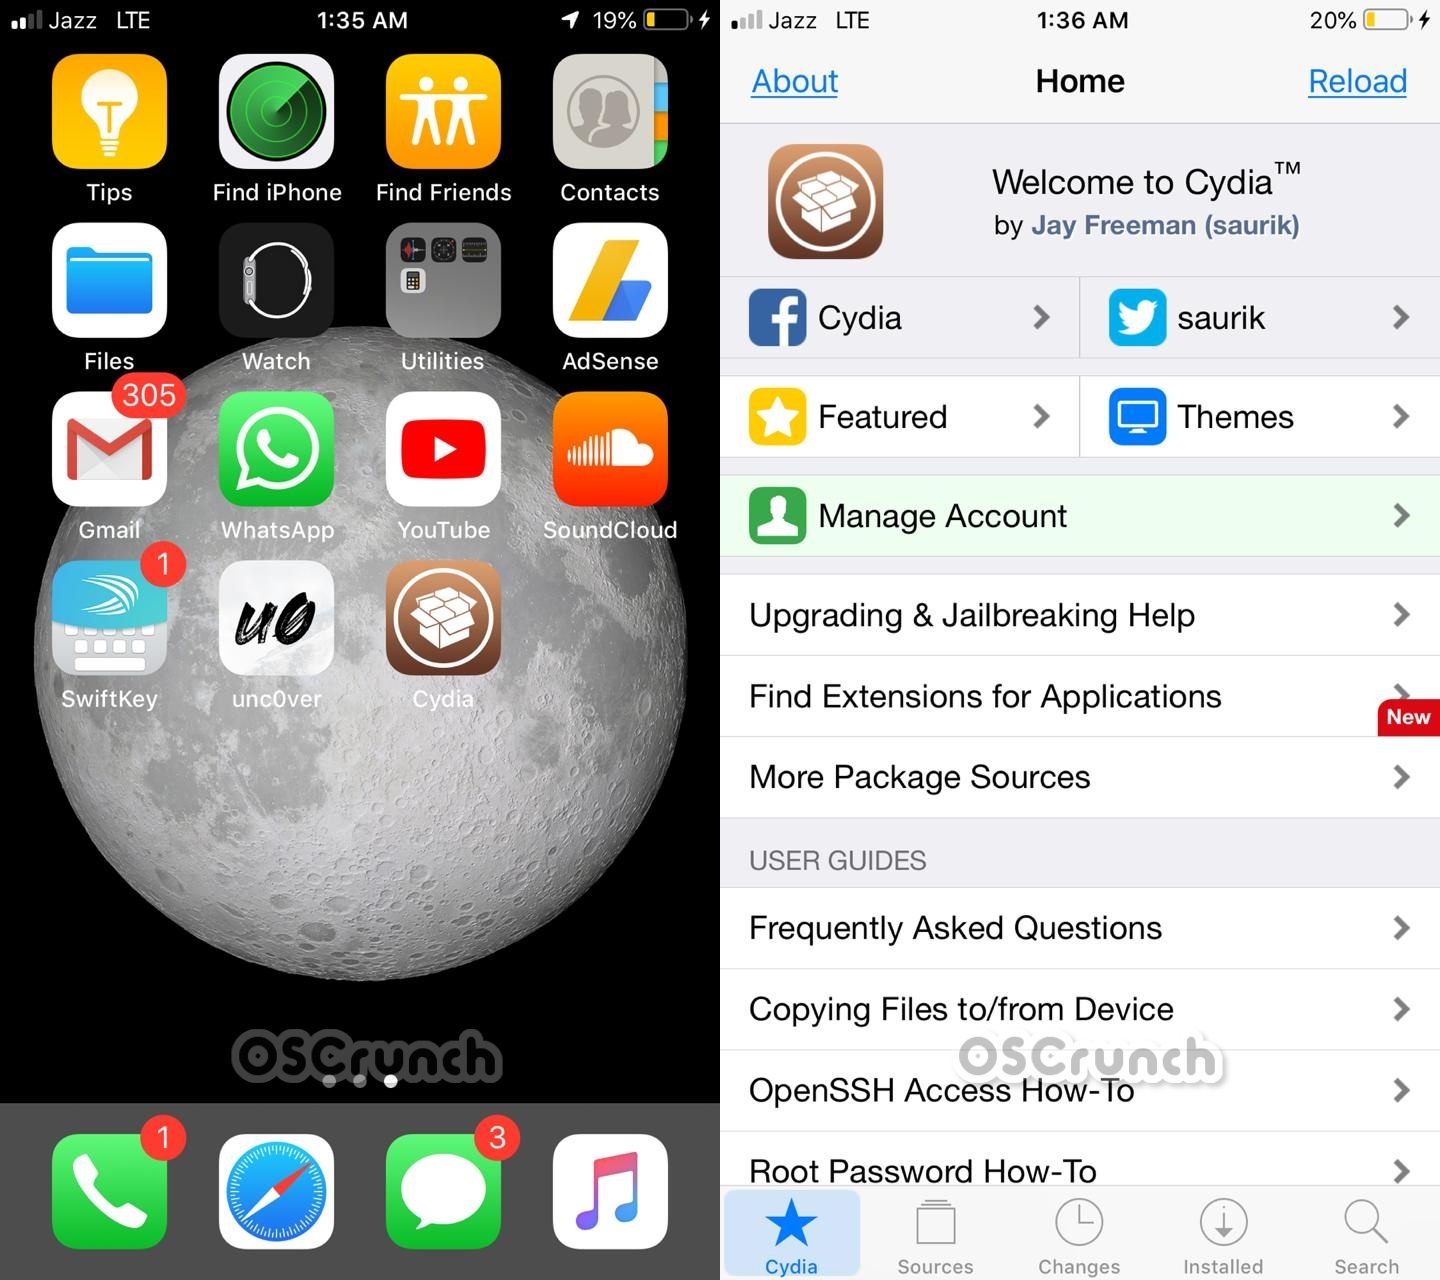
After Jailbreaking the device, you will find Cydia on the Apps Screen. Open Cydia and start installing Tweaks. That’s all.
That’s all with the Jailbreak of iOS 12.4 via Unc0ver 3.5.x. If you plan of going back to the stable iOS 12.4 any time, you can install it via iTunes to restore your iPhone. The process demonstrated above has been hand-tested by me on my iPhone X. If you have any queries or questions, feel free to reach out to me through the comments section below. I will try my best to get back to you as soon as possible.
Unc0ver 3.7 is here. You can download Unc0ver 3.7 IPA to Jailbreak iOS 12.4 now. The Unc0ver 3.7 IPA can be sideloaded via Cydia Impactor on Windows and Mac.
The famous Unc0ver tool has been updated to its version 3.5. This is a huge update as it enables Jailbreak on iOS 12.4. The news of this tool’s support for iOS 12.4 came from its own developer, pwn20wnd. Earlier, the Unc0ver supported iOS 12.2, 12.1 and prior. This is a first after so many years that the developers have achieved Jailbreak for a current stable version of iOS. The Unc0ver 3.5 supports a huge list of devices. In a bit, I will show you how you can download Unc0ver 3.5 IPA and install via computer to Jailbreak iOS 12.4. Before doing so, let me give the new users a brief idea of what Jailbreak is.
Jailbreak
The term Jailbreak refers to giving root access of your iPhone/iPad to custom scripts and apps. If you have heard of the term rooting the Linux or Android operating system, Jailbreaking is similar to that. Users can install new features, change the behavior of existing features and apps, and they can also add the new UI mods to the iPhone this way. The performance and battery life of an iPhone can be tweaked via Cydia tweaks.
When you Jailbreak an iPhone or iPad, you bypass all the security certificates and gateways that Apple has installed to make your device secure. While a Jailbroken iPhone/iPad opens a never-ending world of modifications, it brings in a lot of risks at the same time. This is why you have to be extra careful while installing tweaks and mods on a Jailbroken iPhone or iPad.
Jailbreak is something that Apple never recommends. If you take a Jailbroken iPhone to an Apple service center, they will refuse to repair it. So, before you go ahead, you must understand everything and take complete responsibility for it.
Update 9/23/2019: Un0ver 3.7 comes with full-fledged support for all A12-A12X-powered iPhones and iPads. Jailbreakers can now get Cydia and system-wide tweak injection on the newest iPhones & iPads.
Update9/10/2019: Unc0ver 3.6.3 is out now.
Update: 9/9/2019: Unc0ver 3.6.1 is now out. Changelog is below.
Completely redesign and rewrite all jailbreak patches from scratch
Make the jailbreak patches static and not dynamic–Meaning that the system stability will be completely stock after the jailbreak
Fix the app crashing on launch when signed with provisioning profiles with non-ASCII characters
Internally prepare jailbreak patches for full-fledged A12-A12X support
Make the jailbreak significantly and noticeably more reliable and faster to run
Add the SockPort 3.0 exploit for improved reliability on iOS 12.4 and devices with low RAM
Fix SSH support for arm64e devices running iOS12.0-12.1.2
Make it possible to jailbreak with corrupted SystemVersion.plist on iOS 12.4
Make the jailbreak perform proper clean up to preserve system stability in case of a failure
Fix the jbctl command-line utility
Switch to a new technique for setting the system boot nonce generator that works on all arm64e devices running iOS12.0-12.4 (Thanks to @0x7ff for the idea)
Fix a bug with the initial Cydia installation getting stuck sometimes
Significantly speed up the initial Cydia installation process
Internally prepare upcoming stable substitute support
Update 08/24/2019: Unc0ver 3.5.6 is now out. Changelog is as follows.
– Add support for remounting the RootFS as read-write on A12-A12X devices running iOS 12.1.3-12.4
– Adds support for restoring the RootFS on A12-A12X devices running iOS 12.1.3-12.4
Update: Unc0ver 3.5.5 is now out. Changelog is below.
– Fixes issues with the jailbreak introduced with the last update
– Fixes iOS 11 support
Update: Unc0ver 3.5.4 has been released. Here is the changelog.
– Add full-fledged SSH support with root-shell for A12-A12X devices on iOS 12.1.3-12.4
– Add support for arbitrary unsigned code execution on A12-A12 devices on iOS 12.1.3-12.4 (Note: Object files will have to be signed with a CMS blob using the codesign utility)
– Add support for running expired or revoked apps on A12-A12X devices on iOS 12.1.3-12.4
– Fix instant or random reboots after jailbreaking with the SockPuppet3.0 exploit on A7-A12X devices on iOS 11.0-12.4
Update: Unc0ver 3.5.3 has been released with partial support for new devices. The new version can Jailbreak iPhone XR, XS, and XS Max running on iOS 12.4. You can find Unc0ver 3.5.3 IPA in the downloads section below.
Methods to Jailbreak via Unc0ver 3.7
At the moment, there are two methods to Jailbreak iOS 12.4 via Unc0ver 3.5. The easier method is to Jailbreak iOS 12.4 without computer.That method allows you to directly install Unc0ver 3.5 on your phone and use it. The 2nd method, which we are going to discuss here, involves the use of a computer. We will be sideloading Unc0ver 3.5 IPA via Cydia Impactor. You can use the Cydia Impactor on both the Windows and Mac.
Preparation
On the iPhone, go to Settings > Storage > delete all the iOS 12 OTA files. If there are no files, skip this step.
Charge your iPhone up to 50% for this process.
Create a backup of your messages, call logs, contacts, and everything else.
You need a Windows or Mac-powered computer for this.
Unc0ver 3.5.6[Laetst – Stable iOS 12.4 A7-A11-A12-A12X] – Download | Mirror [Extract to get IPA]
Unc0ver 3.5.5[Latest – Stable iOS 12.4 A7 – A11 – A12] – Download | Mirror[Extract to get IPA]
Unc0ver 3.5.4 IPA – Download | Mirror [Extract to get IPA]
To Jailbreak iPhone XR, XS, and XS Max, you need Unc0ver 3.5.3 IPA – However, 3.5.3 is not stable yet. Try this at your own risk: Download IPA [Extract to get IPA]
Last, but not the least, you must have the latest iTunes on the computer.
Downloading/installing Unc0ver 3.7.0 IPA via Cydia Impactor
On the computer, open Cydia Impactor.
Connect iPhone to the computer.
In the Cydia Impactor, select your device.
Drag and drop the Unc0ver 3.7 onto the Cydia Impactor.
Impactor will now ask for your Apple ID and password. Enter the details. If it asks for App-specific password, open the Apple ID on PC and get the app-specific password from security settings.
Enter the password and click on Start.
After installation, disconnect the iPhone.
Jailbreak iOS 12.4 via Unc0ver 3.7
On the iPhone, go to Settings > General > Device Management > Click on “Trust <your Apple ID> > Trust”.
Now open Unc0ver from all apps.
In the Unc0ver 3.5 tool, click on Jailbreak.
It will take about 63 seconds for Unc0ver 3.5 to Jailbreak your iOS 12.4.
Cydia store will be installed now.
Go back to the apps screen and open Cydia.
You are all set to install any tweaks. That’s all.
That’s all with this process. If you have any questions/queries, feel free to drop them in the comments section down below.
FAQs
Which is the latest stable version of Unc0ver?
The latest stable version of Unc0ver is Unc0ver 3.7.0.
Is the Jailbreak available for iPhone XR?
Yes, you can Jailbreak iPhone XR. It must be running on iOS 12.4. You need Unc0ver 3.7 to Jailbreak iPhone XR.
Is the Jailbreak available for iPhone XS?
To Jailbreak iPhone XS, you need Unc0ver 3.7
Can I Jailbreak iPhone XS Max?
Yes of course. With Unc0ver 3.7., you can jailbreak iOS 12.4 powered iPhone XS Max.
Which iOS version can I Jailbreak?
The latest public version of iOS i.e. iOS 12.4 can be Jailbroken with Unc0ver 3.5.0 – Unc0ver 3.5.5 or 3.5.6or 3.6.3 or 3.7 .
Can I unjailbreak after jailbreaking?
Yes, the same Unc0ver tool will let you unjailbreak. Take a look at this guide to unjailbreak iOS 12.4.
Does Cydia come with Unc0ver?
When you Jailbreak via Unc0ver, the Cydia is installed automatically.
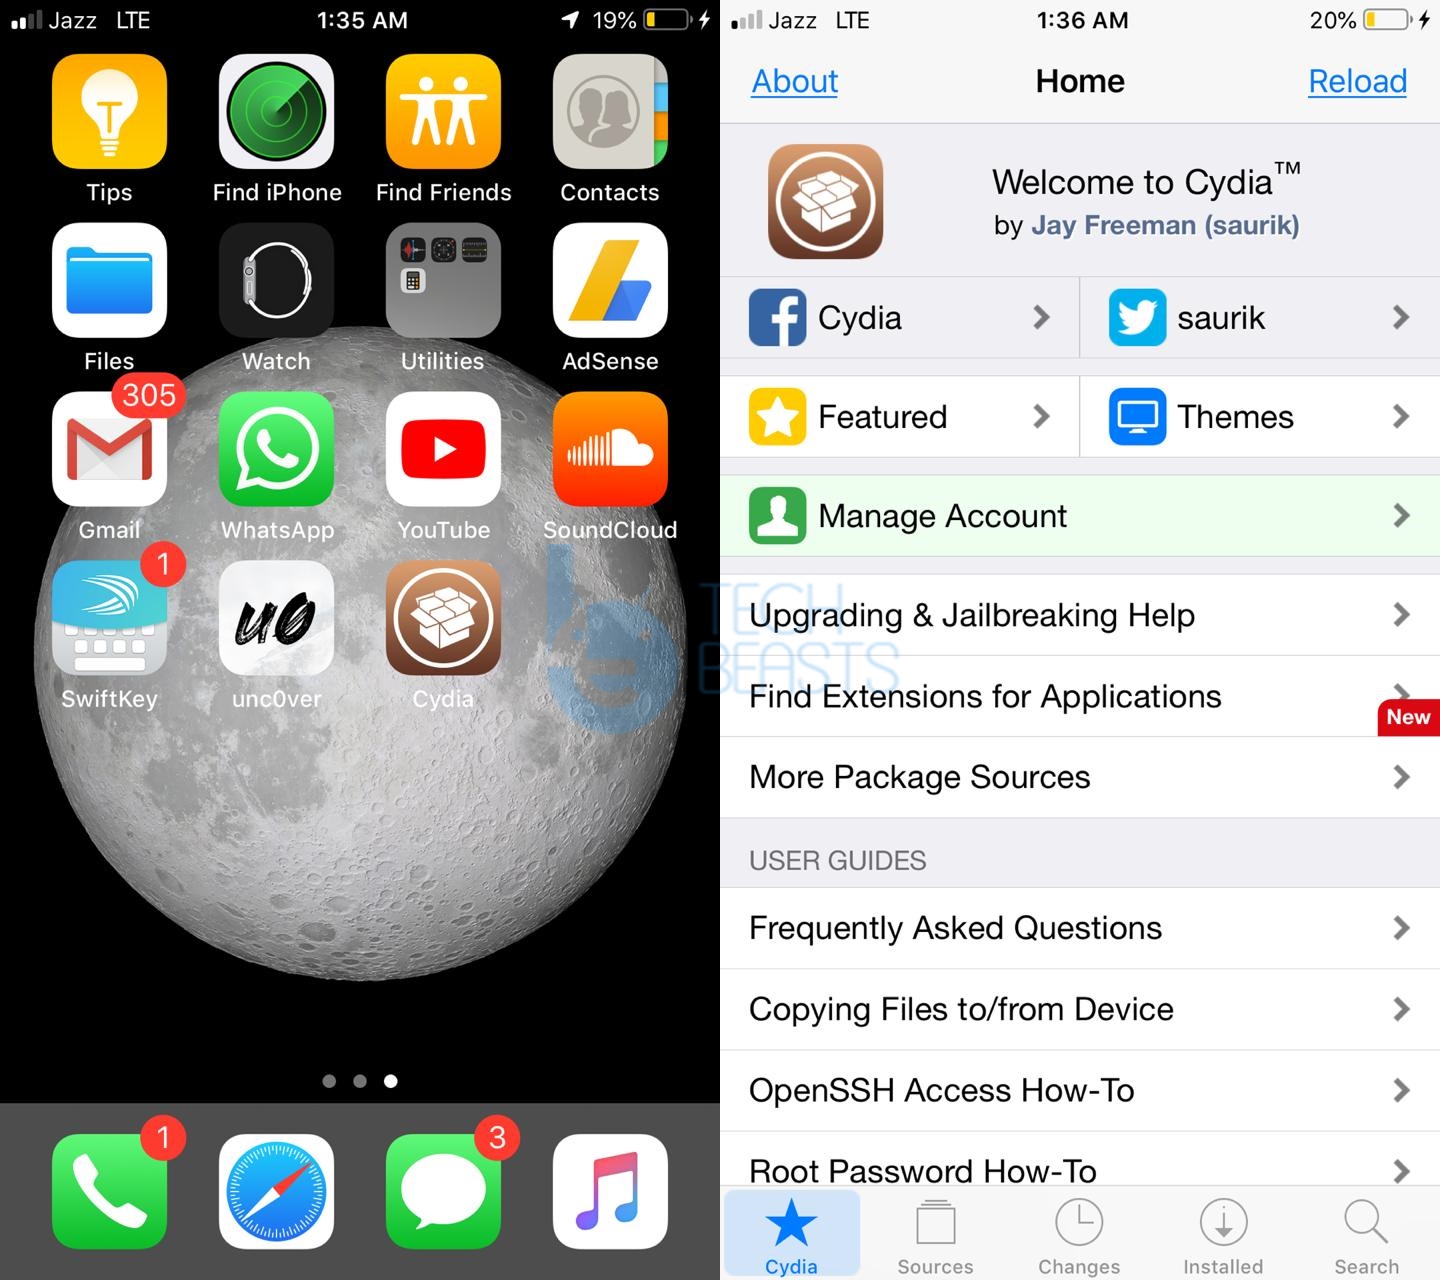
This is the step-by-step guide to Jailbreak iOS 12.4 on iPhone/iPad without a computer. We will use Unc0ver 3.7 to Jailbreak iOS 12.4.
Apple iOS 12.4 Jailbreak is finally here. The good news comes from none other than @pwn20wnd. The developer has released Unc0ver 3.7/3.6/3.5. The latest version of Unc0ver supports Jailbreak on iOS 12.4. Previously, we saw the Unc0ver 3.3.0 which helped us Jailbreak iOS 12.2 and below.
The best part of the current Jailbreak solution is that it supports the currently available stable version of iOS. After so many years, the Jailbreak tool developers have finally achieved a milestone on the latest stable version of iOS. There is a lot of time until the release of stable iOS 13, so if you are currently enjoying iOS 12.4, you can unleash the real potential of your device by Jailbreaking it.
About Jailbreak
In case you don’t know, Jailbreak gives applications and scripts access to the root of your iPhone. In the intact form, Apple doesn’t allow any kind of modifications on its iOS. There are certain certificates which prevent any third-party or modified scripts from accessing any internal file of your iPhone’s system. When you Jailbreak your iPhone, you certainly say goodbye to all the security certificates and opt for a less secure device which has no checks in the play. This, in a way, is not a good idea, but at the same time, it gives you a lot of freedom to customize the handset or iPad. Users can change the UI of their Jailbroken iPhone, they can add new features, change the behavior of the buttons and so on.
Unc0ver 3.7 Supported Devices
Update 9/23/2019: Un0ver 3.7 comes with full-fledged support for all A12-A12X-powered iPhones and iPads. Jailbreakers can now get Cydia and system-wide tweak injection on the newest iPhones & iPads. This includes iPhone XR, XS, XS Max, iPad Mini, iPad 6th Gen and more devices.
Unc0ver 3.6, the tool that Jailbreaks iPhone and iPad running on iOS 12.4, supports certain devices. Here is a complete list of all the compatible iPhones and iPads.
Update 9/10/2019: Another new version of Unc0ver has been released. We have the Unc0ver 3.6.3 out now. The developer Pwn20wnd announced this today.
Update: The new Unc0ver 3.6 is now available. At the moment, the stable version is Unc0ver 3.6.1. This supports all iPhones and iPads running on iOS 12.1, 12.2, and 12.4. It also supports A12 and A12X devices.
Update: Unc0ver 3.5.3 has been released with partial support for A12-powered devices. You can now Jailbreak iPhone XR, XS, and XS Max running on iOS 12.4.
iPhone 5
iPhone 6 & 6 Plus
Apple iPhone 7 & 7 Plus
iPhone SE
iPhone 8
Apple iPhone X
iPad Air
iPad 6th Gen
Apple iPad Mini
iPhone XS
iPhone XS Max
Apple iPhone XR
Jailbreak iOS 12.4 without computer
There are two methods to Jailbreak iOS 12.4. The first is by downloading and installing Unc0ver directly on your phone. For this method, no computer is required. You can just get Unc0ver 3.5 straight away on your iPhone/iPad and start the process. The 2nd process involves downloading Unc0ver 3.5.x IPA file and sideloading it via Cydia Impactor.
To keep things as portable as possible, we have opted for the first method. I applied the process on my iPhone X and I’m going to demonstrate the same below. Follow the few easy steps to Jailbreak iOS 12.4 via Unc0ver 3.5.
Remember that this method will work for iOS 12.4 only. You cannot use it to Jailbreak iOS 12.3 or Jailbreak iOS 13. If your phone is currently running on iOS 12.3, you have to update it to iOS 12.4 If it’s running on a beta version of iOS 13, you must downgrade it to 12.4.
Create a backup of everything on your iPhone.
Charge your iPhone up to 50%.
You don’t need any computer or data cables. Just go ahead!
Guide on how to Jailbreak iOS 12.4
The process is as follows.
Delete iOS 12 OTA files if any.
On the iPhone, go to Settings > Storage. If you have any iOS 12 OTA files, delete them. After this, reboot your iPhone.
Install latest Unc0ver on the iPhone or iPad.
On the iPhone/iPad, open any browser. In the browser, open the Unc0ver.dev or ignition.fun site and search for Unc0ver. As you find Unc0ver by pwn20wnd, click on “Get” and it will begin downloading.
Trust Unc0ver 3.7 in Device Management.
On the iOS 12.4 device, go to Settings > General > Device Management > click on “Trust” followed by your Apple ID and then click on Trust again.
Open Unc0ver 3.5 and click on Jailbreak.
The Unc0ver tool will appear on the Apps screen. Open it. You will find the Jailbreak button at the bottom. Click on it to start the process.
Your iPhone will be Jailbroken in 2-3 minutes.
As you press the Jailbreak button, the process will begin and your phone might restart in the meanwhile. If Unc0ver freezes, you don’t need to panic. Wait for an additional 2 minutes and it should work just fine.
Use Cydia and modify your device now!
Cydia will be installed and appear on the Apps screen. You can open Cydia and begin modifying your iOS 12.4. That’s pretty much it.
That’s all with the whole procedure. By this time, you should be enjoying Cydia Tweaks on the iPhone. In case you wish to go back to stock iOS any moment, you can do a full restore via iTunes. If you’ve fallen into any problems, feel free to drop your comments below.
This is a complete list of all Samsung Smart TV Apps on Smart Hub. This list includes movie apps, games, music & radio, sports, etc.
Samsung is the world leader in the Smart TV business. With 21% overall market share, Samsung leads the charts having LG next to it. Over the past few years, Samsung has upped its Smart TV game. Just like its smartphones, Smart TVs are becoming thinner and smarter.
MU7000 4K TV showing Smart TV Apps
If you are not familiar with the Smart TVs already, then let me tell you what Smart TVs are. The TVs that come with integrated internet and support Web 2.0, and also run an operating system are called Smart TVs. Most people misunderstand Smart TVs for Android TVs, but that’s not the case. Samsung’s Smart TVs run their own Tizen software. Samsung uses its Smart Hub to allow apps and games on its TV.
Tizen Smart Hub on MU7000
It also means that you cannot run the Android apps straight away on your Samsung Smart TV. Furthermore, you cannot sideload any external apps on TV. Samsung has its own app store on Smart TVs. Only Tizen-supported applications are available there. Unfortunately, there is not a huge number of apps for Tizen-based TVs. There are nearly 300 Samsung Smart TV Apps in total.
Before you take a look at the Apps for your Smart TV, let me give you an idea of the popular apps.
Popular Samsung Smart TV Apps
YouTube
Thankfully, Smart TV supports the most popular free content-streaming application. In 2019, YouTube has already become the biggest video sharing platform. You can watch content from your favorite YouTuber or watch a live stream right away. YouTube uses your Google Account to work. If your Google Account has any previous YouTube history, the Smart TV will automatically sync it.
Netflix
The platform that needs no introduction. Netflix runs in full HD on Samsung Smart TVs. It even runs in HDR on the supported TVs. You can enjoy the Movies, TV Shows, Documentaries, and Animes in a crispy resolution now. You must own a Netflix account in order to access it.
Prime Video
Just like Netflix, Prime Video is another application where you can watch movies, TV shows, seasons, animes, and documentaries. To run the Prime Video, users need the Prime Video account. In comparison to the Netflix membership, Prime Video is much cheaper and consumes fewer internet resources.
Dailymotion
Dailymotion works are similar to YouTube. It doesn’t have very high-end features like YouTube, but it can be used as a YouTube alternative. Problem with Dailymotion is content censorship. Like YouTube, Dailymotion doesn’t have very strong content filters in place. Furthermore, the content recommendation algorithm of Dailymotion is no that strong either.
Vimeo
Vimeo is for the users who hate ads. If you are tired of seeing those breaks in your videos on YouTube, again and again, its time to switch to Vimeo. It also offers a very high-end streaming experience. Vimeo can be heavy on your internet resources, so be a little careful while using it.
Plex
Plex is the most popular client-server media player. You can install Plex on your computer, phone, Nvidia Shield, Smart TV, and many other devices. After installing Plex, you can add media libraries to your Plex Player. The Player will handle the rest. After this, you can install Plex on any other device, access your media player and play the content on the other device. Basically, you are making your own media server and accessing its content across multiple devices.
BBC News
The name speaks for itself. To stay connected with what’s happening around the globe, BBC News is your way to go. You can watch BBC News Live on Samsung Smart TV.
Al Jazeera
Just like BBC News, you can watch Al Jazeera live on Smart TV. The channel content streams in HD on the Samsung Smart TVs.
TuneIn Radio
To listen to your favorite podcasts, weekly top-charts from the pop and rock genre, or listen to any other kind of music, TuneIn Radio is your way to go. It runs flawlessly on the TV.
Spotify
Spotify, the most popular music streaming application is also available for Smart TV, but not in all the regions. If you are in the US, UK, or India, you may be able to use Spotify. It’s not available in a large number of countries at the moment.
Remember that the availability of all these apps is totally subjective to your religion. Some of these apps will be available in your country and some not. Furthermore, the applications for your country may completely differ from the ones mentioned here.
Samsung Smart TV Video Apps
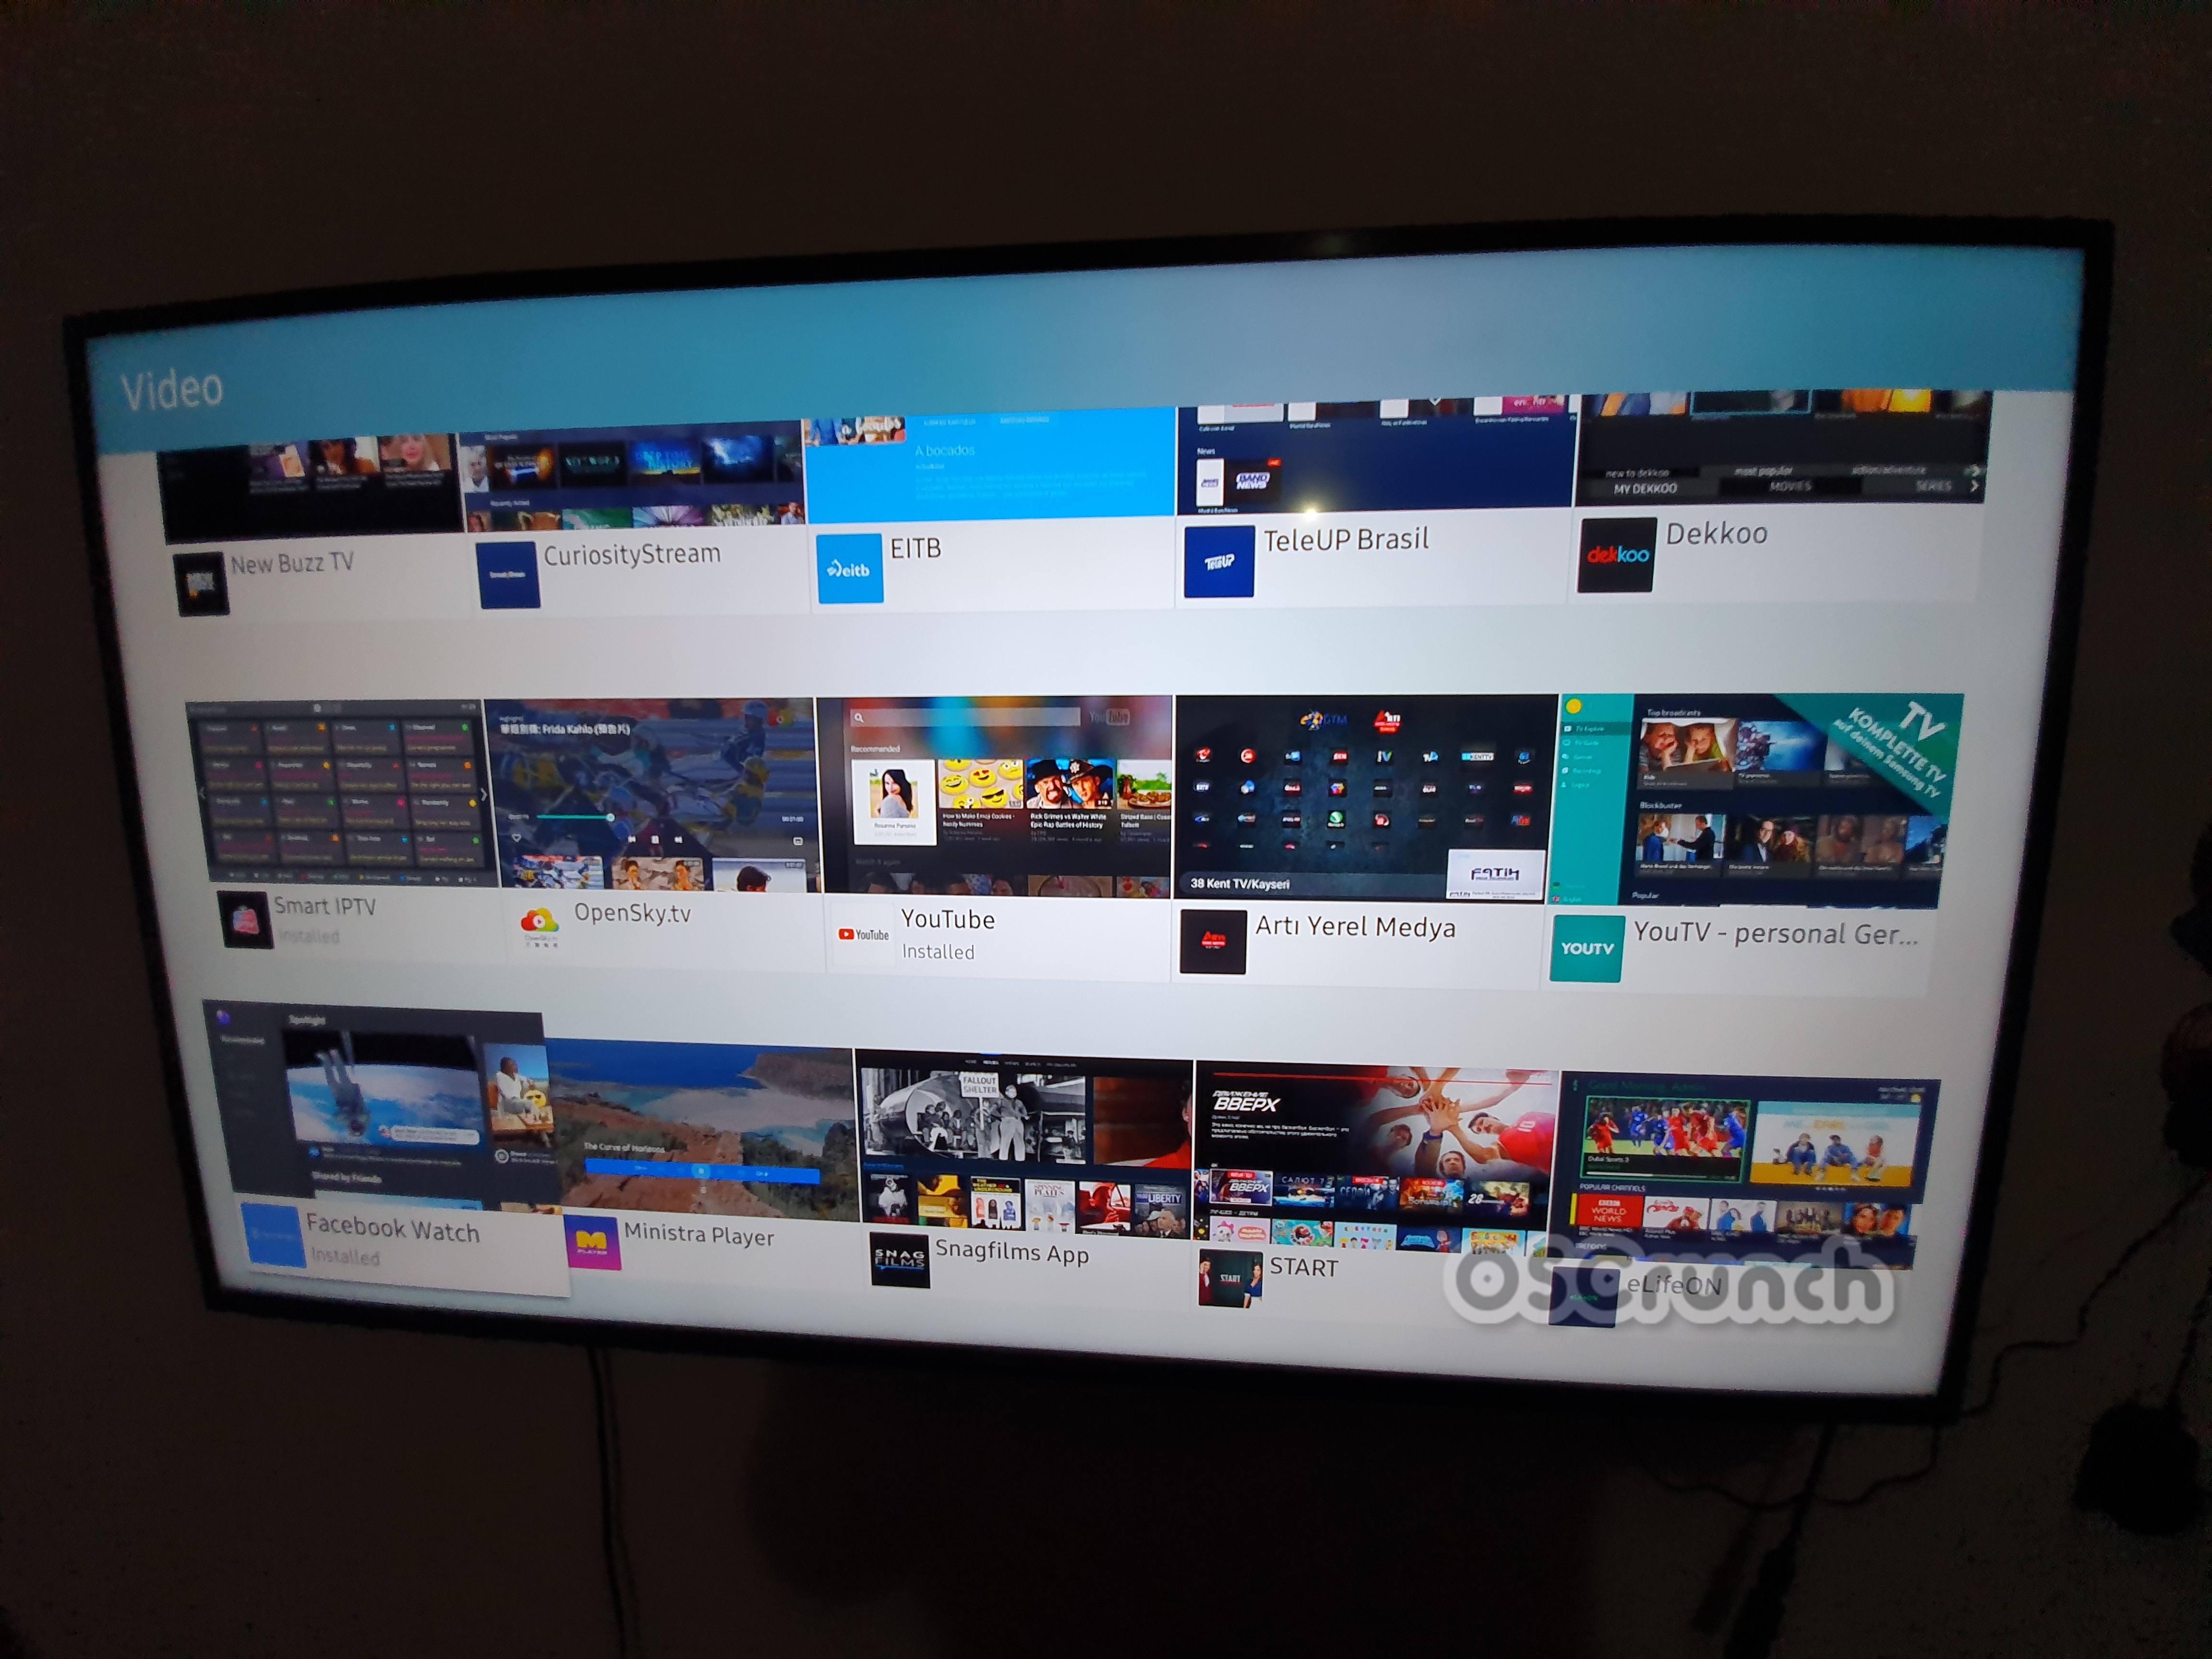
Following is a list of all the Video applications on the Samsung Smart Hub. Remember that these Smart TV Apps include the live streaming applications, these also include the screencasting or screen-mirroring apps and also the documentary apps.
Video Apps Preview Screen on Smart Hub
The Samsung Smart TV Apps reach a number of whopping 146. All 146 Video Apps of Smart TV are listed below according to their row order.
Video Apps – Row
Smart TV App Name
1
TMS Player
Shant Digital TV
ОК Виде
Digiturk Play Yurtdisi
Plex
2
Dailymotion
Super3
ViNTERA.TV
ChannelSPB
Vidio
3
TRT
ZEE5
iflix
Alexander Kondrashov
Boong Cartoon
4
RC Buyer
Filmbox.live
TEATRIX
Net ipTV
TV3
5
Sun NXT
Audi
IPTVPORTAL
SUPERNOVA TV po
Hmara.TV
6
Mediabay
Media Station X
M3.hu
Love Nature 4K
DIGI TV
7
OttPlayer
ANM HD TV
The Lionel B Show
ZicZic Supers Songs
Gloomy House
8
VIN TV
GTA MOD VIDEOS
NOLLYFOCUS
Topsy
DJ Smile VIP
9
Sheet Music Boss
Nanomid Player
MALL.TV
Shalom TV
Gluuoo
10
MasFace
Aomawhee TB
Comedy Bar TV
FTV+12+Channels
Holy Places 4K
11
DancetrippinTV
4NET.TV
Duck TV
Set iptv
Hayat Media
12
MEGOGO TB N KNHO
GjiarafaVideo
Digital Concert Hall
SmartUP
Kartina TV
13
NoraGo
SHAHID
Red Bull TV
Divan.TV
Moja WebTV
14
NetTV Plus
JadooTV Farsi
Wiener Staatsoper Live
takt1
NhacCuaTui
15
New Buzz TV
CuriosityStream
EITB
TeleUP Brasil
Dekkoo
16
Smart IPTV
OpenSky.tv
YouTube
Arti Yerel Medya
YouTV
17
Facebook Watch
Ministra Player
Snagfilms App
START
eLifeON
18
NewsFrontTV
JadooTV
Neverthink
TV RAIN
SQAD
19
GSS MEDIA WW
put.io
Shalom World TV
Mercedes-Benz TV
Mezzmo
20
IPTV ILIRIA
Hactorwee bpemr
Allpay
Bexfy
MUBI
21
Yupp TV
GjirafaVideo
Vizbee
Met Opera on Demand
BBC News
22
Viaway
PlayKids Preschool
Arpinet TV
DeliverfyTV Portal
VTV Go
23
Pycckoe KNHO
Porsche TV
Funbox UHD Tizen
Vimeo
MegaCast
24
LVL
YuppFlix
AVIION TV
OTTPlayer
YouTube Kids
25
Eynio VisionTV
Viewster – Free Movies
TMG Network
Smart STB
DS Video
26
The Dream VR
Lyca TV Pro
TV Cast
Playmigo
Innovation TV
27
Al Jazeera
TV Plus
myGreeceTv
GoLiveTV
Sleep Baby Owl
28
Netflix
Prime Video
IttOtt.TV
IZITV
Tvip
29
BalkaniyumTV
Toon Goggles
Screens on fire
Rockaxis TV
icflix
30
TED
Samsung Smart TV Sports Apps
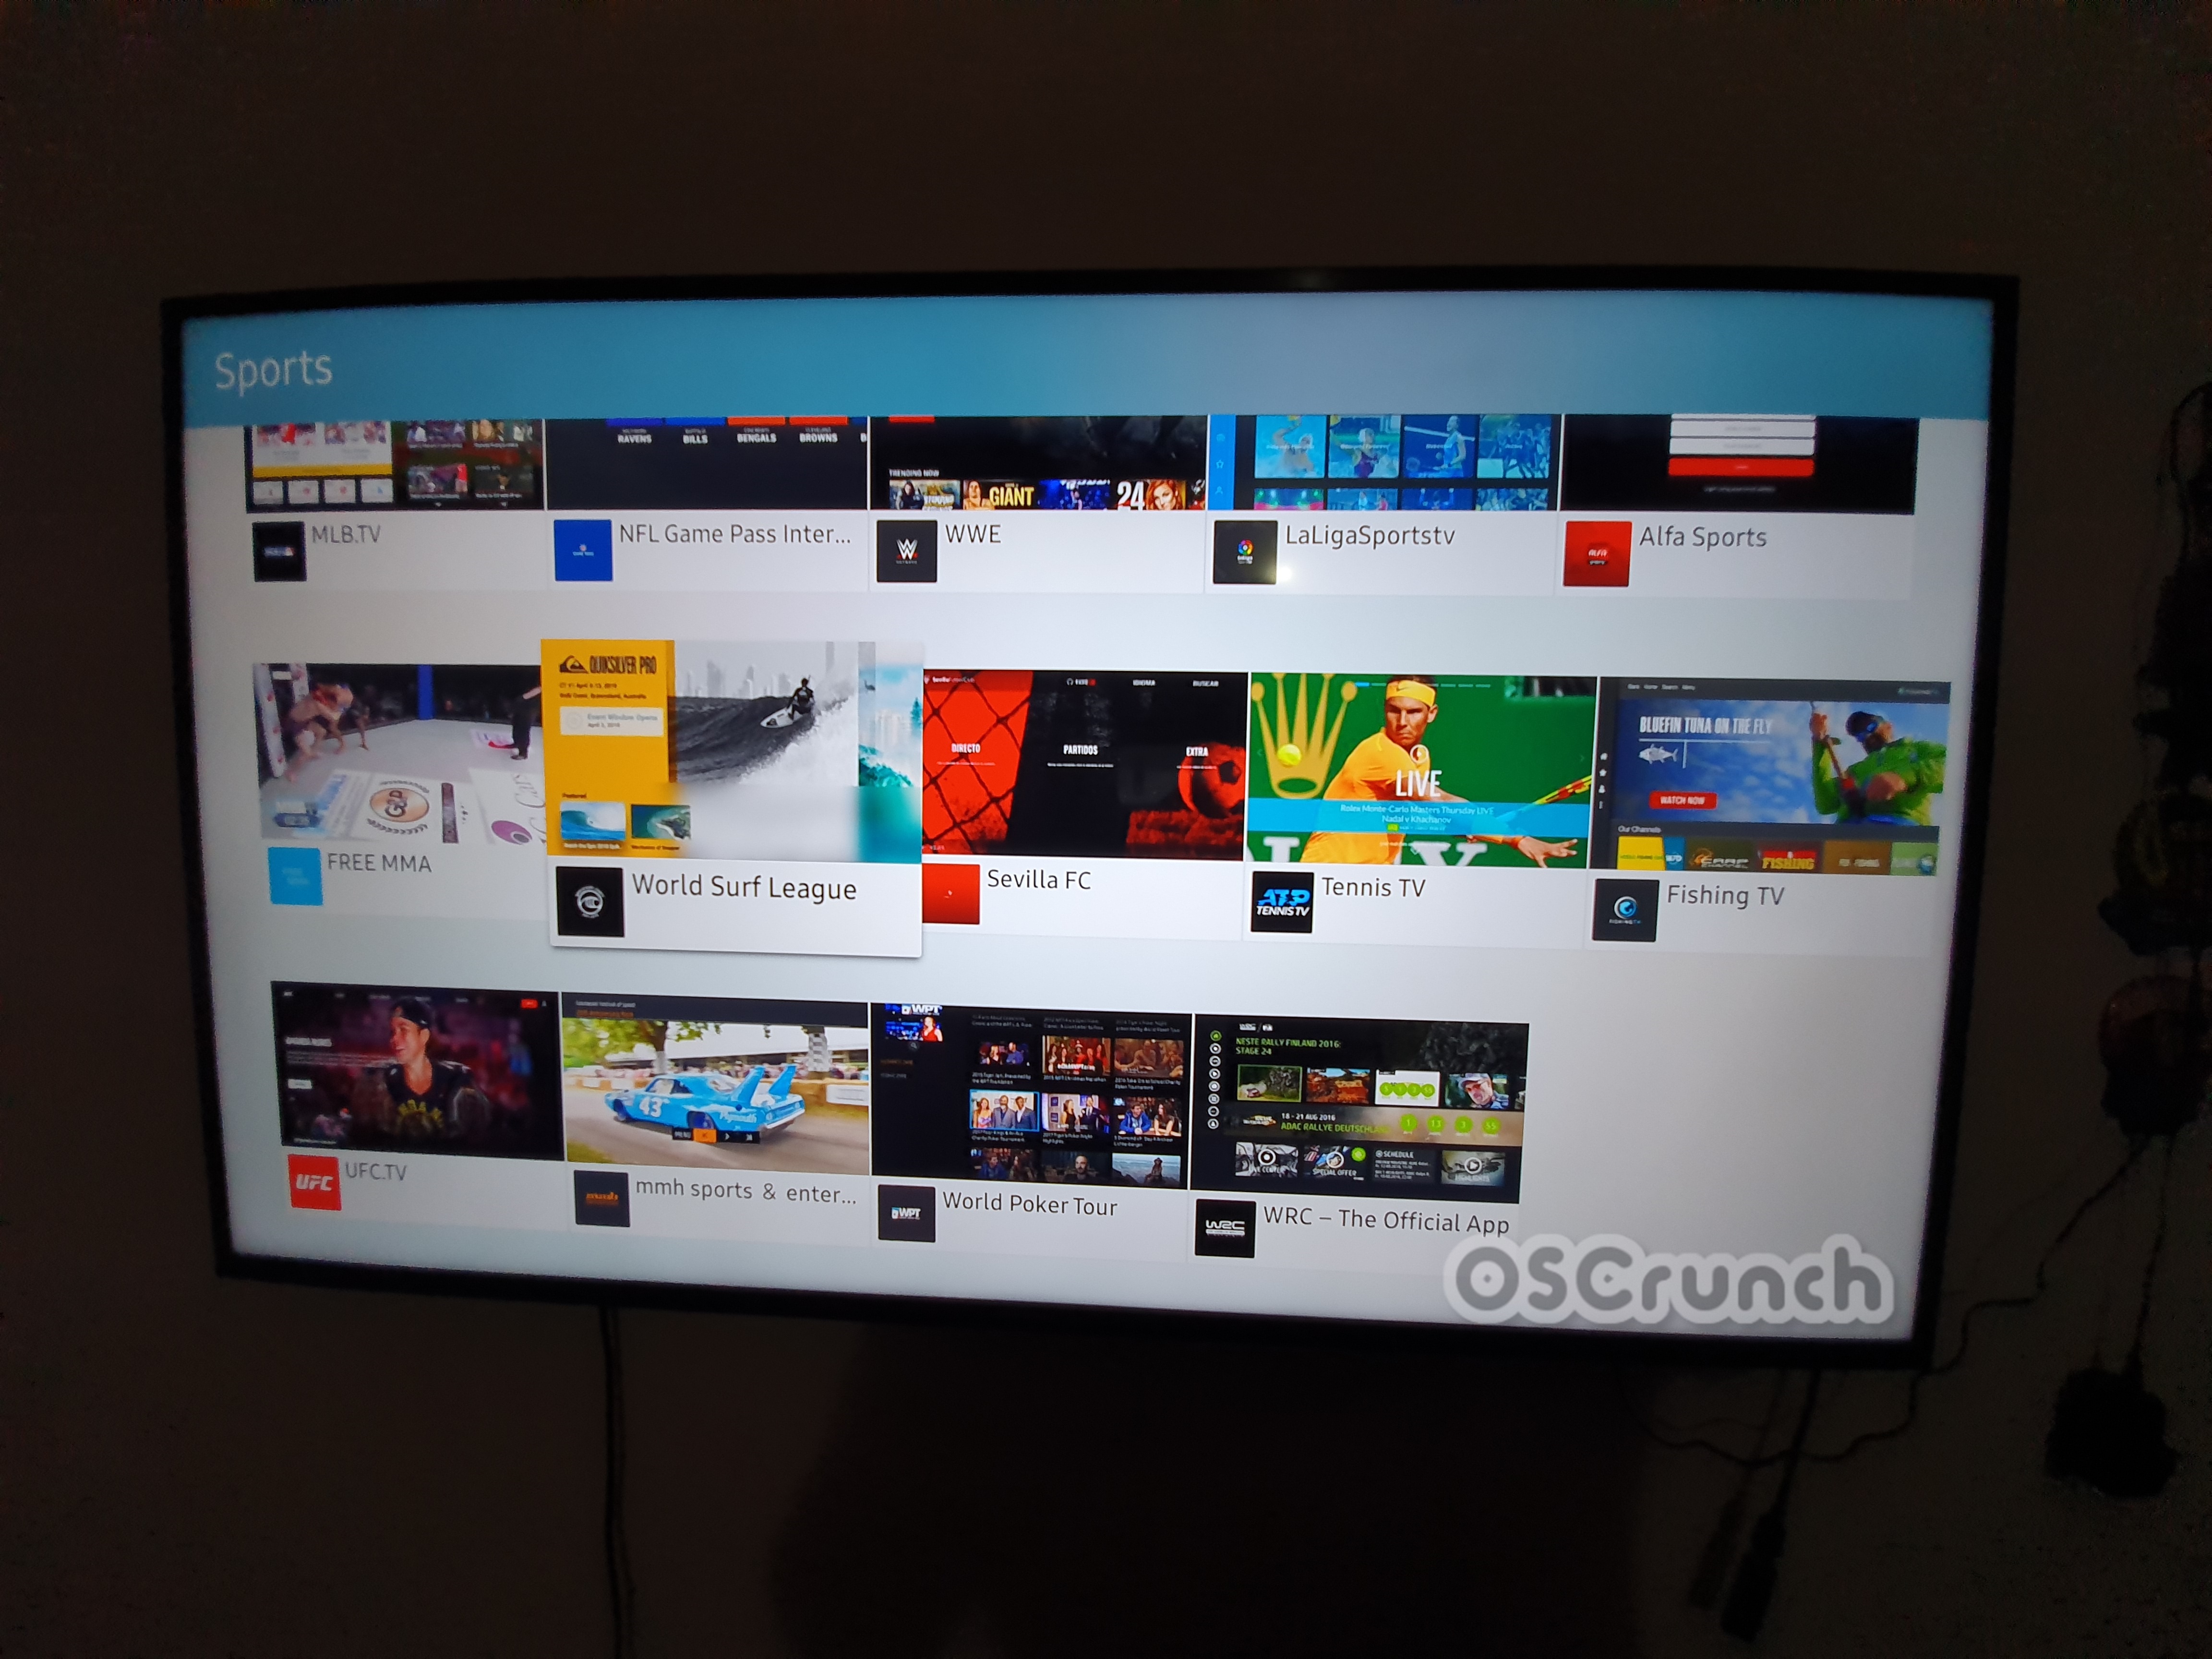
The Samsung Smart Hub has 14 sports apps. These including some famous sports apps too like the WWE and MLB.TV. You also have the UFC.TV and World Poker Tour apps. Here is a list of all 14 Samsung Smart TV Sports Apps.
Sports App Row
App Name
1
MLB.TV
NFL Game Pass
WWE
LaLigaSportsTv
Alfa Sports
2
FREE MMA
World Surf League
Sevilla FC
Tennis TV
Fishing TV
3
UFC.TV
mmh sports & entertainment
World Poker Tour
WRC – The Official App
Samsung Smart Hub Games
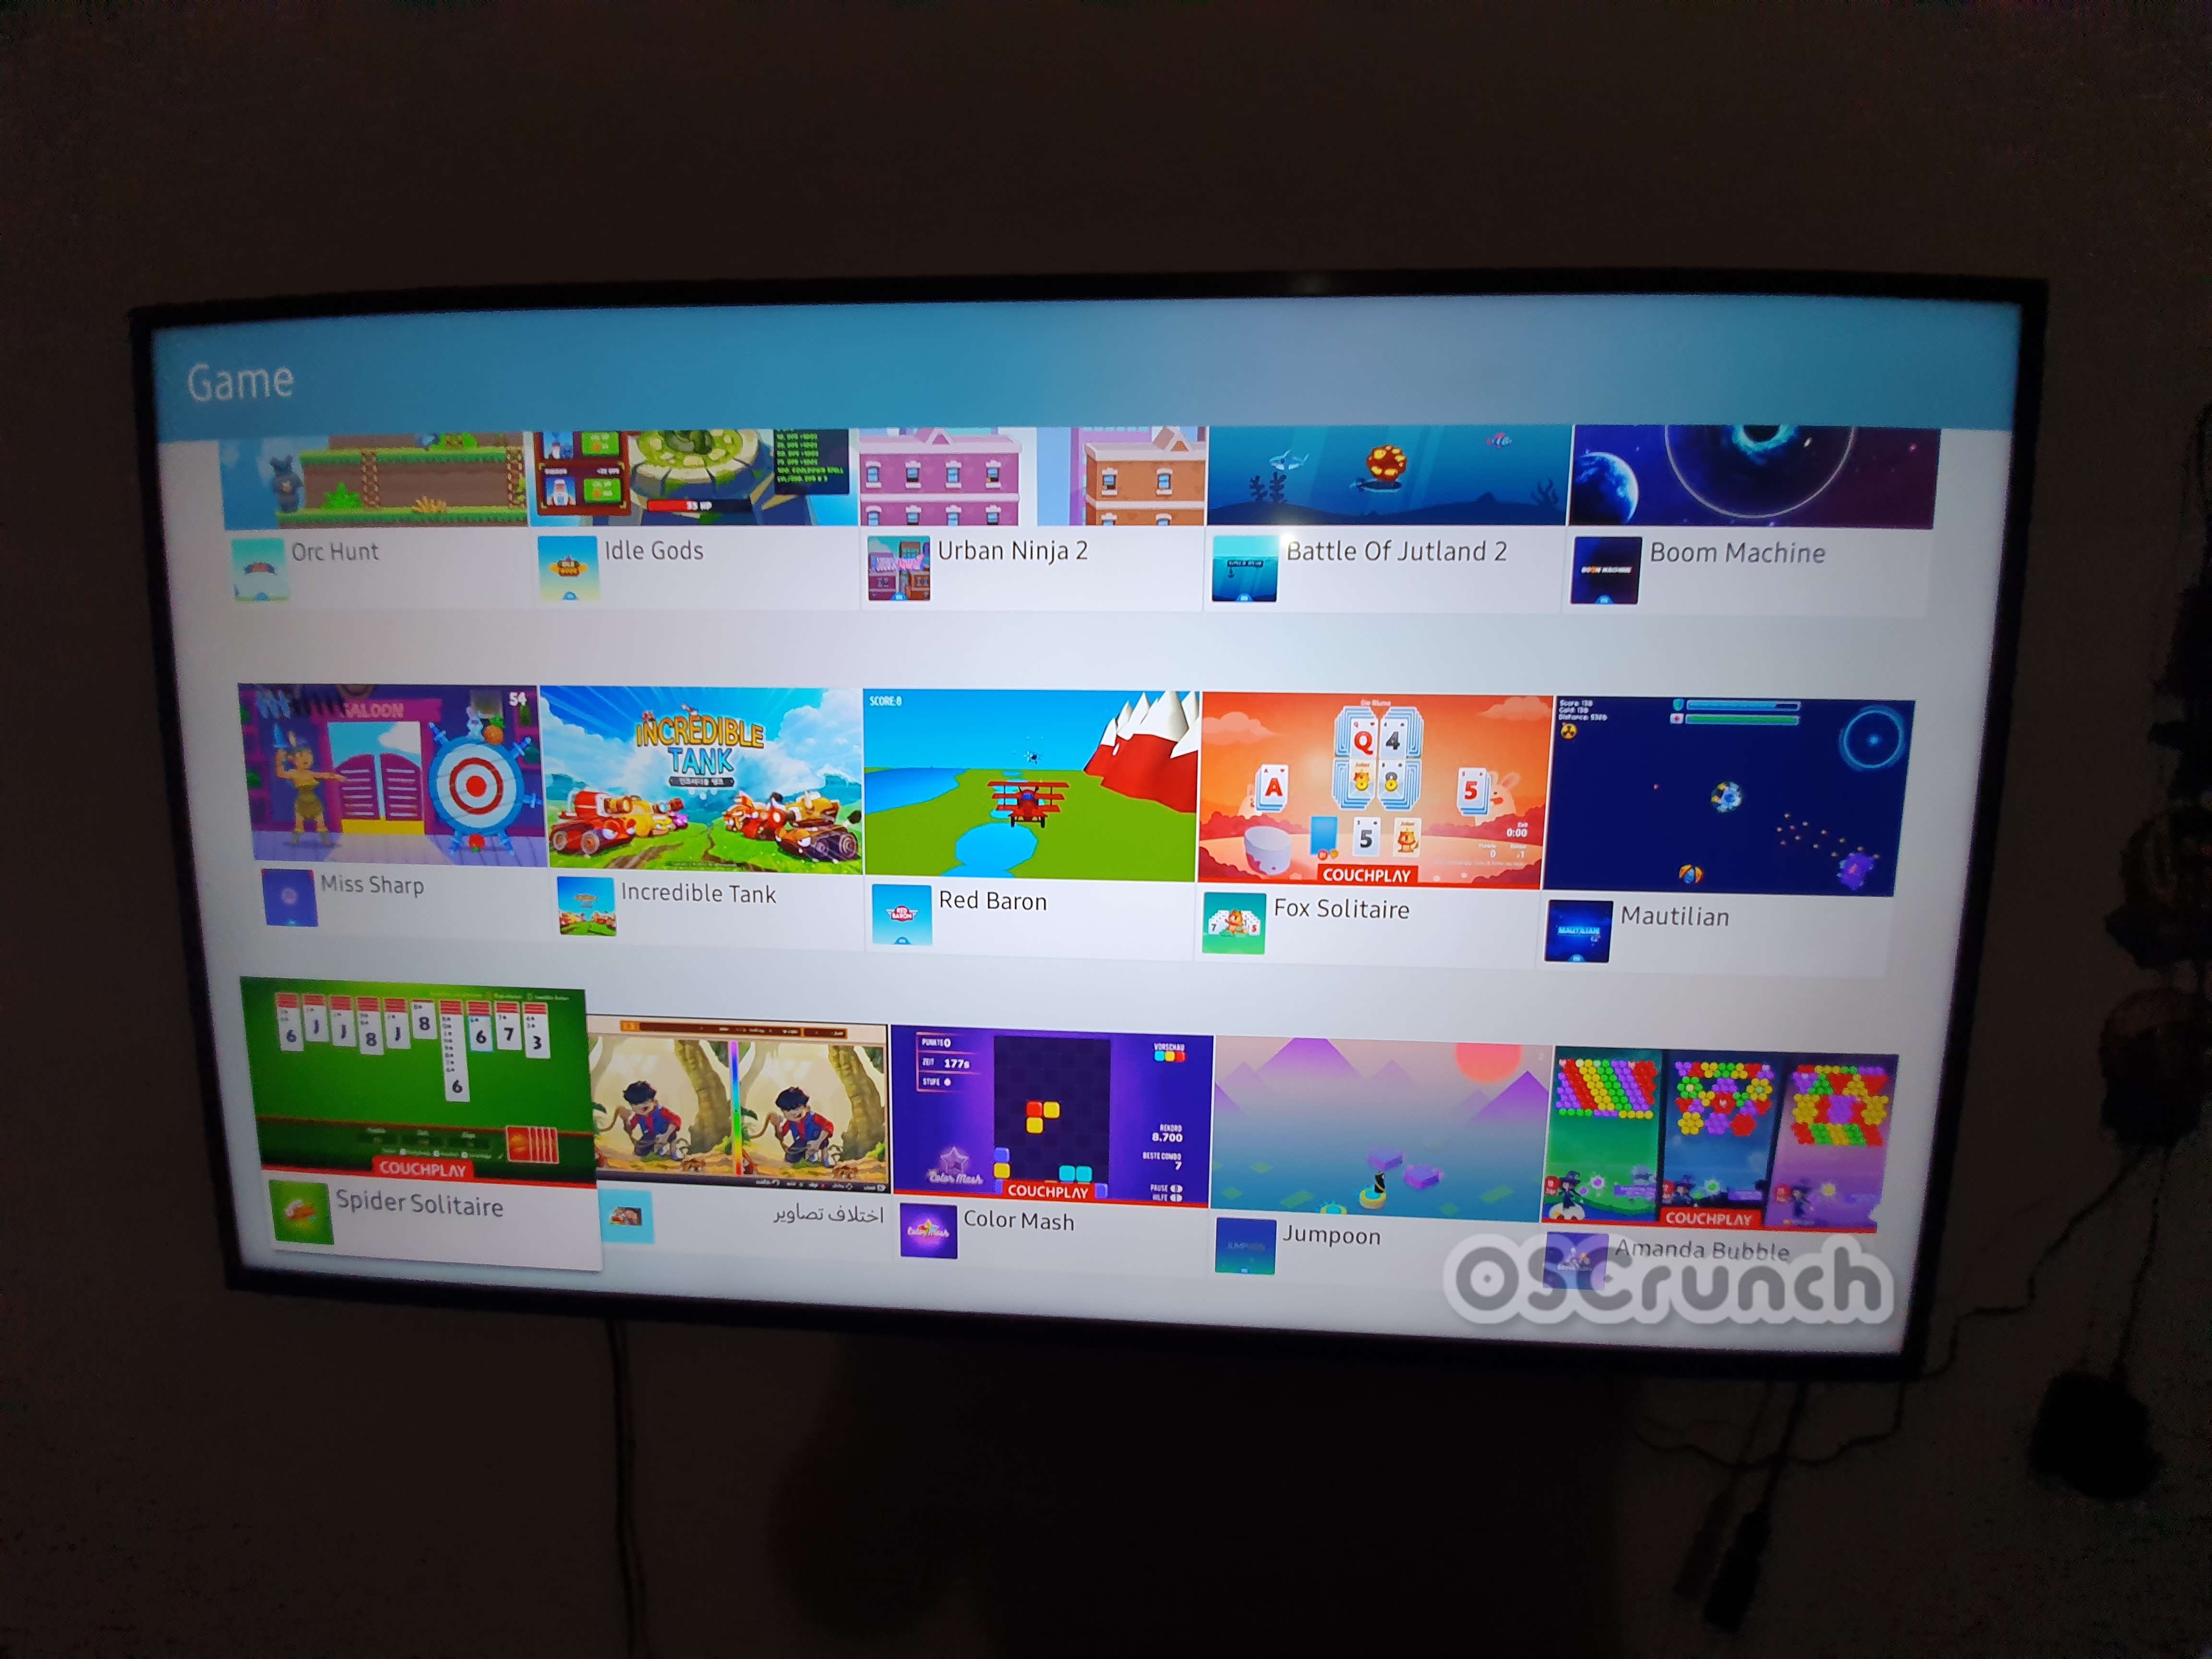
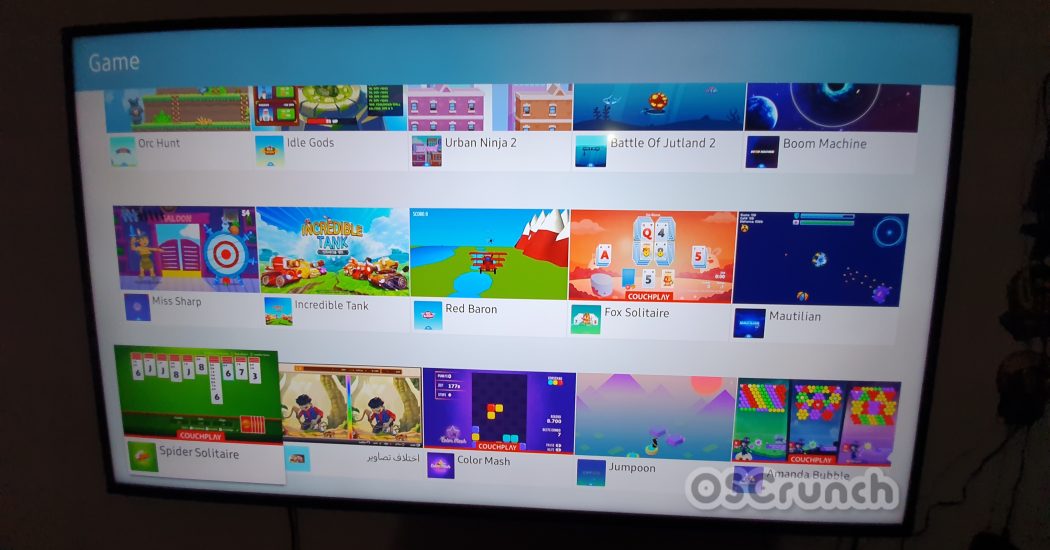
There are 59 games in the Samsung Smart Hub. These are small and easy games that you can play with the remote of your TV. The smart TV does not come with a very powerful CPU and GPU which means you should not expect some resource-intensive games on your TV. Most of these games are there to kill your boredom only. Take a look at all 59 Samsung Smart TV Games in the list below.
Row
Game Name
1
Orc Hunt
Idle Gods
Urban Ninja 2
Battle Jutland 2
Boom Machine
2
Miss Sharp
Incredible Tank
Red Baron
Fox Solitaire
Mautilian
3
Spider Solitaire
Ikhtilaf Tasaveer
Color Mash
Jumpoon
Amanda Bubble
4
Rapid Drift
Star Fighter
Ball O Matic
Snow Battle
Store Keeper
5
Kings of Solitaire
Flying Gomes
Nut War
Laser Mazer
Zebra Crossing
6
TACKs
Quadrix
Let it Surf
Bobble Dobble
Spacedog Yuri
7
Drink Crush
Diaomond Mine
Cocktail Party
Solitaire HD
Rampant Heroes
8
Unblock.It
Battle of Jutland
n-slide
Wal Venture
Numeroso
9
Urban Ninja
Lunar Lander
K-141 Kursk
Flying Fish 2
Flying Fish
10
The Berlin Wall
2048 Maniac
Tarmac Race
Super Candy 2
Space Bubble Defender
11
Munch
Snake
Duck Shooter
TicTacToe4K
CrazyKart
12
Doctor of IQ
House of Quiz
El Doardo
Monkey Madness
Music & Radio
If you live listening to the music, podcasts, and random radio shows, this section is for you. The Music & Radio section has some of the finest applications for this purpose. You will apps like Deezer and TuneIn in this section. These apps come for free and you can play them in the background while having the TV’s screen turned off. There are 11 such applications in total. Take a look at all the Music & Radio Apps in the Smart Hub.
Row
Music & Radio App Name
1
Digital Concert Hall
RFE/RL
Deezer
Radio by my Tuner
The KARAOKE Channel
2
Karaoke TV by Redkaraoke
Calm Radio
Hotelradio.fm
TuneIn
Dirigent
3
42NET Smart Player
Apps to Kill Time
This is just another section of the apps in the Smart TV. These apps are already there in the Movies, Games, Sports, and Music & Radio apps. Samsung has just picked the best possible apps and added into this category. You can take a look at the Apps to Kill Time here too.
Row
Apps to Kill Time
1
Plex
MLB TV
dailymotion
Filmbox Live
Audi
2
OttPlayer
Digital Concert Hall
Red Bull TV
Wiener Staatsoper Live
YouTube
3
TV Rain
UFC.TV
Mercedes-Benz TV
Flying Fish 2
Flying Fish
4
2048 Maniac
MUBI
YuppTV
Porsche TV
Vimeo
5
WRC – The Official App
Netflix
Prime Video
Kanal13
Rockaxis TV
6
Monkey Madness
icflix
TED
SmartView Enabled
There are the smartview enabled applications. These applications can run on your phone from the TV and from the phone to your TV by casting the screen. The SmartView of your Samsung or any other Android handset will work smoothly with these apps. The SmartView Enabled apps include.
Row
SmartView Apps
1
Gjirafa Video
Pycckoe KNHO
Vimeo
MegaCast
Playmigo
2
Toon Goggles
icflix
Smart Life
Smart Life applications are the utility apps in Smart TV. These apps include the following.
Row
Smart Life Apps
1
MP3Quran
Market Hub
SeeColors
McAfee Security for TV
Smart STB
2
Screen Size Simulator
Komfort Cloud Smart
News & Weather Apps
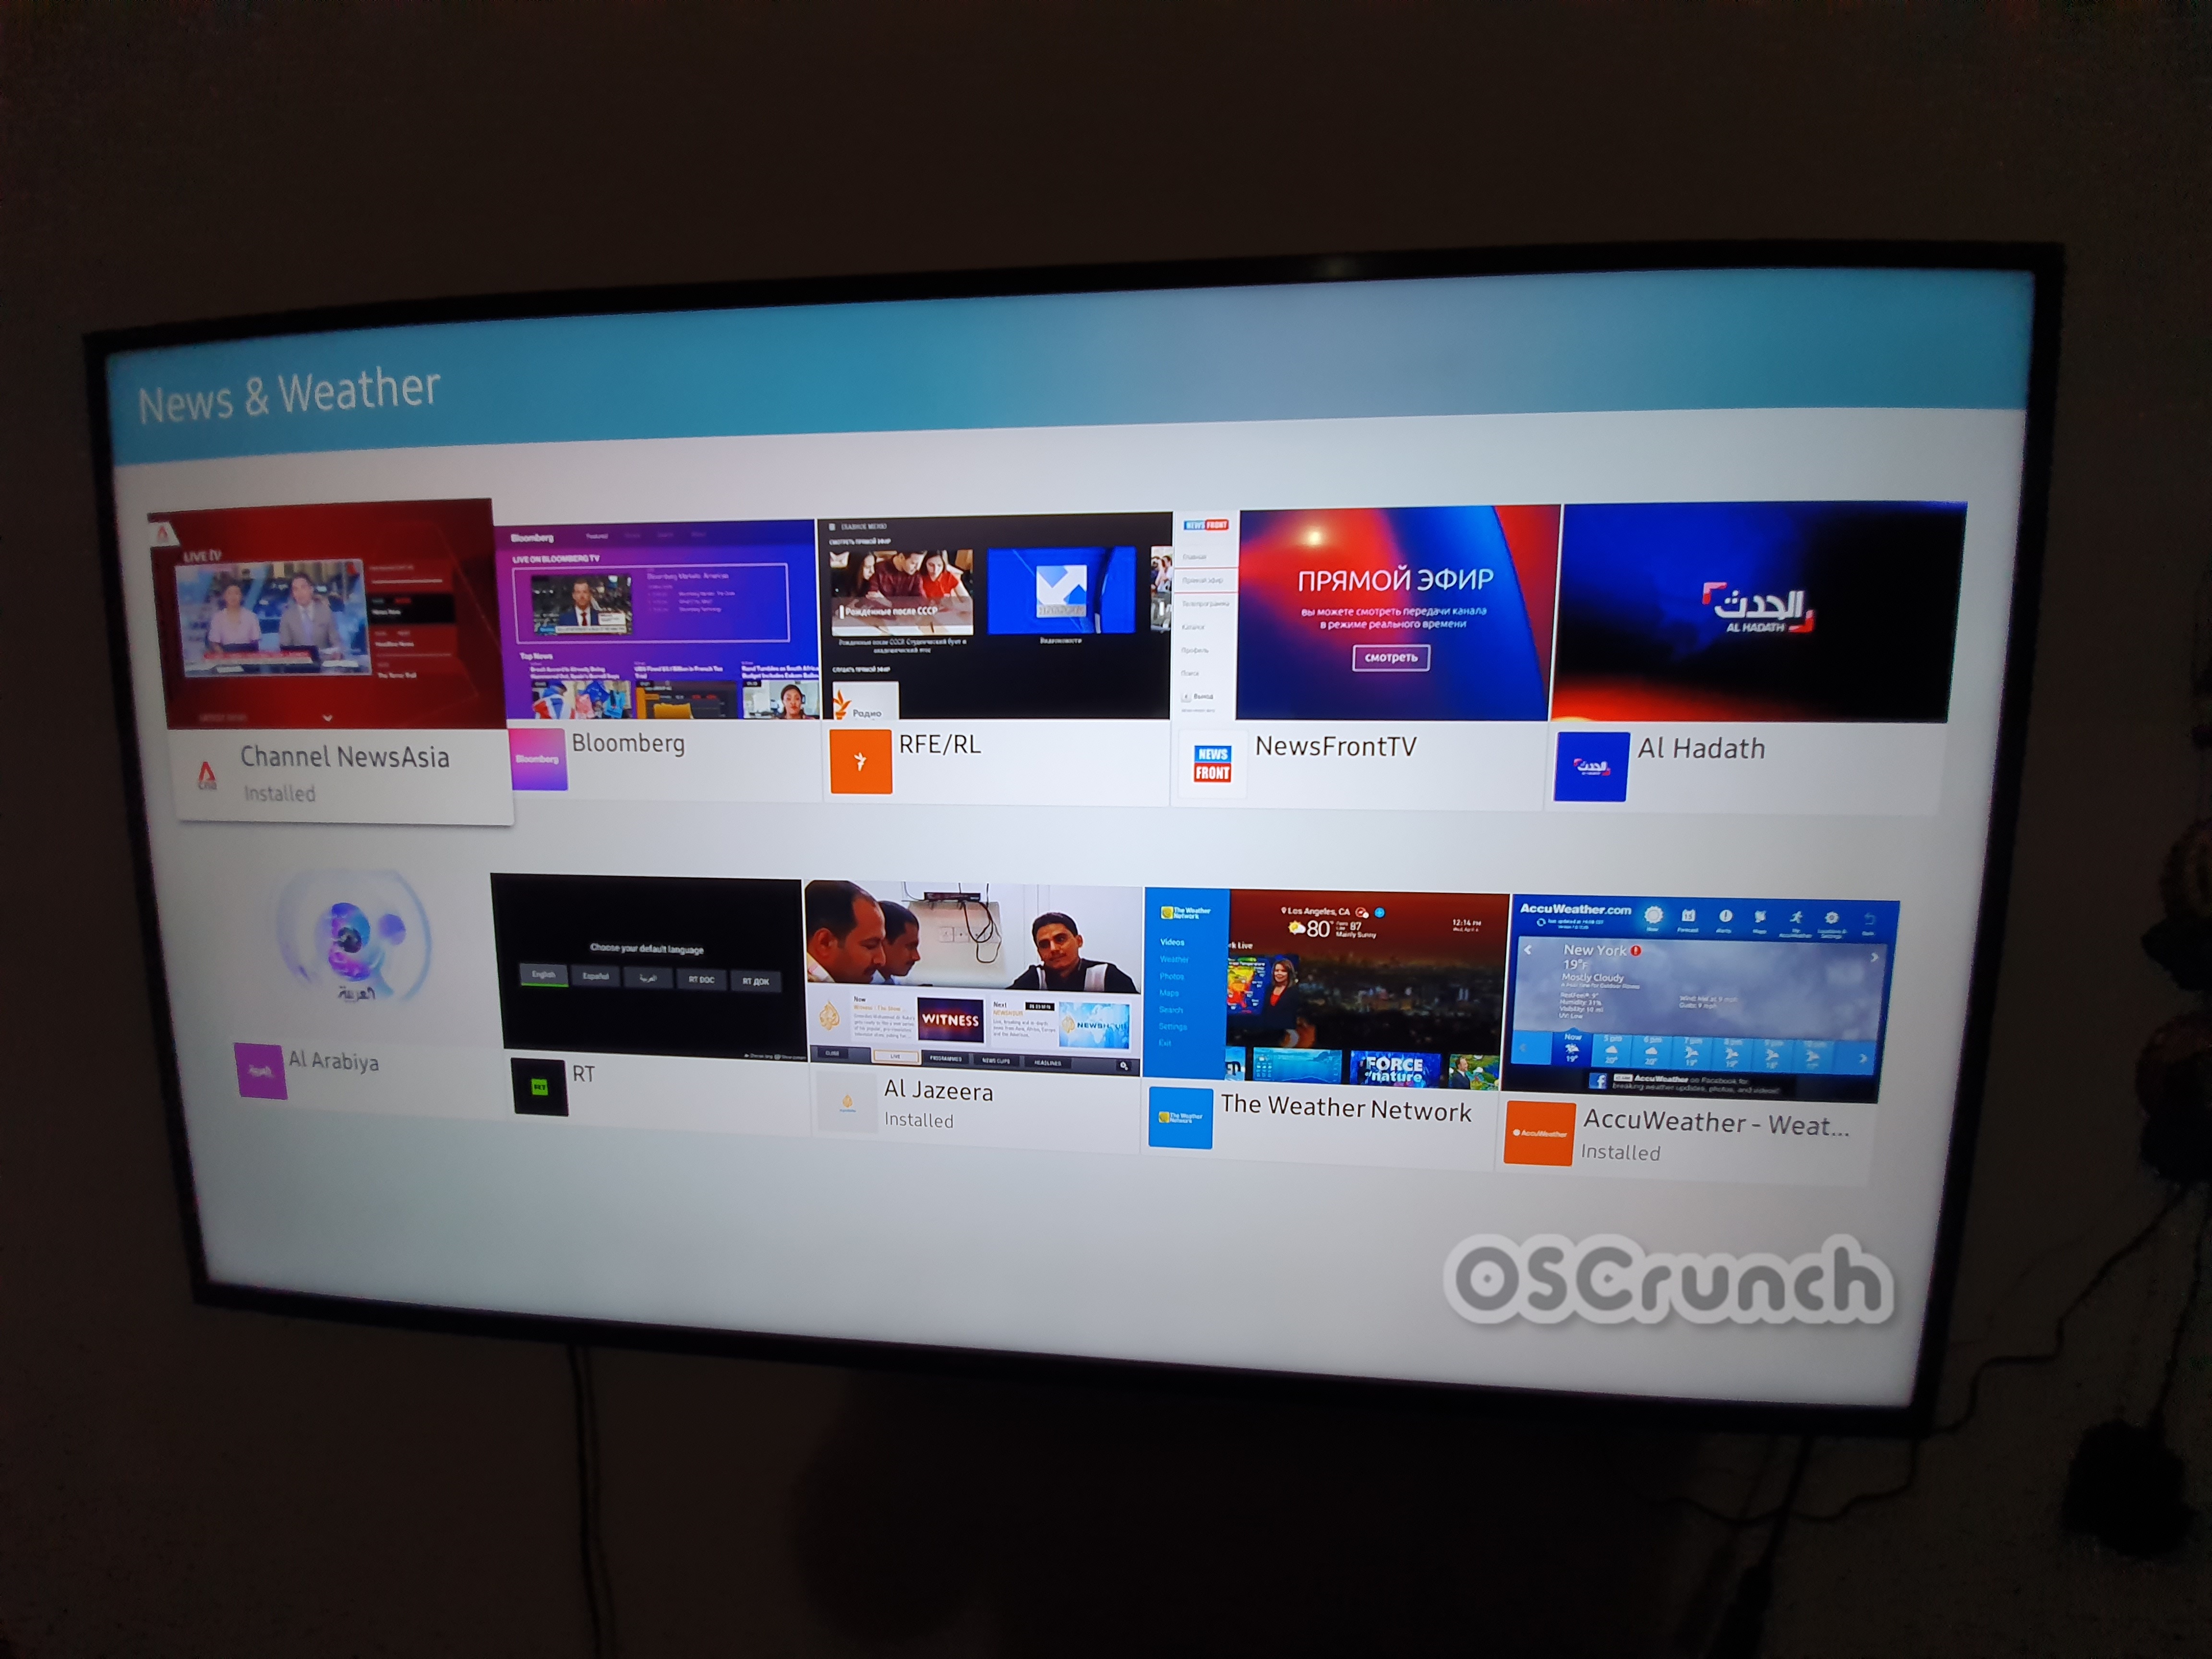
Lastly, there are the News & Weather applications to keep you informed. There are 10 such applications in total.
Row
News & Weather Apps
1
Channel NewsAsia
Bloomberg
RFE/RL
NewsFrontTV
Al Hadath
2
Al Arabiya
RT
Al Jazeera
The Weather Network
AccuWeather
Content Preview Applications
Content preview apps are Samsung’s handpicked apps for mixed content. These apps are picked from all the categories mentioned above. Since there is no new or unique application listed under Content Preview App, I’m not mentioned them once again here to avoid repetiton.
Final Words
That’s all with the list of Samsung Smart TV Apps. What applications are you seeing in your region? Don’t forget to drop the names in the comments below so that we can add them to this list. Stay connected.
Cameras of smartphones have become the most important decision making factor these days. Millennials want maximum value for money, and one thing they don’t want to compromise on is the phone’s camera. Keeping in view the growing trend of smartphone photography, Chinese phone makers started increasing the number of megapixels of the camera sensors. The focus has entirely shifted from camera quality to the number of pixels now. Sony and Samsung both have introduced their sensors trying to keep a balance between the pixel quantity and quality. Their new sensors, IMX586 and GM1 offer good specs on the paper.
Sony IMX586 vs Samsung GM1
Phone manufacturers like OnePlus, Oppo, Xiaomi, and Samsung have been using the Sony sensors for a while. The Samsung camera sensors have also become mainstream now and Xiaomi seems to be using them in most of its phones. The Redmi Note 7 Pro recently came with the GM1 sensor. The Realme X is coming with the 64MP GW ISOCELL Samsung sensor. And just yesterday, Samsung and Redmi announced a new 108MP ISOCELL HMX Sensor.
If you are in the process of selecting a phone, and the phone comes in two options i.e. IMX586 or the Samsung GM1 camera sensor, it can leave you confused. To make a quick decision, you must learn about all the basic differences between the Sony IMX586 and Samsung GM1. That is exactly why I am making this Sony IMX586 vs Samsung GM1 comparison.
Sony IMX586
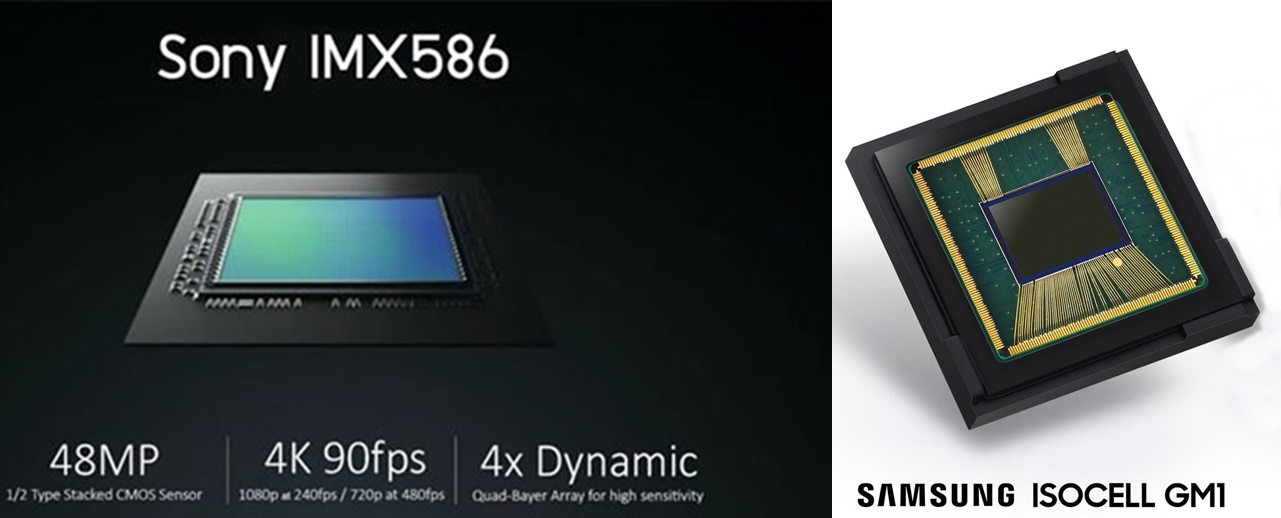
The Sony IMX586 is a 48MP stacked CMOS sensor. It uses the Quad-Bayer color arrangement to add life to the pictures. The previous sensors used classic Bayer RGB pixel pattern. The Quad-Bayer RGB pixel pattern is an extension of the RGB pattern.
The Quad-Bayer arrangement allows three modes i.e. two-exposures HDR, Quad-binning, and normal.
Quad-Bayer vs Class Bayer
With these three modes, the Quad-Bayer pattern can result in very high-resolution pictures, it can perform very well in low-light conditions with the help of pixel binning, and it can high-contrast scenes with the help of two-exposures HDR. The basic idea behind Sony IMX586’s Quad-Bayer tech was to deliver great low-light pictures.
In the Quad-Bayer arrangement, each pair of pixels senses using different parameter reducing the effective resolution by 4x. This is why these sensors need to have a very high resolution. You must have seen that the Quad-Bayer sensors usually sport a 10MP or 12MP default mode. The sensors can be manually switched to the original resolution.
For example, the Sony IMX586 sensor on the Galaxy A80 is set to 3:4 mode, which captures pictures at 12.2 megapixels. These pictures have an effective resolution of 4032 x 3024 pixels.
Switching the phone’s camera to 3:4H captures pictures at a resolution of 6000 x 8000 or 8000 x 6000 pixels. At this resolution, it takes pictures at 48 million pixels, which is the original 48 MP resolution of the camera. I have also discussed this in detail in my Samsung Galaxy A80 camera review.
Camera sensor manufacturers use 0.8-micron pixel to work in a group of 4. Since these are very tiny sensors, it is possible to put them in the form of a group to achieve great results.
Using the camera in the individual sensor mode can perform at its best in the low-light conditions. That is because a single sensor is more effective when the light conditions are poor. This is also why the pixel binning mechanism helps to break it down to 12MP from 48MP.
For the most part, the Samsung GM1 and Sony IMX586 sensors are the same. The major difference is between their tech. Samsung has its in-house tech while Sony has its own.
The Samsung GM1, GD1, GW1, and HMX sensors use the Tetracell and Tetracell Plus technology. The same kind of technology is called Quad-Bayer for Sony sensors.
Tetracell Technology, like the Quad-Bayer, combines tiny pixels of 0.8-micron to deliver light sensitivity equal to 1.6-micron pixels. The Tetracell technology also takes pixel binning into account which helps break the 48MP resolution into affective 12MP resolution by switching to a single sensor. The primary focus of Samsung’s new ISOCELL sensors is to perform better in low light conditions.
The GM1 sensor uses the typical 2×2 array to recognize colors, and it outputs collective results only. It can deliver a resolution of 4000 x 3000 only, which means 12 million pixels/12 Mega-pixels. Samsung is using Software techniques to bump this up to 48 Mega-pixels which greatly compromises on the picture quality. Samsung uses pixel interpolation to theoretically convert a picture of 12MP into 48MP and this is where the Sony IMX586 takes the lead.
Sony IMX586 vs Samsung GM1 – What’s the difference?
The Sony IMX586 has a true 48 million pixels resolution. By using the phone’s camera in 3:4H mode, you can get pictures with great details and high-sharpness. Zooming into these pictures will not lose the quality or break the pixels.
On the other hand, Samsung uses pixel interpolation to convert a 12MP picture into 48MP for its GM1 sensor. The software part here completely damages a picture. Zooming in on a picture taken by Samsung GM1 will immediately show you how it damages the quality.
The Sony IMX586, for now, is definitely a better choice over the Samsung GM1 sensor. Although both the sensors do not have a very good result when compared to a flagship phone of 2017 or 2018, those are the two best sensors you have for the existing and upcoming midrange & premium midrange devices.




![Set up an iCloud account on Android [ Tips ]](https://techbeasts.com/wp-content/uploads/2019/08/Screen-Shot-2019-08-21-at-6.25.41-PM.png "Set up an iCloud account on Android [ Tips ]")
![Jailbreak iOS 12.4 using Chimera [PC & No PC – Chimera 1.3.x IPA]](https://techbeasts.com/wp-content/uploads/2019/08/Chimera-Jailbreak-1.jpg "Jailbreak iOS 12.4 using Chimera [PC & No PC – Chimera 1.3.x IPA]")




![How To Hard Reset Galaxy Note 10 Plus [ Tutorial ]](https://techbeasts.com/wp-content/uploads/2019/08/Screen-Shot-2019-08-20-at-2.11.35-PM.png "How To Hard Reset Galaxy Note 10 Plus [ Tutorial ]")


![Jailbreak iOS 12.4 without computer [Unc0ver 3.7]](https://techbeasts.com/wp-content/uploads/2019/08/Jailbreak-Done.jpg "Jailbreak iOS 12.4 without computer [Unc0ver 3.7]")