Home Blog Page 37

Download Unc0ver 3.6.3 IPA to Jailbreak iOS 12.4 via Cydia Impactor

0
Download Unc0ver 3.6.3 IPA to Jailbreak iOS 12.4 via Cydia Impactor
Jailbreaking my iPhone X running on iOS 12.4

Here is how to download Unc0ver 3.6.3 IPA. The Unc0ver IPA can be installed via Cydia Impactor to achieve Jailbreak on iOS 12.4.
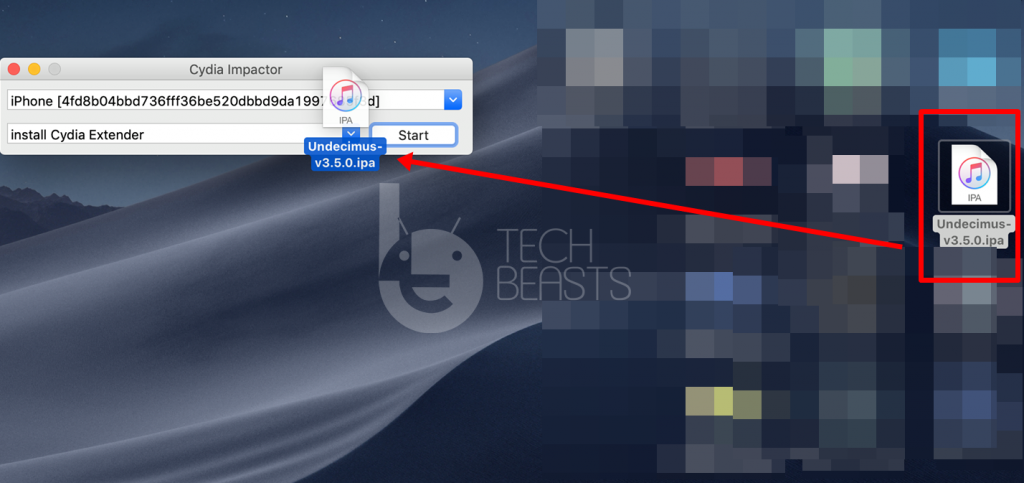
adding Unc0ver 3.5.0 IPA to Cydia Impactor

Unc0ver 3.5.3 is now out with support for iOS 12.4 Jailbreak. The Unc0ver tool can be installed directly or via Cydia Impactor. Earlier, I shared a guide to install Unc0ver 3.5.3 and Jailbreak iOS 12.4 without a computer. It’s time to download Unc0ver 3.5.3 to Jailbreak iOS 12.4 via Cydia Impactor. This guide will work for both the Windows and Mac users.

Unc0ver tool was updated just yesterday. Previously, the Unc0ver’s v3.3.0 came out with support for iOS 12.2 Jailbreak. It also supported iOS 12.1 and a few prior versions. There was no Jailbreak for iOS 12.3 and iOS 12.4 so far. The iOS 12.3’s Jailbreak still remains a mystery while pwn20wnd has already done it for iOS 12.4. The developer announced Unc0ver 3.5.3 on his twitter account.

A number of iPhone/iPad owners have already tested the Unc0ver 3.5.3 and they found it working. Furthermore, they tried installing the stock iOS 12.4 over a Jailbroken iOS 12.4 and the process went smooth for them. The Unc0ver 3.5.0 fully supports Cydia. It supports all Apple devices powered by the Apple A7 – A11 Bionic Chipsets. 

If you have one of these devices, you’re certainly in for the Jailbreak treat.

  • iPhone 5
  • iPhone 6 & 6 Plus
  • Apple iPhone 7 & 7 Plus
  • iPhone 8 & 8 Plus
  • iPhone SE
  • Apple iPad Air
  • iPad 6th Gen
  • iPhone X
  • Apple iPhone XR
  • iPhone XS Max
  • iPhone XS

Update 9/10/2019: Unc0ver 3.6.2 and Unc0ver 3.6.3 are out now. These offer better performance and stability.

Update 9/9/2019: The newest version of Unc0ver, the Unc0ver 3.6.1 has been released. This one comes with a new interface. It makes the Jailbreak process smooth. The process now runs even from a failed state. Jailbreak process has been made static rather than dynamic. You can use the Unc0ver 3.6.1 to Jailbreak iOS 12.1, 12.2, and iOS 12.4 now.

Update: Pwn20wnd has released Unc0ver 3.5.5. It comes with full support for iPhone XR, XS, and XS Max running on iOS 12.4. The Unc0ver 3.5.5 fixes all previous bugs and happens to be the most stable Unc0ver at this time.

Update: Unc0ver 3.5.3 is out now. It can Jailbreak iPhone XR, XS, and XS Max. All these devices can be Jailbroken on iOS 12.4. Unc0ver 3.5.3 also supports iPad Mini 4.

As mentioned earlier, this process is about downloading Unc0ver 3.5.3 IPA and then Jailbreaking iOS 12.4 using a computer.

Before you being, it must be noted that Jailbreak is a risky process and Apple is highly against it. If you Jailbreak your iPhone or iPad, you put your device’s safety at risk. Custom scripts and tweaks can access the system files of a Jailbroken device. You have to be super careful while installing any tweaks once you Jailbreak. For all these reasons, you must take all the responsibility for what you are about to do.

Downloads

  • [Latest] Unc0ver 3.6.3 IPA – iOS 12.4 – iPhone XR/XS/XS Max and below: Download
  • Unc0ver 3.6.2 IPA – iOS 12.4 – iPhone XR/XS/XS Max and below: Download
  • Unc0ver 3.6.1 IPA – iOS 12.4 – iPhone XR/XS/XS Max and below: Download
  • Unc0ver 3.6.0 IPA – iOS 12.4 – iPhone XR/XS/XS Max and below: Download
  • Unc0ver 3.5.6 IPA – iOS 12.4 – iPhone XR/XS/XS Max and below: Download
  • Unc0ver 3.5.5 IPA – iOS 12.4 – iPhone XR/XS/XS Max and below: Download

How to install Unc0ver 3.6.3 IPA via Cydia Impactor

Follow these simple steps to install Unc0ver using Cydia Impactor.

Open Cydia Impactor on the computer and connect the iPhone.

First of all, open Cydia Impactor on your computer. Connect the iPhone now. In the Cydia Impactor, select your iPhone.Select iPhone in Cydia Impactor
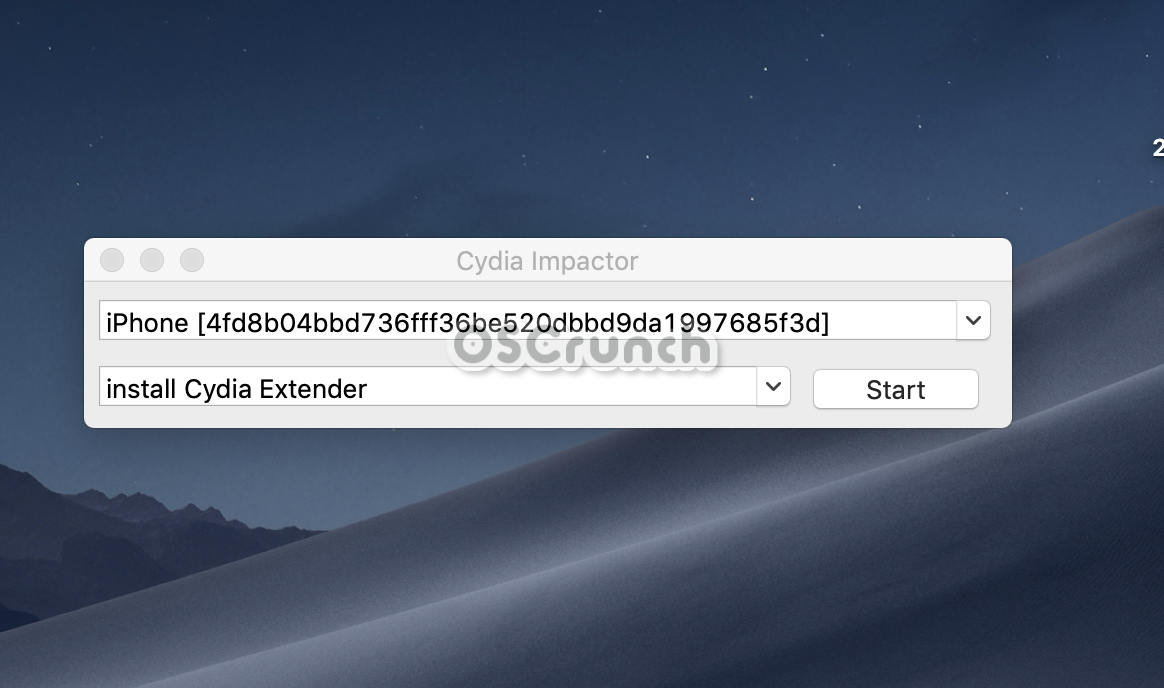
Drag and drop Unc0ver IPA onto Cydia Impactor.

Drag the downloaded Unc0ver IPA and drop it onto the Cydia Impactor. adding Unc0ver 3.5.0 IPA to Cydia Impactor
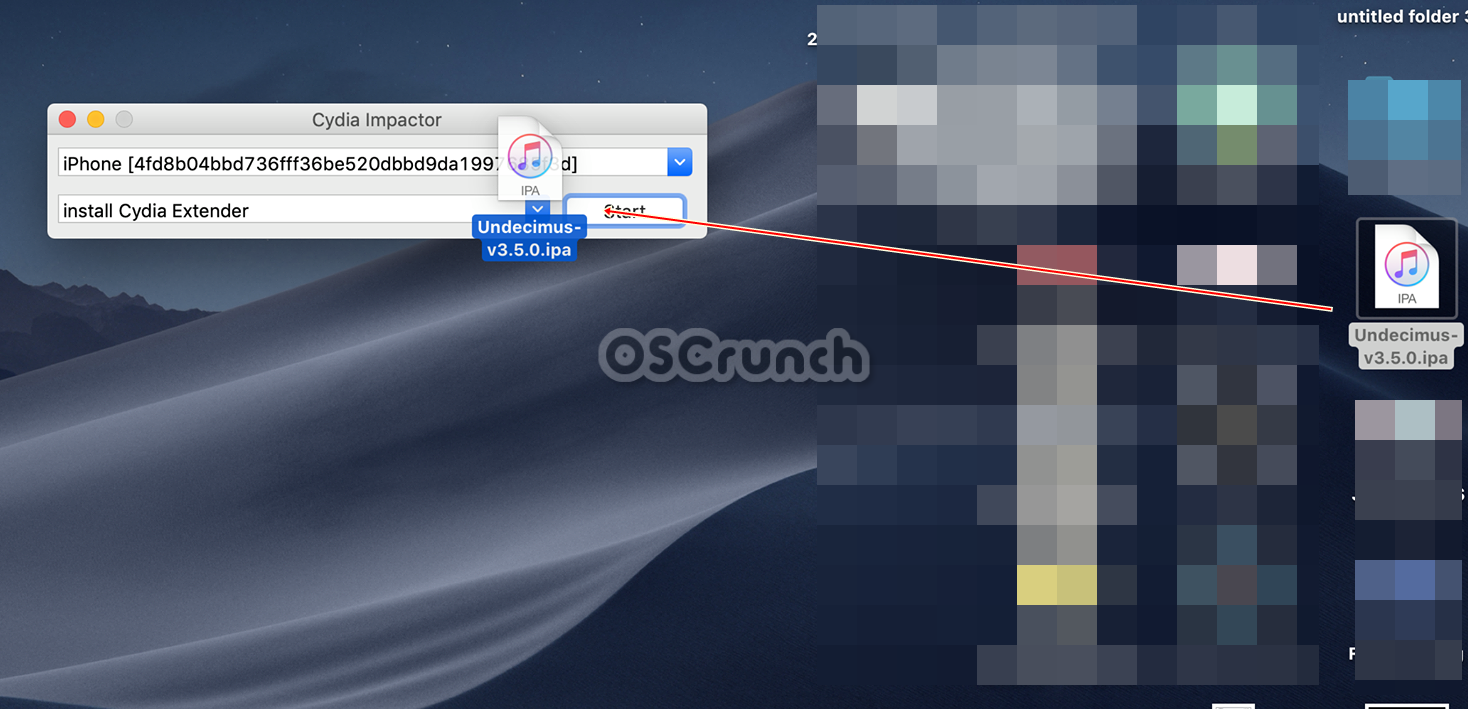
Enter your Apple ID and Password in Cydia Impactor.

Impactor will now ask for your Apple ID details. Enter the details. If it asks for App-specific password, open Apple ID on the computer and go to Security settings. Generate App-specific password and enter it in the Cydia Impactor.generate-password
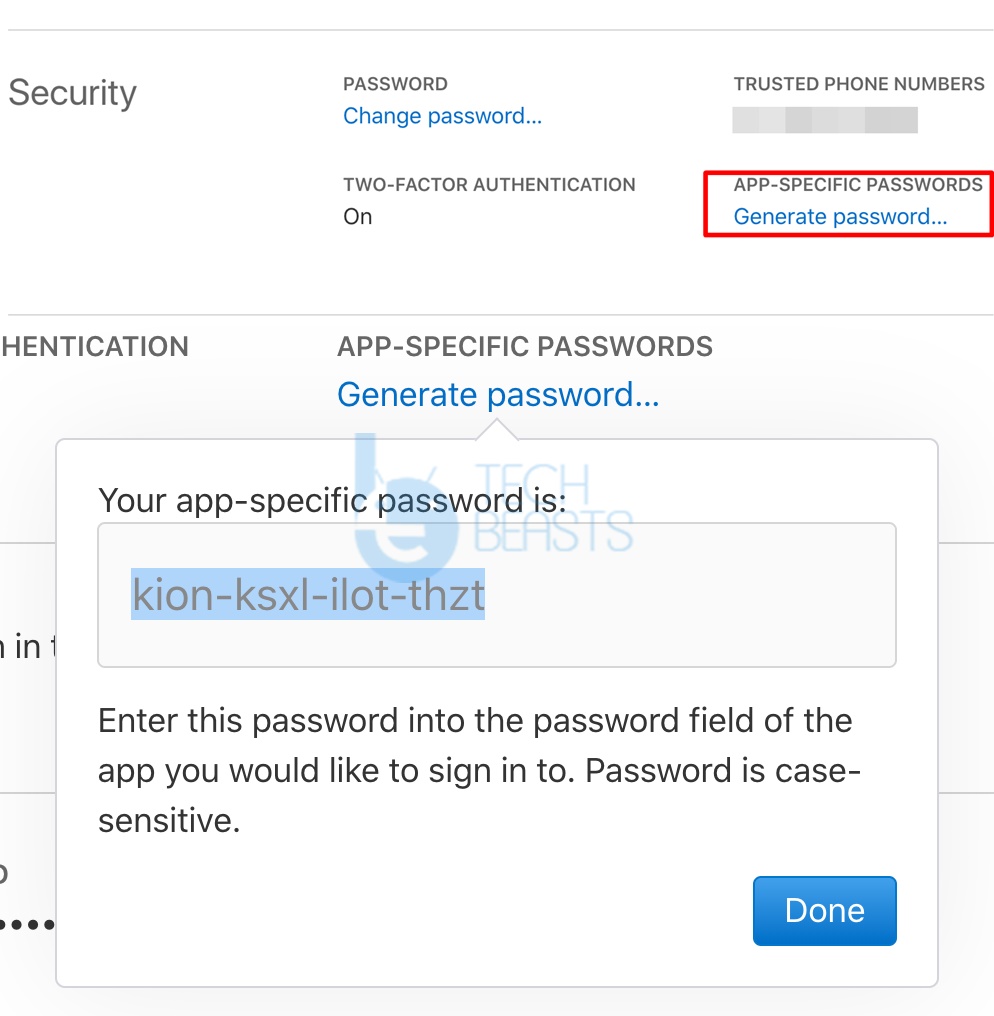
Click on the Start button in Cydia Impactor.

Hit the Start button of Cydia Impactor now. The Unc0ver 3.5.3 will be sideloaded on the iPhone.

Unc0ver 3.6.1 is installed. Disconnect the iPhone.

The tool has been installed. It’s time to disconnect the iPhone now. Follow the steps given next below to Jailbreak.

Jailbreak iOS 12.4 via Unc0ver 3.6.3

  1. At this point, you have the Unc0ver installed already.
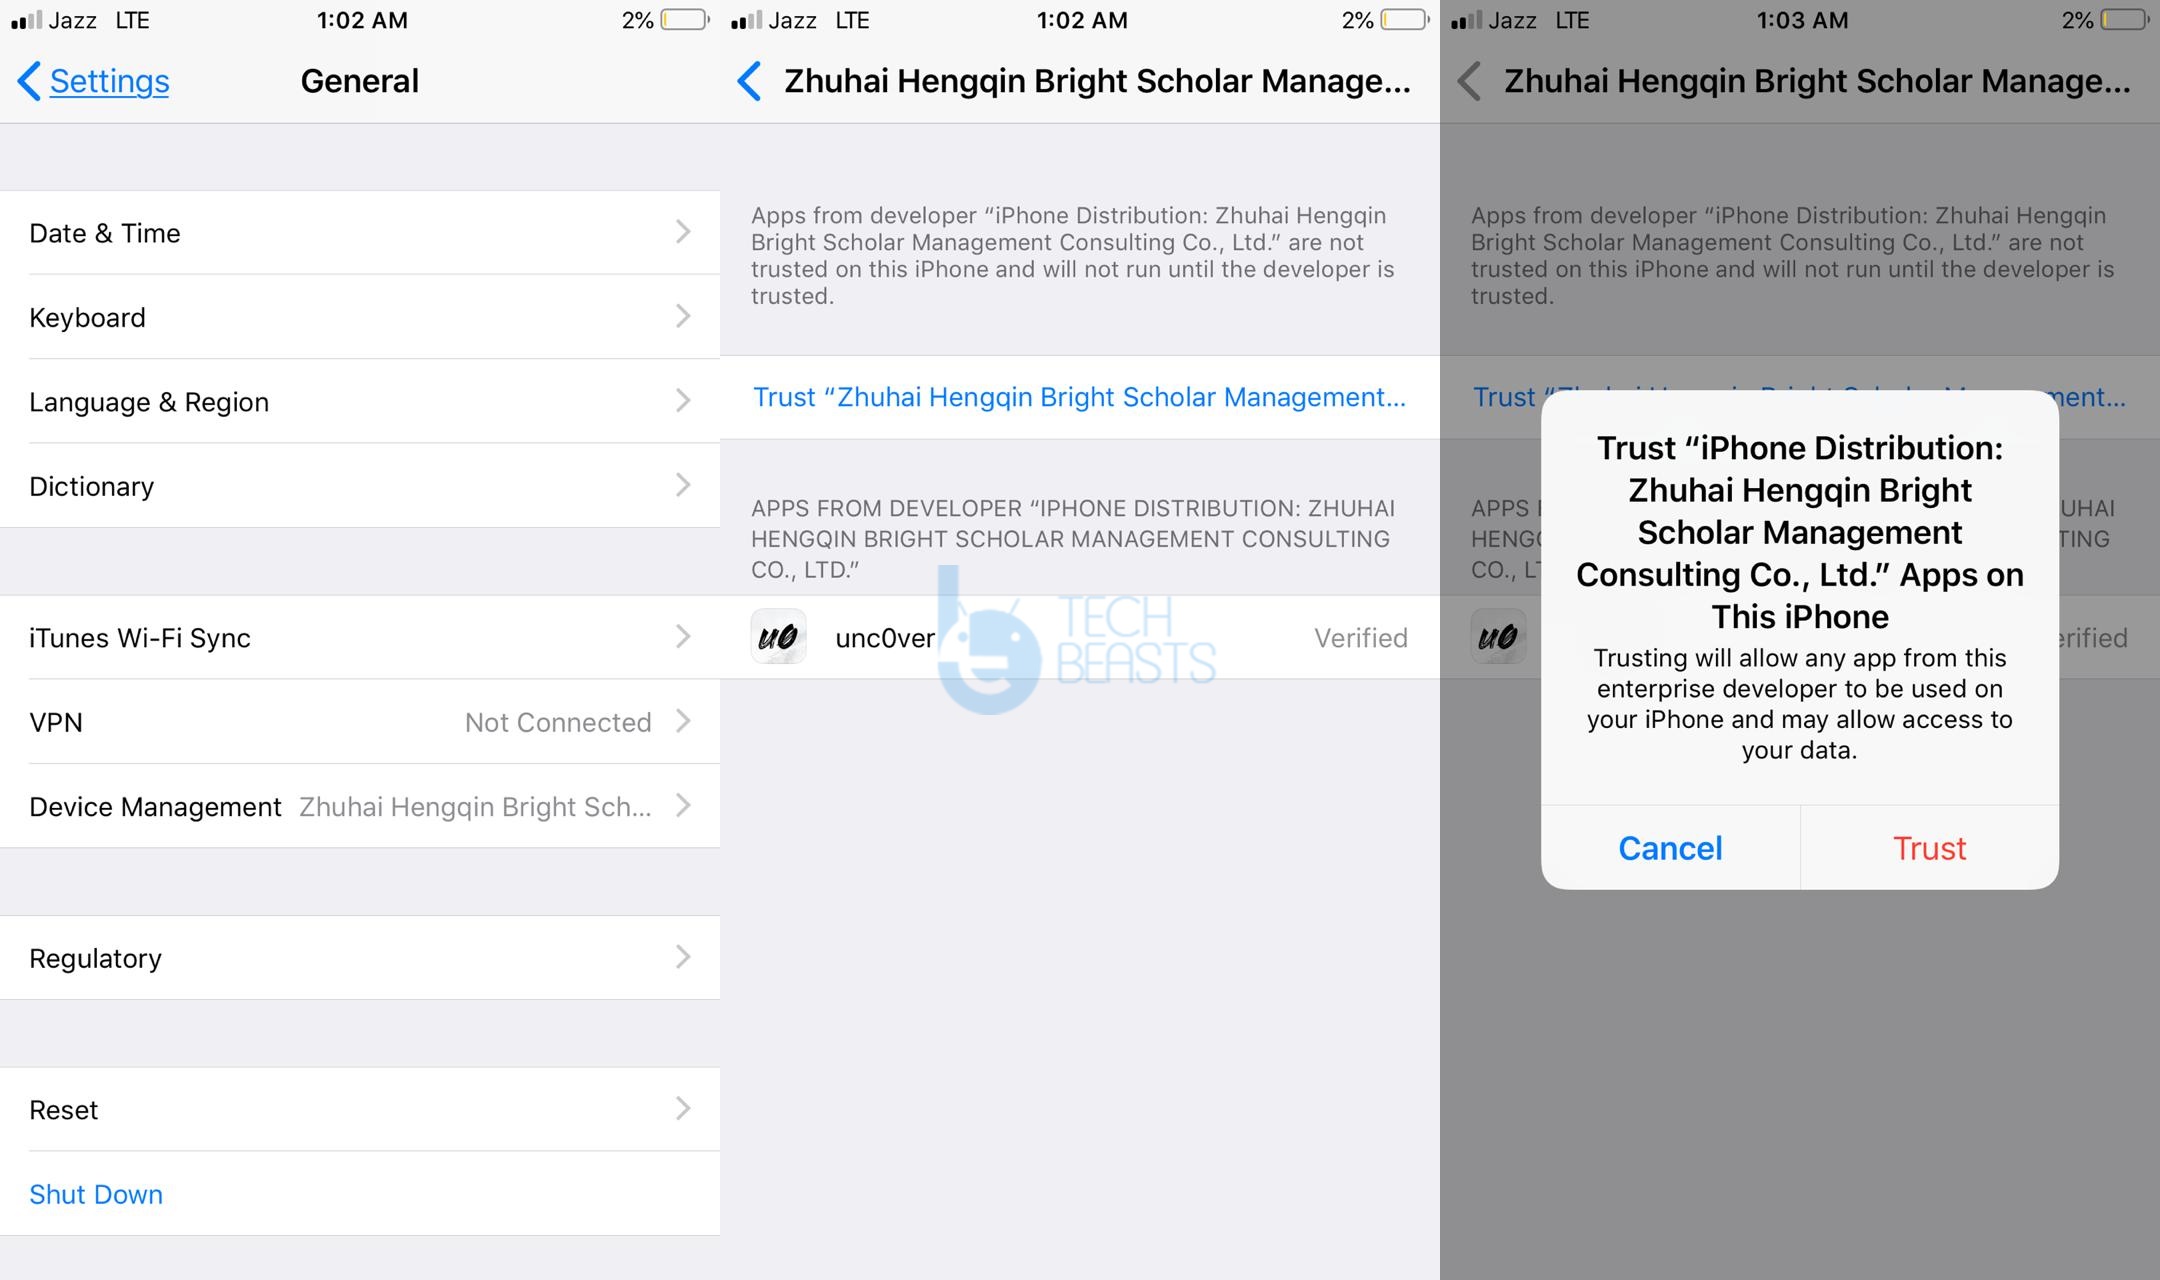
  2. On the iPhone, go to Settings > General > Device Management > Click on Trust <your apple ID> > Trust.Trust Unc0ver 3.5.0
  3. Get back to the Apps now and open Unc0ver.
  4. In the Unc0ver app, click on Jailbreak.
  5. Wait for about a minute or two for the process to end.
  6. In about 63-70 seconds, you will Jailbreak iOS 12.4. Cydia will be installed too.
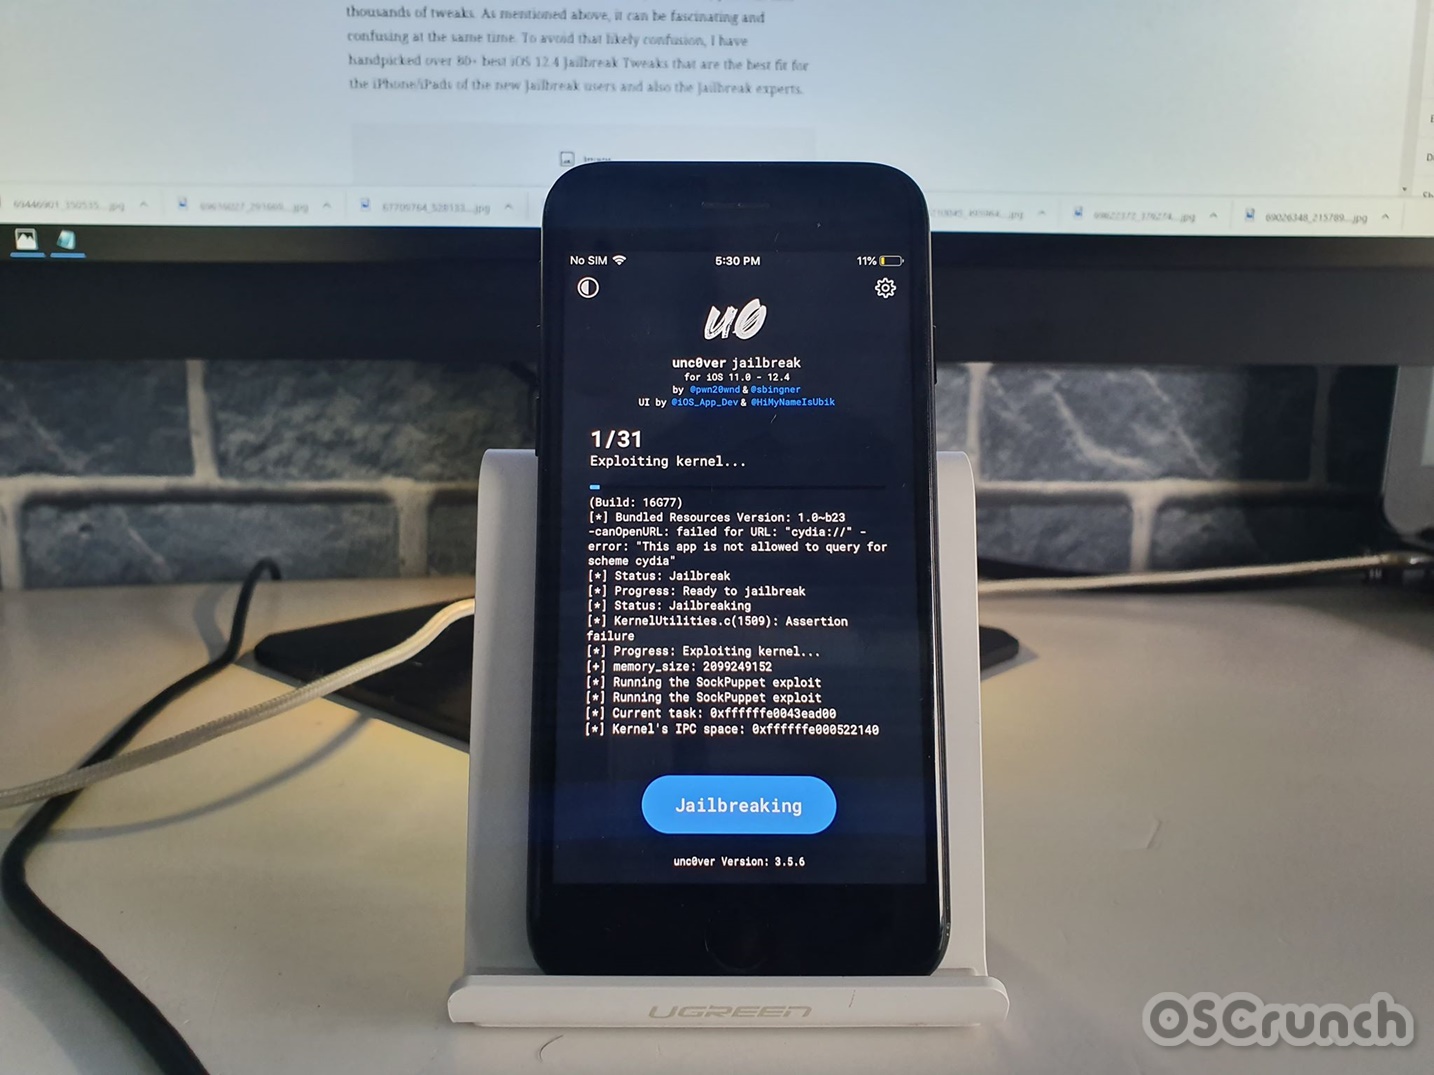
    Jailbreak iOS 12.4 using Unc0ver 3.5.0
    Jailbreaking my iPhone X running on iOS 12.4
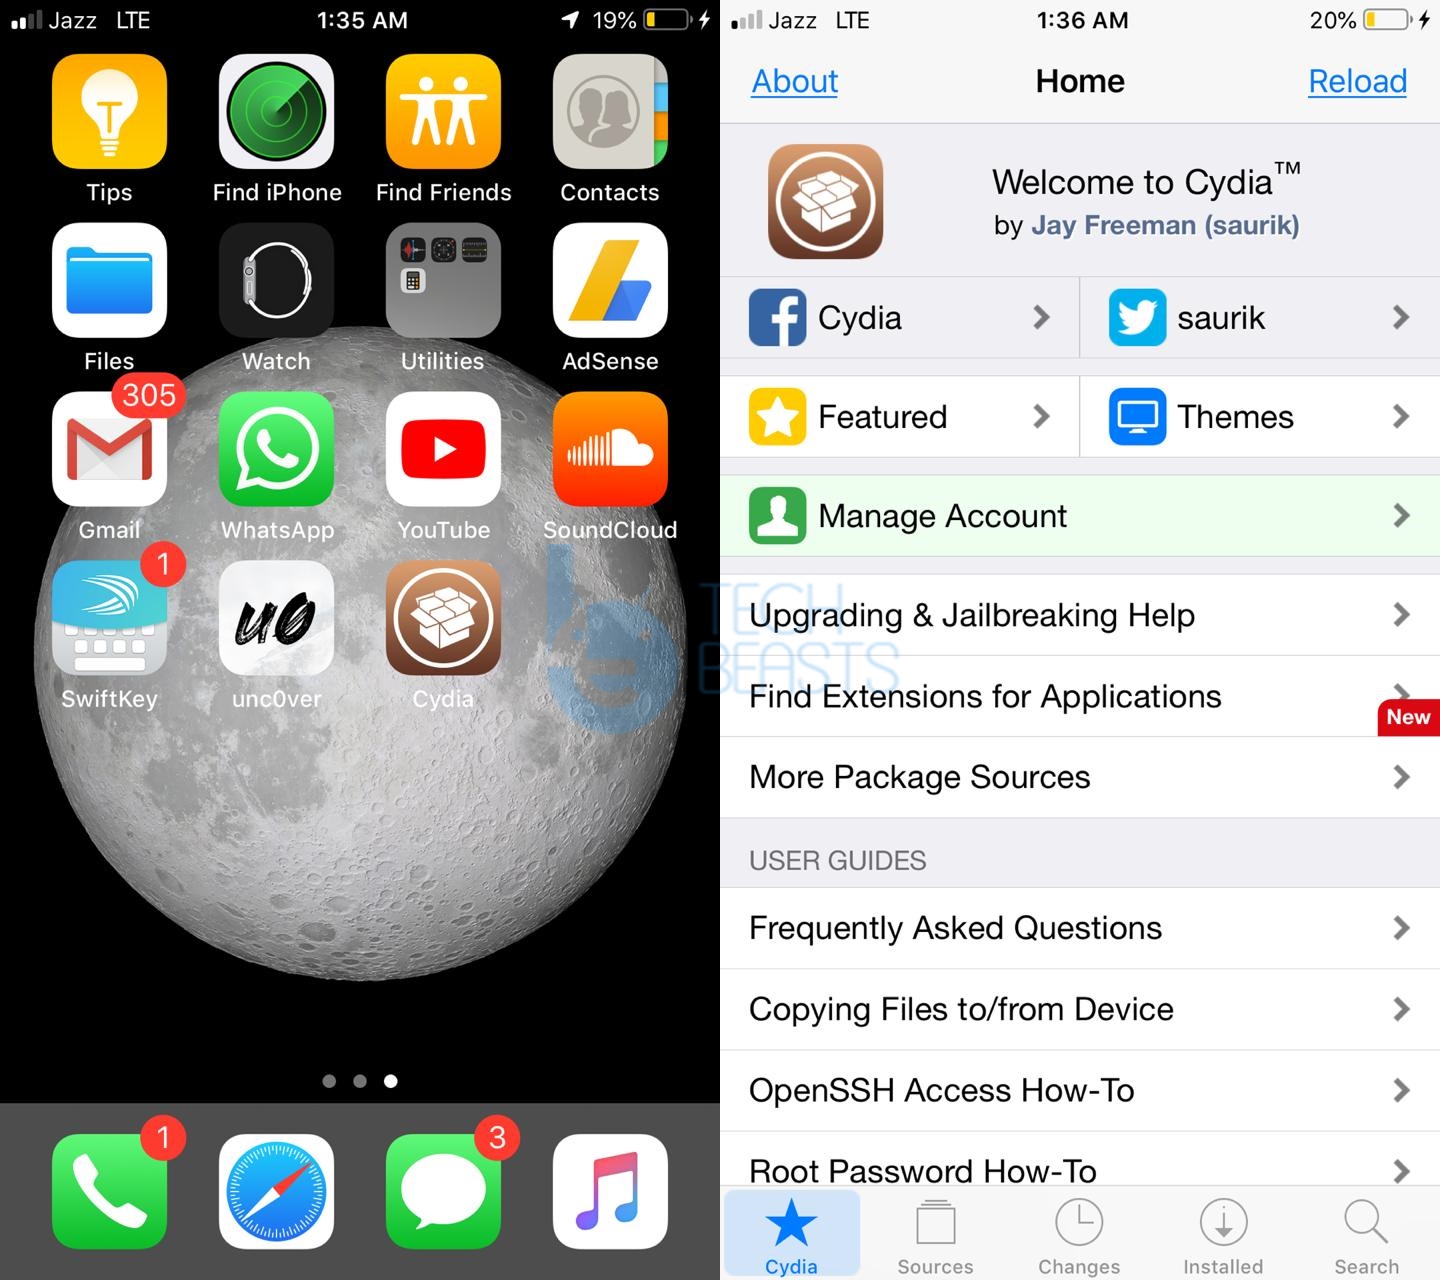
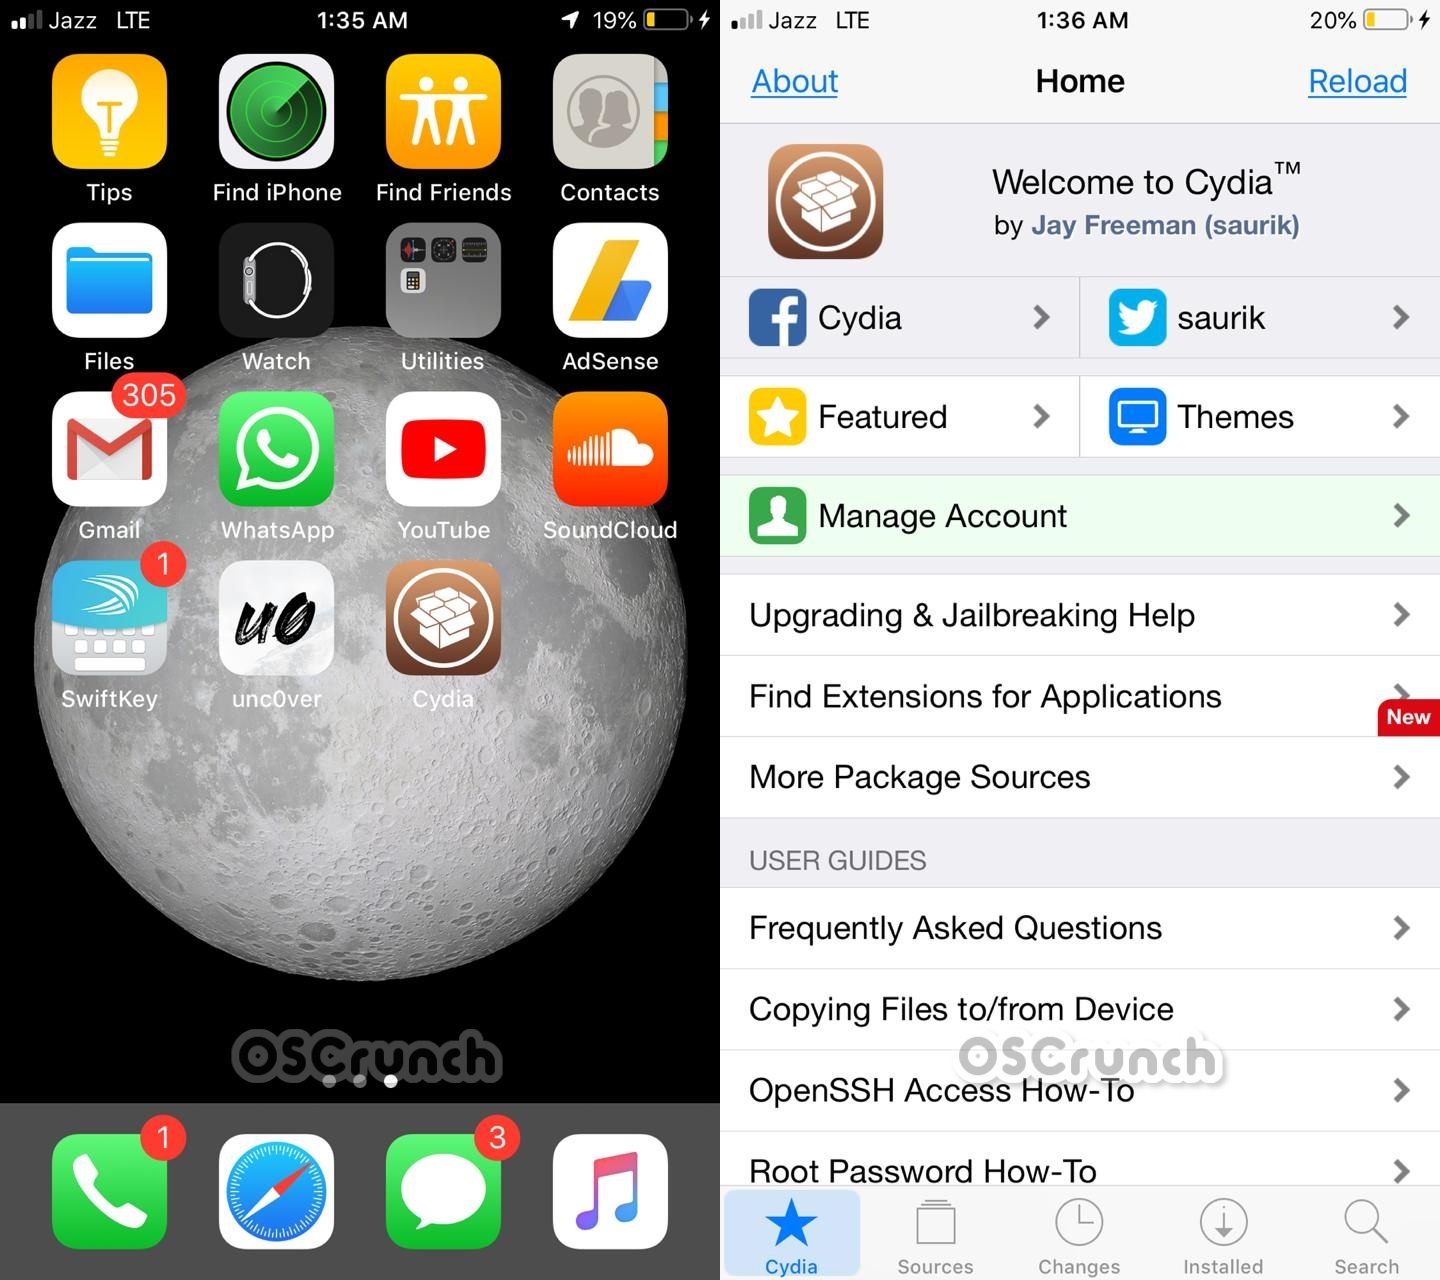
  7. Go back to the Apps screen now and open Cydia.Cydia via Unc0ver 3.5.0
  8. Install any tweaks you want now. That’s all.

That’s all. I hope this guide worked well for you. If you have questions/queries, use the comments box below to reach out to us. I will try my best to get back to you as soon as possible.
Download Unc0ver 3.7.x IPA for iPhone and iPad

0
Download Unc0ver 3.7.x IPA for iPhone and iPad

Download Unc0ver 3.7.x IPA for your iPhone or iPad. The current Unc0ver version is Unc0ver 3.7.0 You can download the IPA or install it directly.

Unc0ver 3.6

The Unc0ver tool has been updated to version 3.7. Unc0ver developer, Pwn20wnd, announced the Unc0ver 3.7.0 yesterday. The new Unc0ver comes with a massive list of changes.

Update 10/26/2019: There is no further version of Unc0ver at the moment. All eyes are on the release of the Chakra1n Jailbreak which may or may not release soon.

Update 9/23/2019: Un0ver 3.7 comes with full-fledged support for all A12-A12X-powered iPhones and iPads. Jailbreakers can now get Cydia and system-wide tweak injection on the newest iPhones & iPads.

Not too long ago we got the Unc0ver 3.5 with support for iOS 12.4. The Unc0ver 3.5 was updated nearly half a dozen times before it reached a near-stable stage. The developer felt the need for a big Unc0ver overhaul and came up with the Unc0ver 3.6.0 which apparently fixes all the bugs of previous versions. The new Unc0ver brings a new interface as well. Let’s take a look at what it has to offer.

The Unc0ver 3.6 first of all has a whole new design. The code to Jailbreak devices has been re-written from scratch. Furthermore, the Jailbreaks will be static now. Previously, the tool used a dynamic approach which didn’t leave the system stock after Jailbreaking. Using the new static approach, the system will remain very stable even after you have Jailbroken.

The Unc0ver and Cydia crashing issues have been fixed in this update. This version also prepares internal Jailbreak patches for A12-A12X chipsets. The Jailbreak process is now sweet and straight forward. It will not take a huge number of attempts as it used to take before. The process will be much more smooth and reliable now.

The SSH support for arm64e devices has been fixed. The Unc0ver will Jailbreak the iPhone or iPad even with a corrupt SystemVersion.plist on the iOS 12.4-powered devices. The bug that used to cause a delay in the Cydia installation has been fixed as well. The tool now performs a proper clean-up before attempting to Jailbreaking again after a failed attempt.

Overall, the new tool is much better than all previous versions. Keeping in view the past record of updates, we can expect more Unc0ver versions to follow with more stability and new features. For now, if you have an iPhone or iPad running on iOS 12.1, 12.2 or 12.4, you can get the Unc0cver 3.6 to Jailbreak it. Go ahead and download the Unc0ver 3.6.x IPA from below.

Update: Download Checkra1n 0.9.1 – Jailbreak iOS 13.2.2

Download Unc0ver 3.7.x IPA

If you want to download Unc0ver 3.7 directly on your iPhone/iPad, you can download it from the official site here.

Here is the cover of Jailbreak on our site so far:

Last Updated: 26th October 2019

Download Galaxy Note 10 Plus HD Wallpapers [Hide Camera]

0
Download Galaxy Note 10 Plus HD Wallpapers [Hide Camera]
Note 10 Plus/Note 10

Here are the Galaxy Note 10 & Galaxy Note 10 Plus HD Wallpapers. These wallpapers are designed to perfectly fit the display of the Note 10 and Note 10 Plus.

Galaxy Note 10 Plus HD Wallpapers
Note 10 Plus/Note 10

Incredible Screen

The Note 10 Plus comes with a 6.8-inches screen and the Note 10 comes with a 6.3-inches display. Both phones have a Dynamic AMOLED Panel. The Note 10 Plus has a QHD+ resolution while the Note 10 has a FHD+ resolution. The curved display on the Note phones has a ratio of 19:9. These phones produce the best possible colors.

Hole-Hiding-Wallpapers

Samsung Galaxy Note 10 and Note 10 Plus are undoubtedly the two most incredible smartphones at the moment. The phones come with top-level specifications with some industry-altering upgrades. Note 10 and Note 10 Plus come with maximum screen-to-body ratio. The hole-punch camera fixed right in the middle of the screen is the only dot on the screen that you’ve got. The creativity of wallpaper makers has helped the Galaxy Note 10 and Note 10 Plus owners help take care of this hole-punch. You can hide the Note 10 and Note 10 Plus’s camera with a cool wallpaper. Not only that, the hole-hiding-wallpapers look fabulous on the Note 10’s screen.

The Note 10 Plus/Note 10

The trend of using regular wallpapers has kind of died down ever since the release of the Galaxy S10 series. Phone owners are inclined towards the wallpaper which transforms the ugly hole-punch into a piece of art. In fact, Samsung itself now releases the wallpapers in its Galaxy Store that can hide the front camera of the phone.

The idea of Galaxy Note 10 Wallpapers

My video on Galaxy Note 10 & Note 10 Plus HD Wallpapers

While I was collecting wallpapers for my Note 10 and Note 10 Plus, the idea of making this post came up my mind. I loved the hole-punch hiding wallpapers on my Note 10 and Note 10 Plus so much that I skipped finding any other regular wallpaper. So, in this post, you will find the Galaxy Note 10 and Galaxy Note 10 Plus HD Wallpapers which will not only beautify the display of your phone but will also make the front camera look awesome.

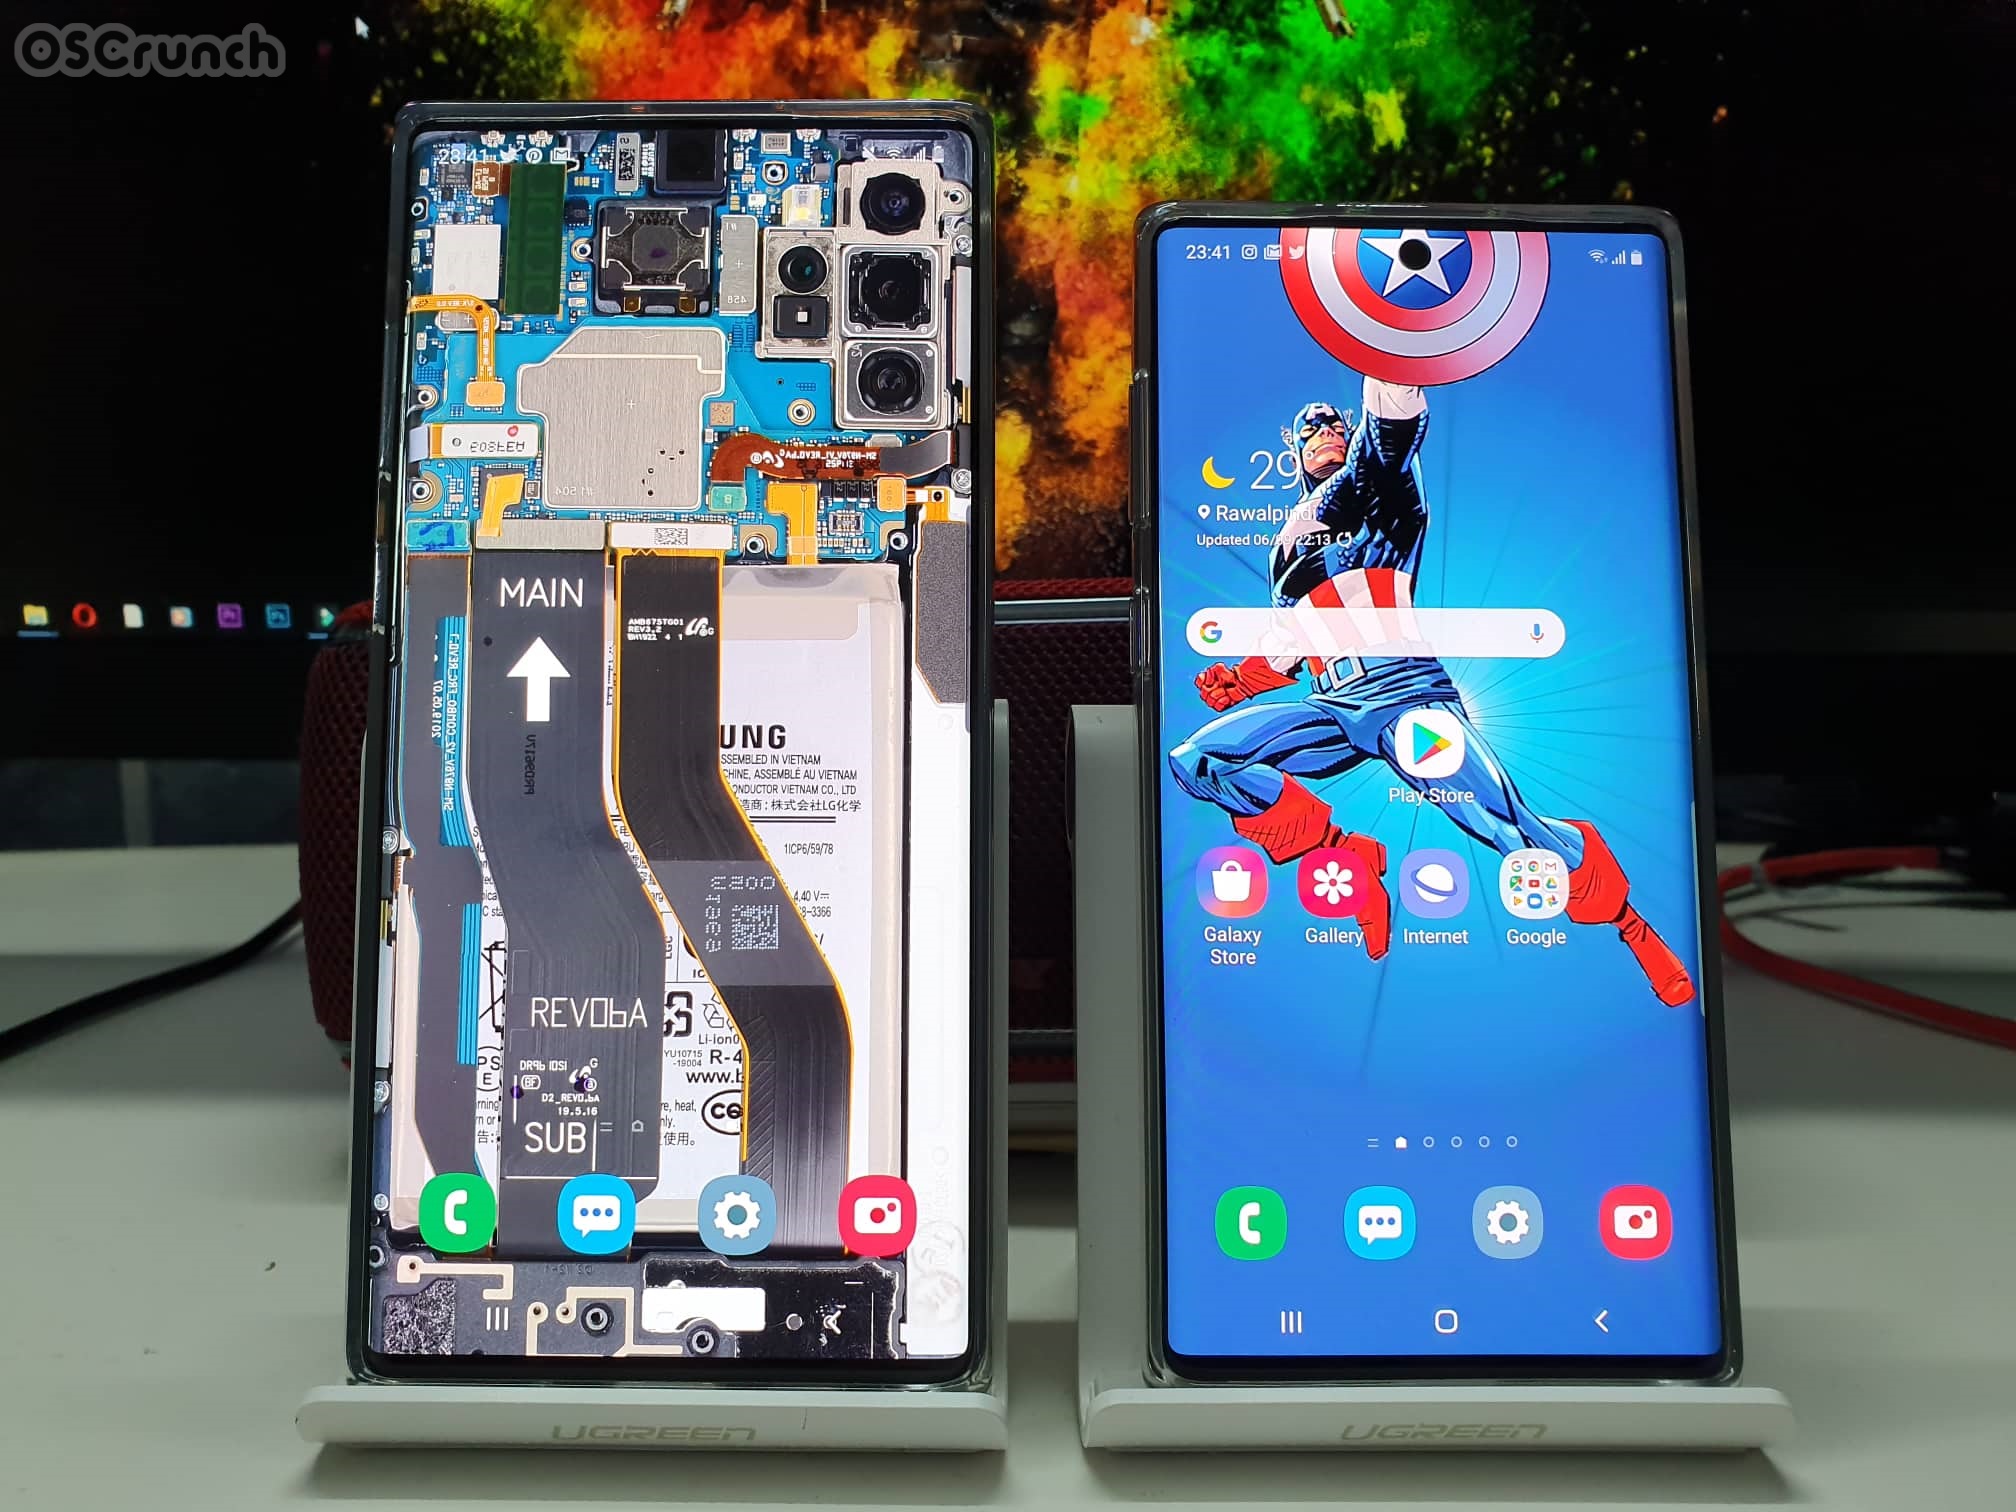
Wallpapers on Note 10+ and iPhone XR Wallpaper hiding notch on Note 10.

Before you take a look at the Galaxy Note 10 Plus HD Wallpapers, I would like to tell you guys that I do not own any of these images. I have collected all these wallpapers from Reddit and the credit goes to the developer of each wallpaper. I am only re-sharing the wallpapers for the Note 10/10 Plus users.

Galaxy Note 10 Plus HD Wallpapers

To download these wallpapers, right-click on your desired image and then click on save image as. Alternatively, you can open this post on your phone. Long press your desired wallpaper and then click on Download image. You can also download all these wallpapers using the all-in-one link given below.

Update: 51 New Wallpapers Added!

All Galaxy Note 10 Plus HD Wallpapers: Download

More Galaxy Note 10 & Note 10 Plus HD Wallpapers: Download

Horror - Note 10 Plus HD Wallpapers
Horror
SuperMan - Note 10 Plus HD Wallpapers
Super Man
Iron Man - Note 10 Plus HD Wallpapers
Iron Man
Shark Note 10 Plus HD Wallpapers
Shark
Funny - Note 10 Plus HD Wallpapers
Funny
Nerve - Note 10 Plus HD Wallpapers
Nerve
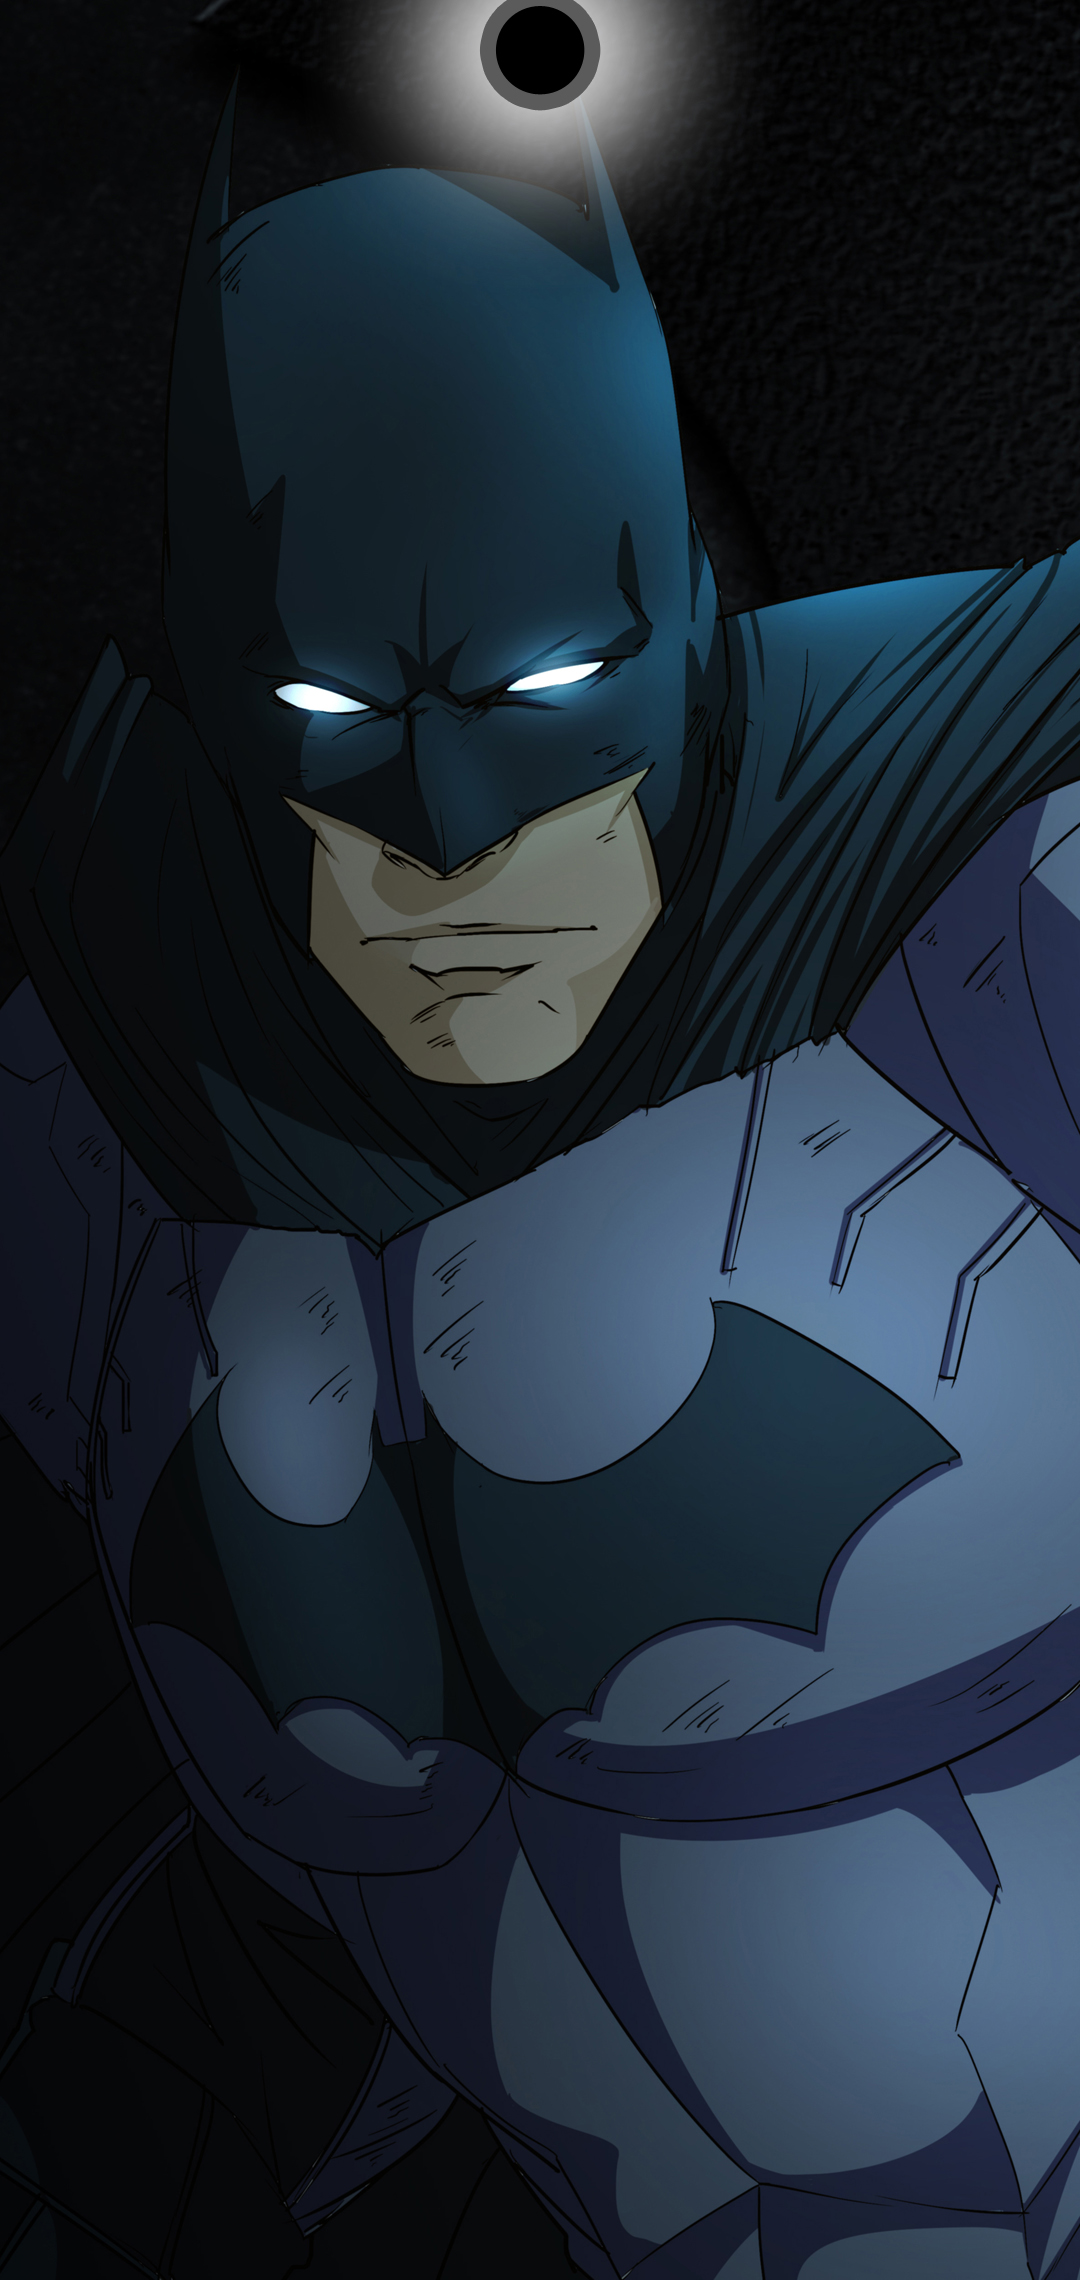
Batman - Note 10 Plus HD Wallpapers
Batman
Godzilla
Colors - Note 10 Plus HD Wallpapers
Colors
UP
Android - Note 10 Plus HD Wallpapers
Android
Jordan - Note 10 Plus HD Wallpapers
Jordan
Note 10 Plus HD Wallpapers
Galaxy S3 Vibes
Zelda - Note 10 Plus HD Wallpapers
Zelda
Frog
Joker
Captain America - Note 10 Plus HD Wallpapers
Captain America
Phone Internals
Mesh - Note 10 Plus HD Wallpapers
Mesh
Cityscapes
Camera - Note 10 Plus HD Wallpapers
Camera
Spiderman - Note 10 Plus HD Wallpapers
Spiderman
Spider man 2 - Note 10 Plus HD Wallpapers
Spider man 2
Eiffel Tower - Note 10 Plus HD Wallpapers
Eiffel Tower
Super Man - Galaxy Note 10 Wallpaper
SuperMan
chip Note 10 Plus HD Wallpapers
chip
Iron man 2 - Note 10 Plus HD Wallpapers
Iron Man 2
hockey - Note 10 Plus HD Wallpapers
L.A. Kings
black water - Note 10 Plus HD Wallpapers
black water
Starlord

To apply these wallpapers, simply open the gallery on your Note 10 or Note 10 Plus. Open the wallpaper and click on the menu-dots on the top-right corner. Click on Set as > Home / Lock Screen / Home & Lock Screen > Apply with or without motion effect. That’s all.

In case you don’t know, we have already posted the Note 10 Stock Wallpapers!

Last Updated: 26th October 2019

Download Samsung Galaxy A90 5G Stock Wallpapers

Download Samsung Galaxy A90 5G Stock Wallpapers

Here are all the Samsung Galaxy A90 5G Stock Wallpapers. All of the 7 stock wallpapers of the Galaxy A90 5G are a sight a behold.

Samsung’s designers have gone the extra mile to design these wallpapers. The A90’s stock wallpapers look completely different than the typical Samsung wallpapers we have seen so far. Before you download the Galaxy A90 5G Stock Wallpapers, let me tell you a little bit about this phone.

Samsung Galaxy A90 5G

Samsung Galaxy A90 was making the rounds of the rumor mills for the last couple of months. Along with the Galaxy A90, a word about its 5G variant also came in. There was a lot of confusion whether Samsung is going to release a Galaxy A90 and a Galaxy A90 5G, or it’s going to release a Galaxy A90 5G alone.

Just today, Samsung brought the rumors to an end. It announced the Galaxy A90 with 5G support. The Galaxy A90 5G has got traits of a flagship at the price of a premium-mid-ranger.

Galaxy A90 5G

First things first, the A90 5G comes in with a 6.7-inches Full HD+ Super AMOLED screen. It’s got a waterdrop notch on the front holding the front 32MP camera. There is a fingerprint scanner underneath the display.

There are three cameras at the back of this phone. It’s got a main 48MP camera, an 8MP ultrawide camera, and a 5MP depth sensor. The 48MP sensor here appears to be Sony IMX586 or Samsung’s own GM1 sensor.

On the power end, the A90 5G houses a Snapdragon 855 SoC with X50 5G Modem. It’s got a RAM of 6 or 8GB with an internal storage of 128GB which can be further expanded.

A battery of 4500 mAh is placed inside this phone. It supports 25W Super Fast charging.

For the most part, the Galaxy A90 5G looks like the Samsung Galaxy A70. The phone will make it into the markets with a price tag of $800. It will make its way to South Korea first of all.

Samsung Galaxy A90 5G Stock Wallpapers

These are all the Galaxy A90 5G stock wallpapers. These wallpapers have a resolution of 1920 x 1920 pixels. You can apply these wallpapers to any Android phone or to an iPhone as well. Either download the wallpapers one by one or get them all using the file linked below.

All Galaxy A90 5G Stock Wallpapers – Download

Galaxy A90 5G Stock Wallpaper

More stock wallpapers:

Download Samsung DeX for Windows and Mac

0

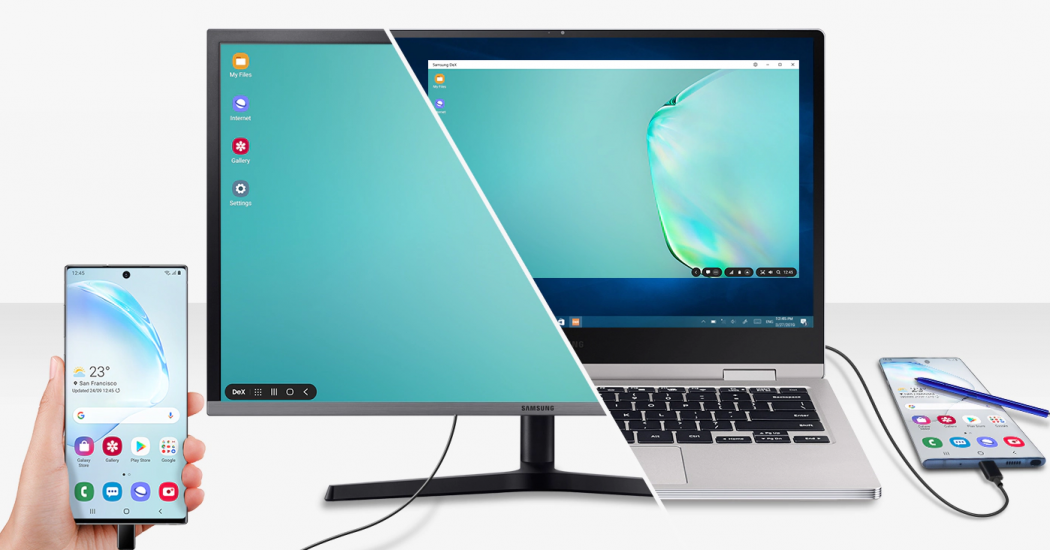
From here you can download the Samsung DeX for Windows and Mac. With the DeX, you can convert Galaxy Note 10 or Note 10 Plus into a computer.

Samsung has transformed DeX from a piece of Hardware to Software. The new DeX application now enables Galaxy phones to transform into a computer. Samsung has already released the DeX application for Windows and Mac. Before you download Samsung DeX, let me tell you a little bit about it.

Samsung DeX

A couple of years back, Samsung introduced its DeX dock. This Dock connected with the Galaxy S8 and the other end was connected to a computer or a monitor. Doing this transformed the Galaxy S8 phones into a computer. You could use your phone as a computer this way.

Later on, Samsung changed the DeX functionality from DeX dock to a USB Type-C to HDMI cable. At this point, users needed this one cable to connect the phone to any external monitor to use it as a computer. The USB Type-C to HDMI cable was quite expensive and not many users opted for it. Furthermore, this didn’t help the popularity of the Samsung DeX.

Download Samsung DeX
Samsung DeX | Picture Credits: Samsung.com

As of 2019, it looks like Samsung is not ready to give it up on DeX. The company has now made DeX much useful and convenient than it ever was. You don’t need the DeX dock, no USB Type-C to HDMI cable is needed. All you need is your phone and the USB Type-C cable that came with it inside the box.

This functionality is available on the Galaxy Note 10 and Note 10 Plus at the moment, but keeping in view that its a software feature, Samsung will probably add the support to previous Galaxy phones.

The Samsung DeX application comes separately for Windows and Mac. You can find the DeX download links below and the guide to install it as well.

Download Samsung DeX

  1. Samsung DeX: Windows | Mac
  2. On the computer, open the DeX setup.
  3. Install DeX and add a shortcut to your desktop.
  4. Connect the Note 10 or Note 10 Plus to the computer.
  5. DeX will detect it launch it. That’s all.

That’s all. If you have any questions or queries, feel free to drop them in the comments section below.

Hide your caller ID when making a phone call on iPhone

0
Hide your caller ID when making a phone call on iPhone

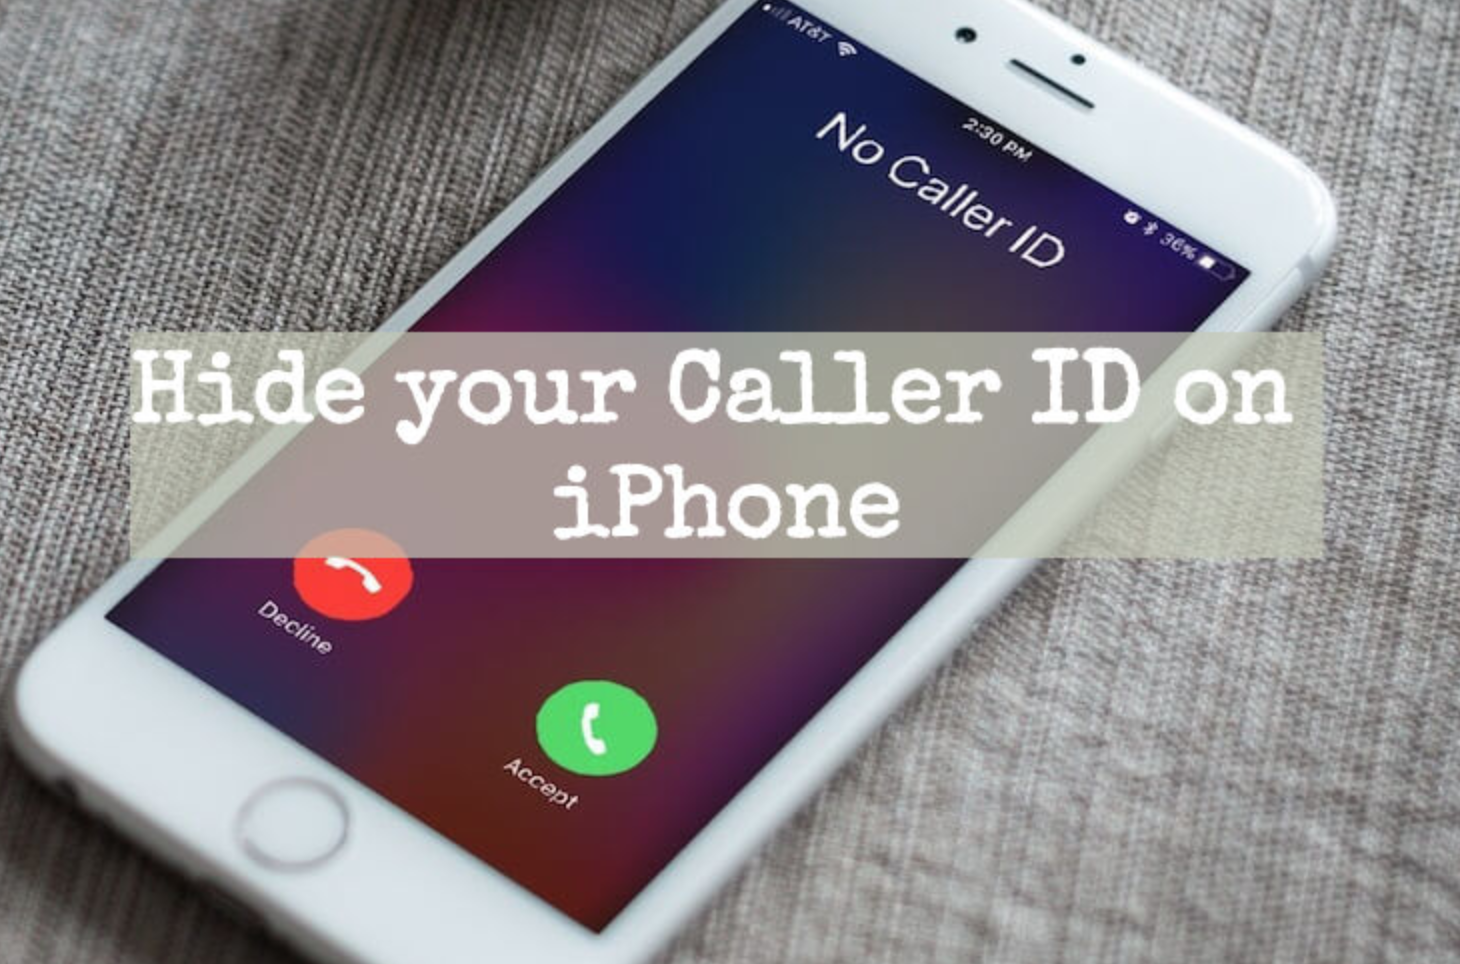
While making calls on your iPhone, want to hide your caller ID? You can do that with ease, there is a built-in feature in Apple iPhones. You don’t have to install any third-party app or Jailbreak your iPhone. Moreover, we have other options as well which we will discuss in this post.

Hide your caller ID

Hide your caller ID for all calls:

Let’s start with the one which will be the first choice of everyone. Since we are using the built-in feature, everyone will be comfortable with it. Open Settings on your iPhone and scroll down, look for Phone. When you do find it, Tap on Phone and it will take you to the Phone settings. Here look for Show My Caller ID, when you find it, turn it off.

By doing that you have made your phone number private. Now, whenever you will call someone, instead of caller ID it will show private number.

  • Just a quick replay: Settings -> Phone -> Show My Caller ID -> Turn it off.

Use a caller ID block code:

As I mentioned earlier, there are options too and among them, there is one called Block code. This solution will be helpful, if you want to call a specific person and you don’t want him or her to see your number. You can achieve that by using the special block code.

Let’s recover deleted SMS in an iPhone

Every country has its own code for e.g in the US the code is *67 and in the European countries, the code is #31#. The caller ID block code will be different in all the countries. If you want to find your country caller ID block code. Google it, please.

Once you do, all you have to do is use the code before the number you want to call and that’s it. Let me give you a proper example so you will get the idea.

  • Suppose you are in Europe and the code is #31#. Now open up your dialer, #31# XXXX-XXX-XX. 

This solution is best if you don’t want to hide your caller ID for everyone. For those whom you don’t want to show the caller ID, you can use the caller ID block code.

Connect iPhone/iPad To Samsung Smart TV [ Guide ]

Make your number private:

It is also a valid option if you choose to pay a small fee. Mostly all of the carriers provide such services, you can make your number private so that way no one will be able to know your number. But I am sure you have to pay a fee for that, you can call your carrier help center and inquire about it.

After that, you need to follow the instructions they will provide or they will tell you the whole procedure. However, I am not suggesting this method but still, it is an option if you are so keen to hide your caller ID when making a phone call on iPhone.

That will be all for today.

YouTube videos keep buffering? This is how you can fix

0
YouTube videos keep buffering? This is how you can fix

Those who use YouTube just like I do, they are well aware of YouTube videos keep buffering issue. Even though you may have a high-speed internet connection but still YouTube videos keep buffering. Most of the time YouTube starts buffering while you are watching a Vidoe in HD.

Today, In this post, I will provide you the potential solutions which will help to fix YouTube Buffering problem. Since there are a number of factors that is why we have covered every aspect. Now before I move on to the solutions, let me tell you why this happens.

YouTube videos keep buffering

The reason behind YouTube videos keep buffering:

I believe that the servers are behind all this buffering problem. It doesn’t matter how good or fast your internet connection is, end of the day, it all comes to the servers which you are trying to communicate. It simply is that sometimes server gets overloaded and the amount of users YouTube servers. It is a normal thing.

Read more: How to Loop Part of YouTube Video [ Tutorial ]

So when servers are overloaded they started to lack and in the result of all this, you don’t receive the package back. Now you’ll be wondering, were are talking about Google. The biggest tech giant of them all and there is no doubt they will have the top of the line internet service. But that doesn’t mean there will be no hiccups or downtime.

Now when tons and tons of users use YouTube at the same time, the server gets cranky sometimes and you need to face the buffering problem. Look guys no matter how good and better they tell you their service is, it is still a machine at the back.

So now you know, what is the reason behind YouTube videos keep buffering problem. Moreover, not all the time it’s backend sometimes it is frontend. Following are the all the solutions that you will need to do from your end.

Fix YouTube Videos keep buffering:

There are a number of methods that you will find on Google forums as well. Even Google also suggest doing that and you will be able to Fix YouTube videos keep buffering problem.

Close some of your web browser tabs:

I am sure you do have notice when there a number of web browser tabs are opened. Your system starts lagging a bit, even though your device will have powerful powerful process and RAM.

When you have too many tabs opened in your web browser, your system may not be able to handle all that processing. Thus your video starts buffering because if you are trying to use 4K video playback, trust me you will need a large chunk of processing power to play that video.

Since your system already has a power processing problem. Your video cannot get the required power juice and it end up with a buffering issue. So Close some of your web browser tabs, give some air to your system.

Best Modified YouTube Apps for Android – [Audio & Background Playback]

Restart your web browser:

You need an easy way out, close your browser and wait for few seconds and then open it again. But make sure you don’t re-open all of your previous tabs. Now open YouTube and Play your desired video. It will work.

Restart your router:

Before you think of anything I think you should give it a try. Sometimes our router gets all cranked up and start messing up things. It would be very really helpful to restart your router, Turn off your router and wait for 2-3 minutes. After that power-it up, open YouTube and check how things are working for you.

Restart your computer:

Sometimes everything is working fine but your system is having some issue. It could be anything, so give it a kick restart won’t do any damage. Maybe your graphics card is not working properly, the system is getting heat up, third-party software is messing up things and more.

Update your web browser and plugins:

I use a number of Add-ons and plugins but sometimes I needed them for only one specific task. Once my work is done i forget them and most of the time I never use them. Here, things get glitchy. Since I don’t use them so I don’t update them and the old version gets buggy sometimes. Thus it ends up with compatibility issues.

Top 9 YouTube Downloader Apps for Android [ 2019 ]

Plugins and Add-ons are not the only ones. You should make sure your browser is up to date so you get to use the latest and updated features. By doing that you are making sure that all of your media files are handled by updated features. Sometimes the website you are trying to access is running on the latest version of the technology and your browser is running on old technology.

It won’t work, you need to get your hands of the updated version of your browser.

Use Google Chrome:

It would be best to use Google Chrome when it comes to using Google services. By using Google Chrome you are making sure that there will no compatibility issue and things will work smoothly.

That’s it for today. Please try these solutions and let me know you also have Fixed YouTube videos keep buffering issue.

Mirror your iPhone or iPad on your LG or Samsung smart TV (iOS 12.X)
0
Mirror your iPhone or iPad on your LG or Samsung smart TV (iOS 12.X)
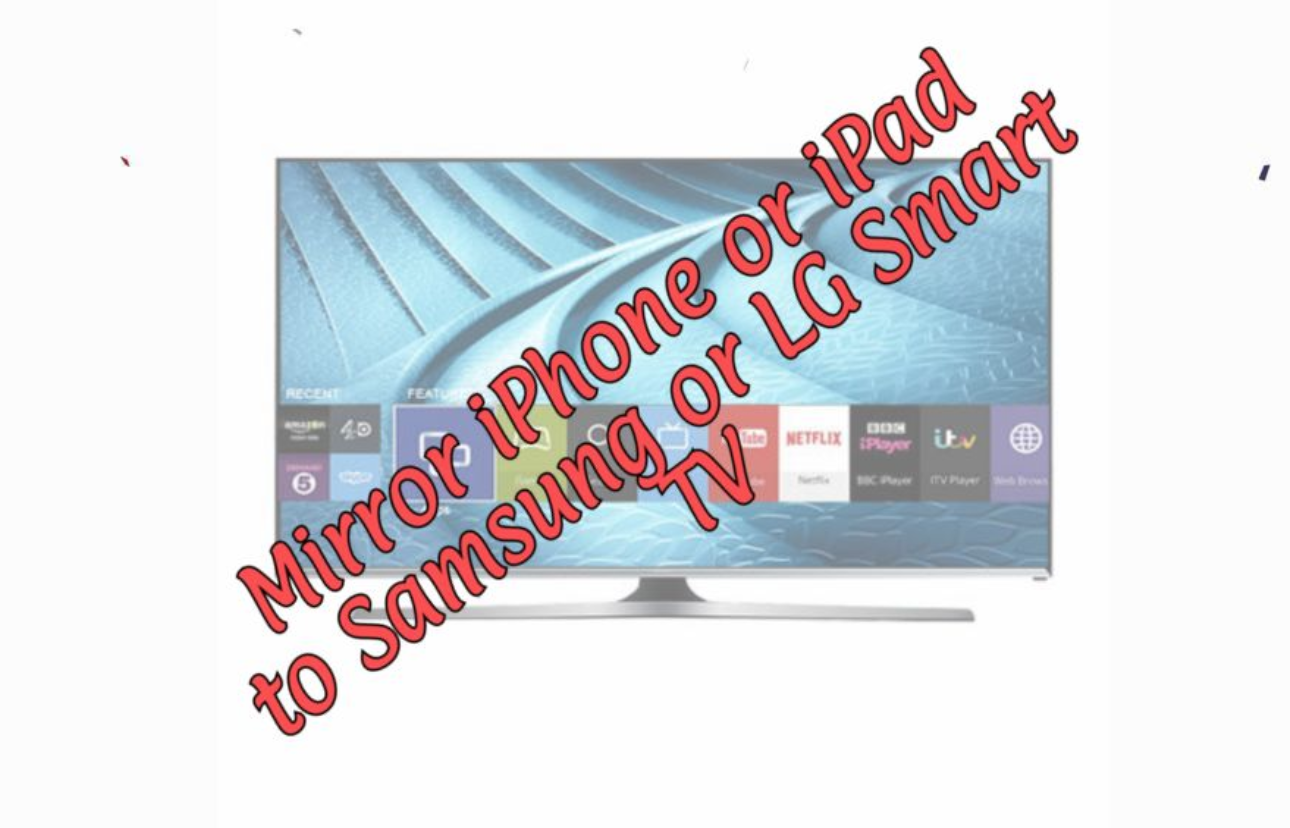
Those who have Samsung and LG smart TV. I have good news for them, now you can connect the iPhone and iPad with both Samsung and LG smart TV. The best part is, you don’t need to buy an Apple TV or any other dongles, as we used to in the past. I have bought a number of dongles in the past just to mirror my iPhone to Samsung Smart TV. But now you can easily Mirror your iPhone or iPad on your LG or Samsung smart TV.

Mirror your iPhone or iPad on your LG or Samsung smart TV

Thanks to AirBeamTV BV, they have released new apps on App Store named as Mirror for Samsung TV and Mirror for LG TV. You can use both of these apps on iOS devices running on iOS 12.

Both of these apps work in the same manner since I have a Samsung smart TV so I will be using the Mirror for Samsung TV. There is one more thing you should keep in the mind, in order to things workout, your device and TV must be on the same WiFI network. Let’s get going now.

Mirror your iPhone or iPad on your LG or Samsung smart TV:

Heed the following instructions and you will be able to connect your iPhone or iPad on your LG or Samsung smart TV with ease. Again, make sure your TV and iPhone or iPad are on the same WiFi network.

Total Time: 5 minutes

Download Mirror for Samsung TV App

Download and Install Mirror for Samsung TV app from App Store. Keep in the mind it’s a paid app, so you have to make a purchase before installing this.

Launch the App

Next step is to head back to the home screen and launch the App.

Select your TV:

If both iPhone and Smart TV are on the same WiFi network. You will see your TV name in the list. Select your TV and Tap Mirror Samsung TV.

Allow your iPhone to connect

You will see a pop-up on your smart TV, an app is trying to connect with your TV. Use your TV remoter and select Allow -> Press OK button.

Downgrade iOS 12.4.1 to iOS 12.4 [iPhone & iPad]

0

This is the step-by-step guide to downgrade iOS 12.4.1 to iOS 12.4. This will work for all iPhones and iPads.

Downgrade iOS 12.4.1 to iOS 12.4
iPhone 7 downgraded to iOS 12.4

iOS 12.4.1 – Apple’s take on Jailbreak

Last night, Apple released a new iOS update. The iOS version has moved to iOS 12.4.1. The new public version of iOS fixes a bug that allowed Jailbreak on the previous version of iOS. Apple has released this update particularly to fix the Sock Puppet Exploit in the iOS 12.4. The new update means that the doors are once again closed for Jailbreak.

A couple of months back, Google’s security researchers found the Sock Puppet Exploit in iOS. Apple was informed about the bug. The bug existed in iOS 12.2 and lower. The developers of Unc0ver and Chimera were quick enough to cash in on the exploit. They both updated their tools that Jailbroke all iOS devices on those versions of iOS.

Apple went ahead and released the iOS 12.3 with a fix. The iOS 12.3 was foolproof. Jailbreakers were either sticking to the old iOS version or they were just saying goodbye to Jailbreak.

Apple felt the need for updating iOS further. It bumped the iOS version to iOS 12.4 with some new fixes. Mistakenly, they left the Sock Puppet Exploit open once again which put over 1.4 Billion devices on risk. Once again, Unc0ver and Chimera developers successfully Jailbroke the iOS, but things were different. In fact, they were very different.

iOS 12.4 Jailbreak – What makes it special?

First of all, the iOS 12.4 Jailbreak came out at a time when Apple, apparently, had the bug fixed. On top of that, this is the first time in years that a public-active version of iOS has been Jailbroken.

While Jailbreak comes with a lot of disadvantages and certainly puts your device’s security at risk, it comes with a lot of freedom that Apple won’t let you experience otherwise. The number of advantages, for the Jailbreak users, is a lot bigger than the disadvantages which is why they choose to stick to a Jailbroken device no matter what.

Going back to iOS 12.4 from iOS 12.4.1

  • If you haven’t already updated to iOS 12.4.1, you can stick to iOS 12.4 and enjoy Cydia and Sileo Tweaks for as long as you can.
  • In case you are on iOS 12.1, 12.2, or 12.3, you should immediately update to iOS 12.4, not the iOS 12.4.1.
  • For those of you who have already updated to iOS 12.4.1 and now want to go back to iOS 12.4 to get the Jailbreak back, you can follow this guide to do so. 

It’s very important to take this decision of switching to iOS 12.4 right now for some obvious reasons. Apple is still signing the iOS 12.4, which means iTunes will allow its installation. Once Apple stops signing the iOS 12.4, your only option would be iOS 12.4.1 which means goodbye to Jailbreak.

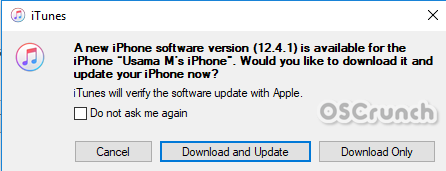
When you add a firmware file to the iTunes, it first connects to Apple’s server to verify that firmware. When Apple stops signing a firmware, the verification fails and you can’t use that firmware anymore.

Before Apple completely wipes off your chances of Jailbreak, you can follow this guide to downgrade iOS 12.4.1 to iOS 12.4.

Preparations

  • You need an iPhone 5 or higher. This will work for all latest iPhones/iPads too.
  • To connect the iPhone to the computer, you must use the original data cable.
  • Backup each and everything from your iPhone.
  • You must be running the latest iTunes on your computer.
  • Also, you want to download the iOS 12.4 IPSW File for your iPhone.
Downgrade iOS 12.4.1
For reference only. Your files may differ according to your iPhone.

Downgrade iOS 12.4.1 to iOS 12.4 [iPhone & iPad]

These are the few easy steps to downgrade iOS 12.4.1 to iOS 12.4 right now.

Total Time: 10 minutes

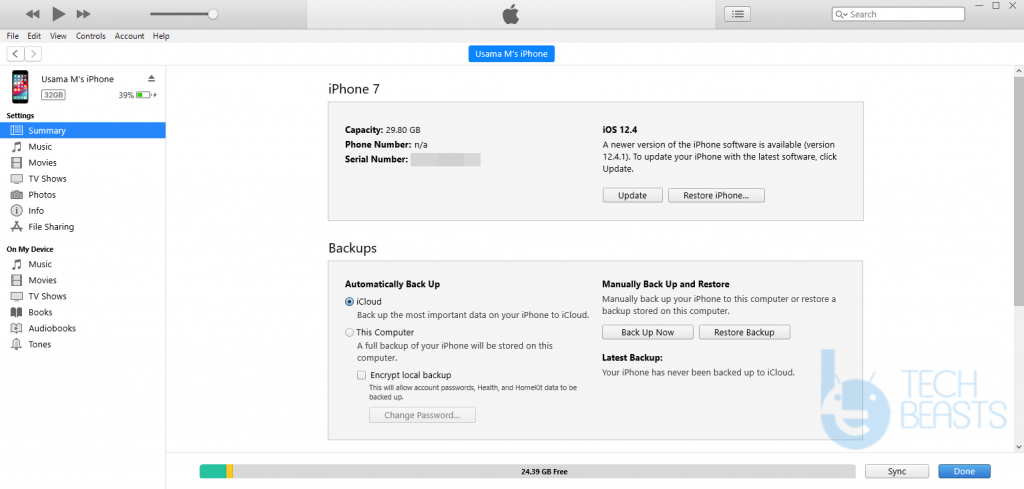
Open iTunes and connect the iPhone.

On your Windows or Mac PC, open the iTunes. Connect your iPhone to the computer. Check iTunes if it has detected the iPhone or not.Downgrade iOS 12.4.1 to iOS 12.4

In iTunes, select your iPhone.

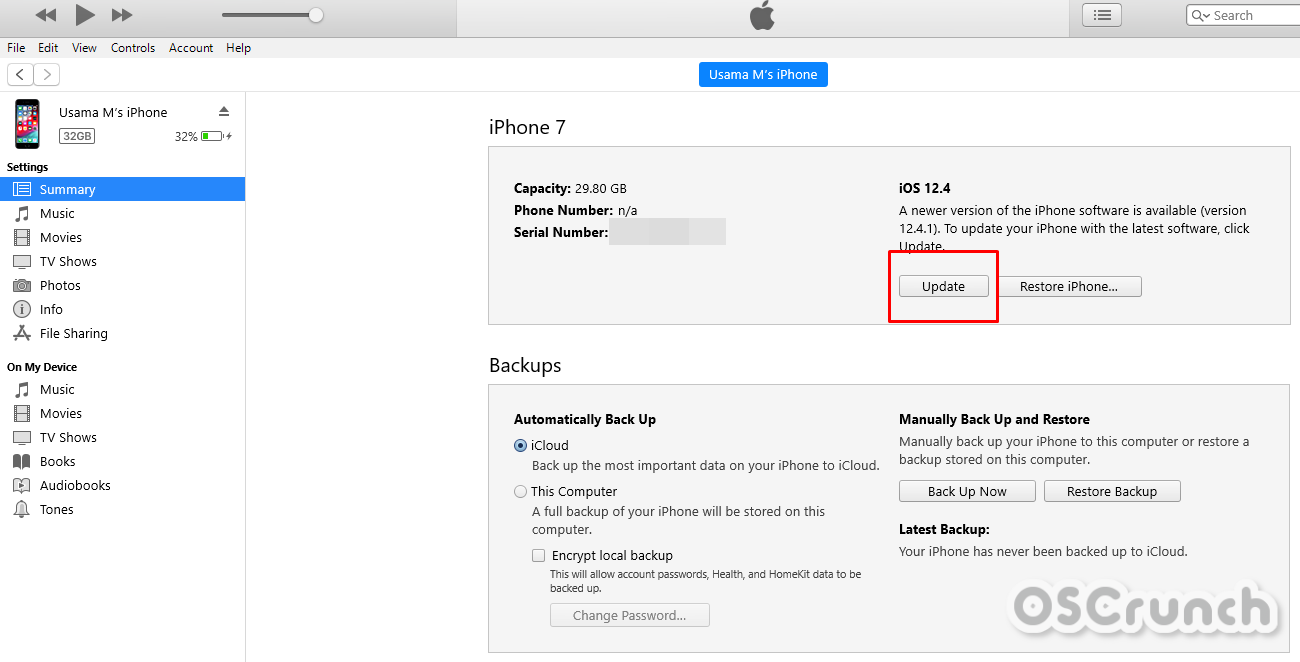
In iTunes, click on the small iPhone icon on the top-left side to access the update options.Downgrade iOS 12.4.1 to iOS 12.

Add the IPSW File to iTunes on Windows/Mac.

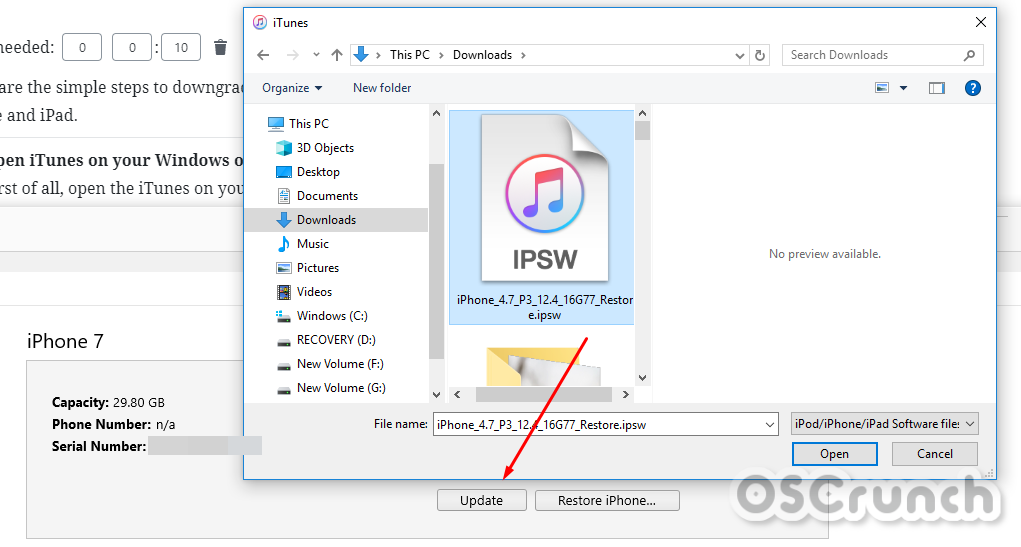
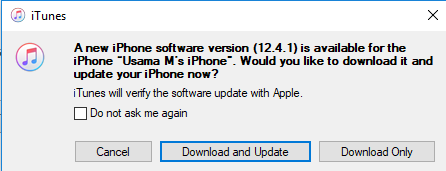
On Windows, press and hold shift and click on “Update” in iTunes. Add the IPSW file in iTunes now.
For Mac, you will press and hold the Command button and click on the “Update” in iTunes. You can select the IPSW file now.

Start the Downgrade process.

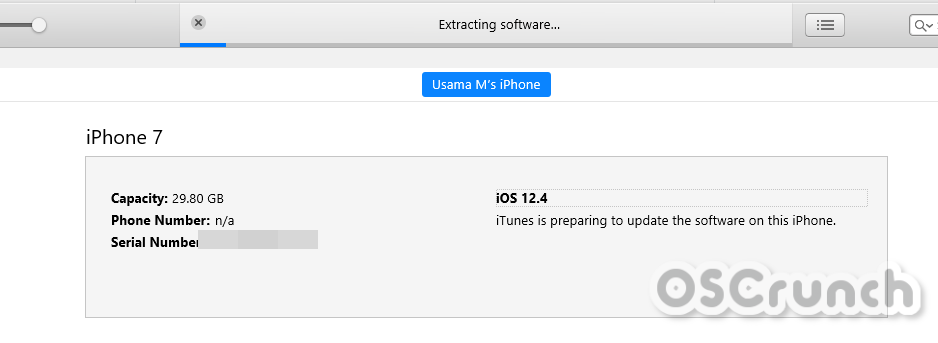
As soon as you add the IPSW file, the firmware installation will start. This can take 2-5 minutes depending on the size of the firmware file. Hold on while it does what it has to.

The iPhone will restart itself once downgrade ends. Disconnect it.

The iPhone or iPad will restart itself as the downgrade finishes. You can disconnect the device and set it up. That’s all.

That’s all. I hope you find this guide useful. Below are all the guides that you may need after downgrading.

For any questions or queries, feel free to reach out to us. I will try my best to get back to you as soon as possible.

Send fake locations on WhatsApp using Android [ Tutorial ]

0
Send fake locations on WhatsApp using Android [ Tutorial ]

A simple trick to Send fake locations on WhatsApp using Android. It is working and you don’t need to root your device.

As you all know that WhatsApp allows us to send our current location using Google Maps to our WhatsApp contacts. Not only your exact location, but you can also share your live location. That way, one can know where you are going and it will provide a sense of security as well.

Send fake locations on WhatsApp

Now it is very useful for many but not for everyone. So those who are looking for a method to Send fake locations on WhatsApp using Android. I have a perfect solution for them and it works. But in order to make it work, you will require a third-party app.

How to send fake locations on WhatsApp using Android:

There are two methods which will let you send fake locations on WhatsApp. One is pretty simple and the other one is a bit lengthy in process. However, the easy one is not as effective as it seems and the other person whom you are sending will know. That it is a fake location but the second one is perfect and you can even share a fake live location to anyone.

The good thing is, using my second method if you send fake locations on WhatsApp. Trust me it won’t be detectable, no one will know what is your real location.

Fake using search on map method:

It’s not reliable. Moreover, everyone knows about this method and most probably you will get caught. This method is simple, open Maps using WhatsApp, pin your location manually and send it. Most likely, the other person will know its a fake location. Still, I think we should give it a try.

Step1: Open WhatsApp, Tap on the contact whom you want to send fake location.

Step2: Tap on the attachment icon and then tap on location. After that, a map will be loaded on your screen.

Step3: Now at the top of the screen you will see search option, type in the place, restaurant and hit enter.

Step4: Select the location and send it. Now when the person on the destination end opens the location, it will show him/her the location you selected in maps.

Send fake locations on WhatsApp using Android using mock location:

Let’s take things to the next level and tell you, people, how to Send fake locations on WhatsApp without getting caught. If you mess with your Android settings or you play games like Pokemon GO or Harry Potter Wizard. You will be well aware of a setting called location mocking. In this method, I will be using this option and a third-party app to send someone a fake location.

Heed the instruction in order to learn how to properly send fake locations on WhatsApp, even more, you can send live Fake locations also.

Total Time: 5 minutes

Install Fake GPS:

First thing you need is Fake GPS. An app which will allow you to select any location you want to send.

Enable Developer Options & Mock Location:

After installing the Fake GPS, now we need to enable Mock location but before that, you need to enable Developer Options. Settings > About device > Tap on “Build number” 7 times > Developer Options > Allow Mock Location.

Set GPS Settings:

Tap and hold on the GPS Icon or location icon in the quick setting drawer. It will take you to the GPS Settings. Set the GPS priority to “Device only.” Next, open the app and grant the permissions.

Select your Location:

In Fake GPS, pinpoint your location anywhere in the world. Once done, that will be your device location.

Send Fake Locations using WhatsApp:

Open WhatsApp -> Select Conversation -> Tap on Attachment Icon -> Tap on Maps -> Send your current location.

How can I send a fake location on WhatsApp iPhone?

Open WhatsApp -> Tap on ” + ” icon -> Tap on Location. Now manually select your location and tap on send. However, it is not reliable. I would suggest Jailbreaking your device and then you can send A fake location on WhatsApp using the iPhone.

How to manipulate WhatsApp live location?

You can manipulate the WhatsApp live location on Android, using the method given above. But on iOS, there is no solution available so far. If you can Jailbreak your device then it can be possible with a tweak called, location faking.

How do I fake my location on the iPhone?

The best method is to Jailbreak your iPhone. After that, you need to Install location faking tweak using Cydia.

Downgrade iOS 12.4.1 to iOS 12.4 – iPhone and iPad

0
Downgrade iOS 12.4.1 to iOS 12.4 – iPhone and iPad

This is the guide to downgrade iOS 12.4.1 to iOS 12.4. iPhone and iPad owners can still Jailbreak iOS 12.4. The iOS 12.4.1 cannot be Jailbroken at the moment.

Downgrade iOS 12.4.1 to iOS 12.4

Apple just released the iOS 12.4.1 update. The new update patches the loophole that led to the Jailbreak of iOS 12.4. The iOS 12.4 was Jailbroken about 10 days back. Previously, Apple patched a loophole in the iOS 12.2 and released the iOS 12.3 with a fix. The iOS 12.3 was unjailbreak-able. Accidentally or mistakenly, Apple unpatched the same bug in the iOS 12.4 update which caught the eye of Pwn20wnd. The developer was quick enough to update his Unc0ver tool to support all iPhones and iPads on the latest signed version of iOS.

iOS 12.4.1 update.

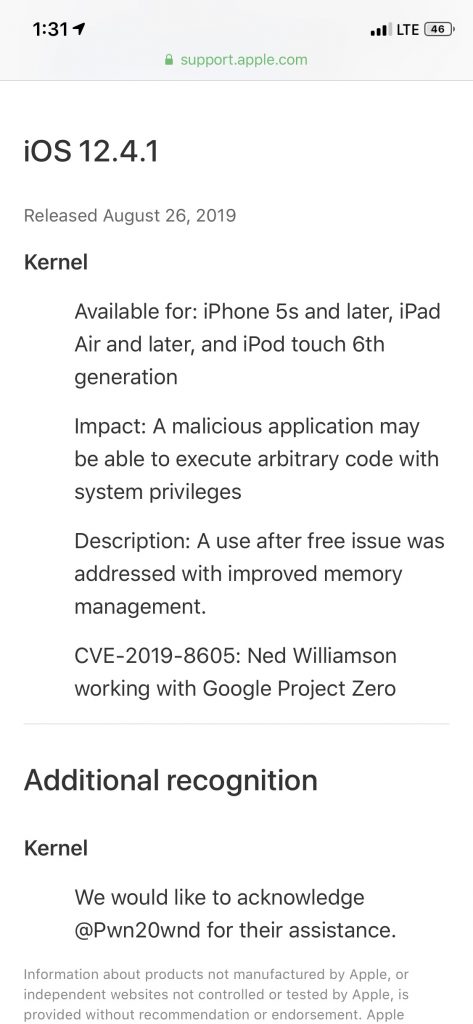
The news of Jailbreak was seen as a security threat by all the privacy-concerned users. Billions of devices were put on risk as this bug allowed a third-party application to access the system files of iOS. The iOS 12.4.1 is Apple’s take on this flaw. Surprisingly, Apple has thanked Pwn20wnd in the acknowledgments of iOS 12.4.1. Previously, Pwn20wnd thanked Apple for the development in iOS 12.4 which allowed Jailbreak. It looks like both Apple and Pwn20wnd are taking a jab at each other.

iOS 12.4.1

Downgrading to iOS 12.4

Now, if you are planning of updating to iOS 12.4.1, remember that you will not be able to Jailbreak the iPhone anymore. Those of you who have already updated to iOS 12.4.1, but want to go back for the sake of Jailbreak, they can downgrade now. Also, the users who upgraded for the sake of checking the new version, but don’t want to stick to it, they can downgrade too. The downgrade is temporarily possible because Apple is still signing the iOS 12.4. Once Apple stops signing it, you will not be able to downgrade it.

This means that you can Jailbreak your iPhone/iPad only as long as Apple is signing the previous version. Jailbreak is something that you don’t see every other day. Apple’s foolproof security patches make it nearly impossible to Jailbreak iOS. The chances of seeing a new iOS version getting Jailbroken are once in a blue moon. It’s only a matter of time until the term Jailbreak becomes history for a while once again. Downgrade iOS 12.4.1 to iOS 12.4 and enjoy Jailbreak while you can.

Preparations

  1. This is a completely safe process. This will not damage your device.
  2. Backup each and everything on your iPhone.
  3. Use the original data cable to connect the phone to the computer.
  4. You need a Windows or Mac-powered PC.
  5. To downgrade, your iPhone/iPad must be running on iOS 12.4.1.
  6. You also need the latest version of iTunes running on the computer.
  7. Lastly, open the IPSW Files page and download the iOS 12.4 IPSW File for your iPhone or iPad.
image for reference only. Your iPhone’s file may differ.

Downgrade iOS 12.4.1 to iOS 12.4

These are the simple steps to downgrade iOS 12.4.1 to iOS 12.4 on any iPhone and iPad.

Total Time: 10 minutes

Open iTunes on your Windows or Mac PC.

First of all, open the iTunes on your Windows/Mac computer. You must have the newest iTunes installed. Close all other programs to allow iTunes’ smooth operation.

Connect the iPhone/iPad to the computer.

Using the original data cable, connect your device to the computer. If the iPhone asks for any permission, allow it. iTunes should detect the iPhone now. Click on the Small iPhone icon in the iTunes now.

Add the IPSW File to iTunes on Windows or Mac

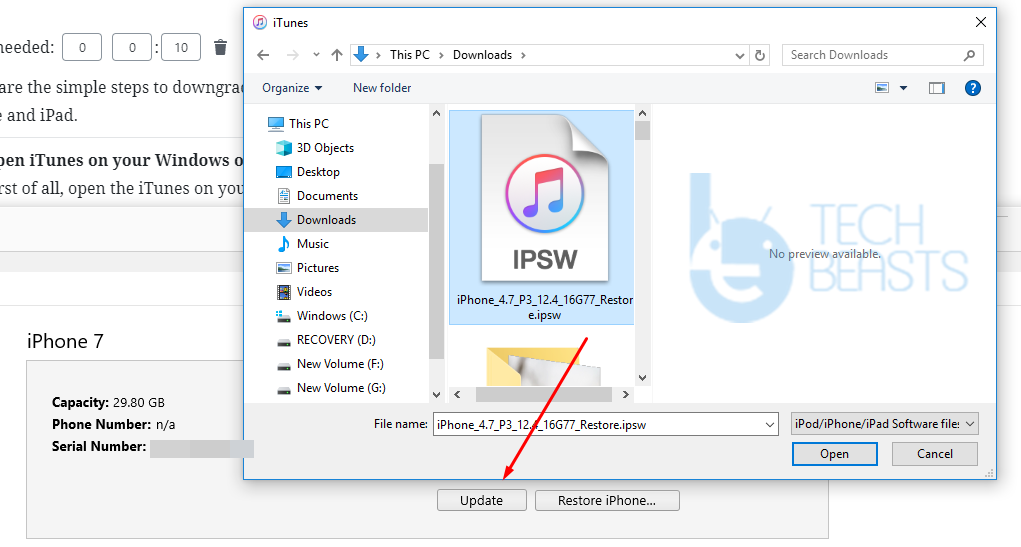
On Windows PC, press and hold the Shift button and click on “Update” in iTunes. Select the IPSW file now.
For Mac, you will press and hold Command button and click on “Update” in iTunes. Add the IPSW file now.Adding IPSW files to iTunes

Let the iPhone downgrade to iOS 12.4 now.

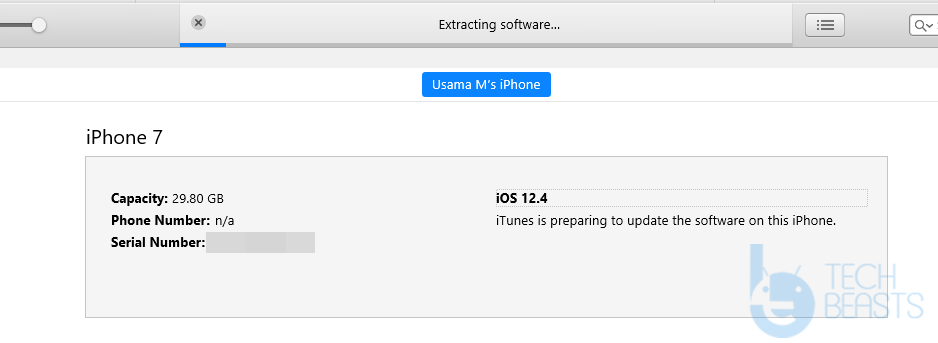
Start the downgrade/update. The progress bar will keep you informed with the process. The update can take anywhere between 5 – 15 minutes.downgrading iPhone

Once the downgrade ends, disconnect the device. That’s all.

As soon as the downgrade process ends, disconnect the device. The iPhone will restart itself. Set up the device as a new one now. That’s all.

That’s all. After downgrading iPhone to iOS 12.4, you are ready to Jailbreak once again. Below are the guides that will help you further.

For any questions/queries, feel free to reach out to us through the comments section below.

80+ Best iOS 12.4 Jailbreak Tweaks [List]

80+ Best iOS 12.4 Jailbreak Tweaks [List]

Here are the 80+ best iOS 12.4 Jailbreak Tweaks for your iPhone or iPad. These tweaks will make your iOS UI much more amazing and user-friendly.

best iOS 12.4 Jailbreak Tweaks

Its been almost a week since we have got the iOS 12.4 Jailbreak. iPhone and iPad owners can once again unleash the real potential of their devices. Jailbreak enthusiasts are rocking some really neat tweaks on their iOS 12.4-powered iPhones/iPads.

For a newbie, Jailbreak can be quite intriguing. That is because as a start, you have no idea what you are doing. After that, Jailbreak is such a huge thing that it can take a lot of time to understand it. By huge, I mean that there are countless modifications that you can apply to your iPhone and iPad.

When you Jailbreak a phone, you get Cydia or Sileo on the device. These are the Tweak repositories or the tools that make way for Tweaks on the iOS gadget. When you look at these tools for the very first time, you will find thousands of tweaks. As mentioned above, it can be fascinating and confusing at the same time. To avoid that likely confusion, I have handpicked over 80+ best iOS 12.4 Jailbreak Tweaks that are the best fit for the iPhone/iPads of the new Jailbreak users and also the Jailbreak experts.

Cydia Unc0ver 3.5

All the tweaks that I’m going to list below, these are hand-tested by me on my iPhone 7 running on the iOS 12.4. What I mean by that is, these tweaks will run smoothly on any iPhone or iPad Jailbroken on iOS 12.4 and below.

The most important part, of course, is to have your iPhone Jailbroken first. You can take a look at the following guides on our site to Jailbreak.

Best iOS 12.4 Jailbreak Tweaks

Following are all the best iOS 12.4 Jailbreak Tweaks. These tweaks can add new features and options to the iPhones. Furthermore, you can get some of the iOS 13 features on iOS 12.4. The performance of an iPhone can also be enhanced with the help of some f the best iOS 12.4 Jailbreak Tweaks.

Top Cydia Tweaks

  • Flame
  • SwipeforMore
  • TweakCount 2
  • Tweak Compatible

Top Sileo Tweaks

  • SileNoBanner
  • BatchOMatic
  • Silactions
  • FluidTabs

iOS 13 Features

  • QuickCC
  • 13HUD
  • Dune

Common Tweaks on Cydia and Sileo

  • PowerModule
  • Fast Unlock X
  • ShyLabels
  • Better Settings
  • Bubbles
  • Notifica
  • BarMoji
  • Hide Bar X
  • Gravity
  • Shuffle

More Cydia & Sileo Tweaks

  1. Smooth Cursor
  2. Filza Tweak
  3. PullOver Pro
  4. Sylph
  5. Artistry
  6. Textyle
  7. AllowTouchesOnPageDots (ZeekForit)
  8. SmoothCursor (BigBoss)
  9. Disconnected (D4ni)
  10. NoSimAlert (SparkDev)
  11. Dune (Skitty)
  12. FloatyDock (Bigboss)
  13. PowerModule (Bigboss)
  14. SugarCane (PackiX)
  15. LeadMeHome (Bigboss)
  16. EvanescoXI (Chariz)
  17. CuttleFish (Bigboss)
  18. Animoji 12.2 (Pulandres)
  19. Togglow (iDH)
  20. CoolCC (BigBoss)
  21. New Grid Switcher (Nepeta)
  22. SmartLPM (Packix)
  23. Low Power DND (BigBoss)
  24. MitsuhaXI (Nepeta)
  25. NewGridSwitcher (Relatives)
  26. BetterSettings (Dynastic)
  27. PlaceHolder (PackiX)
  28. Message Colors (Resistive)
  29. Asteroid (Dynastic)
  30. iGOLED (PackiX)
  31. iCleanerPro (Ivano) (IbSoft)
  32. Filza File Manager (BigBoss)
  33. SiriInvisible (Midkins)
  34. Animations Be Fast (Exqusic)
  35. SilentScreenShot (PackiX)
  36. SnowBoard (Theme Lotus) (Chariz)
  37. XENHTML (Fluid Widget & EW.WdgtPack.6) (Evelyn)
  38. Clean Home Screen (Dynastic)
  39. Primal Folder (Bigboss)
  40. Renovare (BigBoss)
  41. Clean Player (Free PackiX)
  42. Konban (Nepeta)
  43. FindMyiDeviceXS (PackiX)
  44. HapticKeys (PackiX)
  45. ActionBar (PackiX)
  46. Cylinder (Bigboss)
  47. NaturalDeleteDismiss (Bqrichards)
  48. CCLinker (PackiX)
  49. ByeBetaAlert (Cydia Geek)
  50. WhatAboutThis (Nepeta)
  51. Filza Files Manager (BigBoss)
  52. VideoHud (BigBoss)
  53. SendDelay (BigBoss)
  54. MorePowerOptions (eXqusic)
  55. DoubleTapLock (SparkDev)
  56. ColorBoard (Gmoran)
  57. MarkFavorites (PackiX)
  58. VideoHud (BigBoss)
  59. Fast Unlock X (Cp Digital)
  60. HideBar X (SparkDev)
  61. PencilChargingIndicator (ShiftCMDK)
  62. Widgextend (D4ni)

Here are some of the paid Tweaks that are absolutely worth it.

  • BetterCCXI
  • JellyFish
  • Boxy 3
  • Next Up 2
  • Lisa
  • SafeShutDown
  • Floating Dock Plus

Remember that all these Tweaks are loaded from their respective repositories which means that you must have the repository’s source installed before you try installing one of the tweaks.

To install the tweaks through Cydia, you will open Cydia and install Flame on your iPhone/iPad. You will open Cydia on the device and go to Sources > Edit and add the sources given below.

For Sileo, you will simply open it and go to Sileo > Sources > Edit, and add the sources you want.

After adding the source, you can install the Tweaks from the stores.

Here are all the sources.

  • https://bqrichards.github.io/repo
  • http://c1d3r.com/repo/
  • https://repo.chariz.io/
  • https://repo.nepeta.me/
  • https://eXqusic.com/
    http://gmoran.me/repo
    https://repo.packix.com/
  • http://ib-soft.net/cydia
    https://www.idevicehacked.com/
  • https://repo.cpdigitaldarkroom.com/
  • http://skitty.xyz/repo/
  • http://cydiageek.yourepo.com/
  • https://restiveconch.yourepo.com/
    https://shiftcmdk.github.io/repo/
  • https://repo.d4ni.nl/
  • http://sparkdev.me
    https://xenpublic.incendo.ws/
  • https://repo.dynastic.co
  • https://evynw.github.io/
  • https://ib-soft.net/cydia/
  • https://pulandres.rejail.ru/
  • https://fncxpro.github.io/
  • http://beta.sparkservers.co.uk/

That’s pretty much it with this list. In case you want any tweaks added to the list above, feel free to drop them in the comments below. Also, drop your questions and queries below too. I will try my best to get back to you as soon as possible.

Last Updated: 26th October 2019