The Samsung Galaxy Note 9 can act weird at times. The best solution to fix over a hundred problems on your Galaxy Note 9 is to wipe its cache. Wiping the cache of your Galaxy Note 9 is quite easy, however, most of the users get confused with this option as they are afraid of losing their data. If you carefully follow the steps to delete Galaxy Note 9 Cache, you will not lose the data. Nothing else will go wrong with the phone either.
Before we clear the delete Galaxy Note 9 cache, let’s understand the purpose of cache and why you need to clear it.
Contents
Galaxy Note 9 Cache
Cache in simple words is a hardware or software component that can store the data of the applications or process running on your device. This data is then used to perform a task faster next time. For example, on your Galaxy Note 9, when you open an application for the first time, it takes a lot of time. When you will open the same application for the second time, the application will load faster. This is because the cache stored application’s data which helped it to launch faster.
The same happens when you open a website. Opening a website for the first time can take a lot of time starting from a few seconds to a few minutes. The second time you open the same website, it loads quickly because your Internet browser saves the cache which resides in the temporary internet files of your computer.
The cache of all the tasks is also saved. This is why at times when you update something, you are unable to see the changes. The cache still loads old preferences making the changes invisible. In case of applications, when the cache is too much cluttered, the functionality of an application can get affected.
Phone Cache
In the Android eco-system on Galaxy Note 9, there are three types of cache. One is the application cache, there is one called application cache and the last one is called Dalvik cache.
The phone cache is responsible for launching all the applications and all the processes on your phone. So if something goes wrong with a particular application, you have to clear application cache. If your phone acts weird, you have to clear the phone’s cache.
On an Android Phone, clearing the cache can do wonders. Clearing cache can fix the heating up problems. It can also fix the battery problems of a phone. If the phone hangs, clearing the cache is one option you have. To cut it short, the deleting cache on your Note 9 is basically a solution to fix over a 100 different problems.
Application Cache
The application cache is responsible for a particular application. For example, in the case of Netflix, the application at times fails to play a video. You have to clear the cache of the Netflix application in order to play the videos once again.
Dalvik Cache
Apart from these two types of cache, there is another type of cache called Dalvik cache. This cache is responsible for running all the programs on your phone that have the .apk extension. It means this application also handles all the applications on your phone. Deleting this cache can clear all the junk of APK files from your phone. The Dalvik cache is accessible only on a rooted Android phone.
Delete Galaxy Note 9 Cache without losing data
Clear Galaxy Note 9 Cache without losing data
This method is to delete Galaxy Note 9 cache without losing data. We are talking about the cache of your phone. Follow the steps carefully.
- Press the power button and turn off your Galaxy Note 9.
- Now press and hold Volume Up + Bixby + Power button to boot your phone into the recovery mode.
- As you see the recovery mode, let the keys go.
- Now use Volume Down button to highlight “wipe cache partition” option.
- Press the power button to enter the wipe cache partition option.
- Once again, press Volume Down to highlight “Yes”.
- In the end, press power button to wipe Galaxy Note 9 cache.
- Reboot your phone into the system now.
Clear Galaxy Note 9 application cache without losing data
This method is to clear the cache of a particular application. Follow these steps carefully.
- On your Note 9, open Settings.
- Now in Settings, open Applications or Application Manager.
- Open all the running applications now.
- You will see a list of applications, open the target application now.
- Click on “Storage” in the settings of that application.
- Now you will see two options: Clear Cache and Clear Data.
- Click on “Clear Cache“. Do not click on Delete Data.
- Reboot your phone now. Done.
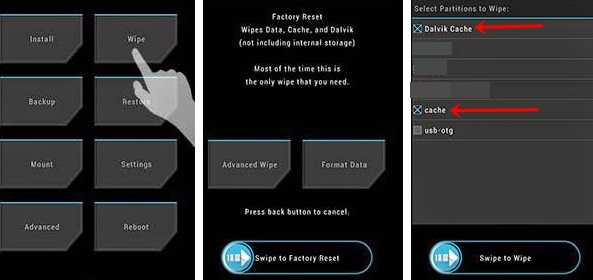
Clear Galaxy Note 9 Dalvik Cache
The Dalvik Cache is not accessible on a normal Galaxy Note 9. For this, you need a custom recovery like the TWRP recovery on your Note 9. If you are willing to clear this cache, install TWRP Recovery for Note 9 first and then follow these steps.
- Power down your Note 9.
- Press and hold Volume Up + Power + Bixby keys to boot into TWRP.
- In TWRP, click on Wipe > Advanced Wipe > Select Dalvik Cache > Swipe screen to wipe.
- Reboot into the system now.
- You are done!
Conclusion
So that’s how easy it was to clear the cache on your Note 9. In this process, you did not lose any data. Everything on your phone is safe and sound. If your phone was experiencing any issue previously, you can check its performance now as clearing the cache can potentially fix problems. In case something has gone completely wrong with your Note 9, consider installing a Galaxy Note 9 stock ROM. For any queries, feel free to reach out to me through the comments section below.


