Home Blog Page 87

Samsung J320P Galaxy J3 Guides: Hard Reset, Recovery, Safe Mode, Download Mode & More

0
Samsung J320P Galaxy J3 Guides: Hard Reset, Recovery, Safe Mode, Download Mode & More

Samsung J320P Galaxy J3 Guides Post: We’ve made this post for Samsung J320P Galaxy J3 users. They can learn how to Hard Reset, Boot Into Recovery, Safe Mode, Download Mode and much more. You can say that this is the ultimate guides post for Samsung J320P Galaxy J3. Now before we move on to the Samsung J320P Galaxy J3 Guides & Tricks. Let me give you an overview of Samsung J320P Galaxy J3 specs.

Samsung J320P Galaxy J3 Guides

Samsung J320P Galaxy J3:

The Samsung J320P Galaxy J3 was released in 2016, January. The Phone came out with a screen of 5.0 inches having 720 x 1280 pixels resolution. Samsung J320P Galaxy J3 was powered by Exynos 3475 Quad ( Quad-core 1.2 GHz Cortex-7 ) CPU and Mali-T720. It had internal storage of 16 GB, 1.5 GB RAM. The camera at the back of this phone is 8 MP, f/2.2, AF and on the front, it is 2 MP. Inside this Phone, there was a 2600 mAh battery. The Phone originally ran on Android 5.1.1 (Lollipop).

Samsung J320P Galaxy J3 Guides & Tricks:

Summary:

Topics:
Safe Mode
Download Mode
Recovery Mode
Reset Network Settings
Clear App Data
USB Debugging Mode

Heed the instructions below and you will find out how you can Clear App data, New Software Update, Safe Mode, Recovery Mode, Download Mode and more on Samsung J320P Galaxy J3.

Hard Reset J320P Galaxy J3:

Heed the instructions provided in the following link and you will get to know how to hard reset Samsung J320P Galaxy J3.

Clear App data:

  1. On your Android phone, go to Settings.
  2. Find the Application Manager or Application settings.
  3. In the Application settings, swipe towards the All or the Running Applications tab.
  4. Select the application of which you want to clear the cache and data.
  5. A list of further options will appear now, tap the Storage option.
  6. Under the Storage option, you will find Clear Cache and Clear Data options.
  7. Tap the button according to your liking.
  8. That’s all.

Check New Software Update on Samsung J320P Galaxy J3:

  • Open Settings Apps.
  • Scroll down and Tap on software update.
  • It will now check the available software update.
  • If there is any, you will be notified and follow the on-screen instruction in order to proceed.

Enter Recovery Mode on Samsung J320P Galaxy J3:

  1. Power down your phone completely.
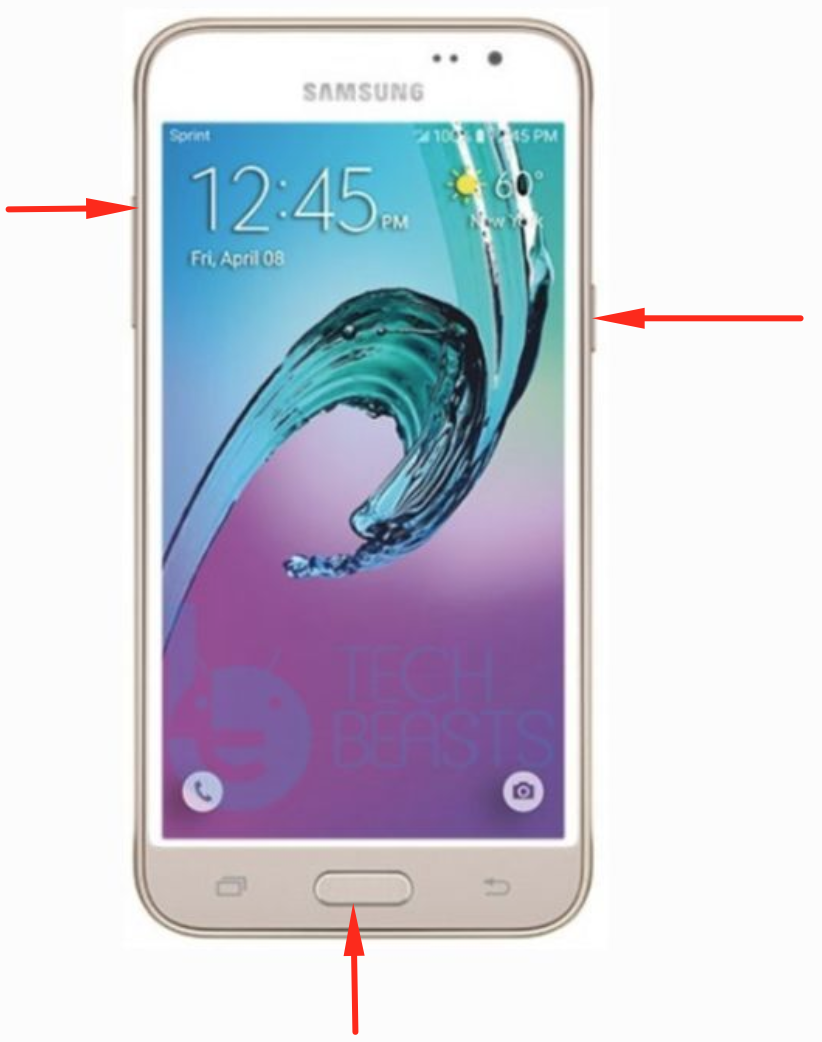
  2. Now press and hold Volume Up + Home + Power keys.
  3. Your phone will take a while to boot up. As soon as it does and shows you the Samsung logo, let the key go.
  4. Your phone will now load the recovery.
  5. Let the recovery load. Once done, you can operate the recovery mode freely using Volume Up, Down & Power keys.

Boot Samsung J320P Galaxy J3 into safe mode:

  1. To boot into Safe Mode, turn off your phone completely. Now turn on your phone. While your phone boots up press the Volume Down key and keep it pressed until the phone boots into the system.
  2. As your phone boots into the system, you will find the Safe Mode watermark on the lower left corner. This means you are now in the Safe Mode.

Wipe cache partition on Galaxy J320P Galaxy J3:

  1. Shut down your phone.
  2. Boot into the recovery mode. Using the instructions provided above.
  3. Scroll down and highlight “wipe cache partition”.
  4. Press the Power button to make a selection.
  5. Highlight Yes and let the phone wipe its cache now. That’s all.

Reset network settings on Galaxy J320P Galaxy J3:

  1. On your phone, open Settings.
  2. Now in settings, go to About device.
  3. Tap Reset > Reset Network Settings > RESET > RESET.

Enable developer options and USB debugging on Galaxy J320P Galaxy J3:

  1. Go to settings.
  2. In settings, scroll all the way down and locate About device section.
  3. In the About device section, find build number in the Software details.
  4. Tap the build number 7 times to enable Developer Options.
  5. Once done, the Developer Options section will appear at the bottom where you found the About device option.
  6. Now go to Settings > Developer Options.
  7. Find USB Debugging mode in Developer Options and tap the radio button located next to USB Debugging mode to enable it.
  8. That’s all.

Enter download or Odin mode on Galaxy J320P Galaxy J3:

  1. Turn off your phone completely.
  2. Now press and hold Volume Down + Volume Down + Power button.
  3. Your phone will turn on and show you a warning.
  4. Press the Volume Up button to continue into Download Mode now. That’s all.
Important Message.
Please follow us on Facebook, Twitter, and Google Plus. Help us grow our social family.

How To Hard Reset Samsung J320P Galaxy J3 (2016)

0
How To Hard Reset Samsung J320P Galaxy J3 (2016)

With the help of this guide, you will be able to Hard Reset Samsung J320P Galaxy J3. There are a number of ways to factory reset Samsung J320P Galaxy J3 and we’ve posted all of them.

This is the best solution so far to boost up the performance level on an Android device. Moreover, it is the ultimate solution of all your hardware or software problems on J320P Galaxy J3.

Now before we move on and start telling you how to Hard Reset Samsung J320P Galaxy J3. Let me give you an overview on Samsung J320P Galaxy J3 so that you get to know why this device is so famous.

Hard Reset Samsung J320P Galaxy

Samsung J320P Galaxy J3:

The Samsung J320P Galaxy J3 was released in 2016, January. The Phone came out with a screen of 5.0 inches having 720 x 1280 pixels resolution. Samsung J320P Galaxy J3 was powered by Exynos 3475 Quad ( Quad-core 1.2 GHz Cortex-7 ) CPU and Mali-T720. It had internal storage of 16 GB, 1.5 GB RAM. The camera at the back of this phone is 8 MP, f/2.2, AF and on the front, it is 2 MP. Inside this Phone, there was a 2600 mAh battery. The Phone originally ran on Android 5.1.1 (Lollipop).

Benefits of Hard Reset:

Summary:
*You can Wipe all of your Data Stored on your device.
*Easily fix all the performance issue.
*Bypass screen lock through hard reset.
*Bring the factory state.
*Fix all the firmware issues.
*Get rid of signal problems, loop issues, rebooting problems and power problems.

How to Hard Reset Samsung J320P Galaxy J3:

Method1:

  • Turn off your device.

  • Now press and hold home+Power+Volume Up key.

  • Release the power button once you see the logo, but keep holding home and Volume up keys.
  • Now when you see the Android logo, let go both buttons.
  • Use the volume down button to navigate and highlight wipe data/factory reset.
  • Now use the power key to select the option.
  • You have to select ‘Yes‘ when you’ll be prompted for the next menu.
  • Now wait for the process to be completed, once it’s done highlight ‘Reboot system now’ and press power button to select it.
  • All Done.

Method2:

  • Open Settings from the Home Screen.
  • Scroll down and Tap on Backup & Reset -> Factory Reset.
  • Now select Reset device.
  • To Confirm Choose Erase everything.
  • That will be all, wait for the process to complete.

That’s all. You have successfully Hard Reset Samsung J320P Galaxy J3. Please do tell us if you face any problem during this process.

Important Message.
Please follow us on Facebook, Twitter, and Google Plus. Help us grow our social family.

[ Whatscan ]Spy and Check another person’s WhatsApp

0
[ Whatscan ]Spy and Check another person’s WhatsApp

Here you will the latest version of Whatscan, the best tool to Spy and Check another person’s WhatsApp. May you haven’t heard about Whatscan that is why we have made this post. Basically, Whatscan is just like all the WhatsApp Mods, it can let you use two accounts on a single device. However, when you go in-depth you will get to know that it can do a lot more than that.

Whatscan allows you to easily check another person’s WhatsApp account. Shocking right? Well, it can and we have tested it. You easily check the messages of another WhatsApp account. In short words, you can spy on other WhatsApp account using WS. It is an extra feature if you think that it is illegal then you won’t have to use it. You can go with the basic purpose, use multiple WhatsApp accounts on a single device.

Whatscan

Whatscan: how it works?

Whatscan allows you to use the WhatsApp Web version on your device. Once installed, you will see that configuration is very easy, it is same as you do on your browser.

WhatsApp Web will run in the Wscan nutshell, you won’t be redirected to your browser. Basically, you can use your own account of some other users account on your mobile device using Wscan. All you have to is get his/her mobile phone and open the app, scan the QR code and you are good to go. Either you can use your account or someone else’s.

There is no hacking involved or anything it is a simple trick that can be performed with ease. Everything works same as you do on the WhatsApp Web, the only difference will be that you are using WhatsApp Web on your smartphone.

Spy WhatsApp Account:

If you want to mess with someone, all you need is his/her smartphone, Open Whatscan, Scan the QR Code and give his/her smartphone back. Now you have access to someones else account, you can check everything.

Download Whatscan:

You can download the Whatscan App form the links below. This app is available for both platform iOS and Android. Since it is removed from Google Play so you need to download it from an unknown source. iOS users are in luck, this app is still available on App Store. Use the following links to download WS for your respected devices.

Protect yourself from Whatscan:

It is very easily to protect yourself form Whatscan, all you have to do is head over to the Settings -> Tap on and select WhatsApp Web. If your account is logged on a PC, you will see a notification there, below the notification you will see ” Log out from all devices ” Tap on it.

Important Message.
Please follow us on Facebook, Twitter, and Google Plus. Help us grow our social family.

That’s all.

WhatsApp Mod Apps for Android | Forked WhatsApp

0
WhatsApp Mod Apps for Android | Forked WhatsApp

These WhatsApp Mod apps will give you an amazing experience as compared to stock WhatsApp. As you all know that WhatsApp is the biggest instant cross-messaging platform available for all smartphones. You can easily send messages including images, videos, GIF, documents, user location, audio clips, phone contacts and voice notes and more. Oh, I forgot to mention that you can make video calls using WhatsApp.

WhatsApp Mod Apps
WhatsApp Mod Apps

If you are an Android user then you will know that there is always a modded on of Android app. Since Android is open source, but just to make thing clearer, Google Play has very austere policies for such apps. You will most of the modded version are not available on Google Play. It is said that the mod version of an app is vulnerable and any hacker can attack and steal your private data.

It is best to stick with the official WhatsApp version but not everybody thinks the same way. WhatsApp Mod apps give more than you ask for and this is the main reason people use this WhatsApp Mod. However, if you don’t want some extra perks then you can stick with the Stock WhatsApp. It allows you to do a lot, it provides you with end-to-end encryption, with the latest WhatsApp update you can send stickers etc. But still not enough, the WhatsApp Mods we are providing you, are the best ones and these forked versions of WhatsApp will give a lot more than you can ask.

Since all of these WhatsApp Mods Apps are unofficial sources, there are some risk involved. Before we move on, let me shed some light on these factors.

Risks Associated with Use of WhatsApp Mod:

Whether you like it or not, all of these forked WhatsApp versions are not safe for use, although they provide you with a number of great features. Since none of these features are available in the original WhatsApp. These apps don’t use WhatsApp servers, so there is no guarantee that your conversation is totally secure. Beside that there are more things to worry about, keep reading and you will find out what are they.

Risks:
These apps are not hosted on secure servers and because of that, Malware and Spyware injection risk are at larger.
All of your Chats are not encrypted, it can be accessed by any third person.
Your personal information can easily be extracted by anyone, Banking credentials, Passwords or more.
Using apps like WhatsApp Plus or GBWhatsApp is not illegal but you can lose your WhatsApp account. Because it Violates the WhatsApp Policies.

Best WhatsApp Mod Apps for Android:

Following are the best WhatsApp Mod Apps for Android. We have used these apps and make sure they are working perfectly. After that, we have posted them here.

GBWhatsapp:

GBWhatsApp is the best-modified version of WhatsApp and also it is popular. This app has some amazing features which make this one the top of the line alternate for WhatsApp. Following are the main features of GBWhatsApp and download links.

GBWhatsapp Features:

  • Hide Online Status.
  • Hide Blue Ticks, Second Tick, Writing Tick, Recording Status, Blue Microphone, View Status.
  • You can send Files up to 50MB in Size.
  • 50MB for Video and Pictures.

WhatsApp Plus:

If you’re tired of your stock WhatsApp application and its boring UI having a few options only, it may be the time to get a little out of the way and add some charm by installing WhatsApp Plus. As the name suggests, this application replaces the original WhatsApp application and has a lot of modifications and options including different color schemes, add different backgrounds to the application.

WhatsApp plus allows the users to modify the conversation and main application screen separately, that’s one of the most unique features found on any chat application ever. There are a plethora of features that you may experience upon installing this application and applying the different mods to enhance your chat experience on the world’s most widely used social chat app.

WhatsApp Plus Features:

  • Always Online Mod, Option to disable voice calling.
  • Added Much More Customization Features in this Version of Whatsapp Plus.
  • Updated to The latest mod of WhatsApp.
  • You can send any files such as PDF, TXT, Docs and much more
  • Change the theme easily with the help of applications.

Fouad WhatsApp:

If you have used GBWhatsApp then you will love Fouad WhatsApp. This works like GBWhatsApp but in terms of smooth experience, Fouad WhatsApp is far better than GBWhatsApp.

Fouad WhatsApp provides a lot more than GBWhatsApp, It has a beautiful material design. Moreover, Fouad WhatsApp offers more depth customization when it comes to chat lock and privacy settings. All the main features of Fouad WhatsApp are listed below.

Fouad WhatsApp Features:

  • Change tick styles and app launch icon (a lot of options)
  • Filters for Images and Videos
  • Material UI with Special Calling UI
  • Font Style Change with Font Preview
  • Send any file type
  • Install external themes from file manager (XML)

FM WhatsApp:

FM WhatsApp does the same as all the other WhatsApp MOD’s do but this one comes with awesome jaw-dropping features. The basic purpose of FM WhatsApp is to let you run two WhatsApp accounts on a single Android device. Those who are using Dual-SIM device, FM WhatsApp is the best solution to run two WhatsApp account. All the main features of FM WhatsApp are listed below.

FM WhatsApp Features:

  • Privacy and Theme modifications
  • Supports audio and video Calling with new UI
  • Hide the Last Seen option
  • Show “Online / Last Seen” on the main screen
  • Themes Store with 100+ Styles to download
  • Choose from 30+ Ticks & Bubbles styles
  • No need of loading for a media preview
  • Send video size up to 1GB (instead of 32MB)
  • Add up to 250 characters in your status field
  • Click and copy anyone’s staus
  • Change app launcher and notifications icon
  • Big emojis, Ban proof and much more!

WhatsApp PLUS Holo:

WhatsApp PLUS Holo is a custom mod for WhatsApp messenger that change the whole Whatsapp chat theme. Basically its a theme for WhatsApp named as Holo. When you install WhatsApp plus holo you will see it comes with a different look and good thing is that you can customize the way you want and it has a lot more option.

YoWhatsApp:

YoWhatsApp is the latest unofficial WhatsApp alternate, which provides you with unlimited awesome features. The first thing about YoWhatsApp is, No Lag issues, it’s quick and fast. YoWhatApp provides features like Hangouts UI, Contact Online/Last See status on the main screen, floating action buttons and bubble style messages.

YoWhatsApp Features:

  • Hangouts UI
  • Contact Online/Last seen Status in Main screen
  • Contact Status in Conversation screen
  • FAB (Floating action button)
  • Contact Online Toast
  • Specific Privacy (choose Privacy for Groups, Broadcasts, Contacts!)
  • Bubbles Style
  • Ticks Style
Important Message.
Please follow us on Facebook, Twitter, and Google Plus. Help us grow our social family.

That’s all.

Google Camera APK 6.1.021.220943556 [ Latest Version ]

0
Google Camera APK 6.1.021.220943556 [ Latest Version ]

You can download the latest version of Google Camera APK from this post. Google Camera is designed for Google devices but now you can install on a number of Android devices. Those who cannot download Google Camera from Google Play, this post is specially made for them. Sometimes your Android version is not compatible with the Google Camera and that is why you were unable to download it from Google Play. There are also a number of factors involved behind this problem. But the Good news is that you can download the latest version of Google Camera APK 6.1.009.215420794 from the links below.

Google Camera APK

Google Camera:

Google has enhanced both the rear and the front cameras on its phones. There are some modes on the phones which take photography to a whole new level. The Google Pixel 2 phones have a portrait mode. This portrait mode can capture stunning photos. If you are selfie freak, or you just want to take detailed pictures of subjects,  you are going to absolutely love this portrait mode in the phones. The portrait mode has been in-demand since the day Google introduced it.

Google Camera has all the features that are required to bring out the best photography experience in a smartphone. You will feature like HDR+, Video Stabilization, Smartburst, Photosphere, Lens Blur, and Slow Motion. If you want to learn more about Google Camera use the links below.

Download Links:

Pixel Camera
Price: Free

Google Camera APK:

Download

Version Info:

Version: 6.1.021.220943556
Package: com.google.android.GoogleCamera
Updated: November 17
Size: 75.77 MB
Minimum Version: Android 9.0

What’s New:

Night Sight.
Google Play

How To Install Google Camera APK 6.1.021.220943556 on Android:

  1. Download Google Camera APK from the link provided above.
  2. Copy the APK file to your phone now.
  3. On the phone, open Settings > Security > Unknown Sources > Allow.
  4. Now using a file manager, locate the APK files that you just copied.
  5. Tap on the APK file to proceed with the installation. Heed the instruction provided on the screen and you will be able to Install Google Camera.
  6. After the installation, launch the Google Camera for Android from the app drawer.

That’s all.

How to download Google Play Store on Honor 8X and 8X Max

89
How to download Google Play Store on Honor 8X and 8X Max

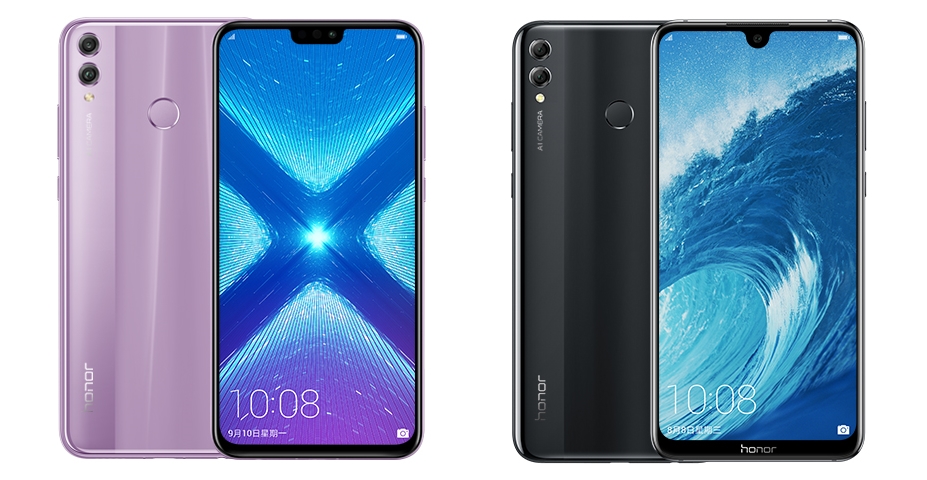
The Chinese versions of the Huawei Honor 8X and 8X Max do not come with the Play Store installed in them. In order to download Google Play Store on Honor 8X and 8X Max, you need this guide. I have explained the procedure to install Google Play Store on Huawei Honor 8X and 8X Max in a few simple and easy steps.

Google Play Store on Honor 8X and 8X Max

Why your Chinese Honor 8X does not have Play Store?

Before taking a look at the steps to download Play Store on Honor 8X and 8X Max, it is important to understand why your Chinese Honor 8X doesn’t have the Play Store installed in it? Well, The Peoples Republic of China has its own rules and regulations for the applications to work within its premises. The Chinese government does not allow applications like Google, Facebook, Instagram, Twitter, and WhatsApp to operate in its boundary. This is because the applications and platforms like Google and Facebook can potentially keep a track of the activities of their users. They do know what you are doing and what hour of the day or night.

The Chinese government cannot let its important information fall into the hands of the likes of Google and Facebook, therefore, it blocks their access in the country. This is why all the Chinese smartphones come without a Google Play Store. The Chinese phones have their specific stores instead. In the app stores of the Chinese phones, only the Chinese government approved applications are available.

Installing Play Store on the Chinese Honor phones is not completely restricted. The devices may not come with anything called Google in them, however, it’s really simple and easy to install the Play Store using third party resources. As you move further in this guide, you will learn the appropriate steps.

How to install Play Store on Chinese Honor 8X?

So now that you have purchased a Huawei Honor 8X from China and you are moving out of China, or you have purchased a Chinese Honor 8X while living in some other country, how are you exactly going to get the Play Store? Well, this guide is your gateway to install the Play Store on your Honor 8X.

The process to install Play Store on your Honor 8X is fairly simple. There are a Google Installer and a GMS Installer APKs that can bring the entire Play Services along with the Play Store to your Huawei Honor phones. The method that I’m going to mention here works for all the Huawei Honor handsets that belong to China. Now if you have landed on this page to install the Play Store on a phone other than the Huawei Honor 8X, you don’t have to worry. This method is going to work regardless of your phone model. Bear in mind that this stands valid for all the Huawei Honor smartphones only.

So folks without any further ado, follow the simple and easy steps given below to get the Play Store working on your Huawei Honor 8X or the Honor 8X Max now.

Preparations: Enable Unknown Sources first & Install GMS APK

  1. On your Honor 8X or the Honor 8X Max, open Settings.
  2. Now go to Advanced Settings > Security > Download from Unknown Sources > Allow.
  3. Google Installer APK for EMUI 10, EMUI 9 & Below: Download
  4. Download the GMSanzhuangqi APK. [EMUI 8 & Below]
  5. Copy the APK files to your phone.
  6. Using a file manager, locate the APK files.
  7. Install the GMSanzhuangqi. If it asks for any permissions, press “Install Anyway”.
  8. After installation, it will ask you to turn on the “Trust this application” feature. Turn it on and do not open this application at this point.
  9. Move to the next step now.

Update: To install Play Store on Huawei phones on EMUI 9, follow this guide.

Download Google Play Store on Honor 8X and 8X Max

  1. Download and copy the Google Installer APK to your phone.
  2. On your phone, using a File Manager, locate and open the Google Installer APK.
  3. Allow the APK installation now. If it asks for any permission, press “Install it Anyway”.
  4. If it asks for “Trust this application” option, tap the radio icon to turn it on to proceed with the installation.
  5. Now the option to open Google Installer will appear. Open it.
  6. Google Installer will now show you a big blue “Install” button at the bottom. This button will tell you to install the core Google applications. These should be 6 applications in total. Press this Install button now.
  7. The Installer will once again ask you to allow the installation, press “Install it Anyway”.
  8. Now whenever it asks you about the “Install it Anyway” option and the “Trust this application” option, you have to allow it. You will have to go through this for 6 installations in total.
  9. The Google Installer will now install all the applications one by one. It can take 3-4 minutes easily so hold on while it finishes up.
  10. In the end, a big red button will appear at the bottom of the screen mentioned “Google Play Store”.
  11. Tap the button to launch the Play Store. All done.

If you are facing trouble while installing the Play Store, take a look at the FAQs below. I have added all the solutions below. The solutions are added after verification.

FAQs

  • For the users who couldn’t load the GMS APK: Run the GMS APK and it will ask you to remove Google Apps. Run it now. Reboot your phone now. Open Huawei App Gallery and change region to China. Now search for Google Play Store or Play Services and install/update it.
  • For the users who got a blank screen while loading Play Store: Run the GMS APK again, it will ask you to remove the Google apps. Answer Yes. After this, reboot your phone and check if there is an EMUI update. Update your phone. Now run the “Google Installer” application. This will install Google Apps in your phone. You can now run the Play Store.
  • The users who are getting “This application may harm your device”: Reboot your device. If there is an update available, update your phone. Run the Google Installer straight away and install the Google Apps. Check if it works this time.
  • Users who are getting a white screen, or force close errors while opening play store: Run the GMS APK on your phone again, it should ask you if you want to uninstall the Google Apps. Complete the uninstallation. Reboot your phone. Now only download the Google Installer 3.0 APK and install it. Complete the installation and you will have the play store. This solution has been verified by the users in the comment section below as well.

Conclusion

That’s all guys. You now have the Play Store installed on your phone which means you have access to the world’s biggest application repository. You can now install any application of your choice from Facebook to Snapchat. The Play Store has nearly 1 Billion applications in it. Feel free to enjoy it. If you have any queries or questions, feel free to reach out to me through the comments section below.

Last Updated: 26th October 2019

How to Add Stories on Youtube | Add Reels on YouTube.

1
How to Add Stories on Youtube | Add Reels on YouTube.

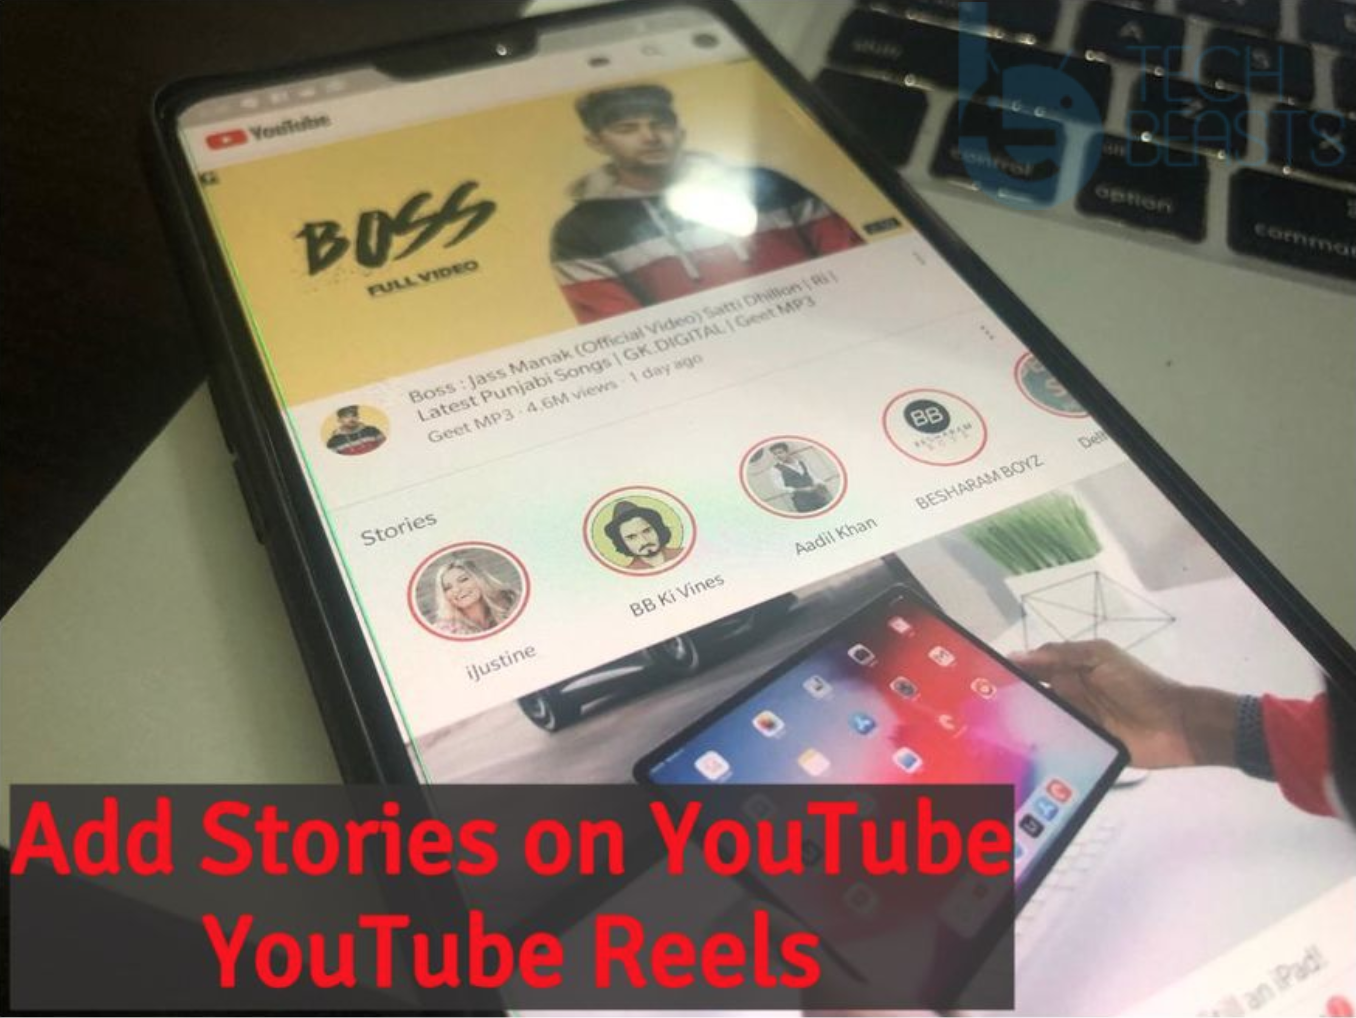
Here’s how you can Add Stories on Youtube. We’ve seen Facebook, Instagram and more social media hubs adopting SnapChat stories mode. Now it’s time for YouTube, Google has rolled out a new feature in the latest update of YouTube app.

You can now Add Stories on Youtube just like Instagram, Facebook and more. I am not sure why Google did that but who cares, it is live and those who don’t know how they can add stories on their YouTube account they need to follow the instructions provided below.

Add Stories on Youtube

This new feature is called Reels, it was introduced back in 2017 in an event of YouTube expanding community. It is not the same as all the other platforms, Just to make things more clear. The Reels will not be live at the top of the app, as it does on Instagram. Instead, all of your Reels will appear in a new Tab on your Channel.

What is Reels?

It is a new idea to introduce a different video format to express them selfs with a short snip of a video. It is said that with the help Reels a YouTuber can engage more fans and they don’t have to post the full video for that.

You can make Reels by shooting quick video snip using your mobile. After that, you can filters, music, text, and more. Moreover, there is one more thing unlike all other stories platforms, YouTube Reels won’t expire.

We a short vide of What Reels will look like and after that, we’ll posting a complete guide to tell you how you can Add Stories on Youtube.

YouTube Reels:

How to Add Stories on Youtube:

  • Open your YouTube App, make sure you are logged in.
  • Tap on the Video Icon located on the top right side of the screen.
  • You will see a pop-up at the bottom of your screen. There you will find 4 options, Tap on Stories icon.
  • Now you can take a Snap or Record a video just like you do on other platforms.
  • After taking a photo or recording a video, you can add a number of different elements such as Text, Stickers, music and more.
  • Once you are done with everything, Tap on Post to proceed.
  • Head back to your YouTube account, Swipe left on your menus and you will find a new menu named as stories. Here you will find all you uploaded stories.

That’s all. This is how you can Add Stories on YouTube or Add Reels on YouTube.

Important Message.
Please follow us on Facebook, Twitter, and Google Plus. Help us grow our social family.

Top 10 Android Apps to Download Movies for Free

0
Top 10 Android Apps to Download Movies for Free

Are you looking for Android Apps to Download Movies for Free? Well, you are the right place, we are here to help you. Since Android is an open-source platform that means we can do anything in terms of developers perspective. When it comes to Android you can find a number of unofficial apps to download or stream movies and TV Shows. However, since all of these are unofficial or unauthorized streaming source, Google Play doesn’t allow such sources. That means you cannot find these streaming apps on Google Play.

We have compiled a list of best Android Apps to Download Movies directly on your smartphone. Before posting these apps here, we have studied them and after that, we have added them to our list. Most of these apps don’t any kind of content on their servers, they provide you a search web directory to stream the movies and TV shows. These apps will let you stream and allow you to download movies and TV shows.

You can find anything on the Web, there are good things and then there are some who try to deceive in your every manner. Same goes with these apps, there are hundreds of fake apps which are designed for one purpose, inject malware into your smartphone. It’s easy to identify such apps, they will ask for permissions which are not required for such apps.

Every app which is not downloaded from reliable sources is a threat to your privacy. So We would suggest you that, always try to download from a well-known source. So today, We’ve will give you the best Android Apps to Download Movies for Free. We’ve tested each app separately and then posted it here because we care of our readers.

Android Apps to Download Movies

Note: Enabled unknown sources. Settings > Security and just right check Unknown sources.

Android Apps to Download Movies for Free:

Following are the best Android Apps to Download Movies for Free. Most of them will be available in APK format, so you need to install them manually.

Method:
Step1: Download the APK directly on your device.
Step2: Head over to the downloads folder or you can access it from the notification bar.
Step3: Tap on the downloaded APK file.
Step4: Follow the instructions provided on the screen.
Step5: Once the installation is finished, open your app drawer to access the newly installed app.

TerrariumTV:

Android Apps to Download Movies for Free

TerrariumTV is said to be the best alternative to ShowBox. They host all of their content on their own servers. Moreover, it supports multi-language Subtitles and you can download movies and TV shows on your external and internal storage.

They have the biggest collection of 4k movies. TerrariumTV App supports Chrome cast, Fire TV and Fire Stick. You can download the TerrariumTV APK from the following button.

ShowBox:

Android Apps to Download Movies for Free

Showbox is currently the best app for streaming movies online. The app includes so much content and you are likely able to get hooked on to it because of its easy to use.

The app is not available on the Google Play Store and if you want to download it, you can do so by going to their website. You can simply install Showbox APK on your Android.

Popcorn Time:

Android Apps to Download Movies for Free

Even though currently in beta testing, the app is getting popular among user who wants to watch TV shows on Android.

Popcorntime not only brings you movies and tv shows but it also has the option to turn on subtitles if your favorite show is not in your language.

The videos are in HD so there should be no problem with the video quality. Popcorn Time was available on Google Play but now it is not, that means you have to download the latest Popcorn Time APK from the following button.

CinemaBox HD:

This app was formerly known as PlayBox HD. This app is best for streaming TV Shows and movies. Moreover, CinemaBox is a trusted app and it doesn’t allow bugs and malware.

All the movies which are available at CinemaBox are in HD quality (720p). One of the best feature worth mentioning is Parental Control. Moreover, CinemaoBox comes with the support of Chromecast, Apple TV, and WiFi sharing.

You can download the movies directly on your Android device. Subtitles feature is also supported. Download the latest CinemaBox APK from the following button.

VidMate:

The Vidmate app is best to watch the latest movies and TV shows. Not only this, it is the best video downloader available for Android.

You can download and stream Bollywood, Tollywood, Hollywood and Dubbed movies on VidMate. This app is totally free and easy to use.

Vidmate supports all the biggest streaming hubs such as Vimeo, Dailymotion, YouTube, Instagram, FunnyorDie, Vine, Tumblr, Soundcloud, Metacafe, and many more.

OGYouTube:

OGYouTube is a modded version of YouTube App. This app can do so much more which is prohibited on Youtube official app. Since Youtube is the biggest source of online movies and tv shows. By using this Mod, you can have all this content your smartphone. OGYouTube has all the main core features of the official Youtube app and along with that, it is loaded with some awesome features.

Features:

  • Video Downloading.
  • No Root Required.
  • Ad Free.
  • Background Playing.
  • Dark Mode.

Kodi:

Kodi was previously known as Xbox media player. However, now that it has been introduced for Android devices, people have gone crazy and it is obvious why. While previously we had no availability to streaming Live TV on Android, with the arrival of apps like Kodi, we are able to stream shows on our devices. Kodi lets its users access media content including movies and TV shows as well as music. So it is an all-in-one app that is also very easy to use.

Besides smartphones, you can also run KODI on your laptop, TV, PC, and tablet. Kodi can actually replace your cable TV with its ability to stream Live TV, record, download and store shows and you can access them around the house on various devices. It uses local storage or cloud storage to keep your saved media. The app also includes various add-ons, for example, weather tools that come in handy as well.

Megabox HD:

This app gives you wide variety to Stream movies online, you don’t have to use Google when you have Megabox HD and it’s the one tap solution for those who are movie freaks. Megabox HD has the biggest collection of movies and TV Shows all in HD.

You don’t have to subscribe to pay for anything it’s totally free. All you have to do is download the App and start watching your favorite movies and TV Shows on your smartphones. Download the Megabox HD APK latest version from the following links.

Bobby Movie Box:

Bobby Movie Box is another online streaming app for Android. You can watch all the latest TV Shows and Movies for free.

Bobby Movie Box provides all the content in full HD. Moreover, you can download the movies and TV Shows directly on your Android device using Bobby Movie Box.

BeeMovie:

An app which is designed to provide free streaming. Moreover, you can watch and download all the movies from all over the world. BeeMovie comes without any cast, you don’t need to sign up and it has a large database of Hollywood, Bollywood, Hindi dubbed movies.

These were the best Android Apps to Download Movies for Free. We will update this post frequently and we’ll add some new apps for sure. So keep visiting our site.

Important Message.
Please follow us on Facebook, Twitter, and Google Plus. Help us grow our social family.

How to Play JioTV on PC, Computer, Desktop, Laptop

0
How to Play JioTV on PC, Computer, Desktop, Laptop

With the help of this guide, you will be able to Play JioTV on PC Computer, Desktop, Laptop. As of now, you are well aware of that, JioPlay App is now JioTV and this app provides the broadest range of TV channels. Most of the Channels are from India, with over 350+ channels, 10+ genres, and 15+ languages.

The important thing to keep in the mind is, JioTV is exclusively available for Jio SIM users. But since this is the age of technology, you can use JioTV without Jio SIM. Keep reading and you will find out how you can do so. Good thing is that you can enjoy live TV on your PC with ease, all you have to do is install JioTV on PC.

You can Install JioTV directly from Google Play or you can use a JioTV Mod and enjoy live TV. Now let’s get back to the main topic and tell you how to Play JioTV on PC, Computer, Desktop, Laptop.

JioTV on ComputerRun and Use JioTV on PC:

Following are the methods you can use download and Use JioTV on PC. We’ve tested all the methods, all of them are working.

JioTV Website for Online Live TV:

This is the most secure and easy method you can find. JioTV website is launched and now you can view online TV on JioTV website you don’t have to download any app or software.

  • Open ” www.jiotv.com “.
  • Log in with your Jio ID / Password.
  • If you don’t have your Password, then click on sign-up and you will be redirected to Jio Website. Follow the on-screen instructions.

The interface of JioTV websites is the same as the JioTV app. You can easily navigate through everything with ease.

JioTV on PC using BlueStacks:

  1. Download, install and setup BlueStacks N on your computer. Mac users can download and install BlueStacks instead.
  2. Now open BlueStacks 3 and then open My Apps tab.
  3. Go to System Apps and open the Google Play Store.
  4. Now in the Play Store, search for “JioTV App“.
  5. Click on the Install button and wait for the installation process to get completed.
  6. Once the JioTV app is installed, click on Open to start using it as you do on your mobile.

Install JioTV on PC using APK Method:

  1. Download JIOTV APK.
  2. Download and install Bluestacks: Bluestacks Offline Installer | Rooted Bluestacks |Bluestacks App Player
  3. Once you’ve installed Bluestacks, double-click the APK that you just downloaded above.
  4. The APK will be installed using Bluestacks, once installed open Bluestacks and locate the recently installed JIOTV.
  5. Click the JIOTV icon to open it, follow the on-screen instructions to play it.

You can also use Andy OS  to install JIOTV for PC, here’s the tutorial: How To Run Android Apps On Mac OS X With Andy.

Important Message.
Please follow us on Facebook, Twitter, and Google Plus. Help us grow our social family.

Download Latest Samsung Firmware Directly Free [ No Subscription Required ]

0
Download Latest Samsung Firmware Directly Free [ No Subscription Required ]

With the help of this guide, you can Download Latest Samsung Firmware Directly for free. As we have seen on many forums that in order to download Samsung firmware either we need to sign up or buy a subscription plan. But not anymore, there is a free software named Samfirm which lets you download Samsung Firmware for free on your Windows PC.

downlaod latest Samsung Firmware Directly

Not every smartphone users try customs ROM’s, Mods, apps which required root, but we cannot deny the fact that there is a large number of users who love to do that. Moreover, if you are not into Rooting, Custom ROM’ etc and you use the phone as it is. There comes a time when you face such issues which can be only fixed by flashing the stock firmware.

When that time comes, it is not as easy as it sounds. Download a firmware from any source is not piece of cake, some required fast internet connection, some required subscription, and some required sign-ups. So it’s not easy, until now. Thanks to Samfirm we can easily download Latest Samsung Firmware Directly on our PC. Before we move on let me give you an overview of SamFirm.

What is SamFirm?

SamFirm is free Tool which is designed for Windows only. All the credit goes to XDA developer zxz0O0. It allows you to download the latest firmware with respect to your device. All you have to do is provide a small amount of information and you are good to go.

What You Will need to Use SamFirm:

We’ve posted a completed step by step tutorial below but let me give you an idea of What is required to use SamFirm. The first and the most important thing is the Model number. Because you cannot flash other models firmware on your device. In order to get the model number of your device you need to head over to the ettings> About device > Model Number. Next, you will be needing the CSC code. This is required to extract information such as region and carrier/network. However, if your device is SIM-Unlocked then you won’t be needing CSC Code. But if your device is Carrier-Branded then you will need the CSC Code.

Now Let’s get started and tell you how to download latest Samsung Firmware directly on your PC without paying.

Download SamFirm:

Download Latest Samsung Firmware:

Heed the instructions provided below in order to learn how to Samfirm to Download Latest Samsung Firmware.

Use Samfirm to Download Latest Samsung Firmware:

  • First of all, you need to download the SamFirm from the links given above.
  • Make sure your internet connection is stable.
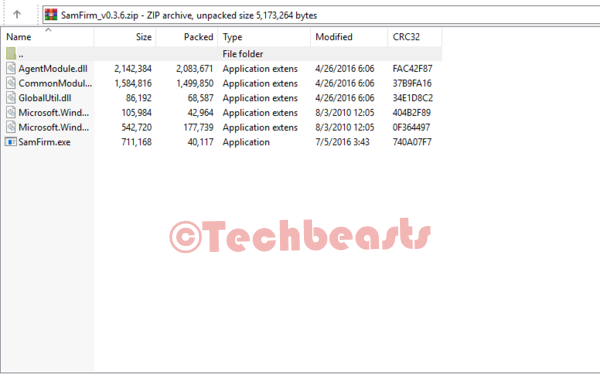
  • Extract the SamFirm_v0.3.6.zip on your desktop.
  • Open the folder you have extracted and double-click on SamFirm.exe.

downlaod latest Samsung Firmware Directly

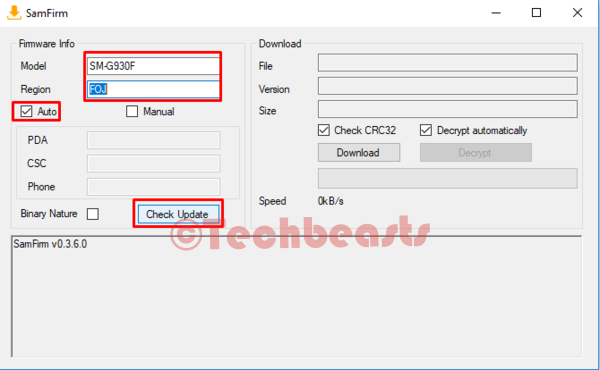
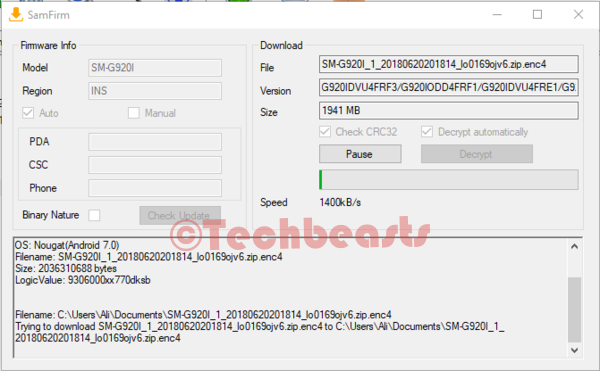
  • Now you have to Enter your Model number and Country region as I have added, you can see the following photo. Moreover, Check the Auto option and click on Check Updates, before you proceed.

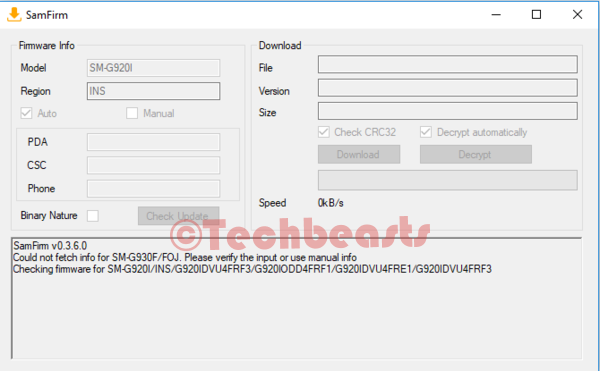
  • You have to wait till SamFirm find the firmware available for your region.

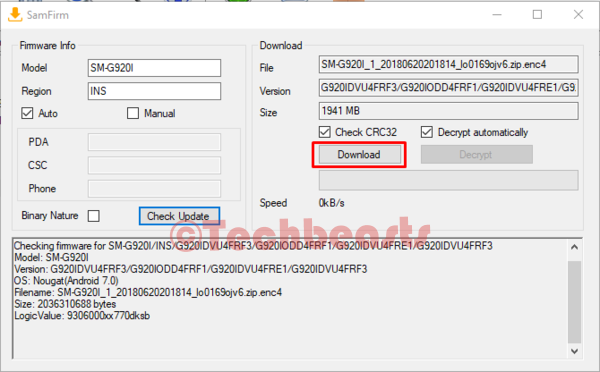
  • Once it does you will see the following window with the file information. Click on the Download button to start the downloading.

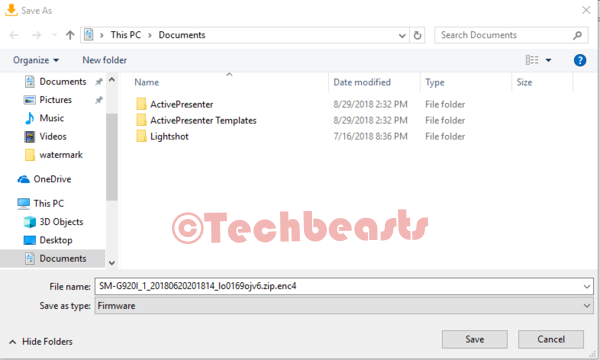
  • When you click on the download button, you will be asked to set the destination, choose as you desire. Click on Save to proceed.

  • The SamFirm will now start the downloading process, you have to wait until the downloading is finished.

  • After the firmware is downloaded, extract it and you will find the firmware with .tar.md5 extension.

You can use the instruction provided in the following link to flash the Samsung firmware you have just downloaded.

That’s all. This is how you can downlaod latest Samsung Firmware Directly on your PC.

How To Hard Reset Xiaomi Redmi 5 [ Tutorial ]

0
How To Hard Reset Xiaomi Redmi 5 [ Tutorial ]

Let’s tell you how you can Hard Reset Xiaomi Redmi 5. The Xiaomi Redmi 5 is the best budget device in terms of specs and it gained a lot of popularity.

Today we’ll tell you how to factory reset Xiaomi Redmi 5. This is the best solution so far to boost up the performance level on an Android device. Moreover, it is the ultimate solution of all your hardware or software problems on Xiaomi Redmi 5.

Now before we move on and start telling you how to Hard Reset Xiaomi Redmi 5. Let me give you an overview of Xiaomi Redmi 5 so that you get to know why this device is so famous.

Hard Reset Xiaomi Redmi 5


Xiaomi Redmi 5 Specs:

The Xiaomi Redmi 5 was released in 2017, December. The Phone came out with a screen of 5.7 inches having 720 x 1440 pixels resolution. Xiaomi Redmi 5 was powered by Qualcomm SDM450 Snapdragon 450 (14 nm) CPU and Adreno 506 GPU. It had internal storage of 32 GB, 3/4 GB RAM or 16 GB, 2 GB RAM. The camera at the back of this phone is 12 MP and on the front, it is 5 MP. Inside this Phone, there was a 3300 mAh battery. The Phone originally ran on Android 7.1.2 (Nougat).

Benefits of Hard Reset:

Summary
*You can Wipe all of your Data Stored on your device.
*Easily fix all the performance issue.
*Bypass screen lock through hard reset.
*Bring the factory state.
*Fix all the firmware issues.
*Get rid of signal problems, loop issues, rebooting problems and power problems.

How to Hard Reset Xiaomi Redmi 5:

Method1:

  • First, you need to Turn off your device, hold down the power button for 2-3 seconds.


  • Once your device is completely turned off. Press + Hold Volume Up and Power Key. 
  • When Mi logo appears, let go of the Power Button.
  • Keep holding the Volume Up Key until you see the Recovery Logo.
  • You will be provided with different languages. Select English using the power button.
  • Use the Volume Buttons to navigate and Power button for selection.
  • Choose Wipe & Reset from the list provided on the screen.
  • On the next screen, you have to go with Wipe All Data. After that, you need to select YES to proceed.
  • Once the process is finished, Reboot your device.

Method2:

  • Open Settings from the Home Screen.
  • Scroll down and Tap on Backup & Reset -> Factory Reset.
  • Now select Reset device.
  • To Confirm Choose Erase everything.
  • That will be all, wait for the process to complete.

That’s all. You have successfully Hard Reset Xiaomi Redmi 5. Please do tell us if you face any problem during this process.

Xiaomi Redmi 5 General Guides: [ Hard Reset, Recovery, Fastboot, Download, Reset Setting etc ]

0
Xiaomi Redmi 5 General Guides: [ Hard Reset, Recovery, Fastboot, Download, Reset Setting etc ]

Here you will find all the Redmi 5 General Guides. You will learn how to Boot into Recovery Mode, Safe Mode, Fastboot Mode. Moreover, you will also learn how to Wipe Cache on Xiaomi Redmi 5 and much more. So let’s get started now.

Xiaomi Redmi 5 General Guides
Quick Summary
Hard Reset.
Soft Reset.
Codes.
Recovery Mode.
Fastboot Mode.
Reset Settings.
Download Mode.
Reset Network Settings.
Portable Hotspot.
Power Saving Mode.
Add Fingerprint.
Screenshot.
Video Tutorials.
Back Up Data.
Bypass Google Verification.
Check IMEI.

Redmi 5 General Guides:

Heed the instructions below in order to learn everything about Xiaomi Redmi 5. These Xiaomi Redmi 5 General Guides will help you master everything on your device.

How To Hard Reset Xiaomi Redmi 5:

We’ve posted this guide yesterday. You can use the following link to learn how you can hard reset Xiaomi Redmi 5.

Hard Reset Xiaomi Redmi 5

Soft Reset Xiaomi Redmi 5:

In order to Soft Reset your Xiaomi Redmi 5, all you have to do is hold down the power button for 2-3 seconds and your device will turn off.

Safe Mode Xiaomi Redmi 5:

  • Power off the device.
  • Hold the Power Button to turn on your device.
  • When you see the Xiaomi logo let go of the power button and hold the volume down button.
  • Release the Volume button when you see the Safe Mode logo on the bottom left side of the screen.

USB debugging Xiaomi Redmi 5:

  • Head over to the Settings.
  • Scroll down and tap on About Device.
  • Look for Build version and tap on it 7 times. You will see a pop-up saying developer options enabled.
  • Head back to the Settings menu and scroll down and tap on developer options.
  • Scroll down again and you will see USB Debugging option. Tap on it to enable it.

Enable USB Debugging on Android

Secret Codes for Xiaomi Redmi 5:

Every Android device has different service codes to access a number of settings. Following are the Xiaomi Redmi 5 Codes.

QC test *#*#64663#*#*
Testing  *#*#4636#*#*
Calendar *#*#225#*#*
Google Play services *#*#426#*#*
Rlz Debug Ul *#*#759#*#*
IMEI   *#06#

Boot Xiaomi Redmi 5 into Recovery Mode:

  • First, you need to Turn off your device, hold down the power button for 2-3 seconds.
  • Once your Redmi 5 is completely turned off. Press + Hold Volume Up and Power Key. 
  • When you see the Mi logon on your screen. Let go of both buttons.
  • Select English to 3s Primeceed. You can choose whatever language you find convenient.
  • Use the Volume Buttons to navigate and Power button for selection.

Boot Xiaomi Redmi 5 into FastBoot Mode:

  • Turn off your Redmi 5 3s Prime by holding down the power button for 2-3 seconds.
  • Now Hold and Press Volume Down + Power Button.
  • When you see the FastBoot Icon on your home screen let go of the button.

Bootloader Mode on Xiaomi Redmi 5:

  • First, you need to Turn off the device using the power button.
  • Now press the Power and Volume Up key together.
  • Release both buttons when you see the Mi Logo on the screen.

How to Reset Settings on Xiaomi Redmi 5:

  • Open Settings -> Advanced Settings.
  • Tap Backup & reset -> Reset all Settings.
  • Now you have to tap two times on Reset all Settings.

Download Mode on Redmi 5:

  • Turn off your device using the power button.
  • Connect it to your PC and Press + Hold Volume Down and Power button.

Reset Network Settings on Xiaomi Redmi 5:

  • Open Settings -> Advanced Settings.
  • Tap Backup & reset -> Reset Network Settings.
  • Now you have to tap two times on Reset Network Settings.

Enable Portable Hotspot on Xiaomi Redmi 5:

  • Open Settings on your device.
  • Head over to the Wireless & networks –> Tethering & portable hotspot.
  • Now select Portable Wi-Fi hotspot and Configure Wi-Fi hotspot.
  • In the end, Turn on Portable Hotspot.

Power Saving Mode on Xiaomi Redmi 5:

  • Open Settings.
  • Tap on the Battery.
  • Here you will find all the options related to power saving mode. Customize as you like.
  • Pull down the notification menu, Tap on Ultra Saving Mode to enable it.

Add Fingerprint Xiaomi Redmi 5:

Now before you Add Fingerprint on your Xiaomi Redmi 5, you have to set Pin or Pattern Lock first.

  • Launch Settings on your device.
  • Head over to the Security & privacy.
  • Tap on Fingerprint and you will be asked to set up a Pin or Pattern. Do as you like.
  • Once you’ve set your passcode or pattern, now you can add fingerprint on Xiaomi Redmi 5.

Take Screenshots on Xiaomi Redmi 5:

There are three methods which can be used to take screenshots on Xiaomi Redmi 5.

Method1:
  • Open the Screen of which you want to take a screenshot of.
  • Press Power + Volume Down button together for once.
  • You will hear a splash voice. Done.
Method2:
  • Open the screen or page of which you want a screenshot
  • Drag down the notification bar.
  • Tap on the screenshot and all done.

BackUp data on Xiaomi Redmi 5:

  • Open Settings on your device.
  • Tap on Backup&Reset.
  • On the next page, select local backup.
  • You’ll see the backup button at the end of the next page.
  • Tap on it to start the backup.

Phone storage > MIUI > Backup > All Backup folder.

Device Description:

The Xiaomi Redmi 5 was released in 2017, December. The Phone came out with a screen of 5.7 inches having 720 x 1440 pixels resolution. Xiaomi Redmi 5 was powered by Qualcomm SDM450 Snapdragon 450 (14 nm) CPU and Adreno 506 GPU. It had internal storage of 32 GB, 3/4 GB RAM or 16 GB, 2 GB RAM. The camera at the back of this phone is 12 MP and on the front, it is 5 MP. Inside this Phone, there was a 3300 mAh battery. The Phone originally ran on Android 7.1.2 (Nougat).

Check IMEI Number on Xiaomi Redmi 5:

Finding IMEI number on any Android is same, all you have to do is open your phone’s dialer. Type *#06#, Voila. You’ll see a pop-up with numbers written on it. That is your IMEI number.

That’s all. These were the Redmi 5 General Guides.