Home Blog Page 46

Fix OnePlus 7 Pro Warp Charge not working

0
Fix OnePlus 7 Pro Warp Charge not working

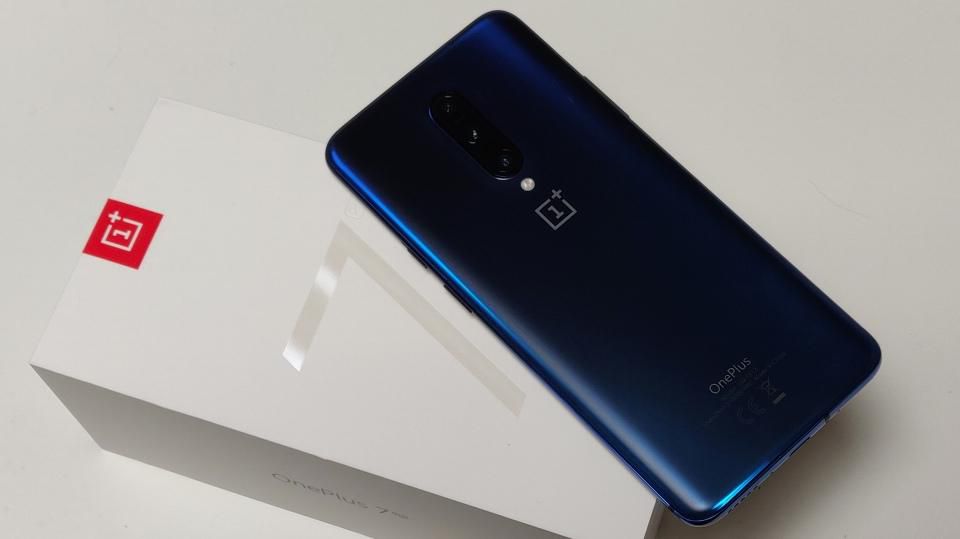
OnePlus 7 Pro is the hottest running device of 2019. It is built with bleeding-edge technology with arguably the best Android skin on top of it. OxygenOS is simply the fastest Android OS adaptation right now. It comes with a 90Hz 1440p display and 12GB of RAM. In order to sustain a good battery life, this beast comes with 4,000mAh battery. Finally, the Warp Charge in OnePlus 7 Pro! It is one of fastest phone chargers on the planet with 30W rating. Everything sounds really good but a lot of users are complaining about OnePlus 7 Pro warp charge not working. This could be due to number of reasons and we are going to explore the possible causes and solutions here.
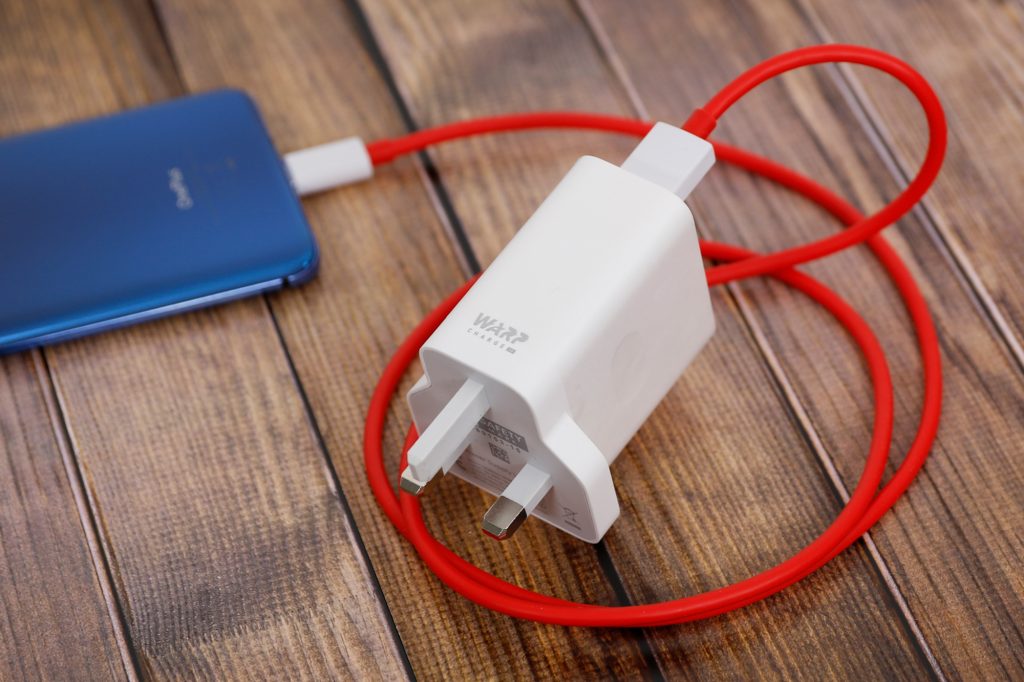
oneplus 7 pro warp charge not working fix

How to check if OP7 Pro Warp Charge working or not?

The executives behind OnePlus series are really keen on making phone charging one of key experiences and best in market. While other companies are going after wireless charging, OnePlus phone just have much faster wire charging speeds. Therefore, the wireless charging basically is irrelevant at this point.

Ever since updating OnePlus 7 Pro to OxygenOS 9.5.7, a lot of users complain that their phone does not activate warp charge. In order to know if it is active or not, just check if the charging logo is a lightning icon or not. Moreover, the lockscreen should show a text saying “Warp Charging”. If you don’t see this, then it is charging at normal speeds.

In some cases, OnePlus 7 pro shifts between normal and warp charge continuously. It may show the lightning icon (warp charge) for a minute or two and then change back to normal. Or in some cases, the charging icon just keeps on fluctuating.

You could also use third-party apps to check charging voltage. It shows low values when it is not warp charging. The phone may also charge and then not charge and keep switching between these modes.

Problems and Solutions

Below is an assortment of all possible reasons for warp charge to not work in OP7 Pro. And you can also check out the solutions one by one to see what works for you.

1: Check original cable and charger

OnePlus phones come with a special fast charging grade cable and wall charger. If any of these are damaged, then the phone may not charge properly or warp charge may not work in this case. Check your cable for any possible breakages because this could be the issue. Order a new one in that case.

When it comes to wall charger by OnePlus, note that it does not work with every power outlet. In my personal experience with Dash Charger 20W, it did not work with a specific power extension. The phone keep fluctuating between charging and not charging. Therefore, try different power outlets. Not all power outlets can work well with OnePlus 7 Pro Warp charge.

2: Check OxygenOS version (OnePLus 7 Pro Warp Charge not working with 9.5.7)

Several users reported on the official forums that this issues started happening only after updating OnePlus 7 Pro to OxygenOS 9.5.7. Although this update aims are improving stuff like camera quality and overall bug fixes, it looks like, it broke something unintentionally.

If your OnePlus 7 Pro Warp charge is not working after OxygenOS 9.5.7 update, then follow the guide below to install 9.5.8 version. It should fix the issue.

Disclaimer: Make a backup of your personal data before attempting below given methods. Also we take no responsibility if your phone breaks, blows up or melts down!!

Download OxygenOS 9.5.8 for OnePlus 7 Pro

There are two methods to update your phone to this or even more latest version depending on when you’re reading it.

Update OnePlus 7 Pro via Oxygen Updater App
  • Install Oxygen Updater on your phone – Play Store.
  • Open the app on your phone.
  • Select update method as “Incremental Update” when app starts for first time. fix oneplus 7 pro warp charge not working
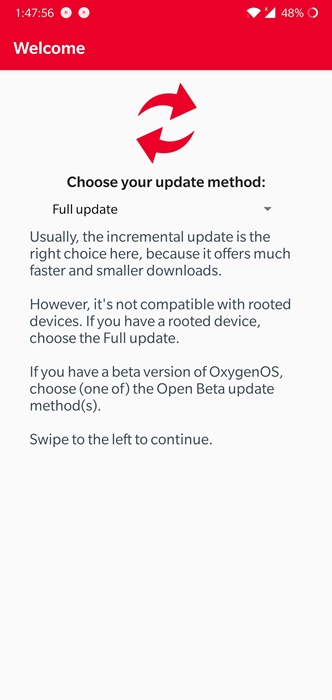
  • Rooted users opt for “Full update”.
  • Once the setup is complete, go to app’s homescreen and let it search for the recently available firmware for your device.
  • It is region-free. Therefore, if an update is available, it will show up here.
  • Tap on the firmware to download it to phone and follow rest of the instructions to install it.
Update OnePlus 7 Pro Manually

Follow the instructions below to download OnePlus 7 Pro OxygenOS 9.5.8 zip in full size. Then install it directly from the phone. 

  • Download update zip from HERE.
  • Put it into root of phone’s storage.
  • Go to Settings > System > System Updates.
  • Tap on icon in top-right and select “Local Upgrade” option.
  • Now just select the file your put into root in second step.
  • Follow the on-screen instructions to reboot phone into recovery and install update automatically.
  • Once it is done, the phone will reboot to homescreen automatically.

That’s it! If the warp charge was not working on OxygenOS 9.5.7, then this should most likely fix the issue. It comes with some new bug fixes and new changes. You can check out the update log on official site.

Conclusion

Of all the awesome features that OP7 Pro offers, Warp Charge at 30W is simply one of the best. It is unfair to miss out on it. Therefore, we hope that your problem with it is now fixed with the guide above. Also read more guides about OP7 Pro here.

Feel free to leave your feedback and queries in comments below

Block Inappropriate Websites on Android [ Tips ]

0
Block Inappropriate Websites on Android [ Tips ]

This is a complete guide on how to block Block Inappropriate Websites on Android. Also, How to Block Adult Content on Android devices.

Smartphones are the basic necessity of our daily life, they are getting more and more popular. Although it seems good in many ways, there are other facts that we cannot ignore. Since everyone has a smartphone nowadays, so everyone can easily access the internet. Even kids can use tablets and smartphones these days, once they have access to the Internet, they can open anything like anything. To be more specific, Adult content, Violent Video Content and more.


Block Inappropriate Websites

A Tablet, Smartphone, and an active Internet Connection can easily lead children’s to pornography. There is no restriction on any Website to block porn for children, we have to do it by ourselves. However, make them stop using a Smartphone won’t be of help.

You have to take some strict measures to make sure you have Blocked Inappropriate Websites on your smartphones. Seems not everyone knows how to do so, we will help you block Adult content on Android. Follow the instructions provided below and you will learn it.

Block Inappropriate Websites on Android:

1: Enable Safe Search

Let’s start with the Safe Search Option, this will do the trick for you. In order to make sure that your kids do not open any sort of adult content while they were browsing the Web. Safe Search Option is available for both Google Play Store and Chrome.

  • Open Google Play Store -> Tap on 3lines -> Settings -> Parental Controls -> Turn it on -> Setup a PIN.
  • Launch Google App -> More -> Settings -> Accounts & privacy -> Turn on SafeSearch.
  • Head over to Chrome -> Click on Search Settings -> Turn on Safe Search.

Once both settings are turned on. Try searching Adult content on your device and you will see it will prevent you from you doing it.

2: Use OpenDNS

This is the best way to block Inappropriate and porn Websites. Moreover, the good thing about OpenDNS is, it is not limited to only Porn, it will also help you block illegal activity, video sharing, and more. Also, use OpenDNS is pretty simple even a layman can do it.

However, if you have enabled data saver settings, Open DNS settings won’t work for you. Once you are connected to an Internet connection, you will be using their ISP’s DNS. But when you will replace them with the Open DNS, every request made from your device will first pass through OpenDNS server. If they find it inappropriate, they will block it and you won’t be able to access it.

  • Head over to Settings -> WiFi -> Selec your connected network -> Advance Option -> Change DNS Setting.

Now add the following DNS and save the Settings.

  1. DNS 1: 208.67.222.123
  2. DNS 2: 208.67.220.123

Before we move on let tell you a bit more about Open DNS. They have a very big team working behind the scene whenever a new Porn Website makes its way to the World Wide Web. This new URL is automatically gets updated in the OpenDNS. Moreover, create a free account on Open DNS, set your own filters. Also, you can use Open DNS settings on your router as well, through this, Adult content will be blocked on devices connected to your router.

The only downside to Open DNS is, anyone, can bypass these settings by using a VPN or Proxy. Moreover, it is easy to change the Open DNS on your device.

3. Use CleanBrowsing app

If Open DNS didn’t do any good for you, I think it’s time to use CleanBrowsing app on your Android devices. This app blocks all the Adult content while you are browsing through CleanBrowsing app. Also, it is available for PC, it uses the DNS server to block porn websites on the Internet.

But we recommend the CleanBrowsing App because it is easy to use and will do the work for you. You may have one issue, it’s a new app and right now privacy is not that good. But since we want our kids to use this app, privacy won’t be a concern.

  • Download and Install the CleanBrowsing App from the links given above.
  • Open it and head over to the Settings -> Password protection -> Set Password.

4. Norton Family parental control:

I am sure you all are familiar with the name Norton, I think it is the best solution and since it from Norton. The trust rate will through the roof, Norton Family parental control will monitor all the browsing history of your Kids. You can easily block Inappropriate Websites with 40+ filters such as pornography, gambling, social networking, violence, etc.

The one feature I like the most, you will get a detailed report of your Kid internet activities straight to your mailbox.

That’s all for now. This is how you can Block Inappropriate Websites on Android. Please do tell you what you think about these tricks and apps. Also, It would be very nice, If you Share this article with friends and Join Techbeasts on Facebook and Twitter.

What is Libra Cryptocurrency and Calibra wallet?

1
What is Libra Cryptocurrency and Calibra wallet?

Blockchain, cryptocurrency and Bitcoin were the buzzwords just few years ago. The hype around Bitcoin specifically died and so did its value. People lost of their hard-earned money in this venture. However, one good thing still came out of it. Blockchain is a secure system for creating decentralized currency. Facebook is launching its own cryptocurrency and it is called “Libra”. Apparently, this new currency learns from the mistakes of previous ventures as well as making new and smart choices to make it an actual viable option for payment. 

Read: Huawei’s entry into Entity list and its implications

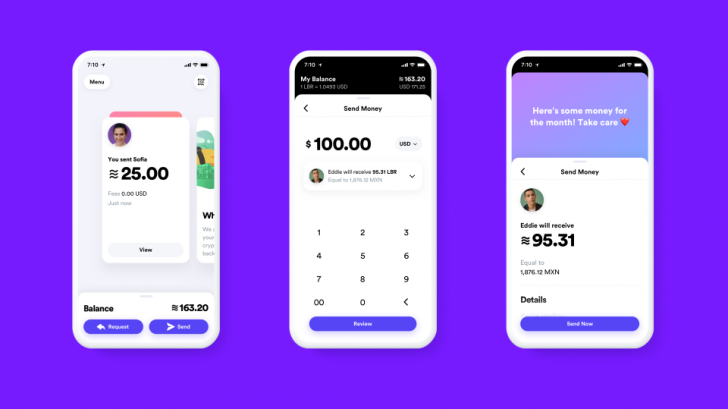
In addition to Libra, FB is also going to launch a dedicated wallet app called “Calibra”. This currency would be exchanged via Messenger, WhatsApp and Calibra’s own dedicated mobile app. The main incentive behind this initiative is to make global payments and fast and painless. Moreover, countless people will get their own account for the first time, even if its a virtual one. All anyone got to do, is to buy Libra coins using real money. You can buy it using any currency around the globe. The exchange rates however are going to vary. 

How to Libra Cryptocurrency stable or volatile? The Libra Reserve

Take any cryptocurrency in past. The biggest disadvantage of using those was their volatility. Bitcoin reached an all-time high of about $20,000 back in 2017. Then it dropped drastically to $6,000. This change of value cost a lot of money to lot of people. The mining cards and mining business, in general, went into loss. Moreover, people who had invested in it lost most of their savings.

bitcoin volatile cryptocurrency vs libra
This chart shows the change in Bitcoin to USD rate during last 5 years

It is pretty clear from this example why not even regular public but a lot of governments decided against cryptocurrency. 

Facebook wants to break this stigma and create a centralized and stable global economy. This is done thanks to a system called “The Libra Reserve”. In order to understand what it is, you need to understand how regular currencies like Dollars and Euro work. These are actually fiat currencies. The values of these currencies is based on solid valuable items like Gold for example. Moreover, the federal reserves decide the global value of these currencies and how they compare internationally. 

Similarly, Libra Reserves is a non-centralized system of reserves owned by various corporations. The reserve money is generated from various investors and the people buying Libra itself. These people are called “Founding members” of Libra. 

Following are the current founding members of Libra in industry:

  • Payments: Mastercard, PayPal, PayU (Naspers’ fintech arm), Stripe, Visa
  • Technology and marketplaces: Booking Holdings, eBay, Facebook/Calibra, Farfetch, Lyft, Mercado Pago, Spotify AB, Uber Technologies, Inc.
  • Telecommunications: Iliad, Vodafone Group
  • Blockchain: Anchorage, Bison Trails, Coinbase, Inc., Xapo Holdings Limited
  • Venture Capital: Andreessen Horowitz, Breakthrough Initiatives, Ribbit Capital, Thrive Capital, Union Square Ventures
  • Nonprofit and multilateral organizations, and academic institutions: Creative Destruction Lab, Kiva, Mercy Corps, Women’s World Banking

How to become a Libra Founding Member?

Organizations that invest their assets into Libra infrastructure before launch will be called founding members. However, not everyone can join this program. There are some strict rules and requirements. These are both expensive and painstaking. Businesses, organizations, institutes all can take part in this program. 

If any business or organization is interested in becoming a founding member of Libra, then they must meet at least 2 of the following requirements.

  • Market value/customer balances:
    • More than $1 billion USD in market value or greater than $500 million USD customer balances.
  • Scale
    • Reach greater than 20 million people a year, multinationally.
  • Brand sustainability
    • Recognized as a top-100 industry leader by a third-party sector-specific association or media company. Examples of lists used to reference potential founding members include the Interbrand Global 100, the Fortune 500, the S&P Global 1200, the FTSE Eurotop 300, and other regional and country-specific lists that identify established brands.

Below given requirements for those businesses that are not as developed as above mentioned. If these organizations can meet the following requirements, then they can become one of the founding members too.

  • Crypto-focused investors:
    • Greater than $1 billion of assets under management (AUM).
  • Blockchain infrastructure companies (must meet all of the following):
    • Has been in operation for over 12 months.
    • Employ enterprise-grade security, privacy, and infrastructure operations backed by modern policies and processes — publicly disclosed by security audits and/or penetration testing reports.
    • Custodying or staking greater than or equal to $100 million in assets for customers or clients.

What is the benefit of becoming a Libra Founding member? Considering its future in global payments, the founding members will get special treatments and rebates in payments. Moreover, become eligible for exclusive incentives in future. Lastly, they can get low-yield dividends from these investments.

Calibra Wallet

calibra wallet libra cryptocurrency

Every cryptocurrency needs a virtual and secure wallet. Use it to buy, sell or share your coins with other people. Since Libra is associated directly with Facebook, users of Messenger and WhatsApp can make direct transactions to their contacts through the app. For those who have recipients out of their social media or they just don’t use these services, then choose the independent Libra app in form of Calibra.

Should you trust Libra?

The initial observation of Libra is actually very strong. It picks up on all the positives of previous cryptocurrencies and throws out all the shortcomings. It promises to be a stable form of currency thanks it reserves system. There are several protocols in place to protect the value or this currency even in case of an economic crisis. 

For now we think that this is a really good initiative. If Facebook successfully delivers what it is promising, then we could see a total shift in global payments system. PayPal, banks and other services like these could become totally irrelevant. It would be the fastest and most secure form of payment. Not to talk about convenience. The best part if that it works globally and all transactions are supposed to be instant! We no longer will have to wait 3-5 days to wire transfers with around 7% cut in transfer fees.

Final Words

The idea behind Libra is really promising. The official launch of this services with Calibra is promised to be in 2020. Therefore, we have our fingers crossed and looking forward to how it all turns out in the end. 

Feel free to leave your thoughts and comments below.

Delete Musically Account Permanently Without Login [ TikTok ]

0
Delete Musically Account Permanently Without Login [ TikTok ]

Let’s tell you guys, how you will be able to delete Musical.ly Account Permanently Without Login. Some of us might don’t know how to delete our Musically or TikTok account after creating. 

The musical.ly name was changed and now it’s TikTok, you will be surprised to know that TikTok is the most used app nowadays. Reports are saying that TikTok surpassed Facebook, Instagram, Snapchat & YouTube in terms of monthly downloads. This lets you create videos with voiceovers, also you can add different type of music, dialogue, and more. Moreover, you can watch and share funny and entertaining videos.

Delete Musically Account

The popularity of TikTok is among teenagers and youngsters. Nowadays you see TikTok videos everywhere, when it comes to fun and entertainment, TikTok is formerly known as Musically stands on the top of the list.

Now coming back to our Topic, sometimes we forget our password and when we want to delete our account. But since we cannot log in in to our Account is not possible. There are two solutions to this, either reset your password and then delete the account. However, sometimes we won’t be able to access that Email or Phone number against we registered the account.

If you are in this same situation regarding your Musical.ly (a.k.a TikTok ) account. Follow the Steps below to delete musically account without a password. 

Delete Musical.ly Account Permanently:

Now the thing is, there is no trick or any option that will allow you delete your Musically account. Your best bet is to contact the support team to delete your account. Heed the instructions below to learn how to delete Musically Account Permanently.

Musical.ly Account Permanently Without Login:

  • Open up your browser, click on this link to open the support page.

Now start selecting the categories as we have mentioned.

  • General feedback option.
  • Android & iOS.
  • Other.

Fill up all the detail required in the form below:

  • Enter your contact Email Address.
  • In description filed, write your message and tell them your Username & Email ID.
  • Once all the details are provided, Click on the Submit button.

Hide Musiacl.ly Account:

There is another option you can choose, if you don’t want to delete your Musiacl.ly account you can hide it. Follow the instructions below in order to Hide Musiacl.ly Account.

  • Open up the App, Which is nowadays TikToK. Tap on the My Account icon.
  • Now Tap on the Settings Icon and look for Only friends can direct.ly, Hiding location info and Private account.
  • Turn on all these three options to hide Musiacl.ly Account.

Delete Account TikTok Account:

1. Go to your profile page.
2. Tap on the top right corner and select “Privacy and Settings”.
3. Select “Manage My Account”.
4. Tap on “Thinking about removing your account?”.
5. Follow the on-screen instructions.
TikTok Support

That’s all. Please do tell us, how did it go for you in the comments sections below. Also, It would be very nice, If you Share this article with friends and Join Techbeasts on Facebook and Twitter.

How to delete OnePlus 7 Pro Cache without losing data

0
How to delete OnePlus 7 Pro Cache without losing data
Image Credits: Forbes

OnePlus 7 Pro and OnePlus 7 are the real powerhouses. These are the fastest Android smartphones to exist to date, but that doesn’t mean they will not have problems. If your OnePlus 7 Pro has started acting up lately, its time to clear its cache. This is the step-by-step guide to delete OnePlus 7 Pro cache without losing data. I have explained how you can wipe cache partition of OnePlus 7 Pro, how you can clear the application cache and then also how to clear the browser cache. 

Before following the guide on how to delete OnePlus 7 Pro cache, take a look at the features of this phone.

OnePlus 7 Pro

So far, OnePlus was famous for pulling out top-notch devices under a friendly budget. After the OnePlus 7 Pro, the Chinese tech-maker has registered itself in the list of industry innovators. The OnePlus 7 Pro has many of the smartphone industry’s firsts. It’s an incredible device catering to the needs of average users and pro-gamers at the same time. The spec-sheet of OnePlus 7 Pro has some serious offerings.

OnePlus 7 Pro has a 6.7-inches Optic AMOLED display. This is a QHD screen and has an aspect ratio of 19:9. The all-screen model on the front has slight edges on both sides. OnePlus has achieved the all-screen by moving the front camera into a motorized pop-up inside the top bezel. This is not about it, this screen on the front has a 90 Hz refresh rate. This is the world’s first display with such refresh rate and its a perfect choice for the gamers, especially the FPS gamers. There is a fingerprint scanner beneath the screen.

OnePlus 7 pro
Image Credits: Forbes

The front shooter holds a 16MP sensor. The OP7 Pro has 3 cameras at its back. It has a main  48MP camera, an 8MP telephoto shooter, and a 16MP ultrawide shooter. In the main 48MP camera, the phone uses the Sony IMX586 sensor, which is pretty ordinary. As far as the processor is concerned, it’s got the Qualcomm Snapdragon 855 processor. OnePlus 7 Pro has storage and RAM options of 128GB/256GB and 8GB/12GB. It has a whopping 4000 mAh battery which can be charged 30W Warp Charger.

The OP7 Pro runs on Android 9 Pie out of the box. OnePlus uses its own OxygenOS to theme the Android OS. You can pick this phone in Mirror Grey, Almond, and Nebula Blue colors.

That’s all about the phone. Let’s get back to the guide to delete OnePlus 7 Pro cache.

Guide on how to delete OnePlus 7 Pro Cache without losing data

  1. Reboot OnePlus 7 Pro into Recovery Mode by using Advanced Reboot.
  2. The phone will ask you for pin/password now to enter recovery.
  3. If you did not set any pin, click on enter without the pin.
  4. Now select English as your language.
  5. Click on Wipe data and cache.

    delete OnePlus 7 Pro Cache
    Demonstrating how to clear cache of OnePlus 7 Pro
  6. Now click on Wipe cache > Yes.
  7. Reboot the phone into the system now.

The cache has been cleared. Clearing the cache will refresh almost everything on the phone. It will finish the little bit of lag that you are facing. In some cases, clearing cache can help the battery life of a phone too. Remember that this will not touch the data stored on your device.

Delete OnePlus 7 Pro Browser Cache

  1. Open the Google Chrome browser on the phone.
  2. Click on the dotted-menu button > Privacy > Clear browsing data.
  3. Go to Advanced > Select Cached images and files.
  4. Click on Clear data now.
  5. Close the Chrome browser and open again.
  6. The cache has been cleared.

Clearing the browser cache will refresh everything in the browser. If the websites were acting up previously, they should load fine now. Clearing cache also improves the loading time of websites on an Android phone. It can also clear the extra space consumed by the browser on the phone.

How to delete OnePlus 7 Pro App cache

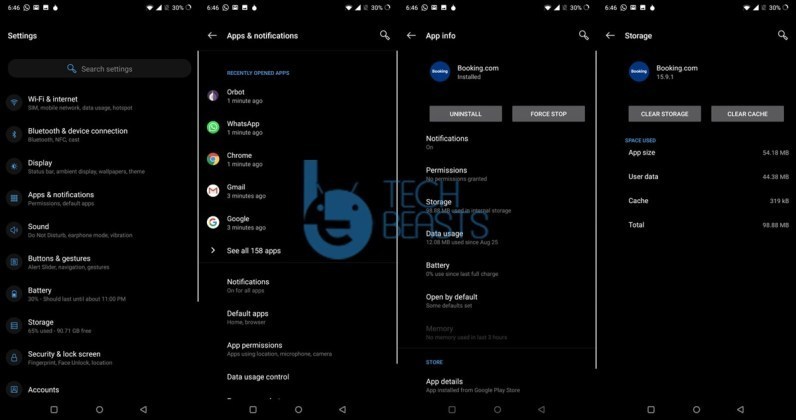
  1. Go to Settings on the OnePlus 7 Pro.
  2. Click on Apps & notifications.
  3. Now click on See All Apps.
  4. Open the App who’s cache you want to clear.
  5. Click on Storage > Cache > Clear Cache.Clear App cache on OnePlus 7 Pro
  6. Restart the OnePlus 7 Pro now.
  7. The App’s cache has been cleared.

Clearing an app’s cache will fix the loading and performance problems of a particular app. It basically clears all the traces of that application from the phone for a better start from scratch. Clearing the cache of an app helps in many cases where the apps come up with annoying errors.

Final Words

That’s all with clearing cache on OnePlus 7 or OnePlus 7 Pro. This should boost the performance of your phone by easing off its burden. If you have any further questions or queries, feel free to reach out to us through the comments section. I will try my best to get back to you as soon as possible.

More:


5 Best Video Converter Apps for Android

0
5 Best Video Converter Apps for Android

Let’s tell you about the Best Video Converter Apps for Android. Once you have installed these Video Converter Apps on your Android devices, you won’t be needing a computer. Nowadays, smartphones are used more than computers and laptops. Moreover, as the time passing by we have seen a significant increase in mobile hardware and software.

If you got your self a high-end flagship device, you don’t your PC to convert videos. All you need is an Android App and you easily convert any video from one format to the other. But finding the right app is not that easy, that’s why we have collected the 5 Best Video Converter Apps for Android.

Video Converter Apps for Android

Best Video Converter Apps for Android:

We’ve tested a number of Video converter apps on Android. You will be surprised to know, most of them have the same interface. You upload the file, select a format, choose a directory to save the converted file. In order to determine the best among all of these, we looked for a few factors. Such as interface, less or no ads, support for multiple formats. After finding of these we choose 5 of them.

Inshot- Video to MP3 Converter:

We will start with the best in our list, Inshot, a perfect video converter app for Android users. Inshot allows you to convert video to audio. This app easily converts video files into MP3 and AAC format. Both of these formats provide you the best sound quality.

Not only this, but Inshot also allows you to cut the clips from your videos. If you want to go a bit further, you can use the advanced features provided in Inshot app. Such as adjusting frequency, Fade in/out, and volume. We’ve also used Inshot app on our PC and it worked pretty well.

Inshot is available on Google Play for free, you can use the following link to download the InShot app.

VidSoftLab – Video Converter:

If you want a dedicated Video Converter for your Android devices. You should go with the VidSoftLap Video Converter, this app has a very neat and user-friendly interface. You can easily convert videos in different formats,

VidSoftLab Supported Formats:

  • MP4
  • FLV
  • MPEG-1,2
  • MOV
  • MKV
  • WMV
  • AVI
  • VOB
  • 3GP

VidSoftLab has a lot of useful tools which will allow you to edit your videos like professionals. There are few which are worth mentioning, trimming, add slow motion effect, extract audio from video, and reverse video effect. One more thing I like to add, VidSoftLab automatically leech all of the videos which are stored on your device. Also, When you are select a video to convert, it displays the device support options.

Media Converter:

A simple yet very functional video converter for Android. Media Converter has not the utmost design but it doesn’t matter because of the app functionality. It does a very good job when it comes to converting videos. Because of its simple interface, even a layman can easily use it.

Select a video from your device library, choose the video format and tap on convert. When you select a video you will be provided with two popular options, “Convert to MP3” and “Convert to MP4.” That doesn’t mean it supports only these two, these are to start with. Media Converter supports all popular formats such as MP4, 3GP, WMA, FLV, MKV, MOV, VOB, MPG, etc.

In order to choose another format rather than MP3 or MP4, tap on Expert Mode. In this mode, you will very useful tools to edit your videos and then convert them.

Video Format Factory:

In our top list of Best Video Converters for Android, Video Format Factory stands on number four. This app has a simple yet a bit confusing or you can a bit advanced interface. Once you install Video Format Factory app you will get know what I am saying. However, it seems modern and advances but actually, it is not.

You can easily convert videos using Video Format Factory. Open the app, Tap on Add to select a video, choose your video or audio format, set the settings as per desire and tap on Convert Now.

Video Format Factory Supported Formats:

  • MP4
  • FLV
  • AVI
  • MKV
  • MP3
  • FLAC
  • WMA
  • OGG

VidCompact:

This app is the same as all the above apps. VidCompact makes video converting so easy. Also, you can edit your videos, cut, trim, crop, and compress videos. It supports all the major formats like AVI, MKV, FLV, RMVB, 3GP, MPEG, WMV, MOV and more. There is one feature which makes VidCompact different from others, you can convert videos from supported formats to MP4 format only. Means you can convert any format into MP4.

Using VidCompact is easy, Tap on convert to MP4, Select the Video and once converted Tap Save to Gallery.

That’s all. These were the 5 best Video Converter Apps for Android. Feel free to contact us using the comments section below and the contact page. Also, It would be very nice, If you Share this article with friends and Join Techbeasts on Facebook and Twitter.

Send Message On Instagram From PC – Send DM On Laptop

0
Send Message On Instagram From PC – Send DM On Laptop

Do you want to send Message On Instagram From PC, Computer or Laptop? If you do then keep reading and you will find out how you can send & view the Instagram direct message on Laptop.

Send Message On Instagram From PC

Instagram:

The best Photo and Video Sharing Social Media Platform launched in 2010. Now it is owned by Facebook, Instagram is available for both Android and iOS devices. You can easily edit photos and videos on Instagram with its built-in features and filters.

First Instagram only allowed one picture sharing with (1:1) aspect ratio but after 2015. This limit or you can say restrictions were lifted. Moreover, they also added the Direct Message and Chat option. Using Instagram is pretty simple, Signup on Instagram, Set up your profile picture, Add your Bio and finally upload your DP.

Back in the day, Instagram was with limited options but now there is a lot more you do now. Upload Multiple Photos, Upload With Videos with different filters and editing features. You can add stories, chat with friends, you can even make your business profile and promote it with Instagram Tools.

Send Message On Instagram From PC:

So now you know What you can do with your Instagram profile but there is one issue, Instagram is available for Android and iOS devices. There is no PC version of Instagram although there is a web version and to be honest it just a formality. You can only view photos, stories, search, comments and check your notifications.

You cannot upload photos and videos, cannot send direct messages or view them. Basically, there don’t want you to use Instagram on your PC, they want you to stick with your smartphones. But When there is a will there is a way, We’ll tell you how you Send Message On Instagram From PC. Let’s get started.

Send Direct Message on Instagram form PC:

There are two options available for sending the Instagram DM from PC. One is a Tool called IGDM and other is to install Instagram on PC using BlueStacks or NOX app Player.

Send Message via IGDM:

Install Instagram on PC:

  • If you are using MacOS or Mac OS X, get the Nox App Player. Those of you who are running Windows, they should get the BlueStacks 4 emulator. Install the emulator and then open it on your computer.
  • The BlueStacks 4 or Nox Player will now ask you to add your Google Account. You can either add your existing Google Account or create a new one.
  • Now open Play Store in the emulator. In the Play Store’s search bar, type “Instagram”. As soon as you find the VPN, install it. It will now appear under the Home Screen or in the App Drawer of the BlueStacks 4/Nox App Player.
  • Login with Instagram account and you will get all the features of the Instagram app on your PC.

Now you can upload photos & videos from your PC on Instagram. Moreover, you will be able to send Message On Instagram From PC Windows & Mac.

Warp Up!

Feel free to contact us using the comments section below and the contact page. Also, It would be very nice, If you Share this article with friends and Join Techbeasts on Facebook and Twitter.

Remove Someone From Snapchat Group Chat [ Guide ]

0
Remove Someone From Snapchat Group Chat [ Guide ]

In this post, we will guide you on how to Remove Someone From Snapchat Group Chat.

As you all know about SnapChat Group Chat feature and it works perfectly when you want to send Snaps to more than one friend. If you have used WhatsApp Group feature then you will find SnapChat Group Chat quite familiar. However, in the SnapChat group, you can add only 31 friends, not more than that. If you want to add a new friend to your SnapChat group you need to remove one and then you can add him/her.

Remove Someone From Snapchat Group Chat

The thing is that SnapChat users may know about this feature and they have created Chat Groups. But the interesting thing is, not all of them knows how to Remove Someone From Snapchat Group Chat. So today, we’ll help you with it, we’ve prepared a step by step guide to tell you how you can kick someone out of your Group.

Before we move on, let me first tell you how you can create a SnapChat Group.

How Do I Create A Group?

Open Up SnapChat on your device, Whether it’s iPhone or Android. Swipe right on the screen to open up the chat sections. Tap on ” + “icon located at the top right corner of the screen. After that, Tap on New Group, Now before you start adding your friends, you need to name your Chat Group. Once you have done that, Start adding your friends to your new Chat Group on SnapChat.

Now that you have successfully created a SnapChat Group, let’s tell you how to remove someone now.

Remove Someone From Snapchat Group Chat:

It may be shocking but it’s the truth, There is no way you can remove a friend once you have added him/her. The only way is, either you ask your friend to leave the group or you can block or remove the contact from your friend list.

We’ve tried a number of tricks but none of them worked so far. We’ll update the post whenever we will be able to work this out. As of now, there is no such option, tool or settings which allows you to Remove Someone From Snapchat Group Chat.

Read more:

Feel free to contact us using the comments section below and the contact page. Also, It would be very nice, If you Share this article with friends and Join Techbeasts on Facebook and Twitter.

Verify Instagram Without Phone Number [ Bypass Phone Verification ]

0
Verify Instagram Without Phone Number [ Bypass Phone Verification ]

We all know that nowadays every social media account is created against our phone number. But What if we want to create another account and we only have a single number which we have before. Well, it seems to be a problem but we can help you with it. In this post, we’ll tell you how you to Verify Instagram Without Phone Number. 

Verify Instagram Without Phone Number

Moreover, you can easily Bypass Phone Verification while creating an account on Instagram. Also, you can even bypass email verification. Before we move on let me tell you one thing, we are not using any tool, Trick or software. In reality, it is impossible to bypass phone verification on Instagram while creating an account. But it doesn’t mean you have to use your phone number, there are hundreds of third-party services which will allow you to use a free virtual phone number.

Read more:

After reading our post, you will get to know how to use Free virtual phone numbers to verify an Instagram account. Let’s get going.

Verify Instagram Without Phone Number:

It’s mandatory that you need to provide your phone number in order to verify your Facebook, WhatsApp, Viber, SnapChat, and Instagram account. But due to security issues and breach of piracy, people hesitate to use their phone numbers. We can totally understand this but you don’t need to use your number. You can always go with the third-party services which provide free virtual phone numbers. Use these numbers to verify your Instagram Account. 

Now you all be wondering HOW? Follow the instructions provided in the following steps. By following these steps you will be able to Verify Instagram Without Phone Number.

Get Free Virtual Phone Numbers:

  • Open up your browser, visit TextNow.com.
  • Create a new account by providing the required information.
  • Now log in with your credentials, create a new pin code to generate virtual phone numbers.
  • Once you have created the free virtual phone numbers. It’s time to use them.
  • Head over to Instagram and create a new account. Provide the required information but when they asked for your Phone number.
  • Put the phone number you generated on TextNow.com. You will receive sms on TextNow.com website.
  • Enter the 6 digits and your Instagram is verified.

That’s all. This is how you can Verify Instagram Without Phone Number. Basically, you are not using your own number and instead of that, you are using a free virtual phone number.

Wrap Up:

We are pretty sure that you guys have liked our work. Now you can create unlimited accounts of Instagram without providing your mobile number. Feel free to contact us using the comments section below and the contact page. Also, It would be very nice, If you Share this article with friends and Join Techbeasts on Facebook and Twitter.

Create WeChat Account Without Mobile Number [ Simple Trick ]

2
Create WeChat Account Without Mobile Number [ Simple Trick ]

Are you looking for a way to Create WeChat Account Without Mobile Number with ease? You have come to the right place, in this post, we’ll tell you how you can easily create a WeChat account without using your phone number. Seems interesting right, let get started but before that let me give you a short overview on WeChat.

What is WeChat:

WeChat is a Chinese multi-purpose messaging, social media and mobile payment app developed by Tencent. It was first released in 2011, and by 2018 it was one of the world’s largest standalone mobile apps by monthly active users, with over 1 billion monthly active usersWikipedia

Create WeChat Account Without Mobile Number

Create WeChat Account Without Mobile Number

Sometimes we want to use more than one account of WeChat but we only have one number. This means you can use only one account against your phone number. In order to create a new WeChat account, you will require another phone number. That is what you will hear from everyone but, to be honest, you can easily create WeChat Account Without Mobile Number.

This is why you are here, isn’t it right? Well in the world of the Internet almost everything is possible. Now let’s begin and tell you how you can Create a WeChat Account.

Read more: How To Fix Unfortunately WeChat Has Stopped on Android

Sign up Without Mobile Number on WeChat:

  • Launch your browser and open WeChat registration page.
  • Now provide the required details on the registration page. [ nickname, mobile number, password, and avatar ]
  • Once all the details are added, Click on Signup Button. After that, verify your phone number.
  • You will receive a One Time Password on your phone number.
  • Use it to verify the phone number.
  • Now your WeChat account is created, you can start adding friends, also you can add contacts in address book.
  • After you are done with the signup process, head over to Settings.
  • Click on “…”, next click on Unlink option and remove your phone number from your account.

That’s all. Once you have removed the phone number from your account, you can use the same number to create a new WeChat account.

Wrap Up:

I am sure now you all know how to Create WeChat Account Without Mobile Number. Please give it a try and if you have Questions regarding this trick, please do tell me in the comments. Also, It would be very nice, If you Share this article with friends and Join Techbeasts on Facebook and Twitter.

Samsung Galaxy A70 Download Mode, Recovery Mode, Safe Mode, Clear Cache & More

0
Samsung Galaxy A70 Download Mode, Recovery Mode, Safe Mode, Clear Cache & More

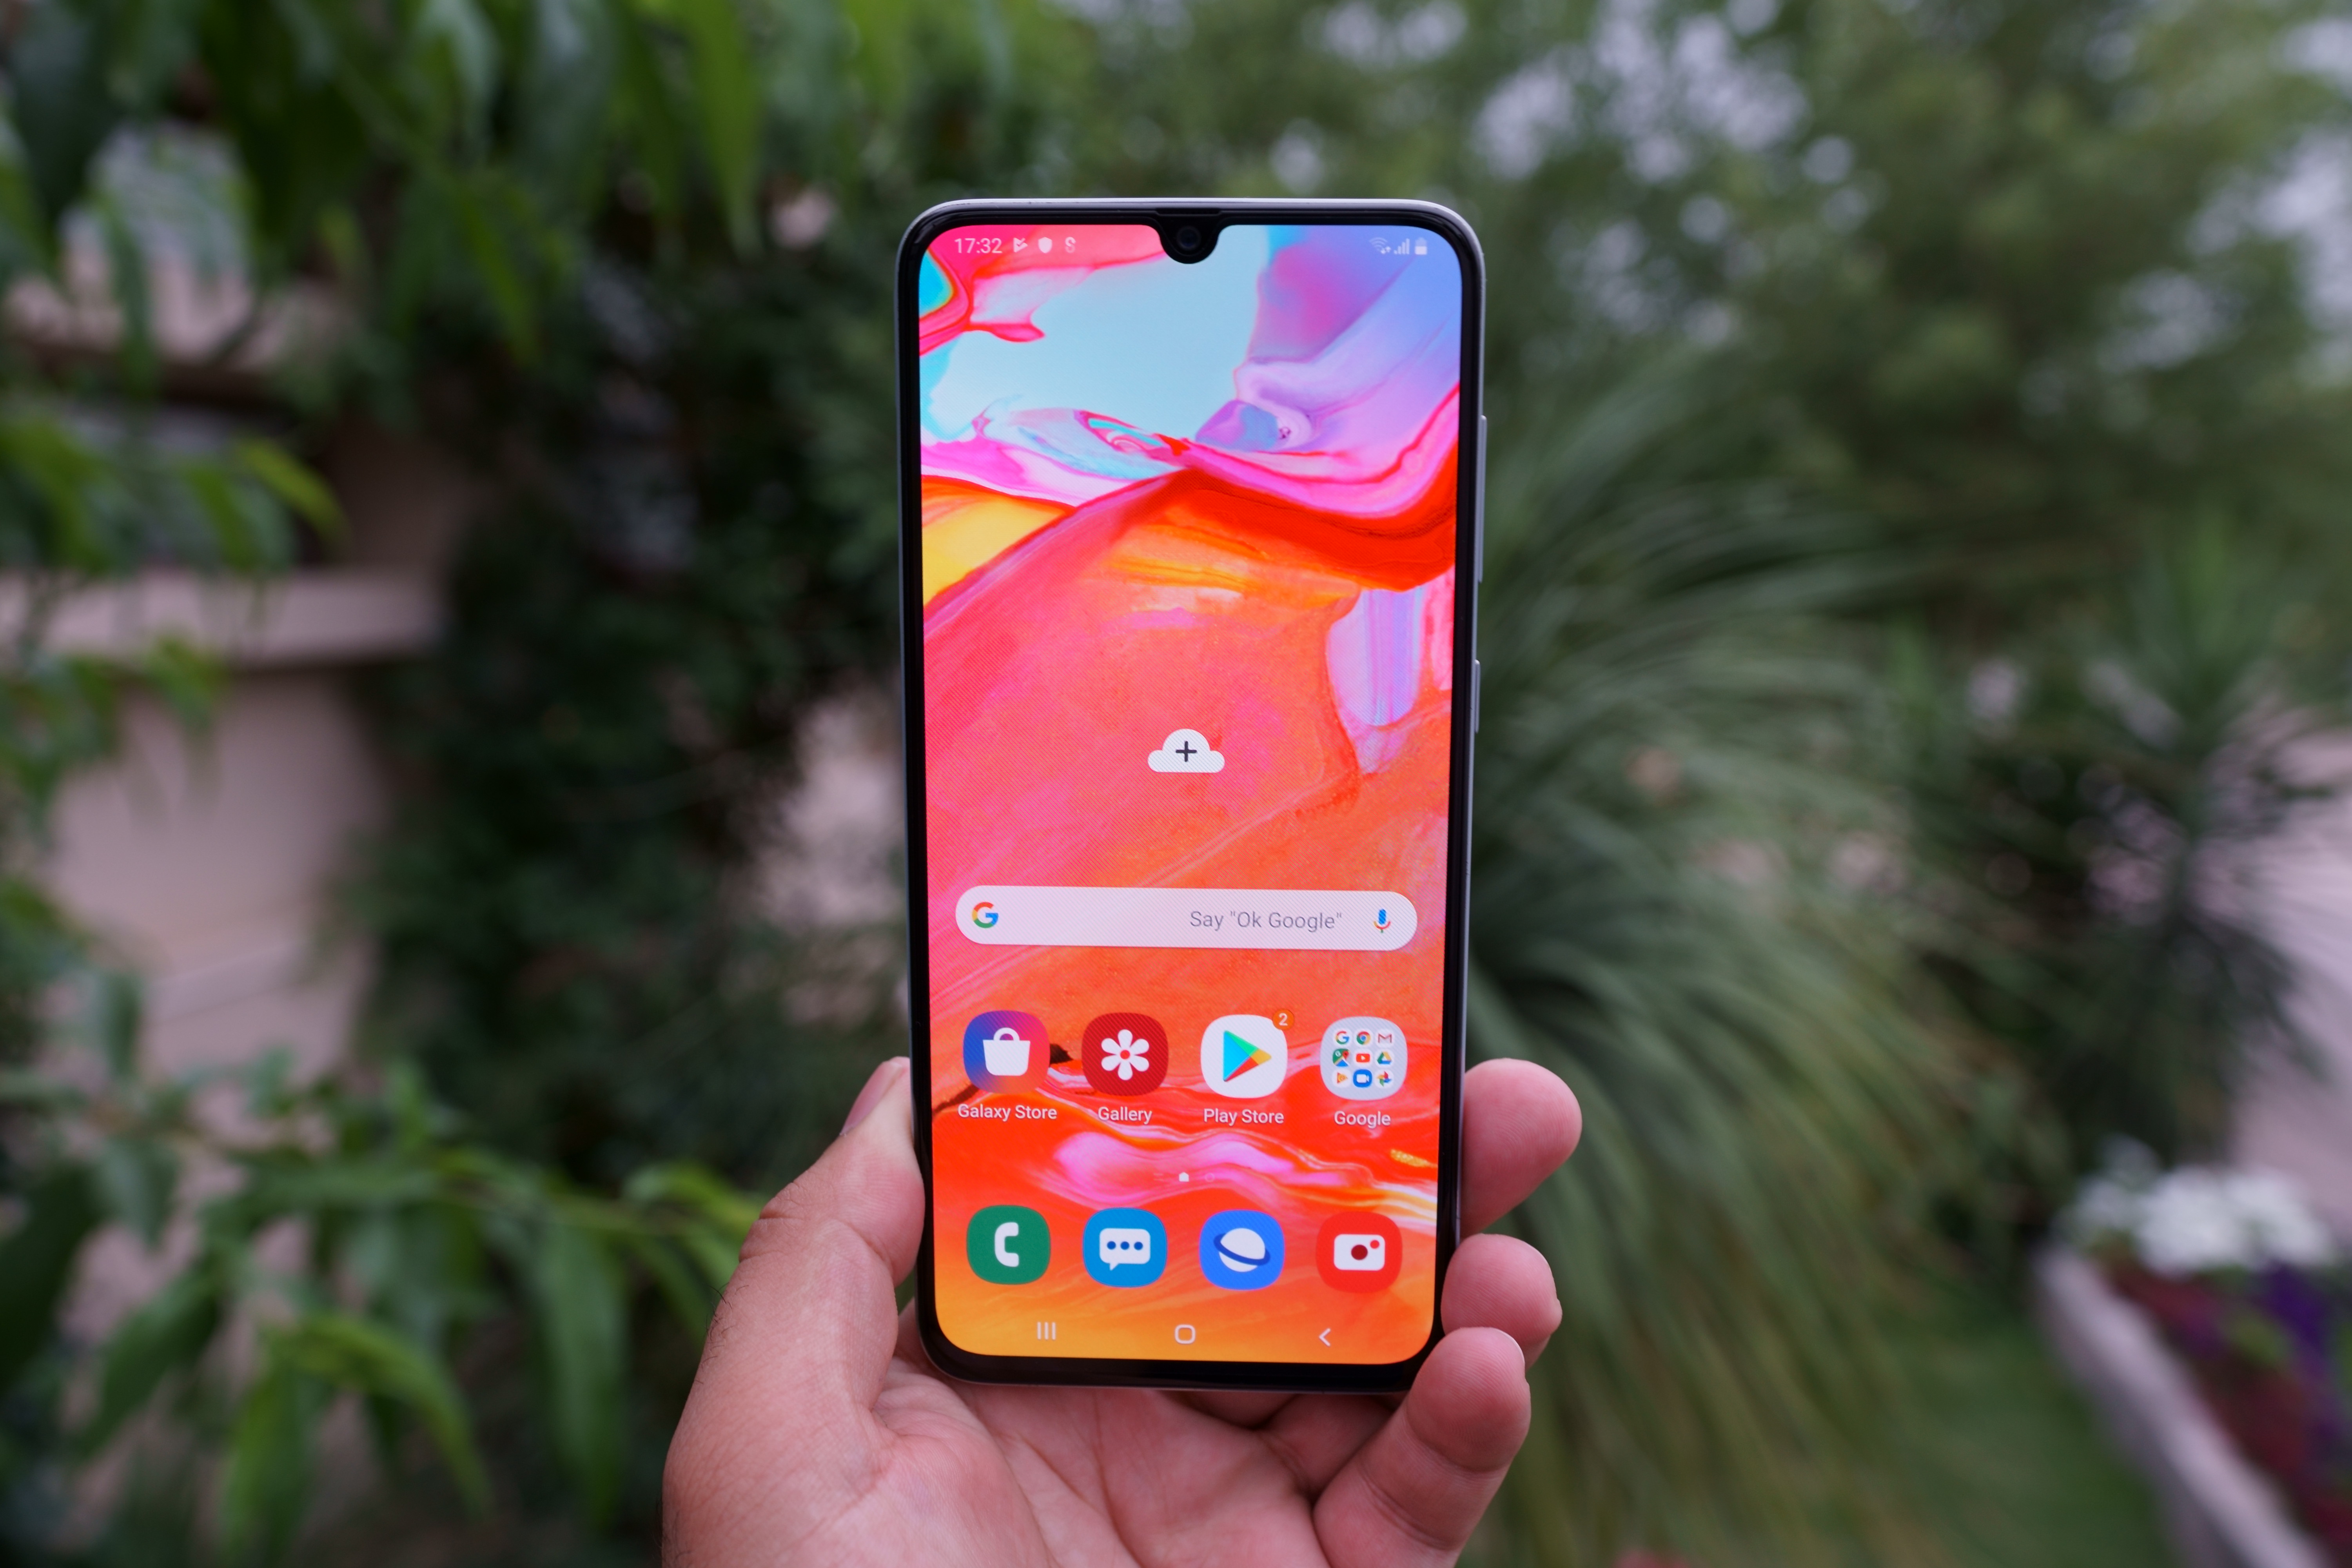
Got a Samsung Galaxy A70 and don’t know how to enter Download Mode, Recovery Mode, Safe Mode, how to clear its Cache, factory data reset, and more? This is the guide you need in that case. I am going to show you how to put your Samsung Galaxy A70 in Download Mode. You will also learn how to boot Galaxy A70 into Recovery Mode. The method to boot Galaxy A70 into Safe Mode is also given below. Steps to clear Galaxy A70 cache without losing data are also given. You can also learn to hard reset Galaxy A70 or just perform factory data reset on it.  The steps to enable OEM unlocking and USB Debugging mode on Galaxy A70 are also given.

Without any further ado, let’s jump into the guide now.

Samsung Galaxy A70 Recovery Mode

  1. Turn off your Galaxy A70 completely.
  2. While the phone is off, press and hold Volume Up + Power button simultaneously.
  3. As the phone turns on and vibrates, let the keys go.
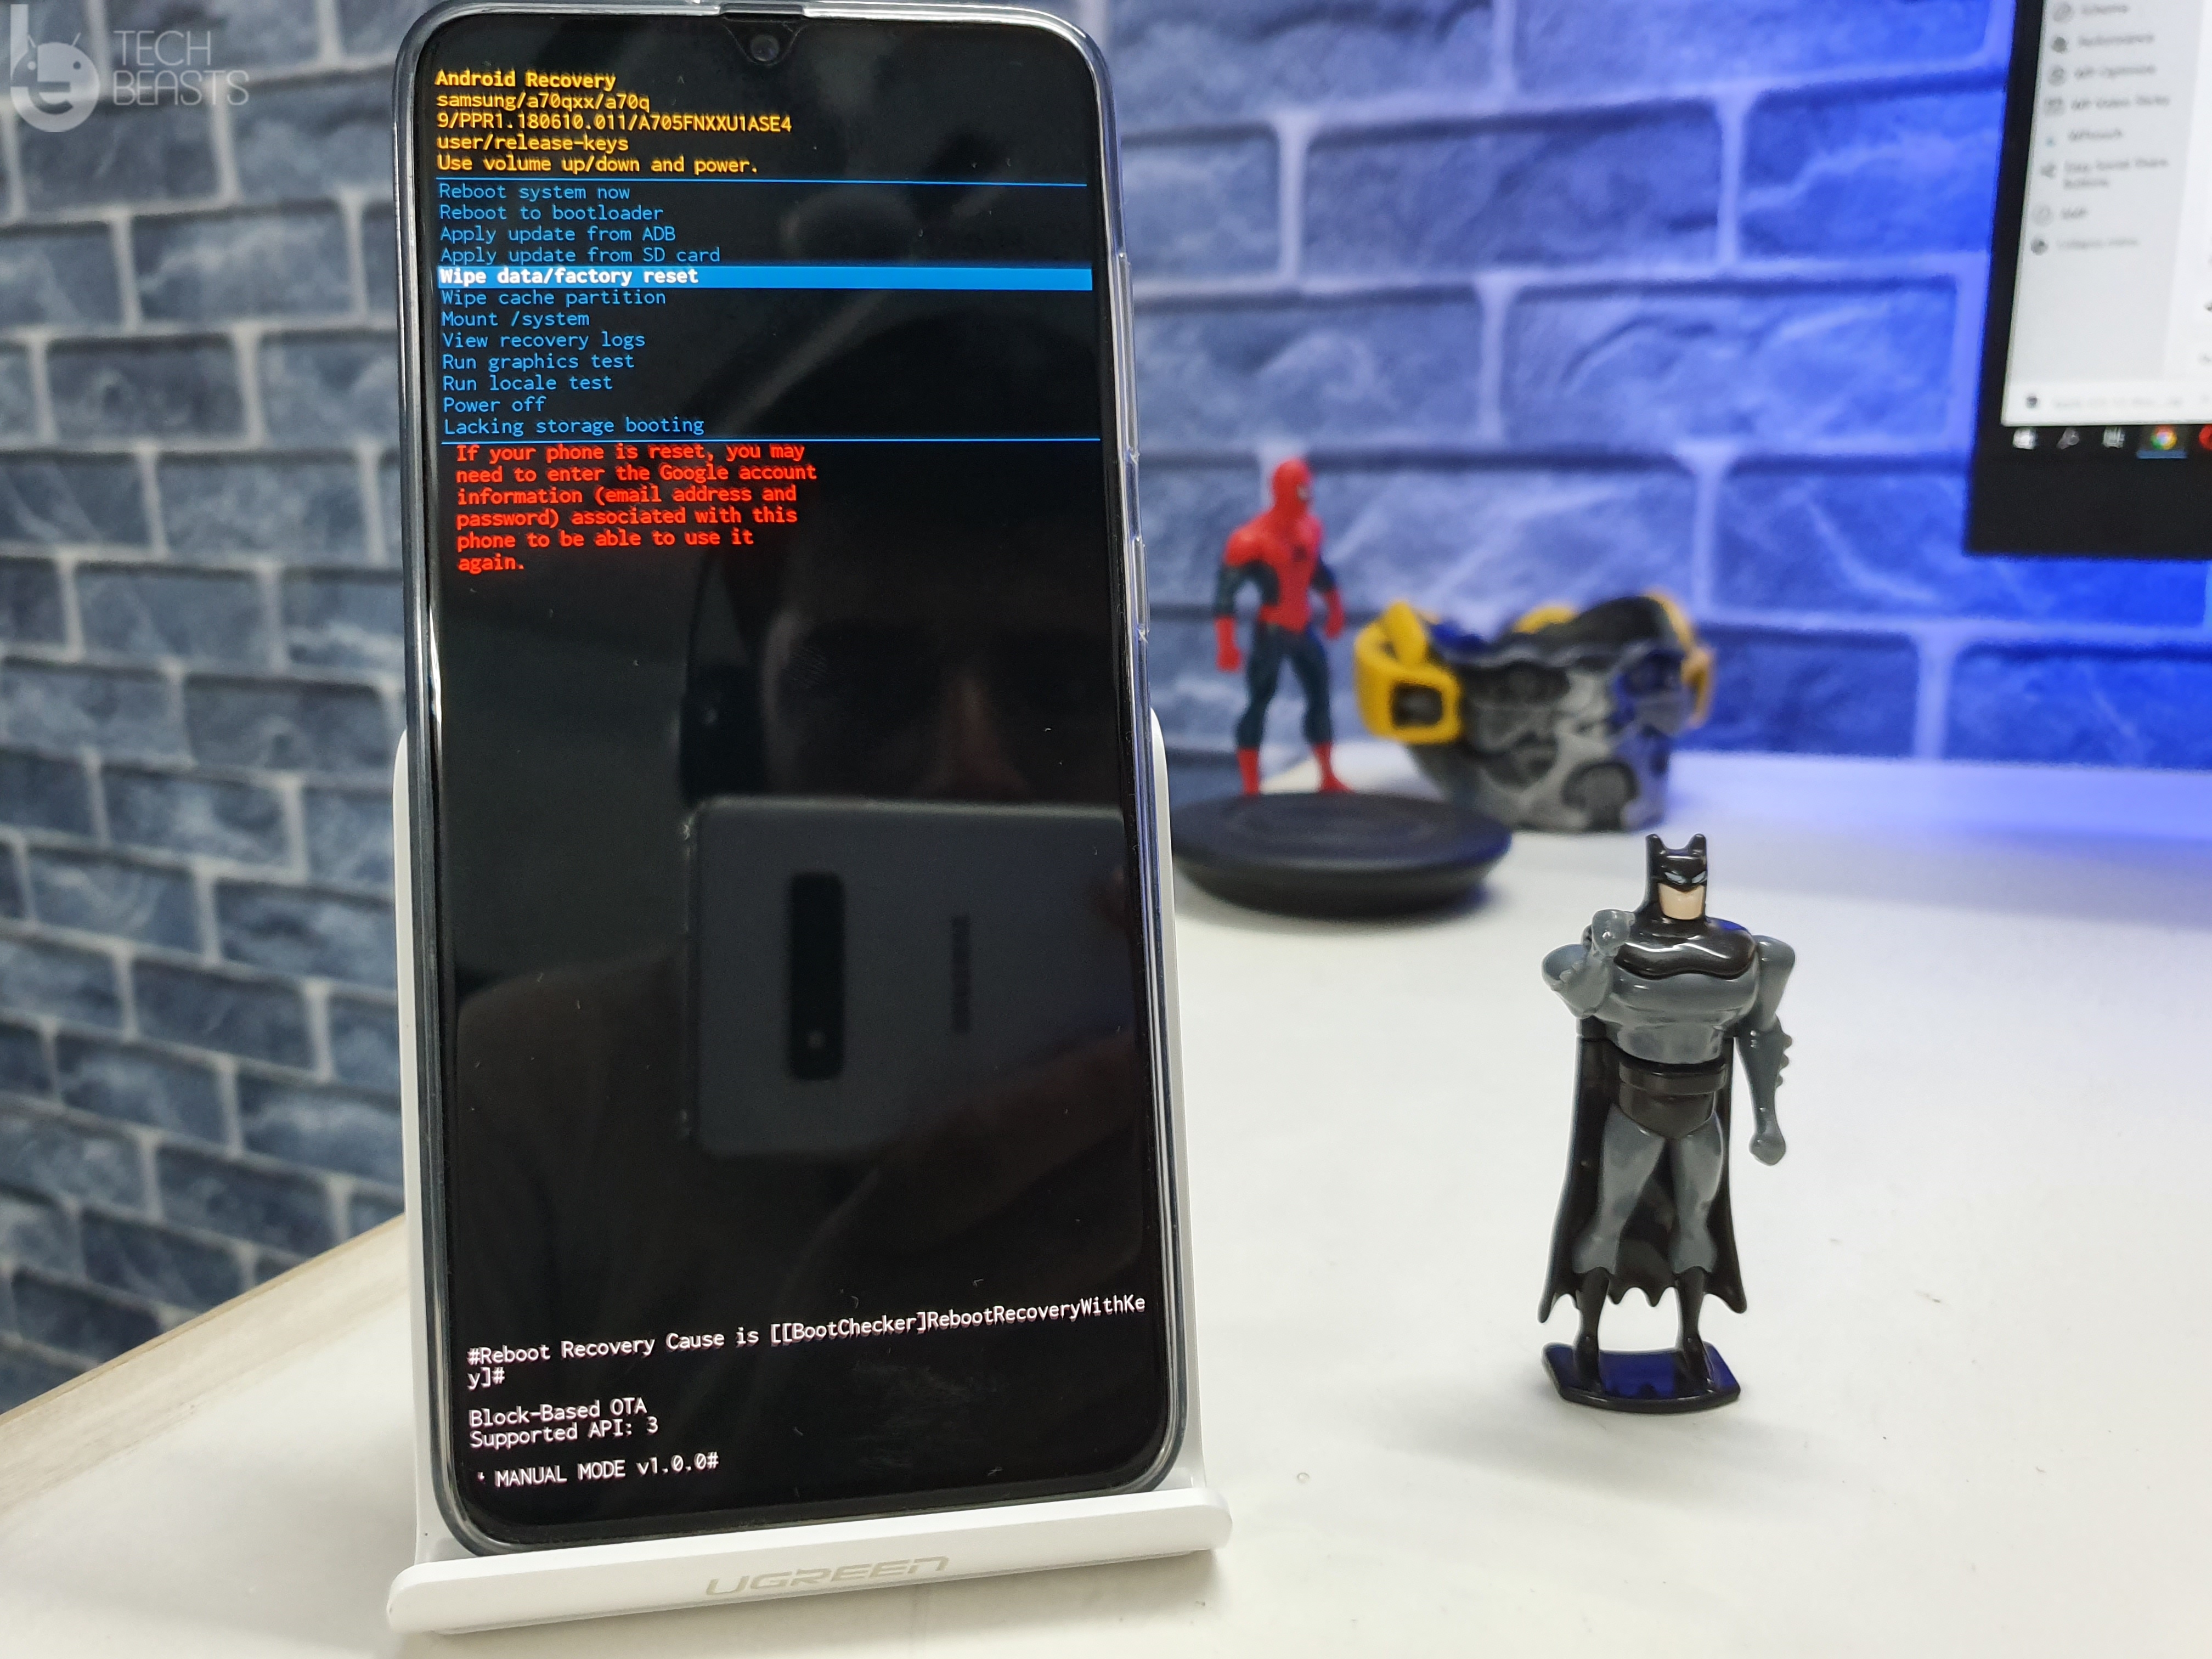
  4. The phone will enter the recovery mode.
  5. In the recovery mode, you will see several options. You may proceed as you want.

Galaxy A70 Recovery Mode

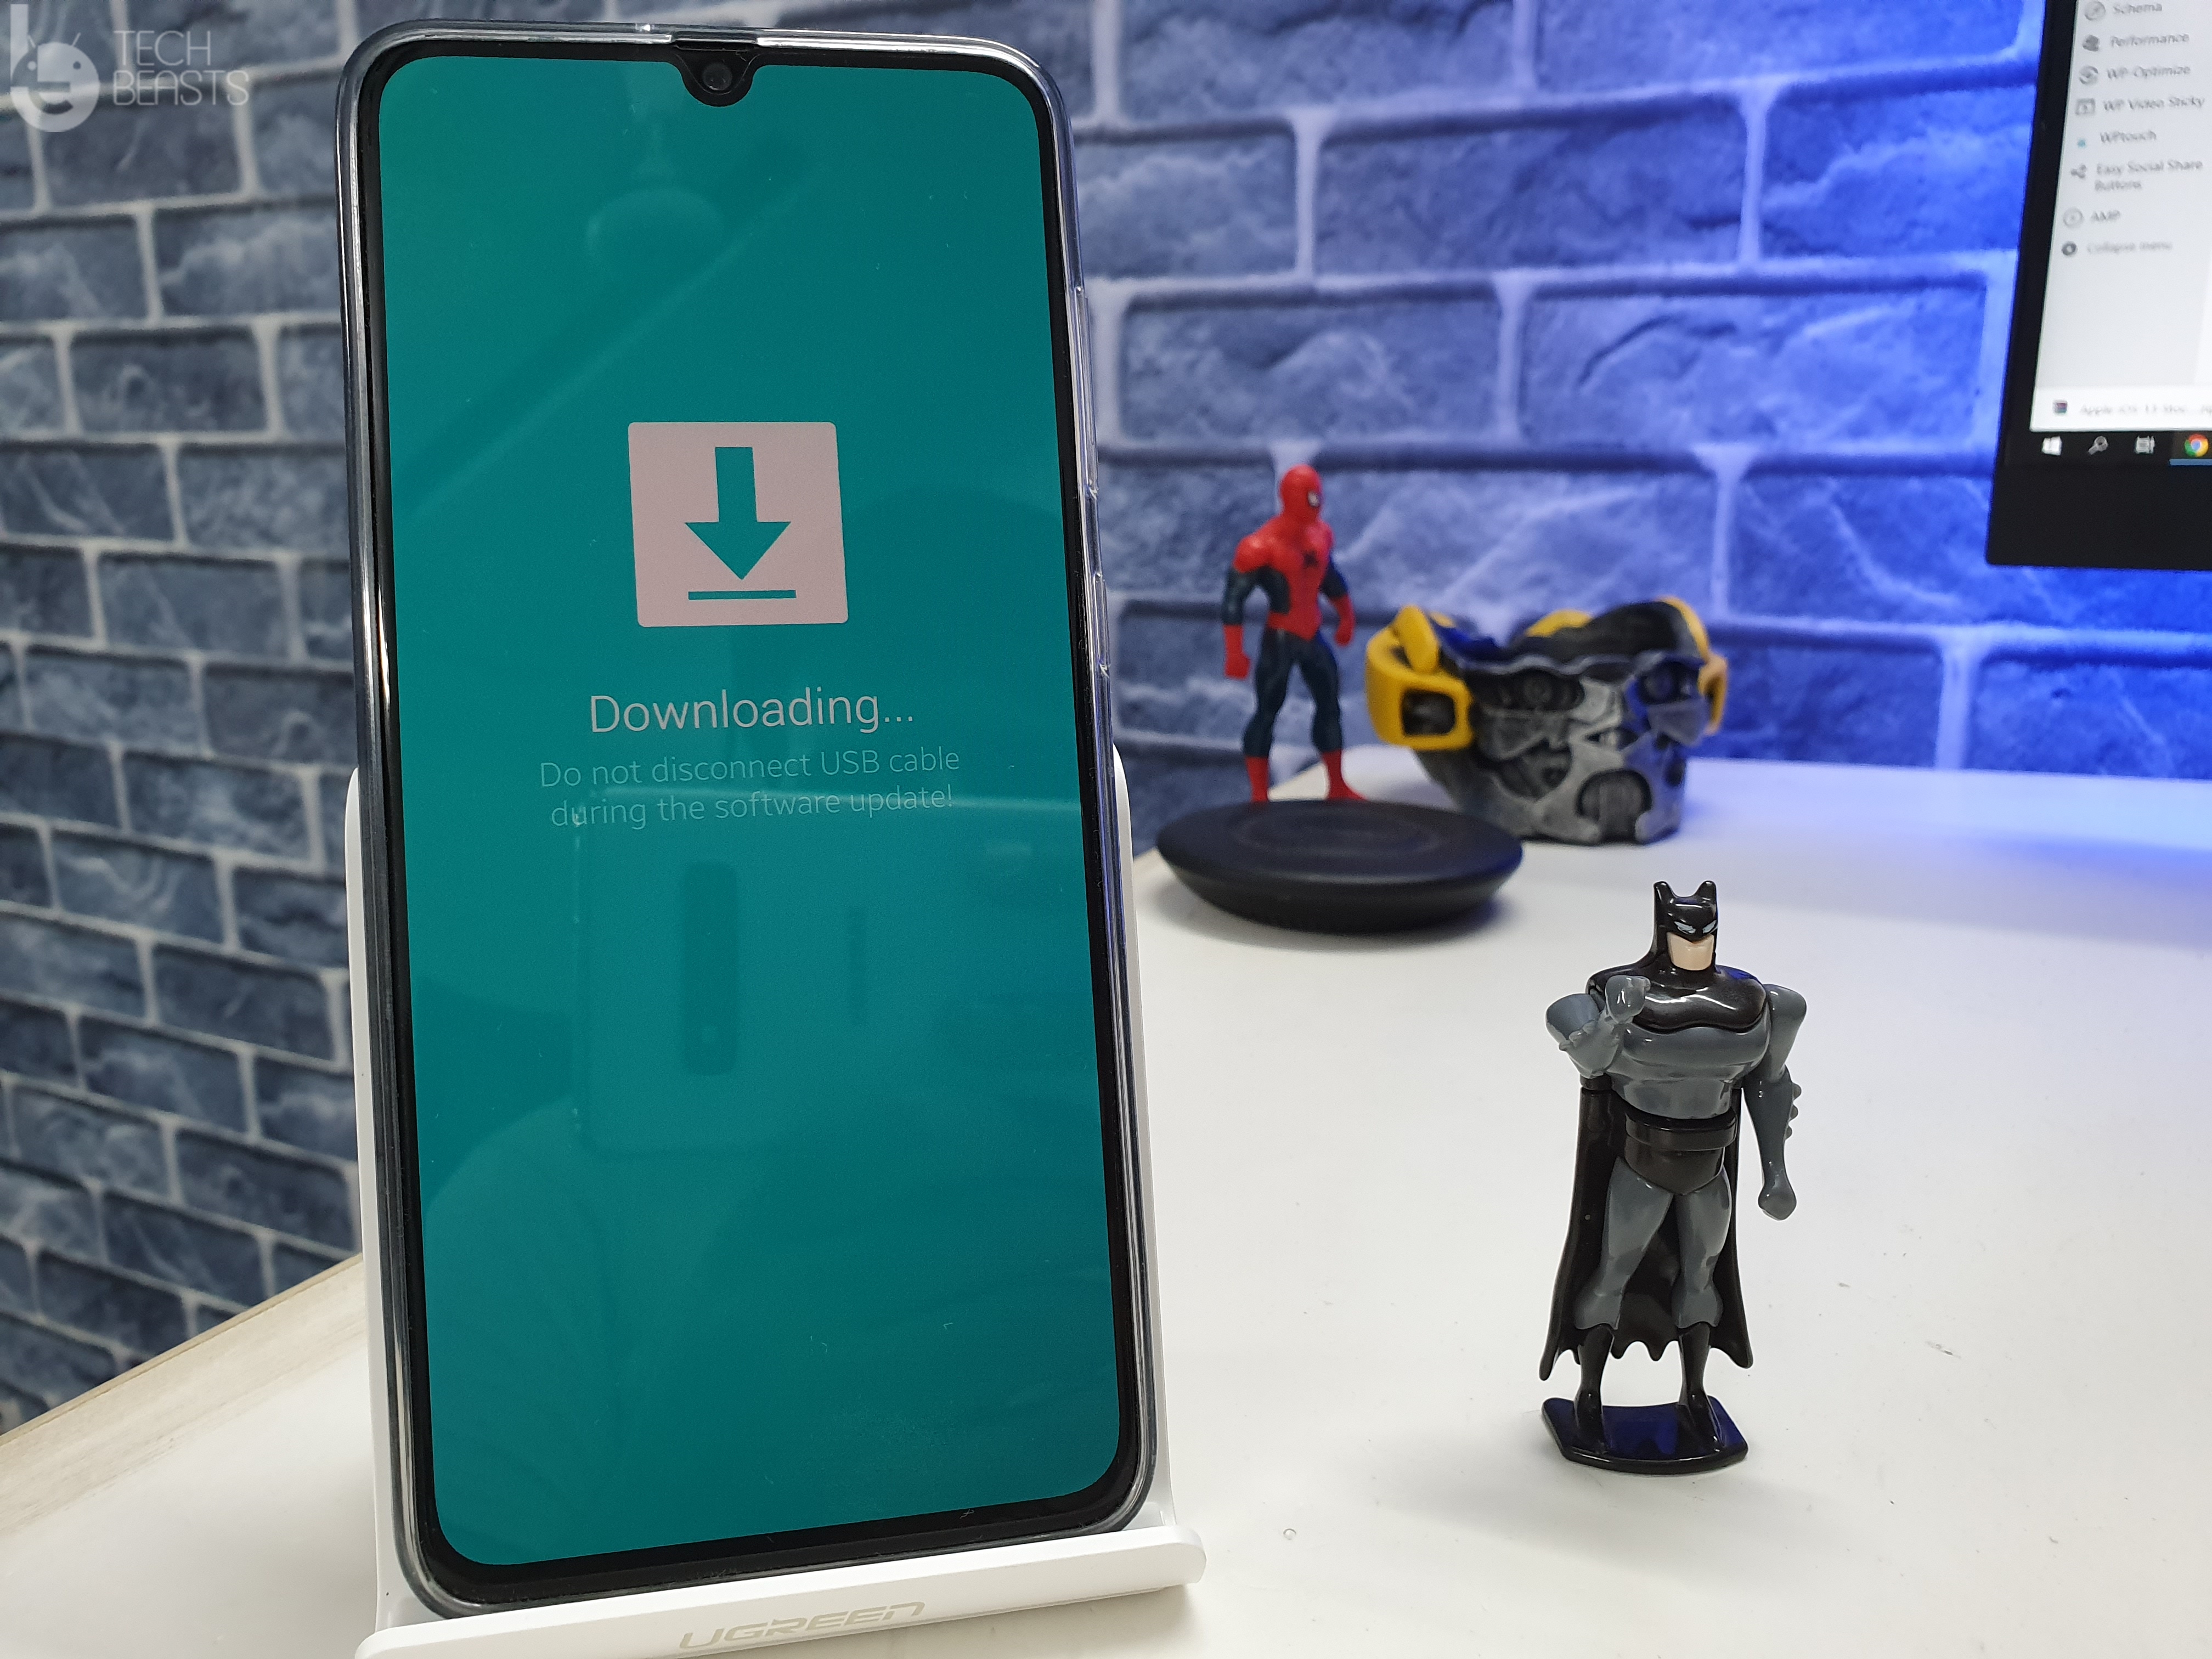
Samsung Galaxy A70 Download Mode or Odin Mode

Download Mode or Odin Mode is used to flash firmware files and other files onto the Galaxy A70 using the Odin flash tool.

  1. By following the instructions above, enter the Recovery Mode.
  2. In the Recovery Mode, highlight “reboot to bootloader”.
  3. Now press the Power button.
  4. Your phone will instantly enter the Download Mode, it will show “Downloading…” on the screen.
  5. You can now connect the phone to the computer to use Odin. Galaxy A70 Download Mode

To get out of the Download Mode, press the Volume Down + Power button for 7 seconds. If the phone goes into the recovery by doing this, just highlight “reboot” and press the power button.

How to enter Safe Mode on Galaxy A70

Safe Mode disables all the third-party applications on a phone. If your phone is having some issues and you want to test it by disabling all apps, the Safe Mode is going to help you.

  1. Turn off the Galaxy A70 completely.
  2. Now turn on the phone.
  3. As soon as the phone vibrates, press and hold the Volume Down key.
  4. Keep the Volume Down Key pressed unless you see the home screen.
  5. As you see the home screen, let the key go.
  6. You will find Safe Mode watermark on the lower left corner now.
  7. All apps are disabled.
  8. To get out of the Safe Mode, just restart your phone.

Delete Samsung Galaxy A70 Cache without losing data

Clearing cache can fix performance and battery life issues on a phone some times.

  1. By following the steps above, boot your Galaxy A70 into the Recovery Mode.
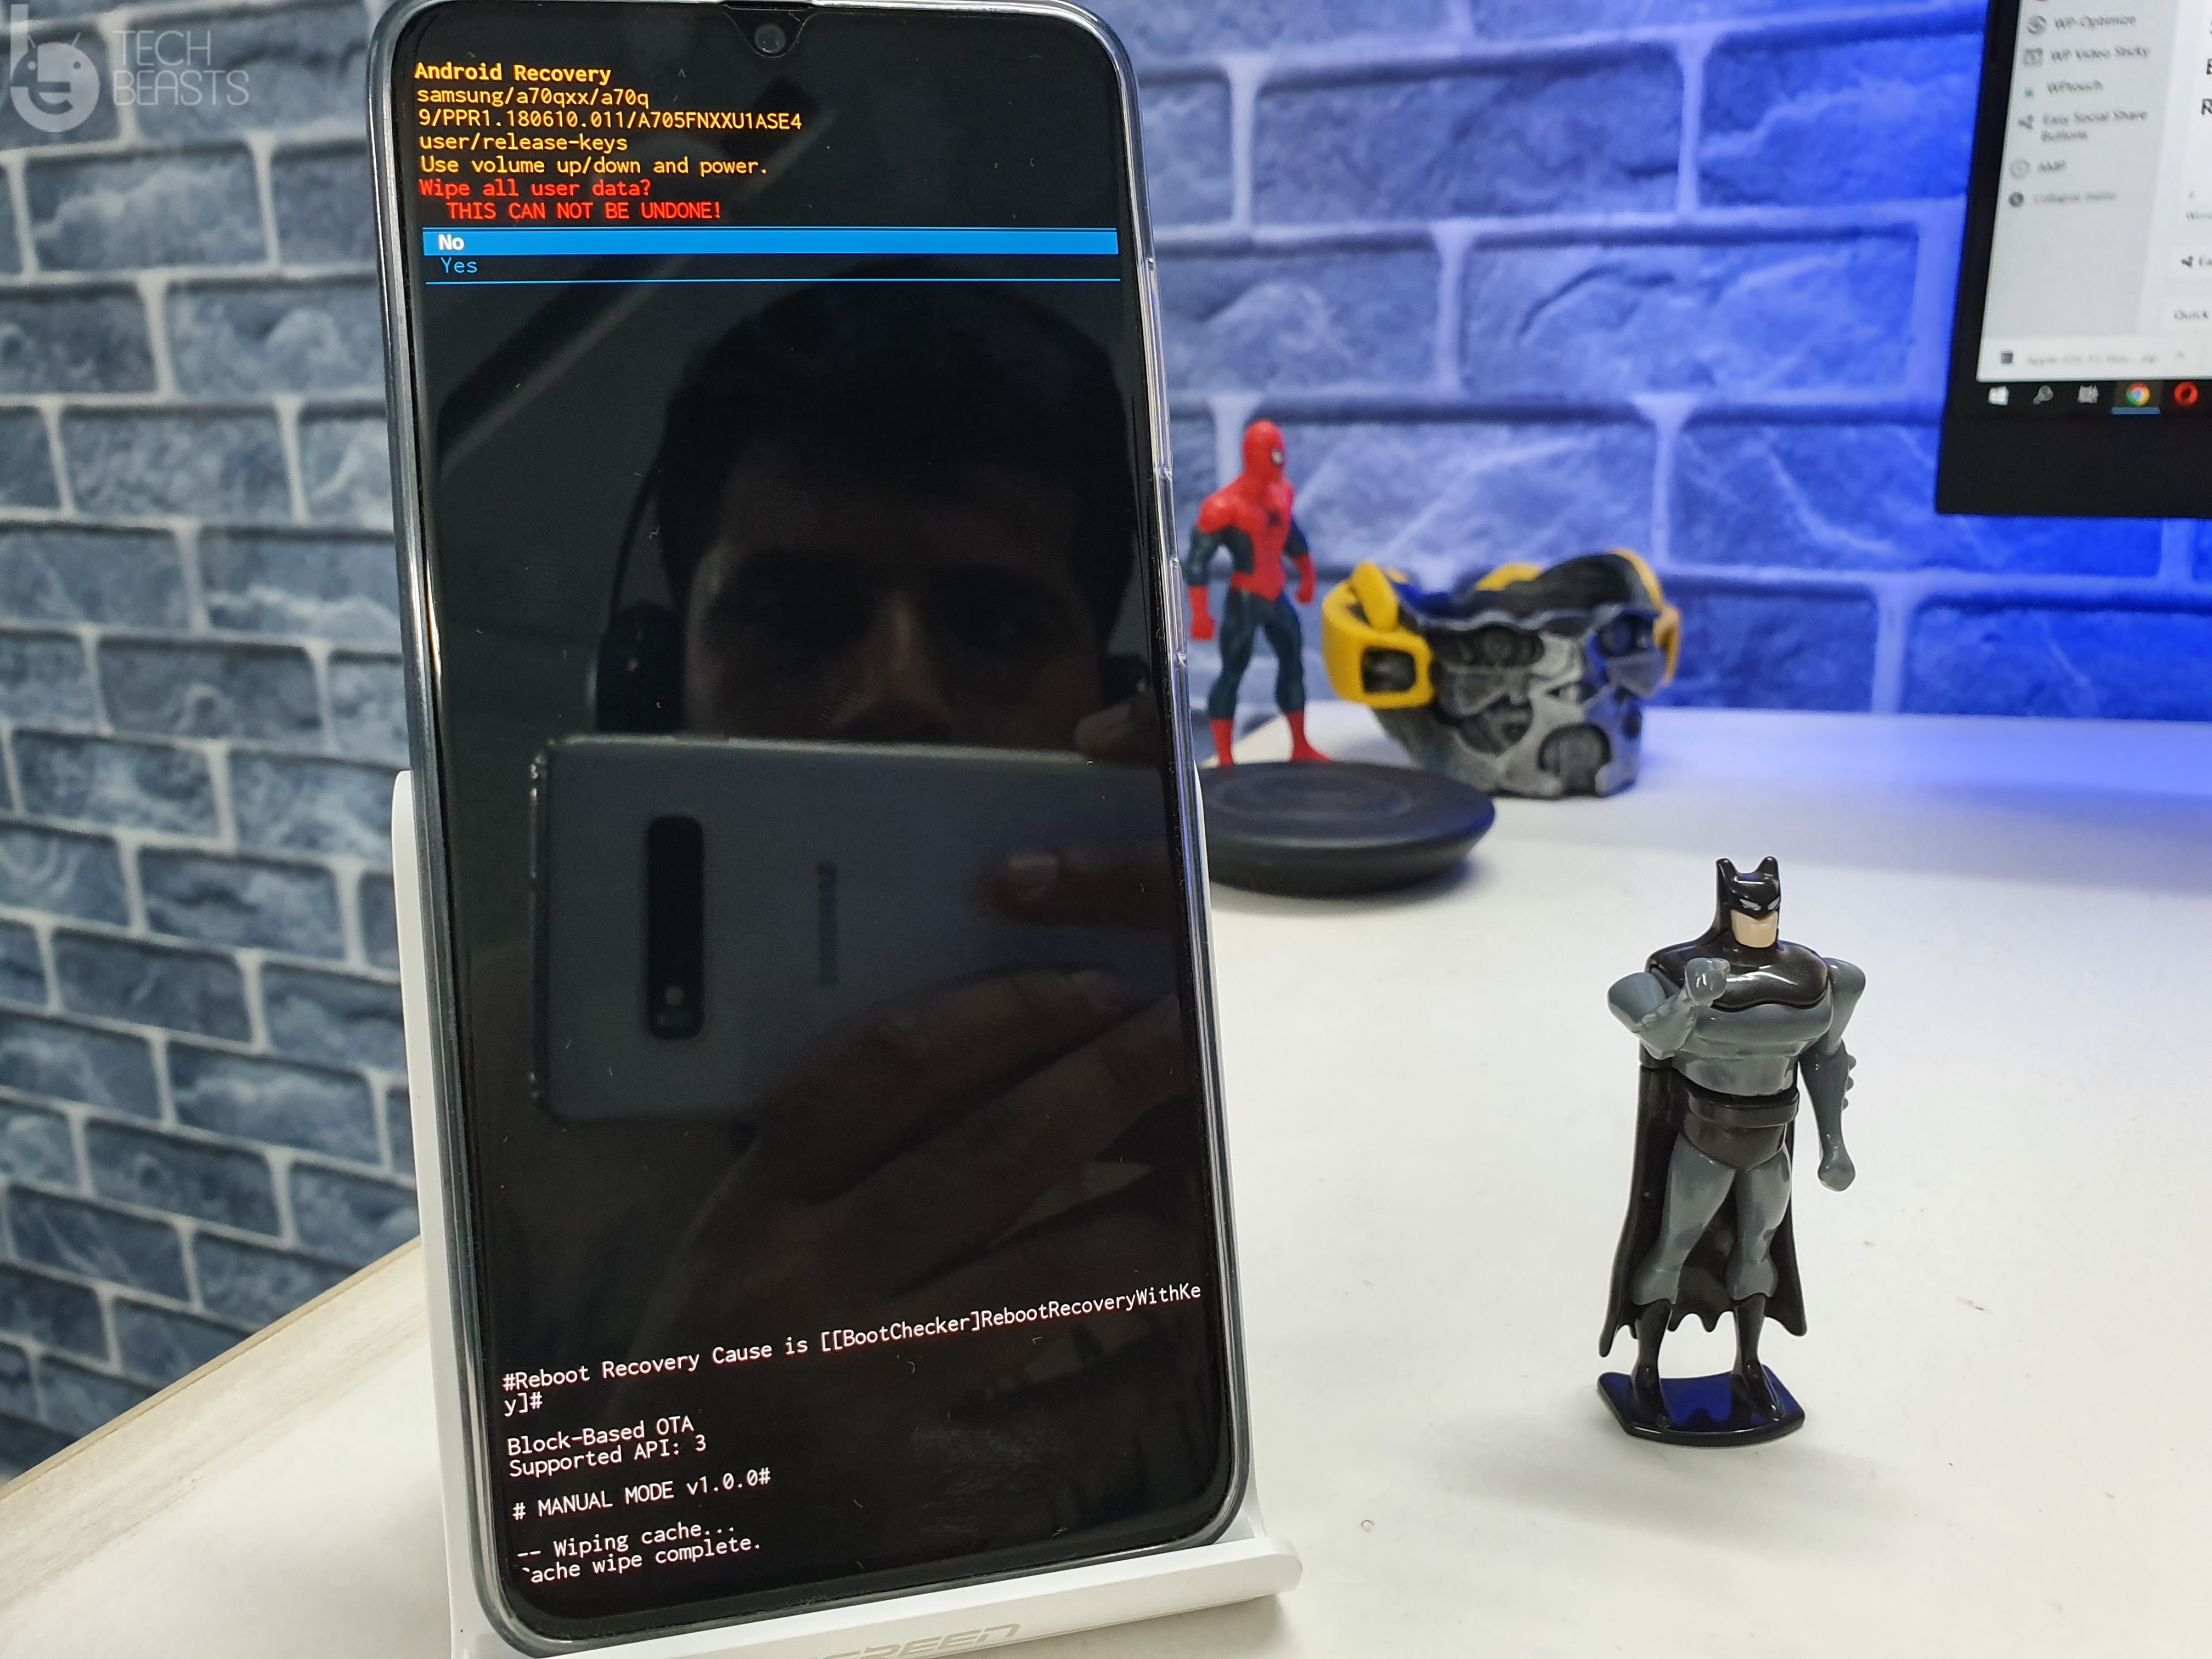
  2. Using the Volume Down Key, highlight “wipe cache partition”.
  3. Press Power Key to wipe it.
  4. Now highlight “Yes” and press Power key again.Galaxy A70 Recovery Mode
  5. The cache will be cleared.
  6. Reboot your phone now.


Hard Reset Samsung Galaxy A70

If you want to restore everything back to factory settings on your Galaxy A70, the hard reset will help.

  1. Once again, follow the steps given above to enter Recovery Mode.
  2. In the Recovery Mode, using Volume Down Key, highlight “wipe data/factory reset”.
  3. Press the Power button and then highlight “Yes”.
  4. Press the Power button again to perform a factory data reset.
  5. Restart the phone now.
  6. All the data and settings will be gone now.

Samsung Galaxy A70 USB Debugging

If you want to connect Galaxy A70 to the computer to flash files using Odin or you want to use ADB Shell, the USB Debugging must be enabled.

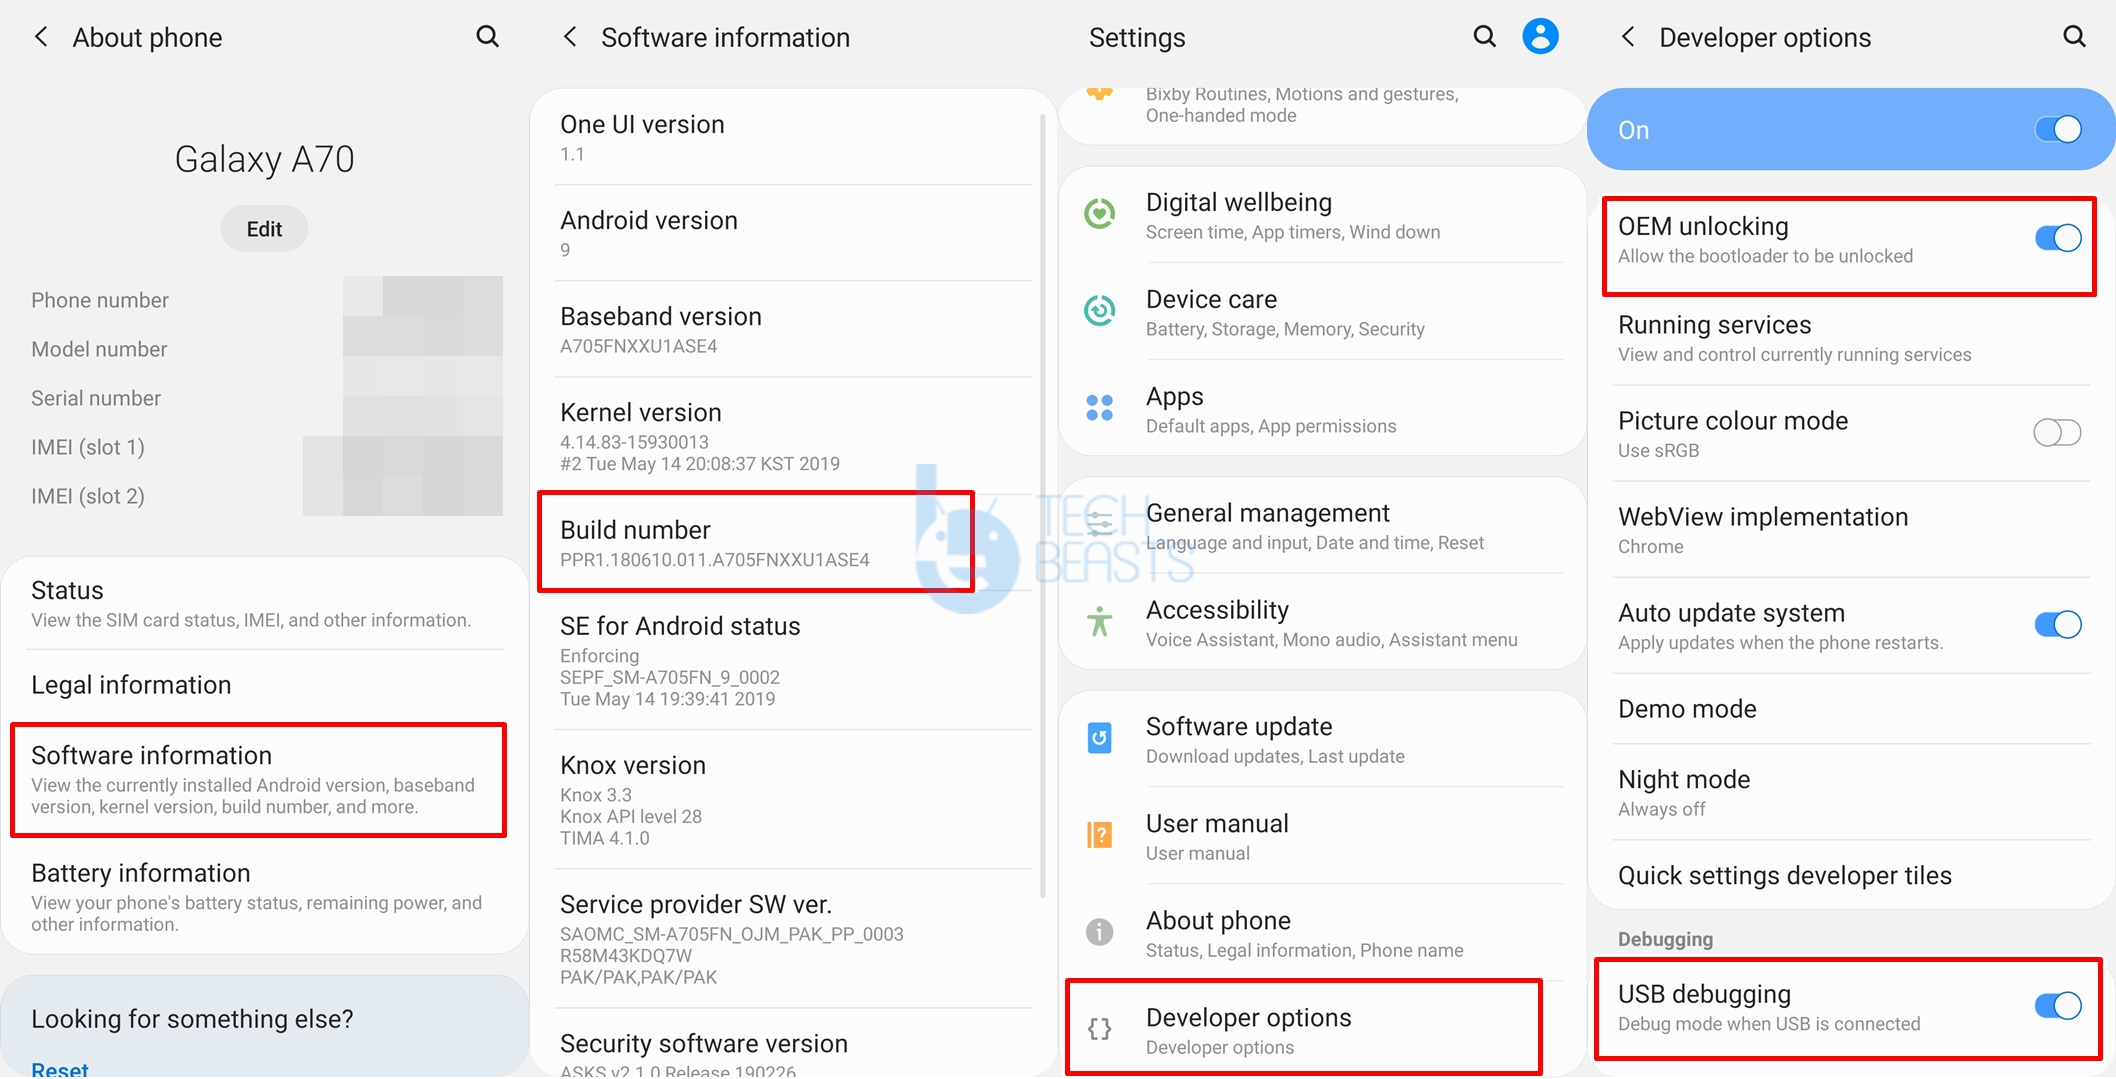
  1. Open Settings and go to About Phone.
  2. Now go into Software Information.
  3. Tap the Build Number for 7 times to enable Developer Options.
  4. Go back to Settings now and open Developer Options.
  5. Find USB Debugging and turn it on.
  6. The phone will show a warning, accept it.

Galaxy A70 USB Debugging and OEM Unlocking

Enable OEM Unlocking on Galaxy A70

To use a tool like Odin, you must have the OEM Unlocking enabled.

  1. Enable Developer Options on your Galaxy A70.
  2. Open Developer Options and find OEM Unlock.
  3. Turn on OEM Unlock now. That’s all.

Reset Samsung Galaxy A70 Network Settings

Resetting the Network settings can fix errors like Not Registered on Network, week signals, and other mobile data and WiFi issues.

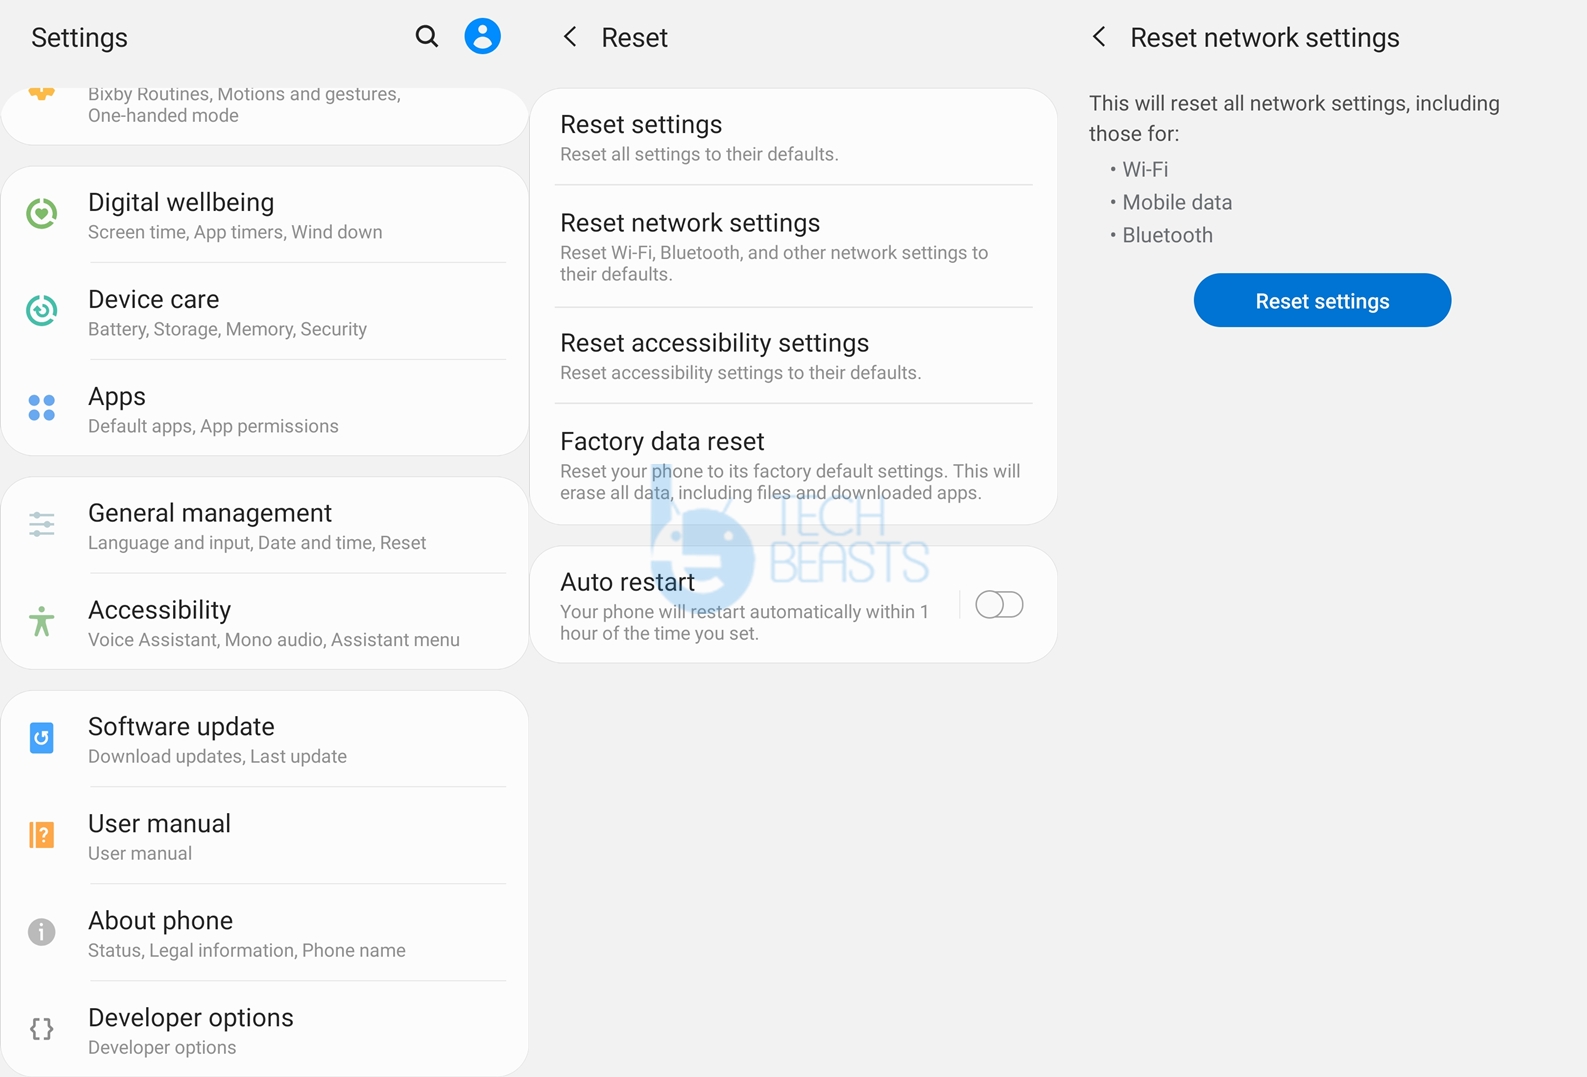
  1. On your phone, go to Settings > About Phone > Reset.
  2. Click on Reset Network Settings > Reset > Enter your PIN or Password.
  3. Click on Reset once again.
  4. The settings will be reset now.
  5. Restart the Galaxy A70.
  6. Set up all network preferences from scratch. That’s all.Galaxy A70 Network Settings

That’s all. You can find more Galaxy A70 guides below.

Download Google Camera for Samsung Galaxy A70

0
Download Google Camera for Samsung Galaxy A70

Samsung Galaxy A70 is powered by the Qualcomm Snapdragon 675 processor. It means that this phone can run the Google Camera. I did try running a number of Google Camera APKs on the Galaxy A70 and finally found a working one. From here, you can download the Google Camera for Samsung Galaxy A70. I will also explain how you can set up the Google Camera to take better photos with the Galaxy A70. Before you install Google Camera for Samsung Galaxy A70, its very important to understand the technicalities of the A70’s camera.Google Camera for Samsung Galaxy A70

Samsung Galaxy A70 Camera

The Galaxy A70 has 3 cameras at the back. The main camera is a 32MP. After this, it has an 8MP ultrawide shooter and then there is a 5MP depth sensor. There is the same 32MP camera on the front as well. The 32MP cameras here are very lucrative for an average user, but the way it works can disappoint you. To get the best results from the 32MP cameras of the Galaxy A70, you have to understand the technology behind it.

Back in 2018, Samsung built the GM1 and the GD1 camera sensors. These camera sensors were built to compete with the likes of Huawei and Xiaomi who were putting up to 48MP cameras in their phones. Both the GM1 and GD1 sensors used a new technology called Tetracell. There is the cell bining mechanism working behind the Tetracell technology which combines 4 sensors of small pixels to form one bigger pixel. Google Camera for Samsung Galaxy A70

The four merged pixels are supposed to increase light sensitivity. Originally, the GM1 and GD1 0.8μm-pixel sensors, but with the help of the Tetracell technology, they can deliver light sensitivity equal to 1.6μm-pixel image sensor. So, the 8MP and 12MP cameras based on GD1 and GM1 sensors are supposed to work as 32MP and 48MP.

In the Galaxy A70, we have the GD1 sensor as mentioned above. Technically, it has 4 x 8MP sensors which form one 32MP sensor at the back. We have the GM1 sensor in the Xiaomi Redmi Note 7 Pro, which has a 48MP camera at the back.

How does the Galaxy A70 Camera work?

When you open the Galaxy A70’s camera for the first time, it is set to 3:4 screen ratio. In this ratio, it does not use the 32MP resolution. You have to switch to 3:4H in order to take 32MP photos. Similarly, the front camera takes 32MP photos only when you are using wide selfie mode with 3:4H. In the normal 3:4 from the rear camera, it takes 12.2MP pictures. In the normal 3:4 from the front camera, it takes 8MP photos. I have done a detailed video explaining all the features of the Galaxy A70 camera. You can take a look at that video below.

Google Camera for Samsung Galaxy A70

The Google Camera, unfortunately, can use 8MP from the rear camera and 5MP from the front camera. This may sound weird to you, but it is what it is. The Google Camera is unable to convert the 8MP rear camera into 32MP computationally. Samsung definitely has some software tricks that convert the 8MP into 32MP for the stock camera app. The Google Camera fails at that. When you look at the pictures taken by the Google Camera on the A70, you will definitely realise that those are not the full 32MP pictures. For me, the Google Camera was only good to take the portraits or those Nigh Sight shots. If these are the two features you cherish, you should definitely install the Google Camera on your Galaxy A70.

Download Google Camera for Samsung Galaxy A70

  1. Google Camera for Galaxy A70 – Download
  2. Copy the APK to your phone.
  3. Using File Manager, install the Google Camera APK.
  4. Now launch the Google Camera from the app drawer.
  5. In the Google Camera, set the saturation and other preferences according to your own choice.
  6. You are all set to take better Night Sight pictures and Portraits now.

Remember that the Slow-mo and video in the Google Camera app for Galaxy A70 doesn’t work at the moment.

You can take a look at the Galaxy A70 Google Camera vs Stock Camera images in the video below.

Conclusion

That’s all with the installation of Google Camera on the Galaxy A70. The Google Camera may not work up to your expectations, but the few features that work properly are absolutely worth it. If you have any questions or queries regarding this guide, feel free to reach out to us. I will try my best to get back to you as soon as possible.

More: