Home Blog Page 59

Best Screen Protector for Samsung Galaxy S10 and S10 Plus

Best Screen Protector for Samsung Galaxy S10 and S10 Plus

Got a Galaxy S10 or S10 Plus? It’s time to add a layer of protection to its screen. Find the best screen protector for Galaxy S10 and S10 Plus below. The best screen protector for Galaxy S10 and S10 Plus listed are compatible with the ultrasonic fingerprint scanner.

Samsung Galaxy S10 and S10 Plus come with an ultrasonic fingerprint scanner. Samsung is the very first phone maker to implement this technology. The ultrasonic fingerprint scanners are far better than the optical scanners. This scanner unlocks the phone before you blink. The ultrasonic fingerprint scanner is cool, but it has a huge downside. The ultrasonic fingerprint scanner doesn’t work with the screen protectors. Ultrasonic fingerprint scanner takes a very special kind of protector to work under. Generally, a plethora of screen protectors come out as soon as a new phone comes out, but things are not the same in the case of Samsung’s new Galaxy S10 lineup. There are only a few screen protectors that will keep the ultrasonic fingerprint reader functioning. Here is the list of best screen protector for Samsung Galaxy S10 and S10 Plus. Before taking a look at the protectors, you must understand why ordinary screen protectors will not let the fingerprint scanner work.
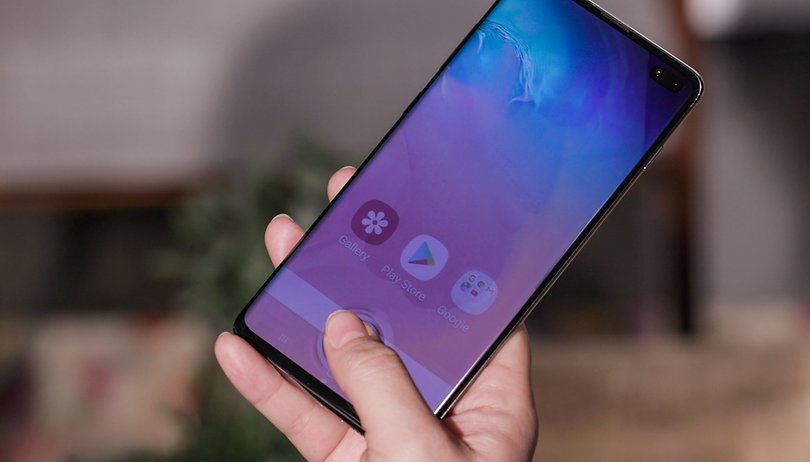
Galaxy S10 Plus Lock Screen Security
S10 Plus Fingerprint Scanner.
Image: AndroidPit

Ultrasonic Fingerprint Scanner

So far, companies have been implementing optical fingerprint readers on their phones. Huawei, OnePlus, Xiaomi, and Vivo have used optical readers. Optical readers use the reflection of light from your thumb to map the impression on the screen. This is why the screen lights up when you unlock the phone. On the other hand, the ultrasonic fingerprint scanner works totally different.

The ultrasonic fingerprint scanner uses high-intensity sound waves to map the ridges of your thumb or finger on the screen of the phone. The sound waves are too strong that they are inaudible for a human ear. In order to let the sound waves pass through the fingerprint scanner, there has to be some air between the screen protector and the screen. Air helps the sound waves pass to the fingerprint scanner. The ordinary screen protectors fail to provide this room for air. This is why they fail to work. For now, accessory makers are rolling out screen protectors with a hole for the ultrasonic reader. This is not a solution and it can potentially damage the fingerprint scanner.Best Screen Protector for Samsung Galaxy S10 and S10 Plus

To cater to this problem, Samsung is shipping the Galaxy S10 and S10 Plus smartphones with in-house screen protectors. It is definitely going to take a while for glass protector makers to come out with a solution for this technology. Since this technology is going to stick around for good, there will definitely be a good amount of companies looking forward to solving this issue at their earliest.

Screen Protector for Samsung Galaxy S10 and S10 Plus

For now, there are two screen protectors that are compatible with the ultrasonic fingerprint-powered displays. One protector comes from Samsung and there is one from Whitestone Dome. You can grab your favorite screen protector for Samsung Galaxy S10 and S10 Plus below.

Samsung Screen Protector for Galaxy S10 and S10 Plus

As mentioned earlier, all the Galaxy S10E, Galaxy S10, and Galaxy S10 Plus units are shipping with a pre-applied screen protector. The original screen protector on your phone should last for good. However, if you are feeling the need of replacing the screen protector right now, you can get your hands on it from Samsung’s official website. Samsung is offering the same screen protector for $29.99. Although this is a very high price for a screen protector, unfortunately, this is the only solution available for now. The price may come down as more companies join the train with their screen protectors. You can buy the original Samsung screen protector from their official Galaxy S10 accessor page.

Whitestone Dome Screen Protector for Galaxy S10 and S10 Plus

The Dome Screen protectors are built for the curved displays. It takes a lot of effort for a normal tampered glass to stick to a curved screen, so, the dome screen protectors are there to get rid off this struggle. A Dome Screen Protector has popped up for the Galaxy S10 and S10 Plus. It comes from the renowned glass-maker, Whitestone. The screen protector works absolutely fine with the ultrasonic fingerprint scanner. A number of YouTubers have already shown off this new tampered glass in action.Whitestone Dome Screen Protector for Galaxy S10 and S10 Plus

Whitestone claims to be the only company to have figured out how the ultrasonic fingerprint scanner works with a protector. The company ships out its protector with a whole kit including all the necessary accessories for its application. Whitestone also ships out an instructions page to apply the protector. The Whitestone Dome Protector is available for $49. Pack of 2 is available for $69.

Buy Whitestone Dome Screen Protector for Galaxy S10 Plus | Buy Whitestone Dome Screen Protector for Galaxy S10

That’s all. For any questions and queries, feel free to reach out to us. The best way to contact us via the comments section given below.

More: Download Wallpapers to hide Galaxy S10 Plus Camera Cutout
Best Free Document Scanners for Android 2019

0
Best Free Document Scanners for Android 2019

When it comes to picking up the best free Scanner Apps, the options trim down to only a few. We have picked up the best free Document Scanners for Android. These are the best Document Scanners for Android in 2019.

Document Scanners for Android have changed the way we used to save documents. Back in the day, Android users captured the pictures of documents to save in the phone’s gallery. The captured pictures were dull, dark, tainted, and whatnot. With the passage of time, new Android apps came into being which massively improved the ecosystem. The scanner applications were also a part of Android’s revolution. Document Scanners for Android did not only change the way we used to save the documents, but they also negated the use of the big computer scanners. Your Android smartphone can now act as a portable scanner. As of today, there are hundreds of Scanner Apps for Android. Before you take a look at the apps, let’s learn a little bit more about this technology.

Document Scanners for Android

Document Scanners for Android – How things changed?

Applications like WhatsApp these days have become a primary medium of exchanging documents with your friends and family. Most of the users would just capture a picture of a document and send it to someone on WhatsApp or just save it on their phone for the record. A normally captured picture is nothing more than a picture, or to put it clearly, it just doesn’t have that essence of a document. Although the cameras on Android phones eased up the lives of consumers, there still was a room for improvement.

This gap was filled by applications like Camscanner. The Camscanner and other similar applications shoot a picture and then edit the picture to make it look like an officially scanned document. You can’t really tell the difference between a document scanned by a traditional scanner and a picture scanned by one of these applications.

What’s good here is that the modern scanner applications for Android can combine a series of documents. These applications can also convert a picture into a PDF document. Users can print the scanned documents on the go. They can also fax the scanned documents. Options to email the documents and upload are also there in some of these apps. To cut it short, these apps are complete document solutions.

Moreover, the apps offer a number of color effects to add to your scanned document. There are some filters which will make your scanned document resemble the real document. To digitally transform the documents on an Android phone, these Scanners are a great tool.

What can you scan with Document Scanners for Android?

  • Important documents like property papers, agreements etc.
  • Invoices can be scanned for your record.
  • You can scan Receipts to save copies.
  • Tickets can be scanned so that you do not need to carry around the hard copies.
  • Exam papers, date sheets, and DMC can be scanned too.
  • And a lot more.

There is a whole bunch of Scanner applications for Android ecosystem today. Every new application tries to offer something new. There is a great competition going on between the developers. To find the best Scanner app for your Android phone, take a look at the best possible options listed below.

Document Scanners for Android 2019

#1. CamScanner

With over a hundred million downloads, CamScanner is the first and foremost choice of the users. There is a number of reasons which make this application so much popular. This application is designed to serve its straight forward purpose. CamScanner is arguably the best choice for users who are looking for Document Scanners for Android.

Document Scanners for Android

When you open CamScanner on your phone, it presents you with a screen showing the menus and a camera button at the bottom. To start scanning the document, simply press the camera button. The CamScanner will now ask you to capture the document, instructions will be given on the screen.

Document Scanners for Android

After capturing the document, users can add a filter of their choice. The scanned documents go to the repository of CamScanner. To access your documents and extended options, simply open the All docs menu. This is where users will find the options to convert documents into PDF or print from the application. Furthermore, users can add watermarks and annotations to the scanned documents.

#2. HP Smart

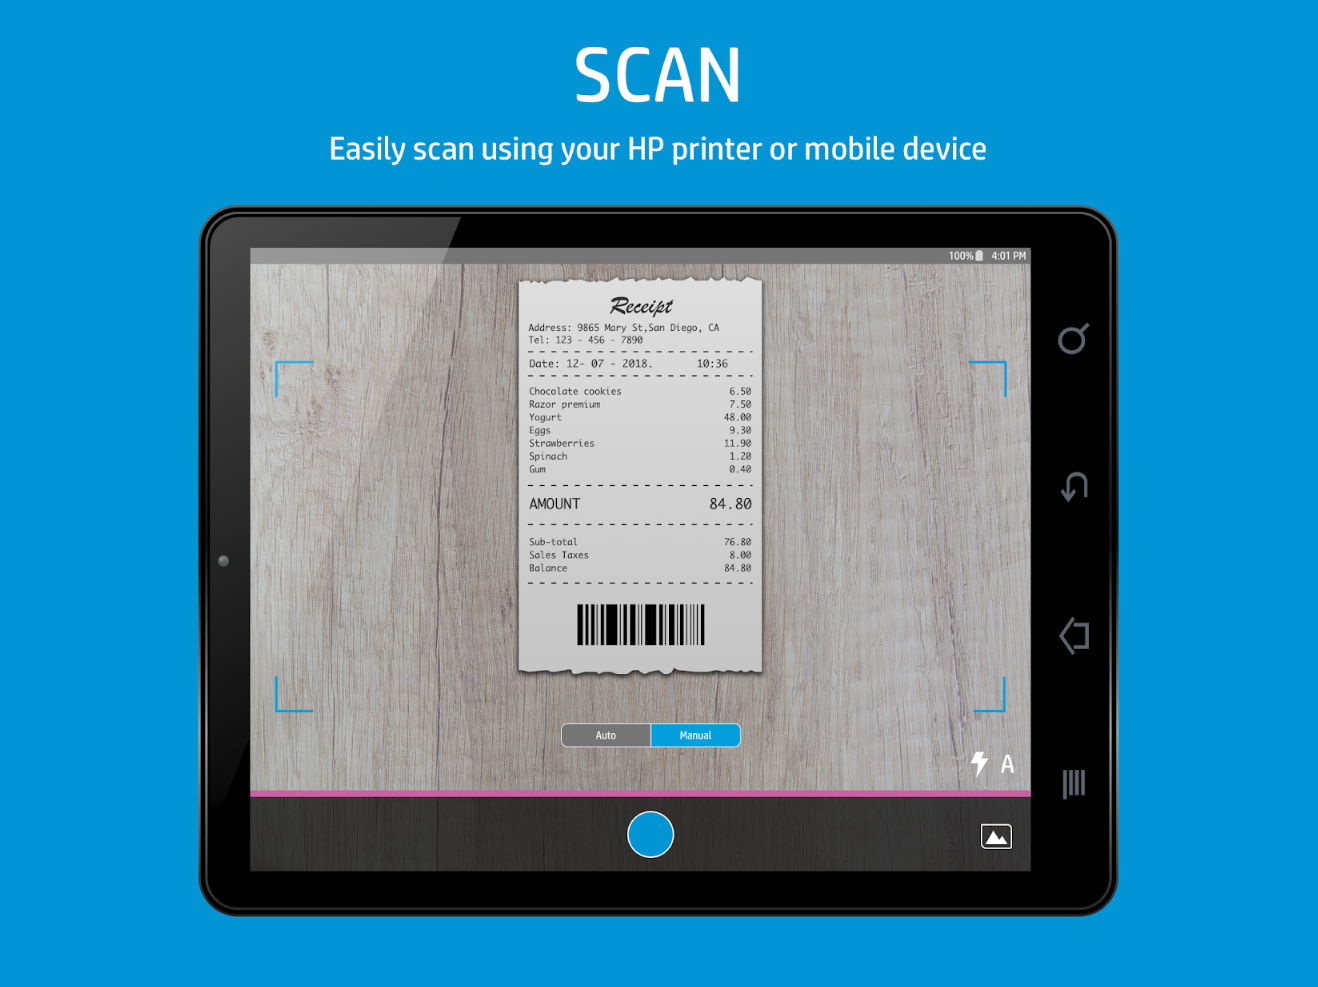
The second choice in our list is the HP Smart application. HP Smart is basically HP’s companion application for its printers. The reason to put it here in this list is that I am personally impressed by this app. Apart from all the printing options, it has a scan option. Tapping the scan option launches the camera. Users can manually scan a document or chose the auto scan option. After scanning the document, the application asks about the format of scanned documents. This is where users can select JPG or PDF format. It doesn’t offer any filters. It tries to keep the scanned documents as real as possible. The scanned documents can be emailed or shared via other mediums. HP Smart is also a completely free application.

Document Scanners for Android

#3. Adobe Scan

If you are a fan of PDFs, and you want all of your documents to be converted to PDFs after scanning this is the application you need. Adobe Scan, an official application by Adobe, is one of the best in business. Adobe has a name when it comes to PDFs. Whether you want to create, edit, or manage PDFs, you will find Adobe’s products topping the lists. Adobe Scan is also a very simple application with the least number of options. The application scans your document right when you open it. The scanned document can be cropped or rotated. There are 4 color options; Original Photo, Auto Color, Grayscale, and Whiteboard. The documents can be saved as PDF.

Document Scanners for Android

#4. Clear Scan

Clear Scan or ClearScanner falls at number 4 in our list. This application offers a Scanner having the OCR integration. OCR stands for optical character recognition. It can detect text in your documents and pull that text out for you to copy. Clear Scan can scan the existing images from your phone or scan new images using your phone’s camera. Color options in Clear Scan are limited. Overall, this is a light application built to serve its purpose well.

Document Scanners for Android

#5. Scanbot

Scanbot is an all-in-one scanning solution. It scans your documents to created PDFs and JPGs. Apart from this, it has a QR Code scanner, Bar code scanner, and OCR feature. Users can scan multiple pages and then create one PDF including all those pages. Scanbot also offers an automatic upload feature. It can upload the files to Dropbox, Google Drive, OneDrive, Box, and all other such drives. Scanbot is also one of the lightest scanners for Android.

Document Scanners for Android

#6. Fast Scanner

Fast Scanner, as its name suggests, is meant to quickly scan the documents. The app developers suggest this to be the fastest Android scanner. It’s a great tool to quickly transform your notes, receipts, invoices, business cards, whiteboards, and paper.s You can also extract the text out of papers. There are absolutely no limits in this application. Users can scan unlimited documents and create unlimited PDFs.

Document Scanners for Android

#7. Simple Scan

The idea of portable scanners gets a little better with the the Simple Scan app. This an application with zero complexity. It offers a handful of processing modes for the documents. It has the color, grayscale, or black and white formats options. There are 5 contrast levels for monochrome text in this app. It offers a really nice edge detection to to avoid quality loss. If you want to protect your documents with a password, this app will help you to add those passwords to the PDFs. Furthermore, it offers a custom page size i.e. A4, Legal, and Letter. Simple Scan, despite having the word simple in its name, offers a variety of options to make your document management easy.

Document Scanners for Android

#8. Tiny Scanner

Tiny Scanner is very similar to the Simple Scan applicatoin. It also has 3 color modes including grayscale, color, and black & white. It is also designed to perform a perfect edge detection. There are over 5 levels of contrast for monochrome here. The documents are sorted nicely in the list view or in the thumbnail view. Documents can be protected with a password. Tiny Scanner is designed to run quickly. This is the lightest portable scanner application for Android.

Document Scanners for Android

#9. Microsoft Office Lens

Office Lens is the Document Scanner by Microsoft. The application comes with some really interesting modes to enhance the documents. This application has a Whiteboard which straightens the documents, removes the glare and shadows. There is a document mode which is meant to make the documents readable. The business card mode can extract information from the business cards since it uses OCR. There is a photo mode which simply captures a document and uploads it to OneNote. Office Lens can link your scanned documents with other Microsoft tools like MS Word and Powerpoint. The edge detection in this application is impressive.

Document Scanners for Android

#10. WPS Office + PDF

WPS Office is a complete package for documents on your Android device. The WPS Office comes with a number of tools to compete the Microsoft Office. It integrates the Scanner and OCR too. It is a good tool to give your scanned documents a professional look. PDFs out of your scanned documents can be generated easily. The docs can be shared via email, WhatsApp, and can be uploaded to cloud storage too. If you are looking for an all in one package, you may consider getting the WPS Office.

Document Scanners for Android

Wrap Up

That’s all with the best free Document Scanners for Android. If you have anything to add to this list, feel free to drop it below. For any queries and suggestions, reach out to us via the comments section.

Check out: Best 10 Minute Mail Alternatives

Backup Text Messages to Gmail on Android

0
Backup Text Messages to Gmail on Android
Backup Text Messages to Gmai

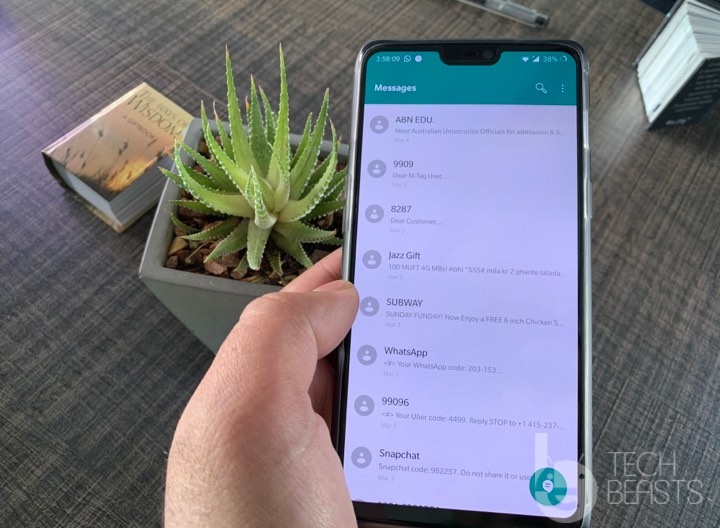
Backing up Text Messages on an Android phone is important to keep them safe. Especially, if you keep switching between phones every now and then, you must back up each and everything. There are ways to back up your contacts, call logs, media content, and even messages. Contacts can be easily backed up either in your phone or they can be synced with your Gmail (Google) account. When it comes to backing up your text messages and multimedia messages, the famous SMS backup apps create a backup on the local storage of your phone only. Backing up data on the local storage may not be viable as a mishap with your phone’s  storage will take the data away. If you are now looking for a way to back up text messages to Gmail on Android, then let me tell you that you can do it now. The steps in this guide will help you to backup Text Messages to Gmail on Android. For this purpose, we will use the SMS Backup+ application. Learn more about this app below before you follow the tutorial.

Backup Text Messages to Gmai

SMS Backup+

SMS Backup+ by Jan Berkel is a famous app. The app has over 5 Million downloads at the moment. This application is cool for a number of reasons. Not only it creates a backup file on the internal or external storage of your phone, but it can also back up all the messages to your Gmail account too. To do so, the application uses IMAP access to establish a connection with your Gmail account. Users can create a back up manually or they schedule the backups. The application will automatically upload all the messages to your Gmail. The messages are synced with the calendar linked with your Google account. Because of the calendar, it’s very easy to find any message through its date. When you switch a new device, all you have to do is to login into your same Gmail account. The messages will be automatically restored given that you have the SMS Backup+ application. It doesn’t restore the MMS at the moment, however, as long as the SMS messages are concerned, this app works great.

Apart from backing up the SMS Messages, it can also back up your call history. The call history and messages are the two basic things that you can ordinarily backup on your Google account. SMS Backup+ solves this problem to make your data more secure. If you are still confused why you should backup Text Messages to Gmail or backup your Call Logs to Gmail, then the detailed answer can be found below.

Why should you backup Text Messages to Gmail?

  • When you lose your Android phone, you will not lose the Gmail account. This will help you to backup messages.
  • Created a backup on SD card, but something has gone wrong with the sd card, now what? Don’t worry! you still have your messages on Gmail.
  • Having backed up messages on Gmail makes it easy to shift all messages to a new phone.
  • You don’t have to manually copy and paste the SMS backup files.
  • The messages are synced with the calendar, that means it’s easy to find messages based on the date.

How to Backup Text Messages to Gmail on Android

The IMAP access is enabled by default on a Gmail account. You don’t need to touch it. Just follow these steps to create a backup.

  1. Download and install SMS Backup+ application on your Android phone.
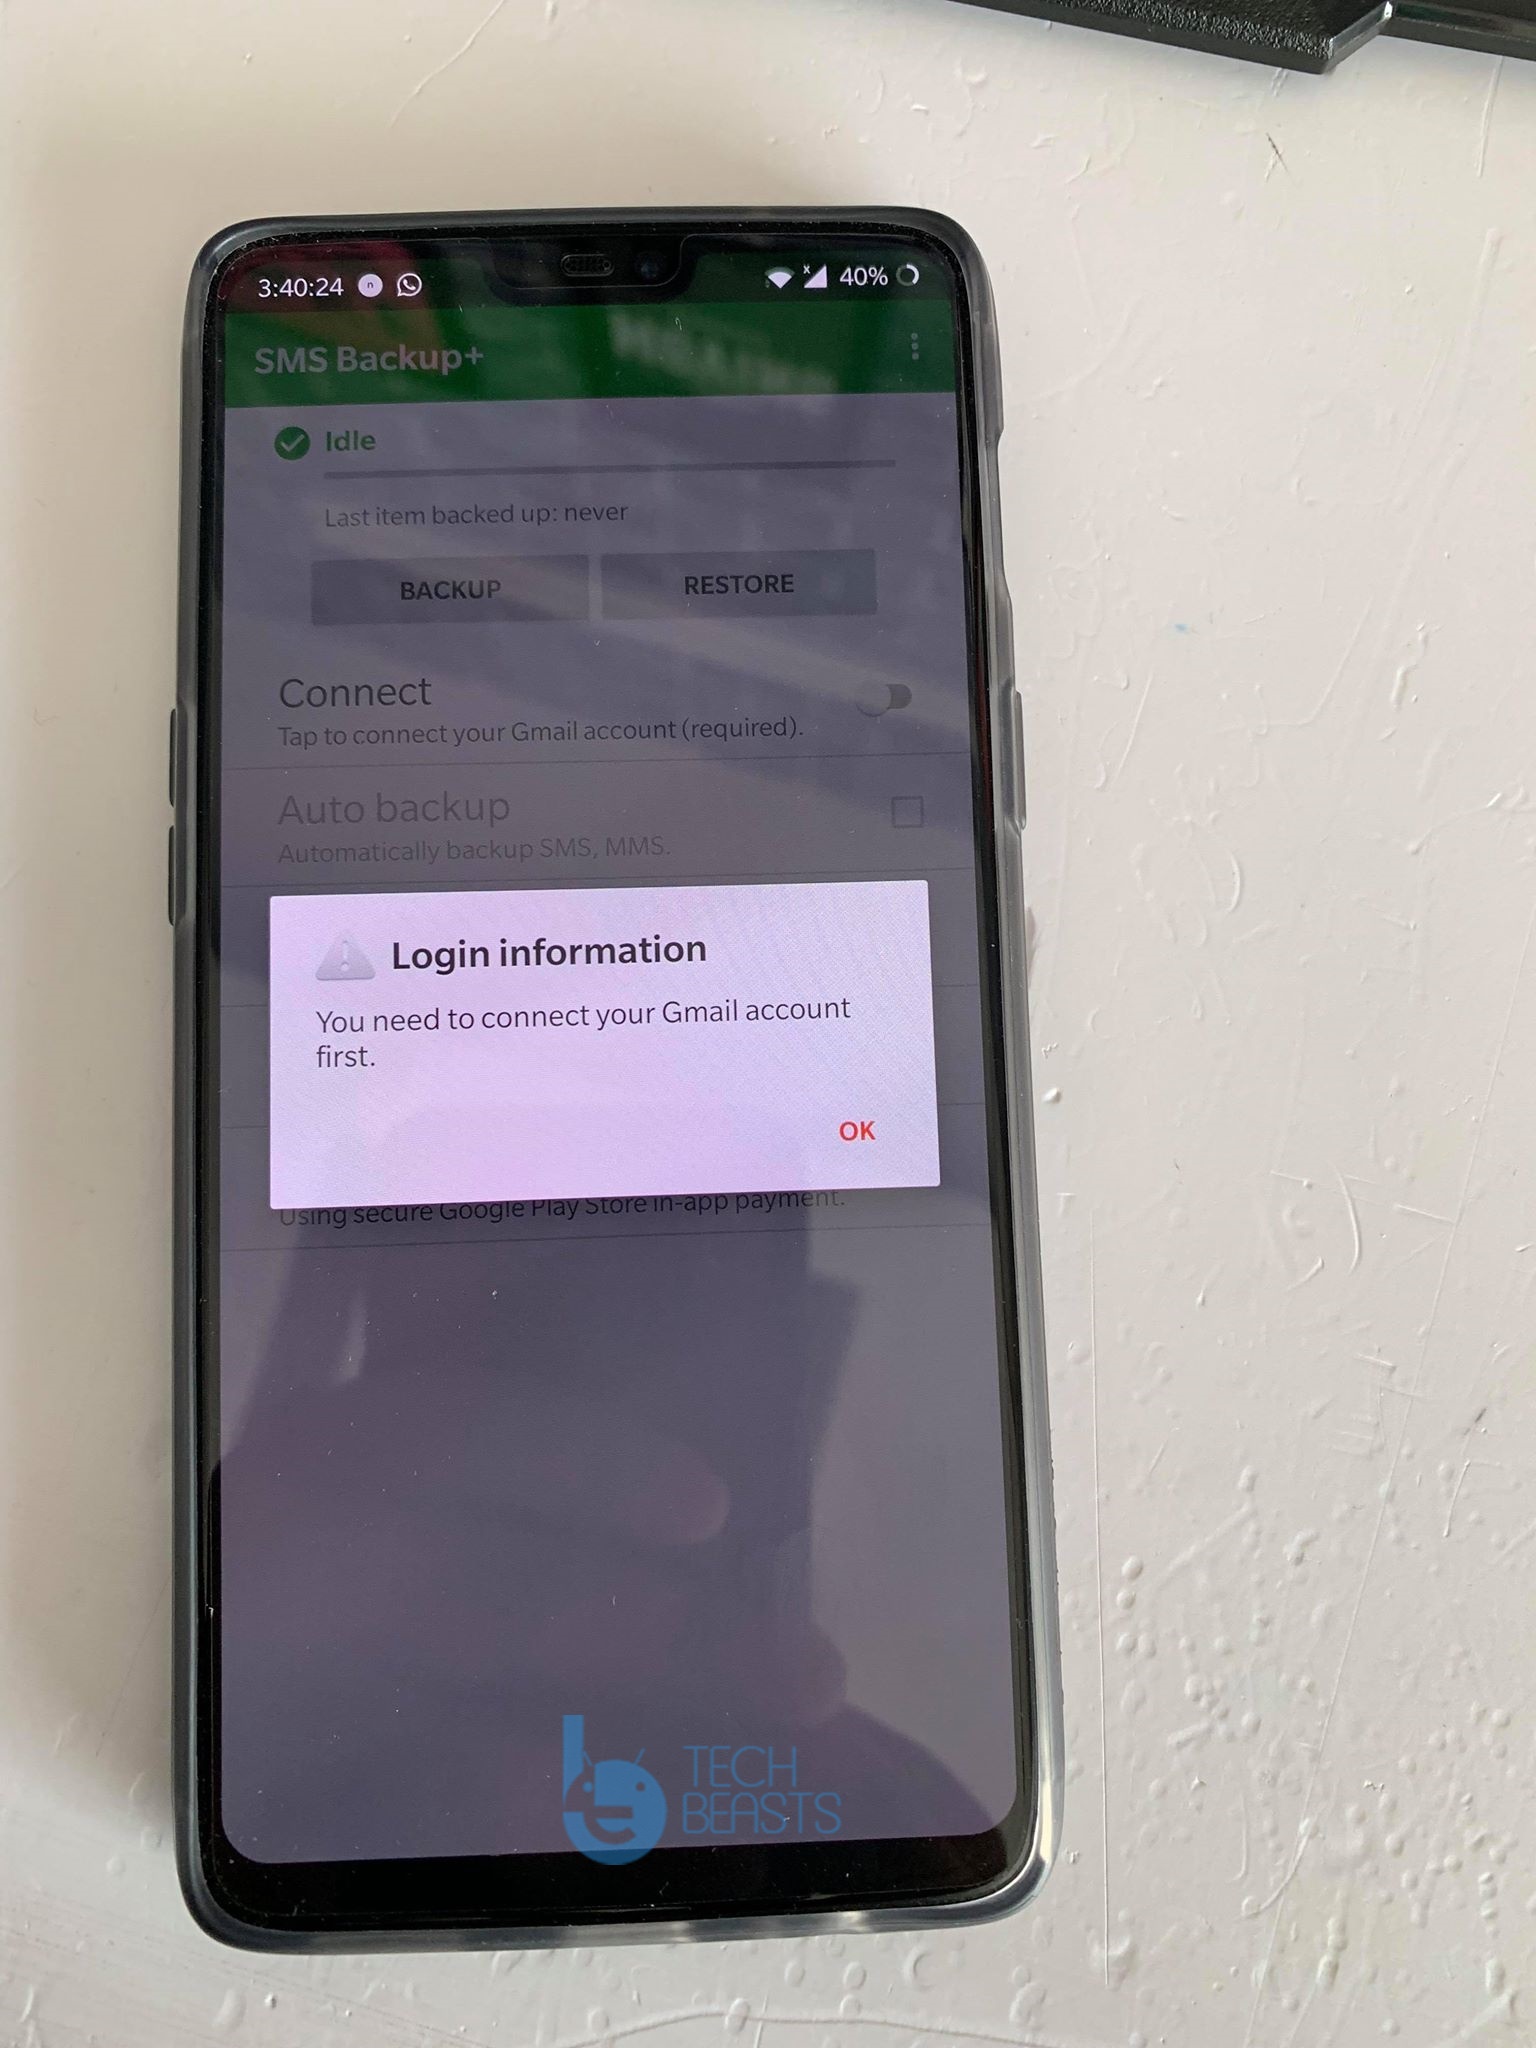
  2. Open the SMS Backup+ application now.
  3. In the application, click on the Radio button next to “Connect” to connect Gmail.
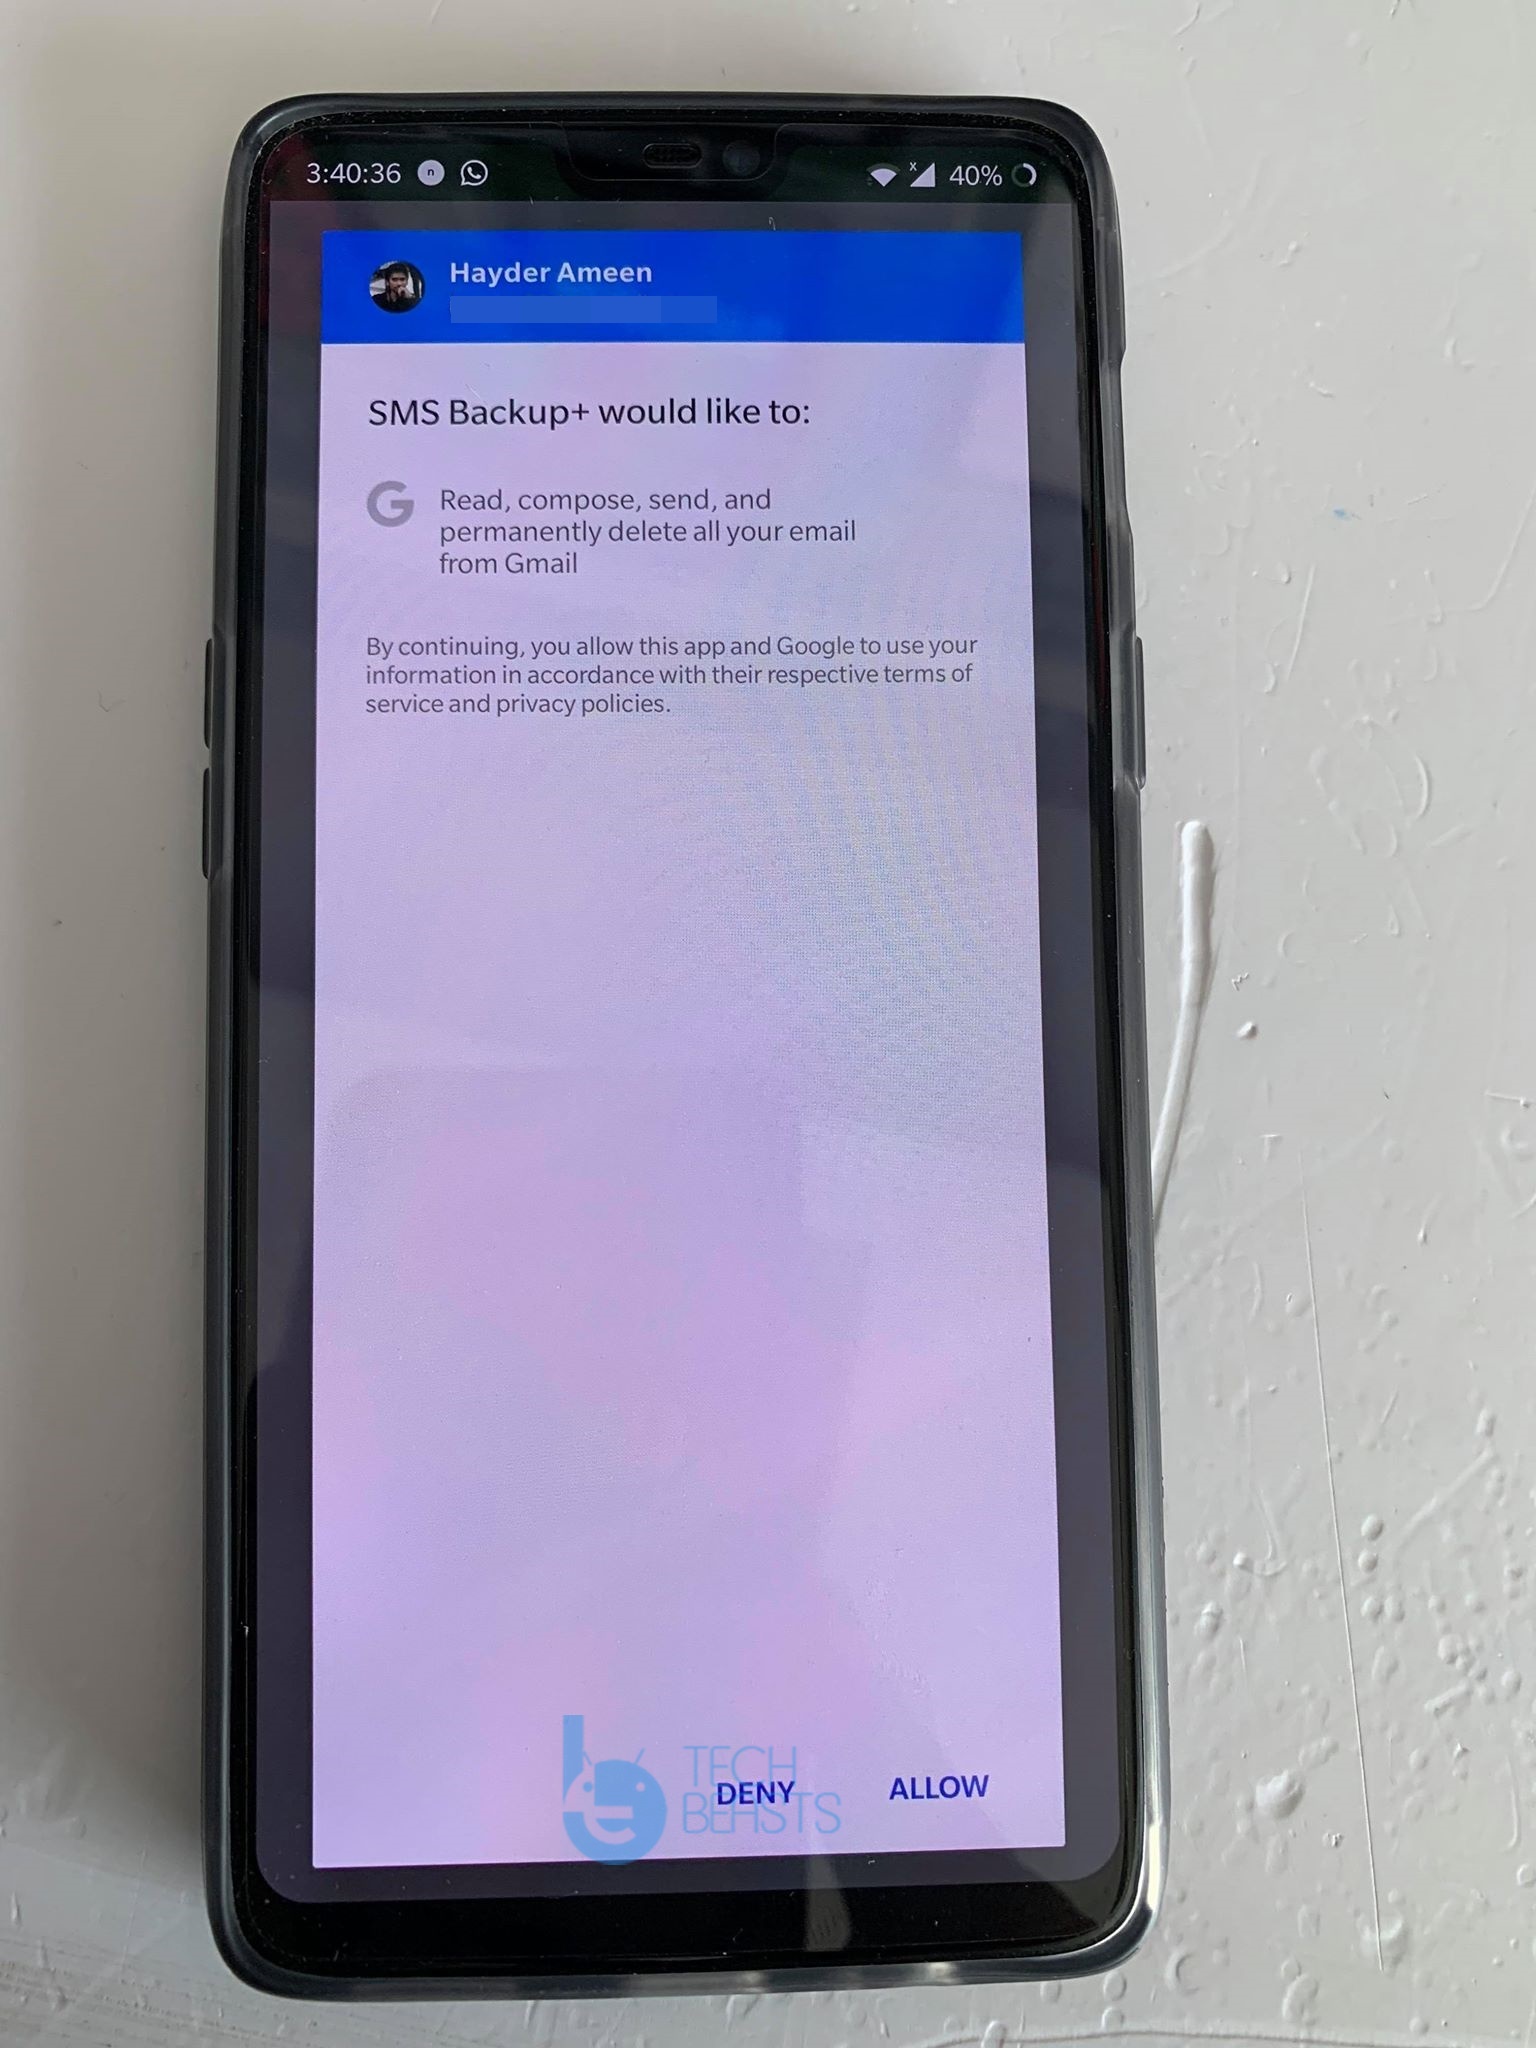
  4. The Gmail account will now ask for a few permissions, allow it immediately.
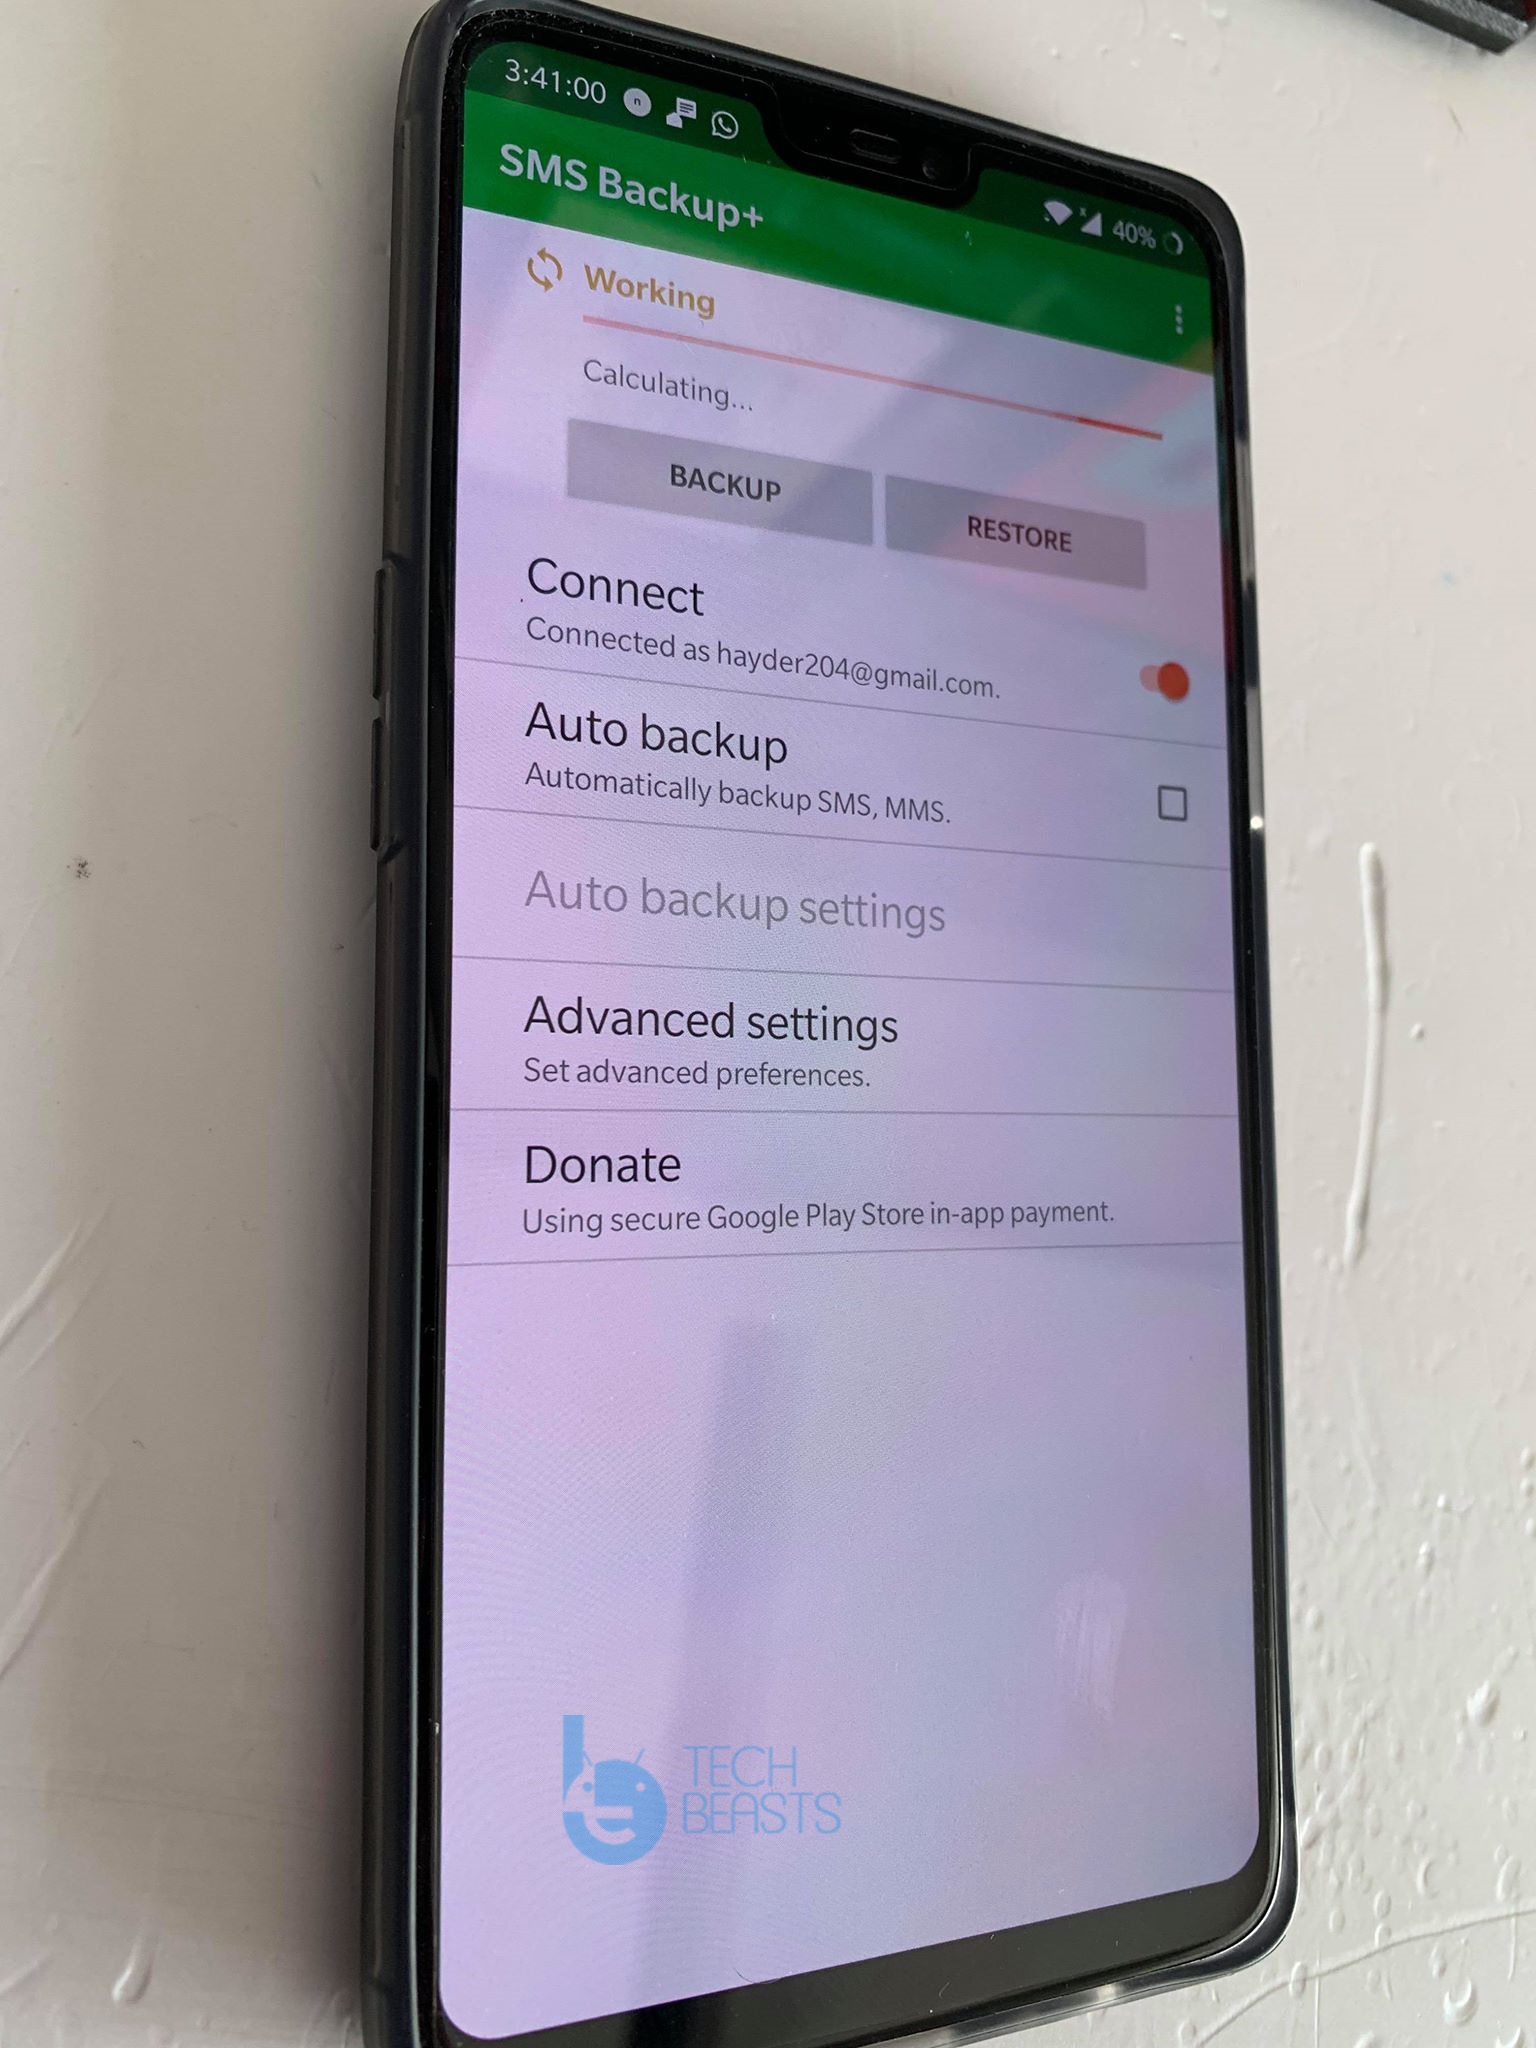
  5. After adding permissions, you will be back to the main menu in SMS Backup+.
  6. Click on the Backup button now.
  7. The backup will start and take a while to upload all messages to Gmail.
  8. If you want to create automatic backups, you can turn on Auto Backup option
  9. To restore the messages, simply click on the restore button.


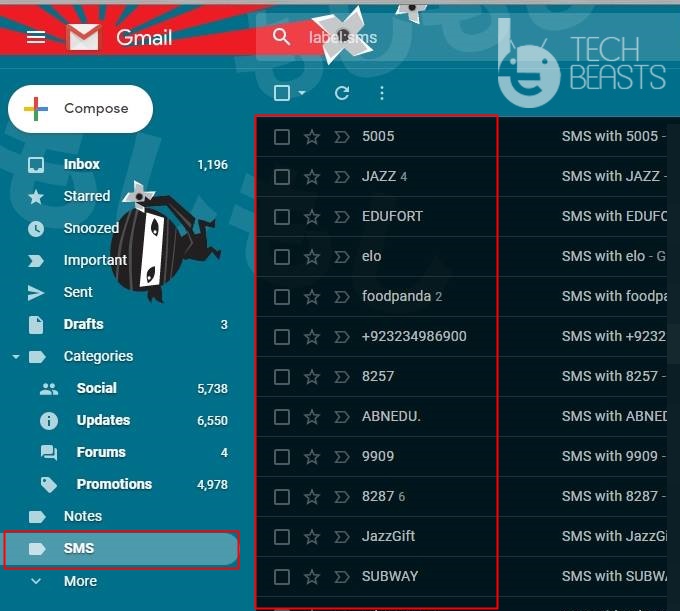
If you want to back up the call logs, you can go to Advanced settings and enable the backup for Call Logs. To manually find your messages in your Gmail account, open your Gmail account and find the “SMS” label, it should be on the right side on the desktop version of Gmail. This includes all of your SMS sorted by date.

Final Words

By now, you should have successfully backed up SMS Messages and Call Logs to your Gmail account. This is probably the best way to secure your data. If you have any questions related to this guide, feel free to drop them in the comments section below. I will try my best to get back to you as soon as possible.

More: 5 Best Texting Apps For Android

Fix battery drain issue after installing One UI update [ Galaxy S9, S9+, S8, S8+, Note 9 and Note 8 ]

0
Fix battery drain issue after installing One UI update [ Galaxy S9, S9+, S8, S8+, Note 9 and Note 8 ]

Today, I will help you Fix battery drain issue after installing One UI update. It seems after the latest OTA update of Samsung One UI, a number of users start complaining about battery rapidly draining problem. Although it was said, this latest update will bring a number of bug fixes. However, it is the other way around, it did fix some bugs but along with that comes a new issue.

Samsung has rolled out the Android 9 Pie update for all the flagship devices. You can now install Samsung One UI update on Galaxy S9/S9+, Note 9, Galaxy S8/S8+, and the Galaxy Note 8.

Now about the battery drain issue, it is affecting a lot of users but not everyone. However, we haven’t heard a word from Samsung officials, being said that, this issue is fixable. We’ve seen this same issues on many Android devices and also on iOS devices.

battery drain issue after installing One UI

There are some potential workarounds that will help you fix battery drain issue after installing One UI update. We’ve round them up below. Let’s jump right in.

Fix battery drain issue after installing One UI update:

Heed the instructions below and fix the battery drain issue on One UI update. Since there is no word from Samsung and it is not confirmed when they will roll out a patch update to fix it. We have to do it by ourselves.

Put high-battery using apps to sleep:

In the past, we have seen some culprit apps are the reason behind the battery drain problem. Sometimes a single or group of apps keep on running in the background and eat up all of your battery. Either you need to put them to sleep or uninstall them for good.

  • Head over to the Settings -> Device care. Tap on Battery, now give it a moment and check which app is eating up your battery more than the usual amount.
  • If there is an app, all you have to do is tap on the application -> Turn on the Put app to sleep option.
  • Moreover, if you are not down with that, you can always uninstall the app.

Check for the latest update:

Since the last update, you’ve installed ruined your device battery life. Maybe, there is another update rolled out but you didn’t get the notification. Give it a try to find out.

  • Open Settings -> Software Update -> Tap Download and install. If there is an update available for your device, automatically downloading will start.

Recalibrate the battery:

The battery needs to be recalibrated after the installation of new software on your phone. It works for us a number of times, so I am sure you should give it a try too.

  • First of all, you need to calibrate the battery of your phone. To do so, charge your phone up to 100% and remove the charging cable. Let your phone’s battery drain to 0 and only the put it back on charge. Charge it to 100% once again and let it drop to 0. Repeat the same cycle for 3-4 times and your phone’s battery will get calibrated.

Perform a factory data reset:

  1. Power down your phone completely.
  2. Now press and hold Volume Up + Bixby + Power button to turn it on.
  3. Your phone will take a while to boot up. As soon as it does and shows you the Samsung logo, let the keys go.
  4. Your phone will now load the recovery.
  5. Let the recovery load. Once done, you can operate the recovery mode freely using Volume Up, Down & Power keys.
  6. Once you are in recovery mode, navigate to the “wipe data/factory reset” using Volume Down key.
  7. Press the Power button to make a selection.
  8. In the next screen, highlight Yes and press the power button to perform a hard reset.

Install fresh stock firmware via a PC:

Use the following links to Install fresh stock firmware via a PC.

That’s all.

MX Player Pro APK 1.10.43 [ Latest Version 2019 ]

0
MX Player Pro APK 1.10.43 [ Latest Version 2019 ]

You can download the MX Player Pro APK 1.10.43 from this post. MX Player is the best Android Video Player and over the years they have done a very good job to stay at the top place. MX Player is not like all the other average players, you can do a lot more. You can watch the live streaming on MX Player all you have to do is add the stream URL and you are good to go.

Moreover, you can both offline and online videos on MX Player with tons of options to explore. Nowadays, everyone uses their smartphones to watch videos & movies. So if you want to watch movies online & offline, we would suggest you MX Player Pro.

Now you’ll be thinking about Pro? Yes MX Player has a free version and also they have a Pro version. If you think you are OK with the free version, head over to the Google Play and grab it. Use the following link to download the MX Player Free version.

MX Player
Price: Free

MX Player Pro APK

Why The Pro Version?

I totally agree with the fact that most Android users will go with the free version. Because everyone wants to make thing easier. However, if you can get a bit more without any effort, I think you should give it a try. Those who think free is the one for them, let me break it to you. In MX Player Free version you will see tons of advertisements.

To be very honest, advertisements are very vexatious and they ruin everything. So, MX Player Pro APk is good in every sense.

Download MX Player Pro Apk Latest Version for Android:

We are providing you the Ad-Free Version of MX Player. In this version, not only you will get tons of awesome features, but you will also get hardware acceleration and Subtitles support.

You can download MX Player Pro from Google Play Store, use the following link. Moreover, you can also download the MX Player Pro Apk from the following links.

MX Player Pro
Price: $5.99

MX Player Pro APK

We’ve tested this version and it 100% working, you won’t be facing any error of any kind. On the Web, you will find a number of MX Player Pro APK files but they are just the free version, I don’t like to do that, my team always test first and then we post it for our users.

App Info:

App Name MX Player Pro
File Type APK
Size 16MB
Version 1.10.43
Language English
Supported Devices Android 4.0+
Category Tools
Updated Feb 2019

Subtitle Formats Supported:

This is box title
DVD, DVB, SSA/ASS subtitle tracks.
SubStation Alpha(.ssa/.ass) with full styling.
SAMI(.smi) with Ruby tag support.
SubRip(.srt)
MicroDVD(.sub)
VobSub(.sub/.idx)
SubViewer2.0(.sub)
MPL2(.mpl)
TMPlayer(.txt)
Teletext
PJS(.pjs)
WebVTT(.vtt)

Install MX Player Pro Apk on your Android Device:

  • Download the MX Player Pro version from the given link above. Save it in the Root directory of your device.
  • Locate the file and tap on it to start the installation process. Make sure you’ve enabled the unknown sources.
Settings > security > unknown sources > allow them.
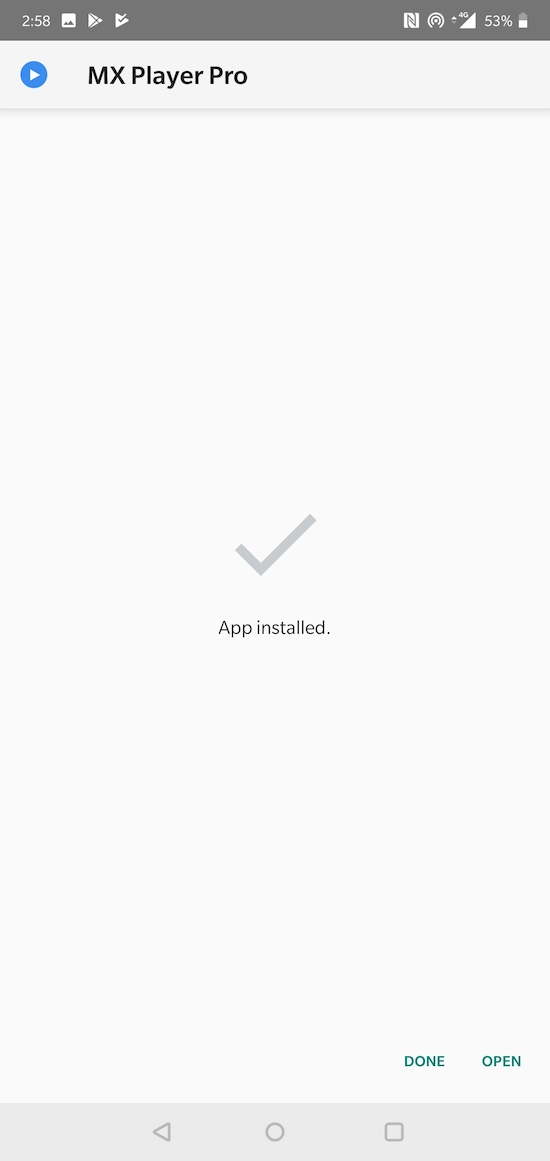
  • Tap on the Install button and wait for the installation process to get completed.

  • Once the app is installed, Tap on one to start using it. You can play any type of Video file. MX Player Pro supports a mostly all of the file formats.

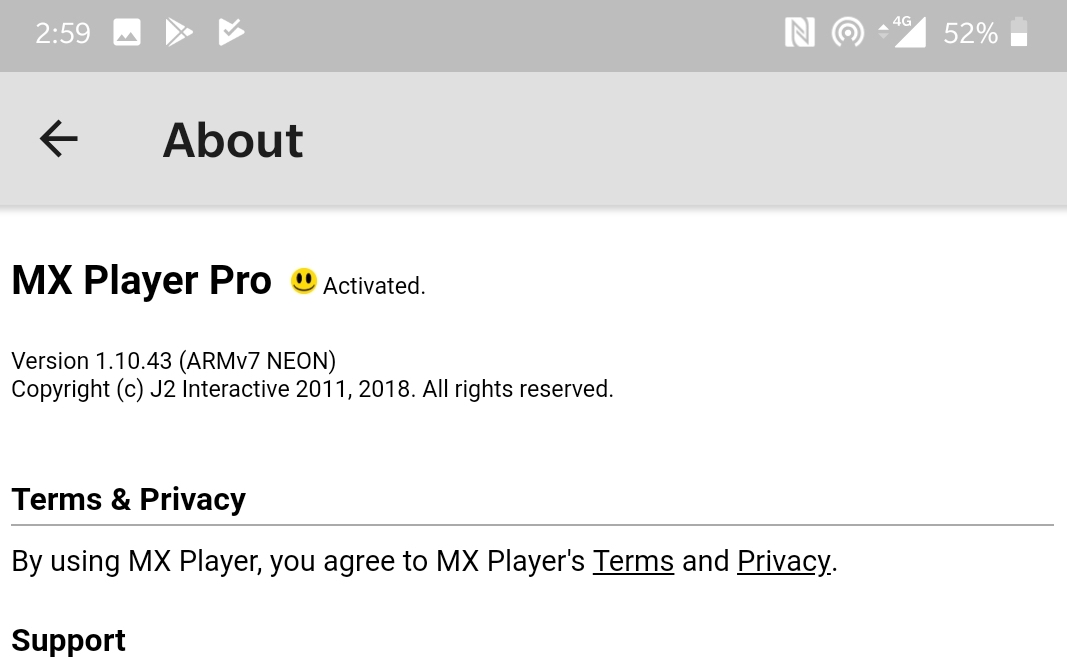
  • In order to check, if it is a Pro version or not. Open MX Player Pro, Tap on 3dots located on the top right corner of the screen -> Help -> About. You will see the following screen.

That’s all. If somehow you don’t seem to support this, you can always be head over to Google Play and purchase it.

Download WiFi Kill APK v2.3.2 | Latest Version 2019

0
Download WiFi Kill APK v2.3.2 | Latest Version 2019

Download the latest WiFi Kill APK v2.3.2 from here. Those who don’t know about the WiFi Kill, let me give you a quick overview before we move into more details. WiFi is the best source to get free internet nowadays, you can use your neighbor’s WiFi or you can go to a mall, Coffee Shop etc. But since it will be an open WiFi connection, you will see a crowd using it. Means you can get the best result and speed.

However, if you have the WiFi Kill on your Android device, you can solve this problem. WiFi Kill will help you cut all the other connection from the WiFi network you are using. No one can use the internet form that connection anymore, you will be the only one. This was the main introduction of WiFi Kill. If you want to know more about it and its features. Keep reading.

WiFi Kill APK:

WiFi Kill APK

About WiFi Kill:
WiFi Kill is the best Tool for Android devices when it comes to terminate all the other connection from a WiFi network. WiFi Kill can be put to test when you are using an open WiFi connection in public.

Note: WiFi Kill is not available on Google Play but you can download the WiFi Kill Pro version from Google Play. However, both apps are the same so you don’t need to download the pro version.

App Name WiFi Kill
File Type APK
Size 0.45MB
Version 2.3.2
Language English
Supported Devices Android 4.0+
Category Tools
Updated Feb 2019

Features:

  1. You can easily check on the user’s data, connected to the same network.
  2. With the help of WiFi Kill, you can easily remove all the users connected on your network.
  3. WiFi Kill is compatible with Android Tablets.
  4. Even a layman can use the WiFi Kill with ease.
  5. This app is completely free to use and you can easily install it on your Android device.

Screen Shots:

Download WiFi Kill:

Use the following link to directly download the latest version of WiFi Kill APk for your Android smartphones & tablets.


What’s New in v2.3.2?
Improved UI Speed.
Supported on all Android, windows and PC devices.
Fixed Bugs with WiFiKill APK downloader.


How to Install WIFI Kill APK:

Heed the instructions provided below in order to learn how to Install WiFi Kill on your Android, iOS & PC.

Install WiFi Kill on Android:

  • Download WiFi Kill from the link given above.
  • Copy the APK to your phone.
  • Open the File Manager on your phone and click on the copied APK.
  • If the APK asks for any permissions, allow it.
  • Complete the installation and launch it.

How To Install WiFi Kill on PC [ Windows & Mac ]

  • First, you need to download WiFi Kill app on your PC. Open NOX Player -> Click on Load APK -> Select the APK -> Click on Open.

Install WiFi Kill on an iOS device:

In order to download WiFi Kill on iOS devices, you need to Jailbreak your iPhone, iPad or iPod Touch. After that, you need to install Cydia on your device. Once you are done with these, follow the instructions provided below.

  • Add this repo to Cydia [ http://extigy.github.io/repo/ ]
  • Now you need to install netKillUIbeta in Cydia.
  • Once done, install the app.

That’s all.

How to take screenshot on LG G7 ThinQ

0
How to take screenshot on LG G7 ThinQ

In this quick guide, you will learn how to take screenshot on LG G7 ThinQ. Most of you now know this but there are some who are new to LG G7 ThinQ. They need to know how can you take screenshots on LG G7 ThinQ. We’ll tell you all the methods in this post.

LG G7 ThinQ Specs:

The LG G7 ThinQ flaunts a 6.1-inch display. This display has a resolution of 1440 x 3120 pixels and its PPI is 564. Corning Gorilla Glass 5 is all over the display. LG has utilized the Dolby Vision on this phone. It does have the Always-on-display as well. The latest Qualcomm Snapdragon 845 CPU is powering up this phone. Adreno 630 GPU is also there. There are two variants of the G7. You can get the 128GB and 6GB variant or the 64GB and 4GB.

LG G7 has a dual camera setup at its back. The dual setup contains 16MP+16MP shooters. On the front, there is an 8MP camera. This phone has a 3000 mAh battery which is quite low for a flagship device of this caliber. The LG G7 ThinQ runs on Android 8.0 Oreo out of the box. LG has already announced its plans to upgrade the G7 ThinQ to Android P as soon as it comes out.

screenshot LG G7 ThinQ

Read more:

How to take screenshot on LG G7 ThinQ:

You can take screenshots on LG G7 ThinQ through two methods. Both of them are mentioned below. After taking a screenshot you will be able to edit it and all of your screenshots will be saved in your gallery.

How to screenshot on LG:

Method1:

  • Open the Screen of which you want to take the screenshot.
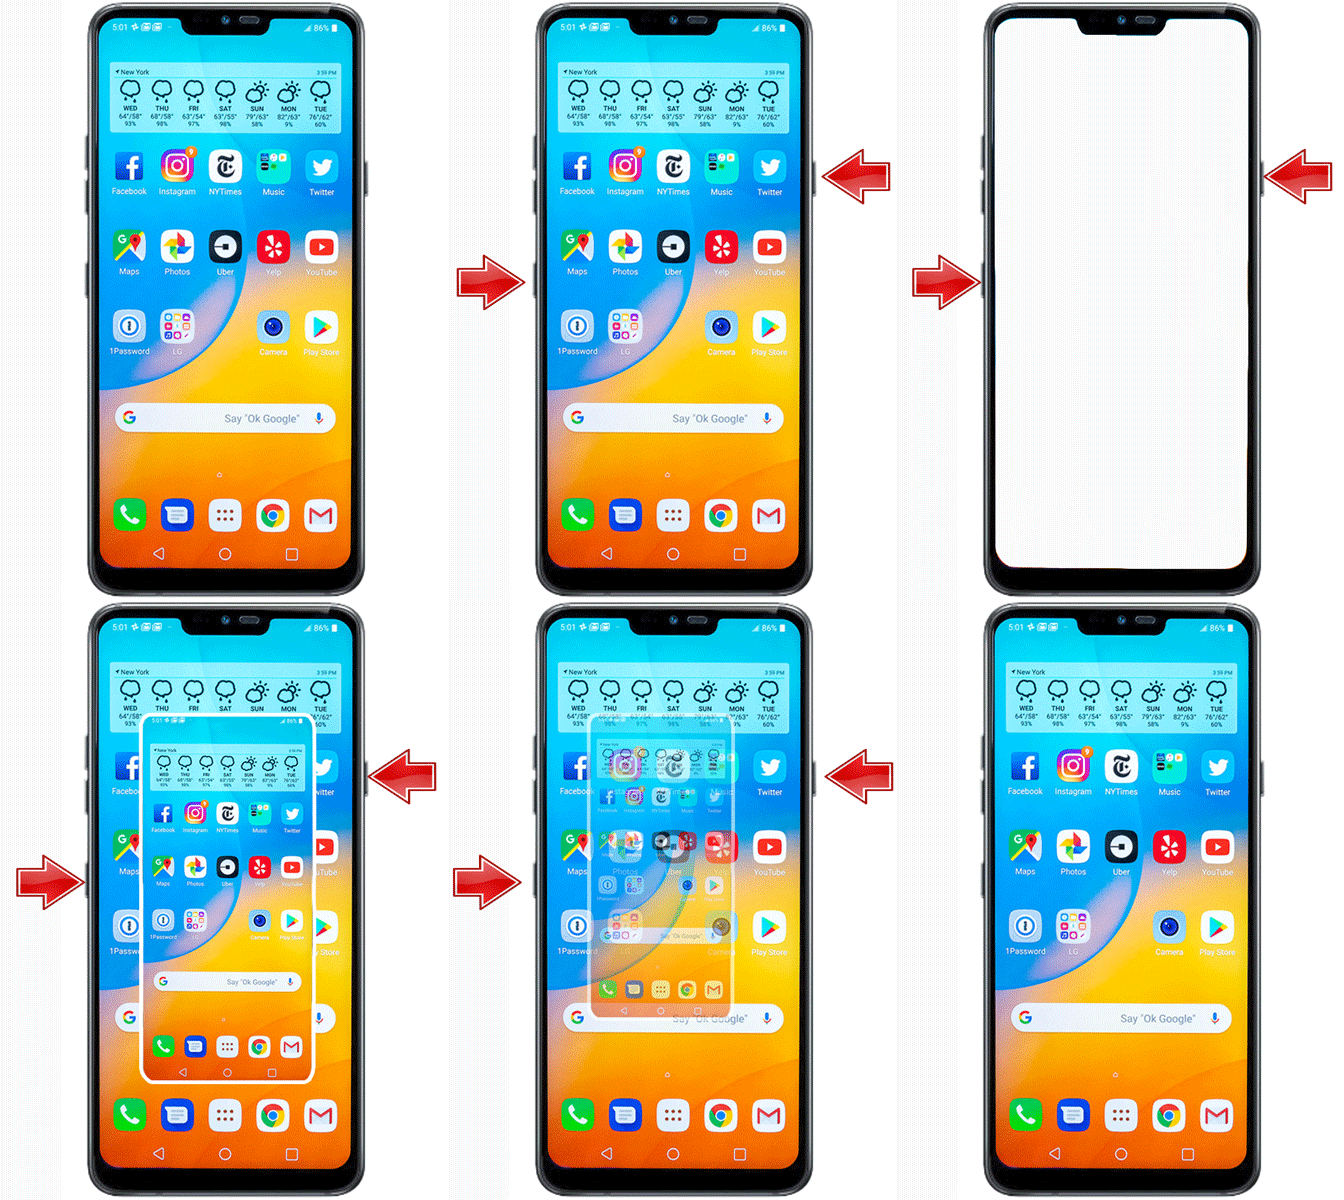
  • In order to take a screenshot, Press & Hold Power and Volume Down Button together. You can see the process in the following GIF.

  • You will hear a splash and your screenshot will be saved in the gallery. Open up the gallery app and you do as you please.

Method2:

  • Open the screen of which you want to take the screenshot.
  • Drag the notification bar down and Tap on the Screenshot+ button.
  • You will hear the splash sound and your screenshot will be saved in your LG G7 ThinQ Gallery.

That’s all.

Fix Huawei Nova 3 Black Screen of Death Issue

0
Fix Huawei Nova 3 Black Screen of Death Issue

With the help of this guide, you will be able to Fix Huawei Nova 3 Black Screen of Death Issue. We all are well aware of the Black Screen of Death issue in Android devices. If you want to see how many devices we have covered on this specific issue, Click Here.

There are a number of factors which are the reason behind the Nova 3 Black Screen of Death Issue. But among all of them, there is one which is the most common. Over the years, seeing this issue in many devices, system crash stand accused of it. This is why you Face Black Screen of Death Issue on your Android devices. However, we are not saying, it is the one and only reason. There are many, Well it doesn’t matter how many of them.

What matter is, how you can Fix all of them. In the following guide, we’ll give all the possible workarounds to Fix Huawei Nova 3 Black Screen of Death Issue. In the past, we used these same solutions for mostly all of our devices and the results were quite good. Let’s get started.

Huawei Nova 3 Black Screen of Death Issue

Fix Huawei Nova 3 Black Screen of Death Issue:

Those who are wondering what is the Black Screen of Death Issue?. Black Screen of Death Issue is, Whenever your screen is not responding or it does not work. Before we move on, let me remind you of one thing. If your screen device is not responding after you dropped your device. It is because of some hardware is damaged, the best solution for this situation is to head over to the Samsung service center.

However, this just happens randomly, it’s because of some software glitch. Heed the instructions below and you will be able to Fix Huawei Nova 3 Black Screen of Death Issue.

Fully charge the phone battery:

It happens, sometimes our battery is drained and because of that our device is not responding. Moreover, if this is the case, your device will not turn on either. Before you figure out anything else, you need to make sure your device battery is fully charged.

  • First, you need to make sure there is no dirt in the charging port. Use can of compressed air and remove any dirt or debris.
  • Use the original charger which came with the box, also use the original USB cable. To make sure, both of these are in working condition. Use it on another device.
  • If you are having no luck with the charger, try charging your device from a computer.
  • Once your device battery is fully charged, try turning on your device.

Soft Reset:

  • Turn off your device by holding down the power button for a few seconds. You will be provided with two option, Restart or Turn Off. Tap on restart.

Start the phone in Safe Mode:

This solution has worked for many, you need to boot your device into Safe Mode. Once you are running your device in Safe Mode, all of your third-party apps will be disabled. Sometimes a third-party app is causing Black Screen of Death Issue. So, by booting into Safe Mode help you find that app.

  • First, Turn off your device by holding down the power button. After that, Turn on your device and when you see the Huawei logo on the screen. Immediately press and hold the Volume down key.
  • You need to Keep holding the volume key until your device completely boots up. Once your device boots up, you will see “Safe mode” at the bottom of your screen.

If your device works perfectly in Safe Mode. Then it is confirmed that a third-party or a group of third-party apps were behind all this fuss. Eliminate such apps and you are good to go.

Wipe the cache partition:

  • Turn off your device, Press & Hold the Volume Up Key. After that, connect the USB charger.
  • After a few seconds, your device will be into recovery mode.
  • Once you are in recovery mode, remove the charger.
  • In order to navigate in recovery mode, use the volume keys. Upon highlighting ‘wipe cache partition’, press the power key to select it. Once the process is finished, reboot the system.

Perform a factory reset:

  • Turn off your device, Press & Hold the Volume Up Key. After that, connect the USB charger.
  • After a few seconds, your device will be into recovery mode.
  • Once you are in recovery mode, remove the charger.
  • In order to navigate in recovery mode, use the volume keys. Upon highlighting wipe cache/factory reset, press the power key to select it. Once the process is finished, reboot the system.

That’s all. This is how you will be able to Fix Huawei Nova 3 Black Screen of Death Issue.

iPhone XS Max WiFi and LTE problems – How to fix

1
iPhone XS Max WiFi and LTE problems – How to fix
iPhone XS Max - Picture: MacRumors

iPhone XS Max is the latest and greatest device by Apple. The iPhone XS Max was the superior most phone in the iPhone XS trio. This device, because of its premium build and industry-altering design, has attracted masses. I also switched from Android to the iPhone XS Max after being mesmerized by this device. After using the iPhone XS Max for a while, I noted that there is something wrong with the phone’s WiFi. Not only WiFi, but things also went wrong with the LTE as well. I looked up the internet and found that it was a widespread issue. Everything was going good for the iPhone XS Max owners unless they came across the WiFi and LTE issues. This guide puts forward the solutions to fix iPhone XS Max WiFi and LTE problems. After following a few easy steps given here, you should be able to fix all iPhone XS Max WiFi and LTE problems. Before diving into the solutions, let us add more to our knowledge.

iPhone XS Max WiFi and LTE problems
The iPhone XS Max – Picture: MacRumors

iPhone XS Max

iPhone XS Max was released in September 2018. This phone has a 6.5-inch Super AMOLED display. iPhone XS Max’s screen is built by Samsung. The screen has s notch in the middle holding the front camera sensor. The display ratio is 19:9 while the resolution is QHD. This phone is powered by Apple’s A12 Bionic 7nm processor. This is the world’s most powerful processor for a smartphone. iPhone XS Max has a RAM of 4GB. The internal storage options are 64GB, 256GB, and 512GB.

As far as the cameras are concerned, the iPhone XS Max has 2 of them at the back. It has a 12MP wide shooter and a 12MP telephoto shooter. On the front, it has a single 8MP shooter.

iPhone XS Max has a battery of 3174 mAh. It comes with a 5W charger which takes a whole night to charge your phone. There is no headphone jack which means you have to rely on Bluetooth headphones. The iPhone XS Max comes in Space Gray, Silver, and Gold colors.

iPhone XS Max WiFi and LTE Connectivity Issues

If you don’t already know what problems the iPhone XS Max owners are facing with the WiFi and LTE, then here’s the answer. The WiFi on the phone sometimes shows a poor signal strength even when the router is nearby. It also fails to make the internet work on the phone. The WiFi stops working on its own and the users get a message about weak signal strength or checking their internet connection. Incredibly slow internet is what pushed the iPhone XS Max to final speak their heart out.

Now that the WiFi is already causing a lot of problems, it also affects the LTE. The WiFi doesn’t automatically switch to the LTE. Users have to manually turn off WiFi and turn the LTE on. The LTE at times stops responding. The phone shows the LTE icon, but it fails to load anything on the internet. iPhone XS Max owners have been restarting the phone or putting it in flight mode to make the LTE work.

iPhone XS Max owners took this issue to Reddit, but to no use. Users at Reddit expected such issues to be software related expecting a quick fix from Apple.

To date, the issues haven’t been fixed. iPhone XS Max is still suffering from those WiFi and LTE connectivity issues. The users who have been able to fix this, they wrote about their experience in different forums. The solutions suggested by other iPhone XS Max owners are the only way to fix the problems. I also successfully fixed the WiFi and LTE on my iPhone XS Max and I’m going to list down what I did. Take a look at the steps coming up next.

Fix iPhone XS Max WiFi and LTE problems

Reset Network Settings

  1. On your iPhone XS Max, open Settings.
  2. In Settings > General > Reset > Reset Network Settings.
  3.  Now enter your screen passcode.
  4. Click on Reset Network Settings once again.
  5. Your phone will restart automatically now.

This will completely forget the existing WiFi on your phone. To connect to the WiFi, open settings and go to WiFi > Select your Network and enter its password. Use the iPhone for a while now and it shouldn’t be having those problems anymore.

This will also fix the LTE problems as it completely refreshes the Network settings.

Check for latest updates

The solution given above will most likely work for you, but if it has failed to work, you may check for the latest software update. Apple keeps releasing software updates to fix potential issues. You can go to Settings > General > Software Update. If there is an update available, install it and restart your phone after that. You may reset network settings after installing a new software update.

Check your WiFi router

The problem doesn’t necessarily have to be with your phone. Your WiFi router can also be a culprit. Try connecting the same internet on another device. If the other device also faces similar internet connectivity problems, you may check your router. If the router is working fine, you may contact your ISP to sort out the ongoing issues.

Perform a factory reset

This should be your last option before taking your iPhone XS Max to the service center. If none of the solutions above have worked for you, go ahead and perform a factory reset on your phone. To do so, Open Settings > General > Reset > Reset All Settings. Your phone will restart on its own after this. Connect to the internet afterwards and see if the WiFi doesn’t act up anymore.

Take your phone to the Apple Service Center

Assuming that the solutions turned out to be useless, it’s time to go a step ahead and contact Apple’s service center. If your phone is still under warranty, you can ask them for a replacement. Apple’s responsibility is to find the problem in your device and either fix it or replace the phone. You will probably get an iPhone XS Max with a faultless WiFI now.

Wrap Up

Hopefully, you have fixed the WiFi and LTE issues on your iPhone XS Max. If you are facing any further problems on your phone, feel free to reach out to us. We will try our best to get back to you as soon as possible.

Fix One UI Battery Drain Issue Galaxy S8/S8 Plus/S9/S9 Plus/Note 8/9

1
Fix One UI Battery Drain Issue Galaxy S8/S8 Plus/S9/S9 Plus/Note 8/9

One UI is Samsung’s latest UI for its Galaxy smartphones. The One UI rolled out with the Android 9 Pie update. Galaxy S9 series was the first to get this update. Later on Samsung updated the Galaxy Note 9, Note 8, and S9 series as well. At the moment, the flagship devices of 2017 and 2018 are running on Android Pie with One UI. It looks like the One UI did not bode well for the South Korean giant. The One UI frustrated the users when the noted the battery percentage dropping quickly. Samsung Galaxy S8/S8 Plus/S9/S9 Plus/Note 8/9 owners reported battery drain issues on One UI. The battery drain issue frustrated the users so much that some even decided to say goodbye to Samsung. A few users considered downgrading to Android Oreo while the rest start looking for a fix. If you own one of these devices and you are on this page at the moment, I assume that you are here to find a fix. Let me tell you that you have found the right place. After following the steps given in this guide, you will fix One UI Battery Drain issue on Galaxy S8/S8 Plus/S9/S9 Plus/Note 8/9.

Fix One UI Battery Drain Issue

Before fixing One UI Battery Drain problems, let me give you a flashback of the One UI update.

Samsung One UI

Samsung released the One UI as a replacement of the Samsung Experience
UI. The One UI update is a part of the Android Pie update. All the Samsung phones that will get Android Pie, they will get the One UI update too.

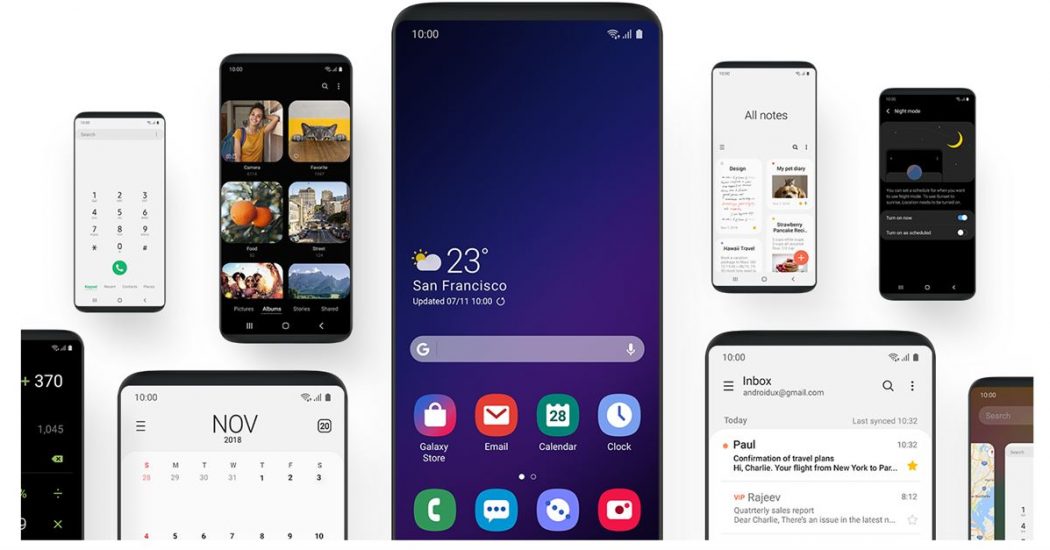
One UI is inspired by the latest UI changes made by Google in the Android Pie. The new interface brings rounded icons, rounded elements, and rounded menus. Samsung has tried to make One UI update friendly for the users who prefer using the phone with one hand. The one-handed operations have been made easy because of the placement of elements in this update.

The One UI for Samsung brings new icons for all apps. It brings new UI for settings app. Samsung has added new headers to almost all of its stock applicatoins. It also adds new icons to the quick toggles. The status bar is new as well.

Samsung One UI

The location of clock and date from the status bar has changed now. You will find this information on the left side. Another change in this update is the displacement of some options under the Settings app.

The prominent new features include Adaptive battery, Dark Mode aka Night Mode, Native Private DNS support, Dex support without Dex pad etc.

As of today, this update has rolled out for the Samsung Galaxy S9 & S9 Plus, Samsung Galaxy S8 and S8 Plus, Samsung Galaxy Note 8 and Note 9.

While a new firmware is supposed to improve things, the One UI has gone on the opposite side. Those of you looking for a fix to One UI Battery drain issues can now follow this guide to fix the problems right away.

One UI Battery Drain Issue Galaxy S8/S8 Plus/S9/S9 Plus/Note 8/9

These are the few simple steps to fix One UI Battery Drain issue on the Galaxy S8, Galaxy S9, Galaxy Note 8, and Galaxy Note 9.

Total Time: 5 minutes

Power down your Samsung phone.

First of all, turn off your Samsung phone. Press the power key for about 5 seconds to do so.

Boot your Galaxy handset into recovery mode.

While the phone is off, press and hold Volume Up + Bixby + Power button to get into the recovery. As you see the recovery, let the keys go.

Clear the Cache of your phone now.

In the recovery, use volume down key to highlight “Wipe cache partition”. Press power key to wipe the cache partition now. After this, reboot your phone.

Open Dialier on your phone and dial *#0228# to calibrate battery.

This will open Advanced Battery setup on your phone. On this screen, you will all the details of the battery.

Press Quick Start button to calibrate the battery.

At the bottom, you will find “Quick Start” button to start the calibration. Press the button and then press on Yes after it shows a warning.

Reboot the phone now.

After you have calibrated the battery from the Advanced battery setup, reboot your phone.

Let your phone discharge to 0, charge back to 100, repeat this cycle for 3 times.

Now after the phone boots up, do not charge it. Let the battery discharge to 0. Once the phone goes dead, charge it to 100% without any break. Use the phone and let the battery get empty once again. Charge to 100% once again. Repeat this for 3 times and then charge your phone as you do in routine. That’s all. The battery has been calibrated now.

Wrap Up

Your Galaxy S8, S9, Note 8, or Note 9’s battery has been calibrated now. In case you are thinking what that Quick Start button did, it basically deletes the battery.stats file of your phone. The battery.stats file keeps a record of your phone’s battery activity. At one point, the phone adapts the battery behavior from the battery stats file. This is why its important to delete this file by opening the Advanced Battery settings. Hopefully, your phone’s battery will be working great on the latest Samsung One UI now. Now that your Samsung One UI battery drain issues have been fixed, don’t forget to drop the feedback below. If you have any further problems and you want us to provide you with a solution, feel free to reach out to us.

Download Fouad WhatsApp APK v8.0 – Latest 2019

0
Download Fouad WhatsApp APK v8.0 – Latest 2019

Download Fouad WhatsApp APK v8.0. Here we are providing you with the latest version of Fouad WhatsApp APK. If you want to run multiple WhatsApp accounts on Android, you can find a lot of Modded WhatsApp apps, but not every one of them gives you what you want. We have tried a lot of such apps and among them, there is an app called Fouad WhatsApp. A perfect app designed for one specific purpose, Run multiple WhatsApp accounts on Android.

In this post, we are providing you with the latest version of Fouad WhatsApp APK v8.0. If you have used GBWhatsApp then you will love Fouad WhatsApp. This works like GBWhatsApp but in terms of smooth experience, Fouad WhatsApp is far better than GBWhatsApp.

Fouad WhatsApp provides a lot more than GBWhatsApp, It has a beautiful material design. Moreover, Fouad WhatsApp offers more depth customization when it comes to chat lock and privacy settings. All the main features of Fouad WhatsApp are listed below.

Fouad WhatsApp APK
Download Fouad WhatsApp APK v8.0

Fouad WhatsApp APK Features:

Following are the Premium features of Fouad WhatsApp and after that the latest features of Fouad WhatsApp APK v8.0 Update.

Premium features:

  • Change tick styles and app launch icon (lot of options)
  • Filters for Images and Videos
  • Material UI with Special Calling UI
  • Font Style Change with Font Preview
  • Send any file type
  • Install external themes from file manager (XML)

latest features of Fouad WhatsApp v8.0: [ New ]


Version Info

App NameFouad WhatsApp APK
Last UpdatedSeptember, 2019
Android Version RequiresAndroid 4.0+
Package Namecom.WhatsApp2Plus
Main TaskWhatsapp Features + Some extra hidden features.

Fouad WhatsApp APK v8.0 ScreenShots:

Download Fouad WhatsApp Last Version 8.0 for Android:

  1. First, Download  APK and copy it to your phone.
  2. On your phone, go to Settings > Lock Screen & Security or Security Settings > Unknown Sources > Tap the radio button or checkbox to allow it.
  3. Now using a file manager, locate the Fouad WhatsApp and open it.
  4. Install the APK by following the on-screen instructions.
  5. Once installed, open the newly installed Fouad WhatsApp app from all apps or app drawer.
  6. Now all you have to do is configure the Fouad WhatsApp same as you have done with the official WhatsApp.

That’s all.

See More:

How to enable Dark Mode in FB Messenger on Android/iPhone

0
How to enable Dark Mode in FB Messenger on Android/iPhone

Latest Messenger update is hitting Android and iPhone devices around the world today. It contains a major easter egg. The Dark Mode. This is year 2019 and everyone is going crazy for the Dark Mode. OS Level implementation is now getting more and more common. Latest adopter is Facebook’s messenger. The dark mode in FB messenger is now live. However, you cannot see it inside settings yet. It is unlocked like an easter egg. In this guide, learn how to unlock the hidden dark mode in FB Messenger on both Android and iPhone.

What does Messenger Dark Mode look like?

In the beta phase, FB claims that it does not cover entire app yet. However, in our experience it seems pretty promising. However, there are still some nooks and crannies that need to get better. The dark mode is supposed to be easy on eyes. It is especially designed for use in dark rooms or low-light areas. Enable the dark mode at night when using Messenger to chat. The regular light theme is way too bright and it can really put stress on the eyes.

However, we do not advise using dark mode in bright or well-lit environment. In that case, the dark mode is taxing for the eyes. It is meant to be used only when using phone in a dark room or very low-lit environment.

Below are some screenshots of current dark mode of Messenger App on Android and iPhone both.

How to unlock FB Messenger hidden Dark Mode on iPhone

Before continuing, make sure that the version of messenger installed on your iPhone is from Feb 2019 or later. This update is included in latest update. Now just follow the steps below.

Follow the steps to enable hidden dark mode on FB Messenger in iPhone.

Total Time: 1 minute

Open Messenger from the App drawer.

Turn your iPhone on and open Messenger App. Chat heads won’t do.

Open any chat. It could even be yourself as receiver.

Because we need to send the Moon emoji to a chat in next step.

Open keyboard and tap on emoji button. Search for Moon emoji in the emoji selection tab.

View the screenshot below for reference.

Send the Moon Emoji to anybody on Messenger.

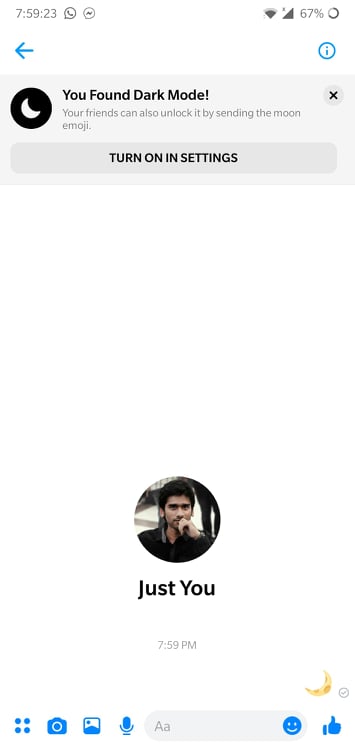
As soon as you send the emoji, lot of emoji moons will come flying onto screen.

Messenger App will show a popup saying “You Found Dark Mode”. Tap on Turn on in settings button below it.

This is how you know the dark mode is unlocked now. Either go to settings directly from here or just tap on your profile picture icon in top corner to open settings.

That’s it! Now navigate through the app and check new dark mode interface of Messenger.

Chats, settings screen and even chat heads are changed in dark mode. It looks super cool! Enjoy!

How to unlock hidden Dark Mode of Messenger on Android phones

Before continuing, make sure the version of Messenger on Android phone is 204.0.0.14.119 or higher. Otherwise, this may not work. Now just follow the steps below to enable hidden dark mode on FB Messenger on Android phones and tablets.

  • Open messenger app on Android from app drawer.
  • Go into any chat.
  • Open keyboard and enter the Emoji tab.
  • Scroll down to find the “Moon” emoji.
enable dark mode messenger android
  • Tap on it to send it.
  • Right after, multiple moons will fly on to screen.
  • On top of the app, a popup will show up saying “You Found Dark Mode”.
  • Tap on “Turn on in settings” button below it.
  • It will open settings tab.
  • The first option is to turn on/off dark mode.
dark mdde messender android
  • Turn it on from here.
  • Now just explore the app enjoy new dark mode on Messenger.

That’s it people! Feel free to leave your feedback and queries in the comments below.