Home Blog Page 50

Samsung Galaxy Note 10 Model Numbers and Differences

Samsung Galaxy Note 10 Model Numbers and Differences

Samsung Galaxy Note 10 is coming out in a couple of months. So far, enough of the information has been leaked to give us a clear idea of the Note 10. It’s very easy to draw a sketch of the Galaxy Note 10 and also guess what’s coming on-board. The model numbers of the Note 10 have leaked too. Rumor mills have it that there will be two variants of the Note 10. There will be further two versions of each variant. This means there are 4 Galaxy Note 10 devices on the way. Based on the available information, I was able to craft this list of Galaxy Note 10 Model Numbers. Down below, you can take a look at the Galaxy Note 10 model numbers and differences.
Galaxy Note 10 Model Numbers

Before you look through the Note 10 model numbers, let me give you an idea about this upcoming phablet.

Samsung Galaxy Note 10 – What’s on the way?

The smartphone news sector is full of Galaxy Note 10 information at the moment. It is quite difficult to find out the authentic information and the one that is merely a rumor. So before, I tell you about all the information that is based on guesses or that is just a hint, let’s take a look at what has been confirmed.

The model numbers of Galaxy Note 10 have been confirmed. At first, there will be two Galaxy Note 10 devices. The Note 10 will have a 6.28-inch variant and a 6.75-inch variant. The first will be called the Note 10 while the later will be called Galaxy Note 10 Pro. The Note’s model number will be SM-N970 and the Note 10 Pro’s model number will be SM-N975.

As I mentioned earlier, there will be 2 variants of each device, the Note 10 will have its 5G versions. The Note 10’s 5G phone will have the SM-N971 model number while the Note 10 Pro’s 5G version will sport the SM-N976 version number.

Another authentic piece of information suggests that the Note 10 will have a 19.5:9 display. This information came out as a result of an HTML 5 Test. The tests show a Galaxy Note 10 SM-N976V, which seems to be a Verizon-bound Galaxy Note 10, having a 19:9 screen.

The color options of Galaxy Note 10 suggest that the standard Note 10 will have 5 options. It will include a Red, Pink, Black, White, and Blue color. The Note 10 Pro will come in Black, White, and Blue colors only.

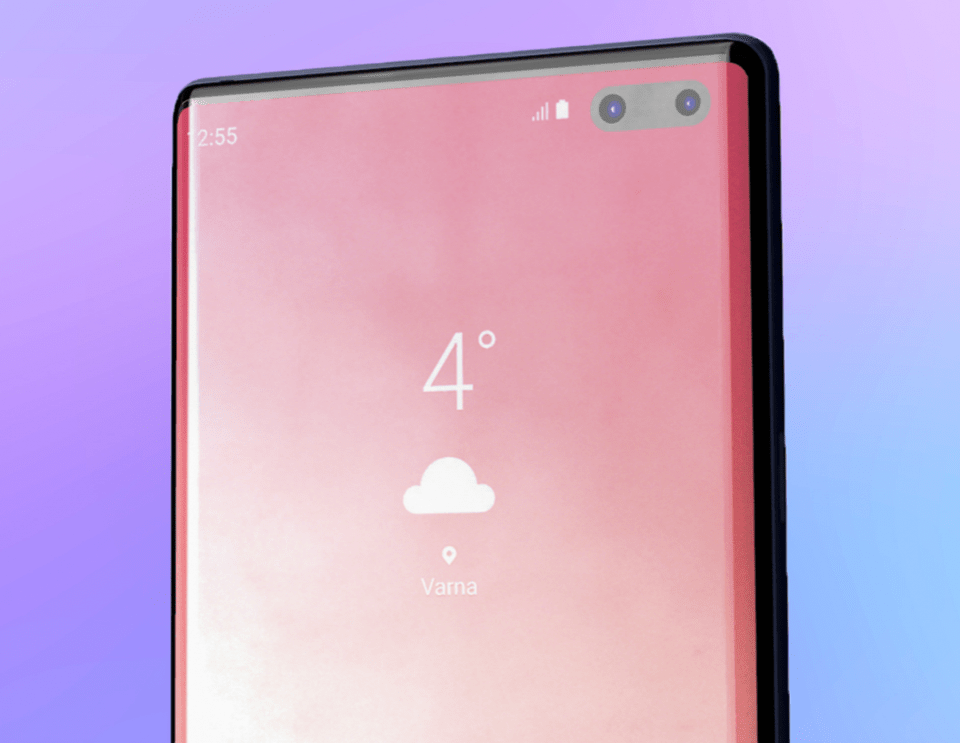
The information that cannot be confirmed right now, suggests that the Note 10 will flaunt a punch-hole camera on the front, just like the Galaxy S10 Plus. It will also have a new 64-megapixel camera system at the back. The Note 10 is expected to support 25W Super Fast Charging which we saw on the Galaxy A70. It will have an ultrasonic fingerprint scanner under the hood.

The last thing that we can be sure of, is that the Note 10 will run on Android 9 Pie themed by the Samsung One UI.

Make sure that you read all this information while tasting a pinch of salt as these are not the full and final details of the Note 10.

Samsung Galaxy Note 10 Model Numbers

Like all of its devices, Samsung will manufacture a different model of the Galaxy Note 10 for each country, and for some network carriers in countries like the US. This is done in order to make the handset compatible with the radio frequency bands used by Network Carriers in the countries. For example, the frequencies used by a Network Carrier in India will not be the same as that of the one in the US. So, Note 10 for India will have a different model number and vice versa.

For this very reason, you must be well aware of all the Galaxy Note 10 model numbers, and also what frequency bands they support, so that you do not pick a wrong device. For example, if you are living in the US, and you get a carrier branded Galaxy Note 10 like the SM-N970U or SM-N975U, and you take this device to a country like Canada later on, the device will fail to pick up the carrier. In such a case, you would want to pick an unlocked Galaxy Note 10, or in fact, get a Note 10 from the country you are going to live in for a longer time.

Earlier, we posted a list of iPhone XS, iPhone XS Max, iPhone XR, Galaxy S10 & S10 Plus model numbers and differences. Now that the Note 10 is on the way, I found it really important to post its model numbers and differences too.

After spending a few hours on the research, I have the list ready. Some of the information on this list is based on my past knowledge of the previous Galaxy handsets. This may not be the final list, as Note 10 is not out yet. However, I will try my best to keep this list as updated as possible.

Go ahead and take a look at the list of Galaxy Note 10 model numbers and their differences.

List of Samsung Galaxy Note 10 Model Numbers and Differences

Galaxy Note 10 Model Number Processor (CPU) Region/Carrier 2G Bands 3G Bands 4G/LTE Bands
SM-N970F Exynos 9820 Europe GSM850, GSM900, DCS1800, PCS1900 3G UMTS: B1 (2100), B2 (1900), B4(AWS), B5 (850), B8 (900)

3G TD-SCDMA: B34 (2010), B39 (1880)

4G FDD LTE: B1(2100), B2(1900), B3(1800), B4(AWS), B5(850), B7(2600), B8(900), B12(700), B13(700), B17(700), B18(800), B19(800), B20(800), B25(1900), B26(850), B28(700), B32(1500), B66(AWS-3) 4G TDD LTE: B38(2600), B39(1900), B40(2300), B41(2500)
SM-N970F/DS Exynos 9820 Aisa – Singapore/Philippines/India/Pakistan

Middle East – UAE/KSA/Qatar/Oman

GSM850, GSM900, DCS1800, PCS1900 3G UMTS: B1 (2100), B2 (1900), B4 (AWS), B5 (850), B8 (900)

3G TD-CDMA: B34 (2010), B39 (1880)

4G FDD LTE: LTE band 1(2100), 2(1900), 3(1800), 4(1700/2100), 5(850), 7(2600), 8(900), 17(700), 20(800), 28(700)

4G TDD LTE: B38(2600), B39(1900), B40(2300), B41(2500)

SM-N970N Exynos 9820 South Korea GSM850, GSM900, DCS1800, PCS1900 3G UMTS: B1 (2100), B2 (1900), B4 (AWS), B5 (850), B8 (900)

3G TD-CDMA: B34 (2010), B39 (1880)

4G FDD LTE: B1 2100, B2 1900, B3 1800, B4 AWS, B5 850, B7 2600, B8 900, B12 700, B13 700, B17 B24 (800), B20 (800), B25 (1900), B26 (850), B28 (700), B66 (AWS-3) 4G TDD LTE: B38 (2600), B39 (1900), B40 (2300), B41 (2500)
SM-N9700/DS Snapdragon 855 Hong Kong/China GSM850, GSM900, DCS1800, PCS1900 3G UMTS: B1 (2100, B2 (1900 PCS), B5 (850), B8 (900 GSM) 4G FDD LTE: B1 2100, B2 1900, B3 1800, B4 AWS, B5 850, B7 2600, B8 900, B12 700, B13 700, B17 B24 (800), B20 (800), B25 (1900), B26 (850), B28 (700), B66 (AWS-3) 4G TDD LTE: B38 (2600), B39 (1900), B40 (2300), B41 (2500)
SM-N970U Snapdragon 855 US – Carriers – At&t/T-Mobile/Sprint/US Cellular/Verizon etc 2G, 3G, 4G/LTE (Frequencies will vary according to the Carrier)
SM-N970U1 Snapdragon 855 US Unlocked GSM850, GSM900, DCS1800, PCS1900 3G UMTS: B1 (2100), B2 (1900 PCS), B4 (1700/2100 AWS 1), B5 (850), BB (900 GMS), B39(TD 1900+)

3G-CDMA: BC0 (800), BC1 (1900 PCS), BC10 (Secondary MHz)

4G FDD LTE: B1 2100, B2 1900, B3 1800, B4 AWS, B5 850, B7 2600, B8 900, B12 700, B13 700, B17 B24 (800), B20 (800), B25 (1900), B26 (850), B28 (700), B66 (AWS-3) 4G TDD LTE: B38 (2600), B39 (1900), B40 (2300), B41 (2500)
SM-N970W Snapdragon 855 Canada GSM850, GSM900, DCS1800, PCS1900 3G UMTS: B1 (2100), B2 (1900 PCS), B4 (1700/2100 AWS 1), B5 (850), BB (900 GMS), B39(TD 1900+)

3G-CDMA: BC0 (800), BC1 (1900 PCS), BC10 (Secondary MHz)

4G FDD LTE: B1 2100, B2 1900, B3 1800, B4 AWS, B5 850, B7 2600, B8 900, B12 700, B13 700, B17 B24 (800), B20 (800), B25 (1900), B26 (850), B28 (700), B66 (AWS-3) 4G TDD LTE: B38 (2600), B39 (1900), B40 (2300), B41 (2500)
SM-N971U Snapdragon 855 US-Carrier-At&t/Verizon/Sprint/US Cellular etc 2G, 3G, 4G/LTE, 5G (Frequencies will vary according to the Carrier)
SM-N971N Snapdragon 855 South Korea 2G, 3G, 4G/LTE, 5G (Frequencies will vary according to the Carrier)

List of Samsung Galaxy Note 10 Pro Model Numbers and Differences

Galaxy Note 10 Model Number Processor (CPU) Region/Carrier 2G Bands 3G Bands 4G/LTE Bands
SM-N975F Exynos 9820 Europe GSM850, GSM900, DCS1800, PCS1900 3G UMTS: B1 (2100), B2 (1900), B4(AWS), B5 (850), B8 (900)

3G TD-SCDMA: B34 (2010), B39 (1880)

4G FDD LTE: B1(2100), B2(1900), B3(1800), B4(AWS), B5(850), B7(2600), B8(900), B12(700), B13(700), B17(700), B18(800), B19(800), B20(800), B25(1900), B26(850), B28(700), B32(1500), B66(AWS-3) 4G TDD LTE: B38(2600), B39(1900), B40(2300), B41(2500)
SM-N975F/DS Exynos 9820 Aisa – Singapore/Philippines/India/Pakistan

Middle East – UAE/KSA/Qatar/Oman

GSM850, GSM900, DCS1800, PCS1900 3G UMTS: B1 (2100), B2 (1900), B4 (AWS), B5 (850), B8 (900)

3G TD-CDMA: B34 (2010), B39 (1880)

4G FDD LTE: LTE band 1(2100), 2(1900), 3(1800), 4(1700/2100), 5(850), 7(2600), 8(900), 17(700), 20(800), 28(700)

4G TDD LTE: B38(2600), B39(1900), B40(2300), B41(2500)

SM-N975N Exynos 9820 South Korea GSM850, GSM900, DCS1800, PCS1900 3G UMTS: B1 (2100), B2 (1900), B4 (AWS), B5 (850), B8 (900)

3G TD-CDMA: B34 (2010), B39 (1880)

4G FDD LTE: B1 2100, B2 1900, B3 1800, B4 AWS, B5 850, B7 2600, B8 900, B12 700, B13 700, B17 B24 (800), B20 (800), B25 (1900), B26 (850), B28 (700), B66 (AWS-3) 4G TDD LTE: B38 (2600), B39 (1900), B40 (2300), B41 (2500)
SM-N9750/DS Snapdragon 855 Hong Kong/China GSM850, GSM900, DCS1800, PCS1900 3G UMTS: B1 (2100, B2 (1900 PCS), B5 (850), B8 (900 GSM) 4G FDD LTE: B1 2100, B2 1900, B3 1800, B4 AWS, B5 850, B7 2600, B8 900, B12 700, B13 700, B17 B24 (800), B20 (800), B25 (1900), B26 (850), B28 (700), B66 (AWS-3) 4G TDD LTE: B38 (2600), B39 (1900), B40 (2300), B41 (2500)
SM-N975U Snapdragon 855 US – Carriers – At&t/T-Mobile/Sprint/US Cellular/Verizon etc 2G, 3G, 4G/LTE (Frequencies will vary according to the Carrier)
SM-N975U1 Snapdragon 855 US Unlocked GSM850, GSM900, DCS1800, PCS1900 3G UMTS: B1 (2100), B2 (1900 PCS), B4 (1700/2100 AWS 1), B5 (850), BB (900 GMS), B39(TD 1900+)

3G-CDMA: BC0 (800), BC1 (1900 PCS), BC10 (Secondary MHz)

4G FDD LTE: B1 2100, B2 1900, B3 1800, B4 AWS, B5 850, B7 2600, B8 900, B12 700, B13 700, B17 B24 (800), B20 (800), B25 (1900), B26 (850), B28 (700), B66 (AWS-3) 4G TDD LTE: B38 (2600), B39 (1900), B40 (2300), B41 (2500)
SM-N975W Snapdragon 855 Canada GSM850, GSM900, DCS1800, PCS1900 3G UMTS: B1 (2100), B2 (1900 PCS), B4 (1700/2100 AWS 1), B5 (850), BB (900 GMS), B39(TD 1900+)

3G-CDMA: BC0 (800), BC1 (1900 PCS), BC10 (Secondary MHz)

4G FDD LTE: B1 2100, B2 1900, B3 1800, B4 AWS, B5 850, B7 2600, B8 900, B12 700, B13 700, B17 B24 (800), B20 (800), B25 (1900), B26 (850), B28 (700), B66 (AWS-3) 4G TDD LTE: B38 (2600), B39 (1900), B40 (2300), B41 (2500)
SM-N976U Snapdragon 855 US-Carrier-At&t/Verizon/Sprint/US Cellular etc 2G, 3G, 4G/LTE, 5G (Frequencies will vary according to the Carrier)
SM-N976N Snapdragon 855 South Korea 2G, 3G, 4G/LTE, 5G (Frequencies will vary according to the Carrier)


Wrap Up

That’s all with the list of Galaxy Note 10 model numbers and differences. Remember that this is not the final list. I will keep updating this list as more information comes in. For now, it can give you a good idea of what phone you should plan for. I hope that you guys find this list useful. If you have anything to add to this list, feel free to drop it in the comments section below. I will try my best to get back to you as soon as possible.

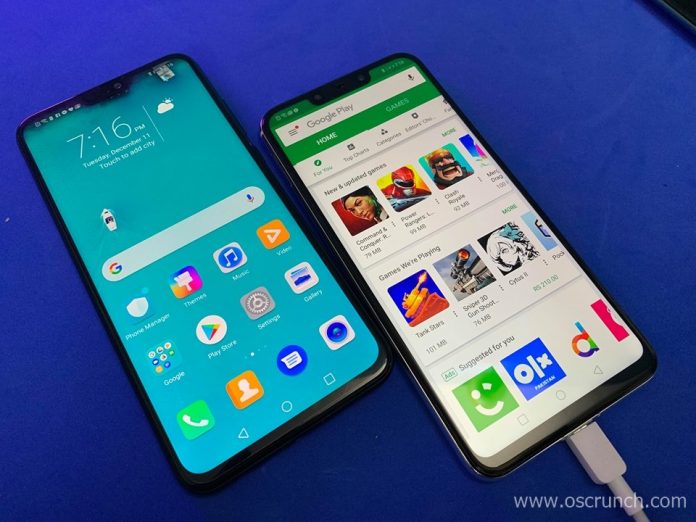
Download Google Play Store APK for EMUI 9 – Working

10
Download Google Play Store APK for EMUI 9 – Working
The Google Play Store APK for EMUI 9

Good evening ladies and gentlemen! I have really good news to share with all of you. As you have already read the title, we have finally found a working version of the Google Play Store on the EMUI 9. Thanks to our site user Tonny, who found the working Play Store version and reported it. Tonny successfully installed the Play Store on his Huawei Mate 9 running on EMUI 9.0.1.179. We are going to share the same Google Play Store APK with all of you here. You can find the Google Play Store APK for EMUI 9 here. Before you install the Play Store on EMUI 9, let me tell you why it wasn’t working before.

Google Play Store APK for EMUI 9
The Google Play Store APK for EMUI 9

Google Play Store on EMUI

In order to abide by the laws of the Great Firewall of China, phone makers like Huawei and Xiaomi remove the Play Store and Play Services from there devices. Huawei does this with all of its Huawei and Honor devices.

Previously, it was easily possible to install the Play Store on Chinese phones using third-party installers and apps. Starting with the EMUI 9, Huawei blocked the Play Store installation even with those installers.

This is when things took a frustrating turn. The Huawei and Honor owners were quite angry and they have been leaving their feedback on our site every now and then.

I have been trying to keep our respective Huawei and Honor users with all the latest updates regarding the Google Play Store, and they have remained equally cooperative too. As a result, Tonny shared how he got the Play Store running on his phone, and I believe it is totally fair to help all other users do the same. 

If you want to learn more about the restrictions in China, you can take a look at this post here, here, here, and here.

Google Play Store APK for EMUI 9

  1. Google Play Store 14.9.70 APK for EMUI 9 – Download
  2. Copy the APK to your phone.
  3. Using a File Manager, open the APK.
  4. If it asks for any permission, allow it.
  5. Complete the installation now.
  6. Restart the phone.
  7. Open the Play Store.
  8. Set it up and enjoy!

Conclusion

As a Huawei P30 Lite Chinese owner, I can totally understand the pain you are going through. This time on the EMUI 9 without the Play Store has been the darkest phase of my life so far. But now, things should settle down well. If you were able to install the Play Store using this new version, please drop your feedback in the comments section below. If you have any questions, feel free to reach out to us. That’s all.

Downloads OnePlus 7 Pro Stock Ringtones (All 65)

Downloads OnePlus 7 Pro Stock Ringtones (All 65)

This year we got our hands on the first ever true flagship OnePlus phone. OnePlus 7 Pro lives true to its ‘Flagship-killer’ DNA. This company is known for delivering some of the best wallpapers and ringtones. Therefore, we have extracted the OnePlus 7 Pro stock ringtones for you. Out of all 65, most of these are fresh and sound pretty good.

Also Check out:

It is equipped with the latest Snapdragon 855 SoC, upto 12GB of RAM and Octa-Core CPU. It is also the first commercial phone to come with a 90Hz AMOLED QHD+ display and UFS 3.0 storage. These specs make this phone insanely fast to use. On top of it all, OxygenOS 9.5 does a superb job at optimizing all the tasks to make it the fastest smartphone on planet right now.  

OnePlus 7 Pro stock Ringtones direct download

Below you can download both the Call ringtones and notification tones extracted directly from stock image of OnePlus 7 Pro itself. Most of these are fresh and sound pretty neat. There’s clear variety among the entire collection. We have got upbeat ringtones, some slow tones as well as melodious sounds. 

Similarly, the notification ringtones are both brief and non-obtrusive. The good thing is that none of these tones are too shrill or noisy. To download all the tones, click on the OnePlus 7 Pro stock ringtones direct download link below.

Stock OnePlus 7 Pro Ringtones – Direct Download Link

Guide to use Ringtones and Notification sounds from OnePlus 7 Pro

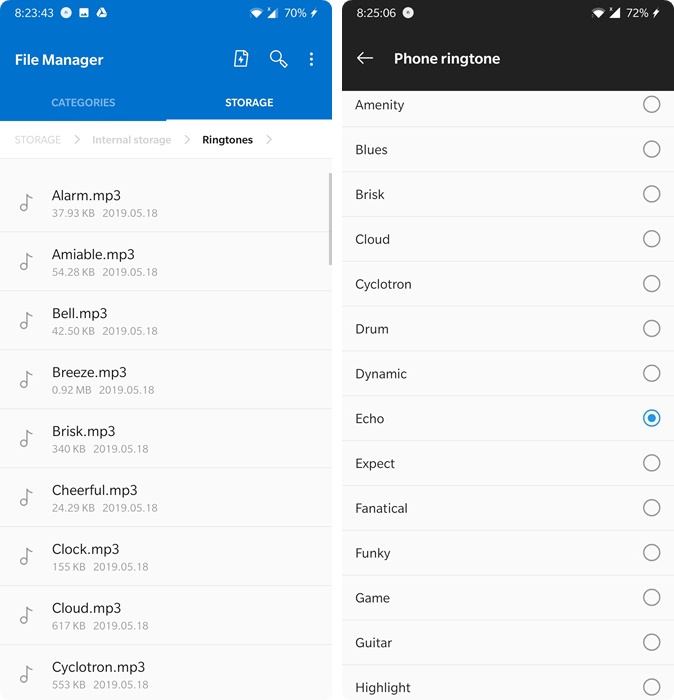
Either download the zip to PC or mobile directly. It is not usable instantly afterwards. You need to first unzip the file and then put all ringtones in a specific folder. If places in just any folder, then these may appear in music players as well.

  • Download the Ringtones zip to phone or just copy it to phone.
  • Then open the file manager and navigate to the folder with downloaded zip in it.
  • Next up, unzip into the folder named “Ringtones” inside internal storage root.download oneplus 7 pro stock ringtones
  • Once done, go to Audio Settings and check out new ringtones.

oneplus 7 pro stock ringtones and notification sounds

That’s it! This guide works for any Android phone out there. You may use it on devices like OnePlus 6, 6T, Note 9, Note 8, S10+, Huawei Honor series, P series and more. 

Feel free to leave your feedback and queries in comments below

Guide to install Stock Firmware on Samsung Galaxy A70

0
Guide to install Stock Firmware on Samsung Galaxy A70

Galaxy A70 owners, here is your guide to install stock firmware on this phone. By following the procedure given here, you can restore your Galaxy A70 back to factory settings. This guide will also help to update, hard-reset or unroot the Galaxy A70. Furthermore, this is the easiest and most comprehensive guide to install stock firmware on Samsung Galaxy A70. Before you start, let me give you an overview of the A70.

Samsung Galaxy A70

The Galaxy A70 is a part of the re-branded Galaxy A lineup. In the new A-series, the Galaxy A70 falls in the upper tier. This handset is like a flagship of the Galaxy A lineup. The A70 comes with very impressive hardware coupled with Samsung’s latest software.

Galaxy A70 is equipped with a 6.7-inches Full HD Super-AMOLED screen. This is a 19.5:9 screen with a waterdrop notch. This phone has 3 cameras on the back. The main camera is a 32MP Samsung GD1 sensor. Then it has an 8MP Ultrawide camera, and there is a 5MP depth sensor. On the front, it’s got the same 32MP Samsung GD1 sensor. Galaxy A70 can shoot 4K videos and 1080P @ 60FPS from the rear cameras. From the front camera, it can shoot 1080P videos only.

 install Stock Firmware on Samsung Galaxy A70
Samsung Galaxy A70

On the power end, the A70 utilizes Qualcomm’s Snapdragon 675 11nm processor. It’s got the Adreno 612GPU. The RAM of this handset is of 6GB and it’s got 128GB internal storage. A70 has a whopping 4500 mAh battery inside. It has a 25W Super Fast Charger. The charging port uses a USB Type-C. Galaxy A70 has an under-display fingerprint scanner too.

It runs on Android 9 Pie out of the box. Samsung has added its latest One UI over the top. The A70, under a very friendly-budget, is a flagship-like powerhouse.

Now that you know everything about the A70, take a look at the reasons to install stock firmware on it.

Why install stock firmware on Galaxy A70?

  • You just want to refresh the firmware of Galaxy A70.
  • There is a new software update, but it is not available in your region. You want to install the update manually. This is the guide you need.
  • The Galaxy A70 you have has started having performance problems. It hangs and lags. Flash a new firmware to fix it.
  • Your Galaxy A70 is having a battery drain problem. New firmware may help.
  • You just want to hard-reset the A70 through new software.
  • The Galaxy A70 was rooted, you want to unroot it now. This is the tutorial you need.
  • A soft-bricked Galaxy A70 can be recovered through emergency software recovery, which basically re-installs the firmware.

Methods to install Stock Firmware on Samsung Galaxy A70

There are two ways to install the software. The first method is for users who do not want to get into anything technical or complex. It is the Samsung Smart Switch method, which is basically Samsung’s PC Suite. With the Smart Switch, you only have to connect the phone and press a few buttons. This method can be used to recover the phone or find an OTA update.

The 2nd method is the Odin method. The Odin method is for experts, but with the help of this guide, any user can completely master it. Odin’s latest version Odin 3.13.1 can be used to install stock firmware on the A70. With Odin, you can reinstall the software, update it, unroot it, re-partition, and day 10s of other things.

Take a look at the Smart Switch method first.

Steps on who to install Stock Firmware on Samsung Galaxy A70 via Smart Switch

Note: This method will work for both Windows and Mac operating systems.

  1. On Galaxy A70, open Play Store and install Smart Switch. Smart Switch Play Store.
  2. Download and install Smart Switch on your computer. Smart Switch for Windows or Mac.
  3. Open Smart Switch now.
  4. Connect Galaxy A70 to the computer. If the phone asks for any permission allow it.
  5. Now in the Smart Switch, take a complete backup of your phone first of all.
  6. Click on the “More” button on the top-right corner and then click on “emergency software recovery”.
  7. Smart Switch will start looking for an update. If it finds and installs an update, it will show the logs.
  8. If you want to recover the phone from a bricked state, click on “Emergency recovery using the recovery code”.
  9. Enter the recovery code now to let the Smart Switch re-install the firmware.
  10. Remember that during this process, Smart Switch will ask you about many permissions and backups. You have to follow the on-screen instructions carefully to finish this.

Disconnect the phone once the installation comes to an end. If this method does not fulfill your requirement, go ahead and follow the Odin method.

Steps on how to install Stock Firmware on Samsung Galaxy A70 via Odin

Preparations

  1. This guide is only for the Galaxy A70.
  2. Back up each and everything from your phone.
  3. Charge the phone up to 50%.
  4. Use original data cable to connect the phone to the computer.
  5. Go to Settings > About Phone > Software information > Tap the build number for 7 times. Developer options will be enabled. Go back to Settings and access the Developer options now.
  6. Enable OEM Unlocking and USB Debugging on the phone from the Developer options.
  7. Do not use Samsung Smart Switch while using Odin.
  8. Follow remaining steps carefully.

Downloads

Firmware Files – Image used for reference only.

Note: The CSC file can wipe your phone, it means it will factory reset. The Home_CSC file will not wipe your data. CSC will perform a clean install and Home_CSC will be a dirty installation. While choosing the CSC file below, make sure that you know what file you want to flash.

Guide on how to install stock firmware on Samsung Galaxy A70

  1. Open Odin 3.13.1.exe on the computer.
  2. In Odin, go to Options > The only checked options should be F.Reset.Time and Auto Reboot.
    1. Click on the BL tab now, load the BL file.
    2. Add the AP file to the AP tab.
    3. In the CP tab, add the CP file.
    4. In the CSC file, depending on you want clean or dirty install, load the CSC or Home_CSC file.
  3. Now power down your Galaxy A70.
  4. Press and hold Volume Up + Power button to boot into the Recovery Mode.
  5. In the Recovery, select “reboot to bootloader”, press Power button to reboot.
  6. A70 will go into the Download Mode. Connect it to the computer now. install Stock Firmware on Samsung Galaxy A70
  7. Odin will detect the phone and show you a Blue light in the ID:COM box, or it will show you “Added” in the logs.
  8. Click on the “Start” button now. Odin will flash new software in 5 – 7 minutes. After installation, your phone will restart automatically. Disconnect it now.

Here is an image showing the firmware installation process. In the end, it will show “Finished” or “Passed” status.

Galaxy A70 stock firmware
Image used for reference only

Wrap Up

That’s it with the software re-installation on the new Galaxy A70. If you think that the phone is taking too long to boot up or something else is wrong, you can boot into the recovery mode and wipe the cache partition. Normally, the first boot can easily take up to 10 minutes. If you have any queries or questions regarding the Galaxy A70, feel free to drop them in the comments section. I will try my best to respond to you as soon as possible.

More:

Take a look at this video of Galaxy A70 Tips and Tricks

How to Hard Reset OnePlus 7 or 7 Pro

How to Hard Reset OnePlus 7 or 7 Pro

When it comes to Android, every OEM likes to have their own skins installed on their devices. OnePlus is the kind of custom Android skin. It is pretty close to stock Android with few extra features. Interestingly, it gets rid of all possible bloatware leaving only the most usable features. Moreover, the amazing optimization makes it feel even faster than Pixel phones. Even so, you may want to factory reset or hard reset OnePlus 7 Pro or OnePlus 7 for some reason. Maybe the phone is stuck in bootloop (soft-bricked) or  battery life is getting poor after an update. Whatever the reasons, even the best Android skin may need to be reset once in a while.

Also Read:

Below is the most comprehensive guide (with pictures) to both factory reset and hard reset these phones. They are currently running on Android Pie and OxygenOS 9.5. Even after the future updates like Android Q 10.0, the base method should remain pretty much the same.

How to Factory or Hard Reset OnePlus 7 / OnePlus 7 Pro 

Whether the phone is stuck in bootloop or you just want to erase all the data, it is time to Hard Reset OnePlus 7 Pro or OnePlus 7. There are two methods to do so. The first method works directly from homescreen. For it to work, your phone should be working fine of course. You may need to do so because of high battery use or phone just not working properly. The second method is hard resetting the phone from recovery. It works even if the phone is off. Therefore, if phone is stuck in booting up or just not starting properly, use it to reset the system. 

Note that, both of these methods will wipe all data on internal storage. There are options to just wipe the system settings but that does not count as a hard reset or factory reset.

First Method (Factory Reset from Settings)

This is the simplest and safest method. It works when phone is turning on properly and you can access the Settings menu. Use it to wipe data from the phone and stuff like that. Follow the steps below to factory reset OnePlus 7 or OnePlus 7 Pro.

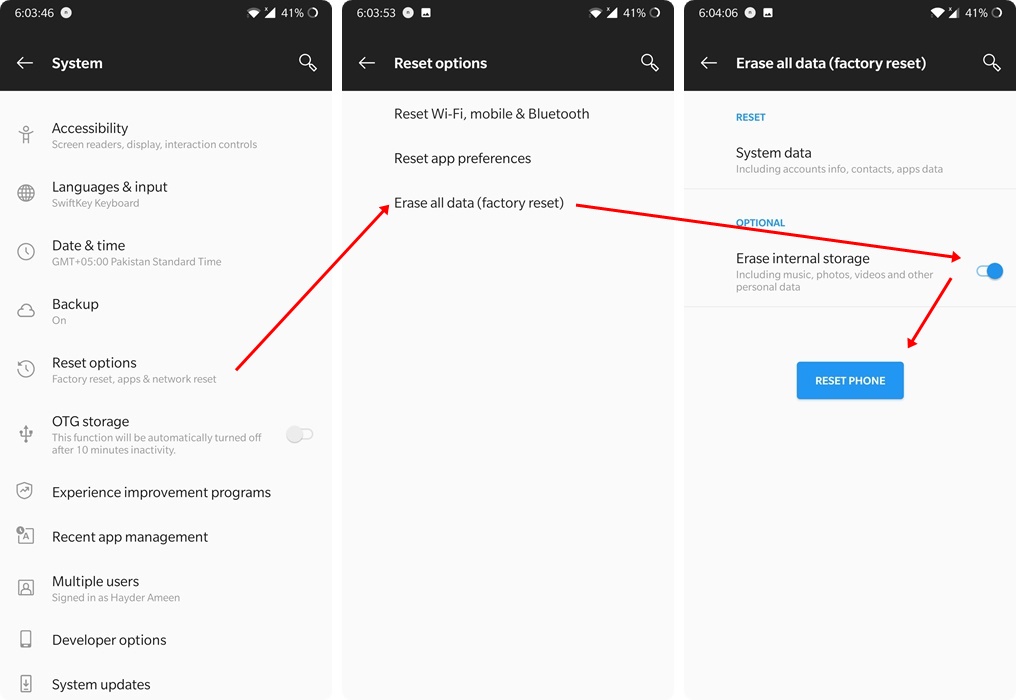
  • Turn on the phone.
  • Open Settings.
  • Scroll down and open “System”.
  • Here look for “Reset Options” and open it.
  • Select the “Erase all data (factory reset)” option here.
  • In the next screen, enable “Erase internal storage”.
  • Finally tap on the “RESET PHONE” button.factory reset oneplus 7 pro oneplus 7 homescreen
  • That’s it! Your phone will now reboot and when it comes back on, all data will be wiped.

Second Method (Hard Reset from Recovery)

If the phone is not turning on or is just stuck in bootloop, the follow the steps below to hard reset OnePlus 7 or OnePlus 7 Pro manually. This works even when the phone is off. Follow the steps below.

  • Turn off the phone and enter recovery mode using this GUIDE.
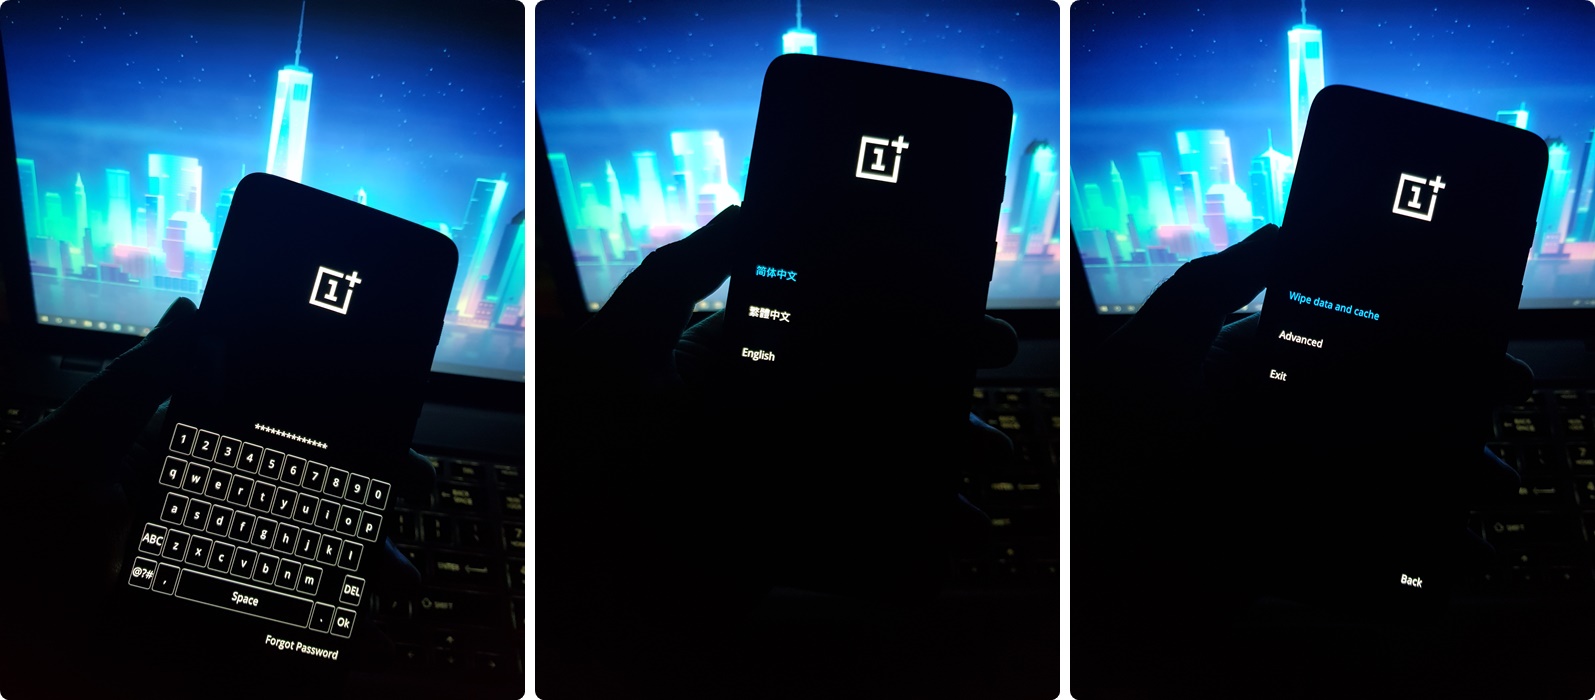
  • Once in the recovery mode, enter the password and unlock full recovery mode.
  • Next up, select your preferred language. 
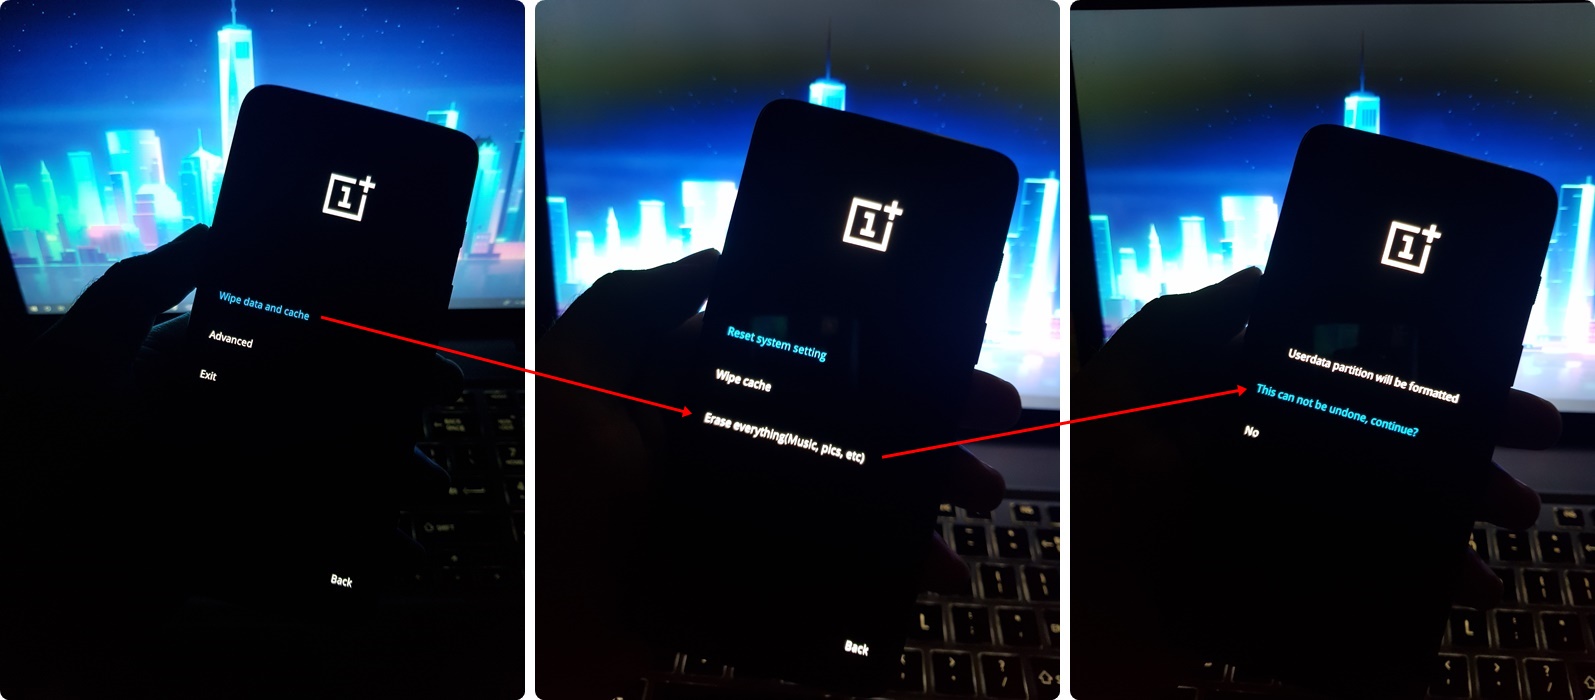
  • Now select “Wipe data and cache” option here.
  • Next up, select “Erase everything” option.
  • Phone will warn your about it in next screen. Press the continue option here.hard reset oneplus 7 pro oneplus 7 recovery
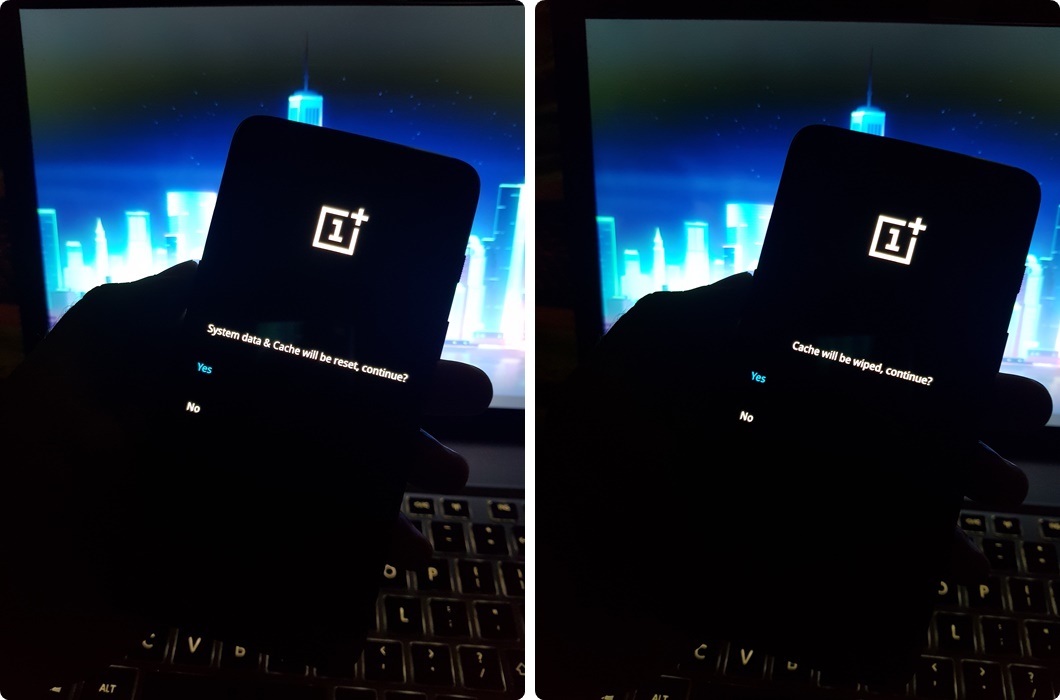
  • Optionally, try wiping cache and system settings before wiping everything to see if it solves your issue.wipe system cache on oneplus 7 pro recovery
  • That’s it! You have now hard reset your phone and it will reboot automatically. If not, then just press Exit on main menu of recovery and reboot the phone.

Conclusion

If we keep using the phone normally, there is little chance of it getting soft-bricked ever. However, the phone may start getting slow either by itself or after an OTA update. Moreover, the battery life may start getting shorter. In order to solve these issues, the hard reset often works like a charm. You can follow any of the above mentioned methods to perform said task.

Feel free to leave your feedback and queries in the comments section below

MIUI 9 Supported Devices List [ Official and Unofficial ]

0
MIUI 9 Supported Devices List [ Official and Unofficial ]

Want to Install MIUI 9 on your Xiamoi devices but you don’t know whether your device is supported or not. Let me help you with that, you can check for your device in the following list of MIUI 9 Supported Devices.

MIUI 9 Supported Devices

I am sure you are all well aware of the fact that Xiaomi is also a leading Android device manufacturer. Along with Apple, Samsung, and Huawei. Xiaomi has gained a lot of popularity in the Android community. Not like others, Xiaomi provides the best Android user experience. They are working hard on their OS ( MIUI ) development and we have seen in the past years. Every time a new version is rolled we have seen a lot of new features and improvements. Those who don’t know, Xiaomi OS is called MIUI and the latest in line is MIUI 10.  

But today I am not here to tell you anything about, I am here to provide you the list of the MIUI 9 Supported Devices. Since MIUI 10 is not available for all as of yet. Users will prefer to go with the stable one which is MIUI 9.

MIUI 9 Features:

As far of now, MIUI 9 is available for mostly all of Xiamoi devices. You will see in the list of MIUI 9 Supported Devices. A new firmware always comes with new features, improvements, and with the fixes of all bugs. There are a number of new features included in the MIUI 9 firmware. Which you can check out below but I find one particular feature unique. This one is called Dual Space, means you can create a guest account on your phone.

You are familiar with the term Always On Display, Widely used for Samsung devices. In MIUI 9, Xiaomi added a new feature called Always-On VPS. Moreover, you can now reply without opening any app, you can call it a quick reply feature. Other than that, the following are the other features of MIUI 9.

New Features:
★: Optimized dose mode.
★: RAM optimization.
★: Better Data saving approach.
★: Call screening feature.
★★: Dual space feature.
★: Dual appsMulti-window support.

MIUI 9 Supported Devices List:

Wileyfox Swift 2 Download
ZTE Nubia Z17S Download
China Mobile A3s Download
Cubot Manito Download
Lenovo S920 Download
LeEco Le Pro 3 Download
ZTE Blade A510 Download
Leagoo KIICAA Power Download
ZTE Nubia Z11 Mini Download
Doogee X7 Pro Download
Doogee Y6 Piano Download
Doogee X5 Max Download
Motorola Moto G5 Plus Download
OnePlus 5 Download
Infinix Note 3 Pro Download
Alcatel Idol X+ 6043D Download
Alcatel Pixi 3 3.5 Download
ZTE Axon 7 Download
YU Yuphoria Download
Vivo Y21L Download
Lenovo ZUK Z2 (Plus) Download
Lenovo Vibe K5/Plus Download
Condor Allure A55 Slim Download
Condor Allure A8 Download
Gionee S6s Download
Gionee S6 Download
BLU Vivo 5R Download
BLU Vivo 5 Download
BLU Vivo XL2 Download
Bluboo Xtouch Download
Gionee F103 Pro Download
Cubot Max Download
Lava Pixel V2 Download
ZTE Nubia M2 Download
Vivo Y51L Download
Lava Iris 870 Download
ZTE Nubia Z9 Max Download
Lenovo P2 Download
Lenovo Vibe P1m Download
Samsung Galaxy E5 Download
Infinix Hot 3 Download
LeEco Le Max 2 Download
HTC Desire 816G Download
Alcatel Flash 2 Download
Highscreen Power Five EVO Download
Elephone Trunk Download
Elephone P6000 Download
Elephone P8000 Download
Uhans U100 Download
Zoji Z7 Download
Bluboo Dual Download
Smartisan U1 Download
Ulefone U008 Pro Download
Cubot Dinosaur Download
Micromax Canvas Doodle 3 (A102) Download
Amoi N828 Download
Lenovo S660 Download
Huawei Y5 2017 Download
ZTE Nubia Z11 Mini S Download
ZTE Nubia Z11 Download
Doogee X5 Pro Download
ZTE Nubia Z17 Mini Download
MegaFon Login + Download
ZTE Blade A465 Download
Beeline Fast Download
Huawei Honor 4C Pro Download
Oukitel U15 Pro Download
Lenovo P70 Download
ZTE Blade A1 Download
JiaYu G5 Download
JiaYu G4 Download
Lenovo S939 Download
Fly IQ4415 Era Style 3 Download
Hasee X50 TS Download
Doogee X9 Pro Download
Coolpad Note 3 Lite Download
Coolpad Note 3 Download
ARK Impulse P2 Download
Highscreen Boost 3 Download
THL 5000T Download

MIUI 9 Global Stable ROM now available for all supported Xiaomi India devices:

  • Redmi 1s
  • Redmi 2 / Redmi 2 Prime
  • Redmi 3S / Redmi 3S Prime
  • Redmi 4
  • Redmi 4A
  • Redmi Note Prime
  • Redmi Note 3
  • Redmi Note 4G
  • Redmi Note 4
  • Redmi Y1 / Redmi Y1 Lite
  • Mi 3
  • Mi 4
  • Mi 4i
  • Mi 5
  • Mi Max / Mi Max Prime
  • Mi Max 2
  • Mi Mix 2

How to enter Recovery Mode on OnePlus 7 or 7 Pro

How to enter Recovery Mode on OnePlus 7 or 7 Pro

Recovery Mode in Android OS is used for multiple things. Whether the phone is soft-bricked, not starting, you just want to wipe cache or even install updates. It is the core for doing any advanced stuff. This guide takes you through the steps to enter recovery mode on OnePlus 7 Pro and OnePlus 7 both. Whether the phone is stuck at startup or it just needs to be reset, recovery always comes in handy.

Also Read:

Note that if you are not sure about something, then don’t do it without supervision or guidance. Thankfully, the stock recovery of OnePlus 7 Pro / 7 is petty much mistake-proof. This means that there are checks set up everywhere. Phones asks you to confirm each action several times before executing it. There’s a good chance that we may press a wrong option by mistake. Therefore, the developers have done a good job at making sure that none of that stuff happens. 

Lets just dive into it now and see how the whole thing works.

How to enter Recovery Mode in OnePlus 7 or OnePlus 7 Pro

Recovery mode or “Stock Recovery” is home to Android’s most basic tasks. In includes stuff like installing update zip files, hard resetting the phone, wiping cache and so on. It is important to know how to access it and there are more than just one way to do it. Below are the two safest methods to enter recovery mode in OnePlus 7 Pro or OnePlus 7. These are both easy and foolproof. Therefore, you do not have to worry about messing things up.

First Method (From Homescreen)

Use this method to get into recovery (stock or custom) if your phone is turned on. It is simple to use since there are no weird button combinations. Moreover, it is only useful when the phone is functioning properly and you can turn the phone on just fine. 

  • Turn on the phone screen.
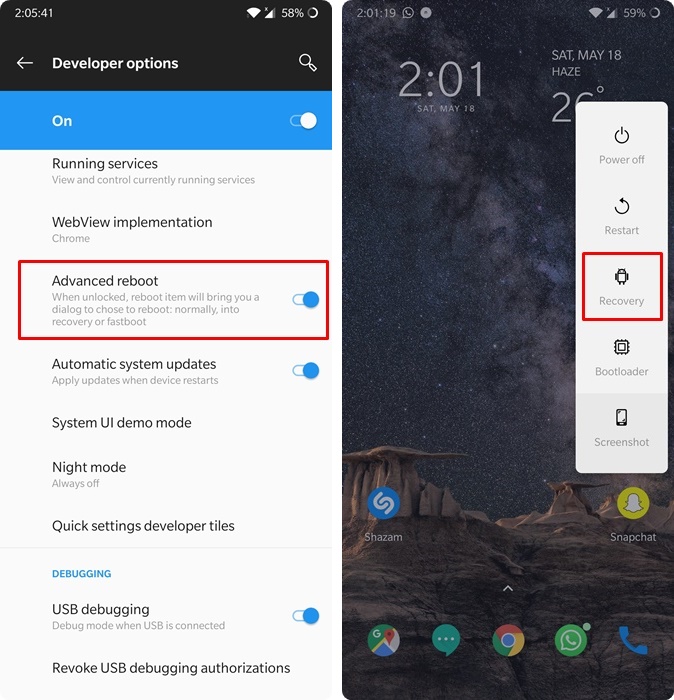
  • Hold down the power button until you see the popup on top-right.
  • Now tap on the “Recovery” button.
  • If you do not see the recovery button, then open Settings > About Phone and tap the Build Number 7 times. A “You are now developer” toast should show up.
  • Open Settings main page, scroll down and open System > Developer Options.
  • Scroll down and enable “Advanced Reboot”.
  • Once done, hold power button once again until the popup appears.
  • Press the Recovery button now.enter recovery mode on oneplus 7 pro homescreen
  • The phone will reboot after this.
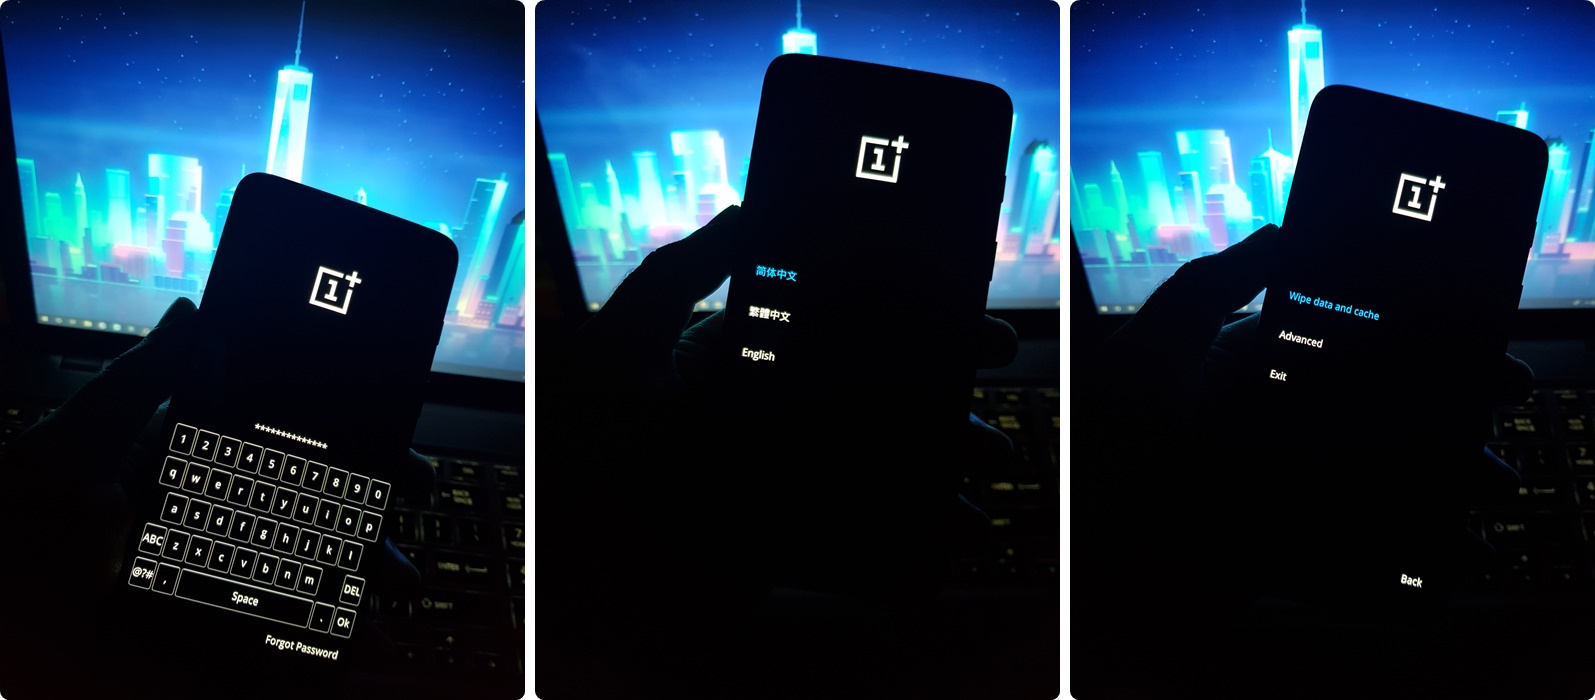
  • If you have set a lock on your phone, it will ask you to enter it before entering recovery mode. This system is in place for security reasons.
  • Then select the language and that’s it! You are now in OnePlus 7 Pro Recovery mode.enter recovery on oneplus 7 pro homescreen

Second Method (When phone is turned off)

We take it that you are trying to enter recovery mode after either a soft brick or you just like to do it the old-fashioned way. Follow the steps below or manually open recovery on your phone.

  • Turn off the phone and wait 10 seconds.
  • Now hold volume down + power keys together.
  • Keep both buttons pressed together until the OnePlus wake up logo appears.
  • Now leave the buttons.
  • If you have a password in place, it will show a keyboard for you to enter that password here first.
  • Once done, the phone will open recovery screen here.enter recovery mode on oneplus 7 screen off
  • That’s it! The OnePlus 7 Recovery mode works with touch mode and there are checks at every stage to ensure you don’t do anything by mistake! So, there is nothing to worry about.

Conclusion

The recovery mode of Android is like a second homescreen for power Android users. It server lot of purposes whether your phone is rooted or not. Therefore, follow one of the two easy methods to open recovery mode on OnePlus 7 Pro or OnePlus 7 above. And make sure to take some precautions like charging the battery just enough so that your phone does not run out of juice amidst any task.

Feel free to leave your feedback and queries in the comments section below

How to take Screenshot on OnePlus 7 or 7 Pro

How to take Screenshot on OnePlus 7 or 7 Pro
Just a Screenshot of my Homescreen

What’s the most basic task for any smartphone out there? Some may say it’s making a call or sending a text. However, I believe it is the screenshot feature. Now, most people just avoid calling and prefet text messages. Whether it is WhatsApp, Skype, FB Messenger or any other app. Therefore, learn how to take screenshot on OnePlus 7 Pro and OnePlus 7 in this guide. It goes through the 3 official and safest methods for doing it.

Also Read:

A word of caution though! The screenshots may be blocked in certain apps or parts of these apps. For example, now we cannot take screenshots in Incognito mode of Chrome Android. Similarly, we cannot take screenshots in sensitive parts of our phone. It is done for peoples’ own good. If you take a screenshot on app like Snapchat, it’d notify the other person/s in that chat. So, be very careful when capturing screenshots on your phone.

take screenshot on oneplus 7 oneplus 7 pro
Just a Screenshot of my Homescreen

How to take screenshot on OnePlus 7 or OnePlus 7 Pro

Taking screenshots is a simple and one of most used features in any phone out there. Therefore, the OEMs tend to offers more than just one way to do it. Here are the top 3 ways to take screenshots on OnePlus 7 Pro and OnePlus 7 both.

First Method (Power + Volume Down)

This is the simplest and most traditional method out there. In order to do so, follow these steps:

  • Turn the screen on.
  • It may be homescreen or lockscreen. It does not matter.
  • Hold down power button and volume down button at same time.
  • Press both of these buttons at same time and you’ll hear a click sound when screenshot is taken.
  • A popup may appear, with options to edit, delete or share the screenshot.

Second Method (Power Button)

Those who don’t like the double button combination above, just follow the method below to take screenshots on OP7 or OP7 Pro in simplest way possible.

  • Hold down the power button.
  • A popup will appear on right top of screen.
  • Tap on the “Screenshot” icon here.capture screenshot on oneplus 7 pro
  • That’s it! It is now saved in gallery.

Third Method (3 Fingers Gesture)

The gesture controls are a commodity that some people like while others do not. Nonetheless, it is also a decent option to take screenshots on your phone.

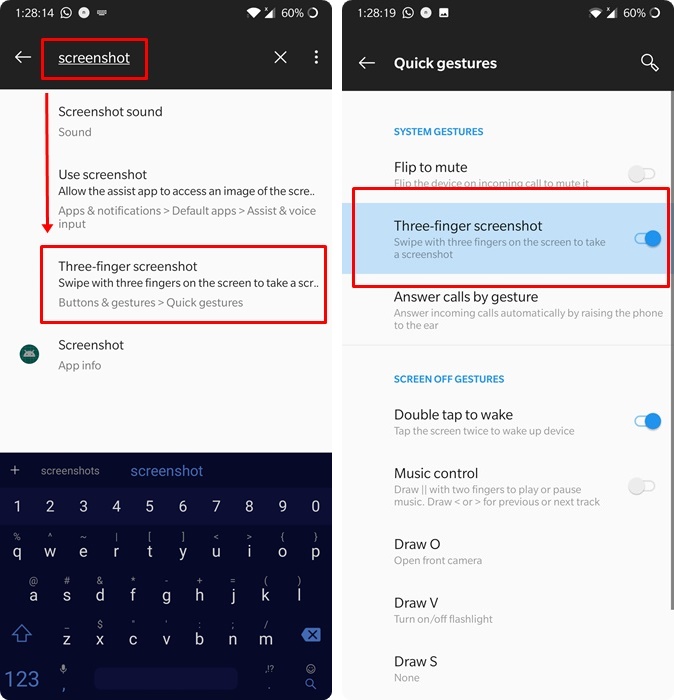
  • Open Settings.
  • Search for “Screenshot”.
  • Now open the “Three-Finger Screenshot” option.
  • It will take you to Quick Gestures tab.
  • Enable the Three Finger Screenshot gesture here.take screenshots on oneplus 7 pro
  • Now if you want to take a screenshot, just slide three fingers on the screen at once. All three tips should be on screen at same time. Mis-timing may cause you to scroll the page but it’s easy to get hang of after some time.

Conclusion

This is pretty much it. We have enlisted the top three official and easiest methods to capture screenshots on OnePlus 7 Pro and its little brother OnePlus 7. If you follow all the steps closely, you’ll notice that there’s no room for error here.

Feel free to leave your feedback and queries in the comments section below

Download OnePlus 7 Pro Camera APK OxygenOS 9.5

0
Download OnePlus 7 Pro Camera APK OxygenOS 9.5

OnePlus phones are built on the promise of speed. OxygenOS is arguably the best Android skin ever made. It is fast, snappy, free of bloatware and insanely simple to use. It contains all the useful features. While OnePlus phones are considered giant killers, they still lack somewhat in Camera department. After using Pixel devices, we know that number of lenses does not make a phone’s camera better. It is actually the software. Therefore, follow this guide to install updated OnePlus 7 Pro Camera APK on old OnePlus phones like OP6, OP6T, OP5T and more. In addition to improved processing, this new app also comes equipped with some brand new additions.

Also Check:

What’s new in OxygenOS 9.5 Camera App

The first notable mentions are the changes to its interface. Now, we have the option to add or remove camera modes from main screen slider. Moreover, change the position of these camera modes according to personal preference. Access this option in Settings > Customized Modes. 

customize modes oxygenos 9.5 camera app

The new app also gets rid of Smile capture. A feature that is somewhat flawed and not used by many. Moreover, you get the “Smart Content Detection” feature. It recognizes addresses, phone numbers, QR Codes and other texts directly from main camera app. Therefore, you no longer have to rely on a third-party app for this primitive stuff.

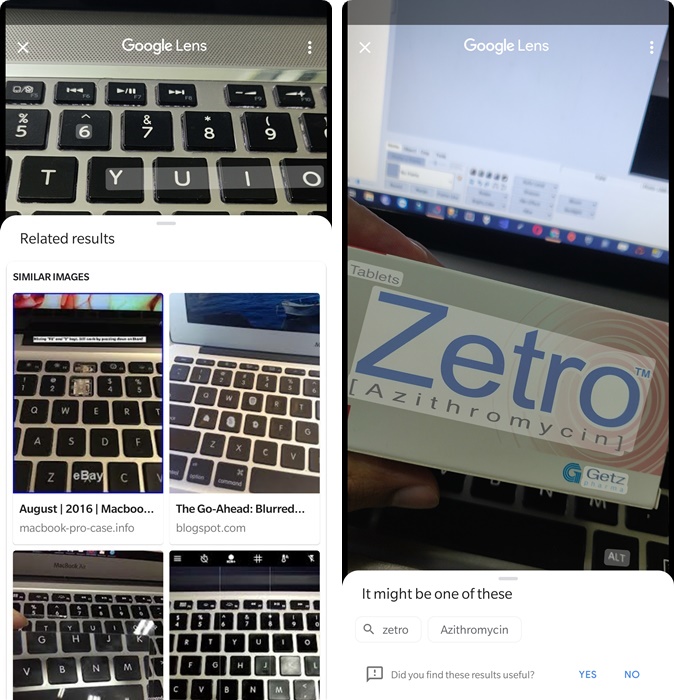
Lastly, the major addition is Google Lens integration. In order to access this, long-press one the camera screen while it is on. Do not press the capture button. Just long-press on the screen, on object you want to recognize. Google will open similar images and Google results in ViewFinder for you. It works both offline and online and works insanely fast. However, the results may not always be accurate depending on what you are finding and how the camera angle is. Nonetheless, it is a very cool feature and works like a charm in most cases.oneplus 7 pro camera google lens

How to install OxygenOS 9.5 Camera App (from OnePlus 7 Pro) on old OnePlus devices

This is an incremental update. The following method guides you to update from current camera app to new OnePlus 7 Pro Camera APK without extra permissions. This is based on OxygenOS 9.5 (Android Pie 9.0). It works with any old OnePlus device as long as it’s Android Pie. 

  1. Download OnePlus 7 Pro OxygenOS 9.5 Camera APK from HERE.
  2. Copy it to the internal storage of phone.
  3. Now open the file manager on phone and navigate to folder with APK in it.
  4. Tap in its icon and press on Install. If the phone asks for install permission from unknown source, allow it.
  5. Once installed, open the app drawer and access camera app from here.download oxygenos 9.5 camera apk oneplus
  6. That’s it! You have successfully installed OnePlus 7 Pro Camera App on your phone now.

Feel free to leave your feedback and queries in the comments section below.

Download OnePlus 7 Pro Gallery APK OxygenOS 9.5

0
Download OnePlus 7 Pro Gallery APK OxygenOS 9.5

OnePlus 7 Pro is the first official phone to come with latest OxygenOS 9.5. It is Android 9.0 Pie still. However, there are slight changes and some new features. The current system apps are improved and new apps come too. A notable new app/feature is Zen mode. This mode will help you not use the phone all the time. Thankfully, it will definitely come to older OnePlus models in future updates. However, we are here for the brand new OnePlus 7 Pro Gallery App in OxygenOS 9.5. It comes with a brand new interface and slight improvements to overall performance. 

Also Read:

What’s new in OnePlus 7 Pro Gallery App

This is actually an incremental change. The overall performance and speed on OnePlus phones and its system apps is already pretty impressive. The developers behind arguably the best Android skin to date just keep on working to make it better than ever! 

The new OxygenOS 9.5 gallery APK with OP7 Pro comes with a new interface that divides albums into three main categories. These are respectively named as “My Device”, “App Collections” and “My collections”. Unlike before, this clear division makes the overall interface look much cleaner. 

download oneplus 7 pro gallery apk

The clear separation makes sure that your camera photos are screenshots are put on top. Next up are the folder generated by apps like WhatsApp, Viber, Facebook, Downloads, Instagram and so on. This section also contains copied folders or downloaded movies, songs or other videos/pictures. Finally, the My Collections section shows personally created albums only. You could names these albums anything and put anything in these. It only shows the albums that you created via gallery app. Or just manually copy a folder to “My Collections” folder in file manager.

Also Check out: OnePlus 7 Pro Camera App (OxygenOS 9.5)

How to install OxygenOS 9.5 Gallery (from OnePlus 7 Pro) on old OnePlus phones

The reason why everyone loves Android and more so OnePlus, is the flexibility and speed of updates. Even though OxygenOS 9.5 is not yet officially available for OnePlus 6, OnePlus 6T and previous devices, you can still follow the steps below to install OnePlus 7 Pro Gallery APK on these devices.

  1. Download OnePlus 7 Pro OxygenOS 9.5 Gallery APK from HERE.
  2. Copy it to the phone’s internal storage.
  3. Now open the file manager and navigate to the folder where you put APK in 2nd step.
  4. Tap on its icon.
  5. It may ask for installation permission. Grant it.
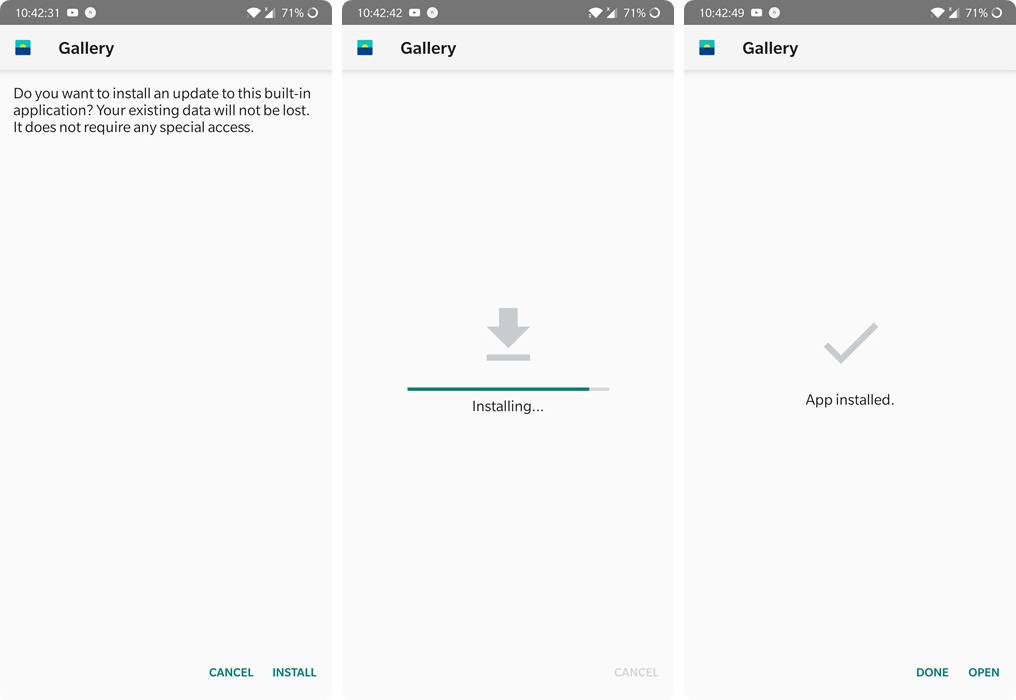
  6. This install won’t ask for any additional permissions since it is just an update over current Gallery app.
  7. Tap on Install and wait till it is complete.download oxygenos 9.5 gallery apk oneplus
  8. Now just open the App Drawer and open your new Gallery app from there anytime.
  9. That’s it! You have successfully installed OnePlus 7 Pro Gallery App from OxygenOS 9.5 in any older OP device.

Feel free to leave your feedback and queries in the comments section below.

Samsung Good Lock 2019 Plugins APK (NiceShot, Task Changer, NotiStar & More)

1
Samsung Good Lock 2019 Plugins APK (NiceShot, Task Changer, NotiStar & More)

The Samsung Good Lock 2019 is your all-in-one customization app for the One UI. With the help of the latest plugins like the Nice Shot and NotiStar, the Good Lock 2019 has become much more useful. From this post, you can download the Samsung Good Lock 2019 APK. You can also download Good Lock 2019 Plugins APK. All of the Good Lock 2019 Plugins including Multistar, Lockstar, Task Changer, NavStar, QuickStar, Nice Shot, NotiStar, Nice Catch, and others are available here. Before you download the Good Lock 2019 APK or its plugins, let me give you an idea of this app.

Good Lock 2019 APK

Samsung Good Lock 2019

The purpose of Good Lock app is to enhance the UI of your Samsung Galaxy smartphone. Good Lock Add-ons bring in new features and options for the system of your Samsung device.

Samsung first introduced the Good Lock in the year 2016. The Good Lock 2016 was released for Android 6 Marshmallow. At that time, the Samsung TouchWiz UI was in use. The Good Lock 2016 allowed TouchWiz users to add new features and options with the help of that app. Good Lock was updated in 2017 for Android Nougat, in 2018 for Android Oreo, and now in 2019, it has been updated for Android 9 Pie.

Good Lock 2019 works on all Galaxy phones running on Android 9 Pie. You can make the already-good Samsung One UI eye-popping now. The feature-rich plugins of Good Lock 2019 will make you fall in love with your phone once again.

Good Lock 2019 APK

While the Good Lock app itself is just like a dashboard or control panel, you have to install all the Plugins one by one. You can either install the Good Lock 2019 with its Plugins from the Galaxy App Store, or you can download their APKs manually.

Unfortunately, Good Lock 2019 is limited to only 5 countries at the moment. If you are living in a country like South Korea, the US, UK, or Canada, you can get the Good Lock from the Galaxy App Store. But if you are living outside, your only option is to install it via the APKs.

This brings us to the purpose of this guide. You can find the Good Lock 2019 APK, the Good Lock 2019 Add-ons, and the Good Lock 2019 Plugins APKs here.

Good Lock 2019 APK – Download

Remember that the Good Lock 2019 APK will only work with the help of a VPN. You will first download and install a VPN on your Android phone. After that, you will connect to a country like the US or South Korea, and then you will install the Good Lock 2019 APK. Installing and opening the Good Lock 2019 without the VPN connected to eligible locations will fail this app.

Good Lock 2019 Alternative – Nice Lock

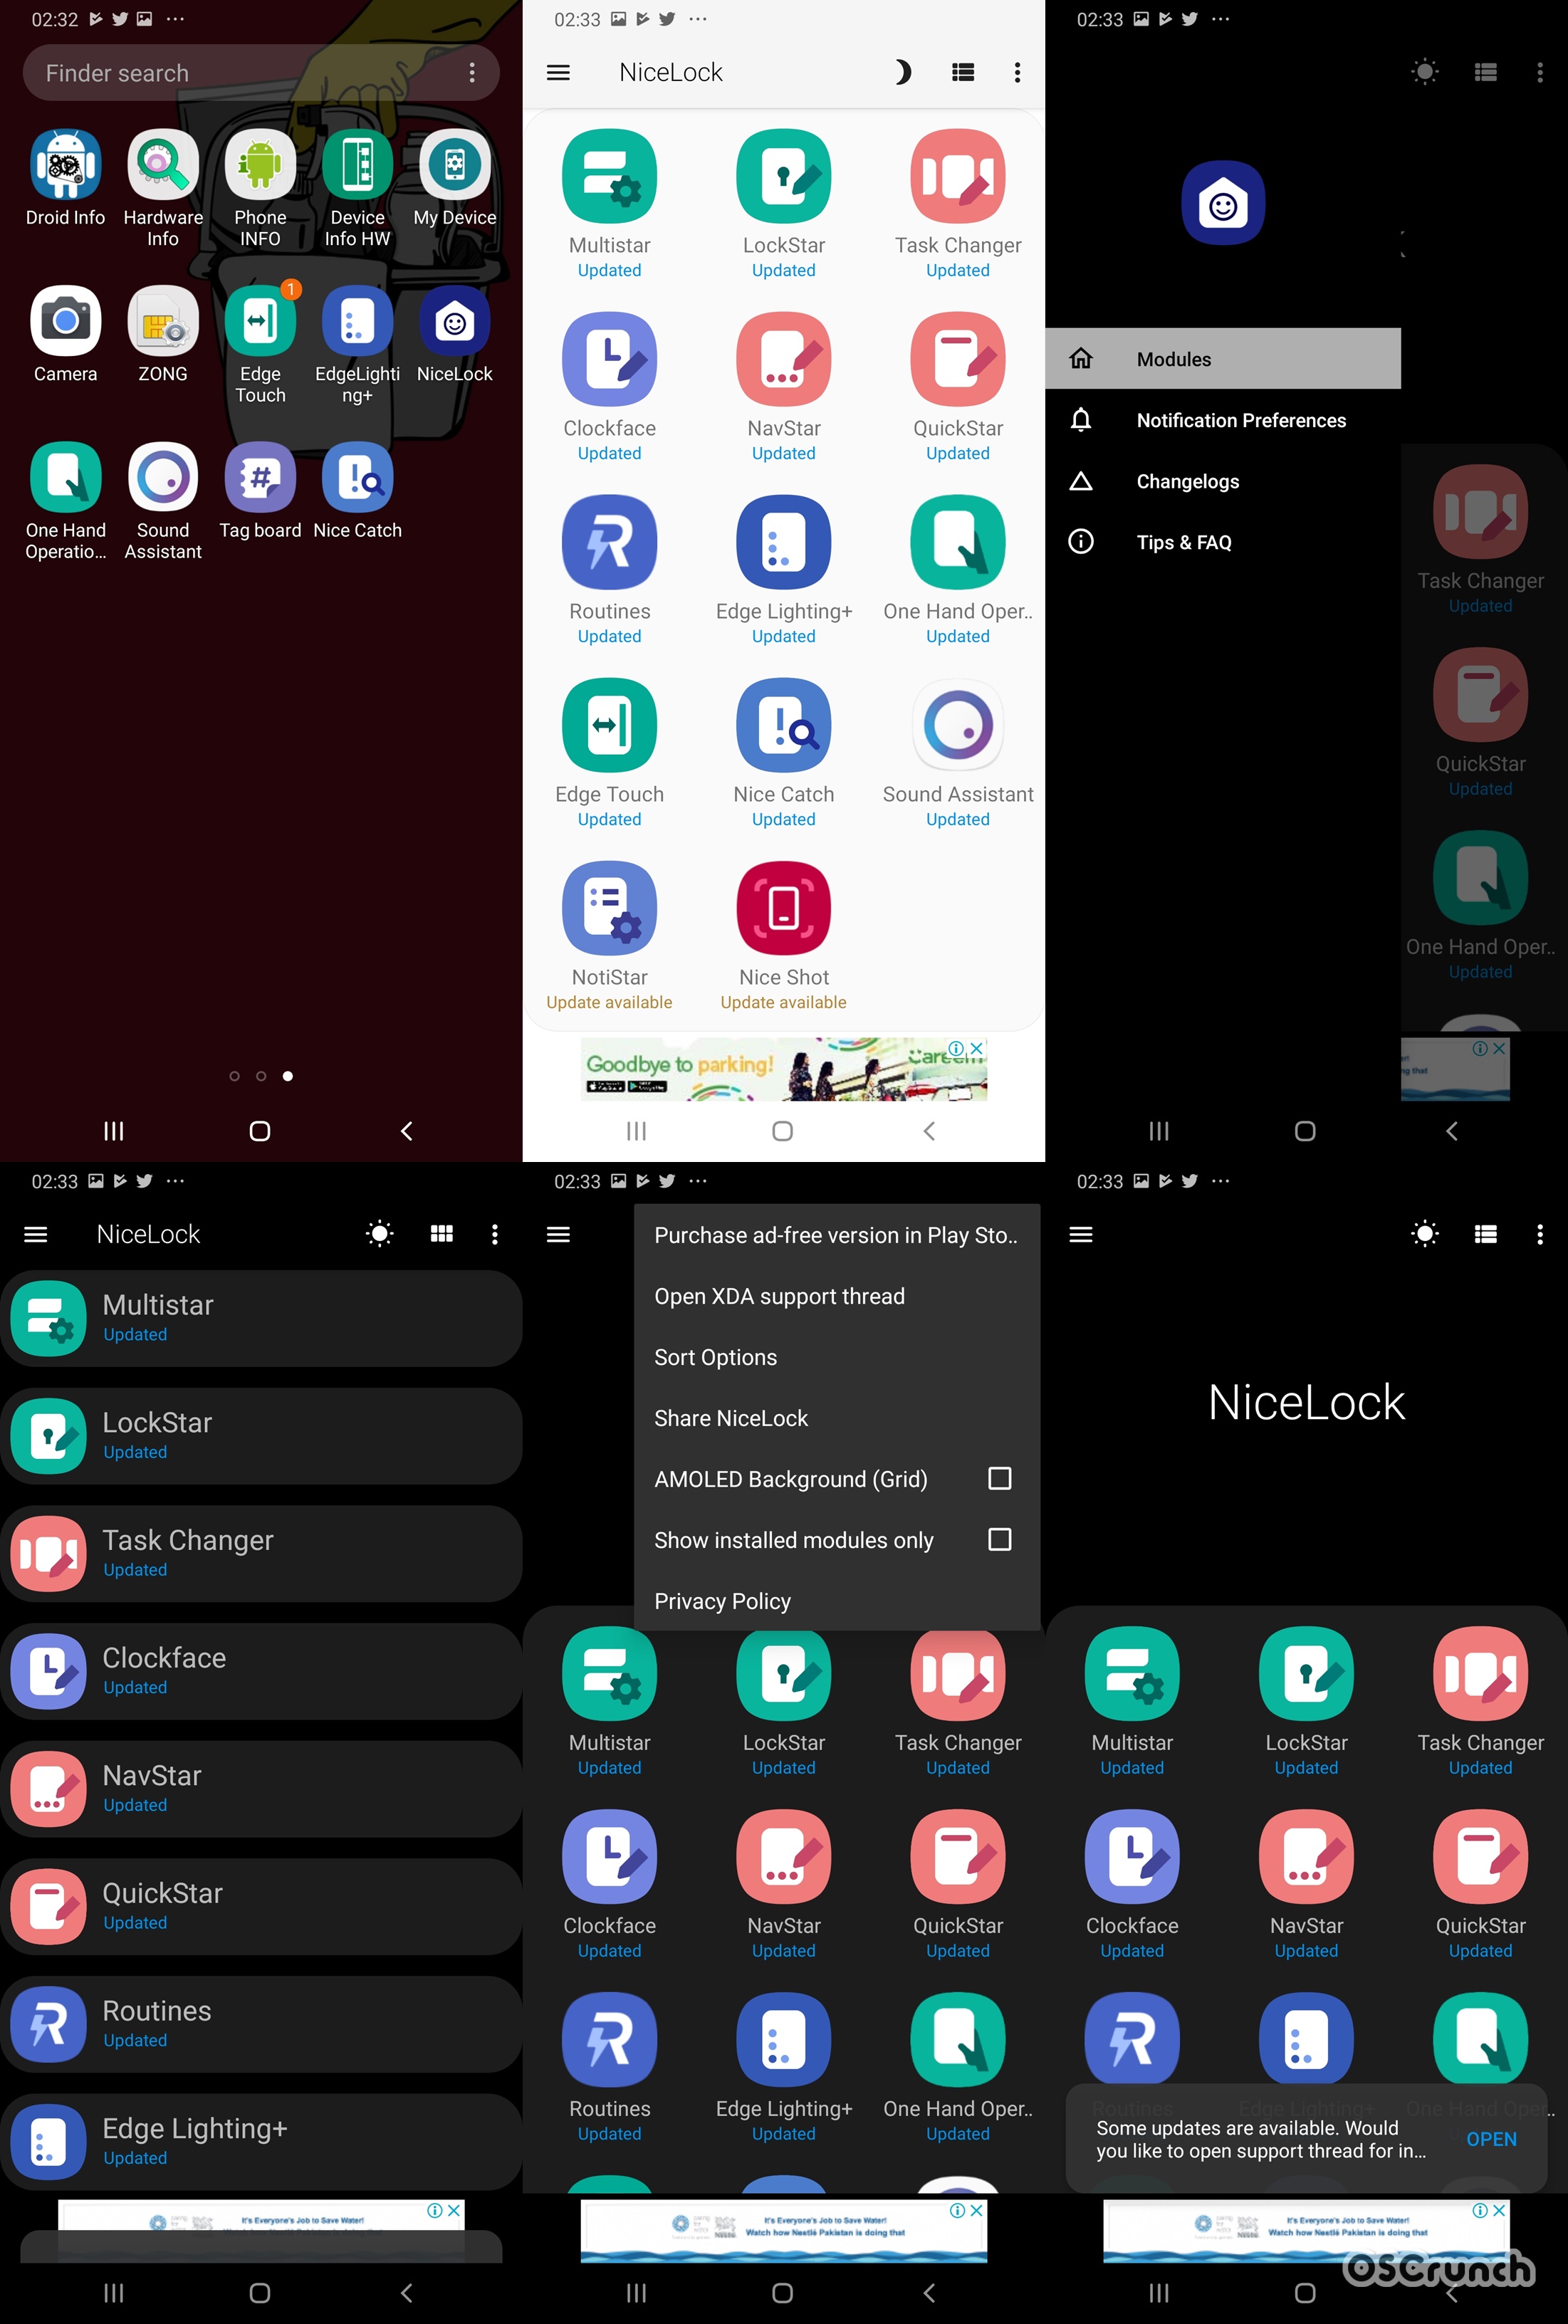
If you don’t want to go through the hassle of using a VPN, you need a Good Lock 2019 Alternative which is as good as the original app. The Nice Lock app is here to do the job for you. This application looks 110% like the Good Lock app. The only downside here is that you have to install the plugins manually after installing the Nice Lock app. The plugins will only appear as installed in the Nice Lock app if you have installed them one by one through their APKs.

Nice Lock APK

Apart from this, the Nice Lock is the kind of app that I can recommend any given day to use as a replacement of the Good Lock 2019.

Nice Lock APK – Download

Samsung Good Lock 2019 Add-ons/Plugins

  1. Multistar
  2. Lockstar
  3. Task Changer
  4. Clockface
  5. NavStar
  6. QuickStar
  7. Routines
  8. Edge Lighting+
  9. One Hand Operation +
  10. Edge Touch
  11. Nice Catch
  12. Sound Assistant
  13. NotiStar
  14. Nice Shot

Good Lock 2019 Plugins APK

Before you go through each plugin individually, I would like to tell you that I have uploaded all of them altogether as well. You can download Good Lock 2019 Plugins.zip file and extract it to get all add-ons. Otherwise, you can also get them one by one from below.

Multistar

The Multistar plugin is built for enhancing the multi-windows and multitasking feature of the Galaxy phones. This app will let you use multi-windows without pausing one of the windows now. The pop-up view action brings the old diagonal-swipe to launch multi-windows back to the phones. You can change the split-screen color too. Another great use of the Multistar app is to enable multi-windows for all the apps.

MultiStar APK

Multistar APK – Download

Lockstar

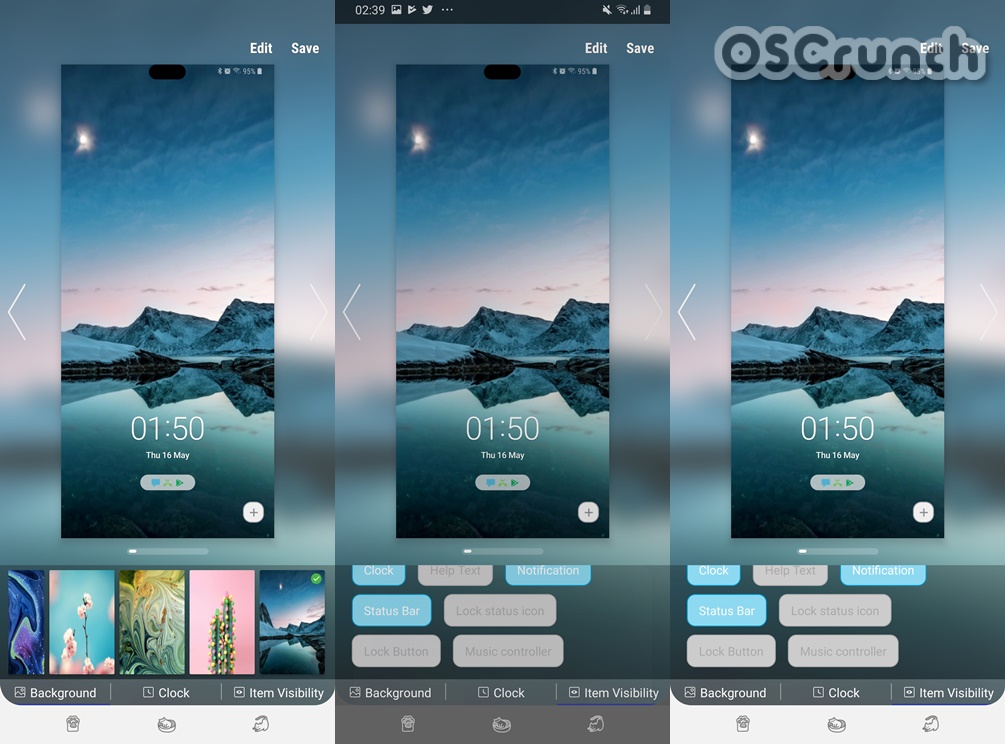
Lockstar brings tens of new styles for the lock screen of Galaxy phones. You can change the Unlock Type on the phone to swipe, swipe up, swipe down, swipe left, and swipe right. It will let you disable the system clock on the lock screen. Item Visibility on the lock screen can be changed in this app. Remember that these lock screen settings are not there in the native settings of One UI. 

LockStar APK

Lockstar APK – Download

Task Changer

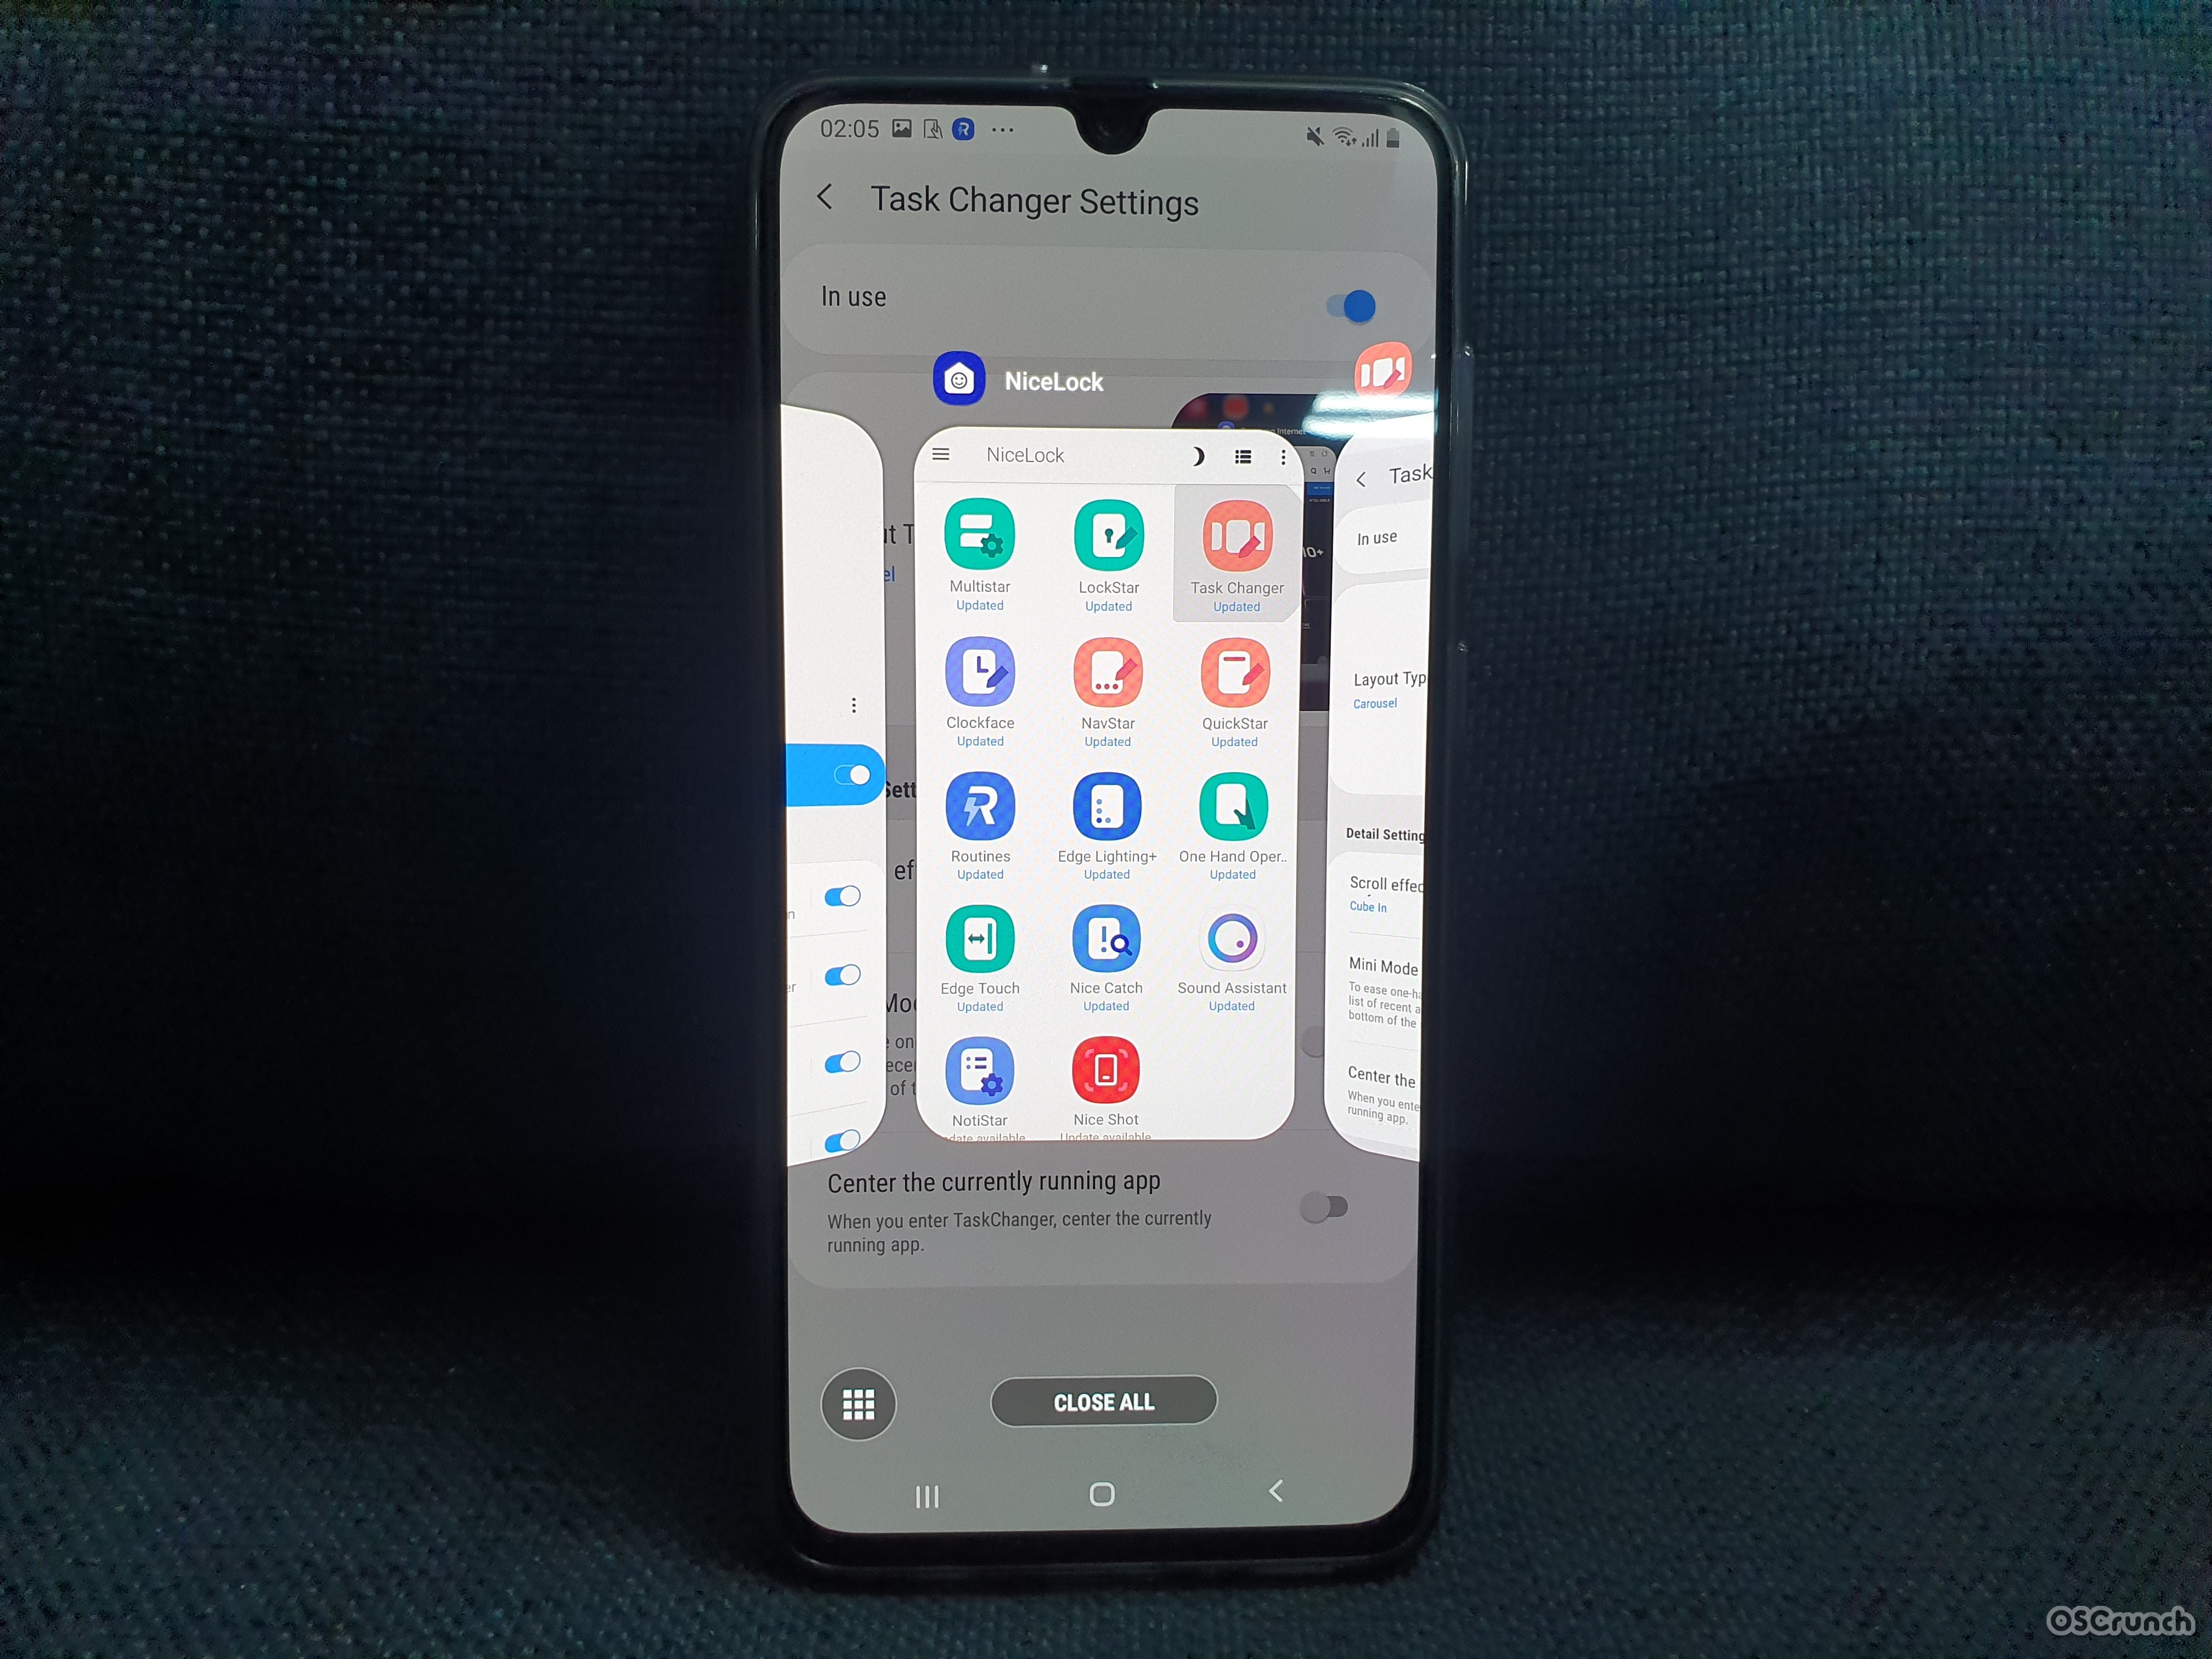
Remember using that Nova Launcher, the Action Launcher, and many others that were there? Those launchers had a cool feature which was to scroll the screens in the form of a cube or make a carousel. You have the same options for the Recent Apps menu in Task Changer. Alongside the Carousel, you get the List, Grid, Stack, and Slim List options for the recent apps. To be honest, this is the plugin that I personally like the most. Its just way-way better than the stock look of the recent apps cards.

Task Changer APK

Task Changer APK – Download

Clockface

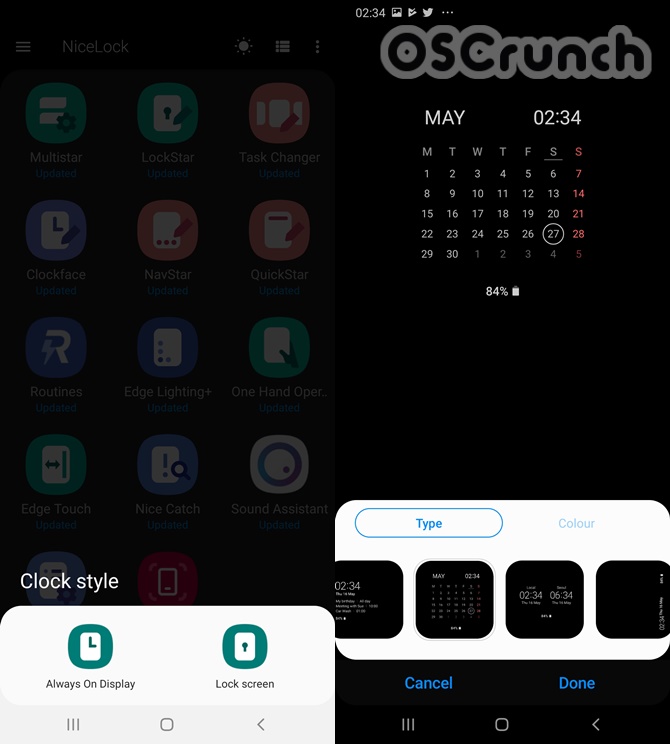
Want to change the look of the clock on the lock screen or on the home screen? Or you just don’t like the way clock looks on the always-on-display? Its time to change it. You can use the Clockface to customize it the way you want.

ClockFace APK

Clockface APK – Download

NavStar

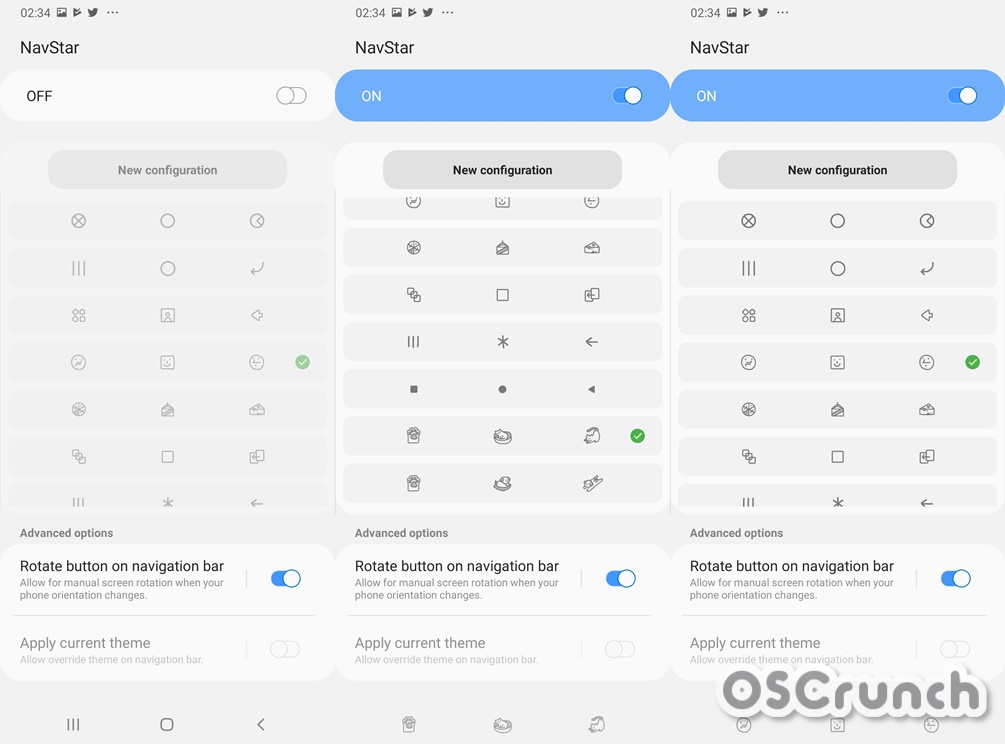
Another favorite of mine. The NavStar will give your navigation buttons a funny look. It uses the structures or sketches of emojis to replace the typical navigation buttons on Samsung One UI. It has over 5 different styles for the navigation buttons.

NavStar APK

NavStar APK – Download

QuickStar

QuickStar can change the look and feel of the notifications panel and the toggles section. You can change the entire color of the notifications panel. It also adds the pop-up view button to the notifications. You can also decide what indicator icons you want in the status bar. You can disable them all, or activate a few of them to keep the status bar neat and clean. 

QuickStar APK

QuickStar APK – Download

Routines

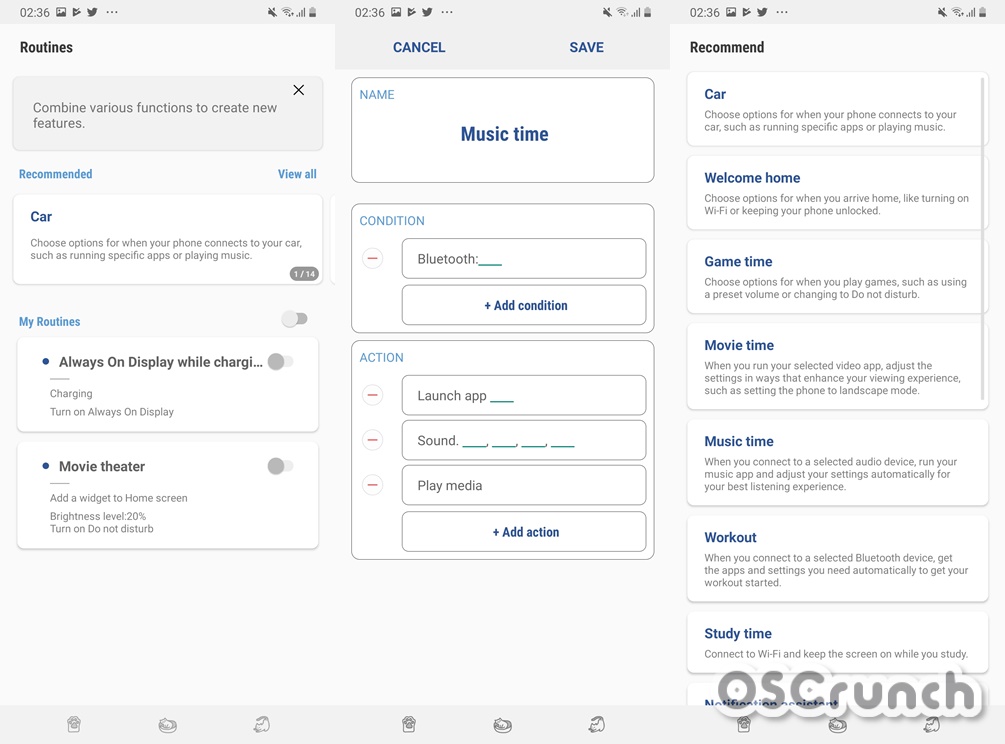
The basic purpose of routines is to set automated tasks on the phone. For example, you want your phone to tell you when to watch a movie, when to play or pause the songs, when to call someone, or when to take a picture, you can do this all by setting up routines. By default, you do get the Routines as a part of the Samsung Bixby platform, but these Routines make it much more easy to set up because you get the pre-built templates.

Good Lock 2019 Routines APK

Routines APK – Download

Edge Lighting+

Edge Lighting+ is only for the edge-powered handsets. This adds a very beautiful lighting effect around the edges of phones. If you have a phone like the Galaxy S10 or S10 Plus, you can add a lighting effect around the camera cutout with the help of this app. Edge Lighitng+ does not work on Samsung phones that have flat displays.

Edge Lighting+ APK – Download

One Hand Operation +

The navigation gestures are already here, but they are difficult to use with one hand. The One Hand Operation + is basically a version of Navigation Gestures for one-handed use. These gestures are enabled anywhere on the screen. You can swipe in or out from the right and left to perform your desired task. 

One Hand Operation + APK

One Hand Operation + APK – Download

Edge Touch

Edge-phones look cool, but they have a problem. The edge is sensitive to touches. Your phone can detect touch while it’s in your pocket or it is lying around. To get rid of this problem, you can get the Edge Touch. It gives the option to specify the areas where you don’t want the touch to be detected. 

Edge Touch APK

Edge Touch APK – Download

Nice Catch

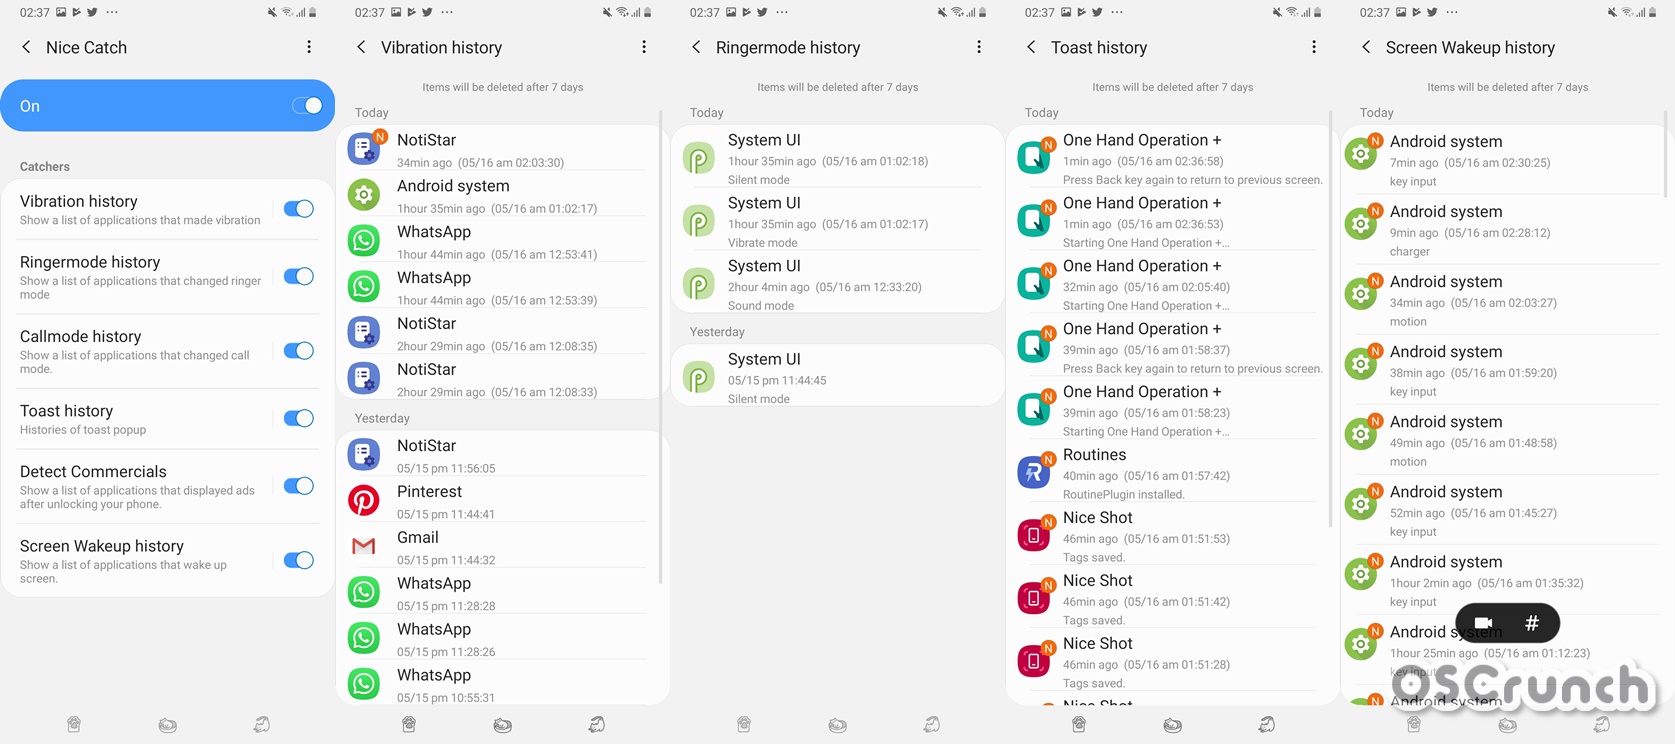
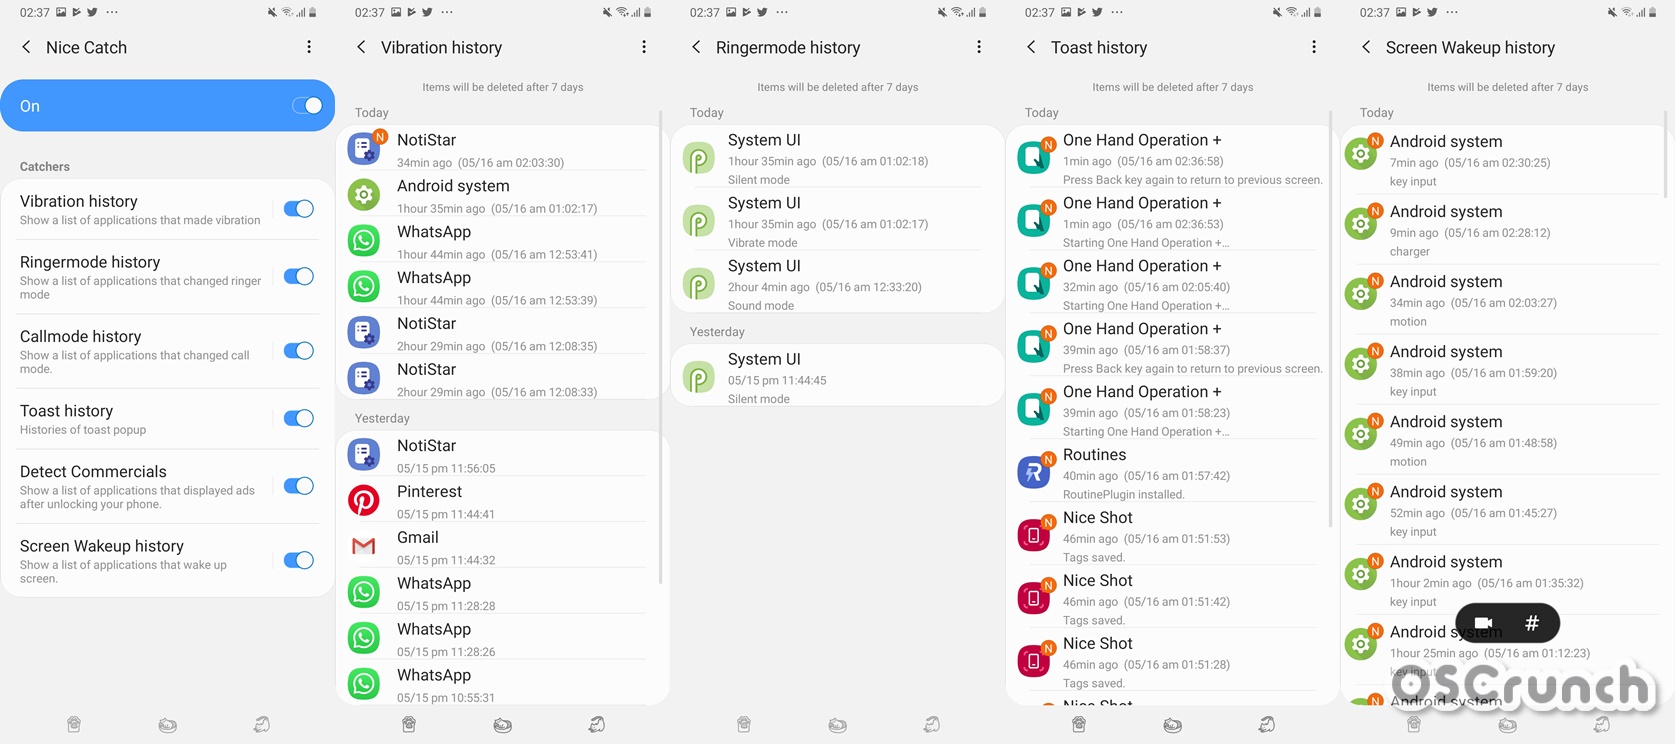
As its name suggests, it is such a nice app. Nice Shot keeps an eye on the activity of your apps. It can tell you what application caused vibration at what time. It can also detect what application used the ringer on the phone. The Call mode history can be tracked there too. It also keeps an eye on the apps that show you weird ads. At times, anonyms apps wake the screen up and we cannot figure them out. The Nice Catch will catch those apps too. If you have been getting annoyed lately because of the suspicious activity done by the apps, its time to nicely catch them.

Nice Catch APK

Nice Catch APK – Download

Sound Assistant

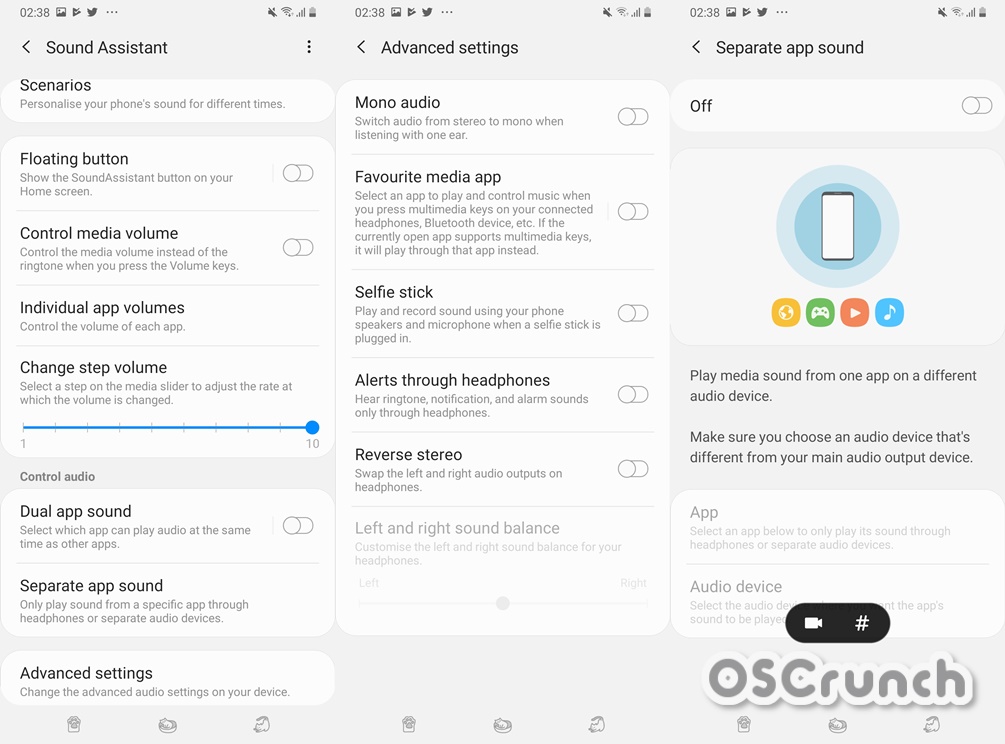
The Sound Assistant gives you extended control over the volume settings. You can control the sounds of each individual app now. The Sound Assistant has its in-built equalizer too. You can also use the dual app sound, which let two apps use the speakers at the same time. You can also set a specific app to use the speaker or headphone on the phone. It has some other useful options like Reverse stereo, alerts through the headphone, and favorite media app. 

Sound Assistant APK

Sound Assistant APK – Download

NotiStar

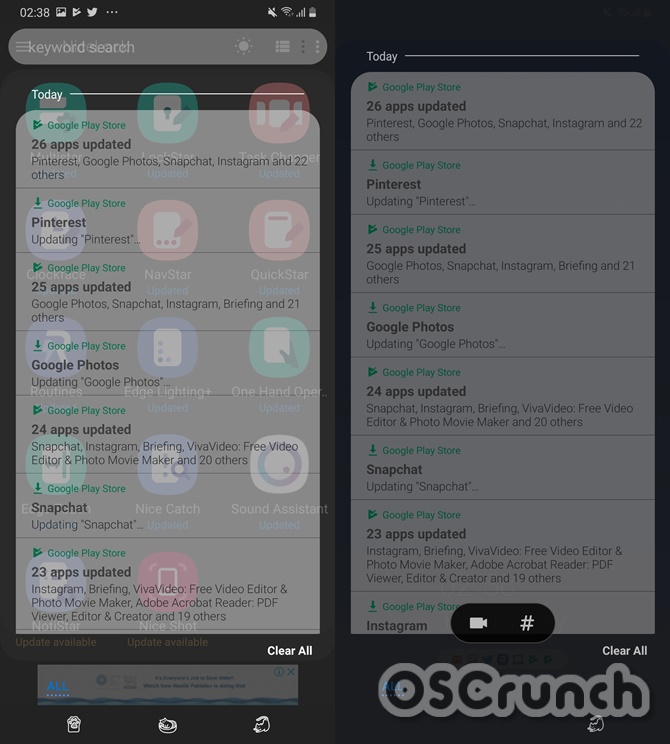
NotiStar was released very recently. It is, in fact, a part of the Good Lock 2019. The NotiStar adds a filter to your notifications. You can quickly search through your cluttered notifications using a specific keyword. You can also choose what apps should send you the notifications. The UI used by NotiStar is really easy-on-the-eyes.

Noti Star APK

NotiStar APK for Nice Lock – Download


NotiStar APK for Good Lock – Download

Nice Shot

The last plugin in this list is the Nice Shot. It is the screen capture plugin with extended features. For example, you can change the quality and format of the screenshots. It also adds a native video recording button to the screenshots. Whenever you take a screenshot, a video recorder appears which can record the screen in high quality. It also records the audio.

Nice Shot APK

Nice Shot APK – Download

Note: All the Good Lock 2019 APKs attached above are safe and sound to install. Furthermore, all the APKs are the latest versions as of May 16, 2019.

In order to install the Good Lock 2019 and these plugins, you can follow this guide: How to install Samsung Good Lock 2019

That’s all. If you have any queries, feel free to reach out to us.

How to install Samsung Good Lock 2019

How to install Samsung Good Lock 2019

Want to install Samsung Good Lock 2019? You have spotted the right place. This tutorial will help Galaxy owners to install Samsung Good Lock 2019 on any Samsung Galaxy phone on Android Pie. You can install Good Lock 2019 on any Samsung device outside the US, South Korea, and Canada.

Samsung Good Lock 2019
The Samsung Good Lock 2019 on Galaxy A70

For years, the developers of custom ROMs and third-party launchers have helped Android users add desired features to the phones. As time passed on, the trend of the custom ROMs started dying down. It wasn’t that the custom ROMs or launchers themselves were becoming obsolete. It was the fact that the phone makers started adding the same features to the stock UI. ROMs are still there and so are the launchers, but if you have an application like Good Lock for a Samsung handset, you don’t really need a custom piece of software. In this guide, I will show you how you can download Samsung Good Lock 2019 on any unsupported Samsung Galaxy handset. You can install the Good Lock 2019 on Samsung Galaxy phones running on Android 9 Pie. Before you learn how you can get it, let me tell you what Samsung Good Lock exactly is.

What is Samsung Good Lock?

Samsung Good Lock is the South Korean giant’s official UI customization application. The application uses a bunch of add-ons or plugins to bring in a number of useful features to your phone. The Good Lock app can change the whole look of your phone. It has 14 different plugins which can make the stock UI of your Samsung Galaxy phone more useful.

Whether you want to customize the lock screen of the handset, you want to change the look of the recent apps panel, or you want to change the way the always-on-display looks, you will find all the relevant options in the Samsung Good Lock.

Giving control to the Galaxy owners

If you are already wondering why Samsung released a tool like the Good Lock, then let’s get an answer to that first. Samsung basically uses the Good Lock app to test experimental features. If the users like a particular feature and the provide the feedback to the manufacturer, depending on the type of feedback, Samsung either adds that feature into a future version of its UI, or it completely removes it.

Many of the experimental features in the first version of Good Lock made it to Android Nougat, and then many made it to Android Oreo and Android Pie. The available customizations in the Good Lock 2019 might find some space in the next version of Android for Samsung handsets.

The Good Lock, in my opinion, is one of the best possible ways to change the look and feel of your smartphone’s interface. It keeps you from the hassle of rooting or flashing a custom ROM that you cannot even trust. 

install Samsung Good Lock 2019

The Good Lock app itself is basically a control panel. Or, you can call it a dashboard that will let you take complete control of its Plugins.

When you install the Good Lock, it shows you a list of all available add-ons. You can choose to decide one or all of the add-ons. After that, you can launch the settings of that plugin within the Good Lock app. Some of the Add-ons appear as standalone apps in the app drawer while some are accessible only via the Good Lock handler. 

Good Lock 2019

Samsung Good Lock was released in the year 2016 first. It was compatible with the Android Marshmallow and Nougat. The app was updated in 2018 for Android Oreo and then it got another update in the year 2019. This year, Samsung introduced a couple of new apps like the NotiStar and the Nice Shot. The Good Lock 2019 has also added new options in the existing modules. It can be safely said that the Good Lock 2019 is the best among all of its versions.

Bypassing Country Restriction for Good Lock 2019

If you are on this page, my very first assumption is that you are only here because you couldn’t install the Good Lock 2019. The most probable reason is you are living outside a country like the US, Canada, or South Korea. At the time of writing this, the Good Lock 2019 supports only 4 or 5 countries. If you are living outside any of those countries, you are out of luck.

But wait, there is no reason to be sad here. We are here with a solution. You can install Samsung Good Lock 2019 by bypassing the country restriction. All you need to do is to follow this tutorial.

Downloading Good Lock 2019 on any Samsung phone

It does not matter what phone you have, the only thing that matters is the Android 9 Pie on it.

By this time, I’m sure that you already know about the Good Lock app merely being a dashboard only. The plugins can be installed as stand-alone apps, but handling them will be a problem. So, you do need a handler. It is clear that you can’t download the official Good Lock handler, but it doesn’t mean that you should compromise for a ripoff. 

install Samsung Good Lock 2019

So far, a majority of the Galaxy owners has been using the Activity Manager to handle Good Lock. The Activity Manager, in my opinion, is not such a great app. Its UI may not seem as intuitive to some of the users.

To keep the customization experience as premium as the official Good Lock app, the XDA Senior Member xantrk introduced an app called Nice Lock. The Nice Lock is a 110% lookalike of the Good Lock 2019. While using Nice Lock, you can’t really tell if you are using the official Good Lock or something else.

Also, the Activity Manager seems a bit off the track, while the Nice Lock has everything in the right place achieving maximum sterility.

Installing Good Lock 2019

As we approach the method to install, it is important to prepare your device. You don’t really need to prepare your phone as you used to prepare it for rooting or for a custom ROM. The Good Lock is an official app, its plugins will not harm your phone. None of the plugins will cause a crash either. Every single thing in this tutorial is 100% safe and sound. The uninstallation of the add-ons is as easy as the installation. So, even in case you don’t find anything useful, you will have enough control to get rid of it instantly.

Let me tell you what Good Lock 2019 Plugins/Add-ons we have.

Good Lock 2019 Plugins/Add-ons

  1. Multistar
  2. LockStar
  3. Task Changer
  4. Clockface
  5. NavStar
  6. QuickStar
  7. Routines
  8. Edge Lighting+
  9. Edge Touch
  10. One Hand Operation+
  11. Nice Catch
  12. Sound Assistant
  13. NotiStar
  14. Nice Shot

So, what do these micro-apps do? Well, take a look at the brief description below.

MultiStar

The MultiStar can add new options for multi-windows.

LockStar

LockStar can customize the lock screen.

Task Changer

Task Changer can change the look of the recent apps panel of the handset. NavStar can add new navigation gestures.

ClockStar

ClockStar changes the look of the clock on the always-on display.

QuickStar

QuickStar can add extra control to the notifications in the notification panel or on the lock screen. It also changes the color of the notifications panel. It has a handful of default templates for the notifications area. 

Routines

Routines will help you automate tasks on your smartphone. For example, you can schedule when you want your phone to shut down, or when you want its torch to turn on, or you can set when you want the phone to tell you to go for a movie. This can be done via Bixby routines too, but Good Lock has its own different Routines.

Edge Lighting

Edge Lighting Plus is useful for phones with the edge as you can add new lighting effects. The Edge Lighting will not work on a phone without edge screen.

Edge Touch

Using a phone that has an edge screen? you must be going through pain because of accidental touches on its edge. The Edge Touch will restrict those touches for you.

One Hand Operation+

One Hand Operation+ adds gestures to let you control the phone with one hand.

Nice Catch

Nice Catch keeps an eye on the actions of the apps and shows you the relative history.

Sound Assistant

Sound Assistant gives you control to change sound effects for each individual app or overlap the sound of multiple apps.

NotiStar

NotiStar can show you faded notifications on the lock screen.

NiceShot

The Nice Shot is a screen capture feature which incorporates video recording and saves the screenshots to its internal tagboard. 

You can download all the Good Lock 2019 Plugins from this page.

Guide on How to install Samsung Good Lock 2019

  1. First of all, download the Nice Lock APK – Download Link
  2. Now download the Good Lock Add-ons/Plugins from the page linked above. You may download one, few, or all the plugins.
  3. Copy the Nice Lock and Good Lock plugins to your handset’s internal storage.
  4. On the phone, open File Manager and then open the Nice Lock APK for installation.
  5. If it asks for permission, allow it and finish the installation.
  6. Now in a similar way, install the Good Lock plugin or plugins.
  7. Once done, go to the App Drawer and open Nice Lock.
  8. You will find all of your installed plugins there.
  9. Open any plugin and set it up. Use it away and enjoy!
install Samsung Good Lock 2019 - Nice Lock
The best replacement of Good Lock – Nice Lock

Wrap Up

That was too easy, isn’t it? Well, you are all set to add stylish elements to your phone’s already-amazing One UI. This latest version of Good Lock is crazy-good. Especially, the way the task changer changes the look of the recent apps panel, the sound control given in the Sound Assistant, the way the Nice Shot shoots videos or adds screenshots to the tagboard, and the way Nice Catch works. 

I do hope that all of you found this guide useful. If you have any questions or queries, do not hesitate to ask. The best way to reach out to us is through the comments section below or through our Contact Us page.