Home Blog Page 293

Flush and Reset the DNS Cache in Windows 10

Flush and Reset the DNS Cache in Windows 10

Learn how to Flush and Reset the DNS Cache in Windows 10.

Today I’ll tell you how to Flush DNS cache and also how you can reset the DNS Cache in Windows 10, We all have face issues like ” website not found errors “. This method will help you to fix DNS related problems in Microsoft Windows 10. Now Let’s start the method.

Flush and Reset the DNS Cache in Windows 10

Flush and Reset the DNS Cache in Windows 10

Flush and Reset the DNS Cache in Windows 10:

In order to fix Flush and Reset the DNS Cache in Windows 10, all you have to do is change few basic settings. No need to go for anything party software or program, Just follow the instruction below to fix DNS issue in Windows 10.

Flush and Reset the DNS Cache in Windows 10

  • Press + Hold down the Windows + R keys together.
  • Now type in “ipconfig /flushdns” and press Enter.
  • Make sure you use the same command as written.
  • Sometimes nothing happens but do it again.

You can apply this method for Windows 10, 8, 7, XP, 2000, 2003 and 2008. Now this all for now, once you enter the command and hit enter in a matter of seconds your DNS cache will be flushed.

Download KDZ TOT LG FlashTool for LG Phones [All Versions]

0
Download KDZ TOT LG FlashTool for LG Phones [All Versions]

Owning an Android smartphone is not less than a perk in your life as long as you know how to customize it and make the best out of it. Various modifications make their way to a smartphone as soon as a manufacturer releases it. Once you start customizing your device, it puts you at certain risks. One of the biggest risks is of corrupting your stock firmware and in that case, you need a tool which can easily recover your phone by providing it a fresh installation of stock firmware. Different manufacturers have their own flash tools for this purpose. Sony has a Sony FlashTool, Samsung has its own Odin flash tool and LG has its own FlashTool which flashes the KDZ and TOT firmware files on your LG smartphone.lg-flashtool

The KDZ and TOT are the extensions for the LG firmware files. It may be noted here that these files are only compatible with the LG FlashTool. Just like you flash .tar.md5 files via Odin, in the same way, you will flash the KDZ and TOT files on your LG Android-powered smartphone with the help of the only available FlashTool.

LG FlashTool is available for free. You can grab it easily from many different sources. To make sure that you can get it at hand easily, we have uploaded it here for all LG users. A guide has been linked right next to the LG KDZ and TOT FlashTool. Just get the FlashTool and then learn how you can install the stock firmware on your LG smartphone. In order to make the tool work, you need to install the LG USB Drivers on your PC first. After installing the USB Drivers, you need to have the firmware files downloaded on your PC as well. The download links of old versions of the tools are also linked below. Pick up the one that completes all of your needs and starts using it right away.

Download KDZ TOT LG FlashTool for LG Phones [All Versions]

  1. Download and install LG USB Drivers
  2. Download and install the LG FlashTool according to your liking
  • LG FlashTool 2016 (Patched) – Download | Patched by renowned developers to work without any issues.
  • LG FlashTool (Patched) – Download
  • LG FlashTool 2016 – Download
  • LG FlashTool 2015 –Download
  • LG FlashTool 2014 – Download
  • LG FlashTool 1.8.1.1023 – Download | for version 1.8, you need to download the MegaLock.dll file and copy it to C:\LG\LGFlashtool

Dragon Ball Z Wallpapers HD Goku free

Dragon Ball Z Wallpapers HD Goku free

I have a special treat for all Dragon Ball Z lovers ” Dragon Ball Z Wallpapers HD Goku free “. You can download all the Goku Free HD Wallpapers for your mobile devices and Desktop.

3-super-saiyan-dragon-ball-z-wallpaper-620x349

3 super Saiyan dragon ball z wallpaper

Dragon Ball Z Wallpapers HD Goku free:

dragon_ball_z_wallpapers_by_imran_ryo-620x465

dragon-ball-wallpaper-with-mix-character-in-high-resolution-620x349

Dragon Ball wallpaper with Mix Character in High Resolution.

dragon-ball-z-free-wallpaper-download-620x349

Dragon Ball wallpaper with Mix Character in High Resolution.

dragon-ball-z-goku-wallpaper-download-jpb_-620x349

Dragon Ball Z Goku Wallpaper Download.

dragon-ball-z-goku-wallpaper-full-hd-620x349

Dragon Ball Z Goku Wallpaper Full HD.

dragon-ball-z-wallpaper-1920x1080-620x349

Dragon Ball Z Wallpaper 1920×1080.

dragon-ball-z-wallpaper-2560x1600-620x388

Dragon Ball Z wallpaper 2560×1600.

dragon-ball-z-wallpaper-hd-download-free-620x349

Dragon Ball Z Wallpaper HD download free.

dragon-ball-z-wallpaper-hd-free-download-620x388

Dragon Ball Z wallpaper HD free download.

dragon-ball-z-wallpapers-background-620x465

Dragon Ball z Wallpapers Background.

dragon-ball-z-wallpapers-free-download-620x349

Dragon Ball Z Wallpapers free download.

dragon-ball-z-wallpapers-goku-620x388

Dragon Ball Z Wallpapers free download Goku Wallpaper

dragon-ball-z-wallpapers-goku-windows-7-wallpaper-620x388

Dragon Ball Z Wallpapers free download Goku Windows 7 Wallpaper

dragon-ball-z-wallpapers-images-620x388

Dragon Ball z Wallpapers Images.

dragon-ball-z-wallpaper-songoku-620x361

Dragon Ball Z Wallpapers Goku

dragon-ball-z-wallpapers-small-goku-620x349

Dragon Ball Z Wallpapers Small Goku

dragon-ball-z-wallpapers-superb-620x388

dragon ball z wallpapers superb.

dragon-ball-z-wide-hd-wallpapers-620x465

Dragon Ball Z Wide HD Wallpapers.

[Windows 10]: PC Won’t Go to Sleep Mode

[Windows 10]: PC Won’t Go to Sleep Mode

Learn how to fix PC Won’t Go to Sleep Mode in Windows 10.

Those who have facing PC Won’t Go to Sleep Mode in Windows 10, follow the steps in order to fix Windows 10 Won’t Sleep. Once you start facing this issue your battery timings will start to reduce and performance rate will drop. Let’s start the guide to fix it.

Windows 10 Won't Sleep

Windows 10 PC Won’t Go to Sleep Mode:

  • Click on Start Button, Select Settings.
  • Select System.
  • Select “Power & sleep“.
  • Here you have check that Sleep setting is set to desired value.
  • Now look under “Additional power settings“.
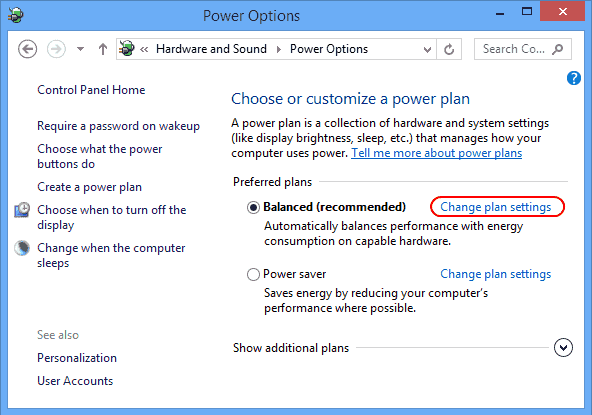
  • Click on “Change Plan Settings”.

Windows 10 Won't Sleep

Windows 10 Won’t Sleep

  • Now click on “Change advanced power settings“.
  • You’ll be in power settings menu, here you have to expand all the options and set the value to “Allow the computer to sleep“.

Windows 10 Won't Sleep

Windows 10 Won’t Sleep

This is all, I hope after applying these step your PC will no longer be facing Windows 10 Won’t Sleep issue, but if still, you are facing the same issue then you need to run you antivirus in order to check if there is any virus which is causing such issue. If not then i would suggest you should go to service center and let it checked by the professionals.

Source

Windows: Enable or Disable Superfetch

Windows: Enable or Disable Superfetch

In this Post, I’ll tell you how to enable or Disable Superfetch on Windows 10,8&7.

Superfetch stores cache data for applications so it can be available  immediately when you open applications. Now as we all know that Cache is a big problem for performance, same in this case Superfetch cache application data and because of this our system become laggy and slow. Let’s start the method to Enable or Disable Superfetch.

Enable or Disable Superfetch

Enable or Disable Superfetch

Windows: Enable or Disable Superfetch:

Disable from Services:

  • Open Run dialog box ( Windows Key + R ).
  • Type in “services.msc“, then press “Enter“.
  • Find “Superfetch” in the list.
  • Now Right Click on “Superfetch“, then select “Properties“.
  • Click on “Stop” button to stop this service.
  • In the “Startup type” dropdown menu, choose “Disabled“.

Enable or Disable from Registry:

  1. Press Windows Key + R.
  2. In Run Dialog box, Type “regedit”.
  3. Expand the following.
  • HKEY_LOCAL_MACHINE
  • SYSTEM
  • CurrentControlSet
  • Control
  • Session Manager
  • MemoryManagement
  • PrefetchParameters

Find “EnableSuperfetch“ and double click on it and if you cannot find then you have to create new value. Use the following method to create it.

Right, Click on “PrefetchParameters” folder.

Choose “New” > “DWORD Value“.

Use any of the following values.

  • 0 – to disable Superfetch
  • 1 – to enable prefetching when program is launched
  • 2 – to enable boot prefetching
  • 3 – to enable prefectching of everything

Select Ok.


Enable or Disable Fast User Switching-Windows 10

0
Enable or Disable Fast User Switching-Windows 10

In this post, I’ll tell you how to Enable or Disable Fast User Switching Windows 10.

Windows 10 came out many nice features but on the most people find these features quite annoying. One feature that I don’t want is Fast User Switching, which allows multiple users to use single PC without closing other users work.  Let’s start the guide to Enable or Disable Fast User Switching.

disable fast user switching windows 10

Enable or Disable Fast User Switching-Windows 10:

Option 1 – Group Policy:

  1. First, Hold Windows Keys and Press R.
  2. You’ll be in run dialog box, type “gpedit.msc” then press “Enter“.
  3. A new Window will appear, you’ll see following options.
  • Local Computer Policy
  • Computer Configuration
  • Administrative Templates
  • System
  • Logon
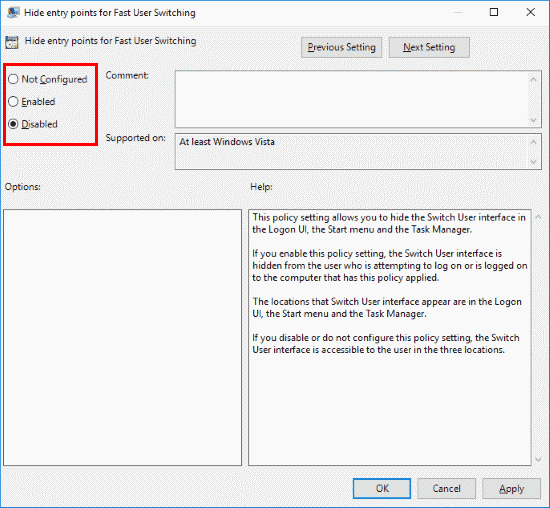
  1. Click on “Hide Entry Points for Fast User Switching“.
  2. Now you can easily enable or disable Fast User Switching option.

Option 2 – Registry:

  1. Press Windows Key + R.
  2. In Run Dialog box, Type “regedit”.
  3. Expand the following.
  • HKEY_LOCAL_MACHINE
  1. Find “HideFastUserSwitching“, from the list. If you cannot find the value then you have to create a new value.
  2. Right-click the “System” folder.
  3. Click on “New DWORD 32-bit value“-> Type “HideFastUserSwitching“-> Press “Enter”.
  4. Once the value is created, Double click on “HideFastUserSwitching“-> To Enable Value Data (1), To Disable Value Date (0).

All Done.
Source

How To Fix Failed To Mount Data (Invalid Argument)

6
How To Fix Failed To Mount Data (Invalid Argument)

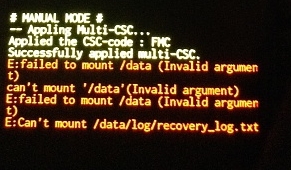
Failed To Mount Data may be the most annoying error that your Android device may come up any moment when you are trying to play around. The reason for this error to pop up is something going wrong with the internal storage partition of your phone. This can happen when you are applying any tweaks or trying to modify your phone using something custom. Once this error comes up, it will not let your phone boot up and it will stay stuck in the boot-screen unless you fix it. failed-to-mount-data

Fixing this error is not as easy as it seems. Simply wiping the cache will not be good enough. You have to try multiple workarounds and see which one suits the situation. Simply factory resetting your device might fail as well. This error is more of bad news because while trying to fix it, you will lose all your data. If you have a backup previously, then you are on a safe side. Let’s have a look at the available solutions and see which one works out for fixing Failed To Mount Data (Invalid Argument) error.

How To Fix Failed To Mount Data (Invalid Argument)

Method #1 Wipe Data/Factory Reset

  1. Boot your Android phone into recovery mode. You may use the Volume Down + Home button for Google Nexus and other smartphones. Use Volume Up + Power + Home button for Samsung phones and for other phones use Volume Up + Volume Down + Home button.
  2. Once you are in recovery mode, use Volume Up and Down keys to navigate to “Wipe Cache Partition” option. Press Power Key to select it and then wipe it.
  3. Reboot the device and see if it boots up. This is just a try, it won’t boot up though.
  4. Now boot into recovery mode again and this time select “Wipe Data/Factory Reset”. This will wipe the partition from your phone.
  5. Now reboot and your phone should boot up fine.

Method #2 Wipe Data/Factory Reset using a Custom Recovery

For this method to work, you need to have a custom recovery like TWRP, CWM or Philz Advanced CWM installed on your phone.

  1. Install TWRP recovery or any other recovery depending on your convenience.
  2. Now boot into the recovery that you just installed.
  3. If you have TWRP recovery, then do this.
    1. Boot into TWRP and tap Wipe > Advanced Wipe > Select the Data partition, cache and Dalvik cache > Wipe > Swipe to confirm wipe.
    2. Reboot your device and it should just boot up right.twrp_i9001plus
  4. If you have Philz Advanced CWM, do this.
  5. Boot into Philz Advanced CWM recovery and tap Wipe Cache/Data Partition and then wipe it. With Philz Advanced CWM, you can go to Wipe Cache/Data Partition options > Wipe for flashing new ROM option might work as well.
  6. If you have CWM, then boot into it and select the Wipe Data/Factory Reset option and do it.
  7. Reboot your phone now and it should boot up. In case if it fails, you will have to flash new stock firmware on your phone.

Method #3: Install Stock Firmware

At this point, you are completely out of luck and the only option that you are left with is the installation of a brand new Stock Firmware. Various guides for different brands are available on our site. Pick up the one that suits you and do it now.

That’s all. Let us know which method works for you. If you need any further help, reach us out through the comment box below.

Failed To Mount Cache (Invalid Argument) – FIXED

4
Failed To Mount Cache (Invalid Argument) – FIXED

Failed to Mount Cache error is bad news. This error occurs when the cache partition of Android phone damages & phone fails to boot up. This error can come up with any Android phone and once it happens, your phone will just get stuck on the boot screen. The error isn’t easy to handle is it requires multiple workarounds to get tackled. You can find this error on your phone when you boot into the recovery mode of your Android phone, you will find out few lines of text appearing at the bottom of the screen identifying the aforementioned error.failed-to-mount-cache

If you have just reached here while looking for a solution to this error, I would like to tell you that you have found the right place. You just have to follow a few steps to get rid of this error. During the process of fixing this issue, you will not loose your messages, contacts, call logs or any other data. We will not touch the data partition of the phone and we will try to fix it without involving ourselves in any complexity. Follow this method to fix Failed To Mount Cache (Invalid Argument) error now.

Failed To Mount Cache (Invalid Argument) – FIXED

The fix given here is not supposed to work on a particular Android powered handset. It will work for all Android phones facing the Mount /Cache error. Have a look on the easy steps now to wipe off this annoying error from your Android smartphone.

  1. In order to kill this error, you need to boot into the recovery menu of your Android smartphone.
  2. If you have a Google Nexus, Volume Down + Power button will bring up the bootloader and then you can choose the recovery mode to boot int. If you have a Samsung Galaxy, Volume Up + Home + Power Key will boot you into the recovery mode. For most of the Android phones, Volume Down + Power or Volume Up + Down + Power combination will take you into the recovery mode.
  3. Once you are in the recovery mode, use Volume Up and Down keys to navigate to “Mount System/Cache” option and then press Power button to select it.
  4. Once done, navigate to Wipe Cache Partition option in the recovery using Volume Up/Down and then press power key and wipe it.
  5. After wiping cache, reboot your phone.
  6. It should boot up fine now. In case if it doesn’t, go back to recovery mode again, once again select Mount System/Cache and then reboot your phone.
  7. That’s all.

In case the above method fails to work for you, then unfortunately, your only option is to perform a factory reset or to flash a new stock firmware on your phone. For that, you can find several guides regarding your smartphone on our site.

How to check Android phone is rooted or not using Root Checker

0
How to check Android phone is rooted or not using Root Checker

When you own an Android-powered device, be it a smartphone or a tablet, rooting it is the probably best thing that you can do on this planet. Rooting your phone gives you the freedom to control it according to your liking. Rooting brings you plenty of options to add new features to your phone, customize its look, enhance its performance and also tweak the battery life of the gadget. Whenever a new smartphone comes out, it doesn’t take too long for the developers to root it. As soon as the root access for a particular device is achieved, a load of users tends to root their devices and they need certain tools to work. At first, you need to root your phone by following an appropriate method and afterward, you need to check whether your phone is properly rooted or not.

Checking Root Access on Android

To check the root access, various applications are available in the play store. The best one that is always guaranteed to work is the Root Checker applications. This application takes a few seconds to install. Once you have it on the phone, you just need to open it and tap the Verify Root button. It asks for root permissions by bringing up a pop-up of the SuperSU applications installed on your phone. As soon as you allow it or tap yes, the application immediately results in displaying that the device is rooted. If the Root Checker fails to gain the root permissions or bring up the SuperSU pop-up, it will inform you about the device not being rooted. That’s how simple it is via the Root Checker application.

If you have recently rooted your phone or you are in a doubt that your phone is rooted or not, you can get your hands on Root Checker and do it instantly. To help you further, a little guide is up here that explains the method in very easy steps.

How to check Android phone is rooted or not using Root Checker

  1. Download and install Root Checker application on your phone from the Play Store.
  2. Open the Root Checker application now.
  3. Tap the “Verify root” button appearing in the application now.
  4. Root Checker will now ask for root rights, quickly tap “Grant”.
  5. Once granted, it will provide you the root details mentioning your phone’s model number and firmware version.
  6. That’s all with it.

verify-root-on-android


How to enable USB debugging on Android

0
How to enable USB debugging on Android

Before going all custom with your Android phone or tablet, the very first thing you need to do is to enable the USB debugging mode. Enabling this particular mode on your Android phone makes it easy for your computer to communicate with the device when it is connected through a power cord. The USB debugging mode is responsible for allowing the manual operations being done on your Android phone. Especially, when you have to perform ADB and Fastboot operations through a command window on your phone, having the USB debugging mode enabled is a must. At times, in order to root your phone or to flash a custom recovery through scripts running on your desktop PC, you have to bypass this permission by enabling this mode.

The USB debugging mode is hidden in your Android phone. You may not be able to find it easily by simply going into the settings application on your phone. It was visible in the settings app prior to Android 4.2.2 KitKat. Keeping in view the sensitivity of the feature, Google hid the entire developer options in Android 4.2.2 KitKat onwards. In order to enable the USB debugging mode in Android KitKat, Lollipop, Marshmallow or Nougat now, you first have to enable the developer options and only then you are capable of enabling the said mode.

To save a few minutes of Android users, we have put up this method here which explains how to enable USB debugging on Android KitKat, Android Lollipop, Android Marshmallow, Android Nougat, Android Oreo and Android Pie powered smartphones/tablets. Have a look at the steps and get it done right away.

  1. First of all, go to settings on your Android phone and scroll all the way down.
  2. In settings tap About device.
  3. Now in the About device menu, locate “Build number” for your Software. If there is no build number in about device section, then find the “Software info > Build number” option.
  4. Once you have found the build number option, tap it 7 times.
  5. Tapping the option for 7 times will bring up the developer options in the settings menu.
  6. Now go back to the settings application and scroll all the way down to find developer options.
  7. Tap developer options and scroll down to find USB debugging.
  8. Once you have found the mode, enable it and connect your phone to your PC.How to enable USB debugging on Android
  9. Once the phone prompts up with the permissions regarding your PC, allow it.
  10. That’s all. You are done.

Also check: How to enable USB debugging on Android Pie

Download Pre-Rooted BlueStacks 2 App Player

2
Download Pre-Rooted BlueStacks 2 App Player

There is no doubt that BlueStacks App Player is the best available Android emulator at the moment. BlueStacks makes it very easy for Android enthusiasts to replicate their smartphone experience on their Desktop PCs and Laptops in the form of a tablet running on the screen.pic3

The BlueStacks does not only let you play your favorite Android games or run your favorite Android apps on your PC, but it also makes it possible to enjoy those HD graphics of applications on bigger screens.

BlueStacks – A Flashback

Gone are the days when you used to have memory issues to install something new or when you used to have the compatibility issues. BlueStacks is compatible with almost all of the games and apps out there. It is highly unlikely that BlueStacks will give you a compatibility error with any installation.

Back in 2015, BlueStacks was updated to BlueStacks 2. The new version was built from scratch. It came out of the curtains with a whole new UI. BlueStacks 2 brought a new toolbar which made it very easy to control the entire player.

The most wanted multi-window feature also made its way to the player. BlueStacks 2 made it smooth to run apps for PC. BlueStacks 2 was rooted immediately after it came out. The rooted version allowed you to run all those root-specific apps on your computer as well.

The method to root BlueStacks 2 required you to install third-party applications and then perform the operation. Many users, who are reluctant to the use of third-party applications didn’t find it a good idea. A piece of good news for such users has landed in. A pre-rooted version of BlueStacks 2 has just surfaced and now you can run the rooted BlueStacks 2 on the go.

The download link of pre-rooted BlueStacks 2 app player is attached here. Just go ahead and grab it, and then set it up on your computer to enjoy a new kind of Android experience on your Windows-powered computers.

Download Pre-Rooted BlueStacks 2 App Player

  1. Download pre-rooted BlueStacks 2 setup file and install it.
  2. Set-up BlueStacks 2 App Player now.
  3. Start running all the games and applications on your computer now.
  4. That’s all.

pre-rooted-bluestacks-2


iPhone iPhone 8 Specs, Features, News, Price and Release Dates

0
iPhone iPhone 8 Specs, Features, News, Price and Release Dates

2017 marks one decade of Apple producing the remarkable iPhones. To celebrate this milestone, Apple is working on the ‘radical redesign’ of iPhone to be launched at the momentous occasion. Tim Cook and his team are working on challenging themselves to produce a device that showcases why iPhone is one of the top smartphone brands globally. Even though iPhone 7 was just unveiled two months ago and people have still not gotten their hands on the nifty device, rumors regarding the next iPhone have started making rounds. A report from Bloomberg suggests that the next iPhone is already under development in Apple’s office in Israel. The company is not leaving anything to chance and is all set to wow people next year.

The Name Game

Technically, the iPhone should be named iPhone 7s as iPhone 7 was launched this year. Everyone knows that Apple brings major upgrades to the iPhones every 2 years. As the company plans to bring some radical changes in its features and design philosophy, there is a greater probability that the next device will be named iPhone 8. Usually devices with S models are given incremental upgrades and in 2017, the company is planning on going all out, hence their jump to iPhone 8. There are also reports that the upcoming device maybe named iPhone Pro or The iPhone.  The rumors also suggest that three variants of iPhones are under development at the moment, which will be iPhone 8 and 8S and the premium iPhone 8. What name the upcoming iPhone ends up with will become clear in the coming months.iphone-7-concept

Dazzling Display

Different reports out in the market claim that 2017 will be that year when Apple equips iPhone with an OLED display. This fact can be further confirmed by the fact that Apple has contracted Samsung to make OLED displays for their devices. Along with Samsung, Sharp and AU Optronics will also provide OLED panels for the next generation iPhone. To date Japan Display was equipping the iPhone with the display panels but the company does not have the technology to develop the OLED panels.

OLED displays have some major advantages over the usual LED display. An OLED does not require the use of a backlight that is used in an LCD. In addition, the panel is energy efficient as it has a lower power consumption. Maximizing the battery  time is one of the major concerns among consumers and if a display can provide them with just that it is a win twin situation. The image quality the OLED has is amazing which provides higher contrast ratios.apple-iphone-8-concept

The use of the OLED also gives confirmation to the rumors that Apple introduce an edge-to-edge curved display for iPhone 8. As the OLED panel is flexible, Apple will up the ante and go ahead with a curved display. Rumors also hint to the fact that the company is also working on increasing the screen-to-body ratio. This hints to the fact that the upcoming iPhone (or one of them) will have a full screen display.

Forbes in their recent report have confirmed that Apple will be unveiling 3 iPhone’s in 2017. The iPhone Pro with a 5.5″ or 5.8″-inch display will most probably end up with an OLED panel and a full screen edge-to-edge curved display. The rest of the two iPhone variants will vary in size having a 4.7″ and a 5.5″-inch display and will make use of TFT-LCD. The two major reasons why Apple will not use OLED displays for all of its variants are : i) the suppliers cannot produce the quantity of panels required by the company and ii) uniqueness, how will they create a differentiation between the three variants unveiled.iphone-8-worth-the-wait-02

Apple has benefited immensely from Samsung’s Note 7 disaster. Their iPhone Pro with an OLED display and full-screen curved display aims at courting the high-end phablet users. One thing that works in Apple’s favor is the history of producing impeccable products.  With their 10 year anniversary they are going to reinforce this fact

Bye Bye Home Button

As mentioned earlier that Apple will unveil an edge-to-edge full screen curved display, this means that the Home Button will be given a boot. With iPhone 7 we saw that the developers had worked on removing the click option, so for the next upgrade this makes sense. Mark Gurman claims that:

“Apple is already at work on a major redesign of the iPhone for 2017 that focuses more heavily on the display by removing the Home button.”

Where will the functions of the home button go? Well the Touch ID sensor will be integrated into the display. The same is expected to happen to the front facing camera and the speaker. Well this is going to be a welcome upgrade as critics have been after Apple for getting rid of the button which feels old school and introduce something new. Apple did file a patent application for a fingerprint sensor embedded in the display back in 2015, maybe with iPhone 8, we may look at the actual application of the concept.iphone-8-renders

Powerful Processor

Apple will be equipping iPhone 8 with A11 chipset produced by Taiwan Semiconductor Manufacturing Company (TSMC). The A11 chipset will be produced using the 10 nm FinFET process. This is a logical choice as Apple’s rival Samsung is also producing and making used of the Exynos 8895 and Snapdragon 830 chipset for Galaxy S8 which have been produced using the 10 nm method. The A11 chipset will reduce the power consumption and increase the speed of processing by 20%.

Wireless Charging

Apple is reportedly working on developing a long-range wireless charging technology. This means that the device does not need to be connected to any physical device for charging. This seems like a far fetched concept at the moment , but Apple has been working on hiring the best experts in the past few months to work on his project. If they are successful in implementing this concept, this will be another feather in their cap. Foxconn, Apple’s partner in this venture is testing this technology, we will have to see whether it is part of the next generation iPhone or will it be launched later on. The updates coming in the next few moths will clarify what Apple is up to in this regards.

Dual Camera

Apple made us of the dual camera with iPhone 7 Plus which was a massive success. The use of a dual camera means that two lens are used for enhanced image processing and better focus. This feature will be making a comeback with the 5.5-inch iPhone 8 and the iPhone Pro. The third variant will have the standard camera as it is seen in iPhone 7.iphone-8-concept-6

Iris Scanning

The rumors making rounds about the next iPhone also claim that it will have advance biometric features. Apple is working on an Iris Scanner that will provide increased security to its devices. Xinetic is providing Apple with iris scanning chips. It is still unclear whether Apple will have this feature all ready for use in their device. They cannot compromise the integrity of their devices by a faulty feature.

iPhone 8 Price

What about the price of the new iPhone? With so many new features coming on board the next generation iPhone, expect the price point to increase as well. The three variants will according to their features have different prices with iPhone Pro being the most expensive out of the three due to its features.

Release Dates

It is a bit early to speculate on the release date for the new iPhone but when has that stopped us from predicting. Going by Apple’s iPhone launch patters for the past few years, we will be looking at the new iPhone 7s or the iPhone 8 in the first half of September, 2017. Expect a spectacular event from Apple showcasing and celebrating the production of innovative iPhone’s for the past 10 years. So, are you excited for the next iPhone and what features are you looking forward to?