Download the latest version of QuickShortcutMaker APK. There are hundreds of apps available on Google Play which will let you create shortcuts and widgets. Even more, we can add a widget using the built-in feature. So Why we need a dedicated app to make a shortcut for us. Let’s get started and tell you what is the reason behind QuickShortcutMaker success.
QuickShortcutMaker:
This app does not perform all other shortcut makers apps. This app lets you create a shortcut of a specific task from any app. Let me make it more easy for you, you can make a shortcut of “processes” or “activities” of a distinct app. For instance, you only want to log out of Facebook with one, Open QuickShortcutMaker and set the task, that’s it. Next time you don’t have to open the Facebook app, go through the settings and then log out.
Now things don’t stop here, QuickShortcutMaker will also let you access all the hidden settings on your Android device. The settings which we cannot open after using the particular app. But QuickShortcutMaker will let you do it with ease. Now you’ll be wondering how? As I have told you before that QuickShortcutMaker looks for processes and activities of a single app. That’s why it can easily access all the hidden settings.
That is enough, you will get the idea when you will Install and Use QuickShortcutMaker 2.4.0. Let get to it.
You can download the latest version of QuickShortcutMaker APK from the links below. However, if you are not comfortable with the APK, We’ve also added the Google Play Link.
Step1: Download the APK directly on your device. Step2: Head over to the downloads folder or you can access it from the notification bar. Step3: Tap on the downloaded APK file. Step4: Follow the instructions provided on the screen. Step5: Once the installation is finished, open your app drawer to access the newly installed app.
Here you will find all the Xiaomi Mi 5 Tips & Tricks. You will learn how to Boot into Recovery Mode, Safe Mode, Fastboot Mode. Moreover, you will also learn how to Wipe Cache on Xiaomi Mi 5 and much more. So let’s get started now.
Xiaomi Mi 5 Tips
Quick Summary
Hard Reset.
Soft Reset.
Codes.
Recovery Mode.
Fastboot Mode.
Reset Settings.
Download Mode.
Reset Network Settings.
Portable Hotspot.
Power Saving Mode.
Add Fingerprint.
Screenshot.
Video Tutorials.
Back Up Data.
Bypass Google Verification.
Check IMEI.
Xiaomi Mi 5 Tips & Tricks:
Heed the instructions below in order to learn everything about Xiaomi Mi 5. These Xiaomi Mi 5 Tips will help you master everything on your device.
How To Hard Reset Xiaomi Mi 5:
We’ve posted this guide yesterday. You can use the following link to learn how you can hard reset Xiaomi Mi 5.
Every Android device has different service codes to access a number of settings. Following are the Xiaomi Mi 5 Codes.
QC test
*#*#64663#*#*
Testing
*#*#4636#*#*
Calendar
*#*#225#*#*
Google Play services
*#*#426#*#*
Rlz Debug Ul
*#*#759#*#*
IMEI
*#06#
Boot Xiaomi Mi 5 into Recovery Mode:
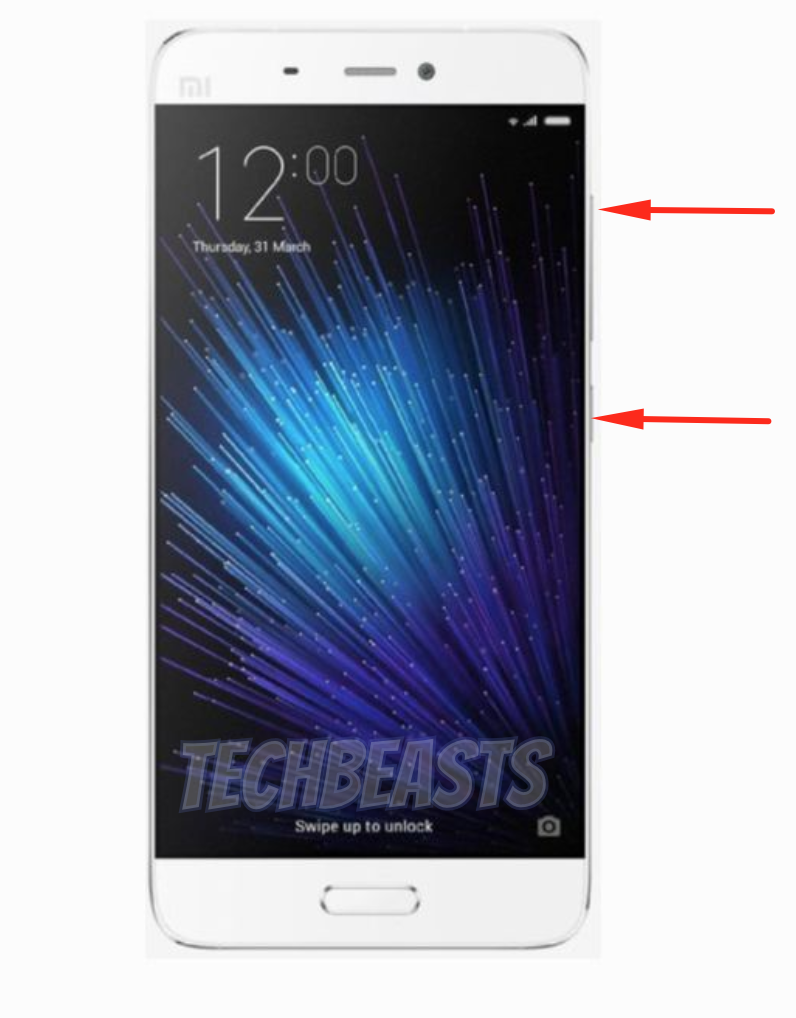
First, you need to Turn off your device, hold down the power button for 2-3 seconds.
Once your Mi 5 is completely turned off. Press + Hold Volume Up and Power Key.
When you see the Mi logon on your screen. Let go of both buttons.
Select English to 3s Primeceed. You can choose whatever language you find convenient.
Use the Volume Buttons to navigate and Power button for selection.
Boot Xiaomi Mi 5 into FastBoot Mode:
Turn off your Mi 5 3s Prime by holding down the power button for 2-3 seconds.
Now Hold and Press Volume Down + Power Button.
When you see the FastBoot Icon on your home screen let go of the button.
Bootloader Mode on Xiaomi Mi 5:
First, you need to Turn off the device using the power button.
Now press the Power and Volume Up key together.
Release both buttons when you see the Mi Logo on the screen.
How to Reset Settings on Xiaomi Mi 5:
Open Settings -> Advanced Settings.
Tap Backup & reset -> Reset all Settings.
Now you have to tap two times on Reset all Settings.
Download Mode on Mi 5:
Turn off your device using the power button.
Connect it to your PC and Press + Hold Volume Down and Power button.
Reset Network Settings on Xiaomi Mi 5:
Open Settings -> Advanced Settings.
Tap Backup & reset -> Reset Network Settings.
Now you have to tap two times on Reset Network Settings.
Enable Portable Hotspot on Xiaomi Mi 5:
Open Settings on your device.
Head over to the Wireless & networks –> Tethering & portable hotspot.
Now select Portable Wi-Fi hotspot and Configure Wi-Fi hotspot.
In the end, Turn on Portable Hotspot.
Power Saving Mode on Xiaomi Mi 5:
Open Settings.
Tap on the Battery.
Here you will find all the options related to power saving mode. Customize as you like.
Pull down the notification menu, Tap on Ultra Saving Mode to enable it.
Add Fingerprint Xiaomi Mi 5:
Now before you Add Fingerprint on your Xiaomi Mi 5, you have to set Pin or Pattern Lock first.
Launch Settings on your device.
Head over to the Security & privacy.
Tap on Fingerprint and you will be asked to set up a Pin or Pattern. Do as you like.
Once you’ve set your passcode or pattern, now you can add fingerprint on Xiaomi Mi 5.
Take Screenshots on Xiaomi Mi 5:
There are three methods which can be used to take screenshots on Xiaomi Mi 5.
Method1:
Open the Screen of which you want to take a screenshot of.
Press Power + Volume Down button together for once.
You will hear a splash voice. Done.
Method2:
Open the screen or page of which you want a screenshot
Drag down the notification bar.
Tap on the screenshot and all done.
BackUp data on Xiaomi Mi 5:
Open Settings on your device.
Tap on Backup&Reset.
On the next page, select local backup.
You’ll see the backup button at the end of the next page.
Tap on it to start the backup.
Phone storage > MIUI > Backup > All Backup folder.
Device Description:
The Mi 5 was released in 2016, April. The Phone came out with a screen of 5.5 inches having 1080 x 1920 pixels resolution. Mi 5 was powered by Quad-core (2×1.8 GHz Kryo & 2×1.36 GHz Kryo) CPU and Adreno 530 GPU. It had internal storage of 128, 64,32 GB, 4/3 GB RAM. The camera at the back of this phone is 16 MP and on the front, it is 4 MP. Inside this Phone, there was a 3000 mAh battery. The Phone originally ran on Android 6.0 (Marshmallow), upgradable to Android 8.0 (Oreo).
Check IMEI Number on Xiaomi Mi 5:
Finding IMEI number on any Android is same, all you have to do is open your phone’s dialer. Type *#06#, Voila. You’ll see a pop-up with numbers written on it. That is your IMEI number.
That’s all. These are the main Xiaomi Mi 5 Tips & Tricks.
Let’s tell you how you can Hard Reset Xiaomi Mi 5. The Xiaomi Mi 5 is the best budget device in terms of specs and it gained a lot of popularity.
Today we’ll tell you how to factory reset Xiaomi Mi 5. This is the best solution so far to boost up the performance level on an Android device. Moreover, it is the ultimate solution of all your hardware or software problems on Xiaomi Mi 5.
Now before we move on and start telling you how to Hard Reset Xiaomi Mi 5. Let me give you an overview of Xiaomi Mi 5 so that you get to know why this device is so famous.
Xiaomi Mi 5 Specs:
The Mi 5 was released in 2016, April. The Phone came out with a screen of 5.5 inches having 1080 x 1920 pixels resolution. Mi 5 was powered by Quad-core (2×1.8 GHz Kryo & 2×1.36 GHz Kryo) CPU and Adreno 530 GPU. It had internal storage of 128, 64,32 GB, 4/3 GB RAM. The camera at the back of this phone is 16 MP and on the front, it is 4 MP. Inside this Phone, there was a 3000 mAh battery. The Phone originally ran on Android 6.0 (Marshmallow), upgradable to Android 8.0 (Oreo).
*You can Wipe all of your Data Stored on your device.
*Easily fix all the performance issue.
*Bypass screen lock through hard reset.
*Bring the factory state.
*Fix all the firmware issues.
*Get rid of signal problems, loop issues, rebooting problems and power problems.
How to Hard Reset Mi 5:
Method1:
First, you need to Turn off your device, hold down the power button for 2-3 seconds.
Once your device is completely turned off. Press + Hold Volume Up and Power Key.
When Mi logo appears, let go of the Power Button.
Keep holding the Volume Up Key until you see the Recovery Logo.
You will be provided with different languages. Select English using the power button.
Use the Volume Buttons to navigate and Power button for selection.
Choose Wipe & Reset from the list provided on the screen.
On the next screen, you have to go with Wipe All Data. After that, you need to select YES to proceed.
Once the process is finished, Reboot your device.
Method2:
Open Settings from the Home Screen.
Scroll down and Tap on Backup & Reset -> Factory Reset.
Now select Reset device.
To Confirm Choose Erase everything.
That will be all, wait for the process to complete.
That’s all. You have successfully Hard Reset Mi 5. Please do tell us if you face any problem during this process.
Mozilla has taken one more step towards the security of its users by launching its all new Firefox Focus. It’s a new browser meant for smartphones. Firefox Focus is currently out on Android OS and it looks promising. The browser aims at protecting the data and personal information of a user while he’s surfing the internet. The moment you open this browser, it hides all your personal information and them moment you leave the browser, it erases all traces of your each and every single activity. This way, the unwanted ads cannot make your internet browser’s performance sluggish. The browser blocks a variety of common web trackers by default. It has the ability to block all the ads. Fire Focus removes your cookies, history and other temporary files as soon as you exit it. The browser is a must-use for those who are looking for a super-fast application with no compromise on their personal information.
Firefox Focus is making its way to different regions at the moment. If you wish to get it right now and it’s not appearing in the Play Store in your country, you may want to get its APK file. We have already got our hands on the Firefox Focus APK file and put it up here. You can go ahead to download Firefox Focus APK and then install it by following the instructions listed next.
With the help of this guide, you will be able to Root OnePlus 6T and you can Install TWRP Recovery on OnePlus 6T. OnePlus 6T is the latest flagship from OnePlus.
OnePlus 6T is upgraded version of OnePlus 6. We have seen a number of improvements, Now we have screen inbuilt fingerprint scanner. Moreover, the battery is improved, the notch is now is small as compared to OnePlus 6. These are the main improvements, other than it’s similar to OnePlus 6.
Let’s start the guide to Root OnePlus 6T & Install TWRP Recovery. But before we move on let me give you an overview of OnePlus 6T.
Root OnePlus 6T & Install TWRP Recovery
OnePlus 6T Overview:
Talking about the screen, OnePlus 6T has a 6.41-inch Optic AMOLED display on the front. This display has a ratio of 19.5:9. The resolution this time around is 1080 x 2340 pixels. OnePlus 6T’s display is protected by Gorilla Glass 6. It is powered by Qualcomm Snapdragon 845 CPU and has the Adreno 630 GPU support. OnePlus 6T won’t get a 64GB variant. It will be available only in two variants having 6GB RAM and 128GB storage or 8GB RAM and 256GB internal storage. The camera system is similar to the OnePlus 6. There is a 16MP + 20MP dual shooter at the back. On the front, it has a 16MP shooter. OnePlus 6T has a bigger battery which is of 3,700 mAh as compared to the 3,300 mAh battery of its predecessor. The phone runs on Android 9.0 Pie out of the box.
Make sure all installations are done and all files are placed where they are supposed to be.
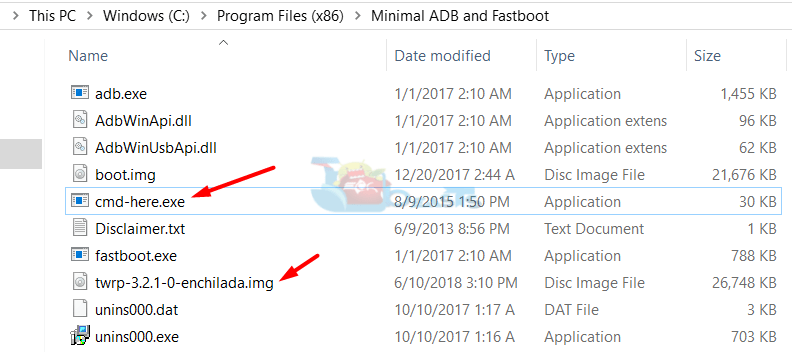
Open the Minimal ADB and Fastboot folder on your computer.
Now open the cmd-here.exe file. It will open the command window.
Connect your OnePlus 6T to the computer and give it USB Debugging permission as it asks on the phone.
Now in the command window, enter the following commands one by one.
adb devices
This command will return a code verifying connection of your phone with the computer. If it doesn’t return a list of devices attached to a string, you need to check the connection again.
adb reboot bootloader
This command will reboot your phone in the fastboot mode.
fastboot devices
This command will verify the connection in fastboot mode.
Here’s how you can install Stereo Speakers MOD on OnePlus 6T. As you all know that Stereo Speakers trend is rasing at a high rate. More and more manufacturers are adding Stereo Speakers to their devices. Yet OnePlus 6T manage with normal speakers as we have seen in the OnePlus 6.
But thanks to hard working developers of XDA, now we have got our hands on a Stereo Speakers MOD, designed for OnePlus 6T. Since not everyone knows how to Install custom MODs on OnePlus devices. Keep that in mind, we have created a step by step post to tell you how you can Install Stereo Speakers MOD on OnePlus 6T.
Before we move on, you need to do a few things. Heed the instructions below to Install Stereo Speakers MOD on OnePlus 6T. Also, I forgot to mention one thing, this MOD will require root access. You must Root your OnePlus 6T before proceeding.
OnePlus 6T Overview:
Talking about the screen, OnePlus 6T has a 6.41-inch Optic AMOLED display on the front. This display has a ratio of 19.5:9. The resolution this time around is 1080 x 2340 pixels. OnePlus 6T’s display is protected by Gorilla Glass 6. It is powered by Qualcomm Snapdragon 845 CPU and has the Adreno 630 GPU support. OnePlus 6T won’t get a 64GB variant. It will be available only in two variants having 6GB RAM and 128GB storage or 8GB RAM and 256GB internal storage. The camera system is similar to the OnePlus 6. There is a 16MP + 20MP dual shooter at the back. On the front, it has a 16MP shooter. OnePlus 6T has a bigger battery which is of 3,700 mAh as compared to the 3,300 mAh battery of its predecessor. The phone runs on Android 9.0 Pie out of the box.
Here you will find all the Xiaomi Redmi 3s Prime Tips & Tricks. You will learn how to Boot into Recovery Mode, Safe Mode, Fastboot Mode. Moreover, you will also learn how to Wipe Cache on Xiaomi Redmi 3s Prime and much more. So let’s get started now.
Xiaomi Redmi 3s Prime Tips
Quick Summary
Hard Reset.
Soft Reset.
Codes.
Recovery Mode.
Fastboot Mode.
Reset Settings.
Download Mode.
Reset Network Settings.
Portable Hotspot.
Power Saving Mode.
Add Fingerprint.
Screenshot.
Video Tutorials.
Back Up Data.
Bypass Google Verification.
Check IMEI.
Xiaomi Redmi 3s Prime Tips & Tricks:
Heed the instructions below in order to learn everything about Xiaomi Redmi 3s Prime. These Xiaomi Redmi 3s Prime Tips will help you master everything on your device.
How To Hard Reset Xiaomi Redmi 3s Prime:
We’ve posted this guide yesterday. You can use the following link to learn how you can hard reset Xiaomi Redmi 3s Prime.
In order to Soft Reset your Xiaomi Redmi 3s Prime, all you have to do is hold down the power button for 2-3 seconds and your device will turn off.
Secret Codes for Xiaomi Redmi 3s Prime:
Every Android device has different service codes to access a number of settings. Following are the Xiaomi Redmi 3s Prime Codes.
QC test
*#*#64663#*#*
Testing
*#*#4636#*#*
Calendar
*#*#225#*#*
Google Play services
*#*#426#*#*
Rlz Debug Ul
*#*#759#*#*
IMEI
*#06#
Boot Xiaomi Redmi 3s Prime into Recovery Mode:
First, you need to Turn off your device, hold down the power button for 2-3 seconds.
Once your Redmi 3s Prime is completely turned off. Press + Hold Volume Up and Power Key.
When you see the Mi logon on your screen. Let go of both buttons.
Select English to 3s Primeceed. You can choose whatever language you find convenient.
Use the Volume Buttons to navigate and Power button for selection.
Boot Xiaomi Redmi 3s Prime into FastBoot Mode:
Turn off your Redmi 3s Prime 3s Prime by holding down the power button for 2-3 seconds.
Now Hold and Press Volume Down + Power Button.
When you see the FastBoot Icon on your home screen let go of the button.
Bootloader Mode on Xiaomi Redmi 3s Prime:
First, you need to Turn off the device using the power button.
Now press the Power and Volume Up key together.
Release both buttons when you see the Mi Logo on the screen.
How to Reset Settings on Xiaomi Redmi 3s Prime:
Open Settings -> Advanced Settings.
Tap Backup & reset -> Reset all Settings.
Now you have to tap two times on Reset all Settings.
Download Mode on Redmi 3s Prime:
Turn off your device using the power button.
Connect it to your PC and Press + Hold Volume Down and Power button.
Reset Network Settings on Xiaomi Redmi 3s Prime:
Open Settings -> Advanced Settings.
Tap Backup & reset -> Reset Network Settings.
Now you have to tap two times on Reset Network Settings.
Enable Portable Hotspot on Xiaomi Redmi 3s Prime:
Open Settings on your device.
Head over to the Wireless & networks –> Tethering & portable hotspot.
Now select Portable Wi-Fi hotspot and Configure Wi-Fi hotspot.
In the end, Turn on Portable Hotspot.
Power Saving Mode on Xiaomi Redmi 3s Prime:
Open Settings.
Tap on the Battery.
Here you will find all the options related to power saving mode. Customize as you like.
Pull down the notification menu, Tap on Ultra Saving Mode to enable it.
Add Fingerprint Xiaomi Redmi 3s Prime:
Now before you Add Fingerprint on your Xiaomi Redmi 3s Prime, you have to set Pin or Pattern Lock first.
Launch Settings on your device.
Head over to the Security & privacy.
Tap on Fingerprint and you will be asked to set up a Pin or Pattern. Do as you like.
Once you’ve set your passcode or pattern, now you can add fingerprint on Xiaomi Redmi 3s Prime.
Take Screenshots on Xiaomi Redmi 3s Prime:
There are three methods which can be used to take screenshots on Xiaomi Redmi 3s Prime.
Method1:
Open the Screen of which you want to take a screenshot of.
Press Power + Volume Down button together for once.
You will hear a splash voice. Done.
Method2:
Open the screen or page of which you want a screenshot
Drag down the notification bar.
Tap on the screenshot and all done.
BackUp data on Xiaomi Redmi 3s Prime:
Open Settings on your device.
Tap on Backup&Reset.
On the next page, select local backup.
You’ll see the backup button at the end of the next page.
Tap on it to start the backup.
Phone storage > MIUI > Backup > All Backup folder.
Device Description:
The Redmi 3s Prime was released in 2016, August. The Phone came out with a screen of 5.0 inches having 720 x 1280 pixels resolution. Redmi 3s Prime was powered by Qualcomm MSM8937 Snapdragon 430 (28 nm) CPU and Adreno 505 GPU. It had internal storage of 32 GB, 3 GB RAM. The camera at the back of this phone is 13 MP and on the front, it is 5 MP. Inside this Phone, there was a 4100 mAh battery. The Phone originally ran on Android 6.0 (Marshmallow).
Check IMEI Number on Xiaomi Redmi 3s Prime:
Finding IMEI number on any Android is same, all you have to do is open your phone’s dialer. Type *#06#, Voila. You’ll see a pop-up with numbers written on it. That is your IMEI number.
That’s all. These are the main Xiaomi Redmi 3s Prime Tips & Tricks.
Let’s tell you how you can Hard Reset Xiaomi Redmi 3s Prime. The Xiaomi Redmi 3s Prime is the best budget device in terms of specs and it gained a lot of popularity.
Today we’ll tell you how to factory reset Xiaomi Redmi 3s Prime. This is the best solution so far to boost up the performance level on an Android device. Moreover, it is the ultimate solution of all your hardware or software problems on Xiaomi Redmi 3s Prime.
Now before we move on and start telling you how to Hard Reset Xiaomi Redmi 3s Prime. Let me give you an overview of Xiaomi Redmi 3s Prime so that you get to know why this device is so famous.
Xiaomi Redmi 3s Prime Specs:
The Redmi 3s Prime was released in 2016, August. The Phone came out with a screen of 5.0 inches having 720 x 1280 pixels resolution. Redmi 3s Prime was powered by Qualcomm MSM8937 Snapdragon 430 (28 nm) CPU and Adreno 505 GPU. It had internal storage of 32 GB, 3 GB RAM. The camera at the back of this phone is 13 MP and on the front, it is 5 MP. Inside this Phone, there was a 4100 mAh battery. The Phone originally ran on Android 6.0 (Marshmallow).
*You can Wipe all of your Data Stored on your device.
*Easily fix all the performance issue.
*Bypass screen lock through hard reset.
*Bring the factory state.
*Fix all the firmware issues.
*Get rid of signal problems, loop issues, rebooting problems and power problems.
How to Hard Reset Redmi 3s Prime:
Method1:
First, you need to Turn off your device, hold down the power button for 2-3 seconds.
Once your device is completely turned off. Press + Hold Volume Up and Power Key.
When Mi logo appears, let go of the Power Button.
Keep holding the Volume Up Key until you see the Recovery Logo.
You will be provided with different languages. Select English using the power button.
Use the Volume Buttons to navigate and Power button for selection.
Choose Wipe & Reset from the list provided on the screen.
On the next screen, you have to go with Wipe All Data. After that, you need to select YES to proceed.
Once the process is finished, Reboot your device.
Method2:
Open Settings from the Home Screen.
Scroll down and Tap on Backup & Reset -> Factory Reset.
Now select Reset device.
To Confirm Choose Erase everything.
That will be all, wait for the process to complete.
That’s all. You have successfully Hard Reset Redmi 3s Prime. Please do tell us if you face any problem during this process.
Here you will find all the Xiaomi Redmi Pro Tips & Tricks. You will learn how to Boot into Recovery Mode, Safe Mode, Fastboot Mode. Moreover, you will also learn how to Wipe Cache on Xiaomi Redmi Pro and much more. So let’s get started now.
Xiaomi Redmi Pro Tips & Tricks
Quick Summary
Hard Reset.
Soft Reset.
Codes.
Recovery Mode.
Fastboot Mode.
Reset Settings.
Download Mode.
Reset Network Settings.
Portable Hotspot.
Power Saving Mode.
Add Fingerprint.
Screenshot.
Video Tutorials.
Back Up Data.
Bypass Google Verification.
Check IMEI.
Xiaomi Redmi Pro Tips & Tricks:
Heed the instructions below in order to learn everything about Xiaomi Redmi Pro. These Xiaomi Redmi Pro Tips will help you master everything on your device.
How To Hard Reset Xiaomi Redmi Pro:
We’ve posted this guide yesterday. You can use the following link to learn how you can hard reset Xiaomi Redmi Pro.
In order to Soft Reset your Xiaomi Redmi Pro, all you have to do is hold down the power button for 2-3 seconds and your device will turn off.
Secret Codes for Xiaomi Redmi Pro:
Every Android device has different service codes to access a number of settings. Following are the Xiaomi Redmi Pro Codes.
QC test
*#*#64663#*#*
Testing
*#*#4636#*#*
Calendar
*#*#225#*#*
Google Play services
*#*#426#*#*
Rlz Debug Ul
*#*#759#*#*
IMEI
*#06#
Boot Xiaomi Redmi Pro into Recovery Mode:
First, you need to Turn off your device, hold down the power button for 2-3 seconds.
Once your Redmi Pro is completely turned off. Press + Hold Volume Up and Power Key.
When you see the Mi logon on your screen. Let go of both buttons.
Select English to proceed. You can choose whatever language you find convenient.
Use the Volume Buttons to navigate and Power button for selection.
Boot Xiaomi Redmi Pro into FastBoot Mode:
Turn off your Redmi Pro Pro by holding down the power button for 2-3 seconds.
Now Hold and Press Volume Down + Power Button.
When you see the FastBoot Icon on your home screen let go of the button.
Bootloader Mode on Xiaomi Redmi Pro:
First, you need to Turn off the device using the power button.
Now press the Power and Volume Up key together.
Release both buttons when you see the Mi Logo on the screen.
How to Reset Settings on Xiaomi Redmi Pro:
Open Settings -> Advanced Settings.
Tap Backup & reset -> Reset all Settings.
Now you have to tap two times on Reset all Settings.
Download Mode on Redmi Pro:
Turn off your device using the power button.
Connect it to your PC and Press + Hold Volume Down and Power button.
Reset Network Settings on Xiaomi Redmi Pro:
Open Settings -> Advanced Settings.
Tap Backup & reset -> Reset Network Settings.
Now you have to tap two times on Reset Network Settings.
Enable Portable Hotspot on Xiaomi Redmi Pro:
Open Settings on your device.
Head over to the Wireless & networks –> Tethering & portable hotspot.
Now select Portable Wi-Fi hotspot and Configure Wi-Fi hotspot.
In the end, Turn on Portable Hotspot.
Power Saving Mode on Xiaomi Redmi Pro:
Open Settings.
Tap on the Battery.
Here you will find all the options related to power saving mode. Customize as you like.
Pull down the notification menu, Tap on Ultra Saving Mode to enable it.
Add Fingerprint Xiaomi Redmi Pro:
Now before you Add Fingerprint on your Xiaomi Redmi Pro, you have to set Pin or Pattern Lock first.
Launch Settings on your device.
Head over to the Security & privacy.
Tap on Fingerprint and you will be asked to set up a Pin or Pattern. Do as you like.
Once you’ve set your passcode or pattern, now you can add fingerprint on Xiaomi Redmi Pro.
Take Screenshots on Xiaomi Redmi Pro:
There are three methods which can be used to take screenshots on Xiaomi Redmi Pro.
Method1:
Open the Screen of which you want to take a screenshot of.
Press Power + Volume Down button together for once.
You will hear a splash voice. Done.
Method2:
Open the screen or page of which you want a screenshot
Drag down the notification bar.
Tap on the screenshot and all done.
BackUp data on Xiaomi Redmi Pro:
Open Settings on your device.
Tap on Backup&Reset.
On the next page, select local backup.
You’ll see the backup button at the end of the next page.
Tap on it to start the backup process.
Phone storage > MIUI > Backup > All Backup folder.
Device Description:
The Redmi Pro was released in 2016, August. The Phone came out with a screen of 5.5 inches having 1080 x 1920 pixels resolution. Redmi Pro was powered by MediaTek MT6797T Helio X25 (20 nm) / Helio X20 (20 nm) – Standard edition CPU and Mali-T880 MP4 GPU. It had internal storage of 128/64/32 GB, 4/3 GB RAM. The camera at the back of this phone is 13 MP/5MP and on the front, it is 5 MP. Inside this Phone, there was a 4050 mAh battery. The Phone originally ran on Android 6.0 (Marshmallow).
Check IMEI Number on Xiaomi Redmi Pro:
Finding IMEI number on any Android is same, all you have to do is open your phone’s dialer. Type *#06#, Voila. You’ll see a pop-up with numbers written on it. That is your IMEI number.
That’s all. These are the main Xiaomi Redmi Pro Tips & Tricks.
Let’s tell you how you can Hard Reset Xiaomi Redmi Pro. The Xiaomi Redmi Pro is the best budget device so far from Xiaomi and it gained a lot of popularity.
Today we’ll tell you how to factory reset Xiaomi Redmi Pro. This is the best solution so far to boost up the performance level on an Android device. Moreover, it is the ultimate solution of all your hardware or software problems on Xiaomi Redmi Pro.
Now before we move on and start telling you how to Hard Reset Xiaomi Redmi Pro. Let me give you an overview of Xiaomi Redmi Pro so that you get to know why this device is so famous.
Xiaomi Redmi Pro Specs:
The Redmi Pro was released in 2016, August. The Phone came out with a screen of 5.5 inches having 1080 x 1920 pixels resolution. Redmi Pro was powered by MediaTek MT6797T Helio X25 (20 nm) / Helio X20 (20 nm) – Standard edition CPU and Mali-T880 MP4 GPU. It had internal storage of 128/64/32 GB, 4/3 GB RAM. The camera at the back of this phone is 13 MP/5MP and on the front, it is 5 MP. Inside this Phone, there was a 4050 mAh battery. The Phone originally ran on Android 6.0 (Marshmallow).
*You can Wipe all of your Data Stored on your device.
*Easily fix all the performance issue.
*Bypass screen lock through hard reset.
*Bring the factory state.
*Fix all the firmware issues.
*Get rid of signal problems, loop issues, rebooting problems and power problems.
How to Hard Reset Redmi Pro:
Method1:
First, you need to Turn off your device, hold down the power button for 2-3 seconds.
Once your device is completely turned off. Press + Hold Volume Up and Power Key.
When Mi logo appears, let go of the Power Button.
Keep holding the Volume Up Key until you see the Recovery Logo.
You will be provided with different languages. Select English using the power button.
Use the Volume Buttons to navigate and Power button for selection.
Choose Wipe & Reset from the list provided on the screen.
On the next screen, you have to go with Wipe All Data. After that, you need to select YES to proceed.
Once the process is finished, Reboot your device.
Method2:
Open Settings from the Home Screen.
Scroll down and Tap on Backup & Reset -> Factory Reset.
Now select Reset device.
To Confirm Choose Erase everything.
That will be all, wait for the process to complete.
That’s all. You have successfully Hard Reset Redmi Pro. Please do tell us if you face any problem during this process.
Here you find Huawei P9 Tips & Tricks or you can say general guide on how to use Huawei P9. We will include Hard Reset, Recovery, Fastboot, Download, Reset Setting and more. Without further ado, Let’s get started now.
Huawei P9 Tips
Quick Summary
Hard Reset.
Soft Reset.
Codes.
Recovery Mode.
Fastboot Mode.
Reset Settings.
Download Mode.
Reset Network Settings.
Portable Hotspot.
Power Saving Mode.
Add Fingerprint.
Screenshot.
Video Tutorials.
Back Up Data.
Bypass Google Verification.
Check IMEI.
About Huawei P9:
The Huawei P9 was released in 2016, April. The Phone came out with a screen of 5.2 inches having 1080 x 1920 pixels resolution. Huawei P9 was powered by HiSilicon Kirin 955 (16 nm) CPU and Mali-T880 MP4. It had internal storage of 32/64 GB, 3/4 GB RAM. The camera at the back of this phone is 12 MP / 12 MP and on the front, it is 8 MP. Inside this Phone, there was a 3000 mAh battery. The Phone originally ran on Android 6.0 (Marshmallow), upgradable to 7.0 (Nougat).
Huawei P9 Tips & Tricks:
Heed the instructions below in order to learn everything about Huawei P9. These Huawei P9 Tips will help you master everything on your device.
How To Hard Reset Huawei P9:
We’ve posted this guide yesterday. You can use the following link to learn how you can hard reset Huawei P9.
In order to Soft Reset your Huawei P9, all you have to do is hold down the power button for 2-3 seconds and your device will turn off.
Secret Codes for Huawei P9:
Every Android device has different service codes to access a number of settings. Following are the Huawei P9 Codes.
Project menu
*#*#2846579#*#*
Testing
*#*#6130#*#*
About phone
*#*#0000#*#*
Calendar info
*#*#225#*#*
Google Play service
*#*#426#*#*
IMEI
*#06#
Boot Huawei P9 into Recovery Mode:
Turn off your Huawei P9 by holding the power button for 2-3 seconds.
Once your device is turned off completely. Press + HoldVolume Up and Power button together for 2-3 seconds.
Now when you see the Huawei logo, let go of all the buttons.
Boot Huawei P9 into FastBoot Mode:
Turn off your P9 by holding down the power button for 2-3 seconds.
Connect your device to PC using USB Cable and While doing that Hold Volume Down button.
When you see the FastBoot Icon on your home screen let go of the button.
How to Reset Settings on Huawei P9:
Open Settings -> Advanced Settings.
Tap Backup & reset -> Reset all Settings.
Now you have to tap two times on Reset all Settings.
Download Mode on P9:
Turn off your device using the power button.
Connect it to your PC and Press + Hold Volume Down and Up button.
Reset Network Settings on Huawei P9:
Open Settings -> Advanced Settings.
Tap Backup & reset -> Reset Network Settings.
Now you have to tap two times on Reset Network Settings.
Enable Portable Hotspot on Huawei P9:
Open Settings on your device.
Head over to the Wireless & networks –> Tethering & portable hotspot.
Now select Portable Wi-Fi hotspot and Configure Wi-Fi hotspot.
In the end, Turn on Portable Hotspot.
Power Saving Mode on Huawei P9:
Open Settings.
Tap on the Battery.
Here you will find all the options related to power saving mode. Customize as you like.
Pull down the notification menu, Tap on Ultra Saving Mode to enable it.
Add Fingerprint Huawei P9:
Now before you Add Fingerprint on your Huawei P9, you have to set Pin or Pattern Lock first.
Launch Settings on your device.
Head over to the Security & privacy.
Tap on Fingerprint and you will be asked to set up a Pin or Pattern. Do as you like.
Once you’ve set your passcode or pattern, now you can add fingerprint on Huawei P9.
Take Screenshots on Huawei P9:
There are three methods which can be used to take screenshots on Huawei P9.
Method1:
Open the Screen of which you want to take a screenshot of.
Press Volume Up + Volume Down button together for once.
You will hear a splash voice. Done.
BackUp data on Huawei P9:
We have posted a complete tutorial on how to backup data on Huawei devices. Use the link below to access that guide and following instructions provided in that post will help you back up the data on Huawei P9.
Finding IMEI number on any Android is same, all you have to do is open your phone’s dialer. Type *#06#, Voila. You’ll see a pop-up with numbers written on it. That is your IMEI number.
With the help of this guide, you will be able to Hard Reset Huawei P9. There are a number of ways to factory reset Huawei P9 and we’ve posted all of them.
This is the best solution so far to boost up the performance level on an Android device. Moreover, it is the ultimate solution of all your hardware or software problems on Huawei P9.
Now before we move on and start telling you how to Hard Reset Huawei P9. Let me give you an overview of Huawei P9 so that you get to know why this device is so famous.
Huawei P9:
The Huawei P9 was released in 2016, April. The Phone came out with a screen of 5.2 inches having 1080 x 1920 pixels resolution. Huawei P9 was powered by HiSilicon Kirin 955 (16 nm) CPU and Mali-T880 MP4. It had internal storage of 32/64 GB, 3/4 GB RAM. The camera at the back of this phone is 12 MP / 12 MP and on the front, it is 8 MP. Inside this Phone, there was a 3000 mAh battery. The Phone originally ran on Android 6.0 (Marshmallow), upgradable to 7.0 (Nougat).
Benefits of Hard Reset:
Summary:
*You can Wipe all of your Data Stored on your device.
*Easily fix all the performance issue.
*Bypass screen lock through hard reset.
*Bring the factory state.
*Fix all the firmware issues.
*Get rid of signal problems, loop issues, rebooting problems and power problems.
![Download QuickShortcutMaker APK 2.4.0 [ Latest Version ]](https://techbeasts.com/wp-content/uploads/2018/11/Screen-Shot-2018-11-12-at-6.26.34-PM.png "Download QuickShortcutMaker APK 2.4.0 [ Latest Version ]")
![Xiaomi Mi 5 Tips & Tricks: [ Hard Reset, Recovery, Fastboot, Download, Reset Setting etc ]](https://techbeasts.com/wp-content/uploads/2018/11/Screen-Shot-2018-11-12-at-5.05.32-PM.png "Xiaomi Mi 5 Tips & Tricks: [ Hard Reset, Recovery, Fastboot, Download, Reset Setting etc ]")
![How To Hard Reset Xiaomi Mi 5 [ Tutorial ]](https://techbeasts.com/wp-content/uploads/2018/11/Screen-Shot-2018-11-12-at-4.44.11-PM.png "How To Hard Reset Xiaomi Mi 5 [ Tutorial ]")
![Download Firefox Focus APK 8.0 [ Latest Version ]](https://techbeasts.com/wp-content/uploads/2017/06/C5Lp_b7pgYw6-7MaTBJBzwnALsQL48BMJf1cDkD-8NC5gmcZ8HH2IwKfcEPpWC8ONDcw300.png "Download Firefox Focus APK 8.0 [ Latest Version ]")



![Install Stereo Speakers MOD on OnePlus 6T [ Root Required ]](https://techbeasts.com/wp-content/uploads/2018/11/IMG_4439-copy.jpg "Install Stereo Speakers MOD on OnePlus 6T [ Root Required ]")
![Xiaomi Redmi 3s Prime Tips & Tricks: [ Hard Reset, Recovery, Fastboot, Download, Reset Setting etc ]](https://techbeasts.com/wp-content/uploads/2018/11/Screen-Shot-2018-11-10-at-1.22.27-PM.png "Xiaomi Redmi 3s Prime Tips & Tricks: [ Hard Reset, Recovery, Fastboot, Download, Reset Setting etc ]")
![How To Hard Reset Xiaomi Redmi 3s Prime [ Tutorial ]](https://techbeasts.com/wp-content/uploads/2018/11/Screen-Shot-2018-11-10-at-1.04.33-PM.png "How To Hard Reset Xiaomi Redmi 3s Prime [ Tutorial ]")
![Xiaomi Redmi Pro Tips & Tricks: [ Hard Reset, Recovery, Fastboot, Download, Reset Setting etc ]](https://techbeasts.com/wp-content/uploads/2018/11/Screen-Shot-2018-11-09-at-7.38.21-PM.png "Xiaomi Redmi Pro Tips & Tricks: [ Hard Reset, Recovery, Fastboot, Download, Reset Setting etc ]")
![How To Hard Reset Xiaomi Redmi Pro [ Tutorial ]](https://techbeasts.com/wp-content/uploads/2018/11/Screen-Shot-2018-11-09-at-7.25.38-PM.png "How To Hard Reset Xiaomi Redmi Pro [ Tutorial ]")
![Huawei P9 Tips & Tricks: [ Hard Reset, Recovery, Fastboot, Download, Reset Setting etc ]](https://techbeasts.com/wp-content/uploads/2018/11/Screen-Shot-2018-11-09-at-6.41.15-PM.png "Huawei P9 Tips & Tricks: [ Hard Reset, Recovery, Fastboot, Download, Reset Setting etc ]")
![How To Hard Reset Huawei P9 [ Tutorial ]](https://techbeasts.com/wp-content/uploads/2018/11/Screen-Shot-2018-11-09-at-5.47.40-PM.png "How To Hard Reset Huawei P9 [ Tutorial ]")