Home Blog Page 70

Download WhatsApp on Huawei MediaPad

1
Download WhatsApp on Huawei MediaPad

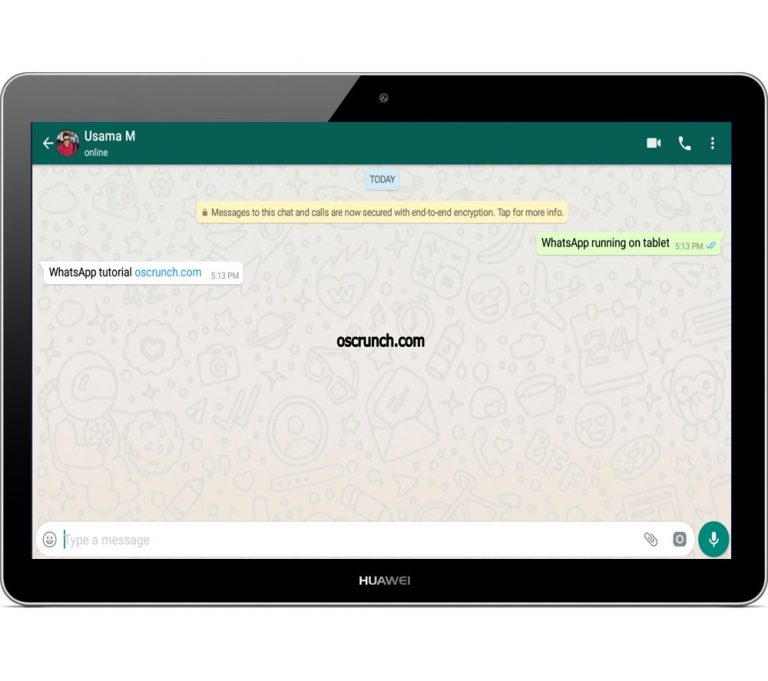
Huawei releases 2 variants of each of its MediaPad devices. One variant comes with a SIM card and the other has the WiFi connectivity only. You can easily install WhatsApp on the Huawei MediaPad that comes with the SIM card support. However, installing WhatsApp on WiFi-only MediaPad is a little bit tricky. This is the guide for the WiFi-only Huawei MediaPad owners. You will find the steps to download WhatsApp on Huawei MediaPad that has WiFi option only. This guide is valid for all the Huawei MediaPad owners residing inside or outside China. Before download WhatsApp on Huawei MediaPad, let us understand the background of no-WhatsApp-support for WiFi-only devices.
WhatsApp on Huawei MediaPad

WhatsApp for WiFi-only Tablets i.e. Huawei MediaPad

WhatsApp needs a phone number for verification. When you have SIM card inserted in your device, you can use that phone number to quickly verify your WhatsApp account. When you are using a WiFi-only Huawei MediaPad, you will not have the SIM card to send the verification SMS too. In such a case, you need another phone number with a SIM card that does not already have WhatsApp registered on it. This guide is all about that. We will be using a SIM card inserted in a spare phone to run WhatsApp on Huawei MediaPad devices.

Huawei MediaPad is available all across the globe. Users who are living inside China, they do not have any access to WhatsApp at all. Users who are residing outside China, they do have access to WhatsApp for MediaPad, but they cannot install it on WiFi-only models. Let us take a look into why the Huawei MediaPad in China does not have the WhatsApp messenger.

WhatsApp on Huawei MediaPad in China

The Chinese government controls all the information that floats through its country. People in China do not have free access to information in the country. There is nothing called “Freedom/right to information” in China. Be it Google, Facebook, Instagram, Snapchat, or WhatsApp, everything is blocked in China. These applications do not comply with the policies of the Chinese government, so there is no specific Chinese version either.

The regressive policies of the Chinese government do not even let the Android users access the Google Play Store in China. The Chinese Android users have their alternatives to everything. For example, for the Play Store alternatives include the Huawei App Gallery, Oppo’s Application Store, Lenovo’s Application store etc. The WhatsApp alternatives include WeChat and Line. The Facebook alternatives include Weibo and Baidu. The Google alternatives include Sogou and Baidu’s search engine.

Now here’s the thing. These alternatives are good and built for Chinese users specifically. But they are definitely not as good as the original applications. You cannot simply replace WhatsApp with WeChat. If you are living inside China and you want to have the usability and feature offered by WhatsApp, Line is not going to fulfill those. So, what’s the best option? Well, it is to use WhatsApp using a neat trick.

So, the Huawei MediaPad owners, who do not have anything called “WhatsApp” in their tablet, it’s time for them to install it. Go ahead and follow this procedure to download WhatsApp on Huawei MediaPad WiFi. Follow the steps carefully.

Download WhatsApp on Huawei MediaPad

First of all, you need two devices. These devices include your Huawei MediaPad WiFi version and another phone with a spare SIM card.

Here is how you can name these devices for your ease:

  • Huawei MediaPad: Device A
  • Phone with SIM card: Device B

Now install WhatsApp on Huawei MediaPad

  1. WhatsApp APK: Download
  2. Copy the APK file to Huawei MediaPad.
  3. On MediaPad, open File Manager and locate WhatsApp APK.
  4. Click on the APK to install it.
  5. If it asks for any permission or asks to allow unknown sources, allow it.
  6. Finish the installation now.
  7. Follow the steps given below now.

Register WhatsApp on Huawei MediaPad

  1. Open WhatsApp on Huawei MediaPad. WhatsApp will now ask for phone number.
  2. Enter the phone number that is inserted in Device B and send the verification number.
    WhatsApp for Huawei MediaPad
    Device B’s number for verification
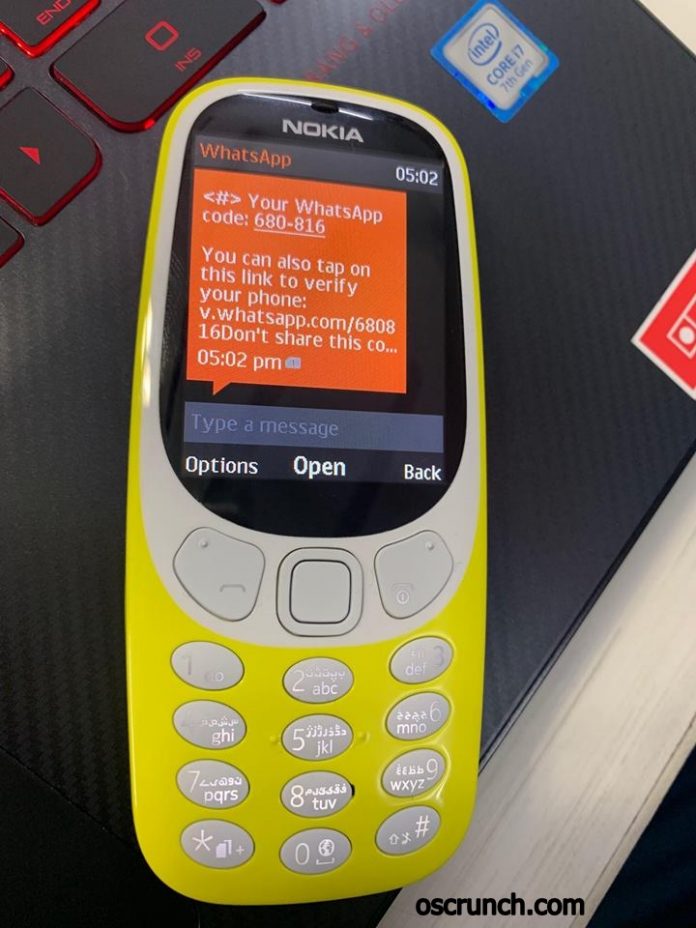
  3. Device B will get WhatsApp SMS with a verification code.
    WhatsApp on Huawei MediaPad
    The Device B gets Verification Code
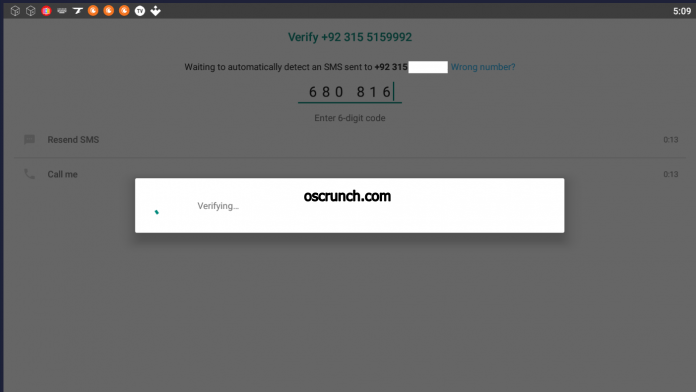
  4. Enter the verification code from Device B on Device A (Huawei MediaPad).
  5. Proceed with verification.
    WhatsApp for Huawei MediaPad
    Entering verification code on Device A
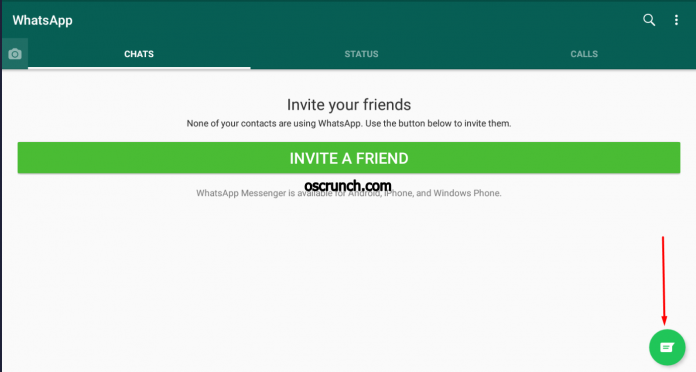
  6. You will have WhatsApp installed and set up now. That’s all.
    WhatsApp Huawei MediaPad
    WhatsApp Set up on Huawei MediaPad

Adding Contacts on Huawei MediaPad

On Tablets without SIM card, you do not have the Contacts application. To enroll contacts in MediaPad’s WhatsApp, here is what you can do. Open WhatsApp and click on new chat. Now you will find the option to add a new contact. Go ahead and add new contact details. Close WhatsApp and open it again. Click on new chat icon again. You will find that contact added there. You can add all of your contacts one by one like this.

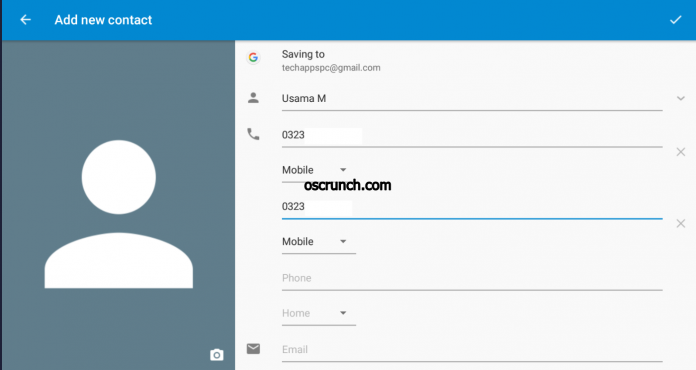
 

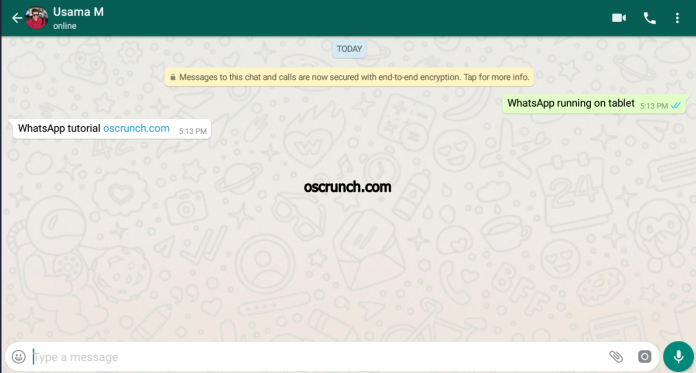
As the contacts have been added and everything is done, you are all set to go ahead. Make video calls, voice calls, or send documents and files, it is totally up to you. WhatsApp is all yours now. Use it the way you want.
A tip for Chinese MediaPad users: In case WhatsApp is still not working for you, grab a VPN for your Android tablet. Install the VPN and connect to it. Open WhatsApp after connecting to VPN. You are all good now.

Disconnecting the VPN will disconnect WhatsApp too. This is a downside for sure and there is no other solution available at the moment. Every time you want to use WhatsApp inside China, you need the VPN connection. Outside China, WhatsApp for MediaPad will run without a VPN flawlessly

Conclusion

I hope that you have successfully installed WhatsApp for Huawei MediaPad now. WhatsApp should be running just like a normal Android phone on your Tablet now. If you are facing difficulties with the installation process, you can reach out to us. I will try my best to get back to you as soon as I get your query. Till then, stay connected and do drop your feedback below.

Windows 10 Product Activation Keys 2019 [ All Versions ]

0
Windows 10 Product Activation Keys 2019 [ All Versions ]

Those who are looking for free Windows 10 Product Activation Keys. This is the post for you. Today, we are providing you all with the latest & working Windows 10 Product Activation Keys 2019. We’ve collected all the activations keys, so if somehow, one doesn’t work for you. Try another & another, until you will get activation for free.

Windows 10 is so far the best operating system from Microsoft, Hmm, We’ll this is what they always say. There is no doubt that, when Windows 10 came out, every Windows user switched to Windows 10. Yes, they did, I mean why not, lots of exciting and new features were introduced.

The one thing that I like about Windows 10, is that they have different Windows 10 editions. One is for normal users who like to use it on their PC at home. However, if you are a Pro or work in an organization, then you would get Windows 10 Enterprise. This pro version of Windows 10 is different from all the others, Including Windows 10 Student.

We all know that when it comes to the installation of Windows, you must have a product activation key. Otherwise, you won’t be able to proceed with the installation. However, if you want to Install Windows 10 just for testing, you can use the following Windows 10 Product Activation Keys. By using these Activations keys you will be able to use Windows 10 for 30 days for free. After that, your free trial version will be finished.

Before we proceed further, let me tell you one thing. These Keys will let you install Windows 10 and once the period of 90 days is over, you need to activate your Windows to avail all the features. Let’s start now and provide you with the latest Windows 10 Product Activation Keys 2019.

Windows 10 Product Activation Keys

Windows 10 Product Activation Keys 2019 [ All Versions ]:

Following are the Windows 10 Activations keys, all of them are tested and then we are posting.

Windows Server 2016 All Versions
★ Windows Server 2016 Datacenter [ CB7KF-BWN84-R7R2Y-793K2-8XDDG ] .
★ Windows Server 2016 Standard [ WC2BQ-8NRM3-FDDYY-2BFGV-KHKQY ].
★ Windows Server 2016 Essentials [ JCKRF-N37P4-C2D82-9YXRT-4M63B ].

Windows 10 version 1607, version 1703, and version 1709:

These are the keys for all Windows 10 version. If one doesn’t work for you, try another. You need to enter these keys while you are installing Windows 10. Through these Keys, you will be able to activate your Windows 10.

Windows 10 Professional:

  • W269N-WFGWX-YVC9B-4J6C9-T83GX

Windows 10 Professional N

  • MH37W-N47XK-V7XM9-C7227-GCQG9

Windows 10 Enterprise

  • NPPR9-FWDCX-D2C8J-H872K-2YT43

Windows 10 Enterprise N

  • DPH2V-TTNVB-4X9Q3-TJR4H-KHJW4

Windows 10 Education

  • NW6C2-QMPVW-D7KKK-3GKT6-VCFB2

Windows 10 Education N

  • 2WH4N-8QGBV-H22JP-CT43Q-MDWWJ

Windows 10 Enterprise 2015 LTSB

  • WNMTR-4C88C-JK8YV-HQ7T2-76DF9

Windows 10 Enterprise 2015 LTSB N

  • 2F77B-TNFGY-69QQF-B8YKP-D69TJ

Windows 10 Enterprise 2016 LTSB

  • DCPHK-NFMTC-H88MJ-PFHPY-QJ4BJ

Windows 10 Enterprise 2016 LTSB N

  • QFFDN-GRT3P-VKWWX-X7T3R-8B639

Product keys for Windows 10 Version 1803

Windows 10 Enterprise Evaluation

  • MNXKQ-WY2CT-JWBJ2-T68TQ-YBH2V

Windows 10 Enterprise

  • XGVPP-NMH47-7TTHJ-W3FW7-8HV2C

Windows 10 Professional Workstation

  • WYPNQ-8C467-V2W6J-TX4WX-WT2RQ

Windows 10 Education

  • 84NGF-MHBT6-FXBX8-QWJK7-DRR8H

Windows 10 Professional

  • VK7JG-NPHTM-C97JM-9MPGT-3V66T

There you go, if you face any issue while using these keys to activate your Windows 10. Please do tell us in the comments section.

How do I activate Windows 10 Pro or Home editions?

  • Open Settings -> Update & Security -> Activation -> Go To Store.

How do I enter the product key for Windows 10?:

  • Open Settings -> Update & Security -> Activation -> Change Product Key -> Enter a valid product key.

That’s all. Enjoy the Windows 10 Product Activation Keys 2019.

Download CamHi for PC – Windows & Mac

0
Download CamHi for PC – Windows & Mac

Security has become an essential part of our life. With the technology changing the world, it has now become easier to keep an eye on our houses, our offices and everything else that we have a concern with. We have the IP cameras placed in our homes that we can easily monitor using the applications installed on our smartphones.

Gone are the days when we had to sit down and watch a TV screen all day long just to monitor what’s happening at a certain place that we are concerned with. CamHi is one such application that will let you keep an eye on your desired place. This application needs a working camera placed in a location in order to show you the real-time video and also help you take real-time photos.

CamHi saves the video on your phone’s SD card. You can play the video anytime later on. The application will show you the video of a place while you are sitting in any other corner of the world. CamHi comes for free. It’s meant for those who cannot physically spy on their business all the time and they need a remote view right in the palm of their hands.

Whether you are a restaurant owner, you run your own factory or you have to keep an eye on your office, CamHi is the application you need to keep an eye on your workers. CamHi originally came for the Android OS. The application can be installed on a desktop computer and a Laptop as well now. CamHi for PC

CamHi for PC can be downloaded, installed and used on a computer powered by Windows 7, Windows 8, Windows 8.1, Windows 10, MacOS and Mac OS X. To install CamHi for PC on Windows and Mac, you can get Nox App Player or the BlueStacks App Player. Let’s go through the tutorial to run CamHi for PC now.

Download CamHi for PC using Nox App Player – Windows/Mac

  1. Download and install Nox App Player on your computer.
  2. Now download the CamHi APK.
  3. Double-click the downloaded CamHi APK to start its installation via Nox App Player.
  4. Wait a minute and let Nox install the APK file now.
  5. Once the APK has been installed, it will appear on the home-screen of Nox.
  6. You can now click on the CamHi icon in Nox to launch it.
  7. Download the game data and proceed with the on-screen instructions now.
  8. The game won’t take too long to run now. You’re all set to play it now. That’s all.

Download CamHi for PC using BlueStacks 3 – Windows only

  1. Download, install and setup BlueStacks 3 on your computer. Mac users can download and install BlueStacks instead.
  2. Download CamHi APK.
  3. Now open BlueStacks 3 and then open My Apps tab.
  4. Click on the “Install APK” button located inside BlueStacks 3.
  5. Locate and select the CamHi APK. Let BlueStacks 3 install it.
  6. Once the installation comes to an end, CamHi will appear in the My Apps section. It will also appear as a shortcut on your computer’s desktop.
  7. You can open CamHi now. Follow on-screen instructions to run it within BlueStacks 3.

How to download Facebook Videos on iPhone and iPad

0
How to download Facebook Videos on iPhone and iPad
Download Facebook Videos on iPhone and iPad

This is your ultimate guide to download Facebook Videos on iPhone and iPad. If you have been keeping an eye on some of the videos that clicked your heart, it is the time to download them. In case something was keeping you from downloading those Facebook Videos on your iPhone and iPad, this guide is going to help you out. Before you download Facebook Videos on iPhone and iPad, let us take a look at how videos have changed the content trends.

download Facebook Videos on iPhone and iPad
Download Facebook Videos on iPhone and iPad

How Facebook changed the content trend?

Facebook has changed the ways people used to look at the content. Back in the good old days, people had the capacity to read the content. They were more into reading rather than watching. Another thing that forced people to read only was their limited internet packages. With time, access to internet improved. People today have internet in more parts of the world. Almost everyone these days has a smartphone connected to the internet all the time. The more the internet grew, the content trends changed.

What people used to read, they like to watch it now. When there were the days of reading, not a huge number people were well informed because not all of them used to read. There were only a few people who spent a few minutes reading some informative, knowledgeable, educational, review, satire or any other type of content.

As of 2019, people are more informed because they get everything in the form of video now. Be it news, be it a discussion, a tutorial, a review, an opinion, they get every single thing in the form of a video. Thanks to Facebook. It was Facebook that normalized the trend of videos. Yes, YouTube did exist before, but it was Facebook that urged everyone to pick up their cameras or smartphones to start shooting videos.

Facebook Videos

Facebook gets nearly 8 Billion Video views on average every day. 75% of these views come from mobile devices like the iPhone and iPad. Facebook pages and users share funny, motivational, and informative videos that leave an impact on their followers. These videos sometimes are really useful and you want to share them with your friends on platforms like WhatsApp. Videos shared over Facebook are sometimes very small in size, so if you want to download those, they are not going to occupy much of your device’s local storage.

The iPhone and iPad owners sometimes want to save Facebook videos but they don’t know how to do so. If you also own an iPhone or iPad and you want to download a Facebook Video, you will find the method to do so in this guide.

Here are the simplest steps to download Facebook Videos on iPhone and iPad without a hassle. Remember that this method is valid for all iPhones, iPads, and all versions of iOS.

Download Facebook Videos on iPhone and iPad

Before downloading the video, open Settings on your iPhone or iPad and go to Display > Auto-Lock > Never. This has to be done because if the phone goes off during the download process, it will fail the download. To successfully download the video, your phone’s screen must stay on.

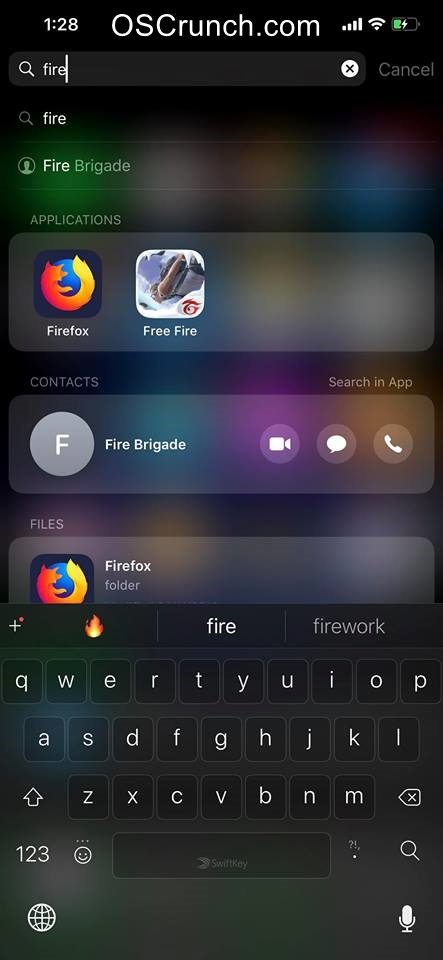
  1. First of all, open the App Store on your iPhone/iPad and download the FireFox Browser.
  2. Open Facebook and open the video that you want to download.
  3. Below the video, click on the “Share” button and then click on “Copy Link”.
  4. Open FireFox on your iPhone/iPad now and click on the Address Bar.
    Firefox for iPhone/iPad
    Firefox for iPhone/iPad
  5. Now open this website: Fbdown.net
  6. On the Fbdown home page, you will find a bar asking for the URL of the video that you want to download.
  7. Long press this bar and then paste the link that you just copied from Facebook.
  8. Now click on Download button.
  9. Fbdown will now show you two download optionsDownload Video in Normal Quality or HD Quality”.
  10. Long-press the quality option that you want to download, you will now see a pop-up showing an option “Download Link“.
  11. Click on Download Link > Download Now. The video will start downloading.

Saving Facebook Videos to Photos

After the video is downloaded, it will show you the “Downloads” button next to the video. Click on the Downloads button to access the downloaded file. Now open the downloaded video from Downloads in Firefox. It will show you the share options for video. Click on “Save Video” in order to make this video appear in your “Photos” application. You can now access this Facebook Video from the Photos app any time. This video will also appear in the Videos application on your iPhone or iPad. If you want, you can download a third-party file manager for the better management of videos on your phone.


In case you do not save the video to Photos or copy it to the file manager, it is going to stay there in the FireFox’s downloads section only. After moving the video to the Photos, don’t forget to delete it from FireFox’s downloads to free up that extra space.

Alternative

Just in case the FBDown fails to work, you can use this site “Savefrom.net”. The method to download the videos will remain the same. A downside of the site Savefrom is that it does not give you resolution options like the FBDown. So, for the better resolution choice, you should stick to the exact website that I have mentioned in the tutorial above.

Conclusion

That is all folks. I hope you guys found this tutorial very useful as I have tried my best to make it as simple as possible. By now, you should be able to download any kind of Facebook Videos on iPhone and iPad. As you have noted above that I have talked about the Firefox Browser for downloading Facebook Videos on iPhone and iPad, that is because no other browser supports this procedure. If you will try downloading videos using Google Chrome or the Safari Browser, it’s not going to work. After these browsers, the best choice is the Firefox Web Browser. If you are facing any difficulties while following this procedure, you can reach out to us. We will try our best to get back to you as soon as possible.

Fix Samsung Galaxy S7, S7 Edge Bootloader Exception Error

17
Fix Samsung Galaxy S7, S7 Edge Bootloader Exception Error

Samsung Galaxy S7 and Galaxy S7 Edge are two exceptionally cool devices by the Korean giant. While the Galaxy Note 7 put Samsung on the brink of falling apart, Samsung Galaxy S7 and S7 Edge saved the company’s fate. Samsung has been giving more importance to the device since the Galaxy Note 7 fiasco ended. Galaxy S7 and S7 Edge saw new colours, the devices also tasted the Nougat beta builds and are all set to get the official update any moment.

If you go up looking for some custom stuff to flash on your phone, you will find plenty of it. You can flash a TWRP recovery, root your S7/S7E and even install Xposed framework. These out of the way things need a little extra knowledge about the Android OS first and then the phone. Trying to go beyond the boundaries set by device manufacturers put you at a risk of killing your own phone. 1 single error that you are not aware of, and you are doomed. That’s how bad things can get at times. This is exactly what happened with my friend who was trying to root his S7 Edge. Upon trying to flash the SuperSU, his phone got stuck on the “Bootloader Exception” error followed by a messed up log as Exception: do_handler_sync: UNKOWN(esr: 0x2000000), and that was all he could see.

While trying to tackle this issue, we tried a number of solutions but none of the traditional methods like trying to clear cache, dalvik cache or even a factory reset couldn’t work. The reason was, none of the aforementioned options are accessible once the Bootloader Exception takes over. This simple doesn’t let your phone work. In literal terms, the bootloader of the phone got screwed and a phone will never boot without a right bootloader.S7 Edge Bootloader Exception Error

The moment you get to know that it’s basically nothing other then a bootloader issue, a solution lands in the mind of an Android power user. Simple trying to replace the bootloader of the phone worked out and we were able to get into the phone. You may also flash a stock firmware to get out of this situation, but a stock firmware will take an extra while to first get downloaded and then to flash as well. Let’s have a look on the fix to rescue you in case your phone has also fallen prey to this error.

How to fix Samsung Galaxy S7, S7 Edge Bootloader Exception error

  1. The very first thing is to get an appropriate bootloader for your phone. You must download the latest bootloader according to your devices’ firmware. In case you are unable to locate a separate bootloader file, you can skip the search and download the latest firmware for your phone. Make sure that it is the same firmware as the previous one running on your phone. i.e. If your phone was running on Android 6.0.1, you must download the latest Android 6.0.1 firmware file. The firmware file that you will download will be in the .tar or .md5.tar format.
  2. Now extract the downloaded firmware file. You will get a handful of files starting with codes like AP_, BL_, CSC_, and so on.
  3. Here in these files, the file starting with the name BL is your bootloader file. Copy this file to your computer’s desktop for easy access.
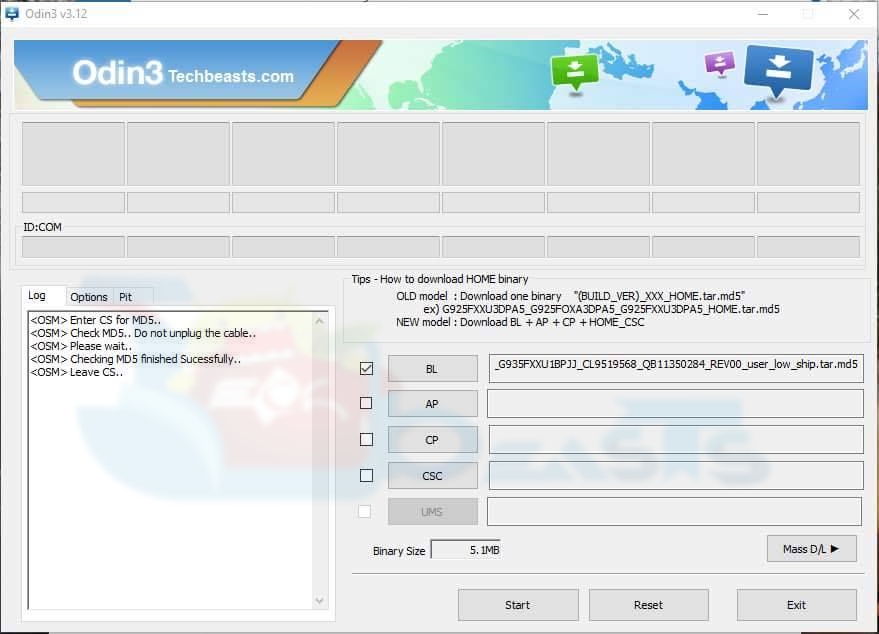
  4. Now that you have copied the file, it’s time to download and extract Odin3 on your desktop PC. Also download and install Samsung USB drivers on your PC.
  5. Open the Odin3.exe.
  6. Put your phone in download mode. To do so, keep holding the Volume down + Home + Power key for a while on your phone. Your phone may resist at first, but it will eventually get into the download mode.
  7. Connect your phone to your PC now.
  8. In Odin, hit the BL tab and select the BL file that you copied on your desktop.
  9. Now making sure that Odin has the Device Added status and its ID:COM box has turned blue, the BL file is all set, hit the START button.
  10. It will quickly flash the Bootloader on your phone.
  11. Once bootloader has been flashed, reboot your phone.

I hope the fix worked well for you. In case the fix given above doesn’t work, go ahead and flash a stock firmware. If you have any further queries, reach me out through the comment box below.

Download Latest Official Google ADB and Fastboot Drivers

1
Download Latest Official Google ADB and Fastboot Drivers
 Updated: 09/05/2020  Google has been running its Android platform really well over the course of last few years. It has always remained Google’s priority to facilitate its users with all the utilities and tools that the users need every now and then to play with their Android smartphones. The only thing that Google lacked for a while was an independent package of the ADB and Fastboot binaries.Download Latest Official Google ADB and Fastboot DriversIn order to download and install official ADB and Fastboot drivers, Android users used to download the entire Android SDK tools and then operate the ADB and Fastboot part. This installed the entire Android Studio in the computers.

Now the pain lands in when you look at the size of the Android Studio/Android SDK setup files and also the time it takes to install these tools. To overcome this difficulty, many different developers came up with their version of Android ADB and Fastboot. One such tool is Minimal ADB and Fastboot which literally takes 2 minutes to bring the entire ADB phenomena into your computer. There are many other tools, but you can not trust those tools easily as they do not have the official stamp on them.

Latest Official Google ADB and Fastboot Drivers

Google has finally taken a note of this issue. As mentioned, the independent version of ADB and Fastboot is out. You can download it for Windows, MacOS or Linux OS and start using it straight away. Google has provided the download links, which will likely stick for a while. You can go ahead, pick up the ones against your OS.

To know how you can operate the ADB and Fastboot tools, have a look at this detailed guide. In the guide linked behind, only follow the method to issue commands in ADB command window. You will not be performing any installations at all.

How to logout of Facebook Messenger on Android and iPhone

0
How to logout of Facebook Messenger on Android and iPhone

Logging out of Facebook Messenger on your Android smartphone or iOS powered iPhone is a little bit tricky. Here are a few steps you need to follow in order to logout of Facebook Messenger on Android and iPhone.

Facebook Messenger has made communication a lot more easier than it was a few years ago. With Messenger, you can communicate with your friends and family in a few taps just like you do on WhatsApp and other such platforms. Messenger has the video and voice chat features as well. It becomes a whole package for you and reduces the need of another communication application.

If you have installed Facebook application on your Android or iOS powered phone, chances are that you have also installed Messenger on your phone and both of your applications have the same account logged in. Sometimes, you want to use a different account in the Facebook application and a different account in the Messenger and sometimes you just don’t want to use any account in Messenger or want to loggout so that it doesn’t show you “Active” all the time. The “Active” status of Messenger is capable of causing misunderstandings among your buddies, it’s better to have it off when you are not willing to face an issue just because you were away and you couldn’t get back on time.

Messenger application doesn’t provide the option to logout of it easily. If you go into the settings of Messenger, you will find options like Switch Account, security etc, and no option to logout. The only solution that you may have in front of you is to delete the Messenger and get rid of it. But that doesn’t seem right if you just want to keep it in your phone for a certain account. Logging out of Messenger requires following a little trick on both the Android and iOS platform. We have had a look into the method for both operating systems and after successful implementation, we are able to come up with this guide.

Here’s how you can do it now.

How to logout of Facebook Messenger on Android

  1. On your Android phone, go to Settings.
  2. In settings, open Application Manager or Applications.
  3. Now in Applications > Goto “All Applications or Running Applications”.
  4. Scroll down to the list of letter “M” and find Messenger.
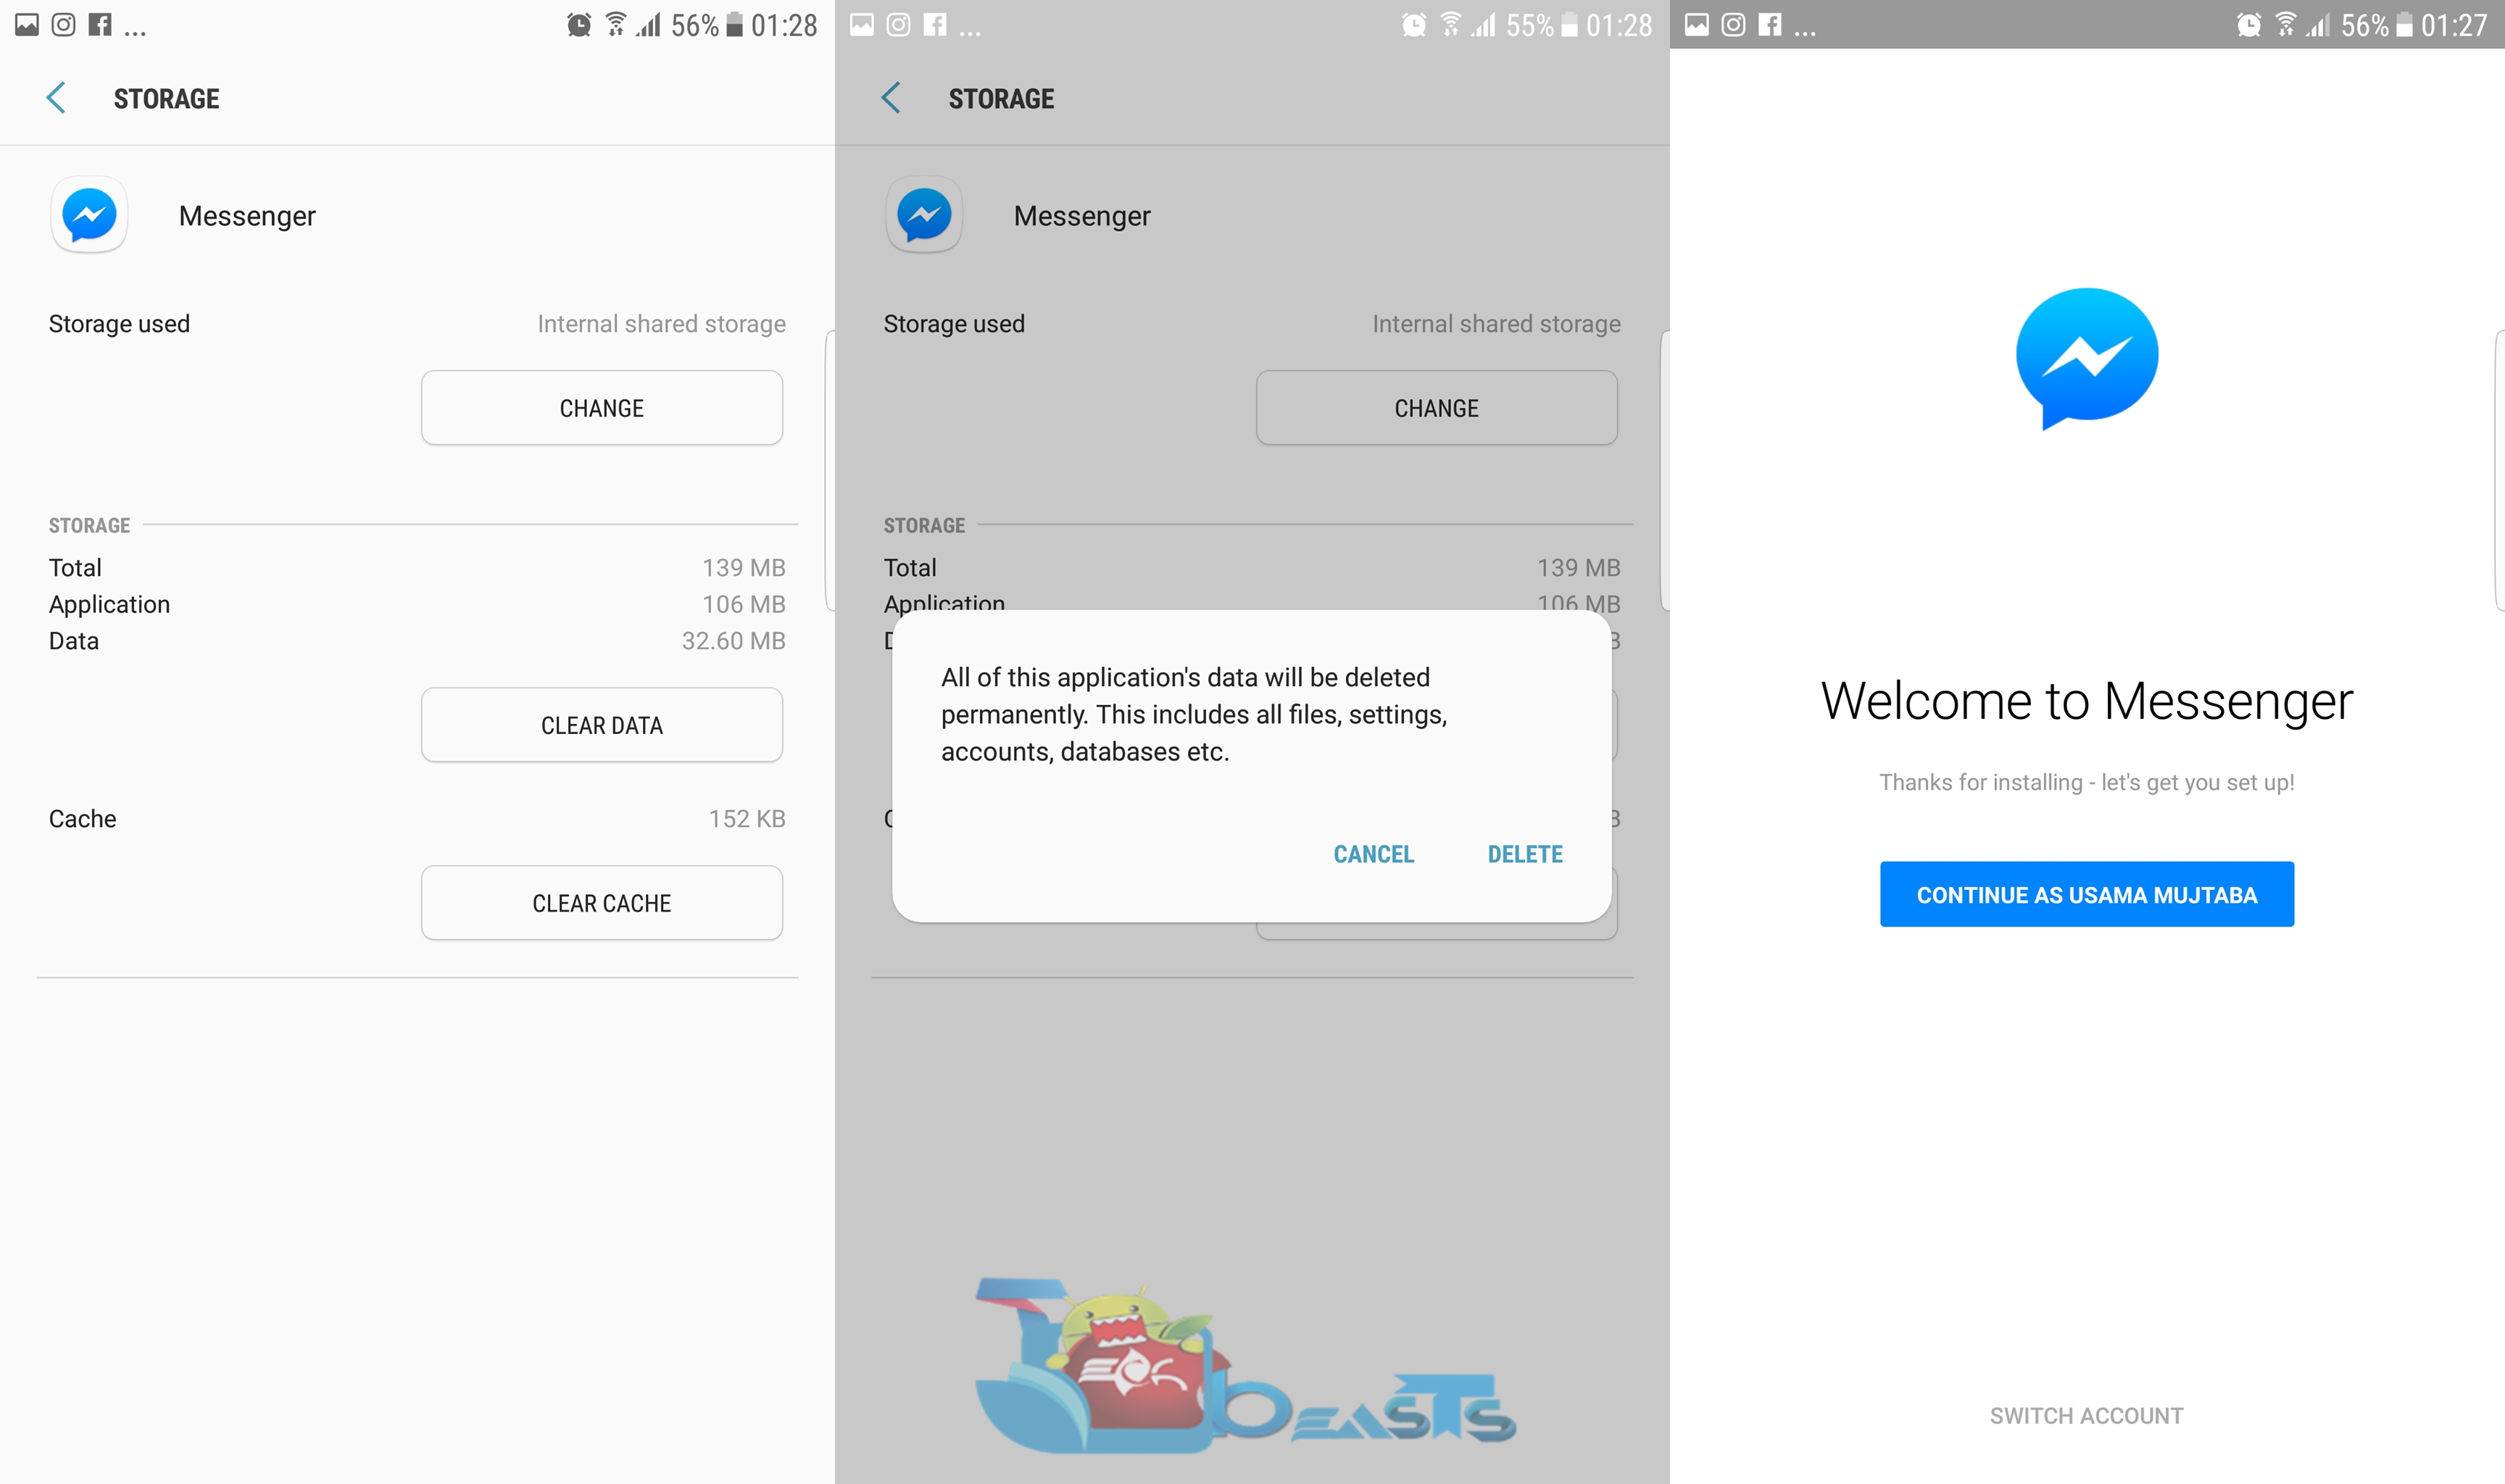
  5. Tap Messenger and clear its data. If you are running on Android 6.0.1 or higher, then tap Storage > Clear Data.
  6. Clearing data will delete your account from Messenger resulting in requiring you to log back in.
  7. You can now open the Messenger and use a different account or log back in using the account that you just logged out of.
  8. That’s all with the Android procedure.Logout of Facebook Messenger on Android

How to logout of Facebook Messenger on iPhone

  1. Open the Facebook application on your iPhone.
  2. Tap the options button on the lower right in Facebook application and scroll all the way down to locate Account Settings.
  3. In Account Settings, tap “Security”.
  4. Now in Security, tap “Where you’re logged in”.
  5. This menu shows the list of all the devices and platforms you are logged in through.
  6. Find the Facebook Messenger session in this list and delete it.
  7. After deleting it, open Messenger and you will find yourself logged out.
  8. That’s all.Logout of Facebook Messenger on iPhone

I hope that this guide worked fine for you. In case you are facing any issues, reach me out through the comment box below.

How to enable Google Play Store Instant Apps

0
How to enable Google Play Store Instant Apps

In this post, we are going to overview a method through which you can easily enable Google Play Store instant apps.

Google made the instant Apps available for Android users with the release of Android 7.0 Nougat. The idea behind instant apps is to give the users ease of access. If we look deep into the entire concept, it isn’t new actually. The foundation of portable software was laid down a few years ago. Having portable software allowed the users to access that particular piece of software without installing it completely on a computer.

Portable Software – For whom it’s useful?

Portable software became much useful for users who always carry a portable hard disk and they instantly want to use their favorite software anywhere on any computer across the globe. Instant Apps, to some extent, are similar. You can get an application from the Play Store without having it installed on your phone completely. Instant apps installation just brings a small chunk of an application on to your Android smartphone. This way you do not lose a huge amount of your mobile data and it doesn’t take a long time to install that application either.

Developers have to make a separate instant app version of their main application. Instant apps do not support heavy processes and restrict certain activities which usually eat up a huge amount of mobile data or bandwidth. It is of much use when you have a slow internet connection and there is a dire need of getting your hands on an application given the fact that an instant version is available. It is also quite handy as it ends up saving a lot of previous minutes of yours. With just a few taps, you can quickly enable this feature on your Android Nougat powered smartphone and have fun. Here’s a look on how to do it now.

How to enable Google Play Store Instant Apps

  1. Go to settings on your Android phone.
  2. Scroll all the way down and tap “Google”.
  3. Enable “Instant Apps” located right next to the “Set up nearby device” option.
  4. Tap “YES, IM IN” in the screen showing up next.
  5. Now open Google Play Store and check the instant app versions of your favorite apps.

How to rotate Instagram to Landscape mode (Horizontal)

0
How to rotate Instagram to Landscape mode (Horizontal)

Ever wanted to view Instagram in landscape or horizontal mode? It has been made easier now. Here is how to rotate Instagram to Landscape mode and view your pictures in a much more better way.

Instagrammers may have noted that they always view a portrait mode of Instagram on their Android smartphones. Upon rotating the phone in landscape mode, the Instagram application doesn’t rotate. It stays in the portrait mode (vertical mode) and users are bound to view the size of pictures that it has in the portrait mode. The landscape mode can bring a wide-view of photos and result in more clarity and that’s why it is slightly useful. On an application like Instagram, a landscape mode is a must to view the pictures closely. Unfortunately, there is no official method to rotate the Instagram application. If you are an Android Instagrammer, you certainly are not out of luck. You can force rotate the Instagram application and photos to landscape mode.

A third party application,  which can force rotate the screen of your Android phone will also force rotate Instagram. The catch is that it will rotate the entire screen, it won’t work with the sensors of your phone, but yes, the entire control is in your hands. You can switch to whatever mode you want in a single tap. All of the controls of such applications appear in the notification bar, so you can always pull it down and change the settings.

Rotate Instagram to Landscape mode

In order to rotate Instagram into landscape mode, we will use the Rotation Control application, which comes for free. You can install it easily from the Google Play Store. Head up to the few instructions listed below to apply this tweak to your Instagram application.

  1. Download and install Rotation Control from Play Store on your Android smartphone.
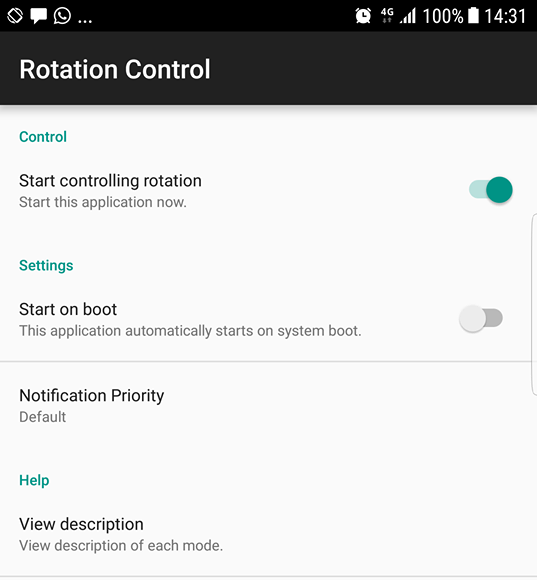
  2. Open Rotation Control from the app drawer.
  3. Turn on “Start controlling rotation”.
  4. Now open Instagram application on your phone.
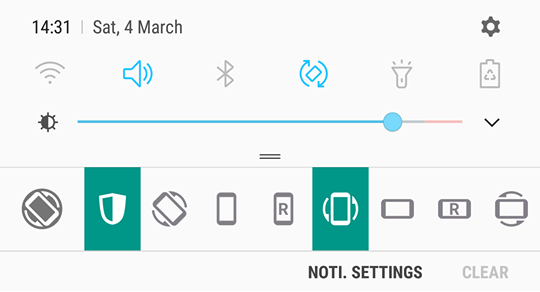
  5. Pull down the notification bar.
  6. Now press the last icon in the line of buttons shown in the notification panel.
  7. This will rotate the screen of your phone and you will have Instagram in landscape mode.
  8. Now to switch it back, simply turn off this button again.
  9. You can turn off the rotation control by opening the application and disabling the option you enabled in step 3.
  10. That’s all.

How to post wide panorama photos on Instagram

0
How to post wide panorama photos on Instagram

You can now post wide, panorama photos on Instagram and here is how to do that.

Instagram without a doubt is the best photo sharing social media platform. You can always share your favorite moments, share your instant stories and leave your precious memories on it. Instagram is just a simple way of telling your stories through your pictures. Since the acquisition of Instagram by Facebook, we have constantly been seeing upgrades, once after another. Instagram today has evolved into a whole new platform. Some of the features were replicated as seen on Snapchat, which did bring Instagram under severe criticism as well, but no one really cares as long as the application is working cool for them.

Recently, Instagram added another great feature. This feature allows users to upload up to 10 pictures or videos at a time in a post. It simply allows users to make an album consisting the mentioned number of photos and videos. Now this folder has a nice view. It shows all your pictures just like you see in the gallery of your Android smartphone. There are some nice ways to utilise this feature, and the very use discovered by an Android developer is to post wide pictures on Instagram.

This has been made possible with the help of an application named as InstaWide. This application basically divides your panorama photos into small photos and then it can help you upload those in an Instagram album. Upon viewing your Instagram album, you can view the whole panorama picture joined by parts and there will be no white spaces around. This means you will have an exact look of that whole panorama picture instead of seeing its pieces joined by each other.

How to post wide panorama photos on Instagram

  1. Download and install InstaWide on your Android smartphone.
  2. Open the newly installed InstaWide application now.
  3. Select a picture in Instawide and tap the next button on the top-right corner.
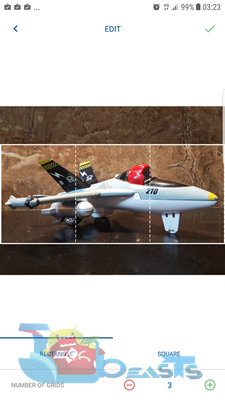
  4. Select the angle, and the number of grids now and crop the picture. 
  5. Open Instagram now and tap the “+” button to share pictures.
  6. Now from the options, tap “Select Multiple” and select the cropped pictures in a 3-2-1 manner.
  7. After selecting the pictures, tap next and go ahead to share on Instagram.
  8. Once the pictures have been shared on Instagram, you can swipe through the picture and you will find out that it looks like one big drag-able picture without any white spaces or corners around.
  9. That’s all.

Identify Correct Architecture and DPI for Google Play Services

0
Identify Correct Architecture and DPI for Google Play Services

At times you have to install the Google Play Services manually on your smartphone. In order to perform a manual installation of the Play Services, you have to be sure about 2 things. You must know what architecture your phone is running and what’s the DPI. Google Play Services come in different packages. The packages are build based on the architecture and DPI of an Android phone. Especially, if you have an old Android phone, you definitely have to take the DPI and architecture into account since those phones ran on old architectures.

Now if you are thinking why you would want to install the Play Services manually, let’s take a look at the answer to this question. At times, you come across Android phones that do not have anything called Google inside. This is the case most of the times happening with the Custom ROM freaks. The AOSP ROMs do not have the Google Apps present inside. Also, the Chinese Android handsets that belong to the Chinese region, they do not have any Google Apps inside. At times, the Google Play Services start crashing on an Android phone. In such a case, you either have to update the Google Play Services or you have to reinstall them. These are a few cases where you will be installing them manually.

To install the Google Apps, you have to install the Google Framework. Google Play Services is the most important part of the Google Framework. For example, if you have all the Google Apps installed, but not the Google Play Services, you will not be able to run those apps. Google Play Services lay out the basis for all other Google Apps to work on an Android phone.

Follow this tutorial to identify correct architecture and DPI for Google Play Services. The guide will first explain how the ARM and ARM64 architectures work and then what’s the role of DPI. In the end, you will find a list of CPUs based on the architectures.

The Architectures: ARM, ARM64, and X86

  1. There are three basic frameworks that exist in the world of Android. The very first is x86, which is basically Google’s version to run Android on a computer. x86 is not based on the ARM platform.
  2. Then comes the ARM platform which is also known as the ARM-v7a. This is the 32-bit platform which powers low-end and mid-range smartphones. It was popular back in the day. Nowadays, most of the smartphones run on the ARM64 architecture.
  3. ARM64 is currently the most popular platform. It is the 64-bit system. As the CPUs for smartphones evolved, ARM64 became a norm. Most of the high-end smartphones today are powered by ARM64.

The architectures are backward compatible, here is how they will work.

  1. ARM or ARM-v7a apps on ARM-v7a will work.
  2. ARM or ARM-v7a apps on ARM64 or ARM-v8a will work.
  3. The ARM64 or ARM-v8a apps on ARM64 or ARM-v8a will work.
  4. The ARM64 or ARM-v8a apps on ARM or ARM-v7a will not work.

DPI Values [Software Density]

Similarly, following are the DPI ranges that we currently have.

  1. 160dpi
  2. 240dpi
  3. 320dpi
  4. 480dpi
  5. nodpi

Now the DPI has more to do with the UI. It basically makes the UI of an application compatible with the UI of your phone. For example, if your phone has 160dpi, you will install an application having 160dpi on it. If you install an application of 240dpi on your 160dpi smartphone, the UI will be messed up.

When the DPI range of your phone does not match any given DPI of an application, you can simply install the nodpi version. In fact, installing the nodpi version is always better since it automatically sets the DPI of an application according to your phone.

When it comes to Google Play Services, we have various versions of DPI. If your phone’s DPI matches any version of Play Services, you can pick that version, otherwise, there is a nodpi version of Play Services which you can always install.

DPI is not backward compatible, however, it works in different ranges. This is how it works.

  1. Your phone’s DPI: 1×0160dpi apps compatible.
  2. Phone’s DPI: 2×0 240dpi apps compatible.
  3. Your phone’s DPI: 3×0320dpi apps compatible.
  4. Phone’s DPI: 4×0480dpi apps compatible.

Now comes the main question, how to determine what Architecture is powering up your phone and what’s the Software Density i.e. DPI? Well, follow these steps.

Identify Correct Architecture and DPI for Google Play Services

  1. Download and install Droid Hardware Info application on your phone.
  2. Open the application from the app drawer on your phone.
  3. The application will take you into the “Device” tab by default.
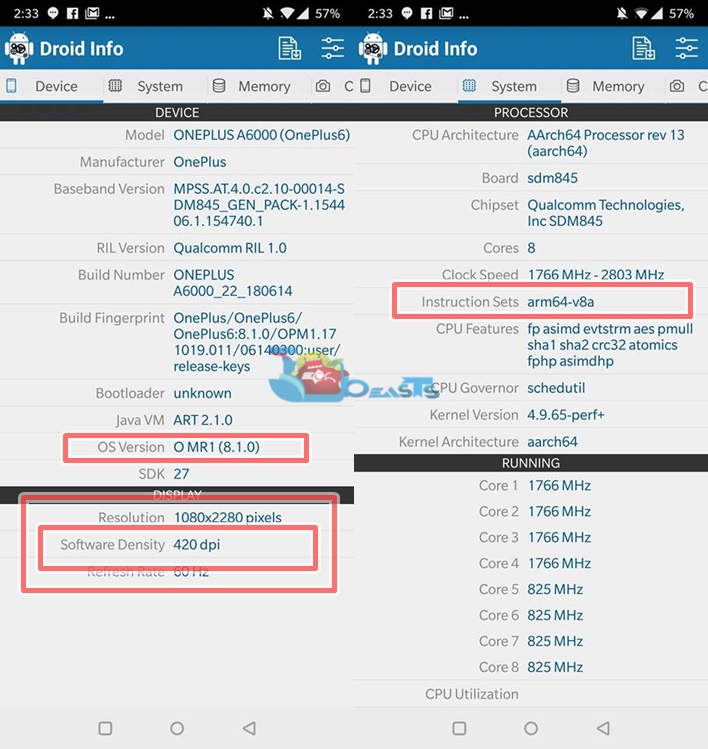
  4. At the bottom of this page, you will find “Software Density” provided by a DPI value. Write down this value.
  5. Now tap the “System” tab which is next to the Device tab.
  6. On this tab, the 6th line is “Instruction Sets” stating the architecture of your phone, it should be something like arm-v7a or arm64-v8a.
  7. Note down the value of Instruction Sets as well.
  8. Also, not down the Android Version of your phone. You must be sure what Android your phone is running on.
  9. Now look for your required Google Play Services APK and install it.
  10. Your installation should be going smoothly now. That’s all.

In the screenshot above, the DPI of my phone is 420 and its architecture is arm64-v8a. It means I can install both the ARM and ARM64 apps on it, but I have to install the Play Services APK either having 480dpi or nodpi. Going below this will crash the Play Services on my phone.

You can always check the CPU of your phone at the back of your phone’s box or even using Droid Info application. Just so you know, here are the CPUs that are based on ARM-v7a and ARM-v8a architectures:

CPUs based on ARM-v7a

Samsung Exynos

Exynos 3 3110, 3250, 3470, 3475
The Exynos 4 4210, 4212, 4412, 4415
Exynos 5 5250, 5260, 5410, 5420, 5422, 5580

Qualcomm Snapdragon 

Qualcomm Snapdragon S1, S2, S3 
Snapdragon S4 Play, S4 Plus, S4 Pro
The Snapdragon 200, 205, 208, 210, 212
Snapdragon 400, 410, 412, 415

Huawei HiSilicon

K3V2
→ K3V2E
Kirin 910, 910T, 920, 925 and 928

CPUs based on ARM-v8a

Samsung Exynos

Exynos 7 5433
Also, Exynos 7 7420, 7570, 7580, 7870, 7 7880, 7872, 7885
Exynos 7 8890, 8895
Also, Exynos 7 9610, 9810

Qualcomm Snapdragon

Snapdragon 425,427, 430, 435
Also, Snapdragon 610, 615, 616, 617, 625, 626, 650 or 618, 652 or 620, 653, 630, 636, 640, and 670
Furthermore, Snapdargon 800, 801, 805, 820, 821, 835, 845 and 850

Huawei HiSilicon

Kirin 620, 650, 655, 658, 659
Also, Kirin 930, 935, 950, 955, 960, and 970

Conclusion

That’s all for now. I hope that you find this guide helpful. If you have any kind of queries, feel free to reach out to me through the comments section below.

Identify Correct Architecture for Google Gapps

0
Identify Correct Architecture for Google Gapps

Just yesterday, I was trying to find Google Gapps for LineageOS 15.1. I realized that the Google Gapps packages now come in various forms. I did not only need to know that I need Google Gapps for LineageOS 15.1, I also had to be sure about what architecture my phone was based on. For example, I was finding Gapps for OnePlus 6, so the Gapps package that I had to download was supposed to be for ARM64 architecture. It turns out that almost all the famous Gapps packages vary architecture to architecture. There is no standard or unified Gapps package that would work on all the architectures. Identify Correct Architecture for Google Gapps

So, if you are planning to flash an AOSP based custom ROM, you are definitely going to need the Gapps package. The most popular Gapps nowadays come from Opengapps. They have the Gapps available for all versions of Android and all the architectures. Whether you are using Android x86, ARM or the ARM64 architecture and any version of Android from Android Gingerbread to Android Oreo, Opengapps has got you covered.

Now if you are not sure of the architecture of your handset, you will find this guide useful. Follow the simple and easy steps given below to identify correct architecture for Google Gapps. We will use a simple tool to find it out.

How To Identify Correct Architecture for Google Gapps

There are many ways to check the exact platform of your phone’s CPU. If you know the CPU model of your phone, you can find the architecture online as well. An average Android user, who doesn’t pay much heed to the tech specs of a phone, doesn’t really have an idea about the specifications of the CPU. So in such cases, a handy application happens to be fruitful. To identify the correct architecture for Google Gapps, I have given a try to the Droid Hardware Info.

Droid Hardware Info shows you each and everything about the tech specs of your phone. For example, you want to determine the DPI of your phone in order to check out the compatibility of an application, you can find it in Droid Hardware Info as well. It also shows you the exact specifications of almost all the hardware components of the phone including the display, the camera, battery and other such elements.

These are the steps to check out whether your phone is based on ARM or ARM64 in order to download correct Gapps.

The architectures are backward compatible, here is how they will work.

  1. ARM or ARM-v7a apps on ARM-v7a will work.
  2. ARM or ARM-v7a apps on ARM64 or ARM-v8a will work.
  3. ARM64 or ARM-v8a apps on ARM64 or ARM-v8a will work.
  4. ARM64 or ARM-v8a apps on ARM or ARM-v7a will not work.

Determine correct architecture for Google Gapps:

Here is how to know what version of Google Gapps is suitable for your Android phone.

  1. Download and install Droid Hardware Info on your phone.
  2. Now open Droid Hardware Info from the application drawer.
  3. You will land in the Device tab by default.
  4. Here at the bottom, you can find the exact OS version of your phone. Note it down.
  5. Now click on the System tab.
  6. In the System tab, you will see Instruction Sets. This is the architecture of your phone.
  7. Note down the architecture and now download the Google Gapps from Opengapps.

Conclusion:

That’s all. I hope it was very easy for you to achieve the goal here. If you have any queries or questions, feel free to reach out to me through the comments section below.