Home Blog Page 397

How to Fix iPhone/iPad Not Charging Issue

0
How to Fix iPhone/iPad Not Charging Issue

Well I haven’t seen this type of issue in on of my iPhones, I only suffered the Accessory Not Supported issue, but that can be removed simply by taking out the charger and putting it back in the socket again. Although there are some users who have experienced this Not Charging Issue, where they connect their device to the Charger, the device charges for some seconds, thus appears an error stating that Charging it not supported with this accessory, simply users try to change the Charger and even after that the error remains, making the users frustrated and forcing them to try more chargers.

However, the solution is quite simple, but it requires a little attention, it usually happens when the Cable is distorted, or some un-certified 3rd party accessories can cause such problem, if you literally believe that this is the problem with the OS, then you are quite wrong than you can imagine. We are here to provide you some of the relevant solutions to solve this problem, let us hope they work for you.

How to Fix iPhoneiPad Not Charging Issue

Drain the Battery Completely and then Charge:

Use your device till the battery is completely finished, after your device starts showing black screen, Plug-in the charger and also make sure to use the Original Accessory, It will usually take 10 minutes for iPhone and 20 Minutes for iPod to show that it has been charging.

Check the Charger Connection:

  • Check the bottom of your device, the connector where you plug the Cable. Clean it, Clean it properly, use a small Vacuum cleaner a blower or a tooth pick to clean it. Once cleaned properly, try charging the device.
  • If still won’t work after charging, change the charger.

Check the Power Adapter:

  • Whatever power Adapter you are using, make sure it is properly plugged-in, if you are trying to charge it via PC, the must install iTunes to do so.
  • Connect your device to charger and wait for at-least 30-minutes to see what is going on.

Remove Unnecessary Data in iOS using iCleaner Pro

0
Remove Unnecessary Data in iOS using iCleaner Pro

Now we all must have been curious to know one thing when we connect our iDevice to iTunes, it shows us the data Categorized in different things like Music, Videos, Images and at the end we all see something like Others. Now when a user see that, it typically assumes that all those files which can’t be categorized in above Sections are mentioned as others, but the Panic starts when that Others takes alot more space than you can imagine and that space kept increasing time by time and you can’t able to do anything against it. However, despite that I am not a huge fan of Apple products and also Apple support, there are times when they actually have something important for the users.

The Other Data is filled with some unknown stuff and there is no way you can get rid of it using iTunes itself. In such cases the 3rd party apps plays such a nifty hand. While if you are still wondering what could be in the Others Section, it is filled with History, Cookies, Cache etc. of your current apps and un-installed too. iCleaner Pro is a Cydia Tweak ,that allows you to Clear this section without interfering with the others, while you can also use the Cache Cleaner too, but we are here to show you How to use iCleaner Pro to remove unnecessary data from your device.

Remove Unnecessary Data in iOS using iCleaner Pro

Prerequisites:

JailBreak your device: Link

Download iCleaner Pro: Link

Clear Others Data with iCleaner Pro:

  1. Download and Install iCleaner Pro.
  2. Launch the app from Spring-Board
  3. The Tweak has alot of Default options to Erase Attachments, from Messages, Safari etc.
  4. Configure the Settings, if you don’t like the Default one, exclude certain apps if you like.
  5. Once Configured, Just tap the Clean Button and you are good to go.
  6. Make Sure to double check the apps that you have included.
  7. Enjoy!

Crossy Road for Pc Download ( Windows 7,8.1,8,Xp-Mac )

0
Crossy Road for Pc Download ( Windows 7,8.1,8,Xp-Mac )

Crossy Road Endless Arcade Hopper for Pc is available, this game was basically designed for iOS and Android, but we can install Android apps for pc using third party emulators like BlueStacks and Andy. Crossy Road is simple game in which you have to help chicken to cross the road while traffic is coming from both ways. In the following guide i’ll tell you how to download Crossy Road Endless Arcade Hopper for Pc, but before going any further let me give you an overview on Crossy Road.

Also Read: TwoDots for PC

About Crossy Road:

* You have to Cross roads, train tracks, and rivers.

* Crossy Road is a endless arcade just keep on going.

* Dodge traffic in a candy wonderland with the Android Chicken Robot.

Crossy Road Endless Arcade Hopper for Pc

How To Download Crossy Road Endless Arcade Hopper for Pc Using Andy Emulator:

Step 1: Download the Andy from here.

Step 2: After downloading is complete, install Andy on PC.

Step 3: Andy installation process will take few minutes, When installation is finished launch Andy on you PC.

Step 4: When Andy is open, you’ll see an Android tablet interface head over to Google Play.

Step 5: Open Google Play->Search->Crossy Road->Install.

Step 6: when the installation process is complete, go to the home screen there you’ll see Club Penguin.

Step 7: Double click on Crossy Road icon and start playing the game.

Step 8: Now Crossy Road is successfully installed on your PC, Enjoy the the game.

Also See: Download Crossy Road Apk

Download and Install Crossy Road for PC ( Windows Xp,8,8.1,7 – Mac ):

  1. To download Crossy Road  for PC, you will need an Android emulator like Bluestacks. If you do not have it already, you can download it from the website Bluestacks.com.
  2. Open Bluestacks and search for Crossy Road using search tool on the top of the homepage.
  3. Click on install button. The game will automatically download and install.
  4. Once the app has been installed, go to My Apps in Bluestacks homepage.
  5. The icon for the game will appear in My Apps.
  6.  Click on this icon to open Crossy Road.


TwoDots for Pc – ( Windows 8,8.1,7,Xp,Vista and Mac )

0
TwoDots for Pc – ( Windows 8,8.1,7,Xp,Vista and Mac )

TwoDots for Pc is available but not in formats like .EXE and DMG, still we can install Android apps for Pc using third party emulators like BlueStacks and Andy. TwoDots is a puzzle game basically designed for Android and iOS. In the following guide i’ll tell you how to download TwoDots for Pc, but before going any further let me give you an overview on TwoDots.

Also Read: WWE Immortals for PC

About TwoDots:

* TwoDots is available for free in both iOS and Android app stores.

* The basic concept of TwoDots is that you have to connect one dot to another, sink anchors, make a line, create bombs, fight fire.

* There are 135 addictive levels you have to cross.

* No need to worry about any time clock, just take your time and make the perfect move.

* You have to make a line or a square, not a circle, to connect every dot of a single color.

https://techbeasts.com/category/android-apps-for-pc/

How To Download TwoDots for Pc Using Andy Emulator

Step 1: Download the Andy from here.

Step 2: After downloading is complete, install Andy on PC.

Step 3: Andy installation process will take few minutes, When installation is finished launch Andy on you PC.

Step 4: When Andy is open, you’ll see an Android tablet interface head over to Google Play.

Step 5: Open Google Play->Search->TwoDots->Install.

Step 6: when the installation process is complete, go to the home screen there you’ll see Club Penguin.

Step 7: Double click on TwoDots icon and start playing the game.

Step 8: Now TwoDots is successfully installed on your PC, Enjoy the the game.

Also See: Download TwoDots Apk

Download and Install TwoDots for PC ( Windows Xp,8,8.1,7 – Mac ):

  1. To download TwoDots  for PC, you will need an Android emulator like Bluestacks. If you do not have it already, you can download it from the website Bluestacks.com.
  2. Open Bluestacks and search for TwoDots using search tool on the top of the homepage.
  3. Click on install button. The game will automatically download and install.
  4. Once the app has been installed, go to My Apps in Bluestacks homepage.
  5. The icon for the game will appear in My Apps.
  6.  Click on this icon to open TwoDots.

LG G2 Slow Gallery Loading Issue Fixed!

0
LG G2 Slow Gallery Loading Issue Fixed!

LG G2 is no doubt one of the most awesome devices I have ever seen, I would prefer it over alot of other devices, that also includes top Flahgships like Galaxy Note 3, Galaxy S5, not to mention iPhone 6 etc. However, even in such powerful device lag and slow loading issues are present, although not in all apps and also not all the times. Although there is an Error in LG G2, that has been experienced by alot of users and that is the Slow Loading in Gallery app, and most of the times, users tend to go after 3rd party apps to get rid of such issues, then again those who love the Stock Gallery app, don’t want to switch and for those we have a solution.

The Problem starts, when you have alot of photos in your LG G2 and once opening the app it starts loading the thumbnails, that does take alot of time to load, furthermore, if you have synced your Gallery with any Cloud services, it also will take alot of time to load, thus putting everything on Load causes the Gallery to operate Slow. While on the Other hand, you might have kept some photos in Cloud service and once the Internet is Off, you can’t able to load all the Photos. Without further ado, let us Continue towards the solution.

LG G2 Slow Gallery Loading Issue Fixed!

Solve LG G2 Slow Gallery Loading Issue:

  1. Open Gallery App.
  2. Navigate to Settings.
  3. Navigate to Sync.
  4. Un-Sync all the Services, whether it is Facebook, Flicker, 500px or Google.
  5. Or Visit each apps settings and un-sync Pictures
  6. Close the app.
  7. Restart the device to take effects.
  8. After a Successful Boot ,your Gallery will start working like normal
  9. Enjoy!
  10. If still won’t work, please try any 3rd Party Gallery app for more ease.

Force Close Android Apps Error Fixed!

0
Force Close Android Apps Error Fixed!

One of the most irritating error in any of the Android device, force closing of any app, especially when you need it the most and it mostly happens with the stock apps, the basic ones. For example, you are trying to open the Browser app for a quick search for anything and what you get in the return is the force closing of app. However, this is a problem with the OS itself, and any problem with Software can be solved with ease and in matter of minutes, although there are times, when you have to pay a little more than usual to solve such errors, maybe a factory reset or even worse.

The are Two methods to solve this error, both are easy but cost a little more than usual, but if the problem is with any 3rd party apps, do visit the Settings > Apps > App name > Clear Data, and then give it a try. However, if the problem is with Stock apps only, then proceed ahead and find out how to Fix Fore Close Android Apps Error.

Force Close Android Apps Error Fixed!

Method 1:

  1. If you have any External SDcard, remove it.
  2. Then Navigate to Settings.
  3. Navigate to Back-up & Reset.
  4. Scroll Down and see the Factory Reset button
  5. Tap it and Confirm the Process
  6. Doing so you’ll erase everything, including data, Cache etc.
  7. This Process, most of the times works

Method 2:

  1. If the above process won’t work for you, then this process will work for sure.
  2. Flash a Custom Recovery on your device.
  3. Once flashed, Boot into Recovery mode.
  4. Tap on Wipe Cache and do it.
  5. Tap on Factory Reset and do it.
  6. Doing so will only Erase the Cache and Refresh the Firmware, all the user data will be saved.

Method 3:

If none of the above method works, Re-Flash the stock or any Custom Firmware, that for sure will solve this problem

Trial Xtreme 4 for PC Download ( Windows 8,8.1,7-Mac )

0
Trial Xtreme 4 for PC Download ( Windows 8,8.1,7-Mac )

Trial Xtreme 4 for PC is available there is no such version like .EXE or DMG, but you install Android apps on Pc using third party emulators such as BlueStacks and Andy. In this post we’ll tell you how to install Trial Xtreme 4 for PC using BlueStacks and Andy. Trial Xtreme 4  is the latest version of famous Trial Xtreme series, with over more then 70,000,000 downloads Trial Xtreme series is rocking the top charts. Before moving on to the guide let me give you an overview on Trial Xtreme 4.

Also See: WWE Immortals for PC

About Trial Xtreme 4:

* If you are a bike racing lover then Trial Xtreme 4 will give you a chance to race against other riders from your country and around the world.

* If you really want to go Xtreme level and double you cash then you should try duels arena.

* The best thing about Trial Xtreme is that it comes with 3D graphics, it gives us a insane riding experience.

* If you prove yourself as top rider to get cash from sponsors while racing with the world best.

Trial Xtreme 4 for PC


How To Download Trial Xtreme 4 for Pc Using Andy Emulator

Step 1: Download the Andy from here.

Step 2: After downloading is complete, install Andy on PC.

Step 3: Andy installation process will take few minutes, When installation is finished launch Andy on you PC.

Step 4: When Andy is open, you’ll see an Android tablet interface head over to Google Play.

Step 5: Open Google Play->Search->Trial Xtreme 4->Install.

Step 6: when the installation process is complete, go to the home screen there you’ll see Club Penguin.

Step 7: Double click on Trial Xtreme 4 icon and start playing the game.

Step 8: Now Trial Xtreme 4 is successfully installed on your PC, Enjoy the the game.

Also See: Trivia Crack for PC

Download and Install Trial Xtreme 4 for PC ( Windows Xp,8,8.1,7 – Mac ):

  1. To download Trial Xtreme 4  for PC, you will need an Android emulator like Bluestacks. If you do not have it already, you can download it from the website Bluestacks.com.
  2. Open Bluestacks and search for Trial Xtreme 4 using search tool on the top of the homepage.
  3. Click on install button. The game will automatically download and install.
  4. Once the app has been installed, go to My Apps in Bluestacks homepage.
  5. The icon for the game will appear in My Apps.
  6.  Click on this icon to open Trial Xtreme 4.

Download WWE Immortals for PC ( Windows 8,8.1,7-Mac )

0
Download WWE Immortals for PC ( Windows 8,8.1,7-Mac )

WWE Immortals is available for PC, but there is no such pc version of WWE Immortals. We can install Android app on pc using third party emulator like BlueStacks and Andy. WWE Immortals is action pack game with the famous WWE superstars are the main characters, every superstar has its own spectacular signature moves, gear and support cards. In the following guide i’ll tell you how to download and install WWE Immortals for PC. Before proceeding to the guide first let me give you an overview on WWE Immortals.

About WWE Immortals:

* You have to battle with your enemies in 3-on-3 combat, swipe and tap to perform combos and special attack.

* WWE Immortals features Triple H, John Cena, The Undertaker, The Bella Twins, The Rock, Hulk Hogan, and many more.

* To win every fight you have to Build your move set, increase your powers and upgrade your characters.

* WWE Immortals supports online multiplayer so you can fight with players around the world in live.

WWE Immortals for PC


How To Download WWE Immortals for Pc Using Andy Emulator

Step 1: Download the Andy from here.

Step 2: After downloading is complete, install Andy on PC.

Step 3: Andy installation process will take few minutes, When installation is finished launch Andy on you PC.

Step 4: When Andy is open, you’ll see an Android tablet interface head over to Google Play.

Step 5: Open Google Play->Search->WWE Immortals->Install.

Step 6: when the installation process is complete, go to the home screen there you’ll see Club Penguin.

Step 7: Double click on WWE Immortals icon and start playing the game.

Step 8: Now WWE Immortals is successfully installed on your PC, Enjoy the the game.

Also Check: Download WWE Immortals APK

Also See: Download Club Penguin 1.6.1 APK

Download and Install WWE Immortals for PC ( Windows Xp,8,8.1,7 – Mac ):

  1. To download WWE Immortals  for PC, you will need an Android emulator like Bluestacks. If you do not have it already, you can download it from the website Bluestacks.com.
  2. Open Bluestacks and search for WWE Immortals using search tool on the top of the homepage.
  3. Click on install button. The game will automatically download and install.
  4. Once the app has been installed, go to My Apps in Bluestacks homepage.
  5. The icon for the game will appear in My Apps.
  6.  Click on this icon to open WWE Immortals.

How to Fix Galaxy Exhibit (SGH-T599) Not Registered on Network Issue

0
How to Fix Galaxy Exhibit (SGH-T599) Not Registered on Network Issue

You know, I have seen this problem is almost every Samsung device I saw or Own, and now when I try to tell other people, especially my Friends about it, and suggest them to go for any other device, they suddenly become the Brand Ambassador of Samsung, telling me that I just hate their device and nothing else, now how can I tell them, that I don’t hate their devices, I just don’t like them that is all, however, if you would gift me one of these, or give me one for free, I would snatch it from your Hands and never talk to you about it again, ever and if you try to call it bad or something, I will definitely pay you back with something on your face.

This post is specifically for those, who owns a Samsung Galaxy Exhibit and somehow,start facing the Not Registered on Network Issue, not a very un-common or rare thing to see in Samsung devices, but yet there isn’t any permanent solution of it and everyone is looking for a way to solve it, the main reason why we are here too. In this article, we will show you How to Fix Galaxy Exhibit (SGH-T599) Not Registered on Network Issue, without further ado, let us continue.

How to Fix Galaxy Exhibit (SGH-T599) Not Registered on Network Issue

Downloads Required:

Unroot Samsung Galaxy: Link

How to Un-Root your Galaxy Exhibit:

  1. Download the file and copy it your internal sdcard.
  2. Reboot to Recovery.
  3. In Recovery, select Apply Update from Sdcard
  4. Now Press the Home Button and Navigate to Unroot-I9001-signed.zip
  5. Press the Home Button again and Press Yes.
  6. After the process, your device will be completely Root free

Fix Not Registered on Network:

  1. Put your SIM card in your device.
  2. Navigate to Settings
  3. Select About
  4. Select Software Update
  5. Update your device using the OTA
  6. Once updated, the Not Registered on Network Issue will be resolved permanently
  7. Enjoy!

How to Gift a Play Store App on any Android device

0
How to Gift a Play Store App on any Android device

You people have heard about that you can gift a App Store app on iPhone and iPad, its a good thing since now a days apps have more value then other things. Well today i have a good news for Android users they can also Gift a Play Store App on any Android device. In the following guide we’ll explain you how to Gift a Play Store App on any Android device.

How to Gift an Play Store App on any Android device

How to Gift a Play Store App on any Android device:

We are using two methods to gift a Play Store app on any Android devices. Please follow all the steps as mentioned in the following guides.

Method #1:

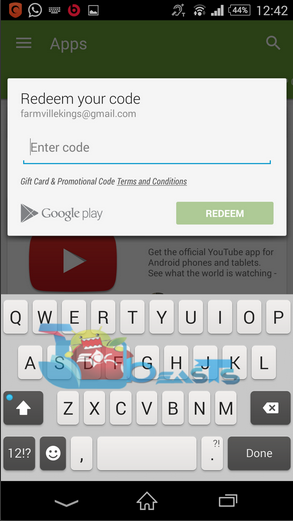
In this method you can use Google Gift cards to give the other person a freedom to get what ever he/she wants. If you have a Google Gift Card and you don’t know how to redeem it follow the steps mentioned below.

Step#1: Open Play Store on your Android device.

Step#2: Tap on Menu located on top left.

Screen Shot 2015-01-18 at 00.53.03

Step#3: Select Redeem from the list.

Step#4: Now all you have to do is add the number written on Google Gift Card.

Screen Shot 2015-01-18 at 00.54.22

Method #2:

In this method we are using Share App or MyAppSharer to gift a Play Store App on any Android device. You can use any of them and follow all the instruction as mentioned.

Download Share Apps.

Download MyAppSharer.

Step#1: Download Share Apps on your Android Device.

Step#2: Open Share Apps from your app drawer.

Step#3: You’ll see all the installed apps list there.

Step#4: Now choose a app and tap on share right beneath the app icon.

Step#5: A popup will appear showing all the option to share the app with your friends.

Step#6: Choose any of the given option and send the app to your friends or family.

All Done !!!!….

Download aa for PC ( Windows 8,8.1,7,Xp – Mac )

0
Download aa for PC ( Windows 8,8.1,7,Xp – Mac )

I bet you have played many Strategy games on your smartphone, but you never played a game like aa. Yes aa is latest new top game in both play stores, this game so simple yet it so hard. Today i’ll tell you how to download aa for pc, yes you can download and play aa on your PC. There is no such Pc version of aa, but you can download aa for pc using third party emulators like BlueStacks and Andy. We’ve prepared guide using both emulators, kindly follow all the steps properly in order to install aa on your Pc.

Download aa for PC

How To Download AA for Pc Using Andy Emulator

Step 1: Download the Andy from here.

Step 2: After downloading is complete, install Andy on PC.

Step 3: Andy installation process will take few minutes, When installation is finished launch Andy on you PC.

Step 4: When Andy is open, you’ll see an Android tablet interface head over to Google Play.

Step 5: Open Google Play->Search->aa->Install.

Step 6: when the installation process is complete, go to the home screen there you’ll see Club Penguin.

Step 7: Double click on aa icon and start playing the game.

Step 8: Now aa is successfully installed on your PC, Enjoy the the game.

Also See: Download Club Penguin 1.6.1 APK

Download and Install AA for PC ( Windows Xp,8,8.1,7 – Mac ):

  1. To download aa  for PC, you will need an Android emulator like Bluestacks. If you do not have it already, you can download it from the website Bluestacks.com.
  2. Open Bluestacks and search for aa using search tool on the top of the homepage.
  3. Click on install button. The game will automatically download and install.
  4. Once the app has been installed, go to My Apps in Bluestacks homepage.
  5. The icon for the game will appear in My Apps.
  6.  Click on this icon to open aa.