Home Blog Page 396

iOS 8 Music App, Create a Genius Playlist in iPhone

0
iOS 8 Music App, Create a Genius Playlist in iPhone

Along with most changes in iOS 8, Apple has given the Music Enthusiasts a little more than what they got in iOS 7, the improvements done in this app brings an exciting dimensions into it. Before, there was no option to create any Genuine Playlist in the Music App, well now you must have been thinking what is a Genius Playlist, this Playlist will be managed by Apple based on what type of Songs you listen, the Rate and Genre you have played the most, furthermore it will be compared with other Genius to provide you some other songs that you might love.

However, once you have turn on the Genius feature, all your Library, Such as content, Music will be sent to Apple. Although it will done Anonymously, but still if you don’t feel secure in this Process, you can always turn off the Genuine Playlist. But first let see How we can Activate this feature.

iOS 8 Music App, Create a Genius Playlist in iPhone

Create a Genius Playlist in iPhone:

  1. Open Music App.
  2. Tap on Playlist, Bottom left corner.
  3. Tap Genuine Playlist.
  4. Tap Turn On Genius .
  5. Tap Accept once prompted to the T&C Page.
  6. Now Wait for a few Seconds till Apple gather all the Necessary Info about your Playlist.
  7. Once all is done, you’ll see the Tick mark next to all of them, Tap Done.
  8. Tap on the Genius Playlist to see to bring up all the Songs.
  9. Tap on any Song you want to add to Playlist or want to create one.
  10. That is it Enjoy!

Turn Off Genius Playlist in iPhone:

  1. Launch Settings.
  2. Tap on Music.
  3. Locate Genius
  4. Turn it Off

MEFaceTimeiOS8, Activate FaceTime in Unsupported Countries

0
MEFaceTimeiOS8, Activate FaceTime in Unsupported Countries

FaceTime is one of the best app for any of the iOS device, mostly users purchase the iOS device because of this one thing. However, disappointment awaits them, when they come to realize that FaceTime is not supported in all the Countries, just like some of the YouTube videos. The app will be there in the SpringBorads, but once you run the app you’ll get the error that this app is not supported in your country. Although, it is frustrating, but this restriction can be removed like any other blocked site, but without any use of VPN or HotSpot shield.

Cydia Tweaks are one of the best reason why anyone would like to Purchase an iPhone, especially if someone wants to enjoy the device to its extent. MEFaceTimeiOS8 is another Cydia Tweak that allows you to remove the Country Restriction in FaceTime, even if Apple declared it to be an illegal act, if you use FaceTime in a specific Country. Without further ado, let us go to the Tutorial to remove this Restriction.

MEFaceTimeiOS8, Activate FaceTime in Unsupported Countries

Activate FaceTime in Unsupported Countries:

First make sure that your device is Jailbroken, Follow the link to do so: Link

  1. Open cydia.
  2. Search for MEFaceTimeiOS8
  3. The Tweak is available for Free and the Repo is BigBoss.
  4. Download and Install it.
  5. Once Installed, Re-spring the Device.
  6. Now Go to Settings
  7. Search for MEFaceTimeiOS8
  8. On the Preference page, Tap Enable FaceTime to active FaceTime.
  9. Now Go Back and Open FaceTime
  10. Tap on any of the Contact and Start Calling or make a FaceTime Call to any FaceTime user
  11. Enjoy!

Got a Broken Power Button, Here is How you can Turn On iPhone Without it

0
Got a Broken Power Button, Here is How you can Turn On iPhone Without it

Hardware components are not that easy to damage, but once you give your device to any little one,these hardware components are nothing but broken. iDevice don’t have much buttons on them, I mean, Volume Keys, Home Button and Power Button, each has its own function and importance, but somehow the Power Button, succeeds them all, cause you can’t Turn On your device without it without going through some complex steps and today we are here to help you in this case, as if you have an iPhone with a Broken Power Button, there are some other ways you can adopt to turn on your iPhone.

Although, I would prefer to repair the Power Button, cause you can’t use these methods all the times, especially when you are out of your house. But if you are looking for a quick and temporary solution, just to Turn On your iPhone, we have got one for you and it doesn’t take much time along with no extra cost at all.

Got a Broken Power Button, Here is How you can Turn On iPhone Without it

How To Turn On your iPhone:

  1. Connect your iPhone with USB Cable.
  2. Connect the Cable with PC or any other Power Source.
  3. It will take a few minutes for your iPhone to Turn On
  4. You’ll see the Swipe to Unlock Option.
  5. Now Swipe to Unlock the Phone

Use Assistive Touch till you Fix the Button:

  1. Go to Settings.
  2. Choose General > Accessibility.
  3. Swipe on the Assistive option and Turn it On.
  4. Now you’ll see a White or Gray Icon, that can be moved or placed anywhere.
  5. Now Whenever you want to Lock your Phone, just Touch it.
  6. You’ll see the Device option Swipe and see the Lock Screen option, Tap it and lock the device.
  7. Now use the Home Button to Wake-up and Swipe to Unlock
  8. From the Lock Screen option, you can also Turn-Off the device

Delete All the Music in iOS 8 using iPad/iPhone

0
Delete All the Music in iOS 8 using iPad/iPhone

Sometime we all, without any thinking, fills the memory with unnecessary files and most of them are Music files, simply cause we fills all those songs too that we will never listen to at all. Because of these songs, not only we have difficulties in finding the one we want to hear, but also fills the precious storage, that we tend to empty time after time. Usually we neglect the Music Category when it comes to empty the space, however, it works like a charm. So anytime you want to free some space, do give a visit to the Music Player before erasing anything else.

In iOS 7, deleting all the Music was easy, now in iOS 8, it has been taken a step ahead. There is more than One Step to delete all the Music from your device, but the easiest way to delete is with one Kill Switch. The process is quite the same as iOS 7, so if you have tried it once there, you won’t feel any difficulty in iOS 8.

Delete All the Music in iOS 8 using iPadiPhone

Delete All the Music in iOS 8:

First Make Sure to Back-up all the Music to iCloud or any other Back-up Media.

  1. Navigate to Settings.
  2. Open General.
  3. Navigate to Usage.
  4. Tap on Manage Storage
  5. Select Music.
  6. Tap Edit on the Top Right.
  7. Now Tap the Red – Along side the All Music
  8. The Delete button will appear.
  9. Tap Delete.
  10. That is it, All done

Restore all the Music in iOS 8:

  1. Now if you have Back-up your Music to iCloud, here is how you can get it back.
  2. Once Again, Open Settings.
  3. Navigate to Music
  4. Tap on Show all Music
  5. Now all the Music will be shown with a Tiny Cloud Icon with them
  6. Tap on them and they will be Downloaded.
  7. Download all of them and get all the Music back on your device

Some of the Best iOS 8.1.2 Compatible Cydia Tweaks

0
Some of the Best iOS 8.1.2 Compatible Cydia Tweaks

Now that the iOS 8 is finally Jailbroken, it is time for the users to get their hands on the best Cydia Tweaks, that are also compatible with the iOS 8.1.2. Since there are tons on the new Tweaks are popping out in the market, searching for the best ones to try is not an easy task to do, in-fact most of the tweaks out there doesn’t able to catch users eyes, and when you have your device Jailbroken especially on the latest version of iOS, I don’t think any users would want to keep itself as minimum as possible. So here we have compiled a list of some of the best Cydia Tweaks for iOS 8.1.2, But first visit the link to Jailbreak your device, if you still haven’t done it: Link

Some of the Best iOS 8.1.2 Compatible Cydia Tweaks

1. Segue: (Free | BigBoss)

Well it is one of the best when it comes to adding a Slideshow of Photos to your iOS Stock Photo apps, for those who are thinking that Apple has given such a feature, but they also should consider that there aren’t much effects available when it comes to stock, this Tweak allows you to do alot more than just Handful animations.

2. StopSend: (Free | Private)

In my opinion, this is one of the best tweak, especially for those who are irritated because of the Auto-Correct. So, if you don’t want to send more of the Embarrassing messages to your Friends, Install StopSend. This Tweak will disable the Send button as long as any of the Auto-Correct Prompt is active

3. SleekCode: (Free | BigBoss)

This tweak was originally written for iOS 7, but it works perfectly on iOS 8 too, simple it allows you to Customize your Lock Screen, not much of gimmicks,but it allows you to add more Blurness, Alpha effects, Hide components in Lock Screen etc.

4. Vine++: (Free | BigBoss)

For all the users of Vine app, this is like a dream comes true, with the help of this Tweak, users can finally download Vine Videos. Vine++ was released like a week ago and has already made a good impact on the users of Vine app.

5. SBflip: (Free | BigBoss)

This Tweak allows you to control the rotation of your Springboard and HomeScreen too, all you need to do is toggle the Rotation button to Enable/Disable it. It also allows you to control the Style of Dock icons when you Rotate the screen, you can choose them to be either stationary or Dynamic.

6. TapSpring: (Free | RCRepo)

One can easily respring by navigate to Settings > Respring8, however, there are those who needs to Respring the device time and again, because of different tweaks and stuff. If they think that Respring like this is a long way, then fear not, cause TapSpring tweak does the job in only a single tap. The tweak is still in Beta stage, but it works

7. CalcBase: (Free | BigBoss)

This is a very useful tweak for all those, who changes the method of Operations, beneficial for Students, Researchers etc. It allows you to easily switch between Decimal, Hex, Binary, Octa etc,

8. CroppingScreen: (Free | BigBoss)

In this era, taking a screenshot is one of the important task of all times, Although, every Smartphone has a way to take a Screenshot, in iDevices, you can Press the Home + Power button to take it, this tweaks add a little more to it. It allows you to select the part of screen you want to capture, instead of taking the whole screen.

9. Air Traffic Control (Free | BigBoss)

This Tweak works while your device is in the Airplane mode, Since you get a Airplane Mode alert every-time you open an app, this Tweak simple remove this Nuisance, and you can use a alert free device

10. PrefDelete: (Free | BigBoss)

This is one of the most useful tweak, when it comes to deleting the tweaks without going into the Cydia itself. Just tap and Hold on the Tweak name from Settings App and Delete it.

Record FaceTime Calls on Mac OS X Yosemite – How to

0
Record FaceTime Calls on Mac OS X Yosemite – How to

Lets face it, Mac OS X along with iOS has alot of restrictions when it comes to sharing, even if you have to share screen of your iDevice on Mac or if you have to Record Screen of your iDevice on Mac. In past we have to rely on 3rd party apps to do such stuff, with the arrival of iOS 8, alot has changed as Apple has given alot of opportunities to do alot of custom things without the need of any 3rd party app. Now with the hep of iOS 8 and Mac OS X Yosemite, any user can easily Record iPhone screen using the OS X Yosemite and we will show you How to do it.

Among the plethora of communication apps like Skype, Facebook Video call, still Apple users are stuck with the FaceTime, the default Video Calling app in Mac OS X and iOS. In my opinion, default and Stock apps are better, cause they have more support and Apple support is precisely for Stock apps and stuff. FaceTime like any other Social Network, doesn’t allows you to see your calls once you send them, in such cases users always need a way to record some important calls and show them, in case of any emergency, afterwards.

Record FaceTime Calls on Mac OS X Yosemite - How to

Record FaceTime Calls on Mac OS X Yosemite:

  1. Make sure your Mac is running OS X Yosemite.
  2. Make Sure your iDevice is running iOS 8 or above
  3. Connect your iDevice with Mac.
  4. Launch QuickTime
  5. In QuickTime, Navigate to File > New Movie Recording.
  6. Along-Side the Red Button, click the Drop Down.
  7. Select your iPhone as Camera and Microphone Source.
  8. Now as soon as you receive a Call, Click the Record button before accepting the call.
  9. Once you are done, click the Record button again to stop the recording
  10. Enjoy

Scratch Your Head for Pc Download ( Windows 8,8.1,10,7-Mac )

0
Scratch Your Head for Pc Download ( Windows 8,8.1,10,7-Mac )

Puzzle games are always interesting and addictive, recently a new puzzle game is getting heat and this game is according to its name Scratch Your Head. Yes you’ve heard it right Scratch Your Head is top puzzle game and today i will show you how to install Scratch Your Head on your PC running Windows 8,8.1,7,10 and Mac. Before going any further let me give you an overview on Scratch Your Head.

About Scratch Your Head:

* You have to related the pictures with given letters, pictures are taken from our daily life.

* You have to see the picture, arrange the letters and solve the puzzles.

* There are thousands of Puzzle games in both iOS and Android App stores, but Scratch Your Head is unique from all of them.

Scratch Your Head for Pc

Also Read: WWE Immortals for PC

How To Download Scratch Your Head for Pc Using Andy Emulator

Step 1: Download the Andy from here.

Step 2: After downloading is complete, install Andy on PC.

Step 3: Andy installation process will take few minutes, When installation is finished launch Andy on you PC.

Step 4: When Andy is open, you’ll see an Android tablet interface head over to Google Play.

Step 5: Open Google Play->Search->Scratch Your Head->Install.

Step 6: when the installation process is complete, go to the home screen there you’ll see Club Penguin.

Step 7: Double click on Scratch Your Head icon and start playing the game.

Step 8: Now Scratch Your Head is successfully installed on your PC, Enjoy the the game.

Download and Install Scratch Your Head for PC ( Windows Xp,8,8.1,7,10 – Mac ):

  1. To download Scratch Your Head  for PC, you will need an Android emulator like Bluestacks. If you do not have it already, you can download it from the website Bluestacks.com.
  2. Open Bluestacks and search for Scratch Your Head using search tool on the top of the homepage.
  3. Click on install button. The game will automatically download and install.
  4. Once the app has been installed, go to My Apps in Bluestacks homepage.
  5. The icon for the game will appear in My Apps.
  6.  Click on this icon to open Scratch Your Head.

How to Fix iPhone 5, iPhone 6 and iPhone 6s Touchscreen Problems

0
How to Fix iPhone 5, iPhone 6 and iPhone 6s Touchscreen Problems

Apple is back on the track after launching its latest flagship iPhone 6 and iPhone 6 Plus. People were waiting a bigger screen from Apple and now they have it. But its doesn’t make any difference that users are reporting about iPhone5s, iPhone 5, iPhone 6 and iPhone 6s Touchscreen Problems. There are many factors that can cause touchscreen issues, in the following guide i’ll tell you how to fix iPhone 5, iPhone 6 and iPhone 6s Touchscreen Problems.

10567-2930-DSC04834-l

How to Fix iPhone 5, iPhone 6 and iPhone 6s Touchscreen Problems:

Method#1:

Step#1: First restart your Apple device.

Step#2: You have maximize your iPhone RAM’s, delete all the recent apps from the task manager.

Step#3: Hard reset your iPhone by pressing power and home button together, wait until your device reboot.

Step#4: Perform a factory reset Settings->General->Reset->Reset All Settings.

Step#5: Reboot your device and delete the latest Apps you have installed.

Step#6: Realign or replace your phone screen display.

Step#7: Try using the pad of your finger, do not use your finger nail.

Method#2:

Step#1: First you have to drain the battery of your iPhone, now charge your device atleast 1 Hour.

Step#2: Restart your device several times.

Step#3:Hold the Power and hold button for 30 seconds, then turn it back on.

Right now these are the possible solution that will help you to fix iPhone 5, iPhone 6 and iPhone 6s Touchscreen Problems. As soon as i got more working solution i’ll update my post.

Change Text Size in iPhone/iPad running iOS 8

0
Change Text Size in iPhone/iPad running iOS 8

We have presented the same article to change the Text size in iOS 7, although Apple users don’t do much of the search themselves, the reason why we are here and also the reason why Apple is earning so much is because of these users. In iOS 7, you need to get a little in depth to make text size larger, Apple has given a little more convenience to the users and brought it out for more ease. Although most of the steps are same as in iOS 7, but still there are some steps minimized in it. The effect will be applied on the whole OS, not in just some particular apps.

The reason to change Text could be any among the thousands, I love large text because, you don’t have to pay much attention, because of some Visual impairments too, sometimes, the Font size of an app can make it a little teasing too. Like in iOS 7, in iOS 8 you can also change Text size via two different ways and we will provide both of them to you.

Change Text Size in iPhoneiPad running iOS 8

Change Text Size in iOS 8:

  1. Go to Settings.
  2. Navigate to Display & Brightness.
  3. Now you’ll see Two options, Text Size and Bold Text.
  4. Now Tap the Text and Drag the Slider to see changes.
  5. Drag to the Right makes the text smaller,and to the left makes it larger.
  6. Now if you Tap the Bold Text, you’ll see the Message prompting to the Restart Device.
  7. Restart the device to see the Whole System Text Bold.
  8. Enjoy.

Change Text into Dynamic Type in iOS 8:

  1. Open Settings.
  2. Tap General.
  3. Navigate to Accessibility.
  4. Tap Larger Text.
  5. Drag the Slider of Larger Accessibility Size
  6. Now Drag the Text slider to see the Changes

Install TWRP Recovery and Root Moto Maxx XT1225

0
Install TWRP Recovery and Root Moto Maxx XT1225

It is said that Perfection lies in Small things, well Motorola Proved it last year as it made quite a good fortune with the help of small budget phones like Moto E, Moto G while still conquering the market with Premium devices like Moto X. Although it was no match for Nexus 6, cause of its bigger screen and Price tag, but that is not the case here. Motorola launched another device at the end of 2014, given two different names in different regions, except for US the rest of the world knows it as Moto Maxx XT1225 and it was launched as Verizon Droid Turbo in US only, a powerful device which can be a good alternate if you don’t want Nexus 6,  but I would still say go after the Nexus 6.

As like any other Android device, Moto Maxx XT1225 has also received the rooting along with the TWRP support. Rooting allows you to get full control over your device. Stock apps and mods are good, but installing Custom Mods give you better support and great battery life. In this article, we will show you How to Install TWRP Recovery and Root Moto Maxx XT1225, the method is simple, first flash the TWRP using the fastboot commands then use the TWRP recovery to Flash the rooting package, without further ado, let us continue.

Install TWRP Recovery and Root Moto Maxx XT1225

Early Preparations:

  • This is only for Moto Maxx XT1225!
  • Battery should be charged at least over 60%
  • Unlock Bootloader Of Your Device.
  • Backup SMS Messages
  • Backup Call Logs
  • Backup Contacts
  • Backup Media – Copy your files manually to your PC or Laptop.
  • Titanium Backup – If already rooted, use Titanium Backup to backup all of your apps, system data and other important content.
  • Backup Nandroid –  If CWM  or TWRP installed previously, otherwise skip this step and perform this at the end of flashing

Disclaimer

The methods involved in flashing custom recoveries, roms and rooting your phone are highly custom and may result in bricking your device, and has nothing to do with Google or the device manufacturer that is Motorola in our case. Also rooting your device will void its warranty and you will be no longer eligible for any kind of free device services by the manufacturers/warranty providers. In case of any mishap we may not be held responsible. Follow these instructions to the letter to avoid any mishap or bricking. Make sure that whatever you do, you are doing it at your own responsibility

Downloads Required:

TWRP Recovery : Link

Root file: Link

Configure Fastboot and SDK: Link

How to Flash TWRP Recovery:

  • Download and Extract the Recovery.
  • Rename it to recovery.img
  • Copy the Files to Fastboot folder.
  • Connect your device with PC.
  • Open Command prompt in the fastboot folder, How? Hold Shift Key and Right Click anywhere in the Folder.
  • Now Type and Execute this command:
adb reboot bootloader
  • Once in bootloader mode, select fastboot and type:
fastboot flash recovery recovery.img
  • After the Process, reboot the device.

How to Root the device:

  • Copy the root.zip file to the root of your Sdcard.
  • Connect your device with PC.
  • Open Command prompt in the fastboot folder, How? Hold Shift Key and Right Click anywhere in the Folder.
  • Now Type and Execute this command:

adb reboot recovery

  • Once in Recovery, navigate to  Install.
  • Choose the Downloaded zip file and confirm the installation.
  • If everything went good, reboot the device from Recovery.
  • After the boot, use any root checker app to verify the root access

Source: XDA

How To Use Whatsapp Web App to Install Whatsapp on PC

How To Use Whatsapp Web App to Install Whatsapp on PC

Today wait is over because Whatsapp has finally announced its first Web Client. Yes, its true now you can use Whats on PC by using Whatsapp Web Client. All you have to do is update your WhatsApp to the latest version, there you’ll see Web client option. This update is not available for everyone yet. In the following guide, I’ll tell you how to Use Whatsapp Web Client to Install Whatsapp on PC.

How To Use Whatsapp Web Client to Install Whatsapp on PC

This time there is no need to any emulator or any trick to install and use WhatsApp on Pc. WhatsApp officially released WhatsApp Web App, its available for Android, Blackberry, Nokia S60 and Windows Phone. Unfortunately, iOS users have to wait for there turn.

Today, for the first time, millions of you will have the ability to use WhatsApp on your web browser. Our web client is simply an extension of your phone: the web browser mirrors conversations and messages from your mobile device — this means all of your messages still live on your phone.

To connect your web browser to your WhatsApp client, simply open https://web.whatsapp.com in your Google Chrome browser. You will see a QR code — scan the code inside of WhatsApp, and you’re ready to go. You have now paired WhatsApp on your phone with the WhatsApp web client. Your phone needs to stay connected to the internet for our web client to work, and please make sure to install the latest version of WhatsApp on your phone. Unfortunately for now, we will not be able to provide web client to our iOS users due to Apple platform limitations.

We really hope you find web client useful in your everyday lives.

How To Use Whatsapp Web App to Install Whatsapp on PC:

Step#1: Open https://web.whatsapp.com on your Google Chrome,

Step#2: Now install the Latest WhatsApp Apk.

Step#3: Install QR Scanner to read the QR Code.

Step#4: Now scan the code inside of WhatsApp.

Step#5: After scanning the QR code you are ready to go.

Step#6: You have now paired WhatsApp on your phone with the WhatsApp web client.

Step#7: You need to stay connected with the internet in order to use WhatsApp Web App.

All Done Enjoy!

Update: 

Android Users: Open WhatsApp-> Menu -> WhatsApp Web App.

BlackBerry Users: Open WhatsApp-> Chats -> Menu Key -> WhatsApp Web App.

Nokia S60 Users: Open WhatsApp-> Menu -> WhatsApp Web App.

Windows Phone Users: Open WhatsApp-> Menu -> WhatsApp Web App.

How to add Dropbox into the LG G3 music and gallery apps

0
How to add Dropbox into the LG G3 music and gallery apps

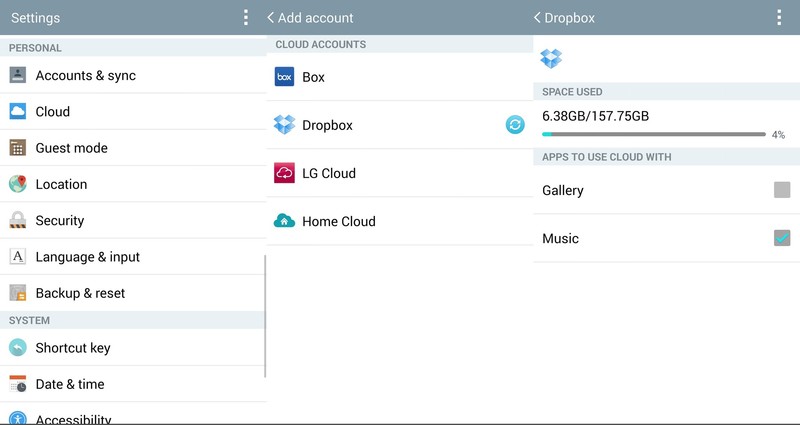
In this following guide i’ll tell you how to add Dropbox into the LG G3 music and gallery apps. Most of us use Dropbox as their primary storage option, in LG G3 you can easily add Dropbox media files in to stocks apps like music and gallery. Those who are using LG G3 AT&T variant they can not add Dropbox into LG G3 music and gallery apps. Let’s start the guide on how to add Dropbox into LG G3 music and gallery apps.

lg_g3_dropbox_screens

How to add Dropbox into the LG G3 music and gallery apps:

Step#1: First you have to setup Dropbox on your LG G3.

Step#2: Goto Settings on your device.

Step#3: Now tap on Cloud from the list.

Step#4: Select Add account at the bottom of the page.

Step#5: On the next page you’ll see different cloud services including Dropbox. Tap on Dropbox.

Step#6: Now you have to enter your login credentials.

Step#7: After successfully logged in, Dropbox will show as active connection.

Step#8: Tap on Dropbox to access the settings.

Step#9: Now in the setting you have to check these options. Access content for “Gallery” and “Music.”

Step#10: All Done now! Photos and audio files on your Dropbox will be in Gallery and Music stock apps.

g3_dropbox_music