Home Blog Page 288

Another Nokia device coming soon as specs of Nokia E1 Leak

0
Another Nokia device coming soon as specs of Nokia E1 Leak

HMD Global seems to be working hard on reviving the Nokia brand name. A few days back they announced the Nokia 6, a mid range smartphone for the Chinese market. New news out suggests that there is another Nokia device is the works at the moment, the Nokia E1. Nokia E1 is another mid range device and if go by HMD Global’s previous pattern then, this smartphone will exclusively be released for the Chinese market.  At the moment the company is targeting China, as they believe that there are a lot of growth opportunities, as the Nokia brand name will resonate with the consumers.

Let’s have a look at Nokia E1 specs to see what the device has to offer. Nokia E1 will be equipped with Qualcomm Snapdragon 425 SoC clocked at 1.4 GHz, along with a 2 GB RAM. Aderno 308 GPU will power the device graphics. The device will have a 5.2-inch or a 5.3-inch 720 p display and will sport a 13 MP main camera with a 5 MP selfie shooter. In addition it will be running Android Nougat out of the box. Nothing much about the make and the build of the smartphone is clear the the moment, but most probably it will have a meal and plastic design which will aim at giving it a premium look.

At the moment there are a lot of challenges for Nokia. The smartphone market is very saturated and the industry landscape is so different from when Nokia reigned it. HMD Global needs to assess the potential issues and then work on creating devices that help bring the Nokia back to the lime light.

Source: 1 | 2

Download Official TWRP App APK

0
Download Official TWRP App APK

If you go online looking for a custom recovery compatible with your Android smartphone, you might end up finding only one recovery in today’s date and that will be the TWRP recovery. Available for most of the Android smartphones, TWRP has been making it really easy for Android users to modify their smartphones. TWRP’s touch interface brought revolution in the custom recovery world. In a few taps, you can change the whole functionality of your Android smartphone. TWRP also makes it easy for users to back up every single partition on their phone. Wiping cache, dalvik cache, wiping the data and the entire system has never been this easy previously. There are many other features that are meaningful for Android power users. TWRP just boosts up your Android customisation fond.

TWRP was flashable by means of Android ADB and Fastboot, or by means of another custom recovery so far. There were applications like Flashify and Flash Fire which allowed flashing recoveries, but they were not as friendly as they were meant to be. Keeping in view the need of a very easy pathway to flash TWRP, the team behind TWRP came up with their own TWRP Official application. The application is now available in the Google Play Store for free. Using the Official TWRP App, you can flash custom images from your devices’s internal storage. Moreover, you can find a compatible TWRP recovery using this very application.Download Official TWRP App APK

TWRP Official App should be easily available in all the regions, but just in case you cannot spot it in the Play Store at your end, you may want to get your hands on its APK file. The Official TWRP App APK is linked below along with the installation instructions. Have a look and install the app right away to start enjoying the all new TWRP recovery on your Android smartphone.

TWRP – Team Win Recovery Project

Official app developed by Team Win for TWRP. Use the app to alert you when new TWRP versions are released for your device. When a new version is available, download it using the app and install it (root users only) without rebooting to recovery.

You can find a brief guide and more details about the app here:
https://twrp.me/app/

The Official TWRP App does not require root to perform version checking, however, additional features are available such as image flashing if you grant root permissions.

Download Official TWRP App APK

  1. Download and extract Official TWRP App APK.
  2. Download the file to your phone straight away, or copy it to your phone from your PC.
  3. Now on your phone, go to settings > security > allow unknown sources > check this.
  4. Now using a file manager, locate the APK file that your just copied or downloaded.
  5. Tap the APK file and finish installation using the on-screen instructions.
  6. Once installed, access the newly installed application through app drawer.


Download and Install Oxygen OS 4.0.1 on OnePlus 3 and OnePlus 3T

0
Download and Install Oxygen OS 4.0.1 on OnePlus 3 and OnePlus 3T

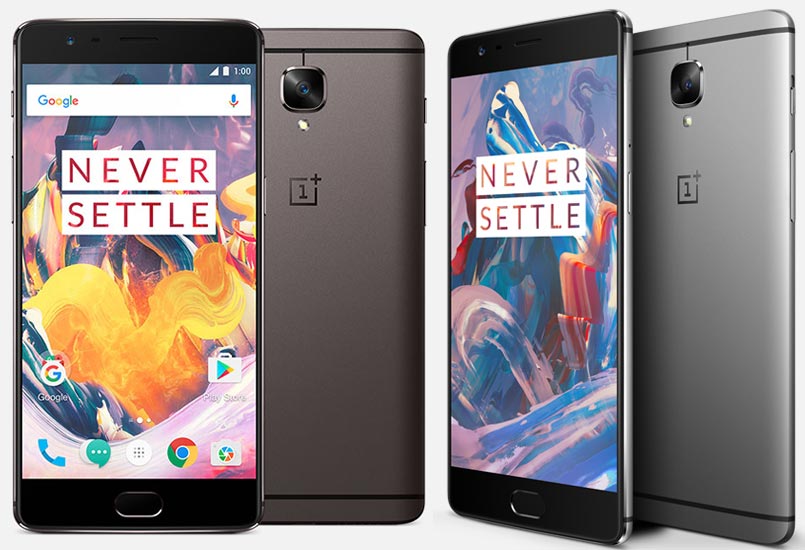
OnePlus is up to make sure that it doesn’t miss a single chance to surprise its users. Just a week back, it rolled out the Android 7.0 Nougat in the form of Oxygen OS 4.0 for its flagship devices i.e. the OnePlus 3 and OnePlus 3T. Just today, OnePlus rolled out another updated versioned as Oxygen OS 4.0.1. The new update is still the Android 7.0 Nougat, it just brings minor bug fixes here and there. Oxygen OS 4.0.1 makes the phone a little bit more stable and enhances performance. Some network and battery performance issues have been fixed. Oxygen OS 4.0.1 is just a 36 MB update, do not expect this update to bring any notable changes in your phone. Although this update is available through OTA, some of you may still be looking for a way to manually flash it. We have got our hands on the update and here is the method how to download and install Oxygen OS 4.0.1 on OnePlus 3 and OnePlus 3T.

What’s New?

Upgraded to Android 7.0 Nougat
New Notifications Design
New Settings Menu Design
– Multi-Window View
Notification Direct Reply
Custom DPI Support
Added Status Bar lcon Options
Improved Shelf Customization
Updated APN Settings for select Carriers
Fixed Proximity Sensor bug during calls
Increased System Stability

Download and Install Oxygen OS 4.0.1 on OnePlus 3 and OnePlus 3T

Method# 1: Update through OTA update

  1. Make sure that you are already on Oxygen OS 4.0.
  2. Open settings on your OnePlus 3 or 3T.
  3. Scroll all the way down and locate “System Updates” option right above the About device option.
  4. Check for system updates, if there’s a new update available, then flash it and you’re good to go with Oxygen OS 4.0.1.

Prepration:

For OnePlus 3:

For OnePlus 3T:

Method# 2: Flashing OTA file over Oxygen OS 4.0

  1. Make sure that your phone is already running on Oxygen OS 4.0.
  2. Download the Oxygen OS 4.0.1 OTA.zip file and copy it to your phone’s internal storage.
  3. Make sure that you have flashed the TWRP recovery linked above.
  4. Boot your phone into TWRP recovery. To do so, turn it off first. Now turn it on by pressing and holding Volume Up + Down + Power Key.
  5. Once your phone is in TWRP recovery, tap “Install > Locate OTA.zip file > Select OTA.zip > Swipe finger to confirm flash”.
  6. Once the flashing is over, reboot your phone and it should be running Oxygen OS 4.0.1.

Method# 3: Download and install the entire Oxygen OS 4.0.1

  1. Download the Oxygen OS 4.0.1.zip file and copy it to your phone’s internal storage.
  2. Make sure that you have flashed the TWRP recovery linked above.
  3. Boot your phone into TWRP recovery. To do so, turn it off first. Now turn it on by pressing and holding Volume Up + Down + Power Key.
  4. Once your phone is in TWRP recovery, tap “Install > Locate Oxygen OS 4.0.1.zip file > Select Oxygen OS 4.0.1 > Swipe finger to confirm flash”.
  5. Once the flashing is over, reboot your phone and it should be running Oxygen OS 4.0.1.

You can also side-load the update. Have a look at: How To Use ADB Sideload to Sideload Custom ROMs, Recoveries and MODs

Samsung Mini Pay and Bixby making their way to Samsung devices soon

0
Samsung Mini Pay and Bixby making their way to Samsung devices soon

Samsung has already talked about bringing an online independent payment platform to make transactions secure. Good news for all the users who were looking forward to this development as Samsung Mini Pay will be part of the Samsung Pay Beta. Along with the the rumored assistant Bixby will also be making it way alongside Samsung Mini Pay to facilitate in the transaction process.

Even though Samsung at the moment is behind in their virtual assistant game as compared to its competitors, but it sure seems like they are catching up. The tech giant has already claimed to integrate Bixby with the integral apps in the Samsung’s devices. How that will be possible will be quite interesting.

With the Samsung Mini Pay, the company will be providing users the facility for a one click online transaction. The user will have to verify the transaction either through scanning their fingerprint or a 6 digit password. At the moment it is not clear how Bixby will work with Samsung Mini Pay. Things will get clearer when we get to know more about the Samsung Pay Beta, how it works and the success of Samsung’s latest development.

PC: @Sammobile

Source : 1

[ Netflix ] Clear Continue Watching List

0
[ Netflix ] Clear Continue Watching List

In this Post, I’ll tell you a simple method to clear Continue Watching List from your Netflix account. While you are watching shows on NetFlix a new list of titles of shows appears with the label continue watching. It’s not a big deal but sometimes it feels irritating so let’s start the method to Clear Continue Watching List from NetFlix.

Read more:


netflix remove from continue watching

Netflix Remove from Continue Watching:

Please follow the steps carefully in order to Clear Continue Watching List from your Netflix Account. I’ll be using Netflix on the browser so try in on your PC.

  • Open NetFlix on your browser using this URL ( Click Here ). Login with your account details.

Netflix Remove from Continue Watching

  • Once logged in, take the note of the titles you want to remove from the continue watching label.
  • Now, Head over to the right top corner of the website and click on your name->Your Account->My Profile section->Viewing Activity.

Netflix Remove from Continue Watching

  • Viewing Activity show all the history that you have streamed on Netflix. You’ll see all the list of the show or shows that you have watched, Click on the episode name and then click on X.
  • Now if you want to remove the complete series from the list, Click on Remove Series option highlighted in the deleting message.
  • This is all, Now when you head back to NetFlix homepage you won’t see the Continue Watching List.

Samsung to showcase Galaxy S8 at the MWC next month

0
Samsung to showcase Galaxy S8 at the MWC next month

Galaxy S8‘s launch date has been in the news for the past few months. Initial reports suggested that due to to the Galaxy Note 7 disaster, Samsung may unveil their next flagship at the CES. Then this date was pushed ahead to the MWC 2017 which takes place at the end of February. A latest report out last week suggested that Samsung will unveil Galaxy 8 at a dedicated event held on 18th April in New York city. Well there is a lot riding on Galaxy S8, so the company cannot take a chance with its launch. An update out by The Investor suggests that Samsung may showcase a small batch of Galaxy S8 devices at the MWC.

Samsung is has already set an ambitious goal for its flagship as it plans to ship 60 million units. This is the highest volume shipped out in the past 3 years. By showcasing the Galaxy S8 at the MWC, the company will create a hype for the device at the show. They definitely would not want other competitors to steal their thunder. Apart from that it will also show the consumers that if they wait, what they can get after the official unveiling at the 18th April event. As a marketing gimmick this could pay off in Samsung’s favor. But then with the official release date 6 weeks later, this seems like a stretch.

We will be getting to hear more news about Samsung’s upcoming flagship. Let’s see which date does the company confirm for its official unveiling. We will keep you updated on all the details related to Galaxy S8.

Source: 1 | 2

Samsung planning to ship 60 million units of Galaxy S8

0
Samsung planning to ship 60 million units of Galaxy S8

There is a lot riding on Samsung’s upcoming flagship, the Galaxy S8. After the Note 7 exploding fiasco, this is the company’s chance to redeem themselves with a stunning device. Well according to new reports Samsung is planning ti ship out 60 million units of the Galaxy S8.

Samsung has also asked its components suppliers to keep up with the target set. Well the Korean giant sure seems confident about the success of its device. In the past the company reportedly shipped 45 millions of of Galaxy S5 and S6 and 48 million units of Galaxy S7. Samsung is also looking at recouping their losses incurred due to the global recall of the Galaxy Note 7 and its subsequent discontinuation.

After the mass production of the units which start in March, the company will be shipping out 5 million units every month after that. Industry analysts suggest that Samsung is setting up an ambitious target of shipping out this many units as the high-end smartphone market has gotten quite competitive. Samsung through Galaxy S8 will be luring back the disgruntled customers that it lost due to the exploding battery episode with Note 7. Galaxy S8 is expected to be unveiled at the exclusive event held at 18th April in New York.

Source: 1 | 2

Apple launching 3 iPads in the second quarter of 2017

0
Apple launching 3 iPads in the second quarter of 2017

Reports out suggest that Apple is working on launching three new iPads in the second quarter of 2017. The update comes from a very reliable analyst at KGI Securities, Mr. Ming-Chi Kuo. According to Mr. Kuo Apple at the moment is planning to unveil three new iPads by the end of April. 2017 is a very important year for Apple as they will be celebrating the tenth anniversary of iPhone. Let’s have a look at whether Apple is working on producing a stallar iPad or are they at the moment totally focused on iPhone 8.

The detailed report by Kuo suggests that the three iPad Pro models that will be released are 12.5-inch model, a 10.5 inch model and a 9.5-inch model. The first two models will have a higher price point and will be powered by the A10X chipset by TSMC. While the 9.5-inch model will be low priced in comparison with the other two and under the hood it will have the A9 chipset by Samsung.

The rest of the specs of the iPads are not yet confirmed, so we cannot say what else will these tablets have. One thing is for sure, the iPhone 8 is the star for Apple this year. It is quite easy to understand why the company is not focusing on their other products. iPad sales have dropped in the last few years and now Apple is working on producing two tablets which aim at different consumers. Like the 12.5-inch and the 10.5-inch model aims at the commercial sector, while the 9.5-inch one focuses more on regular consumers. Kuo in his report also hints that 60% of the iPad sales will be contributed by the 9.5-inch model.


Source: 1 | 2

How to Root and Install TWRP Recovery on Huawei P9/P9 Plus

2
How to Root and Install TWRP Recovery on Huawei P9/P9 Plus

Whenever it comes to picking up a smartphone meeting all of your everyday phoning needs, Huawei is the manufacturer you will definitely come across. It’s been years since Huawei is consistently releasing a good smartphone, one after another. Recently, Huawei pulled the curtains off from its P9 and P9 Plus. Just as the name suggests, P9 is the latest flagship and P9 Plus is its bigger variant. P9 and P9 Plus received a warm welcome. Both the phones have top of the line specifications and offer some cool features. Huawei P9 equips a 5.2-inch and the P9 equips a 5.5-inch Full HD display. Huawei P9 is available with either 3GB RAM, 32GB internal storage or 4GB RAM and 64GB internal storage while the P9 Plus comes with only 4GB RAM and 64GB storage option. P9 has a battery power of 3000 mAh and the P9 Plus has 3400 mAh. Both the phones are powered up with HiSilicon Kirin 955 Octa Core CPU. Huawei P9 and P9 Plus ran on Android 6.0.1 Marshmallow out of the box, both the phones are now upgradable to Android 7.0 or 7.1 Nougat.How to Root and Install TWRP Recovery on Huawei P9/P9 Plus

So, that was a look at both these smartphones. It’s time for us to get towards the real deal for now. A TWRP recovery is now available for these smartphones. TWRP recovery’s availability means that you will eventually get control of everything on your phone and yes, you will be able to unleash its real power. TWRP recovery will first of all allow you to root your P9 or P9 Plus. Once you have rooted the phone, you are free to customise it the way you want and you can even add new features to it by using various root specific applications. TWRP recovery will also let you flash zip files, backup everything and erase everything from your phone.

Now that TWRP’s latest build is out for our beloved devices, we will have a look on the method to flash it on the P9/P9 Plus. It’s time for us to go through the method on how to root and install TWRP recovery on Huawei P9 and P9 Plus.

Precautions & Preparation

  • This guide is intended for Huawei P9/P9 Plus only. Do not try this method on any other device otherwise you may result in bricking it.
  • Make sure that your phone’s battery is charged up to 80% in order to avoid any power issues during the flashing process.
  • Backup all of your important contacts, call logs, sms messages and media content to stay on a safe end.
  • Enable USB debugging mode on your phone in developer options. To do so, go to settings > about device > tap build number for 7 times. You will have developer options in settings now. Open developer options > Enable USB debugging. If you have the OEM Unlocking option, enable it as well.
  • Use your original data cable to establish connection between your phone and your PC.
  • Follow this guide to the letter to avoid any mishap.

Disclaimer: The methods involved in flashing custom recoveries and rooting the device are highly custom. Rooting the device and flashing a custom recover is never recommended by a device manufacturer. In case something goes wrong, TechBeasts or the device manufacturers may not be held responsible. Make sure that you’re doing everything at your own risk.

Required downloads & installations

  1. Download and install Huawei USB drivers.
  2. Download and install Minimal ADB & Fastboot drivers.
  3. Download SuperSu.zip file and copy it to your phone’s internal storage after unlocking the bootloader.

How to Unlock Huawei P9/P9 Plus Bootloader

  1. Unlocking bootloader will wipe your device. Make sure that you’ve backed up everything before going ahead.
  2. Install Huawei’s HiCare app in your phone and call the support in HiCare. Request them to get your bootloader unlock code. You will have to provide your email, IEMI and serial number.
  3. Huawei will send you your bootloader unlock code through an email in a few days or in a few hours.
  4. Make sure that you’ve downloaded and installed Minimal ADB & Fastboot drivers on your Windows PC or installed Mac ADB & Fastboot for Mac.
  5. Connect your phone to your PC now.
  6. Now open Minimal ADB & Fastboot.exe from your desktop. If you do not have this file on your desktop, then go to your Windows installation drive i.e. C drive > Program Files > Minimal ADB & Fastboot > Press and hold Shift Key + Right click on an empty area with the open folder > click “Open command window here”.
  7. Now in the command window enter the following commands one by one.
  • adb reboot-bootloader

    This will reboot your Nvidia Shield in bootloader. Once booted up, issue the following command.

    fastboot devices

    This command will verify the connection of your device with your PC in fastboot mode.

  • fastboot oem unlock (bootloaderunlockcodexxxxxxxxxxxx)

    This command will unlock the bootloader. As soon as you press the enter key after typing this command, you will get a message in your phone asking for the confirmation of bootloader unlocking. Use volume up & down keys to navigate through options and confirm unlocking.

  • fastboot reboot

    This command will reboot your phone. That’s all, disconnect your phone.

How To Install TWRP Recovery and Root Huawei P9/P9 Plus

  1. Download recovery.img file for Huawei P9 or recovery.img for Huawei P9 Plus. Rename the downloaded file to only “recovery.img” to make the process easy.
  2. Copy recovery.img file to Minimal ADB & Fastboot folder which is located in program files in your windows installation drive.
  3. Now boot your Huawei P9/P9 Plus into fastboot mode as suggested in the step 4 above.
  4. Connect your Huawei P9/P9 Plus to your PC now.
  5. Open Minimal ADB & Fastboot.exe explained in step 3 above.
  6. Now in the command window enter following commands:
    • fastboot reboot-bootloader

    • fastboot flash recovery recovery.img

    • fastboot reboot recovery or use the Volume Up + Down + Power combination to get into TWRP now.

    • (this will boot your device in TWRP recovery mode)

  1. At this point, TWRP will ask you whether you want to allow system modifications. Typically, you would want to allow modifications. By swiping right, you will trigger the dm-verity verification. Right after triggering it, you will have to flash SuperSU on your phone.
  2. Go ahead now and flash the SuperSU by tapping the Install option. In case your phone’s storage isn’t working, you will have to perform a data wipe to enable storage. After wiping the data, go back to the main menu and tap the “Mount” option and then tap Mount USB Storage.
  3. After mounting USB storage, connect your phone to your PC and transfer SuperSU.zip file to your phone.
  4. Through all this process, do not restart your phone. Stay in the TWRP recovery.
  5. Now get back to the main menu and once again tap “Install > Locate newly copied SuperSU.zip file and flash it”.
  6. After flashing SuperSU, reboot your phone. You are all done.
  7. Your device will boot up now. Find SuperSu in app drawer. Install Root Checker app to verify root access.

To boot manually in to TWRP recovery mode, unplug USB cable from your Huawei P9/P9 Plus and turn off your device completely by keeping the power key pressed for a while. Now press and hold Volume Down + Power Key to turn on your Huawei P9/P9 Plus. As soon as your phone’s screen turns on, leave the Power Key and keep the Volume Down Key pressed. Your device will now boot into TWRP recovery mode.

Don’t forget to create a Nandroid Backup for your Huawei P9/P9 Plus now. Also checkout how to use Titanium Backup since you’ve got your phone rooted. That’s all. Stuck with something? Don’t worry! Reach us out through the comment box below.


Install TWRP Recovery and Root Huawei Mate 9

2
Install TWRP Recovery and Root Huawei Mate 9

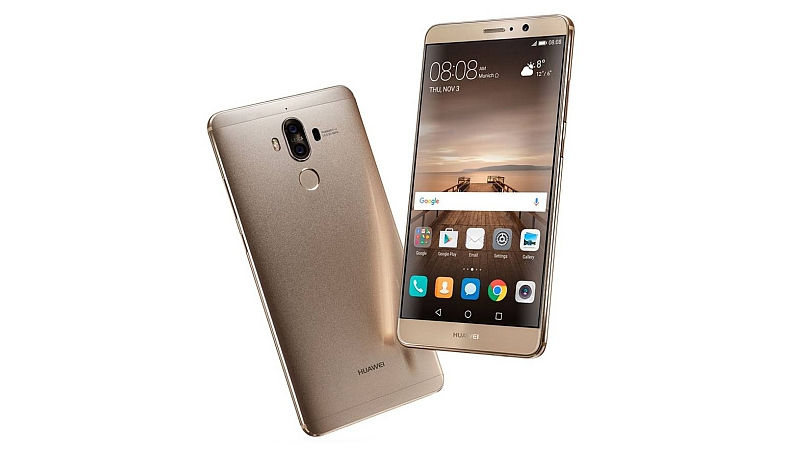
Huawei Mate 9 is Huawei’s latest player in the smartphone market. The Mate 9 unarguably is one of the best smartphones that Huawei has ever produced. On the top, Huawei Mate 9 carries a 5.9 inch Full HD display having 373 ppi. Huawei Mate 9 runs Android 7.0 Nougat with EMUI 5.0 on the software end. Hisilicon Kirin 960 Octa-core CPU powers up this phone while being accompanied by Mali-G71 MP8 GPU. Mate 9 has a 4GB RAM and 64GB internal storage. It also supports microSD cards. At the back of this phone, we have a 20MP, 12MP duo camera setup and on the front we can see an 8MP shooter. A whopping 4000 mAh battery is what will fulfil your phone’s power needs throughout the day. Huawei Mate 9 now happens to be among the lucky smartphones which have already caught the attention of developers, the good stuff is pouring in now.Install TWRP Recovery and Root Huawei Mate 9

TWRP Recovery’s latest version has landed in for our beloved Huawei Mate 9. With the TWRP recovery, you can start flashing zip files of ROMs, MODs and other tweaks. Nandroid Backup, EFS Backup and every single partition that you want to backup on your phone, you can do so now by means of the TWRP custom recovery. Furthermore, rooting your Mate 9 has been made a whole-lot easier with the TWRP. By rooting the Mate 9, you can install root specific applications like Greenify, System Tuner, Titanium Backup to take your Android experience to a next level. Rooting your phone will also give you the freedom of adding new features by using applications like Xposed Framework. In the following guide, we will have a look on a detailed guide to learn how to install TWRP recovery and root Huawei Mate 9.

Precautions & Preparation

  • This guide is intended for Huawei Mate 9 only. Do not try this method on any other device otherwise you may result in bricking it.
  • Make sure that your phone’s battery is charged up to 80% in order to avoid any power issues during the flashing process.
  • Backup all of your important contacts, call logs, sms messages and media content to stay on a safe end.
  • Enable USB debugging mode on your phone in developer options. To do so, go to settings > about device > tap build number for 7 times. You will have developer options in settings now. Open developer options > Enable USB debugging. If you have the OEM Unlocking option, enable it as well.
  • Use your original data cable to establish connection between your phone and your PC.
  • Follow this guide to the letter to avoid any mishap.

Disclaimer: The methods involved in flashing custom recoveries and rooting the device are highly custom. Rooting the device and flashing a custom recover is never recommended by a device manufacturer. In case something goes wrong, TechBeasts or the device manufacturers may not be held responsible. Make sure that you’re doing everything at your own risk.

Required downloads & installations

  1. Download and install Huawei USB drivers.
  2. Download and install Minimal ADB & Fastboot drivers.
  3. Download SuperSu.zip file and copy it to your phone’s internal storage after unlocking the bootloader.

How to Unlock Huawei Mate 9 Bootloader

  1. Unlocking bootloader will wipe your device. Make sure that you’ve backed up everything before going ahead.
  2. Install Huawei’s HiCare app in your phone and call the support in HiCare. Request them to get your bootloader unlock code. You will have to provide your email, IEMI and serial number.
  3. Huawei will send you your bootloader unlock code through an email in a few days or in a few hours.
  4. Make sure that you’ve downloaded and installed Minimal ADB & Fastboot drivers on your Windows PC or installed Mac ADB & Fastboot for Mac.
  5. Connect your phone to your PC now.
  6. Now open Minimal ADB & Fastboot.exe from your desktop. If you do not have this file on your desktop, then go to your Windows installation drive i.e. C drive > Program Files > Minimal ADB & Fastboot > Press and hold Shift Key + Right click on an empty area with the open folder > click “Open command window here”.
  7. Now in the command window enter the following commands one by one.
  • adb reboot-bootloader

    This will reboot your Nvidia Shield in bootloader. Once booted up, issue the following command.

    fastboot devices

    This command will verify the connection of your device with your PC in fastboot mode.

  • fastboot oem unlock (bootloaderunlockcodexxxxxxxxxxxx)

    This command will unlock the bootloader. As soon as you press the enter key after typing this command, you will get a message in your phone asking for the confirmation of bootloader unlocking. Use volume up & down keys to navigate through options and confirm unlocking.

  • fastboot reboot

    This command will reboot your phone. That’s all, disconnect your phone.

How To Install TWRP Recovery and Root Huawei Mate 9

  1. Download recovery.img file for Huawei Mate 9. Rename the downloaded file to only “recovery.img” to make the process easy.
  2. Copy recovery.img file to Minimal ADB & Fastboot folder which is located in program files in your windows installation drive.
  3. Now boot your Huawei Mate 9 into fastboot mode as suggested in the step 4 above.
  4. Connect your Huawei Mate 9 to your PC now.
  5. Open Minimal ADB & Fastboot.exe explained in step 3 above.
  6. Now in the command window enter following commands:
    • fastboot reboot-bootloader

    • fastboot flash recovery recovery.img

    • fastboot reboot recovery or use the Volume Up + Down + Power combination to get into TWRP now.

    • (this will boot your device in TWRP recovery mode)

How to Root Huawei Mate 9

  1. Download phh’s upseruser and copy it to your Mate 9’s internal storage.
  2. Boot into TWRP recovery on your Mate 9 using the volume and power button combination.
  3. Now in the main screen of TWRP, tap “Install > Locate newly copied Phh’s SuperSU.zip file and flash it”.
  4. After flashing SuperSU, reboot your phone. You are all done.
  5. Now after your phone boots up, install phh’s superuser APK to handle the root permissions in your phone.
  6. Your device will boot up now. Find SuperSu in app drawer. Install Root Checker app to verify root access.

Don’t forget to create a Nandroid Backup for your Huawei Mate 9 now. Also checkout how to use Titanium Backup since you’ve got your phone rooted. That’s all. Stuck with something? Don’t worry! Reach us out through the comment box below.

Source

How To Install Android 7.1 Nougat on Galaxy S2 Plus I9105/P via CM 14.1

1
How To Install Android 7.1 Nougat on Galaxy S2 Plus I9105/P via CM 14.1

Samsung Galaxy S2 Plus is a slightly upgraded variant of the original Galaxy S2. Samsung’s Galaxy S2 was responsible for bringing Samsung all the fame. The Galaxy S2 Plus just added a little more to that. The phone dates back to the year 2013, when smartphones were running on Android 4.1.2 Jelly Bean. We are in 2017 now and we have already witnessed the 7th iteration of Android. If you are having a Galaxy S2 Plus in your pocket and you are still running it on Android 4.1.2 or Android 4.2.2, then believe me you are just stuck in the past and not moving ahead at all. The best part for now is that, you can upgrade your pretty-old Galaxy S2 Plus to the latest Android 7.1 Nougat. That is not possible through a stock firmware, of-course. You will be making the use of a custom ROM in order to flash Android 7.1 Nougat on your Galaxy S2 Plus.

The firmware that we are talking about is the CyanogenMod 14.1. CyanogenMod 14.1 is undoubtedly the most widely used aftermarket version of Android. CyanogenMod has already been taken down, but you are good to go with it as long as you have your hands on the firmware files, which is positive in our case. Before Lineage OS takes over, you have the opportunity to install CyanogenMod and experience Nougat on your Galaxy S2 Plus. The available ROM has its WiFi, Bluetooth, Calls, SMS, Mobile Data, Camera, Audio and Video features working perfectly well. It can be kept as a daily driver and meet your smartphone needs easily. All you need to flash this ROM is a little bit of confidence. The guide coming your way has the method explained really well with all the precautions listed prior to the installation method. Just follow the method now to learn how to install Android 7.1 Nougat on Galaxy S2 Plus I9105/I9105P using CyanogenMod 14.1 Custom ROM.

Precautions

  1. This ROM is intended for  Galaxy S2 Plus . Do not try flashing this ROM on any other device otherwise you will result in bricking it. Check your device’s model number under settings > about device.
  2. Charge your phone up to 50% to avoid any power issues during the flashing process.
  3. Flash a custom recovery on your Galaxy S2 Plus. Install TWRP as CWM will result in Status 7 error.
  4. Backup everything including your important contacts, call logs and text messages.
  5. Don’t forget to create a Nandroid backup. This is highly recommended so that you can revert back to your previous system in case of a mishap.
  6. Backup EFS partition to avoid EFS corruption later on.
  7. Follow the instructions to the letter.

DISCLAIMER: FLASHING CUSTOM ROMS VOIDS THE WARRANTY OF A DEVICE AND ITS NOT RECOMMENDED OFFICIALLY. WHILE YOU’RE GOING TO DO THIS, MAKE SURE THAT YOU’RE DOING THIS AT YOUR OWN RISK. IN CASE OF A MISHAP TECHBEASTS, SAMSUNG OR THE DEVICE MANUFACTURERS MAY NOT BE HELD RESPONSIBLE.

How To Install Android 7.1 Nougat on Galaxy S2 Plus I9105/P via CM 14.1.1

  1. Download latest CM 14.1.zip file according to your device
    1. CM 14.1 Android 7.1.zip file
  2. Download Gapps.zip [arm, 7.0.zip] file for Android Nougat.
  3. Connect your phone to your PC now.
  4. Copy all .zip files to the storage of your phone.
  5. Now disconnect your phone and turn it off complete.
  6. Boot into TWRP recovery now, in order to do so, turn it on by pressing and holding Volume Up + Home Button + Power Key. You should see the recovery mode in a while.
  7. Now in TWRP  recovery, wipe cache, factory data reset and advanced wipe options > dalvik cache.
  8. After wiping all these three, select “Install” option.
  9. Now select “Install  >  Select cm-14.1…….zip file > Swipe to confirm”.
  10. This will flash the ROM in your phone, once done get back to the main menu in recovery.
  11. Now once again select “Install > Select Gapps.zip file > Swipe to confirm”
  12. This will flash the Gapps in your phone.
  13. Reboot your device.
  14. You should see the Android 7.1 Nougat CM 14.1 running on your device in a while.
  15. That’s all!

In order to enable root access on this ROM, go to settings > about device > tap the build number for 7 times. This will enable developer options on in settings. Now open developer options and enable root.

First boot may take up to 10 minutes, you may not worry if it’s taking that much long. In case it’s taking too long, you may boot into TWRP recovery and wipe cache and dalvik cache and reboot your device as it may fix the issue. In case your device is having issues, you may return to your old system using the Nandroid backup or follow our guide here to install stock firmware.

Got any queries? Reach us out through the comment box below.

Source