

In this guide, you will find steps to install stock firmware on Galaxy S10, S10E, and S10 Plus. We will use Smart Switch and Samsung’s Odin Flash Tool to install Stock Firmware on Galaxy S10.
Samsung Galaxy S10 is arguably the best phone at the moment. The South Korean giant has managed to set the bar high for all other phone makers. The Galaxy S10 lineup comes with three phones i.e. Galaxy S10E, S10, and the S10 Plus. Out of these 3 phones, the S10 Plus is the most powerful and premium, then comes the S10 and then there is the budget-friendly S10E. Now that the phones are out in their glory, users have already tweaked them. In order to fully master your new Galaxy S10, you must know each and everything about the phone’s troubleshooting. The most important part of mastering your Galaxy S10 is the installation of Stock Firmware.

Refresh your knowledge about the Galaxy S10 series before you start flashing stock firmware.
Contents
Galaxy S10E, S10, and S10 Plus
Galaxy S10E is the smallest S10. It has a 5.8-inch screen. It doesn’t have an under-display fingerprint scanner. The S10E has 2 cameras (12MP + 16MP) at the back and a single camera (10MP) on the front. It has a RAM of 6GB or 8GB and internal storage of 128GB or 256GB. Galaxy S10E is equipped with a battery of 3100 mAh. It does have wireless and reverse wireless charging.
Galaxy S10 has a 6.1-inch display. It has three cameras (12MP + 12MP + 16MP) at the back and a single camera (10MP) on the front. It has a RAM of 8GB with internal storage of 128GB or 512GB. Galaxy S10 is also equipped with an under-display ultrasonic fingerprint scanner. This phone has a 3400 mAh battery inside.
At the end, we have the S10 Plus. This phone has a 6.4-inch screen. It has three cameras at the back like the S10. On the front, it has 2 shooters including an 8MP camera and a 10MP camera. Galaxy S10 Plus also uses ultrasonic fingerprints scanner. It has a battery of 4100 mAh.
All these phones are powered either by the Qualcomm Snapdragon 855 or the Exynos 9820 SoC. These phones run on Android Pie out of the box. The entire Galaxy S10 lineup uses Samsung’s new Dynamic AMOLED screens. These phones also have the stereo speakers. A wide range of color options is available for these phones. The S10E comes in the Canary Yellow color too.
That’s all about the phones. Let’s take a look at the reasons to install stock firmware on Galaxy S10E.
Why install stock firmware on Galaxy S10?
- Stock firmware can hard reset your Galaxy S10.
- It can also factory reset your phone completely.
- Stock firmware installation can fix a soft or even hard bricked Galaxy S10.
- You can install stock firmware to update your phone manually.
- To update the phone when the OTA is not available in your region.
- You may flash stock firmware on Galaxy S10 to fix
bootloop . - Random Reboot issue can be fixed by install stock ROM.
- The stock firmware on Galaxy S10 can unroot the phone.
- You can uninstall the recovery via this guide.
- And many more things…
What are the methods to install Galaxy S10 stock firmware?
We have two methods on the table. The first method is through Samsung Smart Switch. Smart Switch is Samsung’s PC Suite for all Galaxy phones. This tool is very easy. It comes with a clean UI. It has all the nice buttons with descriptions which will let you install the stock firmware. The Smart Switch can be used to update the phone to a new version or it can also fix your phone in case you have bricked it. It comes with firmware installation and emergency software recovery features. So, we will take a look at Samsung Smart Switch method first.
The 2nd method is the use of Odin Flash Tool. This tool, no matter what, will work on your phone. It can be used to flash the firmware files manually on your phone. You can skip the wait for an OTA update and flash the new firmware directly using Odin. In the 2nd part of this guide, we will use the Odin tool.
Let’s learn about the stock firmware that we will use in this guide and then proceed with the first method.
Note
The firmware that you will install using this guide will be official. The firmware will not damage your device. It will not void the warranty or touch the Knox counter of your phone. The only thing you have to do is to pay attention to the guide carefully. This guide stands valid for all models of the Galaxy S10E, S10, and the S10 Plus.
Guide to install stock firmware on Galaxy S10E, S10, and S10 Plus via Smart Switch
These are the steps to install stock firmware or update your Galaxy S10 via Smart Switch.
Connect your Galaxy S10 to the computer.
First of all, use the USB Type-C cable to connect your S10 the computer. If the phone asks about trusting the computer, click on Allow/Trust.
Open Smart Switch on the computer now.
Open Samsung Smart Switch on your computer now. It will detect the phone.
Backup your data via Smart Switch.
Before performing a recovery or install new firmware, backup each and everything from your phone.
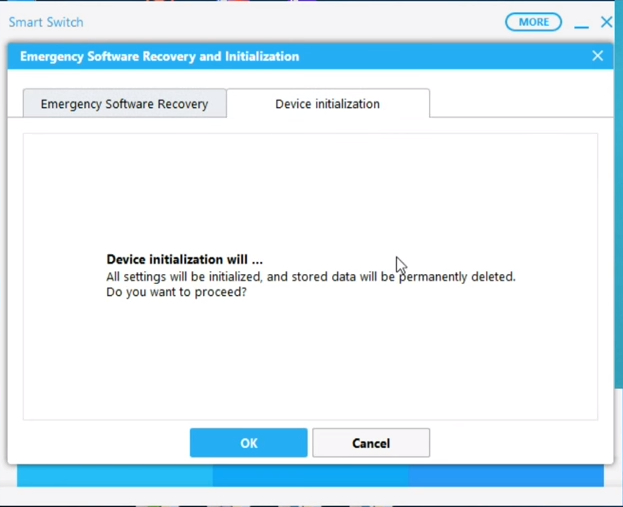
Now go to Emergency Software Recovery & Initialization > Software Recovery or Device Initialization.
Now click on the settings gear icon and then click on Emergency Software Recovery & Initialization. Under this menu, you will click on Emergency Software Recovery if you want to fix your phone. If you just want to install a new update, you will click on Device Initialization.
If you are in Recovery, you can perform software recovery as mentioned on the screen.
The software recovery screen is self-explanatory. Just follow the on-screen options to finish it.
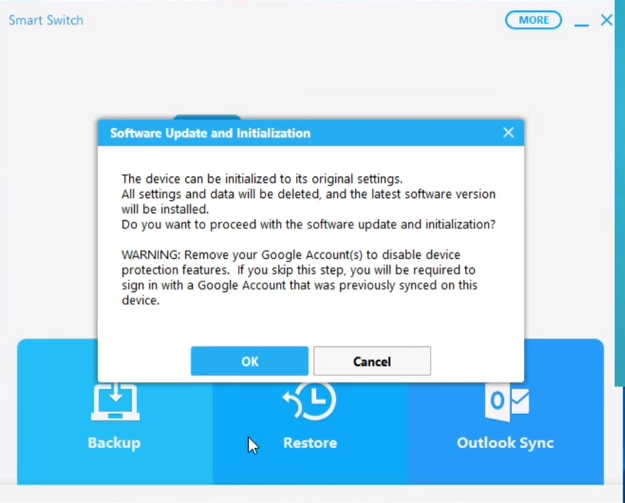
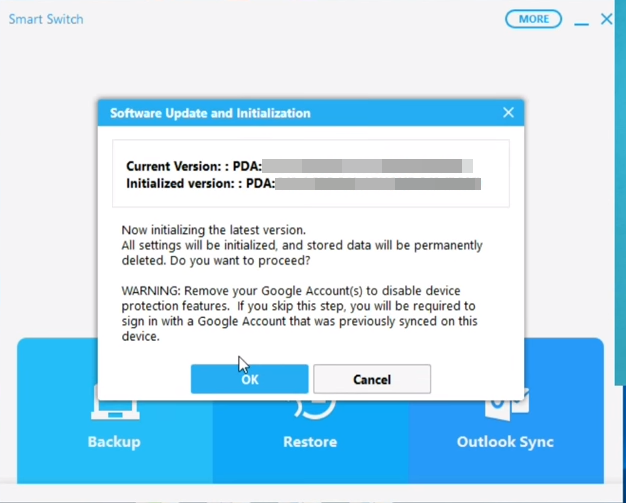
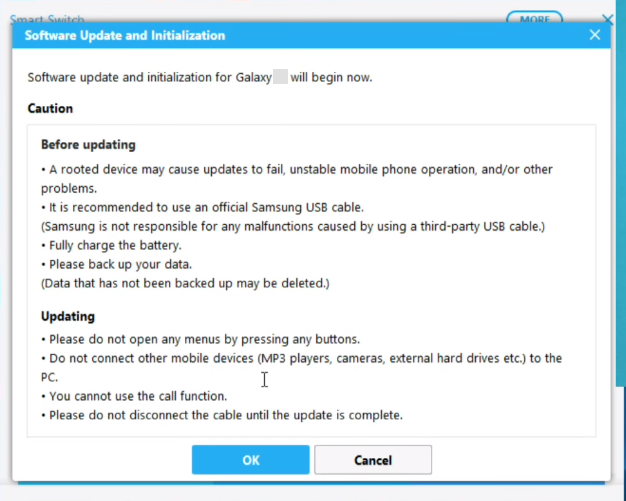
If you are in device initialization, let Smart Switch find an update and then you can flash it.
If you are in the device initialization process, its going to ask you about a number of things. First of all, it will show you the disclaimer, after this, it will show you the software version number and then it will ask you about creating a backup. Go through all the screens one by one to perform device initialization. This process will factory reset your phone with the help of a new firmware.


The Smart Switch method is considerably safe, and easy. The only problem with this method is that it will find the software updates that are built only for your regions. For example, there is a new version of Android available in another country and you are trying to find it in Smart Switch, it will not work. In such a case, you need to use the Odin method through which you can flash any region’s software update.
Guide to Install Stock Firmware on Galaxy S10 via Odin
This method is slightly complex, so you need pay attention.
Preparations
- This guide is valid for all models of Galaxy S10E, S10, and S10 Plus. Do not try on any other phone.
- Backup all the data from your phone.
- Charge your phone up to 50% to ensure power backup.
- Use original data cable to connect your S10 to the computer.
- On your phone, go to Settings > About Phone > Software Information > Tap the build number for 7 times. This will enable Developer Options. Now go the Developer Options in settings and enable USB Debugging and also enable OEM Unlocking.
- Follow remaining steps carefully.
Required Downloads
- Open this page and enter your device model number. Download the latest firmware for your phone.
- Extract the downloaded firmware to get the AP, CP, BL, CSC and Home_CSC files.

Install Stock Firmware on Galaxy S10
- Open Odin3.exe on your computer. In Odin, go to Options. Make sure that the only options checked are F.Reset.Time and Auto Reboot. No other option should be checked. Get back to the main menu in Odin now.
- In Odin, click on the AP tab and select the AP file. Add the BL file to the BL tab. Now add the CP file to the CP tab. In the CSC tab, add the CSC file if you wish to factory reset, add the Home_CSC file otherwise.
- Put your Galaxy S10E, S10, or S10 Plus in download mode now. To do so, connect the USB Cable to the computer. Now power down your phone. Press and hold Volume Down + Bixby Button. While keeping the keys pressed, connect the USB Type-C to your phone. Your phone will be in the download mode now.
- Odin will show “Added” in the logs and it will also show a Blue light in the ID
:COM box. - You are all set now. Click on the Start button in Odin. The firmware installation will begin.
- It will take about 7 minutes for the new software to be installed. Once it ends, the phone will reboot.
- Disconnect the phone and enjoy all new firmware.

The first boot can easily take up to 10 minutes. Keep patience during this process. If you think that something is wrong with the phone, you can try clearing its cache. As your phone boots up, you should have the brand new firmware running on it. Your phone has been factory reset now.
Wrap Up
That’s all with the firmware installation on the Galaxy S10 phones. If you have any questions or queries related to this guide, feel free to reach out to us. The best way to contact us is through the comments section below. I will try my best to get back to you as soon as possible.
")


