Home Blog Page 76

Track And Locate Lost iPhone X

0
Track And Locate Lost iPhone X

iPhone X is the new feather in Apple’s cap. The iPhone X is what Apple users have been wishing to get for years. iPhone X defies all the odds. It’s a true rockstar from the Cupertino based tech giant. I myself am an Android geek, but there’s no point in not accepting the fact that Apple has done a marvelous job with the release of the iPhone X.

iPhone X Recap

The iPhone X comes with an edge-to-edge infinity sort of display. Features like the AI based animojis, portrait mode for selfies and the dual-OIS help the iPhone X stand apart from the current flagship competition. The iPhone X says goodbye to the home button. Apple has removed the home button for the sake of keeping the iPhone X all screen.

iPhone X is a proof of Apple’s craftsmanship and design beauty. iPhone X comes with a $1K price tag. This was a historic moment when Apple’s brand new flagship, the iPhone 8, and iPhone 8 Plus were immediately succeeded by the iPhone X.Track And Locate Lost iPhone X

Spending $1,000 on a smartphone requires you to have a brave heart. If you are going to get a phone with this price tag, it will definitely come with a lot of responsibility. If a very unfortunate event takes place in your life, which takes away your iPhone X, it’s going to give you chills.

Locating the lost iPhone X

You never know when you drop your iPhone X or it simply gets stolen, in this case, you will be in a panic mode. But don’t worry. As long as you have taken a few steps prior to losing your phone, you are going to be safe. Since you are using a top-notch smartphone, we hope that you have added your iCloud account for its safety, you have protected it using a Face ID or a PIN or Password and you have also enabled mobile data.

Having these options enabled on a stolen or lost iPhone X will take you one step closer to it. iCloud activates Find My iPhone feature through which you can check the real-time location of your phone, you can wipe it remotely, you can unlock it, and you can ring it loud to see if it’s lost somewhere around you.

It’s time for you to calm down and follow a few steps. Try your luck now and see if you can locate lost iPhone X right now or not.

Track and Locate Lost iPhone X with iCloud and Find My iPhone

  1. Open the iCloud Find page on your computer.
  2. Login into the iCloud page using the same iCloud account that you were using on your lost iPhone X.
  3. You will see a number of tiles on the screen. Click on “Find iPhone” option.
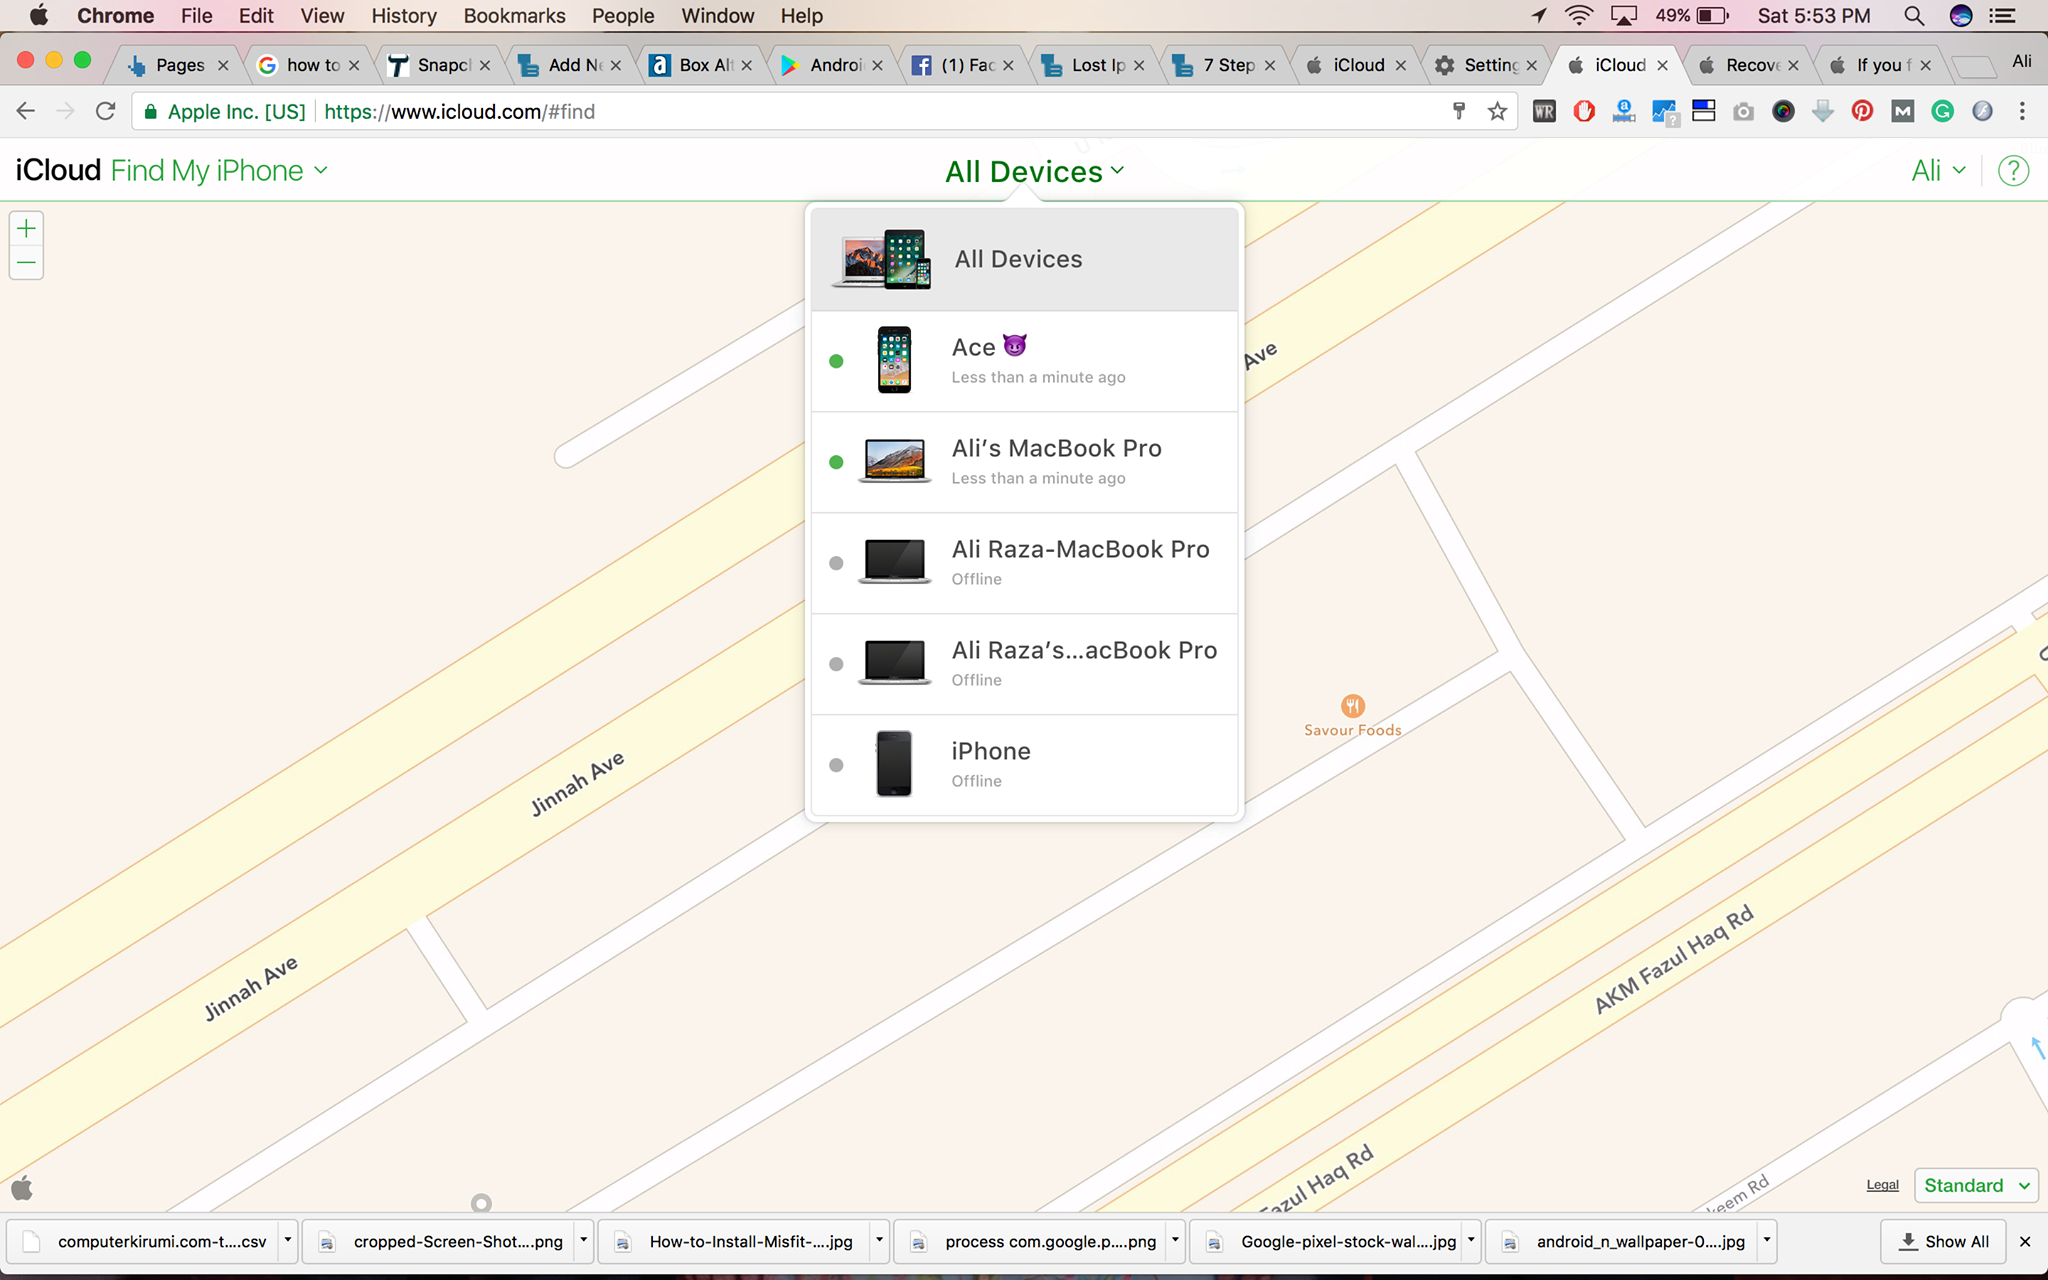
  4. It will now take you to a map where it will be showing all of your devices.
  5. Now click on “All Devices” button appearing in the centre and select the device that is lost.
  6. As you select the lost iPhone X, a menu with options will appear showing Play Sound, Lost Mode & Erase options.
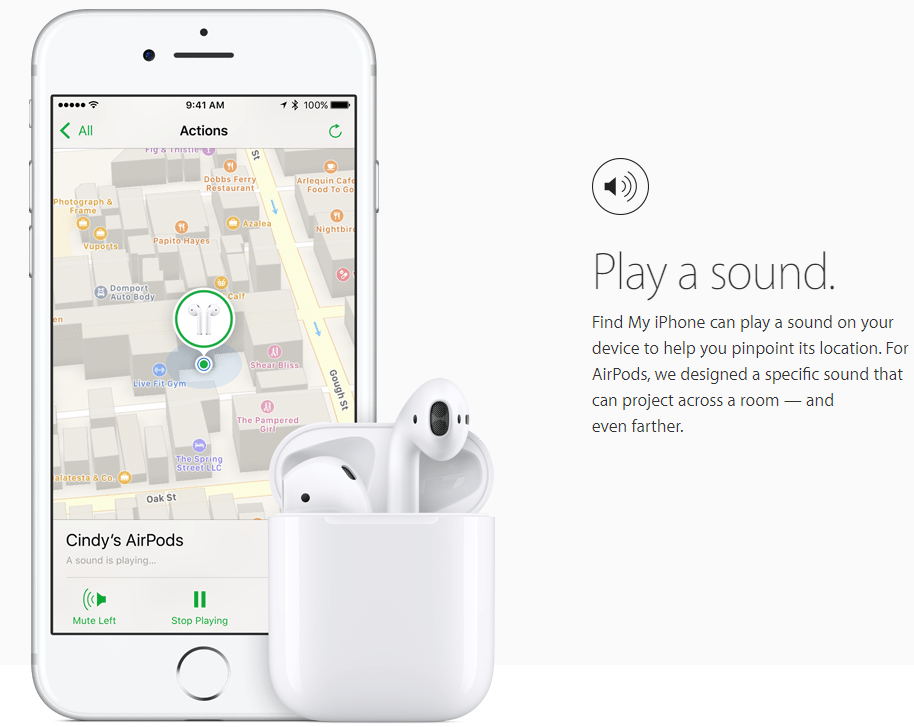
  7. You can now choose whether you want to play a sound on your phone to check if it’s nearby.
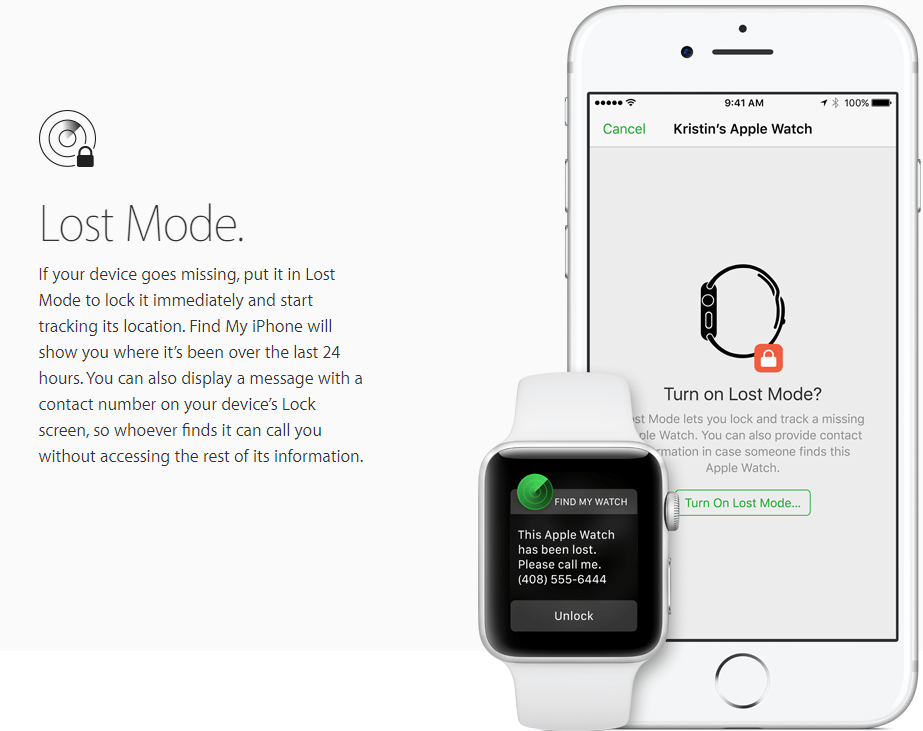
  8. The Lost Mode will display a message on your phone displaying your number telling the new holder of the phone to contact you.
  9. The Erase option is going to completely wipe your phone.

Please be reminded that wiping your iPhone or turning off Find My iPhone is not going to be possible for the one who has the phone now because it requires entering your iCloud account credentials.

That’s how you can find the traces of your lost iPhone. I hope you found this tutorial helpful. In case you are stuck with something, feel free to contact us using the comments section below.

Fix Galaxy S8 Software Update Failed Error

0
Fix Galaxy S8 Software Update Failed Error

Samsung Galaxy S8 keeps getting software updates every now and then. When Samsung Galaxy S8 was released earlier this year, it came out running on Android Nougat. Samsung keeps releasing the security patch updates to make sure that the users experience a safe and secure operating system. Samsung is all set to introduce the Android Oreo update for the Galaxy S8 as well. While installing any software update through OTA, the users often experience a Software Update Failed error.Galaxy S8 Software Update Failed Error

Software Update Failed error is pretty annoying as it doesn’t let you update your phone the easy way. Getting rid of this error is very important since you won’t want to risk your phone for a buggy software. If you are facing this error while installing a major software update like upgrading to a new version of Android, you will not be able to wait before you fix it. The good news is, fixing this error is not difficult at all. You can use various methods to fix Software Update Failed error on your Samsung Galaxy S8. We are going to list a few methods that will solve this issue for you. Let’s move towards the methods to fix Software Update Failed Error on Galaxy S8.

Fix Galaxy S8 Software Update Failed Error by Wiping Cache

Wiping cache of your phone is one solution to a hundred issues. You can wipe the cache partition of your phone to give it a fresh start. This can fix the Software Update Failed issue. This method has worked for a number of users and it also happens to be the most convenient and easiest method to follow. Here’s how to clear the cache of your S8.

  1. Turn off your Galaxy S8.
  2. Now press and hold Volume Up + Bixby + Power button to turn on your phone.
  3. As your phone turns on and shows something on the display, let the keys go.
  4. Your phone will now get into the recovery mode.
  5. From the recovery mode, navigate using Volume Down key to the “Wipe cache partition” and press power key to make a selection.
  6. Now wipe cache partition and reboot your phone.
  7. Try updating your phone now. The error should be gone.

Fix Galaxy S8 Software Update Failed Error using Samsung Smart Switch

Samsung Smart Switch is Samsung’s official tool to manage and update your Samsung Galaxy phone. Smart Switch can be used to transfer data between Galaxy phones, it can be used to install the new firmware and it can be used to transfer your data from iPhone to Samsung phones as well. Smart Switch is basically a PC Suite for Galaxy handsets.

  1. Download and install Samsung Smart Switch on your PC.
  2. Open Samsung Smart Switch now.
  3. Connect your phone to your PC now.
  4. Samsung Smart Switch will take a minute to identify your device. If it asks for any permission on phone, quickly allow it.
  5. Click on “More” appearing on the top right of the Smart Switch.
  6. Now click on “Emergency software recovery and initialization”.
  7. This will take you to the new firmware installation screen.
  8. Read the instructions carefully now and follow on-screen instructions to proceed. This menu will install new software for you to get rid of that issue.


Fix Galaxy S8 Software Update Failed Error by flashing update manually using Odin

You can use Odin to manually flash a software on your Samsung Galaxy smartphone. We have a number of guides published on our site to install software manually through Odin. For Samsung Galaxy S8, you can follow this guide: How to flash factory firmware on Galaxy S8 and S8 Plus [Factory reset]

That’s all for now. If you are still facing any such issue, reach us out through the comments section below and we will try to help you at our best. Thank you.

Track and Locate Lost Galaxy Note 8 Remotely

0
Track and Locate Lost Galaxy Note 8 Remotely

Samsung’s Galaxy Note 8 has turned out to be its most successful phablet so far. Last year, the Galaxy Note 7 caused much of damage to the South Korean giant’s reputation. Samsung took care of every single element while releasing the Galaxy Note 8 this year. It’s an amazing device with a fabulous display and upgraded hardware. Today, we are going to learn how we can locate lost Galaxy Note 8. If your brand new Galaxy Note 8 has slipped out of your hands or your new Note 8 has been stolen and now you need to track it, then this post is for you.Locate Lost Galaxy Note 8 Remotely

Samsung Galaxy Note 8 carries a 6.3-inch WQHD+ display. There is an 8 MP shooter fixed atop of the edge-to-edge infinity display. Like the Galaxy S8, the Galaxy Note 8 doesn’t come with a home button either. The Galaxy Note 8 is the first Samsung phone to come with a dual 12 MP shooter. Both the shooters at the back of the Galaxy Note 8 have the OIS. Galaxy Note 8 has its iconic S-Pen pushed inside from the bottom. The phone has a whopping 6 GB RAM and 64 GB internal storage. Samsung has revamped its Samsung Experience UI for the Note 8. It runs on Android 7.1 Nougat out of the box. Whether you want a phone with a stunning display and crispy graphics, or you want a phone with an amazing design and hardware, Galaxy Note 8 is going to be the right choice for you.

Although you should handle your new Galaxy Note 8 carefully, mishaps of losing your phone can easily occur. There are various methods to find a Galaxy Note 8 that is lost or stolen. The first method is to find your phone through Samsung’s Find My Mobile service and the second method is to find your phone through Google’s Android Device Manager. Both the services work pretty great. Both these services are pre-activated on your phone. Being an Android and Samsung user, you must have one of these activated your phone. If you are not logged in your phone using the Samsung account, you must be running a Google account. So, your chances of finding your phone are pretty obvious because you are definitely using one of these services. This is the phone asks you to set up your Samsung and Google account while setting it up for the very first time.

Locate Lost Galaxy Note 8 [Lost or Stolen]

Track and Locate Lost Galaxy Note 8 Remotely using Samsung Find My Mobile

Find My Mobile is a great service to track or locate lost Galaxy Note 8. Find My Mobile gives you the options to remotely wipe your lost phone. It also has the capability to lock your lost phone and it can ring your phone louder if you have lost it around you. With the help of Find My Mobile, you can also retrieve all the logs of activities on your phone. Here is how you can make the use of Samsung Find My Mobile.

  • Open Samsung Find My Mobile web page.
  • Login into the Samsung Find My Mobile page from your computer or any other device.
  • Make sure you are using the account that you used to sign into Samsung account on your phone.
  • Find My Mobile will show a map if the map is empty then click on “Switch Map”. It will give you the last location of your phone and also the current location of the phone.
  • Find My Mobile will bring also bring a list of options on the right side which will be as
    1. RING MY DEVICE
    2. LOCK MY DEVICE
    3. WIPE MY DEVICE
  • Now depending on your choice, you can Ring your phone, you can remotely lock and yes, you can remotely wipe it to delete all your personal data from the phone.
  • Choose your preference now and track your lost phone. That’s all.Lost Galaxy Note 8

Locate Lost Galaxy Note 8 using Google Android Device Manager

Google’s Android Device Manager can perform almost all of the functions that you saw above in the Samsung Find My Mobile guide. Here is how to make the use of Android Device Manager to locate a stolen or lost Galaxy Note 8.

  • Open Android Device Manager web page and log in using the same account you used on your phone.
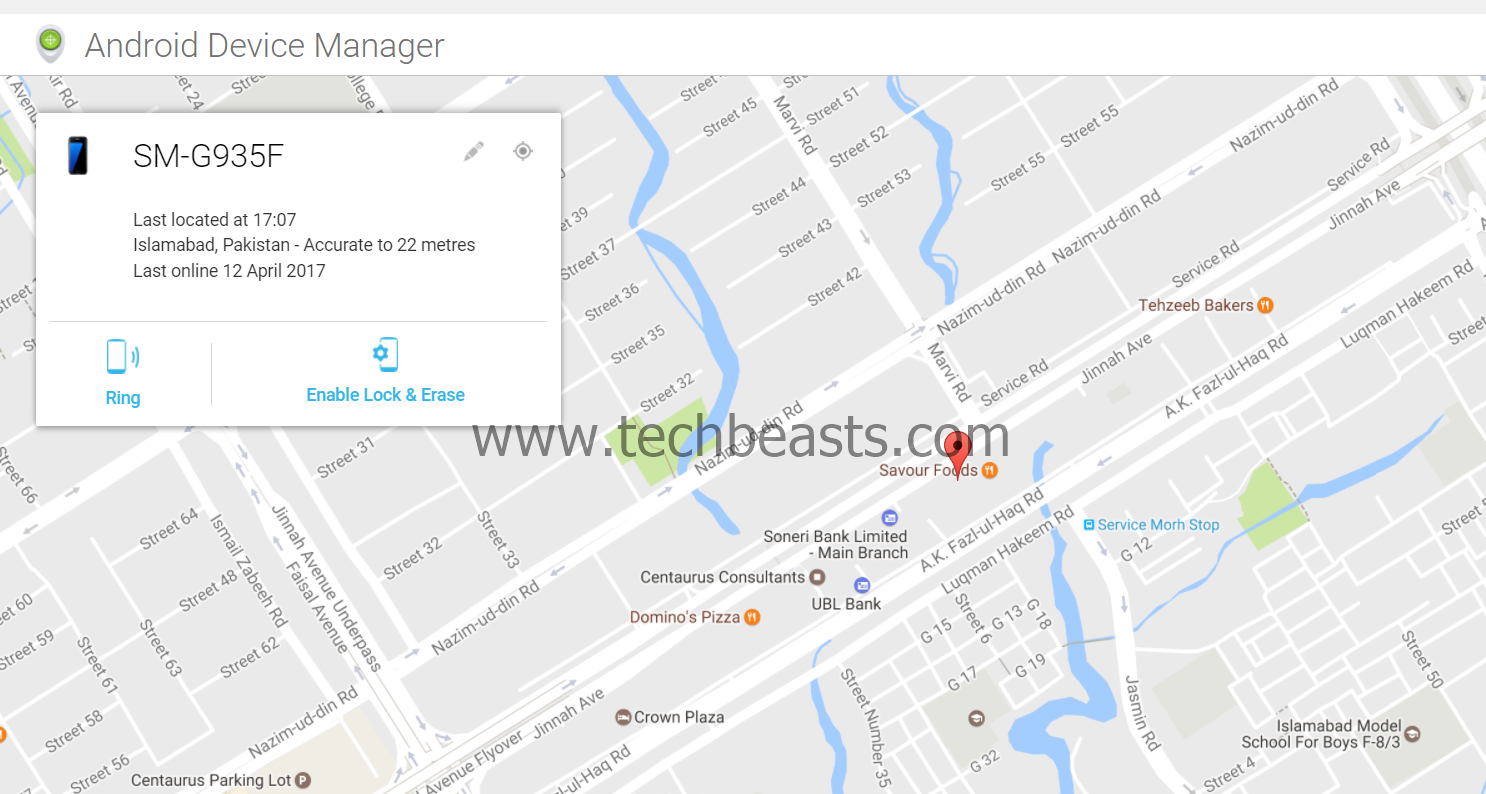
  • Android Device Manager will show up on a map and also the ring and erase options.
  • Now depending on your preference, you can pinpoint where your phone is and you can also ring it to find it nearby or you can remotely lock and wipe it.
  • That’s all.Lost Galaxy Note 8

Track and Locate Lost iPhone 8 Remotely

0
Track and Locate Lost iPhone 8 Remotely

Apple recently released its all-new iPhone(s). The iPhone 8, which just came out, is undoubtedly an impressive device. If you got your hands on the iPhone 8 and you have already lost it, or your iPhone 8 has been stolen, then this guide is what you will find helpful. This tutorial will let you know how you can locate lost iPhone 8 remotely. You will also be able to track iPhone 8.Track and Locate Lost iPhone 8 Remotely

Before jumping up to the method, it’s important to have a recap of the iPhone 8. The phone just came out on September 12, 2017. The iPhone 8 has a 4.7-inch display with 750 x 1334 pixels resolution and 326 PPI. iPhone 8 is protected with IP67 certification which makes the phone water and dust resistant. iPhone 8 runs on iOS 11 out of the box, which is Apple’s latest iOS version. iPhone 8 also houses the all-new A11 Bionic chip which makes this CPU the fastest in the world so far. iPhone 8’s internal storage is either 64 GB or 256 GB. iPhone 8 has an 8 MP camera at its back and a 7 MP camera on the front. The phone still ditches a headphone jack. Just like the iPhone 7, this phone also makes the use of reversible USB connector to connect both the headphones and the data cable for charging the phone. iPhone 8 has been released into the markets all over the world now.

Things to do on your brand new iPhone 8 to avoid a mishap

We can now get back to what we were here for. At first, it is pretty much awful that you lost your brand new iPhone 8. But now that it’s gone, all we can do is to try to locate it using the best possible approach. Before we start tracing the phone, we would like to assume that you haven’t turned on the Find My iPhone feature. This feature is enabled by default on your iPhone once you sign in using your iCloud account. Also, the mobile data connection should be turned on on your phone.

The phone must be protected by a lock-screen password or pin or fingerprint scanner. All this stuff is important because we will be tracking the phone remotely. We can track down the phone by using its internet connection and locked phone is important so that whoever got their hands on the phone doesn’t turn off the mobile data or remove anything from the phone.

Let’s have a look at the steps to locate lost iPhone 8 now.

Locate Lost iPhone 8 with iCloud and Find My iPhone

  1. Open the iCloud Find page on your computer.
  2. Login into the iCloud page using the same iCloud account that you were using on your lost iPhone 8.
  3. You will see a number of tiles on the screen. Click on “Find iPhone” option.
  4. It will now take you to a map where it will be showing all of your devices.
  5. Now click on “All Devices” button appearing in the centre and select the device that is lost.  
  6. As you select the lost iPhone 8, a menu with options will appear showing Play Sound, Lost Mode & Erase options.
  7. You can now choose whether you want to play a sound on your phone to check if it’s nearby.
  8. The Lost Mode will display a message on your phone displaying your number telling the new holder of the phone to contact you.
  9. The Erase option is going to completely wipe your phone.

Please be reminded that wiping your iPhone or turning off Find My iPhone is not going to be possible for the one who has the phone now because it requires entering your iCloud account credentials.

That’s how you can find the traces of your lost iPhone. I hope you found this tutorial helpful. In case you are stuck with something, feel free to contact us using the comments section below.

Track and Locate Lost iPhone 7 Plus Remotely

0
Track and Locate Lost iPhone 7 Plus Remotely

With the release of iPhone 7, Apple said goodbye to the headphone jacks. According to Apple, it was all about courage. iPhone 7 had a big brother called the iPhone 7 Plus. The iPhone 7 Plus actually proved out to be an impressive phone because of a massively stunning display and the dual cameras at the back. iPhone 7 was the only phone standing firm in front of the tough competition given by Samsung, Google and all other smartphone manufacturers. iPhone 7 owners, who just recently lost their phone, will find this guide useful. This post will take you through some steps to locate lost iPhone 7 Plus using the Find My iPhone service.Track and Locate Lost iPhone 7 Plus Remotely

Losing your iPhone 7 Plus is very unfortunate. Now that it has happened, it’s useless to cry over spilt milk. Whether you have dropped it somewhere or it has been stolen, all you can do is to try to find it at your own first. Apple has its own service called Find My iPhone which is activated by default on your phone. Find My iPhone is linked to your iCloud account. As soon as you add your iCloud account to your Apple device, Find My iPhone starts working.

If you haven’t intentionally turned this service off, chances are that you will be able to track your phone using the iCloud on your computer. Also, you have to be sure of the fact that your phone has a working mobile data connection and it is protected by a security feature. If the phone wasn’t protected by a password, pin or fingerprint scanner, it might have fallen into the wrong hands resulting in termination of the mobile data making you unable to locate lost iPhone 7 Plus using Find My iPhone.

Let’s hope for the best and pass through the necessary steps to find lost iPhone 7 Plus now.

How To Find Lost iPhone 7 Plus using Find My iPhone

  1. Open the iCloud Find page on your computer.
  2. Login into the iCloud page using the same iCloud account that you were using on your lost iPhone 7 Plus.
  3. You will see a number of tiles on the screen. Click on “Find iPhone” option.
  4. It will now take you to a map where it will be showing all of your devices.
  5. Now click on “All Devices” button appearing in the centre and select the device that is lost.
  6. As you select the lost iPhone 7 Plus, a menu with options will appear showing Play Sound, Lost Mode & Erase options.
  7. You can now choose whether you want to play a sound on your phone to check if it’s nearby.
  8. The Lost Mode will display a message on your phone displaying your number telling the new holder of the phone to contact you.
  9. The Erase option is going to completely wipe your phone.

Please be reminded that wiping your iPhone or turning off Find My iPhone is not going to be possible for the one who has the phone now because it requires entering your iCloud account credentials.

That’s how you can find the traces of your lost iPhone. I hope you found this tutorial helpful. In case you are stuck with something, feel free to contact us using the comments section below.

Fix Galaxy A7 2017 Charging and Battery Life Issues

0
Fix Galaxy A7 2017 Charging and Battery Life Issues

Samsung Galaxy A7 2017 is among the most popular mid-range devices. There is a number of good facts about the Galaxy A series. Galaxy A series is for the people with a nominal budget, but the phone sports high-end specifications. Of course, we are not expecting the flagship specs here. The Galaxy A7 2017 comes wit ha 5.7-inch 1080P display protected by Gorilla Glass 4. Samsung Exynos 7880 Octa-core CPU can be found inside. Galaxy A7 2017 a 16 MP camera at the back and also on the front. A 3 GB RAM with 32 GB internal storage can be found inside. The Galaxy A7 2017 has run on Android 6.0.1 Marshmallow out of the box. This phone can be easily updated to Android Nougat as well.

Galaxy A7 2017 users have been reporting some issues lately. Some users have reported the phone charges slow or it just stops charging in between. Some users have reported that the battery life of the phone is not lasting as long as it should. The battery of the A7 2017 starts draining as told by the users. A7 2017 is a very good phone, but it’s definitely not free of the issues. If you have got the aforementioned problems with your phone, you need to solve them right now. Fixing the charging issues and the battery life issues on your brand new Galaxy A7 2017 is not a tough job at all.

In this post, we will look into all the possible solutions for fixing the charging issues of the Galaxy A7 2017. Along with the charging issues, we will also try to fix the battery life issues of the Galaxy A7 2017. We will break down the solutions into different parts. You can try the solutions one by one and check your phone afterwards. If one solution doesn’t work for you, then the other will probably work. Let’s go through all the possible fixes for charging and battery life problems of the Galaxy A7 2017.

Fix Galaxy A7 2017 Charging Issues

Solution#1: Check your charger

Check your charger by charging another phone. If the other phone charges fine, that means it’s not the charger issue. But if the charger fails to charge another phone, it means that the charger is the culprit. You need to get a new charger for your phone in this case.

Solution#2: Check the Data Cable

You also need to check if your data cable is fine. You can check the data cable by connecting it to another phone. If the data cable works fine with another phone, that means the cable is fine and the issue is somewhere else. However, if the cable fails to establish a connection with the other phone, then you need to find a good cable and replace your malfunctioned cable.

Solution#3: Check the Charging Port

Have a look into the charging port of your phone. If you find dust and other particles in the charging port, you need to pick up a toothpick and clean the charging port. Connect the data cable after cleaning the charging port and see if it goes fine now or not.

Solution#4: Check the electricity connection

Sometimes, the voltage coming out of the electrical connection is not enough to charge the phone. A too low voltage will give you a charging error on the phone, but if the voltage is low (not too low), you will not see any error and the phone will keep charging extremely slow. In such a case, you need to check out another switch to see if that charges your phone normally or not.

Solution#5: Check your phone’s battery

If everything mentioned above seems to be in a good state, then the last resort is to replace the battery of your phone. A faulty battery can resist charging. You have to take your phone to your nearest service centre to get its battery checked since the Galaxy A7 2017 comes with a non-removable battery.

Fix Galaxy A7 2017 Battery Life Issues

Solution#1: Use Power Saving Mode

Using Power Saving mode can significantly save the battery life of your phone. It turns off all the unnecessary background tasks and optimizes the battery usage accordingly. Turning on the battery saving mode will take a few seconds. To turn it on, pull down the notification bar and expand the toggles. Now tap the Power saving button. Alternatively, you can go to settings > device maintenance > battery > Set the power saving to low or high depending on your choice.

Solution#2: Turn on your phone in Safe Mode

Sometimes, an application that we recently installed can slow down both the performance and battery life of our phone. It’s necessary to examine and capture the culprit application in such a case. Luckily, it’s very easy to determine whether an application is behind the low-life of your phone’s battery. You can simply boot your phone in the Safe Mode which will disable all the applications on your phone. If the phone works absolutely fine after turning off the applications, that means there is an application which is causing the entire issue. Now you need to check your installations one by one and uninstall any that looks like the offender. To boot your phone into Safe Mode, turn it off first. Now turn on the phone and press and hold Volume Down key. Keep the key pressed as long as the phone doesn’t show you the home-screen. Once it shows you the home-screen, you will find a Safe Mode watermark on the lower left corner. All the apps are disabled now and you can wait for the battery results.

Solution#3: Reduce Screen Brightness

The increased screen brightness can eat the battery of your phone. In such a case you can either use the automatic brightness feature or you can lower down the brightness. Since the Samsung phones use Super AMOLED displays, it’s a good idea to use black wallpapers since black wallpapers do not need to draw a lot of pixels on the AMOLED screens. Using colourful wallpapers can eat the battery as well.

Solution#4: Clear the Cache of your phone

Clearing the cache of the phone is like a medicine that cures every single disease. You can try clearing cache of your phone to check if there’s a change in the battery life. To clear the cache, turn off your phone. Now press and hold Volume Up + Home + Power button to turn it on. As your phone shows the recovery screen, select the Clear cache partition option and clear it. After restarting the mobile, you can wait for a change in the battery life.

Solution#5: Perform a factory reset/Flash a new firmware

If all of the above solutions fail to work, you can try performing a factory data reset. This will wipe everything from your phone. Make sure that you take a backup of everything before performing a factory reset.

Even if the factory reset doesn’t make a difference, you can go to a new firmware. Here’s the guide: How To Flash Stock Firmware On Samsung Galaxy With Odin.

Solution#6: Replace the battery

This may seem an odd solution, but if nothing is working for you, then this is the way to go. A faulty battery will never let you live a normal life. Get your phone’s battery checked from the nearest service centre and if it’s messed up, get it replaced immediately.

Fix Galaxy J7 Prime Software Update Failed

0
Fix Galaxy J7 Prime Software Update Failed

Galaxy J7 Prime is just another variant of the original Samsung Galaxy J7. Samsung changed a few minor specifications in the Galaxy J7 and released it as the Galaxy J7 Prime. This phone came out in August 2016. Galaxy J7 Prime targets the mid-range market. This phone has a 5.5-inch 1080P display. J7 Prime is powered by Exynos 7870 Octa-core CPU and a RAM of 3 GB. The internal storage of this phone is 16 GB. J7 Prime has a 13 MP camera at its back. On the front, this phone has an 8 MP camera. When Galaxy J7 Prime was released last year, it was found running on Android 6.0.1 Marshmallow. Just a few days ago, Samsung rolled out the Android Nougat update for this phone.Fix Galaxy J7 Prime Software Update Failed

A number of users have successfully updated their Galaxy J7 Prime to Android Nougat. You can update your phone to Android Nougat either through OTA update or through Samsung Odin. While updating the phone through OTA, so many users have encountered an error called Software Update Failed. This error comes up when you have downloaded the software update and you are just about to install it on your phone. At some point, this becomes so much annoying that you want to hit your phone on the floor. Before you start panicking, we would like to calm you down and tell you that it’s very easy to fix this error. This very post will take you through the steps to fix Software Update Failed error on your Galaxy J7 Prime.

There are three different methods to fix the Software Update Failed error. The very first method will make you clear the cache of your phone. This method is likely to work for most of the users. Since the first method also happens to be very easy to follow, you should try that first of all. If the first method fails to work for you, you can jump to the 2nd and 3rd method as they will definitely work and take this error away from your phone.

Fix Galaxy A7 Prime 2017 Software Update Failed Issue

Solution#1: The very first thing you can do is to clear the cache of your phone. To clear the cache, turn off your phone first. Once the phone completely goes dead, turn it on by pressing and holding Volume Up + Home + Power key. Keep the keys pressed while the phone turns on. As it shows something on the screen, let the keys go. You will be in the recovery mode now. Use the Volume Down key to come down and select “Clear cache partition” by pressing the Power key. In the next screen, use Volume Down key to highlight “Yes” and press the Power button again to wipe Cache partition. Restart your phone after clearing Cache. Try updating your phone now and it will not show the Software Update Failed error anymore.

Solution#2: Download and install Samsung Smart Switch on your computer. Connect your phone to your computer now using the original data cable. You have to launch the Samsung Smart Switch now. It will take a minute for Smart Switch to recognize your phone. After successful connection, Smart Switch will show you a screen with options. Now click on the “More” option appearing on the top-right and then click on “Emergency software recovery and initialization”. Now follow the on-screen instructions to install new software on your phone.

Solution#3: The last solution that will definitely work is to flash a software manually using the Odin flashtool. For Odin, you can follow this guide and fix the Software Update Failed issue: How To Flash Stock Firmware On Samsung Galaxy With Odin.

Fix Galaxy S5 Neo Issues After Nougat Update

0
Fix Galaxy S5 Neo Issues After Nougat Update

Samsung Galaxy S5 Neo was updated to the Android Nougat firmware recently. The update for this phone is just like a droplet of rain in the desert of Sahara. Because the original Galaxy S5, which has almost the same hardware, didn’t receive the Android Nougat update. However, the Galaxy S5 now enjoys the most recent version of Android. The update happened in a few regions only. Users all around the world can update their phone using Odin. We even published a guide back in the days when this phone started updating to Nougat.
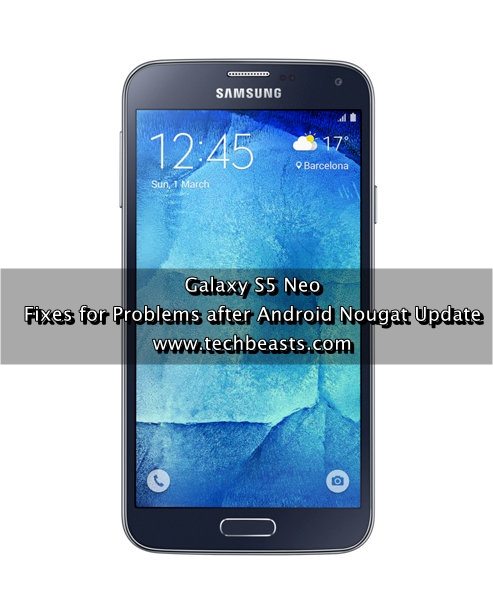
Today, we are going to discuss all the issues that the Galaxy S5 Neo owners have been experiencing after updating their phone to the Android Nougat. Although the Android Nougat firmware is very fast, stable and secure firmware, no firmware in the world is absolutely perfect. Galaxy S5 Neo owners have come across various issues including random reboots, phone heating up, phone’s performance slowing down, battery not lasting long enough, phone showing no service or not registered on network issue, the phone refraining from updating to minor upgrades and the list goes on.

There may be some issues that you can easily fix on your own, but some of the aforementioned issues are going to be a real pain for you. For example, if your phone is heating up and applying your own fixes isn’t helping, what are you doing to do in such a case? Well, that’s what we are here for. Let’s break down all the issues of Galaxy S5 Neo running Android Nougat followed by the best possible fixes.

Fix Galaxy S5 Neo Issues After Nougat Update

There are multiple solutions to fix all the problems. At first, we have mentioned the problems and we have listed the some of the solutions at the end. The solutions that will particularly fix the problems are mentioned under the heading. The solutions that fix various issues are given at the end. You can check the solutions and find out which one sorts out your issue.

#1: Galaxy S5 Neo Heating Up After Android Nougat Update

Solutions: The very first thing that you can do with your phone is to try to clear cache. Clearing the cache is the easiest solution here.

If this doesn’t resolve the problem, you can boot your Galaxy S5 Neo in Safe Mode and check if an application is being the culprit here.

While telling you about clearing cache and identifying an application which may be the reason behind increased temperature of the phone, we are assuming that you have performed a clean installation of Android Nougat on your phone. In case the installation didn’t go clean at your end, you can first try performing a factory reset and then flash a new firmware on your phone using Odin.

#2: Galaxy S5 Neo Not Register On Network or No Service Issue After Nougat Update

Solutions: This is the most annoying issue that almost all Galaxy users come across every now and then. Follow these steps to fix this issue.

  1. On your phone, go to settings > About phone > RESET.
  2. In RESET > Reset Network Settings > RESET SETTINGS > Enter your Pin or Password to reset these settings.
  3. Restart your phone now and check if the problem is gone or not.

In case the above solution doesn’t work, follow these steps:

  1. Go to settings > Connections > Mobile Networks.
  2. In Mobile Networks > Network mode > auto connect.
  3. Now get back to Mobile Networks > Network operators > Select automatically.
  4. Reboot your phone now to check if the problem is gone.

While applying these issues, you would want to be sure that your SIM card is in a working state and the SIM is inserted correctly in your phone.

#3: Galaxy S5 Neo Random Reboot Issue After Nougat Update

Solutions: First of all, try clearing the cache of your phone. If clearing the cache doesn’t help, you can try performing a factory reset. Even if the factory reset doesn’t help, the last resort is to flash a new stock Android Nougat operating system using Odin.

#4: Galaxy S5 Neo’s Performance Slowed Down After Nougat Update

Solutions: The performance issue is what most of the users complain about whenever they update their phone to a new firmware. Again, the first thing you would do here is to clear the cache of your phone. After clearing the cache, you can do this to boost up the performance a little bit.

  1. Go to Settings > About phone > Software information > Tap the build number for 7 times to enable developer options.
  2. Now get back to Settings and go to > Developer options.
  3. Scroll down in the Developer options and find these options:
    1. Windows animation scale
    2. Transition animation scale
    3. Animator duration scale
  4. Turn off all these options and check the performance of your phone now.

Performing a factory reset and flashing new stock firmware should be your last options to go with.

#5: Galaxy S5 Neo Battery Life Issues After Nougat Update

Solutions: First of all, try charging your phone to 100%, let it come down to 0% and then charge it to 100% again. Complete 3 to 4 such cycles and then check the battery time of your phone. If it goes all well, you do not need to do anything else, but in case if it doesn’t then go ahead and clear the cache of your phone.

After clearing the cache, try booting your phone into the Safe Mode and check if the battery works well in Safe Mode. If disabling all the applications boosts up battery life, that means an application is consuming more battery. You need to check your recent installations and uninstall the battery-hogging application.

Although the given solutions should be good enough for you, in case those do not help then factory reset and installation of new firmware are always your options.

#6: Galaxy S5 Neo Slow Charging AFter Android Nougat Update

Solution: Slow charging issues are more of the hardware issues. You can check your charger, the data cable and also the electrical switch. If these are all in place, you can get the battery of your phone checked from a service centre.

How To Clear Cache Partition on Galaxy S5 Neo

  1. Power down your Galaxy S5 Neo.
  2. Now press and hold Volume Up + Home + Power Button to boot into recovery.
  3. As your phone boots up, leave the keys.
  4. Now that you are in recovery mode, use Volume Down key to highlight Clear cache partition option. Press power key to make a selection now.
  5. In the next screen, navigate to Yes and press power button.
  6. Reboot your phone now.
  7. Cache has been cleared.

How To Boot Galaxy S5 Neo Into Safe Mode

  1. Turn off your phone completely.
  2. Now press the power button to turn it on.
  3. Now right after pressing the power button, press and hold Volume Down key.
  4. Keep the key pressed until the phone boots up.
  5. Leave the key as it shows you the home-screen.
  6. Find the Safe Mode water-mark on the lower left corner of the screen.
  7. If the watermark is there, that means the phone is in Safe Mode and all the applications are disabled.
  8. You check the performance, battery life, and temperature of your phone in this mode. If it works absolutely well, it means some of the applications are pulling down your phone.

How To Factory Reset Galaxy S5 Neo

  1. Turn off your phone.
  2. Press and hold Volume Up + Home + Power key to boot it into recovery mode.
  3. Once your phone is in recovery, select “factory data reset” option.
  4. Perform a hard factory reset now and check the phone afterwards.

How To Re-Install Software On Galaxy S5 Neo

You can have a look at our guide here on How To Flash Stock Firmware On Samsung Galaxy With Odin.

That’s all for now. In case you need further help, shoot us your queries using the comment box below.
Fix Galaxy A5 2017 Battery Life Issues

0
Fix Galaxy A5 2017 Battery Life Issues

Samsung Galaxy A5 2017 came out earlier this year. This phone makes Samsung’s lineup of mid-rangers a little bit more healthy. Galaxy A5 2017 has a 5.2-inch 1080P display protected by Gorilla Glass 4. Under the hood, we have the Exynos 7880 CPU and a 3 GB RAM with 32 GB internal storage. Galaxy A5 2017 has a 16 MP shooter at the back and the same 16 MP shooter on the front. Galaxy A5 2017 is IP68 certified which makes this phone resistant to water and dust. It runs on Android 6.0.1 Marshmallow out of the box and users can update it to Android Nougat easily.

Galaxy A series smartphones are known for having very nice specifications under a very friendly budget. This series worked so well for Samsung that Samsung is not planning to give up these models anytime soon. So far we have seen several iterations of these smartphones. Samsung is already working on the 2018 versions of the Galaxy A5, A5, and some other phones.

Galaxy A5 2017 Battery and its problems

Galaxy A5 2017 is being used by masses at the moment. If you have this phone and its battery isn’t being good to you lately, then you need to fix it immediately. Galaxy A5 2017 has a 3000 mAh battery. This amount of battery-juice is good enough to last for a day. If you are not getting a full day output from a single full charge, then there is something cooking up inside your phone that you need to tackle in time. There is not just one reason that can bring down the battery performance of your Galaxy A5 2017. You can never be sure what’s exactly not letting your phone’s battery work up to your expectations.

The battery life issues on the Galaxy A5 2017 can be broken down into several different categories. It’s possible that your phone’s battery is being consumed way too fast, it’s also possible that the battery isn’t getting fully charged and it’s also possible that some application is eating up all the battery right after you charge it. The battery consumption can get worse with the passage of time as well. Your phone needs regular software updates and it also needs a refresh.

If you are a Galaxy A5 2017 owner and you are here on this page, we are assuming that you’ve got a problem with the battery of your phone. Let’s jump up to the solutions now and try fixing the battery life issues of your Galaxy A5 2017.

Fix Galaxy A5 2017 Battery Life Issues

Solution#1: Use Power Saving Mode

Using Power Saving mode can significantly save the battery life of your phone. It turns off all the unnecessary background tasks and optimizes the battery usage accordingly. Turning on the battery saving mode will take a few seconds. To turn it on, pull down the notification bar and expand the toggles. Now tap the Power saving button. Alternatively, you can go to settings > device maintenance > battery > Set the power saving to low or high depending on your choice.

Solution#2: Turn on your phone in Safe Mode

Sometimes, an application that we recently installed can slow down both the performance and battery life of our phone. It’s necessary to examine and capture the culprit application in such a case. Luckily, it’s very easy to determine whether an application is behind the low-life of your phone’s battery. You can simply boot your phone in the Safe Mode which will disable all the applications on your phone. If the phone works absolutely fine after turning off the applications, that means there is an application which is causing the entire issue. Now you need to check your installations one by one and uninstall any that looks like the offender. To boot your phone into Safe Mode, turn it off first. Now turn on the phone and press and hold Volume Down key. Keep the key pressed as long as the phone doesn’t show you the home-screen. Once it shows you the home-screen, you will find a Safe Mode watermark on the lower left corner. All the apps are disabled now and you can wait for the battery results.

Solution#3: Reduce Screen Brightness

The increased screen brightness can eat the battery of your phone. In such a case you can either use the automatic brightness feature or you can lower down the brightness. Since the Samsung phones use Super AMOLED displays, it’s a good idea to use black wallpapers since black wallpapers do not need to draw a lot of pixels on the AMOLED screens. Using colourful wallpapers can eat the battery as well.

Solution#4: Clear the Cache of your phone

Clearing the cache of the phone is like a medicine that cures every single disease. You can try clearing cache of your phone to check if there’s a change in the battery life. To clear the cache, turn off your phone. Now press and hold Volume Up + Home + Power button to turn it on. As your phone shows the recovery screen, select the Clear cache partition option and clear it. After restarting the mobile, you can wait for a change in the battery life.

Solution#5: Perform a factory reset/Flash a new firmware

If all of the above solutions fail to work, you can try performing a factory data reset. This will wipe everything from your phone. Make sure that you take a backup of everything before performing a factory reset.

Even if the factory reset doesn’t make a difference, you can go to a new firmware. Here’s the guide: How To Flash Stock Firmware On Samsung Galaxy With Odin.

Solution#6: Replace the battery

This may seem an odd solution, but if nothing is working for you, then this is the way to go. A faulty battery will never let you live a normal life. Get your phone’s battery checked from the nearest service centre and if it’s messed up, get it replaced immediately.

How To Create App Pairs On Galaxy Note 8

0
How To Create App Pairs On Galaxy Note 8

Galaxy Note 8 is loaded with some exclusive features. These features on the Note 8 are exciting. For example, there is this App Pairs feature which merges two applications into each other. When you launch the App Pair, it launches two applications in a multi-window instance. You can use both the applications simultaneously and you can even resize the window of each application. Earlier, the users were able to launch another application while using one application. App Pairs are similar to that, but you don’t have to launch one application and another one after that. Now you can create a pair of your most frequently used applications and launch them both at the same time.

Creating App Pairs on the Galaxy Note 8 is extremely easy. I just got my hands on the Galaxy Note 8 and I wanted to check how the App Pairs work. I tried putting two applications together and it created a folder instead. So, it took a minute or two to figure out how I can create App Pairs on the Galaxy Note 8.

Are you also a Galaxy Note 8 owner who hasn’t figured out how to create App Pairs? Well, follow these steps to create App Pairs on Galaxy Note 8 now.

How To Create App Pairs On Galaxy Note 8

  1. On your Galaxy Note 8, pull the edge panel from the right side.
  2. Press the + button appearing in the application placeholder at the bottom of the first application column. If there is no space to add a new application, tap the Settings gear icon > Edit the Apps Edge. 
  3. Now in the application selection window, you will find “Create App Pair” on the top right corner.
  4. Tap the create App Pair option now.
  5. Create App Pair will now show you all the applications that support multi-window.
  6. Select the first application and then select the second application.
  7. After select applications, tap “Done”.
  8. App Pair will be added to the edge panel now.
  9. You can launch the App Pair and use two applications at the same time.
  10. That’s all.

How to block or disable Facebook notifications on Android

0
How to block or disable Facebook notifications on Android

Facebook notifications popping up every second minute are annoying sometimes. When there are so many people tagging you somewhere, or doing an activity which pings your Facebook profile, Facebook sends you a notification. Most of the times, the notifications are about something that you have no concern with. In such cases, all you want is to block or disable the Facebook notifications.block or disable Facebook notifications on Android

Disabling notifications on Facebook running on your Android phone does not mean that you will stop knowing about what’s happening on Facebook. The application will still have all the notifications. It’s just that your notification panel on the Android phone will be free of these notifications. In order to check what’s up, you will have to open the Facebook application and tap the notifications button. I personally don’t like seeing a lot of stuff in the notification panel of my smartphone.

Particularly, the least important stuff occupying space in the notification panel, or a notification beep at a time when you want your phone to be completely silent, and that too as a result of something that you have absolutely nothing to do with makes you more than angry. Android Lollipop onwards, the notifications also appear on the home screen of your phone in the shape of cards. In case you have been through something like this, then let’s learn how to disable Facebook notifications on Android-powered smartphones.

How to block or disable Facebook notifications on Android

Disable Facebook notifications on Android – Android Nougat to Android Gingerbread

(I hope you’re not running an Android version below Android Gingerbread now.)

Note: This method can block the notifications inside your Facebook profile and can be used to disable notifications popping up on your phone too.

  1. Open the Facebook application on your Android phone.
  2. Tap the Menu button appearing on the top-right corner of the screen just below the messenger corner.
  3. Scroll down and find “Notification settings”.
  4. Facebook will now show you what notifications you currently receive. You have menus like “Activity about you, Apps, Friend requests, Birthdays etc”. At the bottom, you have another menu showing “Where you receive notifications”.
  5. Now you can turn off notifications either for the individual activities, or you can turn off the entire notifications by using the “Where you receive notifications menu”.
  6. You have the options to turn off Push notifications, Email notifications, and SMS notifications as well. If you want, you can also disable the Vibration, Phone LED Sounds. You can also set your Facebook on Do not disturb mode for a certain time-period. That’s all.

How to block or disable Facebook notifications on Android – Android Nougat & Android Marshmallow

This is for the users who do not want to touch the Facebook application settings. All they want is to stop the Facebook notifications from appearing on their phone. Here’s how this can be done.

  1. On your Android phone, go to Settings.
  2. In Settings, go to App Settings or Application Manager.
  3. Scroll down and find “Facebook”.
  4. In Facebook Settings, find “Notifications”.
  5. Now tap the radio button to turn off or turn on notifications.
  6. That’s all.

How to bypass Adblocker Detection on Websites without whitelisting them

0
How to bypass Adblocker Detection on Websites without whitelisting them

If you have an Ad-blocker enabled in your internet browser, some of the websites will refuse to load for you. The reason is, these websites want you to disable your Ad-blocker so that it doesn’t hurt their revenue. To some extent, the websites are on the right side, they do have the right to get your Ad-blocker disabled as long as their ads do not hurt your surfing experience. Most of the websites earn a living through the advertisements they display on the pages. The advertisement is necessary to run the entire business, to pay the expenses, to pay the salaries and everything else that involves eating up money to keep it live and alive. The refusal loading website without having the Ad-blocker disabled also depends on how ethical the advertisements on that particular websites are.

There are a plethora of websites which have highly unethical ads showing up in their content. Sometimes, you don’t want to see those ads and you also want others around yourself to avoid seeing those ads. In such cases, disabling the Ad-blocker is simply not the solution. You need a more intact solution that would load the web-page without having your Ad-blocker disabled. In the first case as described above, it’s a good idea to disable your Ad-blocker and support the website that you are using for fruitful information, but in the second case, it becomes a little bit messy. This happens especially when a website is using pop-up ads with flashy objects coming up. They do not only hinder your experience, they also affect the responsiveness of your web browser.

In this post, we will learn how you can bypass Adblocker Detection on Websites without whitelisting them or without disabling your Adblocker. While going through the methods, our first priority will be to actually disable the Ad-blocker and support the site. If the advertisement is not viewable, we will proceed with the other options to load the website by bypassing the Ad-blocker restriction.

Whitelist the site and Disable your Adblocker to support the site

  1. Load the website that is asking you to disable the Ad-blocker.
  2. Now click on the red Ad-blocker symbol appearing right next to the Address bar in the browser.
  3. Now click on “Don’t run on pages on this domain”.

  4. A pop-up will come up, click on “Exclude” now.
  5. This will reload the page. You will see the red icon turning green now and the website won’t be showing a warning anymore.

Disable JavaScript for a site to bypass Adblocker detection

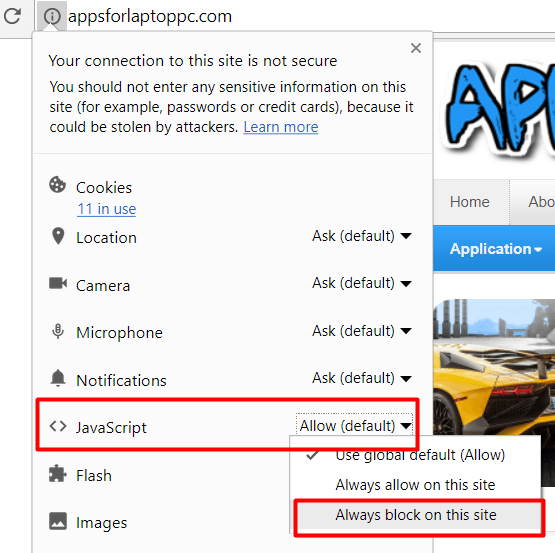
This option will disable the entire JavaScript for a website. Most of the websites use JavaScript to load the Adblocker detection. By opting for this option, you will not only disable the Adblocker detection, you will also disable a number of other elements. This is good for the users who only have to read some stuff on a page. If the UI elements and other objects on a page are not important for you, you may go ahead with this option. Here’s how to do it.

  1. Click on the “Site info” option appearing right before the URL of a website. You will find this in the Address/URL bar of the browser.
  2. A list of options will appear now.
  3. Find the “JavaScript” option and then select “Always block on this site”.
  4. Reload the website now.
  5. Check if it still shows the Adblocker detection or not.

Bypass websites without disabling Adblocker using custom scripts

  1. Download and install Tampermonkey on your Google Chrome.
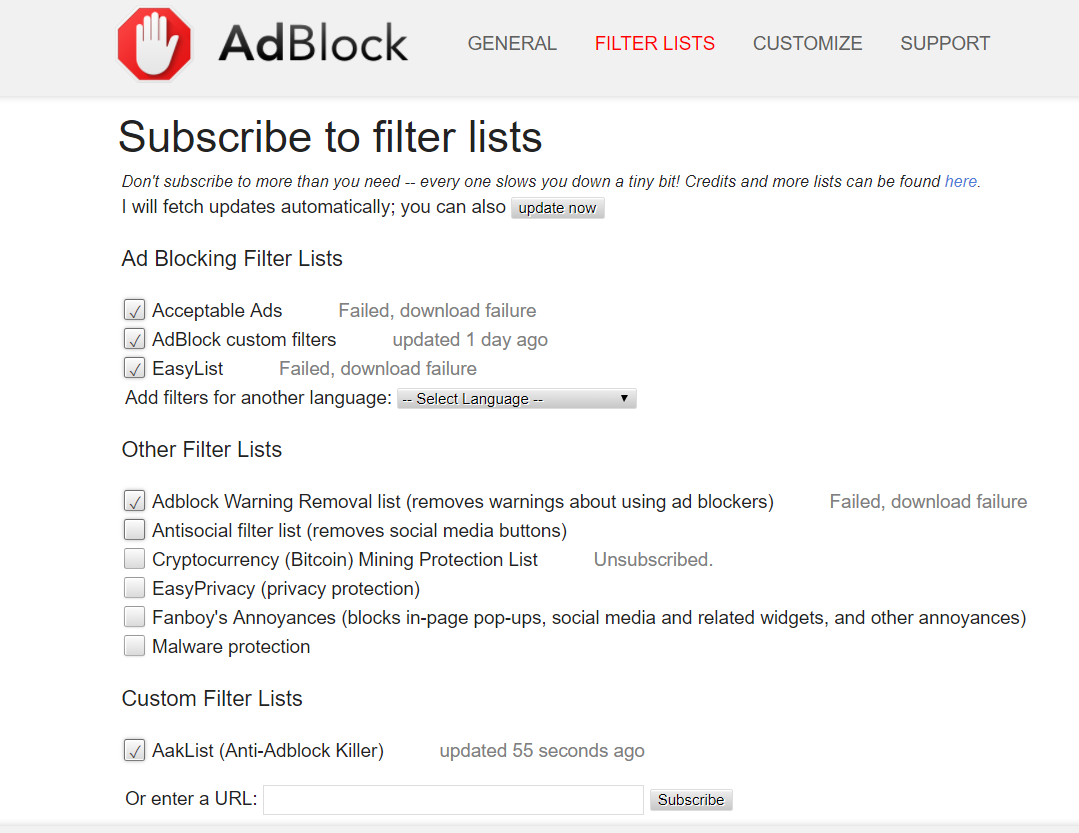
  2. Now open this webpage: Aaklist and subscribe to the Anti-Adblocker-Killer list.
  3. Now install the Anti-Adblocker UserScript.
  4. It will automatically activate the script now.
  5. You should be able to bypass all pop-ups keeping a site from loading now.
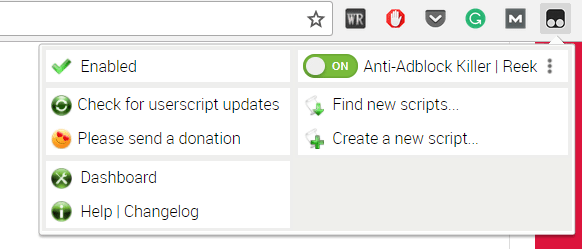
  6. In order to disable this, you can simply click on the Tampermonkey extension icon and turn off the Anti-Adblocker Killer. Disabling it will completely uninstall this script. That’s all.

That’s all with all these methods. We do not really recommend using any of these since a website has the right to display advertisement for the sake of its survival. You should try to disable the Adblocker and support the hard work of the website owner. But if you think that the advertisement is not good for viewership, you have every single right to disable it as well. Stay connected with us.