Home Blog Page 514

How To Increase Battery Life On iOS 7.

0
How To Increase Battery Life On iOS 7.

Learn How To Increase Battery Life on iOS 7: iOS 7 has been released with tons of new features, but those features are the main reason that has been decreasing the battery timing of your iPhone. Features like Air Drop or Notification Centre are not the ones but they are hidden deep inside iOS 7 or let’s say running in the background. So, if you are facing a quick battery drain than usual and you want to get more juice out of your battery just change the following settings.

Read more: Speed Up iOS 7 On Older Devices

How To Increase Battery Life On iOS 7:

BackGround-App-Refresh-iOS-7

Background App refreshing: [  Increase Battery Life on iOS 7 ]

This feature allows your apps to remain active while you multitask, but in case you have minimized an app and forgot to close it, it will keep refreshing and thus draining your battery.

  • To fix that, Go to Settings > General > Background App Refresh, here you have the option to close all the settings together or you can close the one you don’t like.

Automatic Updates:

Automatic updates are quite a time saver, they update all your apps without you have to open App Store to manually update them. But without your notice since the update process is ongoing, your phone battery will be drained without your notice.

  • To fix this, Go to Settings  > iTunes and Apple Store and disable update option, but then don’t forget to check App Store for update option.

Location Services:

Well for a person who doesn’t get out of the house much, this won’t be a problem, but for all the travelers this will sure to drain the battery. Location Services will automatically update your current location without your permission so in case if you are traveling from places to places they might be doing a good job along with a bad one.

  • Just go to Settings > Privacy > Location Services, scroll down and choose system services and disable any option you don’t need, like iAids, after that head towards to Frequent Locations features and Disable it too.

Spotlight:

If you are able to search any sort of data on your device, then this is like a treasure for you, but that means Spotlight will keep crawling for new data and then indexing it and of course draining the battery. Those who heavily rely on Spotlight should not be paying attention to this side but those who rarely used it can change the settings.

  • Go to Settings > General > Spotlight Search and uncheck the items you don’t need to be indexed.

This is how you can Increase Battery Life on iOS 7 in a few simple steps.

Unlock Bootloader Of HTC Smartphones.

3
Unlock Bootloader Of HTC Smartphones.

Through this guide, you can Unlock Bootloader Of HTC Smartphones. Well its obvious that there are many HTC Smartphone owners out there, who also wants to Root their device and want to try Custom ROMs on it, but they just can’t because of the Locked Bootloader. So, they find the easiest way by paying to someone who knows how to unlock the bootloader. Well, I got good news for them, they don’t have to pay any more, because in this article I will show you how it is done.

But before starting you should remember that:

  • Unlocking bootloader will restore all the default settings and all or your installed apps will be removed.
  • Devices released from 9/2011 came with an unlocked bootloader, so if your device is older than 9/2011 then you should not try this tutorial.
  • If you Brick your phone during the process, we will not hold responsible for it.
  • HTC manufacturers will cost extra charges to re-lock the bootloader in case of a bricked or dead set.

Disclaimer:

The methods involved in flashing custom roms and rooting your phone is highly custom and may result in bricking your device, and has nothing to do with Google or the device manufacturers which is Samsung in our case. In case of any mishap we may not be held responsible. Follow these instructions to the letter to avoid any mishap or bricking. Make sure that whatever you do, you are doing it at your own responsibility.

Unlock Bootloader Of HTC Smartphones:

All read and done, let’s head towards the tutorial:

  • First of all Enable the USB Debugging mode, Go to settings > Developers options and tick the USB debugging mode option.
  • Then Visit HTCdev.com, login or create an account, don’t worry it’s free.

Screenshot_4

  • Then click On ‘Unlock Bootloader’ and click on ‘Get Started’
  • Select your device from the List, if you can’t see it, Highlight ‘All Other Supported Models’.

Screenshot_5

  • Confirm the Next Screen, and Accept the legal terms. Then click Proceed.
  • Then Remove and Re-insert the battery. But if your device battery is nonremovable, just turn it off and press and hold Volume Down + Power button to enter into bootloader/fastboot mode.

Screenshot_6

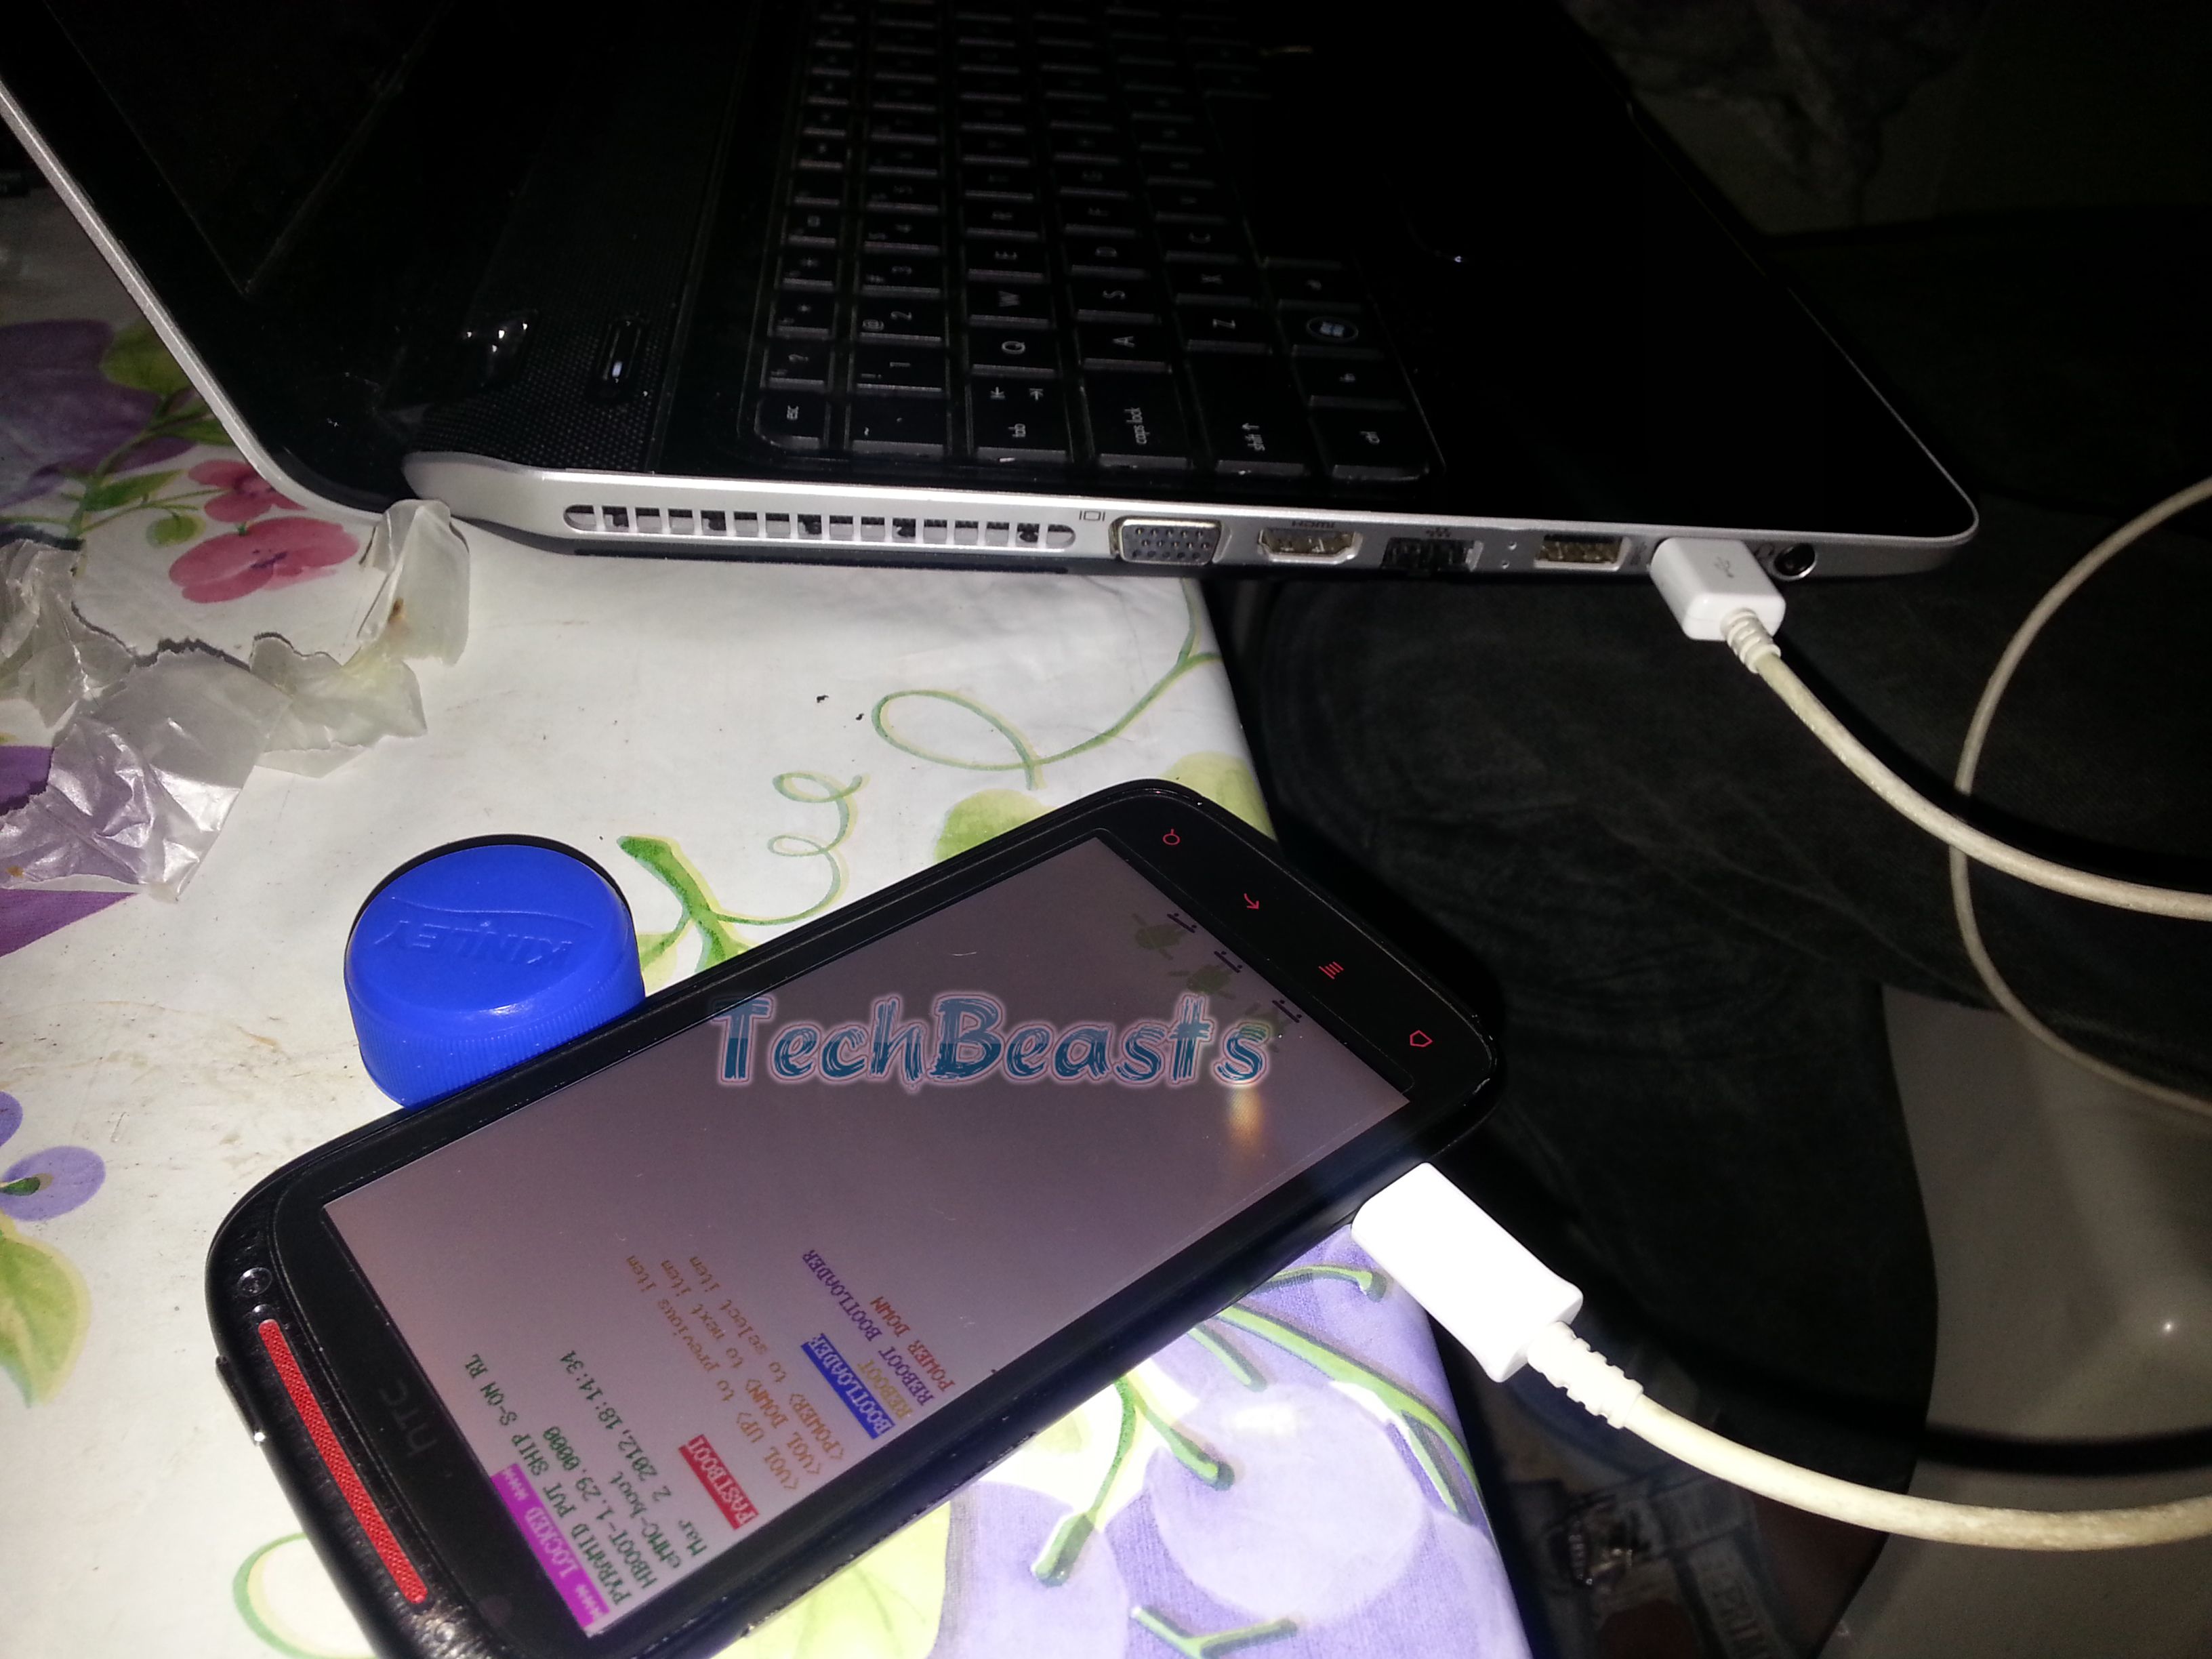
  • Turn on the phone while pressing the Power + Volume Down button to enter into Fastboot/Bootloader mode.

Screenshot_7

  • Highlight the bootloader.

20130927_230009

  • Connect the Device to PC using original Data cable.

20130927_230047

Now You will need these three files.

  • adb.exe
  • AdbWinApi.dll
  • fastboot.exe
  • The process at HTCdev is a bit complicated, so we have uploaded these files, you can download them from here.
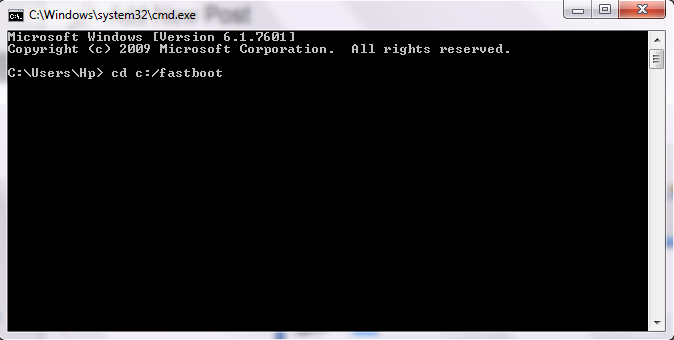
  • Now open Command Prompt. Just search for cmd in the start menu.

step6

  • Once you open the Command Prompt, type this after the username: cd c:/fastboot

Screenshot_8

  • Then type in the following command: fastboot oem get_identifier_token
  • After pressing enter, you will see a long string of text, Copy the text and paste it on this page.

Screenshot_9

  • Click submit, and they will send a file to your E-mail address.
  • Download ‘Unlock_code.bin’ from the message and save it into the Fastboot folder.
  • Now Type in the following command and press enter. fastboot flash unlocktoken Unlock_code.bin
  • Check your phone and read the instructions, press volume up to accept and power button to confirm.

20130927_233726


That’s it your HTC Bootloader must be unlocked by now, wait for device to restart. So, you can root your device and start doing Custom ROMs on it.

Root Samsung Galaxy Mega GT-I9200 and GT-I9205 [Guide]

33
Root Samsung Galaxy Mega GT-I9200 and GT-I9205 [Guide]

Heed the instructions below to Root Samsung Galaxy Mega GT-I9200 and GT-I9205. A few months ago Samsung unveiled its mid-range devices – the Samsung Galaxy Mega 5.8 and Galaxy Mega 6.3. Both of the devices were well received by the users and sported good features.

Let’s have an overview of the Galaxy Mega 6.3’s specs. The Samsung Galaxy Mega 6.3 GT-I9200 and GT-I9205 sports a 6.3-inch SC-LCD with 720 x 1280 pixels and 233 ppi. It has got a Snapdragon 400 Dual-Core processor clocked at 1.7 GHz, a RAM of 2 GB while the internal memory is 8/16 GB and microSD card slot is also available in the phone. An 8 MP camera at the back while a 1.9 MP camera is fixed on the front. Out of the box, it runs on Android 4.2.2 Jelly Bean.

Root Samsung Galaxy Mega

Coming back to the topic, you might have a Galaxy Mega 6.3 and looking to play with your device beyond the boundaries. This includes flashing mods, custom ROMs or installing the applications which require root, in order to do so you need root access on your device, following this need we will see today how we can gain root access on Galaxy Mega 6.3 GT-I9200 / I9205 running on Android 4.2.2.

Before we begin, here some precautions I would like you guys to take.

Root Samsung Galaxy Mega GT-I9200 and GT-I9205:

Please keep in mind that as soon as you root your device, you will void the warranty of your device, so everything you do, do it at your own risk.

Make sure that you have the battery charged over 60 % and have backed up all your important ContactsCall Logs & MessagesIt is highly recommended in case of any mishap or data loss to backup all your important data.

Things you need to download:

      1. Odin PC and install it. – Get it Here
      2. install Samsung USB Drivers – Get Here
      3. Download vcoreroot-v2.tar from HERE

How to Root:

    1. Put your phone in download mode. In order to do so turn it off by pressing power key for a few seconds or by pulling out the battery, wait for 30 seconds. Turn it on by pressing and holding Volume Down + Home Button + Power Key, as soon as it shows you the warning press Volume Up to continue. You are in the download mode now.
    2. Open Odin, you installed in step 1 above.
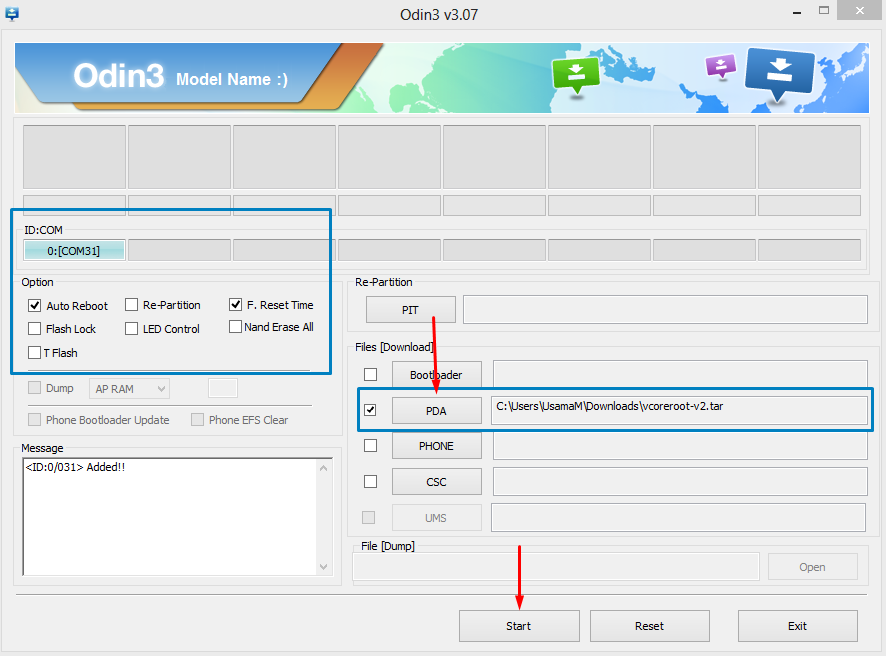
    3. Connect your Galaxy Mega 6.3 to your PC using the original data cable. The ID:COM box should now turn blue, and Odin shows “Added” in the log box below.
    4. Hit the PDA tab and select the downloaded vcoreroot-v2, it should be a .tar file.
    5. Make sure that the options selected in your Odin screen are exactly as shown below.
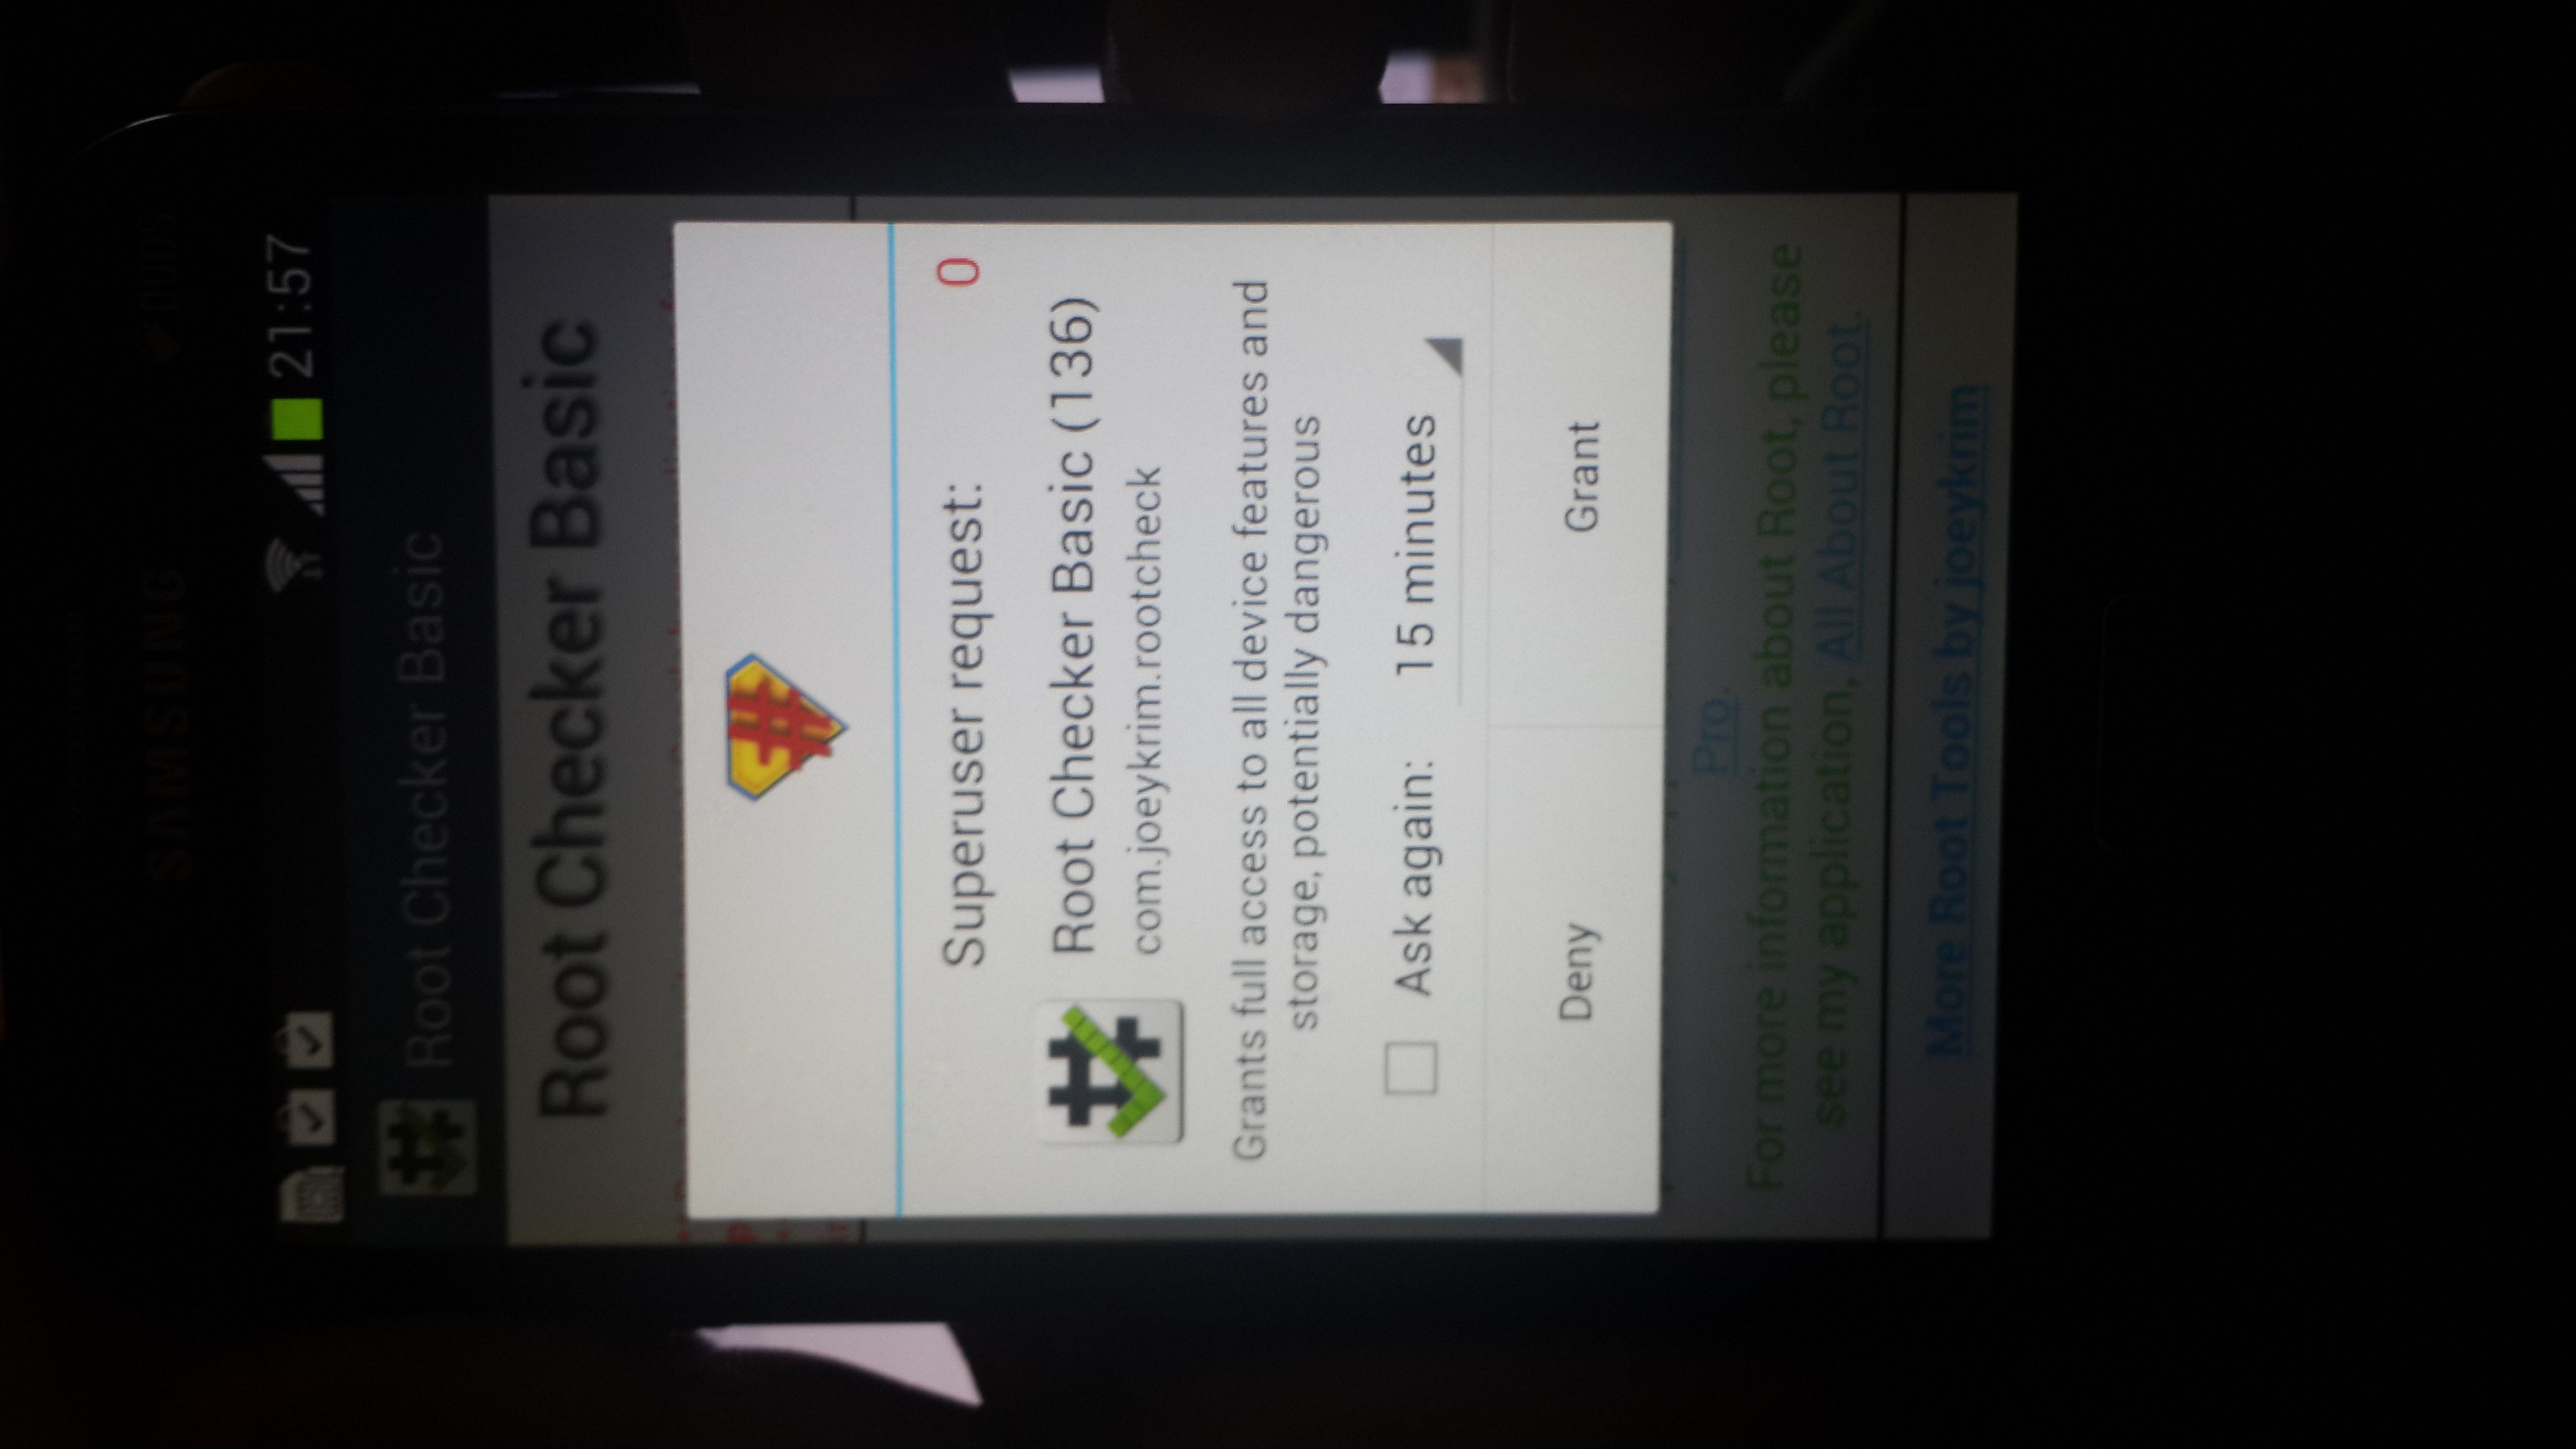
    6. Alright! hit start and let the process begin, as soon as your device restarts, you have the root access on your device. You can verify it by looking up for SuperSu app in your app drawer or either install Root Checker app from the play store and get it verified.

Mega 6.3 Root

Now wondering what to do with your rooted phone? 

Here’s the answer for you!

Rooting your phone gives you complete access over all the data which is apparently locked by the manufacturers. This includes removal of the factory restrictions and making changes to the internal system and the operating system. Gaining the root access gives you the privileges to install various applications to enhance the performance of your device, allows you to remove the built-in applications/programs, helps you to upgrade the battery life of your device & install the apps which require the root access for the proper functionality and modify your device in so many other ways e.g using mods and custom ROMs.

While rooting your phone, please keep it in mind that the Root Process isn’t official and has nothing to deal with Google Inc and the device manufacturer, which is Samsung in our case. Follow the guide carefully to prevent any damages to the device as the method is completely custom.

This is how you can Root Samsung Galaxy Mega GT-I9200 and GT-I9205. In case you face any problem, feel free to leave us a comment. We will try our best to help you out. Good Luck & Thank You!

How To Tell Which iPhone Model You Own?

0
How To Tell Which iPhone Model You Own?

Learn which iPhone Model you own? by using our tutorial below. It will help you find the right firmware and updates.

Though many people own an iPhone most of them don’t know what model they own. This is usually because every iPhone model looks the same. It is very easy to differentiate between iPhone basic models. But when it comes to tell the difference between, let’s say 5 & 5S, then they get confused.  That’s why we have created this post to help you find which iPhone Model You Own?

How To Tell Which iPhone Model You Own?:

The reason behind knowing your iPhone Model is to find the right firmware. So whenever you need to update your device manually or you need to download firmware.

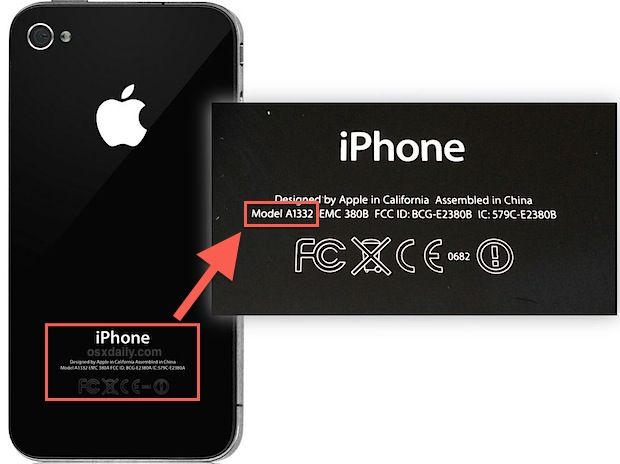
Find the Model number on the Case of iPhone.

  • Examine the back of your iPhone and look below the ‘iPhone’ badge.
which iPhone Model you own
How To Tell Which iPhone Model You Own?
  • Make note of where it says “Model Axxxx” and compare to the list below.
Screenshot_3
How To Tell Which iPhone Model You Own?

iPhone Model Number List:

  • A1428 – iPhone 5 GSM (standard GSM model in USA for AT&T, T-Mobile, etc)
  • A1429 – iPhone 5 GSM & CDMA (normal CDMA model in USA, Verizon, Sprint, etc)
  • A1442 – iPhone 5 CDMA China
  • A1387 – iPhone 4S, CDMA & GSM
  • A1431 – iPhone 4S GSM China
  • A1349 – iPhone 4 CDMA
  • A1332 – iPhone 4 GSM
  • A1325 – iPhone 3GS China
  • A1303 – iPhone 3GS (GSM only)
  • A1324 – iPhone 3G China
  • A1241 – iPhone 3G (GSM only)
  • A1203 – iPhone (Original model, GSM only)

With the help of these models, you can easily differentiate the CDMA and GSM models. Using such numbers you can also find what firmware is for your iPhone.

Firmware Files

Finding Model Using iTunes.

You can use iTunes to find the Model of your iPhone, but iTunes won’t tell the Model number but it will tell you what iPhone it is, for example, iPhone 5, iPhone 4, iPhone 5S etc.

  •  Connect your iPhone to iTunes using Data cable.
  • Under the summary tab, you will find the iPhone model labeled clearly at the top.

If you want to find model number through iOS, then go to settings and about to find whatever you can.

How to Install CWM Recovery and Root Samsung Galaxy Note 3 [All Versions] [Guide]

8
How to Install CWM Recovery and Root Samsung Galaxy Note 3 [All Versions] [Guide]

Install CWM Recovery and Root Samsung Galaxy Note 3: Have you got your Galaxy Note 3? Well, you might have not got your hands on Samsung’s Latest Flagship – the Galaxy Note 3 but the guys over XDA developers have gained the root access on the Galaxy Note 3 SM-N900 and other versions including N9005, N9006, N900t, N900S. 

Root Samsung Galaxy Note 3

Samsung has just announced the Galaxy Note 3 recently at IFA event held in Berlin on 4th of September, 2013. It’s just 2 days before at the time of writing this post that the phone became available in the markets and it is much appreciable that the Xda-Developers community was fast enough. In case you don’t know, let’s have a recap on Galaxy Note 3’s specs and features.

Samsung Galaxy Note 3:

Well, the device sports a 5.7-inch Full HD Super AMOLED display having 386 ppi and 1920 x 1080 pixels resolution. Under the hood, it has got an Octa-Core processor based on Samsung’s Exynos 5 Octa Chipset and clocked at 1.9 GHz with ARM Mali – T628Mp6 GPU or Snapdragon 800 Quad Core chipset clocked at 2.3 GHz with Adreno 330 GPU.

A RAM of 3GB is also placed in the phone, while a 13 MP camera at the back and 2 MP camera at the front are fixed in. The device is powered up with 3200 mAh battery and comes with 32 / 64 GB internal storage and also has an external SdCard slot. Out of the box, the Galaxy Note 3 runs on Android 4.3 Jelly Bean. Check out our post HERE to know more about the Samsung Galaxy Note 3.

Back to the topic, Rooting the phone has always been useful when it comes to utilizing your phone beyond the boundaries. Here some precautions, that I would like you to take before you begin with the rooting process.

Important Note:

***Rooting Samsung Galaxy Note 3 will permanently void its warranty, it is not possible yet to restore the warranty by using any method/app because of Samsung’s new security system ”Samsung Knox”. Make sure that you do it at your own risk.***

Make sure that you have the battery charged over 60 % and have backed up all your important ContactsCall Logs MessagesIt is highly recommended in case of any mishap or data loss to backup all your important data.

Things you need to download:

  1. Download Odin PC and install it. – Get it Here
  2. Install Samsung USB Drivers – Get Here
  3. CWM Recovery for SM-N900 – Get it Here [N900]
  4. If you have a different model, download the recovery from Here
  5. Download the latest SuperSu.zip – Get it Here

How to install ClockworkMod recovery:

    1. Put your phone in download mode. In order to do so turn it off by pressing power key for a few seconds or by pulling out the battery, wait for 30 seconds. Turn it on by pressing and holding Volume Down + Home Button + Power Key, as soon as it shows you the warning press Volume Up to continue. You are in the download mode now.
    2. Open Odin, you installed in step 1 above.
    3. Connect your Galaxy Note 3 to your PC using the original data cable. The ID:COM box should now turn blue, and Odin shows ”Added” in the log box below.
    4. Hit the PDA tab and select the downloaded CWM Recovery file, it should be a .tar file.
    5. Make sure that the options selected in your Odin screen are exactly as shown below.
    6. odin_note3
    7. Alright! hit start and let the process begin, as soon as your device restarts, you can check the recovery by booting into it. In order to do so, turn off your device and then turn it on by pressing and holding Volume Up + Home Button + Power Key simultaneously, your phone should now boot into the ClockworkMod recovery.

How to root Samsung Galaxy Note 3 SM – N900/N9005:

    1. Place the downloaded SuperSu.zip file on your phone’s external SdCard. 
    2. Boot into the recovery mode. In order to do so, turn off your device and then turn it on by pressing and holding Volume Up + Home Button + Power Key simultaneously, your phone should now boot into the ClockworkMod recovery.
    3. You can move between the options by using volume up and down keys, to make a selection press home button or power key.
    4. Select install zip > choose zip and then select the SuperSu.zip file you placed on the external SdCard.
    5. Let it flash the SuperSu.zip, as soon as it ends, restart your device.
    6. Congrats! Now you have rooted your phone and already installed CWM recovery. Find the SuperSu.zip application in your applications.

Now wondering what to do with your rooted phone? 

Here’s the answer for you!

Rooting your phone gives you complete access over all the data which is apparently locked by the manufacturers. This includes removal of the factory restrictions and making changes to the internal system and the operating system. Gaining the root access gives you the privileges to install various applications to enhance the performance of your device, allows you to remove the built-in applications/programs, helps you to upgrade the battery life of your device & install the apps which require the root access for the proper functionality and modify your device in so many other ways e.g using mods and custom ROMs.

While rooting your phone, please keep it in mind that the Root Process isn’t official and has nothing to deal with Google Inc and the device manufacturer, which is Samsung in our case. Follow the guide carefully to prevent any damages to the device as the method is completely custom.

Credits:

Chenglu for CWM Recovery

Chainfire for SuperSu.zip

That’s All! In case you face any issues, or need any assistance feel free to leave us a comment, we will try our best to sort it out. Thank You All!

Root HTC Sensation XE on Android 4.0.3 Official Firmware.

35
Root HTC Sensation XE on Android 4.0.3 Official Firmware.

Rooting your device allows you to install Custom Recoveries and Custom ROMs on it. Rooting is not a very difficult process, but with a little bit of negligence, your device might go brick or dead. In this article, we will show you how to root HTC Sensation XE on Android 4.0.3 Official Firmware. It’s a completely different process than usual so please pay more attention.

Root HTC Sensation XE

Before we begin, I would like you guys to take some precautions.

Please keep in mind that as soon as you root your device, you will void the warranty of your device, so everything you do, do it at your own risk.

  • Make sure that you have the battery charged over 60 % and have backed up all your important ContactsCall Logs & MessagesIt is highly recommended in case of any mishap or data loss to back up all your important data.
  • Enable USB Debugging mode from Settings > Developers option.
  • Disable All security programs.

Download the Following Files:

Super SU.

CWM Touch Recovery.

HTC All in One Root Toolkit.

How To Root HTC Sensation XE on Android 4.0.3 Official Firmware.

    • Connect Sensation XE with PC,  copy and paste the Super Su.zip file to the root of your SD card.
    • Extract the All in one root toolkit and run the One.exe.
    • Now make sure that the Bootloader is unlocked, otherwise, Visit htcdev.com to unlock the bootloader.
    • Run the One.exe file and click ‘install HTC Drivers’  and ignore all the pop-ups.

Screenshot_1

    • After that rename, the recovery-clockwork-touch-5.8.0.9-pyramid.img to CWM5827.img and copy the CWM5827.img to HTC One X toolkit folder/Data folder/recoveries and replace with the one inside.
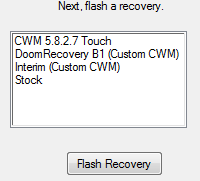
    • Click CWM 5.8.2.7 in the Toolkit click Flash Recovery and wait for it to install.

Screenshot_2

    • Now disconnect the phone and Boot into Bootloader. First Turn Off the Phone, take out the battery wait for 5-seconds, re-insert the battery and Press and Hold Volume Down + Power Button together until you see some text on-screen.
    • Select Recovery and Select ‘install zip from sd card’, choose the Super SU.zip file and wait for the installation to finish.
    • Go back and select ‘Reboot System now’.

That’s it, This is how you can Root HTC Sensation XE on Android 4.0.3 Official Firmware.

Google Nexus 5 Deals on Contract.

0
Google Nexus 5 Deals on Contract.

Before today, we all know that Nexus 5 will be available for $299, something that has stopped the Google servers last time in UK when Nexus 4 was released. Well the price is sort of less but it all depends upon what the will offer in Nexus 5. So for all the users who wants to buy a brand new Cheap but real powerful smart phone, Nexus 5 is a great choice. But the Question is, Can it become more cheaper than this?

New-Nexus-51

Well it is possible, but with a little bit of restrictions, you see Verizon will sure to offer Nexus 5 on contract and the starting price will be only $100. Other Carriers like T-Mobile, Sprint will also be offering Nexus 5 with such low price, so it’s all up to you to decide which carrier you like the most to go after. This is a great combination for all the users, A perfect Nexus 5 under warranty + a powerful carrier connection with only $100.

Now $100 is not a thing that can be handled by anyone, it’s not that difficult to save $100 and other payment is in installation for 1-2 years, so you won’t have any trouble paying it. furthermore you can buy Nexus 5 accessories and/or a beautiful case with the money left and complete the whole set in lesser time.

October 14 is the date then you should start collecting the money right now, to get the perfect Smartphone of this year as we all are hoping.

Install CWM Recovery & Root Samsung Galaxy Grand GT-I9082 on Android 4.1.2 & 4.2.2 [Guide]

85
Install CWM Recovery & Root Samsung Galaxy Grand GT-I9082 on Android 4.1.2 & 4.2.2 [Guide]

Samsung’s Galaxy Grand Duos (GT-I9082) sports 5-inch Super AMOLED display having 187 ppi and resolution of 480 x 800 pixels. The device is powered up with a Cortex A-9 Dual Core chipset clocked at 1.2 GHz and a RAM of 1GB is also placed under the hood. The device is good to play with when it comes to root required applications and installing custom roms and flashing mods. So, if you are looking to do so, you’ve spotted the right page. We’ll learn today how we can gain root access on Samsung Galaxy Grand Duos GT -I9082 running on Android 4.1.2 or Android 4.2.2 Jelly Bean.

Verified by myself – this method works flawlessly!

GRAND DUOS

Before we begin, I would like you guys to take some precautions.

While rooting your phone, please keep it in mind that the Root Process isn’t  official and has nothing to deal with Google Inc and the device manufacturer, which is Samsung in our case. Follow the guide carefully to prevent any damages to the device as the method is completely custom.

Install CWM Recovery & Root Samsung Galaxy Grand GT-I9082

Make sure that you have battery charged over 60 % and have backed up all your important ContactsCall Logs & Messages. It is highly recommended in case of any mishap or data loss to backup all your important data. Also make sure that you use the original data cable to connect to your PC, other cable will cause problems.

Things you need to download:

    1. Download Odin PC and install it. – Get it Here
    2. Download and install Samsung USB Drivers – Get Here
    3. Download the Philz Advanced Touch Recovery.tar.md5 file – Get it Here.
    4. For installing CM 12, ignore the above CWM and download this one: recovery-20141213-odin.tar
    5. Download the SuperSu.zip file – Get it Here.

 How to Install ClockworkMod Recovery on your Galaxy Grand:

  1. Boot your phone in the Download mode. In order to do so turn it off by pressing and holding the power key or by pulling out the battery for 30 seconds. Turn it on by pressing and holding Volume Down + Home Button + Power Key simultaneously. You should see a warning now, press Volume Up to continue.
  2. Galaxy-Grand-Download-Mode
  3. Your phone is in download mode now.
  4. Open ODIN, connect your phone to your PC using the original data cable which came inside the box.
  5. The ID:COM box in the top left corner should turn blue or yellow depending upon your ODIN version now.
  6. Select the PDA tab and select the downloaded Philz Touch Recovery.tar.md5 or the CWM recovery.tar  file here. Make sure that the selections in your ODIN are exactly as shown below.
  7. odin_explained
  8. Click start, it should take a few seconds while your phone restarts, as soon as it shows the ”PASS” status remove your phone from the PC and pull out the battery for a few seconds. Put it back and now turn it in booting into the recovery mode by pressing Volume Up + Home Button + Power Key.
  9.  And you have the CWM recovery installed on your Galaxy Grand Duos!

Now here’s how you can root your Galaxy Grand Duos:

      1. Place the downloaded SuperSu.zip.
      2. Now boot your phone into the recovery mode. In order to do so, press and hold the Volume Up + Home Button + Power Key simultaneously. Your phone should now boot into recovery mode.
      3. In recovery mode select “Install Zip>Install Zip from Sdcard”, and select the placed SuperSu.zip file and select yes after it.
      4. That’s all, it will take a very short time to flash SuperSu. After the process is done, reboot your device and find SuperSu installed in App Drawer.
        20131125_204537 20131125_215720

Now wondering what to do with your rooted phone? 

Here’s the answer for you!

Rooting your phone gives you complete access over all the data which is apparently locked by the manufacturers. This includes removal of the factory restrictions and making changes to the internal system and the operating system. Gaining the root access gives you the privileges to install various applications to enhance the performance of your device, allows you to remove the built-in applications/programs, helps you to upgrade the battery life of your device & install the apps which require the root access for the proper functionality and modify your device in so many other ways e.g using mods and custom ROMs.

How to keep Root after OTA Updates

The OTA updates rolled out by the manufacturers wipe the root access on your phone. In case you don’t know how you can restore the root access after OTA update, you’ll have to root your phone once again, but there is no need to do it as you can restore it using the OTA Rootkeeper App which is available in the Google Play Store. The app creates backup of your root and simply restores it after any OTA update.

That’s all. We hope that you find our guide helpful and easy to use. In case you got any problems, feel free to leave us a comment, we will try our best to sort it out. Thank You All!

Is it worth waiting for the Google Nexus 5?

0
Is it worth waiting for the Google Nexus 5?

LG’s Google Nexus 5 release date is drawing nearer and the gadget has been getting spilled over and over. While all the monster smartphone manufacturers are busy getting their flagship smartphones, Google has yet to think of the following model of the Google Nexus, that is supposed to be the Google Nexus 5.

Where LG has raised G2, Samsung has brought Galaxy S4 and Galaxy Note 3, Apple thought of iPhone 5S and 5C, HTC accompanied HTC One and now the One Max being supposed – It is easy for anybody to get confused while settling on a decision what gadget to sit tight for or what gadget to run with.

Is it worth waiting for the Google Nexus 5?:

Google Nexus 5


Software:

android_kitkat

The Nexus 5 is expected to be built by LG the same manufacturer who built the Nexus 4. Nexus 5 will definitely be a big move from the Nexus 4. One of the top reasons for this device to be in the spotlight is to leave the factory doors having Android 4.4 KitKat installed in it.

This will be the first device to run on Android 4.4, so this is one of the worthy reason to wait for this device while all other devices will be running on Android 4.3, you can enjoy the KitKat on your device. The expected improvements in the Android 4.4 KitKat include:

  • Improved notification widgets
  • Gallery Visuals
  • New APIs for animations
  • Screen re-sizing (fragmentation)
  • Mira-cast updates
  • Optimization on other Android devices including older versions

Hardware:

As far as the hardware of the device is concerned the Nexus 5 is expected to sport a 5-inch Full HD Display having 441 ppi and 1920 x 1080 resolution. The device will be powered with Qualcomm’s Snapdragon 800 chipset (Quad Core) clocked at 2.3 GHz and Adreno 330 GPU, 2GB RAM.

The internal memory is expected to be 16  and 32 GB while no sd card slot will be available. The device will sport a 13-megapixel camera at the back and a 2-megapixel front-facing camera. Some reports claim that Nexus 5 will have a 3300 mAh battery under the hood.

Build Quality:

As far as the design of the gadget is concerned, the construct quality will be great, the gadget will be slim, lighter and delightful. From the asserted spilled photos, it would appear that that the Nexus 5 will get manufactured using an unexpected material in comparison to that of the Nexus 4. It would appear that a polycarbonate material.

nexus5-fcc

Price:

In particular, this gadget merits sitting tight for with regards to cost. The users will have the capacity to make it start from just $299, this will be the cheapest gadget having monster specifications packaged in a reasonable value bundle.

Release Date:

We expect Google to bring the Nexus 5 up sometime in the last week of October 2013.

NExus5-Leaked

Conclusion: 

Taking a gander at the specifications and the value, it is unquestionably worth sitting tight for the Google Nexus 5. While alternate devices like Samsung Galaxy Note 3, Galaxy S4, HTC One will be unreasonably hard for one to bear the cost of it will be easy to run with the Nexus 5. The gadget will also get all the software updates took off by Google as Google rolls out the updates faster than some other producer.

Stay tuned with us for more updates. Thank You All.

Download iOS 6.1 Firmware For iPhone, iPad And iPod Touch [ Final Links ]

1
Download iOS 6.1 Firmware For iPhone, iPad And iPod Touch [ Final Links ]

You can download iOS 6.1 Firmware For iPhone, iPad And iPod Touch from the following links below.

For those who don’t want to use iOS 7, since it has alot of bugs and people are complaining about many errors no need to worry you can easily downgrade your iOS device back to iOS 6.1.

We will soon post Downgrade tutorial for iOS 7. Today I collected iOS 6.1 Firmware Direct download links for all those who want to get rid of iOS 7. iOS 6.1 is last firmware that comes with a lot of improvements and it is more stable then iO7. iOS 6.1 come out a lot of fixed issues, like Siri, Apple id, facebook, and dialing.

The biggest update in iOS 6.1 was to support additional LTE carriers worldwide. Following are the links of iOS 6.1 Firmware IPSW files. Please select the firmware which is compatible with your device.

iOS 6.1 Firmware

Download iOS 6.1 Firmware IPSW:

iOS 6.1 Firmware Update:

This update contains improvements and bug fixes, including: LTE support for more carriers (complete list of supported carriers at www.apple.com/iphone/LTE/).
Purchase movie tickets through Fandango with Siri (USA only).
iTunes Match subscribers can now download individual songs from iCloud New button to reset the Advertising Identifier.
Apple

You might want to see these Tutorials:

Nexus 7, 6 Potential Problems and Their Solutions.

0
Nexus 7, 6 Potential Problems and Their Solutions.

These are the Nexus 7, 6 Potential Problems and Their Solutions. We have found a number of workarounds that will help you fix all the issues.

When I begin hearing news about Nexus 7 and its issues, I thought to try it out. In this way, I persuaded one regarding my companions to purchase a Nexus 7, So I can attempt diverse analyses on it. Yeah, I realize I am a virtuoso, the main thing I found about it was the slack after I refreshed it to Android 4.2.2. The second was the Response of touchscreen and the third was glinting of Screen.

Nexus 7, 6 Potential Problems

Nexus 7, 6 Potential Problems and Their Solutions:

As I endeavored to discover their answers, I found a lot more alongside them. Along these lines, I thought why not I share them with you individuals, In this Article, I will reveal to you 6 Potential issues about Nexus 7 and their answers too.

Let’s get to the Problems and their solutions:

First: Bad Performance After Android 4.2 Update:

What I found was, that if your device is rooted and you did the Update, many of the files won’t merge because Super Su is not giving them permission, so in order to get the full result, here is the solution.

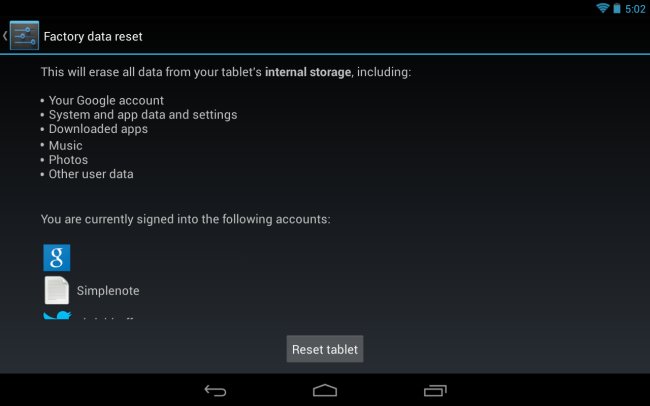
After the update, Open Settings and perform a Factory Reset. After the reset, even if your device is rooted the performance will be great.
nexus-7-factory-reset

Second: Touchscreen responsiveness Problem.

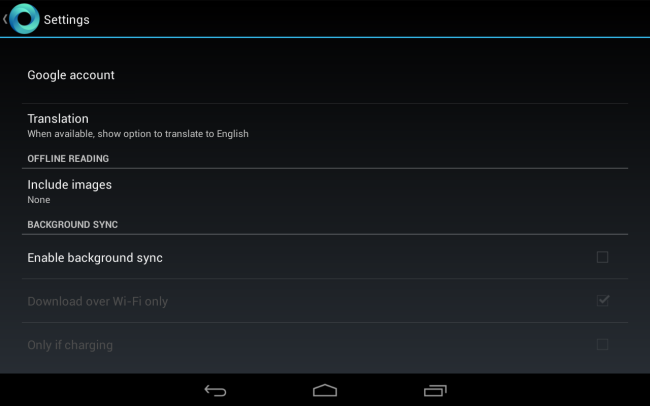
If your Nexus 7 is doing such a thing, just go into settings and disable the Google currents from Syncing on Background. Open Settings, Google Account and un-tick the Enable Background Sync.

google-currents-background-sync


Third: Tablet Won’t Turn On.

On the off chance that you are having such an issue, or your gadget is totally solidified the main arrangement is to haul out the battery and re-embed it. However, since it’s impractical in Nexus 7, so we’ll do it the other way. Press the power catch for Exact 30 seconds, regardless of whether you have Press the power catch for quite a while, take a stab at squeezing it again for 30 seconds it will work.

Screenshot_8

Fourth: Screen separation:

Well, I don’t know the exact cause but you can try this XDA guide for the fixing process.\

Fifth: Screen Flicker:

If your Nexus 7 screen gleams at low light conditions. Particularly at 10% battery and WI-Fi on you can see the screen flashing on the off chance that you open your program. On the off chance that you are encountering such an issue. Do the accompanying arrangement.

Open Screen settings, Open Wi-fi, tap Menu, tap advance, and un-check WI-Fi enhancement.

android-advanced-wi-fi-settings

Sixth: Washed out Colors After a video.

The Nexus 7 utilizes “NVIDIA PRISM Display Technology” to diminish. The backdrop illumination and increment difference and shading circumstance while you watch recordings. In the wake of viewing a Video, you may find that hues are somewhat washed out and dyed. That is because NVIDIA PRISM Display Technology reestablishes the default settings yet some of the time it doesn’t.

  • Temporarily solution is to Press the power button to turn the screen off and press it again to turn it on.
  • Permanent Solution is to turn off the Nvidia Prism, but it will also decrease battery life, while you are watching videos.

If you had any other problem, please share with us in the Comment section.

Samsung Galaxy S4 HD Wallpapers – Download Here

0
Samsung Galaxy S4 HD Wallpapers – Download Here

Download the latest Samsung Galaxy S4 HD Wallpapers. Moreover, we have included some of the stock Wallpapers.

Samsung’s flagship smartphone Galaxy S4 sports a 5.0 – inch Full HD Super AMOLED display having 441 ppi and 1080 x 1920 resolution. You can imagine the awesomeness of the GS4’s display, and you might be owning one.

I’ve compiled up some HD wallpapers especially for the Galaxy S4 that I found over the web. I’ve also attached the original wallpapers of the Galaxy S4, if you are looking for those, you may download from the attached links below.

Galaxy S4 Original Wallpapers in Full HD Resolution: Click on the image and it should take you to the download page.

Samsung Galaxy S4 Stock Wallpapers:

Following are the stock Wallpapers for Samsung Galaxy S4. Right-Click on the following Wallpaper and Click Save Images As.

fhd_06 fhd_02 Samsung Galaxy S4 HD Wallpapers fhd_05 fhd_08 fhd_03 fhd_01

Samsung Galaxy S4 HD Wallpapers:

Here are some other Galaxy S4 Compatible wallpapers. You can download these wallpapers for other smartphones as well as you can adjust these according to your phone’s screen.

Download Link:


Download all these wallpapers HERE.