Home Blog Page 511

How to fix the iPhone 5S Touch ID problem

0
How to fix the iPhone 5S Touch ID problem

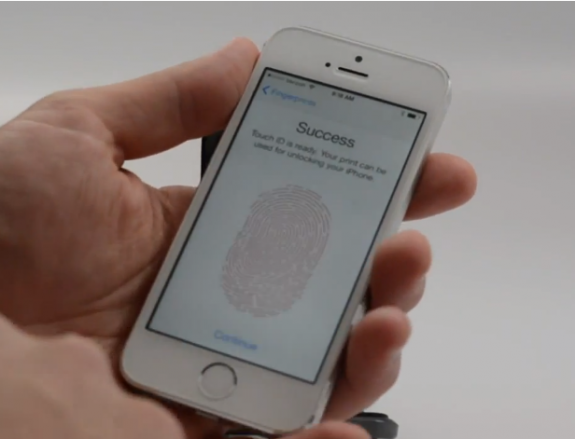
The Apple iPhone 5S came with an embedded fingerprint scanner but ever since it had its first hands-on review, people have been reporting about the security holes that the operating system and the phone has. A less rate of success attempts for the fingerprint touch ID have been reported by many people in the tech support forums.

A thread on the Apple support forums mentioned the same problem and Apple suggests setting it up for the first time. Allegedly, Apple employees who work at the company’s Genius Bar support desks, are encouraging users to place the center of their finger on the device for the fingerprint reader’s first scan. After that they should lift their finger, then place their finger up at an angle slightly for the device’s second setup scan. To quote,

“For phase one, start by putting the meat of the finger being registered on the button for the first picture taken. Then put the finger back down and before it hits the button, roll it up on the left edge, at about a 45 degree angle, and then put it on the button, then repeat by rolling up the right edge at a 45 degree angle. Then tip up the front of the finger and place it down (not too angled up). Then start the 4 step cycle again until it states it is now ready for you to adjust your grip. At this point, put your finger down at the angle you will attempt to unlock the phone. Then move it a little here and there on the button, until it says you have success. I have had 20 straight successes, and counting.”

Buy-Apps-touch-Touch-ID-575x439

I know that it sounds much fatigue but once you’ve had it set up, you’ll learn that it was good you did it. Although this doesn’t completely fix the problem but it does cut it down to 95% successful attempts.

We hope this will lessen your frustration that came with this Touch ID problem.

How to: Make Siri more personable in iOS 7

0
How to: Make Siri more personable in iOS 7

ios7_siri_icon-150x150It was in 2011 that Apple introduced Siri to the world. Siri been helping iOS users schedule their meetings, find places to eat, navigate them to the nearest coffee shop and remind them to get their tasks done on time. However, you can make her more personable by telling her where you work and live, who your family is and how to pronounce your name.

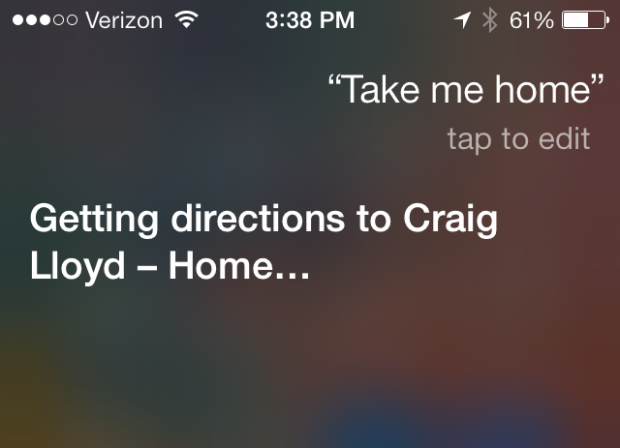
This makes it an amazing assistant. Once you’ve done this, you can give her very simple commands like “Call my mom”, “take me home” or “navigate me home”. Isn’t it more easier than saying “navigate me to [your home location]”. Btw, you will only do that if you are in the middle of nowhere. This is how you can get Siri to give you a catered service.

Tell Siri About Your Family

You can set up contacts in your phone so that it will know who your mom and dad are. You can do this manually or simply ask Siri to do it for you. After that, you tell Siri who your mom dad and siblings are, and if you’re married, you can tell her who your wife/husband is. For that you need to give her commands like “Zaheer is my dad” or if you’re a person of my type and have your dad’s name saved as dad, you tell Siri “Dad is my dad” which is weird I know, but you still need to tell Siri as its just a computer after all. For your partner you’ll tell Siri “[your wife/husband’s name] is my wife/husband” and likewise for your siblings and other contacts that you have family relationships with.

After this is done, you can give Siri commands like “Call my husband” or “Text dad” or “Call mom”. This makes it easier to text or call the people you would mostly talk to.

2013-10-14-15.15.19-169x300

Tell Siri about Your Home & Work Location

The next thing you could do is tell Siri where you live and work so that whenever you’re lost who could ask Siri to navigate you to your home place or you could set a location-based task. Sadly, there is no voice command that you could give Siri to do that for you so you’ll have to do it manually by going to your contacts and add the location details in your own profile there in the home and work fields.

This will let you give Siri commands like “Remind me to check my mail when I get back home” or “Remind me to call mom when I reach my work place”. Now this is based on your GPS. When your phone finds out that you have reached home through your current location that the GPS will tell your phone, Siri will remind you to check your mail. Great, no?

2013-10-14-15.38.43-620x448

Tell Siri How To Pronounce Your Name

Siri has a very good pronunciation of the English words as it has a pretty good grasp on English language and will call your name the right way. But not everybody has a common name. Plus, its not necessary that you have an English name. You might be a person like me and won’t get Siri call your name the right way the first time.

All you need to do is tell Siri “Thats not how my name is pronounced”. After this Siri will ask you how do you pronounce your name and you tell her how is it pronounced. Then, she calls your name in three different ways and lets you choose the best suiting pronunciation.

This is how you can personalise Siri to act as if she knows all about you. We hope you liked it. Let us know if you did 🙂

Download HD Wallpapers for your iPhone or Android Smartphone

0
Download HD Wallpapers for your iPhone or Android Smartphone

While you own an iPhone or an Android powered smartphone such as  Samsung’s Galaxy series or HTC’s phones, you may be looking to check out the display quality of your device, and to do so finding some HD wallpapers that sit perfect on your device’s display. Finding HD wallpapers, that exactly match your iPhone or Android Smartphone’s display is quite hard, specially when it comes to the dimensions of the wallpapers. I’ve compiled up a number of HD wallpapers, go ahead, download these and check out how perfect they fit on your device’s display.

These wallpapers show off cities, nature, wildlife and some of these show my favorite anime character naruto and sasuki.. Here you go.

IMG_0011 IMG_0012 IMG_0017 IMG_0013 IMG_0014 IMG_0015 IMG_0016 IMG_0023 IMG_0024 IMG_0020 IMG_0021 IMG_0022 IMG_0019 IMG_0018 IMG_0025 IMG_0026 IMG_0027 IMG_0032 IMG_0037 IMG_0036 IMG_0031 IMG_0030 IMG_0035 IMG_0034 IMG_0029 IMG_0028 IMG_0033 IMG_0038 IMG_0039 IMG_0040 IMG_0041 IMG_0042 IMG_0047 IMG_0046 IMG_0045 IMG_0044 IMG_0043 IMG_0048 IMG_0049 IMG_0050 IMG_0051 IMG_0052 IMG_0053 IMG_0058 IMG_0059 IMG_0054 IMG_0055 IMG_0060 IMG_0061 IMG_0056 IMG_0057 IMG_0062 IMG_0063 IMG_0064 IMG_0065 IMG_0066 IMG_0067 IMG_0072 IMG_0071 IMG_0070 IMG_0068 IMG_0069 IMG_0078 IMG_0079 IMG_0080 IMG_0081 IMG_0082 IMG_0087 IMG_0086 IMG_0085 IMG_0084 IMG_0083 IMG_0088 IMG_0089 IMG_0090 IMG_0093 IMG_0094 IMG_0095 IMG_0091 IMG_0092 IMG_0097 IMG_0096 IMG_0101 IMG_0102 IMG_0100 IMG_0099 IMG_0098 IMG_0108 IMG_0185 IMG_0186 IMG_0187 IMG_0188 IMG_0193 IMG_0192 IMG_0191 IMG_0190 IMG_0189 IMG_0264 IMG_0259 IMG_0254 IMG_0255 IMG_0256 IMG_0261 IMG_0260 IMG_0265 IMG_0266 IMG_0267 IMG_0257 IMG_0258 IMG_0263 IMG_0262 IMG_0268 IMG_0229 IMG_0224 IMG_0225 IMG_0226 IMG_0231 IMG_0230 IMG_0232 IMG_0227 IMG_0228 IMG_0233 IMG_0238 IMG_0237 IMG_0242 IMG_0243 IMG_0236 IMG_0235 IMG_0240 IMG_0239 IMG_0234 IMG_0241 IMG_0194 IMG_0195 IMG_0196 IMG_0197 IMG_0198 IMG_0203 IMG_0202 IMG_0207 IMG_0208 IMG_0213 IMG_0212 IMG_0211 IMG_0210 IMG_0209 IMG_0204 IMG_0205 IMG_0206 IMG_0200 IMG_0201 IMG_0199 IMG_0214 IMG_0215 IMG_0217 IMG_0223 IMG_0218 IMG_0222 IMG_0221 IMG_0220 IMG_0219 IMG_0103 IMG_0104 IMG_0105 IMG_0106 IMG_0107


You can download these wallpapers by opening the images above and saving them to your computer, or download the whole folder – Download HERE.

Install ClockworkMod Recovery on Galaxy Tab 2 7.0.

0
Install ClockworkMod Recovery on Galaxy Tab 2 7.0.

If you happen to own a Samsung Galaxy Tab 2 and wanted to install Custom ROMs on it, you are on the exact right spot. Because we will tell you what you need for Tab 2 to install custom ROMs on it and, why is it necessary? ClockworkMod recovery let’s you to install custom roms on your device, something that can also be done using a Stock Recovery, but stock recovery can only install Signed Zip files not any other, the main reason why CWM recovery is needed to install custom roms on your device.

samsGALAXYtab2_7_

In this Article, we will tell you how to Install ClockworkMod Recovery on Galaxy Tab 2 7.0. But before we begin make sure to Backup all your data placed on your phone’s internal storage, contactscall logs and messages. This is necessary as if something go wrong during the process, so you will be able to restore it afterwards.

Downloads Required:

Important things:

  • Make sure that battery level is at 85% or more.
  • This tutorial is only for Samsung Galaxy Tab 2 7.0.

How To Install ClockworkMod Recovery on Galaxy Tab 2 7.0.

Odin-Flash GuideInstallation Process:


  • First of all download the required file and extract it anywhere on PC.
  • Then downland Odin.
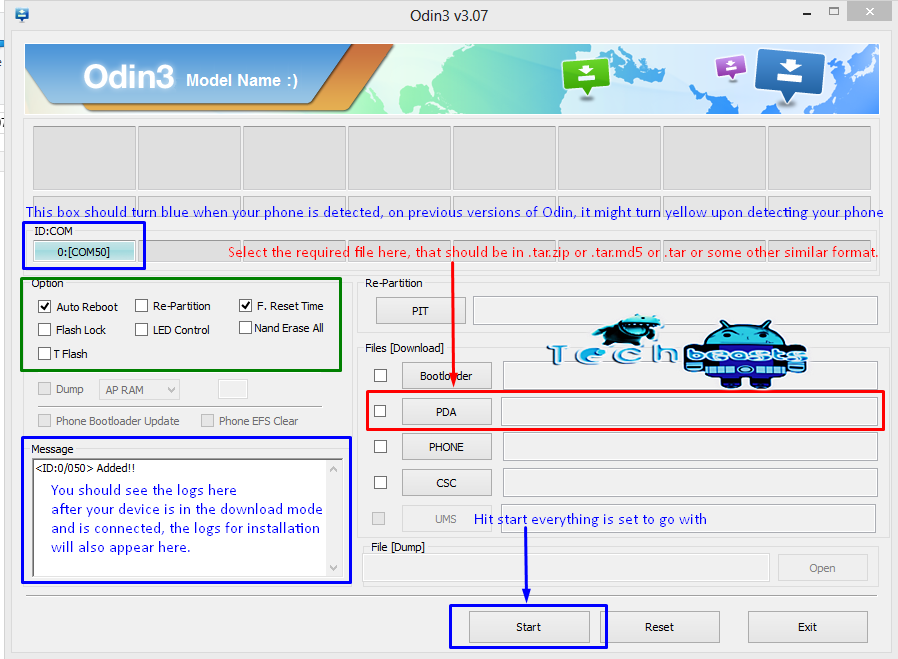
  • Open Odin in PC and select the option shown in picture above.
  • Turn Off your device and Turn it On while pressing Power + Volume Down button, so your device can start in Download mode.
  • Connect your device with PC.
  • Once the drivers are installed one of the Odin’s port will turn either Yellow or Blue.
  • Click on PDA and Select the .tar file from the downloaded files.
  • Press ‘Start’ and wait for the process to finish.
  • Once the process is complete, you will get the ‘Pass’ Message, and on device colour you will see ‘Done’ text.

Now Turn Off your device again, and this time Press and Hold Volume Up + Power buttons to go into recovery mode. If your device successfully does this then everything  went okay.

Android 4.4 may bring always-listening Google Now

0
Android 4.4 may bring always-listening Google Now

The first ever phone to feature an always-listening touchless Google Now feature was the Google-owned Motorola- the Moto X. It was about time Google played an exciting role and gain the attention of tech freaks. It has been rumored that Google has planned to push this feature along the Android 4.4 KitKat update.

Android-4.4-may-bring-always-listening-Google-Now

The Moto X features the specialized X8 chipset with the voice companion core and that might be the reason as to why the alway-listening Google Now feature doesn’t drain out all the battery, but there may be a solution for that problem on some other devices. The X8 chipset is a modified Snapdragon S4 Pro with a stronger GPU and two companion cores by Qualcomm. Qualcomm’s top-of-the-line Snapdragon 800 has Voice Activation built-in in the chipset. Logically, this means that any Snapdragon 800 device will be able to gear an ultra-low power mode to handle the always-listening voice commands. But, we are still not sure if this feature will be compatible with all the Android 4.4 devices.

As the functionality is already supported by the Snapdragon 800, it might be possible that Google pushes out an update the Play Store to add the functionality to any device with that chipset running Android 4.1 or higher. It may not happen now, but it may be possible a little while after the Android 4.4 update. However, it still is an assumption.

There has been evidence found both in the Google Search APK  and with the guys at TuttoAndroid. They reported that the “OK Google Now” command did work from the homescreen in their testing of Android 4.4 (although they didn’t say if it worked when the device was in sleep mode.

As the rumors suggest, the announcement of the Nexus 5 and Android 4.4 coulb be made any day now, so we should be seeing the real picture of the story very soon.

HTC One Max: A max-ed out HTC One (hands-on)

1
HTC One Max: A max-ed out HTC One (hands-on)

440x330-htc-one-max-mains

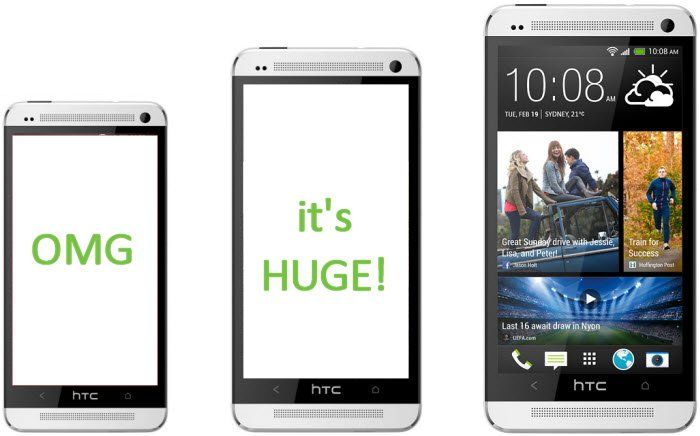
HTC One has already been named as the “Best Phone” of the year 2013. It has also been the most favorite smartphone for most of us for a long time, at least before Samsung and Apple snatched this charm away from HTC. HTC One was a pretty handsome smartphone with everything perfectly fitting in the pieces. All it did not have was a very big display. Don’t forget I said a “very” big display, like don’t start doubting its 4.7″ display. But, as it was not as big to roll itself in the phablet category, HTC planned to stretch it a bit.

HTC One Max, as the name suggests, is nothing but a max-ed out HTC One. Now, was that sentence too judgmental to be put into a review post? Well, lets see.. HTC comes in at a beefy 5.9-inches on the diagonal, blurring the line between what we’d call a phone or a tablet.

Design and build:

Its a 5.9-inch displayed device  that measures 163mm in length and 82mm in width and weighs 220g that makes it noticeable in the pocket.

If you’re a working citizen and want a phone for your everyday use and works perfectly as an Android device, the 4.7 inch HTC One and the 4.3 inch HTC One Mini will rather be a better choice than this huge 5.9 inch HTC One Max.

As for the design, it looks exactly as the HTC One as if they were siblings or something. The grey metal back, the front facing dual BoomSound speakers, the plastic edging, the brushed metal casing. What is different is that the back is removable. And just how innocent of you to think that if the back was removable, the battery could too be removed. Well, here  is a blow to your innocency, the battery is non-removable as HTC plans to stick to its non-removable battery idea just like an egoistic aries (take no offense please) who will not run counter to what he has decided once. But looks like HTC finally realized that people like me who will die but get a phone that is not by HTC also want a larger space for their data. I am sick of going through sessions of transferring data from my HTC  to any other storage location (and that is my biggest grudge against HTC). The removable back gives access to the microSD card-slot that lets you expand the native 16GB/32GB storage. Its power button is now placed on its right edge, alongside its volume control buttons. With this particular placement, we are surprised that it’s better accessible than what we had on the original HTC One. Plus, it has a better response too. However, they have left the IR blaster in the same location as before.

On the rear, the same ultra-pixel camera has been fit, but it has already shown a no better result than its competition on the HTC One so we are not hopeful in testing it again on the HTC One Max. But, yeah I could I forget- being judgmental is just not what we can do here. We’ll have to wait for the users to test it and comment on it.

440x330-htc-one-max-mains-4

Fingerprint Scanner:

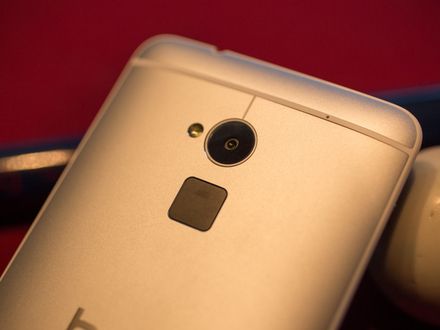
Something that is completely new to HTC devices and we haven’t seen before on any device by HTC is a fingerprint scanner placed a little below the camera at the back of the HTC One Max. It has not been long since Apple introduced a fingerprint sensor embedded in the home button on the iPhone 5S. However, the one on HTC One Max has a different functionality.

Swiping the finger when the device is locked will unlock the device, however, but it has more.. You can set action response to the swipe of three different fingers. Like you can launch apps by swiping your finger in the fingerprint sensor. For instance, swiping your index might launch the camera app. This is actually cool now!

The placing it has been given is, to me at least, is the best it could get. Your index finger will naturally rest on the back of the phone at the location where it has been placed. Once you have managed reaching it, it will start recognizing your fingerprint impressions.
440x330-htc-one-max-mains-3


Display:

The 5.9″ display packs 1920×1080-pixel resolution. Sadly, the HTC One that had a 4.7″ display had the same number of pixels which makes the HTC One Max slightly less sharp. The max has a pixel density of 373 pixels per inch, undercutting its smaller sibling’s 446ppi.

The difference you see in the numbers is not at all noticeable  in reality. The display is also very bright and has excellent colours. The Max’s handling of colour, together with its sheer size makes it an excellent choice for those of you wanting to watch movies and play glossy games on the go.

htc-one-max-home  htc-one-max-blinkfeed-1

Processor:

The Max is running on a Qualcomm Snapdragon 600 processor clocked at 1.7GHz, which is the same processor found inside the One. That’s a real lag and it could be a problem for HTC. The Note 3 is clearly the Max’s direct competitor and it really needs to ensure that it’s giving Samsung’s phone a proper run for its money.

Anyway, it manages to provide a very swift experience overall though, with no delay when swiping around the homescreens or opening apps and menus. The camera launches with no real lag and it disappoint you if you are a game freak- it runs perfect with heavy games.

htc-one-max-asphalt

Camera:

It features the same 4-megapixel camera as did the HTC One. Although it has no match with the 20.7 MP camera of Sony Xperia Z, yet it has a better pixel density which lets it capture in low-light and more-light giving really cool camera results. The camera results that we could find were amazing.

There’s a minimum of image noise too, and plenty of detail, considering it’s only a 4-megapixel sensor. Images aren’t as big as you’d get from the high megapixel phones, but the quality and smaller file sizes makes them ideal for Facebook snaps.

htc-one-max-camera-inline

Battery:

HTC has plopped in a capacious battery, to fill up the rest of the space inside the chunky metal frame. Its enormous, high-definition screen is naturally going to consume battery like anything, but the lower clock-speed of the processor should technically use less power than the 2.3GHz Snapdragon 800 chip.

Pricing and Release:

Nothing about the price of HTC One Max has hit the sources. But, it will cost competitively to other comparable smartphones so you can expect it to cost around $300 with a 2-year contract. The release of the phone is expected to be in mid-end October. The most rumored release date is October 22.

Bottom Line:

The metal body with that enormous high-definition display is definitely one purely considerable excuse for HTC One Max to be one awesome beast. However, everything else (not counting the fingerprint scanner which surely is a plus) is just the same as HTC One.

The Good:

  • Big, bright, bold display
  • Sense 5 interface is attractive and easy to use
  • Good battery life
  • Enough power for most tasks
  • Exciting for images/youtube/ videos

The Bad:

  • Reduced megapixel density, affects camera efficiency too
  • Older processor doesn’t compete well against competition
  • Too big and heavy for most people’s needs
  • Non-removable battery

 Do I need to have The HTC One Max?

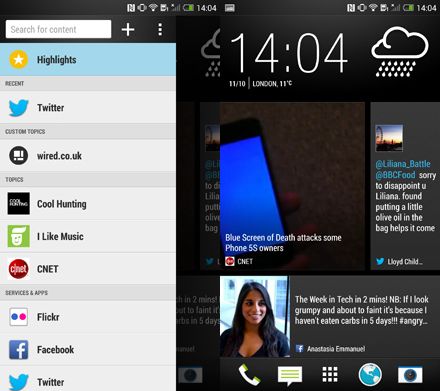
If all this time you’ve been fancying the HTC One and at the same time you have a taste for a bigger display phone that you could watch movies on, HTC One Max is probably for you. It packs together the award-winning design of HTC One and an inspiring 5.9″ display. The HTC Sense 5 looks as perfect and “pretty” as ever. The Sense software has been updated and if you’ve hated the Blinkfeed news panel up till now, you can now get rid of that too.

When it comes to performance, it has a slower processor and an older processor. The camera, being very nice, is still not as good as that of the Samsung Galaxy Note’s 13-megapixel snapper. Moreover, the Note is smaller and lighter as compared to HTC One Max.

If you’re not dying for a 5.9″ display and you like metal bodies and designs that will make others envy to you, go for the standard HTC One and not HTC One Max as it has a full-HD display and the same processor and camera, unless you wish to make similar efforts with your thumb to touch the other corner of the screen as you would with your tongue while you try to touch your nose with it.
HTC-One-Max1

Hope you enjoyed riding this ride with us where we travelled the HTC One Max in detail. We’ll be bringing more in a very short time so stay tuned 😉

How to Root & Install CWM on Samsung Galaxy Star S5282 / S5280

52
How to Root & Install CWM on Samsung Galaxy Star S5282 / S5280

Samsung – the world’s best smartphone selling brand is the one, which will allow you to find a Galaxy device in any price range, and somehow allow you to enjoy a lot of things even if its not a high end Android smartphone, and as the people say ”Samsung has more galaxies then on the sky” jk :D. Samsung recently brought up Samsung Galaxy Star– a low end Android smartphone featuring a 3.0-inch screen with 133 ppi, 1 GHz CPU, 512 MB RAM and 4 GB internal storage memory, while it also supports microSD card up to 32 GB. The device has got a 2 MP camera at the back and runs on Android 4.1.2 out of the box.

Samsung-Galaxy-Star

Getting back to the topic, many of the Galaxy Star owners might be wondering about playing with their device beyond the boundaries, and trying to find out the root methods for their device or flash custom roms, mods and other stuff, the good news came from the xda-developers as usual as the development thread for Samsung Galaxy Star has been opened. Method to root your Samsung Galaxy Star is here now along with the method to install CWM recovery.

Make sure that you have battery charged over 60 % and have backed up all your important ContactsCall Logs & Messages.It is highly recommended in case of any mishap or data loss to backup all your important data.

Also please keep in mind that rooting your Samsung Galaxy Star will void its warranty and raise the binary counter. Make sure that everything you do, you are doing it at your own risk. The method explained below works for both Galaxy Star S5282 and S5280.

Things you need to download:

  1. Download Odin PC and unzip it. – Get it Here
  2. Download and install Samsung USB Drivers – Get Here
  3. Download [CWM] Reovery.tar.zip – HERE.
  4. Download SuperSU.zip – HERE

How to Install ClcokworkMod(CWM) Recovery:

    1. Open Odin
    2. Put your phone in download mode. In order to do so turn it off by pressing power key for a few seconds or by pulling out the battery, wait for 30 seconds. Turn it on by pressing and holding Volume Down + Home Button + Power Key, as soon as it shows you the warning press Volume Up to  continue. You are in the download mode now.
    3. Connect your phone to your PC using the standard USB cable, the ID:COM box should turn blue or yellow as soon as your phone is detected.
    4. Hit the PDA tab, and select the file that you downloaded recovery.tar.zip file. Follow the instructions explained in the image below, also make sure that the options selected in your Odin are exactly as shown below.
    5. Odin-Flash Guide
    6. Hit start, and wait for the process to get finished. Your device will restart now and you’ve successfully installed the ClockworkMod recovery on your Samsung Galaxy Star.
    7. To access CWM recovery, press and hold Volume Up + Home button + Power key. Your device should boot now into cwm recovery.

How to Root your Samsung Galaxy Star:

    1. Place the dowloaded SuperSu.zip file on your device’s Sdcard.
    2. Boot into cwm recovery, in order to do so, press and hold Volume Up + Home button + Power key. Your device should boot now into cwm recovery.
    3. Select ”flash zip via recovery” and select the SuperSu.zip file that you placed on your Sdcard.
    4. It will quickly flash the SuperSu file and you’ve the root access now. Reboot your device and find SuperSu in the app drawer, you may want to update it via Play Store now.

Now wondering what to do with your rooted phone? 

Here’s the answer for you!

Rooting your phone gives you complete access over all the data which is apparently locked by the manufacturers. This includes removal of the factory restrictions and making changes to the internal system and the operating system. Gaining the root access gives you the privileges to install various applications to enhance the performance of your device, allows you to remove the built-in applications/programs, helps you to upgrade the battery life of your device & install the apps which require the root access for the proper functionality and modify your device in so many other ways e.g using mods and custom roms through the cwm recovery.

How to keep Root after OTA Updates

The OTA updates rolled out by the manufacturers wipe the root access on your phone. In case you don’t know how you can restore the root access after OTA update, you’ll have to root your phone once again, but there is no need to do it as you can restore it using the OTA Rootkeeper App which is available in the Google Play Store. The app creates backup of your root and simply restores it after any OTA update.

Credits: Hnk1

That’s all! We hope that the method worked well for you, in  case you face any difficulties, feel free to leave us a comment. Thank You


OLED World: Lets you show off with your Galaxy Note 3, S 4’s Display

0
OLED World: Lets you show off with your Galaxy Note 3, S 4’s Display

Do you own a Samsung Galaxy S4, or Galaxy Note 3? Well, if so, it’s time to show off with your device’s awesome HD display. Samsung has released its very own app named as ‘‘OLED World”. The app sports a number of HD pictures taken by renowned photographers such as Kwon O Chul, Ashley Vincent, Satoshi Kuribayashi and Hougaard Malan who specialized in astronomical objects, wildlife, insect and landscape photography respectively.

The app actually allows you to set up those pictures as backgrounds for your homescreen or the lockscreen and helps you to boast off with your device’s display. Go ahead and download it right now and check out how awesome is the display of your device, and how well it shows the colors and the effects. Download it HERE.

OLED World
OLED World
by – Samsung Display

How to Make Samsung’s Galaxy Device’s Home Key Work Faster

1
How to Make Samsung’s Galaxy Device’s Home Key Work Faster

Samsung’s Galaxy devices have a home key between their two capacitive keys, pressing the home key takes you back to the homepage of your device but takes a little time, have you ever noticed it? if so then you might be wondering how you can make it work faster, and if you don’t then you may be happy to know that you can make it work a little faster. The trick simply boosts up the speed of your Galaxy Device’s home key.

Before I tell you guys about making it fast, i would like to tell you guys that, I have been looking for this solution and was failed to do so earlier, just to get rid of the slow working of my device’s home screen, I restored the factory settings, flashed a new stock firmware and nothing worked, you may laugh but that’s true. Thanks to a friend Raza Anwar for sharing this trick and helping us out.

This is quite simple, what happens is, pressing the Home Key twice opens up the ”S Voice” feature on your Galaxy device, that supports this feature, this is the actual cause for making it slow.

You just need to open settings in the S Voice and disable ”Open via the home key” and that’s all. Try pressing your Home Button now and it should be 10x faster now.

Screenshot_2013-10-15-00-54-09Screenshot_2013-10-15-00-54-15

You can re-enable this option by accessing S-Voice through the icon in the App Drawer on your device.

That’s all! We hope that you found this trick quite helpful 😀

Setting Up Call Rejection Mode on Samsung Galaxy Devices [Guide]

0
Setting Up Call Rejection Mode on Samsung Galaxy Devices [Guide]

Call reject mode becomes quite handy when it comes to block the annoying unknown callers, or even if you want to rest for a while and get  cut off with everyone calling you. Samsung’s Galaxy devices have this in built feature named as ”Call Rejection”. This feature is available in other Android devices as well, but might be named as something else. Setting up call reject mode is quite easy, as we will be also having a look on how you can do it in case you can’t get it to work.

Some users have also reported that the Call Reject mode automatically gets activated on their devices, and they can’t find how to disable it. Also sometimes you accidentally add a contact number to call reject list while accessing its settings in the logs or in the contacts and you don’t get to know about it and it can cause problems at a later time. All of these are sorted out here, have a look on the quick guide below and get it done.

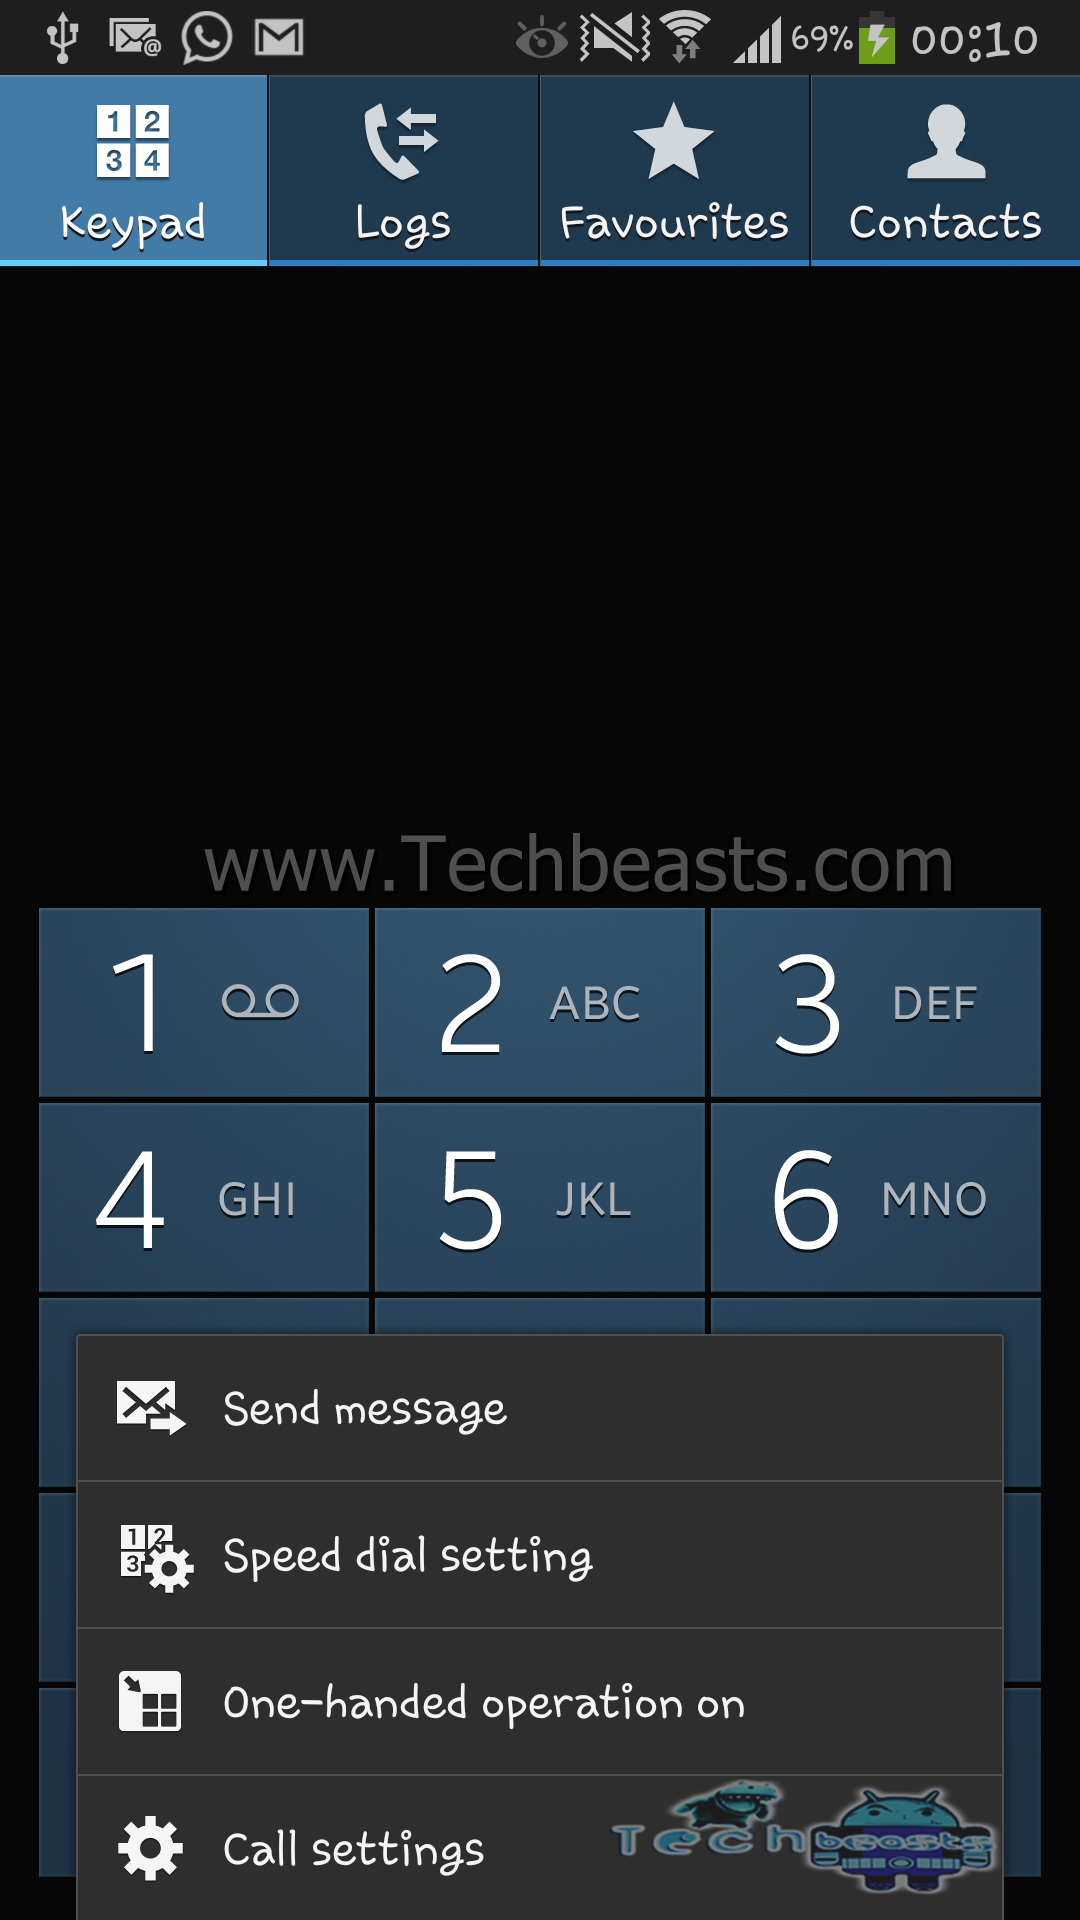
  • First of all you need to access the Call Rejection. You can either find it in Settings > Call or Tap Phone > Hit options key and open settings > Call Rejection.
  • In the devices running on Android 4.2.2 or later you may find ”Call” under the ”Device” tab in Settings.
  • In Call Settings tap ”Call Rejection”. Here you can find Auto Reject Mode and Auto Reject List.

Auto Reject Mode:  Lets you turn off or turn on the Call Rejection. You can make a choice between whether you want to reject all the calls or you just want to reject the numbers added in the Call Rejection List.
Auto Reject List: Lets you add numbers to be rejected to the Auto Reject List. You can select here whether you want to reject all the unknown numbers, or you want to reject some of your contacts as well. The reject also allows you to remove the existing numbers and unblock them.

  • So it all exists in the above two options, to turn it off simply select ”off” in the Auto Reject Mode, and to block a specific number, add it to Auto Reject List.

Screenshot_2013-10-15-00-10-32Screenshot_2013-10-15-00-10-37Screenshot_2013-10-15-00-10-46Screenshot_2013-10-15-00-10-54 Screenshot_2013-10-15-00-11-05Screenshot_2013-10-15-00-11-18Screenshot_2013-10-15-00-11-23

That’s all, as it was simple enough. We hope that it helped you, In case you have any queries, feel free to leave us a comment. Thank You.

How to Reset Default Preferences for Apps on on Android

0
How to Reset Default Preferences for Apps on on Android

Android is world’s fastest growing mobile operating system, and there are several reasons, which add to its growth. Being an open source, it allows the developers to discover something new everyday, and being too easy to use it allows the users to get comfortable in several ways. The Google Play store – previously known as Market has millions of apps, and one can enjoy any application of his choice, there isn’t a break anywhere or any limit until and unless you fill up the storage memory of your device.

The apps on Play Store allow you to modify your device, this includes installing various launchers, music players, video players, browsers, photo editors, file managers etc. Now what happens is, let’s suppose you’ve installed a launcher like Go Launcher, or Next Launcher 3D besides the stock launcher of your device, as soon as you press the home key of your device, it will prompt you to select the launcher using which you want to return to the homescreen. Here you can make a choice, whether you want to choose a launcher everytime, or you want to select one as a default launcher. Same goes for video players, whenever you will open a video, it will ask you to select a video player using which you want to open that video, or whether you want to select as default and so as for other similar applications. Sometimes you install some laucnhers / browsers or other apps and select them as default and later on you want to get rid of them, or sometimes you select an app mistakenly and this becomes a pain in vein, when you can’t find how you can clear that app from the default and choose another app in place of that.

If you had or have similar issue, then let us have your attention for a while and help you get rid of this issue, you just need to follow the steps explained below and get it resolved. So here’s how to do it.

      1. Open Settings > Apps / Applications or Application Manager / Manage Apps
      2. In Samsung devices running on Android 4.2.2 or later Application Manage will appear under the ”General” or ”More” Tab.
      3. Swipe to the right, get in the ”All” menu in the Applications.
      4. Now in the all apps list, find the launcher, or any other app that you’ve selected as default.
      5. Tap that app, and scroll down and tap ”Clear Defaults”
      6. Phewww! That’s all, now whenever you open anything on your device, for what you changed the default preferences, it will ask you to choose the default app once again.

Screenshot_2013-10-14-23-08-29Screenshot_2013-10-14-23-08-47Screenshot_2013-10-14-23-07-59

If you find the above method a little hard to follow, you may not need to worry as a great app named as ”Clear Defaults” is already there to ease your problem in the Play Store. You can get it HERE.

Screenshot_2
Clear Defaults
by – Zeal Droid

We hope that this resolved your issue, If you still have any difficulties, feel free to leave us a comment. Thank You.

How To Download Bluestacks for PC [ Simplest Guide ]

8
How To Download Bluestacks for PC [ Simplest Guide ]

Playing games on Android is quite fun, Google has given us a platform with huge collection of apps and games and with such open source you can even install Apps and games from outside Play Store, something that is not presented in iOS and Windows. Symbian was there to defeat Android, but lack of attention let Symbian lost it self in history, and Android took the sign of legendary from Symbian and because of too much support and more than 82 companies are using Android, it will take a miracle to beat Android.

But our topic does not relate with the comparison of Android with others, it’s about how to Play Android Apps on Windows and Mac OS X. Yes! there is a way you can play Android apps on PC. Due to enormous demand of Android apps, developers have made an emulator that can run Android Apps on PC. In the past, we always wanted to play PS2 and Gameboy games on PC and there were emulators for both of them. Since this is the era of Android, so there is also an emulator for it.

8364.imgcache

BlueStacks is the name of such emulator that allows you to play Android apps on PC. But this emulator is only for Mac and Windows, not of Linux, so only those are eligible to try it who are using either Windows or Mac OS X.

How To Download BlueStacks.

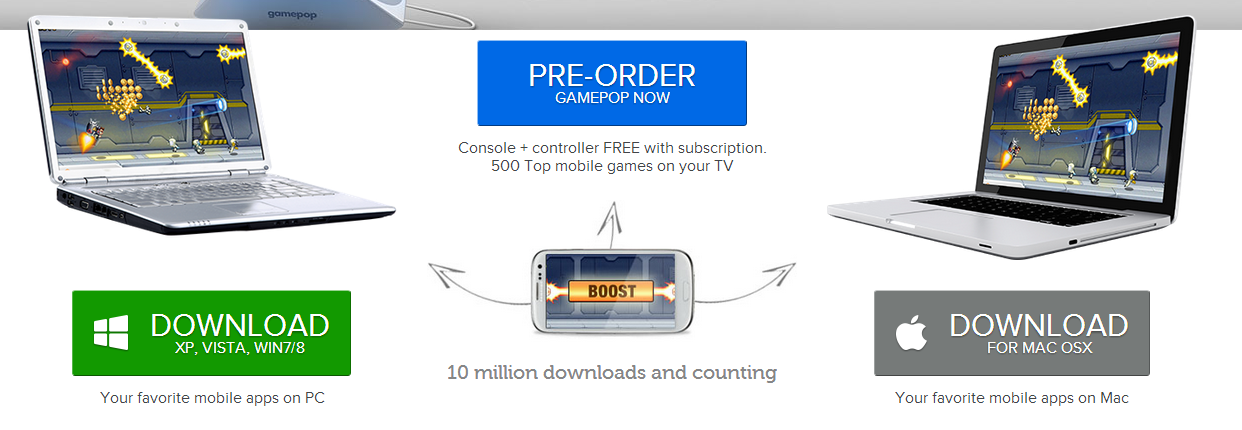
Download BlueStacks from Here.

  • If you are running Windows, then Choose the Windows Option.
  • Otherwise choose the Mac one.

Screenshot_12


How To Install Bluestacks On PC.

  • Download BlueStacks for your OS.
  • After the download is complete, open the exe file.
  • Click Yes, if ask for Admin permission.
  • Follow the Steps carefully.
  • After the installation is complete, restart the PC as recommended
  • After the restart,  Run the bluestacks app.
  • Now you will need an Active internet connection to run Bluestacks.
  • Now search for an app on BlueStacks to make sure that app is working.

review-bluestacks-app-player