Home Blog Page 493

LG G2 LockScreen On Any Android Device – With/Without Root.
0
LG G2 LockScreen On Any Android Device – With/Without Root.

LG Flagship device LG G2 arrived with a lot of beautiful things, First users demanded its launcher and now its Lock Screen is available at Google Play Store to download. But installing a Lockscreen means you have to change the whole Framework of device. Lockscreen works according to the Physical Buttons, something that usually not available that easily. Installing a launcher only changes the Looks and slight Working of device, only Physical Key that works on Launcher is the Home Key, if the device is Samsung. Otherwise, Soft Touch keys that don’t matter much, works on Launchers.

unnamed

But Lockscreen is activated when you Press the Lock/Power Button and wakes up when you press either Home or Power Button. So, installing a lock screen sometimes requires a Rooted device, but this LG G2 Lock Screen, does not demand anything like this, except that it says you need a rooted device to unlock Dew Drop effect, but it still works fine without Rooted Device.

The LG G2 Lock Screen is the closet imitation of the original Lock Screen and work flawless on almost every device. This app is very easy to install and available at Google Play Store without any Cost. Having installed it on your device running ICS, Jelly Bean, Kit-Kat, you will be able to enjoy Five types of Effects on your Lock Screen.

  1. Particle effect
  2. Crystal effect
  3. Ripple effect
  4. White Hole effect
  5. Dewdrop effect

As I mentioned above, that in order to enjoy the Dew Drop Effect, your device must be rooted but some users claimed that they are using it without any Rooting. In Settings, you will find a huge collection of Features. You can Hide/Show the Status Bar, Set upto Five Shortcuts. Whether you want Sound or Vibration on LockScreen, or you want to see Notifications on LockSreen or not. You can Decide the Size of Clock, or Date, or set Some Text on Screen.

The Only Bad Thing is the Pop-up which will irritate you once you try to leave the settings, rather than that, everything else is awesome. Download the Latest Version of LG G2 LockScreen, from Play Store and Start Enjoying it on your device too.

Download LG G2 LockScreen


Root Galaxy Tab 2 P3110 On Android 4.2.2 XXDMH1 Jelly Bean – How To.

0
Root Galaxy Tab 2 P3110 On Android 4.2.2 XXDMH1 Jelly Bean – How To.

Before even Reading the Article, first Follow the Link to Install Android 4.2.2 On Galaxy Tab 2.

Update Galaxy Tab 2 P3110 to Android 4.2.2 XXDMH1 Jelly Bean

Now that you have updated your Galaxy Tab 2 to Android 4.2.2 Jelly Bean  and the way it goes, once you update your device to an Official Firmware, you device will loose its root access and you have to root it again on the updated firmware. Rooting allows you to get full control over your device, Stock apps and mods are good, but installing Custom Mods gives you better support and great battery life, you might need to delete some Stock apps from the device, a non-rooted device can’t do that, but a rooted one has the power to remove stock apps too.

samsung_galaxy_tab_2_70

If you are familiar with Odin and it’s working, then this tutorial might not be difficult for you. Otherwise read the whole tutorial first before trying it on your device. In this Article, we will show you How To Root Galaxy Tab 2 P3110 On Android 4.2.2 XXDMH1 Jelly Bean.But before we begin, Make sure that you have battery charged over 60 % and have backed up all your important ContactsCall Logs & Messages.It is highly recommended in case of any mishap or data loss to back up all your important data.

Disclaimer: 

The methods involved in flashing custom roms and rooting your phone is highly custom and may result in bricking your device,and has nothing to do with Google or the device manufacturers which is Samsung in our case. In case of any mishap we may not be held responsible. Follow these instructions to the letter to avoid any mishap or bricking. Make sure that whatever you do, you are doing it at your own responsibility.

Important things:.

How To Root Galaxy Tab 2 P3110 On Android 4.2.2 XXDMH1 Jelly Bean.

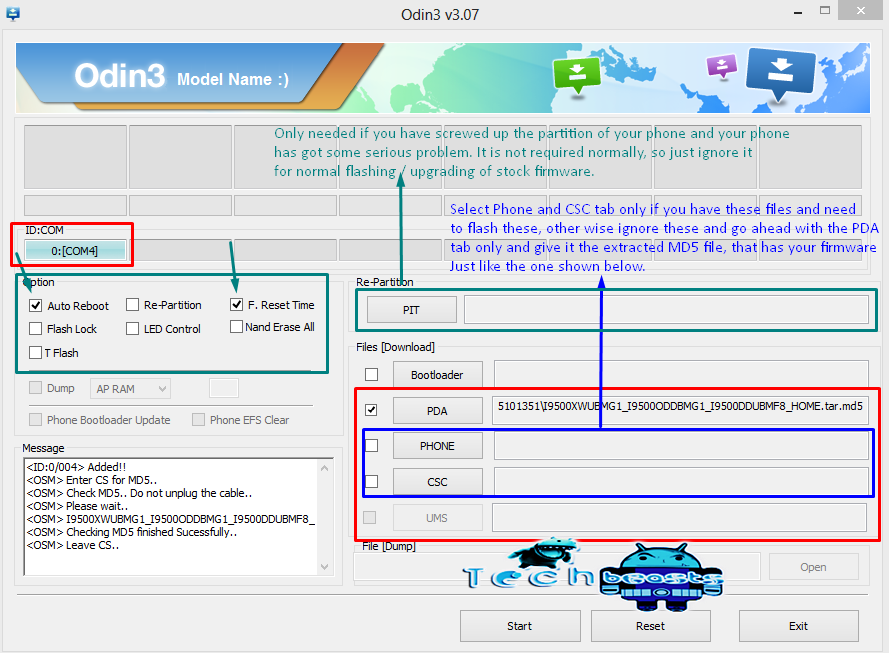
odin_explained

  • Download Root Package – CF-Auto-Root  for Galaxy Tab 2 P3110 to your computer and extract the zip file.
  • Download Odin.
  • Turn off your Phone and Turn it On While Pressing, Power + Volume Down + Home button until you see some text on-screen, Press Volume Up to continue.
  • Make Sure that the USB drivers are installed.
  • Open Odin in Computer and connect your device to PC, while it is in the Download mode.
  • If your Phone is successfully connected to PC, the Odin port will turn Yellow with COM port number.
  • Now Click on PDA and select the File CF-Auto-Root-espressowifi-espressowifixx-gtp3110.zip, or the one who has the biggest size.
  • In Odin, Check Auto reboot and F.Reset Options.
  • Now Click the start button and wait for the process to complete.
  • After the installation is complete you device will restart and once you see the Home Screen, unplug the cable.

That;s it your Samsung Galaxy Tab 2 P3110 has been Rooted On XXDMH1Android 4.2.2 Jelly Bean. Go to Settings > About To verify.

One-Click Tool to Unlock and Re-Lock Bootloader of Sony & HTC Devices

43
One-Click Tool to Unlock and Re-Lock Bootloader of Sony & HTC Devices

You may have heard people talking about and unlocked device and a locked device, that can be split into two contexts. A locked device maybe the one having a locked SIM card restriction, that is put by some carriers to prevent the users from using any other SIM card on their device, while the other context refers to the unlocked bootloader. As off now, our concern is the locked / unlocked bootloader.

The restriction on the bootloader is implemented by the cellphone manufacturers to refrain their users from installing custom recoveries or root their devices in order to keep the status of their phone as close as possible to  official and provide the best security of the device. But there is no end to the Android development, and as long as there are awesome developers, chances are. you won’t be able to stop yourself from going beyond the boundaries and enjoy tweaking your phone to the deepest extent, but to do all this you will probably need an unlocked bootloader, without having it unlocked you won’t be able to load a custom recovery that is one of very basic thing, that paves a way for you to tweak your device.One-Click tool for Sony and HTC bootloaders

Sony and HTC are the ones found putting restriction on their devices’s bootloaders most of the times, while Samsung’s Galaxy devices come with an unlocked bootloader. Samsung’s carrier branded devices may have a locked bootloader otherwise rest are unlocked. Nexus device also come with a locked bootloader, but those devices are the easiest to unlock and there is a list of methods to do so. Although Sony and HTC, both provide a way to unlock the bootloader on their official sites, but the method may take a few minutes and may require you to understand the things first. So, in the case a much easy tool was needed for this purpose.

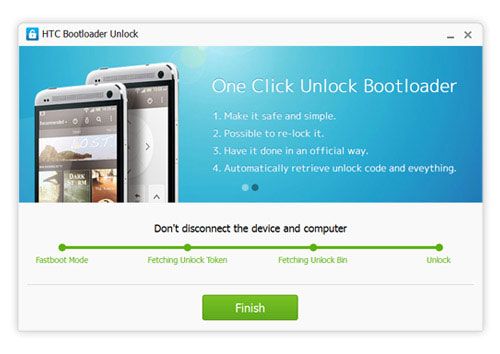
To make the things easier for you, KingoApp has come up with a One-Click tool. The tool is quite simple, although it is self explanatory, but we’ve explained the steps to unlock your phone’s bootloader in detail below. This tool is compatible with almost all devices of Sony and HTC as per said by the developers.

Let’s have a look on the features of this tool first:

      • Safe and Easy to Use.
      • Unlocking + Re-Locking capabilities.
      • Based on the official way to unlock the bootloader.
      • Supports most HTC and Sony devices.
      • Automatically retrieves the OEM Unlock Key and performs other required tasks.

Although the tool is safe, but we still highly insist on using this tool at your own risk. Also, don’t forget to backup all your important media content, contacts, call logs and important text messages as upon unlocking the bootloader your phone will be completely wiped.

How to Use One-Click Bootloader Unlock Tool:

      1. Download and install the Bootloader Unlock/Lock Tool for your device: Download for Sony | Download for HTC.
      2. Open the Bootloader Unlock Tool.
      3. Enable USB debugging mode on your phone, to do so open settings > developer options > Enable USB debugging mode. In case you are on Android 4.2.2 and can’t find the Developer Options in settings, tap About Device in settings and tap “Build Number” for 7 times to get the Developer Options enabled in settings.
      4. Make sure that you’ve a working internet connection. Also make sure that you’ve installed the USB drivers for your device.
      5. Launch the Bootloader Unlock Tool now.
      6. Connect your phone to your PC.
      7. Wait for the Unlock button to get green, as soon as it gets green click it.
      8. Follow the On-Screen instructions now, and get it unlocked.bootloader-unlock-android bootloader-unlock-htc

Voilaa! That’s All! Pretty much easy, right?. You can load any custom recovery now, flash custom ROMs and do a lot more on your Sony or HTC device. In case you got any queries or face any difficulties regarding this post, please feel free to stop by the comment box and drop us your message. We will get back to you as soon as possible.

How to Install/Uninstall Applications using Android ADB

0
How to Install/Uninstall Applications using Android ADB

Are you looking for a way to install apps to your Android device directly fr0m your PC? Well, if so, you’re on the right spot. Sometimes accessing Google Play store is not possible, and sometimes the apps you want to install are not available in the play store and you got to install those manually using an APK file . Although you can install APK files directly on your phone, but there’s another way to install APK files from your computer straight to your Android device.

In the following post we’re going to have a look on the method that requires you to have installed Android ADB drivers first, and understanding the use of it. Once done, you can head towards the method we explained below.unnamed

First of all, let’s have a look on how to install APK files using Android ADB:

      1. Download an APK file of your desired application to your computer. Follow the guide here to do so.
      2. Connect your phone to your PC having USB debugging mode enabled.
      3. Place the APK file in the Fastboot folder that you created using our ADB & Fastboot guide.
      4. Right click on an empty area in the Fastboot folder while holding the shift key, and click on “Open Command Window Here”.
      5. Now in command window type the following command: “adb install packagename.apk” //without inverted commas. And hit the Enter key. E.g adb install com.android.chrome
      6. As soon as you hit the Enter key, it will install the application and show you the “Success” status in the command window.
      7. That’s all.

How to Uninstall an App using Android ADB: 

      1. Find the package name of the application on your phone that you want to uninstall. The easiest way is to use Package Name Viewer.
      2. Connect your phone to your PC having USB debugging mode enabled.
      3. Right click on an empty area in the Fastboot folder while holding the shift key, and click on “Open Command Window Here”.
      4. Now in command window type the following command: “adb uninstall packagename” //without inverted commas. And hit the Enter key. adb uninstall com.android.chrome
      5. If you want to keep the app’s data and cache directory, then use this command: “adb uninstall -K packagename.apk”. E.g. adb uninstall -K com.android.chrome
      6. As soon as you hit the Enter key, it will uninstall the App and show you Success in the command window.
      7. That’s All.

How to update an existing app:

      1. Download the latest version of the app on your PC. Follow the guide here to do so.
      2. Connect your phone to your PC having USB debugging mode enabled.
      3. Right click on an empty area in the Fastboot folder while holding the shift key, and click on “Open Command Window Here”.
      4. Now in command window type the following command: “adb install -r packagename.apk” //without inverted commas. And hit the Enter key. E.g. adb install -r com.android.chrome
      5. As soon as you hit the enter key, it will update the application and show you success status in the command window.
      6. That’s All!

That’s all. Find more usefull ADB and Fastboot commands here. In case you got any queries/suggestions or face any difficulties regarding this guide, please feel free to stop by the comment box and leave us your message.

Scanner Pro For iOS, Free For Limited Time Only.

0
Scanner Pro For iOS, Free For Limited Time Only.

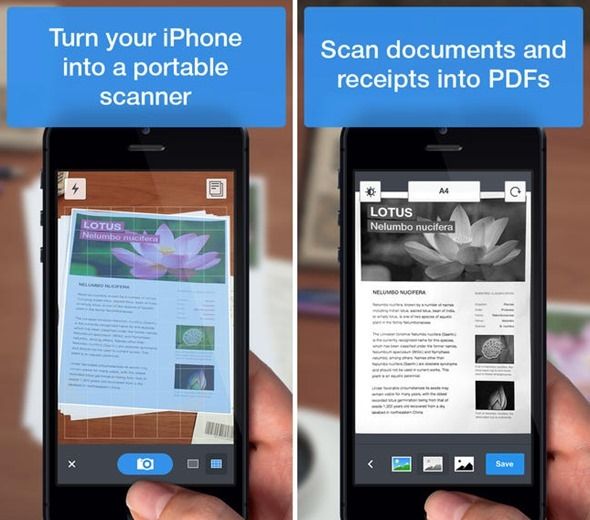
Readdle, a company who has created a lot of Professional app for iOS, has made a Scanner Pro for iOS, which will cost you about $7 if you want to try it. But this app is now free to download and install on your device for a Week. This app is an awesome solution for all those Businessmen who wants to have a Portable Scanner in their hand. This app allows you to scan anything on the go using the built-in camera. The Functionality within scanner pro turns the iOS device to a Professional tool on the Spot, with its abilities and user experience recognized by Apple and it was made the App of the week.

screen568x5681

It is not unusual for the app to go free or gets cheap during some occasions. Keeping this in mind, Readdle wants their users to get on board with Scanner Pro offering a 100& discount, bringing the price from $6.99 to Free for a period of Seven days. Anyone looking for an easy, Mobile and effective Scanner solution will feel at home after hearing this News. All scans with this app are easily read by this app and Convertible to a PDF document easily.

screen568x568-2

Scanner Pro features a lot of smart actions when it comes to detecting and processing the image within the give document. Automatic Edge plays an important role is distinguish between Image and Text. The resulting PDF can also be adopted. As you might have expected, the saved scan can also be E-Mailed directly form the app and can also be send to any Third-Party Services, like Drop-Box, Google Drive, Evernote etc.

iCloud Syncing option is also an amazing feature of this app, Scans can be created on a Phone and direclty send to an iPad using iCloud Syncing, if your iPad and iPhone is using the same iCloud account. It is rarely that an app like this gets free in any App Store, o make sure to Grab it now while it is Free.

Download Scanner Pro

iPhone 5s Compatible Jailbreak Tweaks and Apps.

0
iPhone 5s Compatible Jailbreak Tweaks and Apps.

Owning an iPhone 5s and haven’t Jailbreak it yet, well then you are one of the laziest person ever and you have no business here. but if you have Jailbroken your iPhone 5s using evasi0n7 and found out that most of the Jailbreak tweaks and apps doesn’t work for your device. However, with the release of Cydia Substrate for iOS 7 and A7 chip, Developers are releasing new versions of tweaks with much needed support for iOS 7.

evasi0n-jailbreak

We have grabbed a list of Apps and Tweaks that will work for A7 chip and fully supported by 64-bit. They will most likely to Work on iPhone 5s, iPad Air and Retina Mini iPad. The List is the Courtesy of Twitter User @iAdam1n (via @cammywrites) who has been maintaining a Document with the list of Apps and Tweaks which are compatible with iOS 7 devices.

Here goes the List:

Action Menu
Action Menu Plus Pack
AdBlocker
akLocationX
Caffeine 2
Chinese Calendar Pro for Notification Center
Cleary
DismissMyKeyboard
Fake GPS
GmailSender
GrowlNotifier
iCaughtU
iCaughtU Pro
IconBounce
LandscapeVideos
MessageShower
OneByOne Contacts
QuickWarning
SBPowerAlert
SearchLoader
TapTodaysCalendar
TransparentVolume
TweetAmplius
VoicemailRemoveriOS7
WiFi Passwords
WiPi
Zeppelin
3G Unrestrictor 5 (iOS 7 & 6)
afc2add
akLocationX
AllMail
AnimateAll
AskToCall
AskToSend
Assistant Unrestrictor
Background Manager
Barrel
Bigify
BlurredMusicApp
Browser Changer
Burst mode
Call on GV Pro
CallerID Greece
CamRotate
CCQuick
CCSettings
CCToggles
Chinese Calendar for Notification Center
ClearFolder
ConfirmKill
Core Utilities
customLS
Cydia
Cydia Substrate
DateCarrier
Disable Parallax Effect
DockShift
Erica Utilities
ExchangePolicyCleaner
f.lux
FaceDetectionDuringVideo
Fake GPS Lite
FakeCarrier
Find My iPhone China Corrector
Flashorama
FlipLaunch
FrontFlash
FullScroll
GlowDock
HiddenSettings7
IB Graphics Selector
Icon Renamer
Icon Tool
iFile
iGotYa
iKeywi
Infiniboard
Infinidock
Infinifolders
InfinityTask
IntelliID
iWhiteboard
knowy0urCallActive
LastApp
libpush
libstatusbar
LLBPano
Lock Screen Tool
Lyricalizer
Menu Button Emulator
MobileTerminal
MojiPhoto
Movie Box
My3G
Navigate From Maps
NCAllOnly
No Skype Preview
NoChineseSNS
NoDictation
NoNewsIsGoodNews
NoSlowAnimations
NowListening
NowNow
Open In App For Photos
OpenSSH
OpenSSL
OwnSpy
Percentage
PhotosEnhancer Pro 2
PowerDown Enhancer
PreferenceLoader
ProTube
ProTube Extension for YouTube
ProTube HD
Purge
Record ‘n’ Torch
Reeder2Enhancer
Remove Badges
SBInfoGrabber iOS 7
ShowCase
Simplock
SiriNoConfirm
SleepFX
Slide2Kill 7
Still Capture Enabler 2
SwipeNav
SwipeSelection
SwipeShiftCaret
Swipey
SwitchSpring
TetherMe
ToneEnabler
TransparentCameraBar
TransparentDock
TVLocker Pro
UIKit Tools
Unrestricted Folders Naming
UpsideDown
Video Zoom Mod
VideoPace
VineDownloader
Virtual Home
VoiceChanger
Volume Amplifier
WiFi Booster

Do let us Know, if you find any New Tweak working on iOS 7 and Compatible with A7 Device.

Change iOS Keyboard To Black or White In Any App – How To Guide.

1
Change iOS Keyboard To Black or White In Any App – How To Guide.

The Jailbreak may not have been perfect from from the Offset, but at-least it motivates the Third-Party developers to create Some apps to delight the Jailbreak community. In terms of iOS 7 and 64-bit based tweaks and early previews of extensions show the bright future of Jailbreak world. One of them is called Bloard, it is one of the latest packages arrived at Cydia, with Bigboss Repo.

Bloard

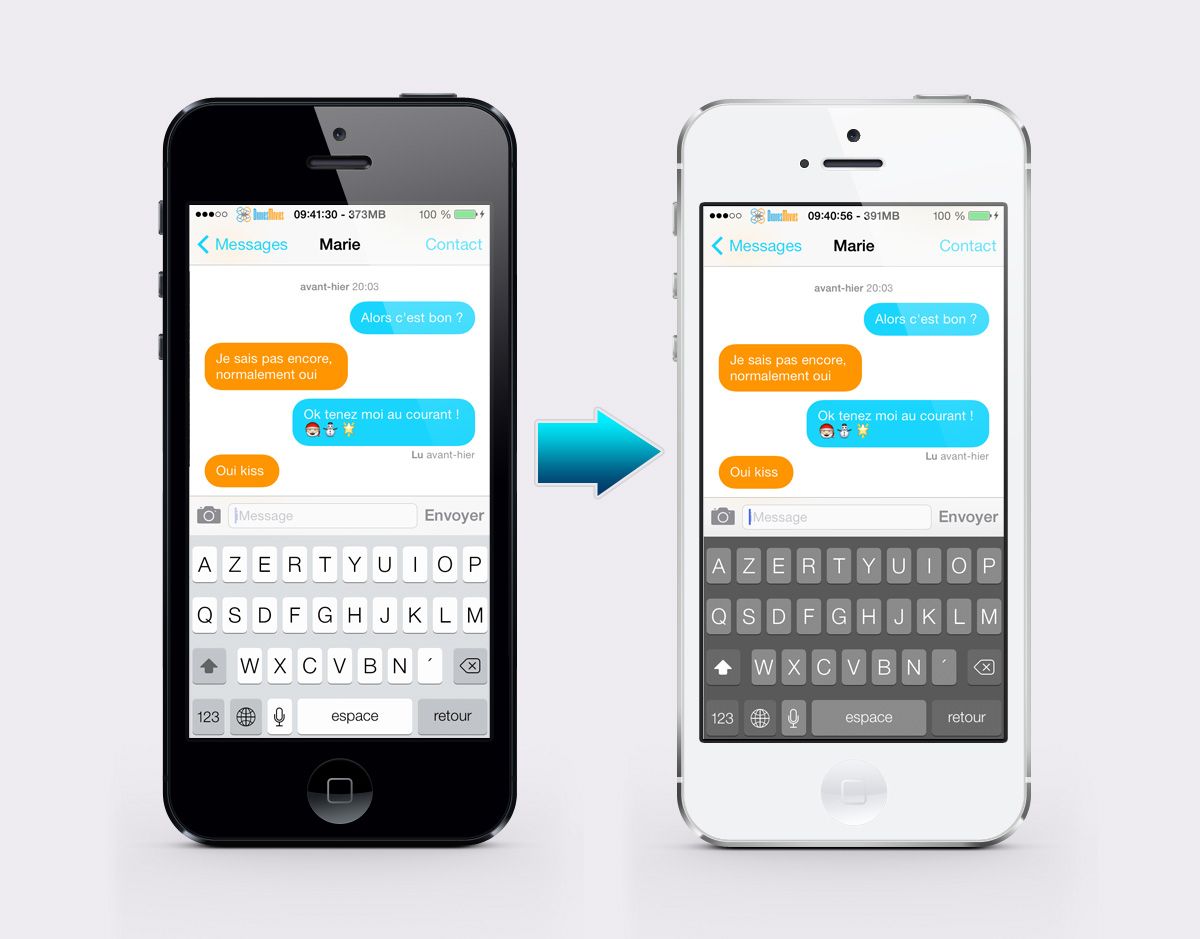
It might not be able to stretch itself in terms of innovation but it definitely have it self among jailbreak devices. This app is designed to work with any Apple native and Third party app that requires a Keyboard to input text. iOS 7 introduced the Keyboard, which features a more clean and clinical look. For all the developers, Apple SDK only allows them to put the White or Light Black Keyboard within their app.

Due to Which, most developers think that Apple only wants the look and feel of iOS 7 white, because it wants to make it light. The main reason why iOS 7 compatible apps are boringly white. Bloard exists to remove such things and give an amazing look to the Keyboard, a gorgeous looking Black Option.

After the installation of this package, users are allow to choose between two keyboards, a new option within the native setting app introduces a simple toggle, that allows users to turn the App On or Off. This is something to except from any app released now a days. Bloard is available free-of-cost download from Bigboss Repository and requires a Jailbroken device running iOS 7 or above. But on iOS 7.1 switching from White to Black is a native feature and this Tweak will be rendered redundant once it’s publicly released.

How To Check If Your Number Was Leaked Via SnapChat.

0
How To Check If Your Number Was Leaked Via SnapChat.

If you are a user of SnapChat, then you might have heard that about 4.6Million numbers were leaked along with their Usernames, now you must have been worried that you number has been leaked in the list too or not. Since the List is huge, it is impossible to find your number in it. This is not a good news for all the users of SnapChat, as they get the new year gift by hearing that SnapChat leaked their number. At the End of 2013, SnapChat published a long post saying that they have acknowledged the concerns of security experts.

Snapchat-flashy-features

They reported that the app’s new friend finding feature is most likely to attack, since this feature allows Users to upload their whole Contact book, so they may learn which one of their friends are using Snapchat. The Blog-post quote:

Theoretically, if someone were able to upload a huge set of phone numbers, like every number in an area code, or every possible number in the U.S., they could create a database of the results and match usernames to phone numbers that way.

Later it was exposed, a Database having more than 4.6 Million Snapcaht User’s phone numbers along with their Usernames were Published Online. This was done only to raise the awareness of Insecurity in this Service of Snapchat. Gibson Security tweeted that they have nothing to do with that and it is only a Matter on Time. Their Respond was:

We’re not terribly happy, but we feel this incident was somewhat inevitable. We don’t think it was the right thing to do, but it’s certainly going to bring a lot more press to the way companies respond to exploits and especially how Snapchat has handled the situation.”

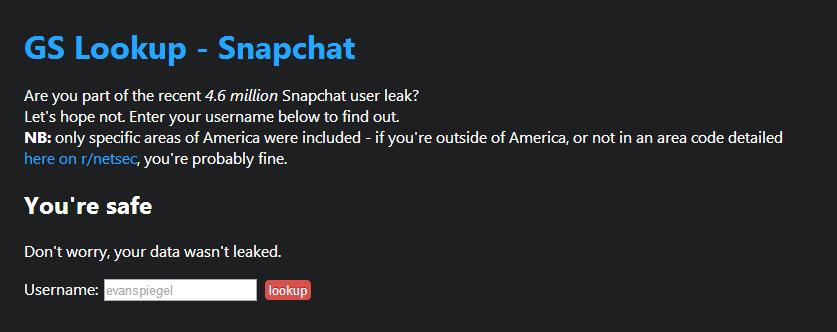
Follow the link to Check if your Number has been leaked on not, if it is, then delete your SnapChat account, but it won’t remove your details from database. We would suggest not to use this app and increase the Security level in other Social Applications.

Screenshot_34

How To Block Numbers In Viber.

1
How To Block Numbers In Viber.

Using Viber is quite amazing, you don’t have to use your Message package to keep updated with your friends while texting. Viber allows you to send and receive Messages like a normal app, but here you need Network connectivity to send and receive messages, it even allows you to call your friends over Wi-Fi or 3G/4G connectivity. There are millions of users of this app but no one knows how to block Number in Viber.This condition can arise due to any reason, either you don’t want to talk to someone or you just know that they will not behave proper with you once you receive their call.

how-to-block-someone’s-number-in-Viber

Millions of users are demanding this feature but still there is no Response form the Developers. So, unfortunately there is no Official way that you can block someone number in Viber. The reason is simple,Since it imports contacts from the PhoneBook and all those who use Viber are automatically seen in the Viber contacts,so there is no way you can stop that number Just Like That. But recently Users have complained that they are receiving Calls from Unknown Numbers, well there is a way to stop that.

Since Viber Developers are not giving any Answers on how to block the number, we will tell you another way to block it. Blocking mode can help you, but it will block all the unknown numbers, sometimes your friends or important Relative tries your number form a new one, at that time you will regret it. So, how to block the Unknown Number then?

Here is another Solution, Open Contacts or Call Logs. Tap and Hold onto the Number, and then select Delete or block this Number. That is the only way you can Block someone form Contacting you. This Method will work on both Android and iOS.

Carbon for Twitter, Twitter Client 2.0.8 Available for Android.

0
Carbon for Twitter, Twitter Client 2.0.8 Available for Android.

Carbon, an all new Twitter client is back with another update and this time it is available in full black color. This all new update has arrived with tinted windows and Zero badges and fully available on Google Play Store. There are a little bit changes made in both UX and UI. With whole new settings and an awesome avatar, which arrives with the slickness of minimalist design. On the other hand, most of the gestures and animations from the previous versions are still in there. Quick feed in something new and you can access it by sliding the finger from left edge.

Screenshot_33

After a long time, Carbon comes with a whole new design and interface, which is undoubtedly Carbon Black Color. The whole UI of Twitter client looks different and feels great to have app if you use twitter. This app gives you enough reasons to use, if you have twitter app on your device. The new update brings Ability to change the Type style used on Tweets on Timeline and Fixed bug that did not add newly accounts to the Home screen. You will be given Download Link to and Apk file of Carbon and Google Play Store link.

Carbon for Android Features:

Fresh new Design & Interface
Brand new Timeline design & aesthetics
Swipe-able Timeline, @Mentions, and Messages on Home.
Quick Timeline, one Timeline for Searches, List, Favourites on your Home screen.
Don’t Disturb Mode
Oxide Mode for Grayscale Timeline experience
Power Scroll: Scroll/Swipe up or down using Two fingers to jump to top or bottom of Timelines
Tweet Quick Actions
Configuratie Tweet Font Sizes
Retweets Timeline
In-App Browser
In-App YouTube Player
Vine Previews & Playback
Rich Timelines with full inline images and videos
Rich and elegant style for User Profiles
Rich Conversation View
Threaded Direct Messages
Background updates with quick actions for Jelly Bean, per account
Username Autocomplete
Mutes/Filters for Hashtags, Users, and Keywords
People Search
Obviously Multi-account with simultaneous accounts tweets
Profile Editor

Download Carbon For Twitter

Download Carbon Apk

Install Latest TWRP Recovery on Samsung Galaxy Note 2 [All Variants]

Install Latest TWRP Recovery on Samsung Galaxy Note 2 [All Variants]

Custom recoveries always become a pretty much handy tool when you want to go beyond the boundaries of your Android smartphone. Samsung’s Galaxy Note 2 is surely one of the most used devices around the world and is widely being used by the developers as well, so if you are owning one, you’ll probably want to tweak it as there is a hefty list of mods, custom roms, and lots of other stuff to do on the device, but to do all this you’ll probably need a compatible custom recovery.

We’ve picked up TWRP recovery, as the recovery works fine on the device running on all Android versions, supports nice backup and restore features, advanced wipe features and a lot more is there to check. Thanks to TeamWin for creating this awesome recovery. Let’s get back to the topic, in the following post we will have a look on how to install TWRP recovery on your Galaxy Note 2. Download links are embedded in for all the variants for latest TWRP recovery, just download the file for your variant and flash it using the method we explained below.

To install TWRP Recovery on your device, you need to follow these instructions.

      1. This guide is only for Samsung Galaxy Note 2, for the variants which are listed below. Before installing this, make sure that your device is listed below. Check your device’s model number in Settings > More > About Device.
      2. Download the file carefully for your device.
      3. Make sure that your device’s battery is charged over at least 60%. Highly recommended in order to prevent any mishap during the recovery installation process.
      4. Make sure that you backup your important media content, ContactsCall Logs & Messages. This is highly recommended just in case something goes wrong and you need to reset your phone.
      5. Use only OEM data cable to establish connection between your phone and PC. Turn off your Anti Virus and Firewall to prevent any connection issues. Also enable USB debugging mode on your phone if you face connection issues.
      6. If you already have rooted your device, use Titanium Backup to back up all your important apps + system data. Also if you are using a custom recovery, it is recommended that you backup your current system using that first. [Just for the sake of safety.]
      7. Recovery works well for Galaxy Note 2 running on all Android versions, no need to worry about the Android version.

Disclaimer: The methods involved in flashing custom roms and rooting your phone is highly custom and may result in bricking your device, and has nothing to do with Google or the device manufacturer that is SAMSUNG in our case. Also rooting your device will void its warranty and you will be no longer eligible for any kind of free device services by the manufacturers/warranty providers. In case of any mishap we may not be held responsible. Follow these instructions to the letter to avoid any mishap or bricking. Make sure that whatever you do, you are doing it at your own responsibility.

Pre – Requisites:

    • Download and Install Samsung USB drivers – Get Here.
    • Download and Extract Odin3 v3.09 – Get Here
    • Enough confidence to flash a recovery :-)!

Download the latest file carefully for your device:

How to Install TWRP Recovery on your Galaxy Note 2:

      1. Download the file for your variant carefully.
      2. Open Odin3.exe.
      3. Put your phone in download mode, to do so, turn it off completely. Now turn it on by pressing and holding Volume Down + Home Button + Power Key, you should see a warning now, press Volume Up to continue.
      4. In case the download mode method doesn’t work for your device, try one of the methods from this guide.
      5. Connect your phone to your PC.
      6. The ID:COM box in Odin should turn blue now, that means your phone is connected properly in download mode.
      7. Click the PDA tab in Odin and select the downloaded Recovery.tar file and let it load. Your Odin should look exactly as shown below, make sure that no extra options are selected.
      8. If you’re using Odin 3.09, you will select “AP” tab instead of the PDA tab, rest of the options should remain untouched.
        odin_explained
      9. Hit start now and sit back, it will take a few seconds to flash the recovery and your device will reboot.
      10. Press and hold Volume Up + Home Button + Power Key to access the TWRP Touch Recovery that you just installed.
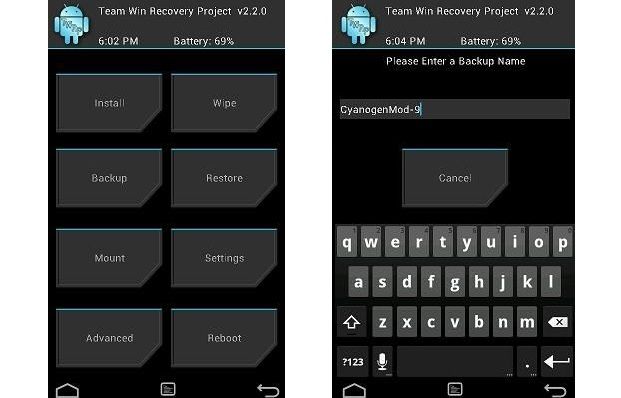
      11. You can backup your current ROM and do a lot of other things using the options in TWRP Recovery.
      12. Make sure that you make an EFS backup and save it on your PC as well. Find the option in TWRP Recovery.
      13. That’s All.

twrp

How to Root:

      1. If you want to root your device now, you can download the SuperSu.zip file.
      2. Place the downloaded file on your phone’s sd card.
      3. Open TWRP Recovery and select Install > SuperSu.zip and flash it.
      4. Reboot your device and find SuperSu in app drawer.
      5. Congrats! You’re now rooted as well.

That’s All! We hope that you found this guide of much help. In case you got any queries or face any difficulties regarding this guide, don’t hesitate to stop by the comment box below and leave us your message. We will try our best to help you out. Thanks All.

Create Bootable Windows 8 USB Drive – How To Guide.

Create Bootable Windows 8 USB Drive – How To Guide.

The best way to use a Windows Copy for a ling time is to either Purchase the Original CD or create a bootable USB Drive. Well in my thoughts, USB is far better than CD, you can use it for more time than any CD or DVD can survive. Plus a USB Dive is a lot faster than a CD or DVD. But creating a Bootable USB Drive is not an easy task. You have to make sure that whatever you are using to create a Bootable drive should work perfect. Scroll down and learn how to Create a Bootable USB Drive for Windows 8.

windows_8_usb_pen_boot

Requirements:

Windows 8 ISO Image – Download

4GB USB for 32-bit OS or 8GB for 64-bit OS.

Back-up all your data from the device you are going to use and don’t use it for data transferring again.

WinUSB Maker – Downlaod

 How To Create Bootable Windows 8 USB Drive.

Download and Extract WinUSB Maker,  it won’t need any sort of Installation, all you need is to run .exe file.

Run the Tool with Administrative privileges, Right Click the .exe file and Run as Admin.

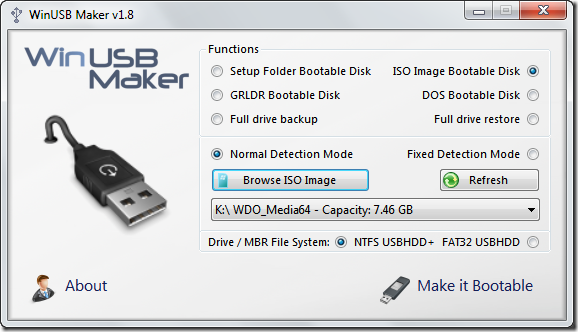
In tool Select the Option ISO Image Bootable Disk, Normal Detection Mode. Then Browser for the Image you have downloaded earlier.

USB-maker

Finally Select the USB Drive, if you have only one plugged in, then it will detect it automatically, otherwise choose the one you want to use. Choose Drive MBR System.

Then Click Make it bootable.

warning

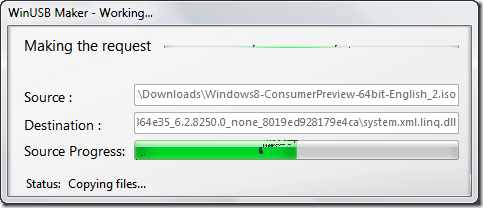
Now Sit back and Relax and let the Tool do its magic.

bootable-creation

Now Select USB as Primary Bootable device to install Windows via USB.