Home Blog Page 454

How To Secure Your Windows 8/7 Laptop By Enforcing Secure Password Policy

How To Secure Your Windows 8/7 Laptop By Enforcing Secure Password Policy

Most of the times, we only care about our Online data protection. 2 factor authentication is one of the best way to keep your Online account from being hacked, but what about our Computer protection, unlike that we are not using a lock-screen password but still its just a simple thing which can easily be cracked open. What you need is something that can make sure about the changing of your password and it shouldn’t allow you to use the same password again.

Windows itself provides secure Password policy, but it is not something easy to be found, and most of us just don’t even pay much attention to it anyway. We set password for our convenience and forget to change it on timely basis. So, here we are with another useful guide to secure your Windows even more by enforcing the Secure Password Policy, and also how all those policies works.

Windows-Problems

Enforce Password Policy:

  1. Open Start Menu.
  2. Type Local Security Policy.
  3. Navigate to Security Settings > Account Policy and Highlight Password Policy.
  4. Here you will see all the rules which we will explain below, that you can enforce on all accounts.
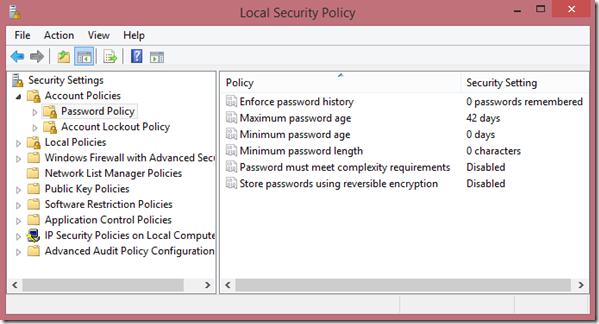
Local-Security-Policy

1.Enforce Password History:

This thing will keep a record of your passwords, and the next time when you change your Password. It will notify you whether you, If you try to use the old one again or the next password is a little similar to any of the old ones. It can save up-to 24 Passwords, but the ideal limit is 8-10. Open the Policy and set the Value from 0-24.

2. Maximum Password Age:

This particular policy will help you in changing the Password, once the Password reach the Mentioned age, you will be notified to change it again. You can set the Value from 1-999, but it is best if you choose from 30-60 days. To disable it, set the value to 0 and you will never be enforce to change your password again.

3. Minimum Password Age:

Opposite to what mention above, this policy ensure that the user don’t change the password before reaching the mentioned days. You can set the value from 0-999, where o means you can change the password anytime you want.

4. Minimum Password Length:

This policy makes sure that the user shouldn’t set the password less than the ideal length, the ideal length can be set from 1-14, but the better one is 8.

5. Password Must Meet Complexity Requirements:

This is the most important policy of all, this policy makes your computer a real Safe house where no one can enter except the one who knows the passwords, even blunders won’t work. If you enable the Policy, your Password must meet the Following requirements:

  • Not contain the user’s account name or parts of the user’s full name that exceed two consecutive characters
  • Be at least six characters in length
  • Contain characters from three of the following four categories:
  • English uppercase characters (A through Z)
  • English lowercase characters (a through z)
  • Base 10 digits (0 through 9)
  • Non-alphabetic characters (for example, !, $, #, %)
  • Complexity requirements are enforced when passwords are changed or created.

6. Store Password Using Reversible Encryption:

If you don’t know much about this Policy, just leave it. However, this policy determines whether the System stores Password using reverse Encryption or not. this policy will encrypt the Password once stored in System, that is all you need to know.

Connect Samsung Galaxy S5 to Nearby Devices via Quick Connect

0
Connect Samsung Galaxy S5 to Nearby Devices via Quick Connect

I’ve posted many guides on Samsung Galaxy S5 like Screen Mirroring, Baby Monitor and Heart Monitor etc. Well, the main reason of posting these guides are because Samsung Galaxy S5 comes with a different interface, so people find it difficult to use. In the following guide, I’ll tell you how to connect Samsung Galaxy S5 to near by device via Quick Connect. You can not only share content through Quick Connect, you can use Galaxy S5 as a remote for your TV, you can start group play with other devices through Quick connect.

Connect Samsung Galaxy S5 to Nearby Devices via Quick Connect

How To Connect Samsung Galaxy S5 to Nearby Devices via Quick Connect:

  • First select what you want to transfer e.g (images, videos, audio files and other contents ).
  • Now use your 2 finger together to pull down the notification menu and select Quick Connect.
  • After selecting Quick Connect your bluetooth will be turned on automatically and Quick will search for available nearby devices.
  • Now you’ll get a list of available devices near you, select the one whom you want to transfer the file.

You can Follow our other guides of Samsung Galaxy S5 and if you want to know about something related to Samsung Galaxy S5 you can tell me in comments.

How To Use Your iPhone As a Joystick For Computer

How To Use Your iPhone As a Joystick For Computer

Now as I’m a regular gamer, if I don’t play games for almost two hours straight, I’m unable to sleep. Since I use a Laptop for gaming, one thing that always bugs me is that I have to get close to it for playing games and at times don’t even get a good spot or posture to play games, most of the times my Legs on which the Laptop is placed gets tired and I have to keep rotating the strike around both the Legs. Now, for an Android device owner, it is easy to use his device as a Joystick to play games from a fair distance, or the least play it comfortably.

Legacy Controller for iPhone does the Job, you can easily configure the app and play games wirelessly on the PC. The same method will work for both PC and Mac, but there aren’t much games available for Mac, so let’s keep it towards windows Only and also, this thing might not suit many Shooting Games but for racing games this is the best thing you need. The app is totally free and works flawlessly.

Joypad

How To Configure and Use Joypad Legacy Controller:

configuration

  • First of all Download and Install the App on both iPhone and Windows.
  • Launch it on Computer First and let it initialize.
  • Now let’s configure the Windows App first, this app will not install any sort of drivers on Computer, but act as a Remote for your Keyboard.
  • Click the New Configuring button and Configure the Button Mapped for your Game, for example, for NFS you need Up, Down, Left, Right for Steering and stuff Space or Shift for NOS, so choose the buttons accordingly.
  • Now launch the app on iPhone and let it connect to PC automatically, if it doesn’t work, try connecting it manually or make sure the Wi-Fi connect is strong, or make a Virtual Hotspot on your device for optimum performance.
  • Once the devices are connected, launch the game on PC and play it using your iPhone.
  • You can even change the display of your Joypad if you want.

Screen Shot 2014-05-17 at 04.38.26

  • If you have more than one iOS device, you can configure the app for more than one player. Click on File Menu on Desktop app and Select New Player.
  • Enjoy!


How To Boost Windows Audio Above Maximum Level

0
How To Boost Windows Audio Above Maximum Level

Well, all those who don’t have an external speaker around to listen Music and they rely on VLC or GOM to increase the volume, but both of them have a little problem. They are not suggested by anyone, as increasing the volume without having proper instrument leads to damaging the device. But forget about that, VLC and GOM only play the Videos/Audios saved on your computer, what about the Songs we play online or Videos payed on Youtube.

To solve this problem, we have two options. One is quite legal, only need a little editing in the Realtek driver itself. It will increase the Volume throughout the whole Platform, while the other do the same thing but it is a third Party software, not bad in itself,  but going after Default things are even better. Without further ado, let’s see both of the tutorials.

volumemixer-400x289

Enable Loudness Equalization Realtek Drivers:

This tutorial has worked with only Realtek drivers, I have no idea whether it will work with any other Sound driver, but there is no guarantee. If you want to do something like this, update your Sound drivers to the latest versions. Once you have updated the drivers, proceed below:

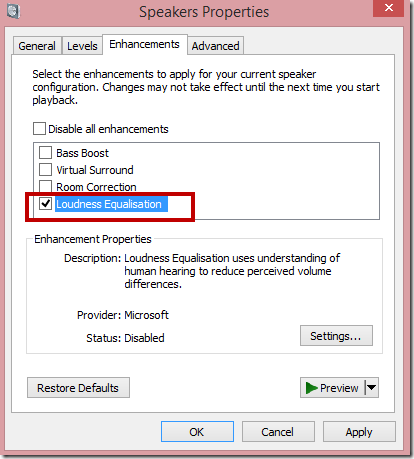
loudness

  1. Open Control Panel and Change the View to Category.
  2. Open Sound and Right Click the Speakers and then Properties.
  3. Navigate to Enhancement tab and Tick the Loudness Equalisation.
  4. Once you enable this Option, you’ll notice the Difference in the Volume of Speakers and it will be around 150% when compared to old Settings.
  5. To reset the Volume Boost, just uncheck the Loudness Equalisation option and all will be back to normal

DFX Sound Enhancer:

DFX

It is a really small app for Windows, but it does the Job. It boosts the Sound quality of all the programs across the Windows Platform. The Tool is available for Free, but like any other good app you will get all the Features once you Pay for it, which is not cheap $39.99. Once you have installed the Application, you can increase the Volume to 150% while in Paid version you can increase it to 200%

Google Has Improved Google Maps Experience With The New Update

0
Google Has Improved Google Maps Experience With The New Update

Google Maps are great, but if you use them in their Default condition, you are going to waste a lot of time while going to a certain place. At first you’ll be like, I don’t know how to get there or arriving to your destination, Google Maps won’t show your location of the same place, thus confusing you whether you have arrived at the point or not. Beside the improve Search and Maps saving, Google has imported a lot of other things in the updated Google Maps including Lane Guidance and Uber Integeration.However, Lane Guidance, which is the most visible change in the Google Maps, is not available everywhere just in selective areas like Canada, Japan and the United States.

google-maps-logo

Lane Guidance:

Lane Guidance is the best way to facilitate, Intersection, Multiple Lanes and Navigation of Exists, Voice guidance is there to ease your work along with some visual cues to help drivers travel very easily. The person driving will be notified of any changes in Upcoming lanes way before they are about to happen.

Lane-Guidance

Uber Integeration:

If you are looking for a Distraction free Transportation, or just want to explore the Town in night. Ubber app has the best private driver ready for you. All you need is to Download the Uber App and Google Apps will estimate the route as fast as possible. The Google Maps will then transfer to Uber app and you’ll be ready to order you own Private car, with cheaper fee than a Standard Taxi cab.

Request-UberX

Public Transportaition:

Public Transporataion is made even simpler in the new update, even if you are not familiar with the Area. Departure, Arrival time for Trains, Buses, Subways will be combined into one simple interface, with walking directions in between. You can even look up for the “Last Trip Available”, which is very helpful if you are staying outside and don’t want to miss the last train home.

Last-Trip

How To Transfer Large Files Between Android Devices Quickly

0
How To Transfer Large Files Between Android Devices Quickly

Well for about now, the only way to transfer data between two mobiles is Bluetooth. Infrared has gone for a long time and despite we don’t use it much, still sometimes we have to use it to transfer small size photos or Music. The real reason why we hate transferring large files via Bluetooth, is because it is not that much fast. You will get a 200kbps rate, not fast enough for files of 1GB or even 100MB, they will consume a lot of time to transfer them.

In Past, we share an article about using ES File explorer to Stream movies from PC, today we will share how to transfer very large files, in terms of Bluetooth, within Android devices using ES File Explorer. Since ES File Explorer has the option to connect to an IP for data transferring, without having any Access point to connect, using a concept of Wi-Fi Direct. All you need is Two or More Android devices with ES File Explorer installed on both of them and your Android device must be running Android 4.1 or Above.

IMG_3577

How To Transfer Large Files Between Android Devices

Screenshot_11

  1. First of all we need to Create a Personal Hotspot, no need to connect to any external Hotspot.
  2. Go to Setting, Select More under Wireless and Network Settings, Tap in Portable Wi-Fi hotspot.
  3. Set the Password if you want, and also set the SSID name.
  4. Now connect the Devices using that Wi-Fi Hotspot, just make sure you have the Dynamic IP, not the Static one.
  5. Once the devices are connected, Open ES File Explorer.
  6. Select the File/Files in ES explorer,either Tap the 3 Dots or the option key in your device and Tap Send.
  7. If the devices are successfully connected, you will see the IP or the Second Android device on the List.
  8. The other device will see the Notification. Once accepted, the transfer speed will be more than 3-5Mbps, you can transfer a full HD movies in a matter of Minutes.
  9. You can minimize the Transfer if you want to do anything else.
  10. You can do the same with more Android devices, I mean more than Two.

Enable Harman Kardon Audio On Your HTC One M8 [How To – Guide]

0
Enable Harman Kardon Audio On Your HTC One M8 [How To – Guide]

HTC’s flagship the all new HTC One M8 did well, the device won the grounds as world’s best Android smartphone for having an elegant design and the heavy spec-sheet. The company has started taking the matters serious now and is giving other manufacturers a tough time, just as we saw HTC managed to keep it’s One [M7] on the top of the list, just because of the device’s build and design and it looks like HTC won’t loose this very thing now. A number of variants has already landed, but to add a little more charm to its device, HTC, in collaboration with Sprint, brought up the special Harman Kardon edition of the M8.

Although HTC’s BoomSound speakers also add to the device’s uniqueness, that it introduced with M7, and is using in M8 as well, but the Harman Kardon edition may take a clean lead here in this department now. Harman Kardon editions’ sound is even more clear and far better than that of the BoomSound. Seeing from what HTC has been doing in the recent few years, from HTC One M7’s design, Mini version, special editions of the devices and now the One M8 with Harman Kardon, it looks like HTC is following the footsteps of Samsung by bringing up the same device’s different variants and special editions with additional and exclusive features.

HTC_One_M8_Harman_Kardon_edition_1

However, what our concern today is, the Harman Kardon speakers will definitely make the BoomSound M8 owners a little jealous as it came out later and it came out better, but this really is not a thing to worry about. In the world of Software, and specailly when it comes to Android, the world’s fastest growing and world’s most used open nature operating system, there is no break and no boundary for the development. XDA Reconigzed Developer baadnewz has come up with Harman Kardon “conversion” compatible with all the variants of the HTC One M8. Wondering how you can get and enable the Harman Kardon sound conversion on your M8? well, that’s what we are for.

In the following post, you will find a complete guide to install Harmon/Kardon conversion on your HTC One M8. The mod is compatible with all the variants of this device. All you need is, follow the guide carefully.

Here are the pre-installation instructions:

  1. This mod is only for HTC One M8 [All Variants including International, At&t, Sprint, T-Mobile, Verizon]. Do not try this on any other device.
  2. Use this mod only on Sense based ROMs. Do not use this Mod on Google Play Edition stock, you will have to install a Sense ROM on the device first.
  3. If your device’s base number is 1.1, H/K mod won’t show up in your settings. Either update your device to the latest base, or flash a latest custom ROM.
  4. For this mod to work properly, it is recommended to have the S-OFF, you also need a custom recovery to flash it. Here’s our full guide on  HTC One M8 Unlock Bootloader,CWM Recovery, Root and Achieve S-OFF.
  5. Backup all your important media content, contacts, call logs, sms messages.
  6. Once you’ve installed a custom recovery, make sure that you create a Nandroid Backup.
  7. Follow the instructions carefully.

How to Install Harman Kardon on HTC One M8:

  1. Download hk_enable_and_adsp_update_v3.zip  file.
  2. Connect your phone to your PC now.
  3. Copy the .zip file to your phone’s SD card [Internal or External].
  4. Now boot into recovery mode on your device. In order to do so, turn it off completely first. Now turn it on by keeping pressed the Volume Up + Down + Power Key. As soon as you see the Hboot mode, select Recovery and proceed.
  5. You should be in the custom recovery now, most probably the CWM recovery.
  6. Now in recovery, select “Install > Choose Zip from SDcard > Locate the .zip file from where you copied > Yes”.
  7. Proceed with the installation and complete it.
  8. As soon as gets done, reboot your One M8.
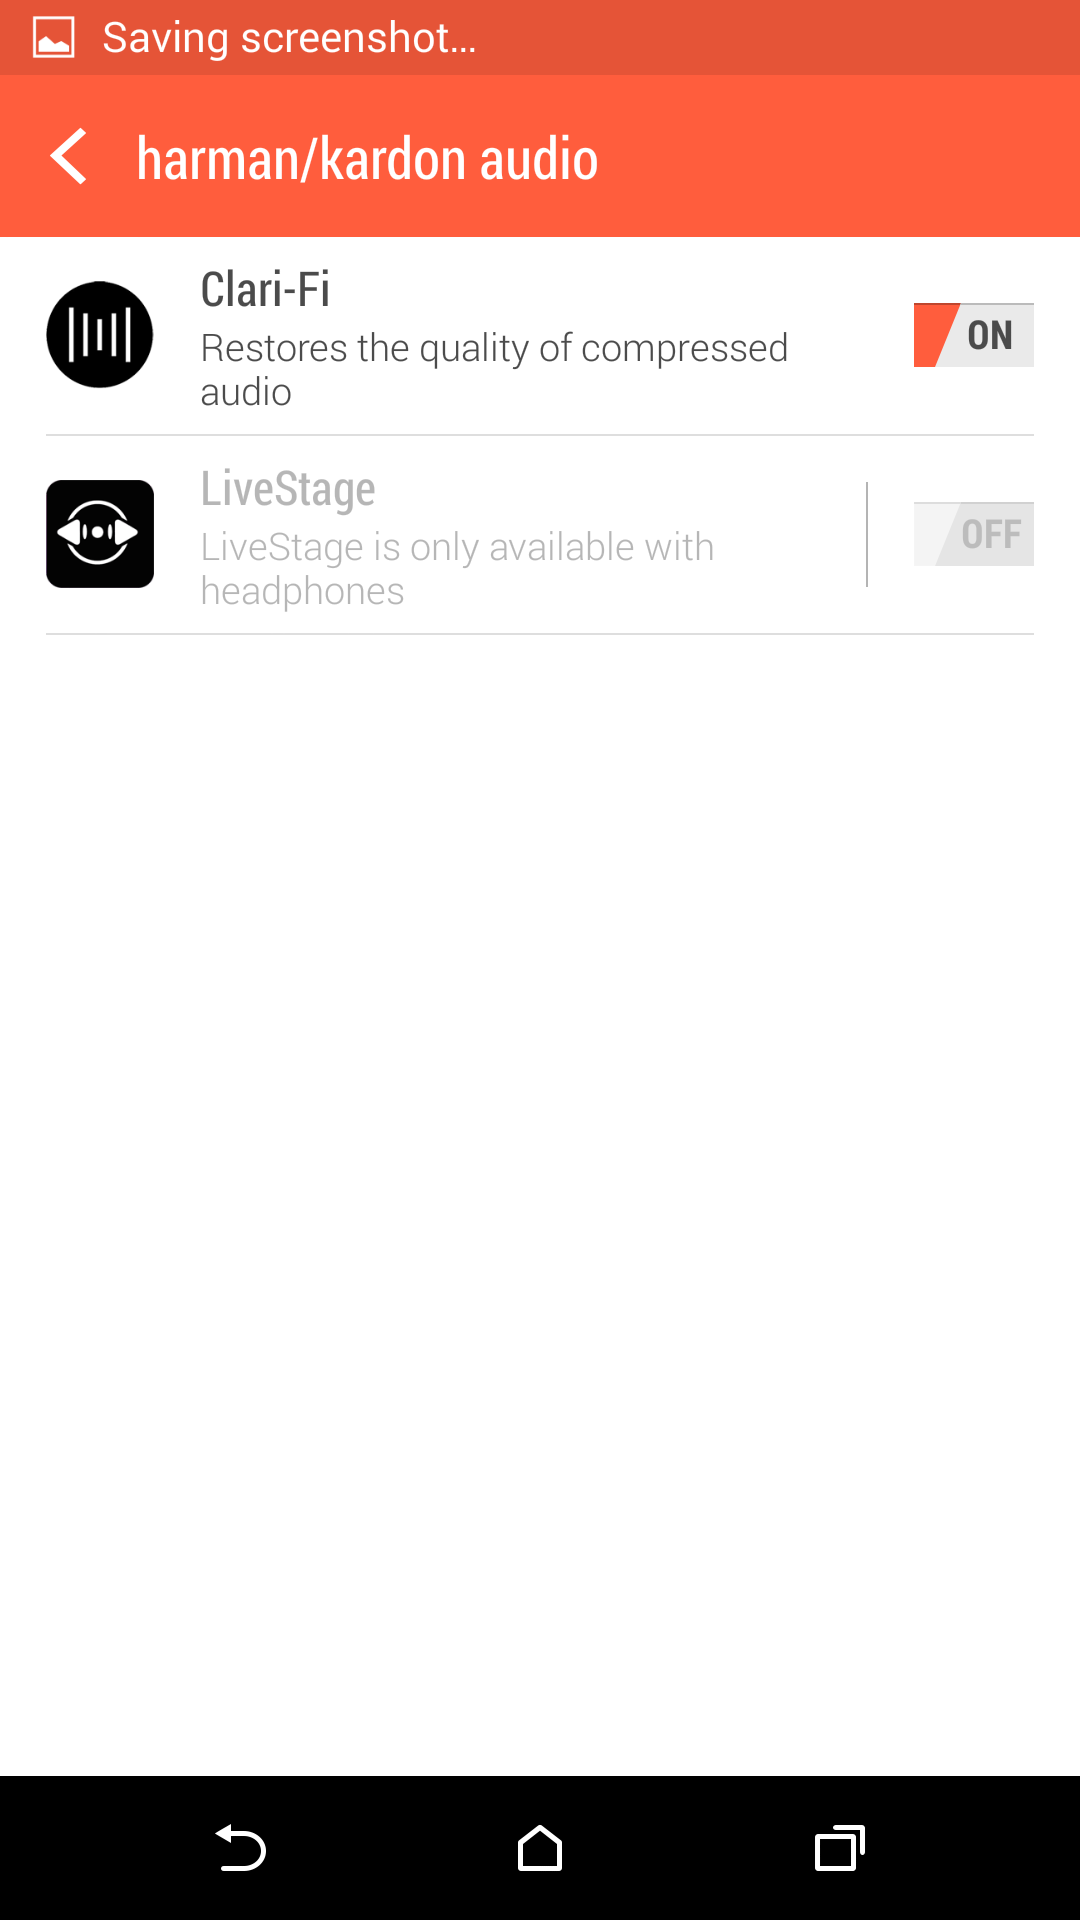
  9. Once rebooted, go to settings > harman/kardon audio > enable it.
  10. Play the music and enjoy the sound.
  11. That’s all!

Harman Kardon - One M8 Harman Kardon - One M8-0 Harman Kardon - One M8-1

We hope that you surely will love this mod, don’t forget to the original developer for his hardwork.

In case you got any queries or you face any difficulties regarding this post, don’t hesitate to reach us through the comment box below. We will get back to you as soon as possible. Thank you all.

How To Enable Multi-Tasking In Google Chrome

0
How To Enable Multi-Tasking In Google Chrome

Upon hearing the Multi-Tasking, the first thing that comes in our mind is an Android or iOS device, but what if I tell you that multi-tasking is possible in Chrome as well. While you are clicking or using CTRL + 1,2,3 to navigate between Chrome Tabs or Windows, Chrome Web store is offering applications, which can create a floating window of a Chrome tab, so you won’t switch between the tabs again and again and Picture in Picture Viewer for Chrome does the job. The working part in the whole thing is that you need to enable the pop-out panel support in Chrome. It is quite simple, just some addition in the Adress bar. Here is how you can install this Extension and enable the pop-out panel support in Chrome.

Screenshot_9

How To Install And Use Picture in Picture Viewer:

Screenshot_8

  1. First of all, download and install Picture in Picture Viewer from Chrome Store.
  2. Now Type chrome://flags/ and look for Enable Panel option, once found Enable it.
  3. Now open any page you want to view in Pop-up mode and copy the URL.
  4. Click the Picture in Picture Viewer icon on the Top right corner and Paste the URL in Clipboard.
  5. You will see the a new Window pop-up at the Bottom of screen.
  6. That Particular site will always open the Pop-up mode.
  7. The same method can be applied on multiple sites to enhance Multitasking.
  8. For even more ease, just add #panel after the URL to open it in Pop-up mode.

Here Is How You Can Use Spotify Outside UK, US

0
Here Is How You Can Use Spotify Outside UK, US

As, you all know that Spotify is not available for the whole world, most of the times it is available only for UK and USA users. Even though there are other services like Spotify that are available throughout the world, but Spotify is specifically made to listen the music. And according to what they wrote on their site, it will be launched very soon, for the country you are living in. Not a very difficult task, but you have to do little things out of the order.

First of all you need to Change your Proxy Server to UK or US. You can use Hotspot shield to do so, but their service is only good for unblocking the sites. Their proxy can easily be caught, as it happened to me while I was playing MW3, and was kicked out for using an illegal proxy server. We will show you a great Proxy switcher, which will help you in opening Spotify.

Screenshot_4

How To Use Spotify:

Screenshot_5

  1. First Of all, Visit Tunnel Bear to Change Your Proxy to UK or US, you will be given maximum 500MB bandwidth, more than enough for the Job.
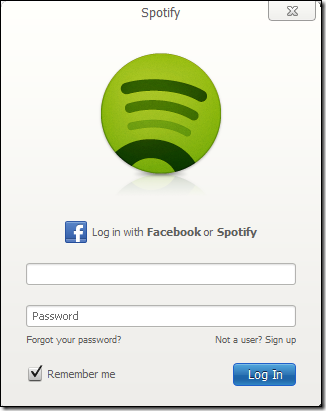
  2. Now visit Spotify home page and Sign in.
  3. You can even use your Facebook account to Log-in.
  4. After logging in, Edit your Profile and Change the Country to UK. The reason why we change the Proxy to UK, if the proxy is not set to UK, Sotify won’t open at all.
  5. That is all, go ahead and install Spotify on your Computer, you can Log-in using  your Facebook credentials again.
  6. Make sure to activate the VPN the whole time, for the first Log-in

login

Accidentally Closed Tab In Chrome, Here Is How To Open It

0
Accidentally Closed Tab In Chrome, Here Is How To Open It

There is no need to mention the reason ,but users open a lot of Tabs and Windows while using Google Chrome. In the search of a simple Answer, Google opens up a lot of results in front of us and it is a stupid thing to open one result, then open the second one and like this the others. Here most of us either use Right Click and Open In New Tab or people like me either Press the Scroll of Mouse or Hold CTRL and Left Click all the related results one-by-one. Now, the problem that arises after that many Tabs is the Accidental click on the X mark, thus closing that Tab.

This is a Common problem faced by many Chrome users, since Google Chrome doesn’t support Tabe Over Flow Feature, like in Internet Explorer and Firefox. So, if you are a Busy tab user, or a person who like to open a lot of tabs without any reason and then gets mad after an accidental close, you have to spend a reasonable time to open the same result again, even if you open the history. What you need is a Quick way to re-open the Tab quickly.

chrome-blank-tabs

There are Two Methods to Do so, one is reliable, fast and time saver, the other, however, gives you more control over your choice, but not suitable on the spot re-opening.

Use History To Open Recent Tabs:

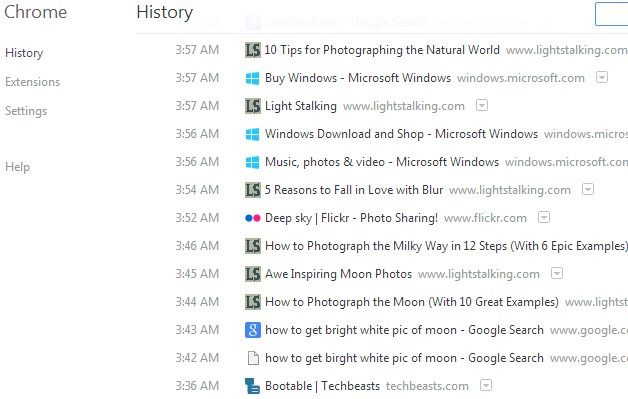
  1. You can Press CTRL + H at the same time to open History Tab or Type  chrome://history/ in History bar to open it.
  2. You will see the list of all the Tabs that you Open Recently.
  3. Click on anyone to open it.
  4. However, the same method will not be applicable on Incognito Mode, as Incognito mode never saves your History.

Screenshot_9

Use Keys Combination To Re-Open Tabs:

The above method is good, but if you are looking for even faster method, follow:

  1. You can Press CTRL + Shift + T to open any closed Tab, but the sequence will be the same as you Close the Tabs.
  2. For example, if you closed Google.com first then closed Twitter, then first Twitter will be open if you use the Combo and if you use it again, Google will open.
  3. This Combo can open a Single tab at a time, keep pressing it to open more.
  4. If your Chrome has Crashed, and all of the Windows are closed. Open Chrome and Hit the combo, the whole window will be open in front of you. You can do the same to open more Windows too.

How To Reset iPod All Variants

0
How To Reset iPod All Variants

Every day we post guides on how to reset Samsung Galaxy s5, iPhone 5s, iPad , HTC and many more. But there are very few guides on how to reset iPod Nano, iPod Touch, iPod Classic, or iPod Shuffle. Today, I’ll tell you how to reset your iPod Nano ,iPod Touch, iPod Classic, or iPod Shuffle through my step by step guide. Every iPod variant has different method so kindly perform reset according to the respected model.

how to reset iPod

Unfreeze or Reset an iPod Touch:

iPod Touch is same like iPhone so there is no rocket science to reset or unfreeze iPod Touch, it doesn’t matter which generation iPod touch your are using. Follow the steps, Press the Home + Power Button until you see a black screen then Apple logo let go the both buttons. After doing this if your iPod Touch is stuck on Apple logo or boot loop perform the following steps.

  • First press Home+Power button together until screen goes black let go the power button but keep pressing home button for 10 seconds.
  • Now connect your device with PC/Mac.
  • Open iTunes and you’ll see your iPod Touch will be connected in recovery mode.
  • Now select restore iPod and wait for process to completed.

Unfreeze or Reset an iPod Classic:

611rsfQE5HL._SL1500_

Reset iPod Classic a little bit tricky and you have to perform correctly all the steps in order to unfreeze or reset an iPod classic.

  • First on and off your iPod using hold switch. (Slide it to Hold, then turn it off again.)
  • Now you have to press and hold Menu + Select button until Apple logo appears on the screen. Let go the both buttons after the Apple logo appear.
  • It’s kind of tricky so give it a 2 or 3 times try it’ll work.

Unfreeze or Reset an iPod Nano (6th & 7th Generation)

440x330-p1150703


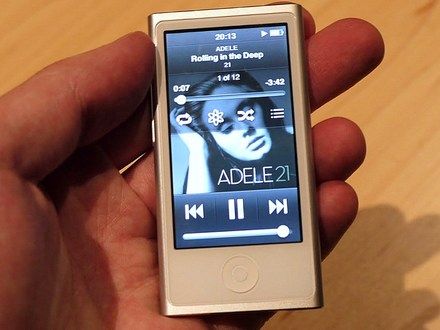
Apple iPod Nano 6th and 7th generation are totally different from all variants. So, resetting process is also different first let me tell you how you can unfreeze and reset iPod Nano 7th generation.

  • Press Sleep/Wake + Home button at same time for 10 seconds.
  • Release the buttons when you see the Apple logo at your iPod screen.

Reset iPod Nano 6th Generation:

440x330-ipod-nano6gen-front

  • Press and hold Sleep/Wake +Volume button together for 10 seconds.
  • Release the buttons when you see Apple logo on your iPod screen.

Note: Unfreeze or reset process for Apple iPod Nano 1st, 2nd, 3rd, 4th & 5th generations is same.

Unfreeze or Reset an iPod Nano (1st, 2nd, 3rd, 4th & 5th Generation)212496-apple-ipod-nano-5th-gen-with-video-recorder-front

Same method for all iPod Nano’s from 1st to 5th generation. All you have to do is follow the steps carefully so you don’t have to do it again and again.

  • First on and off your iPod using hold switch. (Slide it to Hold, then turn it off again.)
  • Now you have to press and hold Menu + Select button until Apple logo appears on the screen. Let go the both buttons after the Apple logo appear.
  • It’s kind of tricky so give it a 2 or 3 times try it’ll work.

Reset or Unfreeze an iPod Shuffle:

ipodshuffle-product-initial-2013

This is the most simplest and easiest way to reset iPod Shuffle all you have to do is turn off your iPod Shuffle by sliding the top switch to off. Now wait for at-least 10 seconds then again switch it to on.

How To Create Windows 8.1 Bootable USB Using An ISO Image

How To Create Windows 8.1 Bootable USB Using An ISO Image

CD/DVD’s are reliable, but they don’t have much lifetime. Most of the time they get damaged, because someone might use them carelessly. If you own a Windows DVD, then I can assume you share it with your Friends and because of that, what usually happens is that they give it back to you, but the DVD is not in a condition to be used again. If you are used to of such situation ,then I think it is time for a change, from DVD to a USB.

ISO images can be used to create a bootable usb drive, you can download the proper ISO images to use them. On the other side, USB drives are always faster than DVDs, and Failure or corruption error while installation is less as compared to DVD or a CD. It doesn’t matter which Windows version you want to install. However, remember that the only way you can use a USB to install a Window is if you use a Bootable drive, so don’t just copy it and think that it is enough for installing the Windows.

windows-8-usb

How To Create Windows 8.1 Bootable USB Drive:

  • Download the ISO image of Windows 8.1: Link
  • Download and Extract WinUSB Maker,  it won’t need any sort of Installation, all you need is to run .exe file.
  • Run the Tool with Administrative privileges, Right Click the .exe file and Run as Admin.
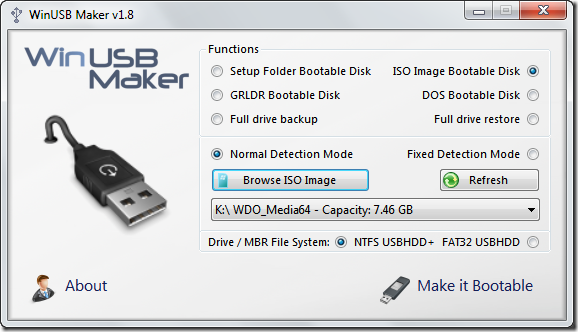
  • In the tool Select the Option ISO Image Bootable Disk, Normal Detection Mode. Then Browser for the Image you have downloaded earlier.

USB-maker

  • Finally Select the USB Drive, if you have only one plugged in, then it will detect it automatically, otherwise choose the one you want to use. Choose Drive MBR System.
  • Then Click Make it bootable.

warning

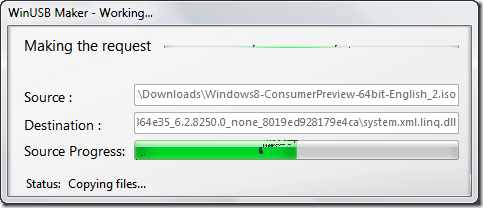
  • Now Sit back and Relax and let the Tool do its magic.

bootable-creation

  • Now Select USB as Primary Bootable device to install Windows via USB.