Home Blog Page 431

Download Nature HD Desktop Wallpapers for Widescreen, High Definition, Mobile

0
Download Nature HD Desktop Wallpapers for Widescreen, High Definition, Mobile

Today i’ve collected the Nature HD Desktop Wallpapers for Widescreen and Mobiles. Every body loves Nature beauty because it speaks for himself. Following are Nature HD Desktop Wallpapers for Widescreen, High Definition, Mobile and Macbook. You can follow our HD Wallpaper Gallery.

Amazing Sunset in Vally wallpaper

Source

breathtaking nature

Source

dawn

Source

morning light

Source

road_among_trees-t2

Source

sea_25-t2

Source

the_heart_of_the_mountain-t2

Source

tree_field-t2

Source water_26-t2

Source

waterscape_2-t2

Source

Brave Frontier 1.1.16 APK for Android – Download Here

Brave Frontier 1.1.16 APK for Android – Download Here

Do you like to Play Style Role games on your Android or iOS devices, if you do then you should try Brave Frontier, the best style role action game for Android and iOS. DOWNLOAD FOR FREE the MOST ANTICIPATED classic style role-playing game for the Android! Venture forth into Grand Gaia, the world of the gods, and unleash your Summoner powers to save it by defeating the fallen god Maxwell in this immersive and addictive RPG!

Brave Frontier 1.1.16 APK for Android

Brave Frontier Features:

* Summon over 200 legendary heroes and ancient beasts, and assemble them into powerful squads, mastering the elemental strengths of Fire, Water, Earth, Thunder, Light, and Dark!

#1 Classic Style RPG game in Japan and Korea!

* Team up with friends and develop your tactics to take on more than 100 missions throughout the land of Grand Gaia!

* Collect loads of beautifully pixel-crafted heroes, each with their own battle style and unique Brave Burst attack!

* Compete in the PVP Arena! Climb its ranks and cut down your opponents to receive rare equipment and other rewards!

* Upgrade resource fields in your town and harvest materials from them to synthesize potions or craft powerful equipment!

Fore More: Google Play

How To Download and Install Brave Frontier 1.1.16 APK for Android:

  1. First Download Brave Frontier 1.1.16 APK for Android.
  2. Download Directly on your phone.
  3. Now goto downloads on your device and search for the Brave Frontier apk file.
  4. Tap on the apk file, a dialog box will open press on next.
  5. Now follow the instruction on the screen to complete the installation.
  6. After the installation is completed start play brave frontier.

Download Original THE KING OF FIGHTERS ’98 on Android/iOS.

0
Download Original THE KING OF FIGHTERS ’98 on Android/iOS.

The King Of Fighters 98 a game which is know as the best game of century and no doubt this game has ruled over the years. I played that game when i was kid so did most of you people. You can download its all version and play it on PC using emulators, but today i got a good news for all those who are mobile geeks and love to play old arcade games on mobiles. Now you can download the original King of Fighters 98 on your iPhone and Android. There are many other version of this game but this one is the original KING OF FIGHTERS ’98.

Download Original THE KING OF FIGHTERS '98

Main Features of THE KING OF FIGHTERS ’98:

Following are the main features of the THE KING OF FIGHTERS ’98. This game is paid you can purchase it by paying $3.6, its worth paying for.

FEATURES:
★ The best game balance in the KOF Series!
“KOF ‘98” is praised among KOF fans around the world as being the ultimate compilation of “KOF ‘94” ~ “KOF ‘97” titles and for its fantastic game balance. Moreover, this perfect port of “KOF ‘98” features 2 different gameplay modes, “EXTRA” & “ADVANCED”, and also includes a “TRAINING MODE” where you can master all your combos! “KOF ‘98” is also compatible with Bluetooth game controllers for the best gameplay experience ever!!

★ 38 playable characters!
In addition to the series’ iconic characters, “Iori” and “American Sports” teams as well as “Shingo Yabuki” and “Rugal Bernstein” edit characters return in “KOF ‘98” to complete the gorgeous roster of 38 characters and for a never ending dream match!

★ A NEOGEO Perfect Port with added features!
Play “KOF ‘98” with its original 4 buttons configuration, or use its unique control scheme of 6 button settings and the simplified special moves with the help of the “SP” button!

★ Challenge your friends via Bluetooth!
Dual with other KOF players via Bluetooth Multiplayer Mode for epic and unforgettable battles!

For more please visit Google Play.

(Download: The King of Fighters’ 98 for iOS / Android)

Root Galaxy S4 Mini Duos I9192 XXUCNG2 Android 4.4.2 KitKat Firmware

4
Root Galaxy S4 Mini Duos I9192 XXUCNG2 Android 4.4.2 KitKat Firmware

Samsung has recently rolled out Android 4.4.2 KitKat firmware based on the build number XXUCNG2. The new update promises a lot of changes. The notable changes are the white icons atop of the transparent status bar, new music player on lock screen, the settings application has been revamped and Samsung has also updated some of its applications with a new UI. Besides these UI changes, a number of bugs has been fixed and performance of the device is enhanced while the battery life gets an improvement as well.S4 Mini Duos Android 4.4.2 KitKat Rooted

If you’re looking to update your device to this latest firmware you may checkout our  complete guide to update the Galaxy S4 Mini GT-I9192 to Android 4.4.2 KitKat XXUCNG2 Official firmware. Once you’ve updated, you may want to go beyond the boundaries on your device and for that you will definitely need root access. Before you start looking here and there, we’ve already done the job. In the on-going post, you will find the complete and comprehensive guide to root your Galaxy S4 Mini Duos running Android 4.4.2 KitKat XXUCNG2 firmware. All you need is, you need to follow this guide carefully.

Here are the early preparations:

      1. This guide is only for Samsung Galaxy S4 Mini Duos GT-I9192. Do not try this on any other device.
      2. Make sure that your phone’s battery is charged at least over 60%.
      3. Use the original data cable for establishing the connection between your PC and phone.
      4. Backup all your important contacts, find the full guide here.
      5. Backup all your important sms messages, find the full guide here.
      6. Backup all your important call logs, find the full guide here.
      7. Backup all your important media content manually. (Copy to your PC.)
      8. Don’t forget to make EFS backup before flashing this firmware. [Important]
      9. Turn off /disable Samsung Kies while using Odin3.
      10. Turn of any Anti Virus software while using Odin3.
      11. Alright. Follow the instructions carefully.

Disclaimer: The methods involved in flashing custom recoveries, roms and rooting your phone are highly custom and may result in bricking your device, and has nothing to do with Google or the device manufacturer that is SAMSUNG in our case. Also rooting your device will void its warranty and you will be no longer eligible for any kind of free device services by the manufacturers/warranty providers. In case of any mishap we may not be held responsible. Follow these instructions to the letter to avoid any mishap or bricking. Make sure that whatever you do, you are doing it at your own responsibility.

How To Root Samsung Galaxy S4 Mini I9192 Android 4.4.2 KitKat:

Downloads Required:

Process:

  1. Open Odin3.exe.
  2. Put your Galaxy S4 Mini Duos in download mode. To do so, turn it off and wait for 10 seconds. Turn it on by pressing and holding Volume Down + Home Button + Power Key simultaneously, You should see a warning, press Volume Up to continue. In case this method doesn’t work for you, try one from this guide.
  3. Connect your device to your PC.
  4. As soon as Odin detects your phone, the ID:COM box should turn blue.  Make sure that you’ve installed Samsung USB drivers before connecting.
  5. For Odin 3.09 hit the AP tab. Select the extracted Autoroot.tar.md5, that you downloaded above.
  6. If you’re using Odin 3.07, you will select “PDA” tab instead of the AP tab, rest of the options remain untouched.
  7. Make sure that the options selected in your Odin are exactly as shown in the pic.
  8. Odin 3.09 explained. (2)
  9. Hit start and wait till the rooting process  is complete, as soon as your device restarts, remove it from PC.
  10. That’s all!


How to Verify Root Access now?

      1. To do so, go to Google Play Store on your Galaxy S4 Mini Duos.
      2. Find “Root Checker and install it.
      3. Open Root Checker.
      4. Tap “Verify Root”.
      5. It will ask you for SuperSu rights, tap “Grant”.
      6. It should show you Root Access Verified Now!
      7. That’s All!

1560688_10202529514651766_2061540064_n

Advantages of Root Access:

Rooting your phone gives you complete access over all the data which is apparently locked by the manufacturers. This includes removal of the factory restrictions and making changes to the internal system and the operating system. Gaining the root access gives you the privileges to install various applications to enhance the performance of your device, allows you to remove the built-in applications/programs, helps you to upgrade the battery life of your device & install the apps which require the root access for the proper functionality and modify your device in so many other ways e.g using mods and flashing custom recoveries and custom ROMs. Here’s our collection of 10 Best Root Apps.

That’s all. If you’re stuck with anything regarding this post, please feel free to stop by the comment box below and drop us your words. We will be up to help you as soon as possible. Thanks all.

How To Fix No Service on Samsung Galaxy

2
How To Fix No Service on Samsung Galaxy

Samsung Galaxy series is the top selling mobile device family all over the world. But nothing is perfect same goes for Samsung Galaxy devices, we face many issues on our Galaxy devices but one is most common ” No Service “. Before starting to fix it i’ve many other guides that can be useful in this situation. You can use fix not registered on network ” , ” Restore Null IMEI ” , ” Fix error while searching network and  Fix Unable to send message “. 

How To Fix Samsung Galaxy No Service

How To Fix Samsung Galaxy No Service:

Kindly follow all the steps carefully in order to fix Samsung Galaxy no Service problem. The main reason of no service error is that your device radio turns off automatically.

  • First open dialer.
  • Now dial  *#*#4636#*#* .
  • Now you’ll be in service mode.
  • Run Ping test.
  • Turn off radio/turn on radio.
  • Now restart your device.

You can apply these steps on the following devices:

  • samsung galaxy s3 No Service 
  • samsung galaxy s2 No Service 
  • samsung galaxy s3 No Service  t mobile
  • samsung galaxy s 4g blaze  No Service  network
  • samsung galaxy s4  No Service  on network
  • samsung galaxy s5 No Service 

NO service error occurs most of the time because of Null IMEI means if you check your IMEI you’ll get a pop-up showing Null/Null instead of the numeric number. If the given method didn’t worked for you then you can use the following guides.

Update Galaxy S4 Mini Duos I9192 To Android 4.4.2 KitKat Official Firmware

0
Update Galaxy S4 Mini Duos I9192 To Android 4.4.2 KitKat Official Firmware

Samsung has surprised the Galaxy S4 Mini Duos users by rolling out Android 4.4.2 KitKat suddenly. The very first and the lucky region to receive this update is Russia. Besides being the latest and greatest version of Android (Android 4.4.2 KitKat), this update packs up a number of changes. These include performance enhancements, bug fixes, battery life has been enhanced and there are quite a few changes in the UI. The music player plays on the full lock screen now, notification bar is completely transparent with white buttons atop, and settings app has been revamped. There are many more changes that you may notice once you update your device. Samsung-Galaxy-S4-Mini-Duos-GT-I9192-black-mist
Although this update is rolling out in Russia at the moment, but the Galaxy S4 Mini Duos users all around the world may not get disappointed as they can also update their device using by using a manual method. If you happen to be one of the Android enthusiasts owning this device and now looking for a method, you might have spotted the right place as in the following post we will be installing Android 4.4.2 KitKat XXUCNG2 official firmware on our beloved Samsung Galaxy S4 Mini Duos GT-I9192. Let’s scroll down now.  Here are the firmware details:

  • Device: Samsung Galaxy S4 Mini Duos GT-I9192
  • OS: Android 4.4.2 KitKat XXUCNG2
  • Region: SER (Russia)
  • Build Number: I9192XXUCNG2
  • Build Date: 8/7/2014
  • Changelist: 1995154

Here are the early preparations:  

      1. This guide is only for  Samsung Galaxy S4 Mini Duos GT-I9192. Do not try this on any other device.
      2. Make sure that your phone’s battery is charged at least over 60%.
      3. Use the original data cable for establishing the connection between your PC and phone.
      4. Backup all your important contacts, find the full guide here.
      5. Backup all your important sms messages, find the full guide here.
      6. Backup all your important call logs, find the full guide here.
      7. Backup all your important media content manually. (Copy to your PC.)
      8. If you’ve flashed a custom recovery, it is suggested that you create a Nandroid Backup. [Important]
      9. Don’t forget to make EFS backup before flashing this firmware. [Important]
      10. If your device is rooted, you may use Titanium Backup to backup each and everything on your phone.
      11. Although it is not necessary to wipe your phone before flashing this firmware, but to achieve the best performance, it is recommended that you perform a factory reset before flashing this firmware.
      12. A clean install is always preferred for the best results from the new firmware. It is recommended that you wipe your phone from the recovery using “Factory Data Reset” option and then install this firmware.
      13. Turn off /disable Samsung Kies while using Odin3.
      14. Turn of any Anti Virus softwares while using Odin3.
      15. Alright. Follow the instructions carefully.

Things you need to download:

    1. Download and extract Odin3 v3.09.
    2. Download and Install Samsung USB drivers .
    3. Download  and extract Official Android 4.4.2 KitKat For  Samsung Galaxy S4 Mini Duos

How To Update Galaxy S4 Mini Duos I9192 with Official Android 4.4.2 KitKat

  1. Clean install is always recommended, at first, you need to backup everything as explained above. Now boot your Galaxy S4 Mini Duos  into recovery mode and wipe factory data / reset. In order to do so, turn off your device first, now turn it on by pressing and holding Volume Up + Home + Power Key and you should be able to see the recovery in a while.
  2. Open Odin3.exe.
  3. Put your S4 Mini Duos in download mode. To do so, turn it off and wait for 10 seconds. Turn it on by pressing and holding Volume Down + Home Button + Power Key simultaneously, You should see a warning, press Volume Up to continue. In case this method doesn’t work for you, try one from this guide.
  4. Connect your S4 Mini Duos to your PC.
  5. As soon as Odin detects your phone, the ID:COM box should turn blue.  Make sure that you’ve installed Samsung USB drivers before connecting.
  6. For Odin 3.09 hit the AP tab. Select the extracted firmware file, that should be in .tar.md5 format.
  7. If you’re using Odin 3.07, you will select “PDA” tab instead of the AP tab, rest of the options remain untouched.
  8. Make sure that the options selected in your Odin are exactly as shown in the pic.
  9. Odin 3.09 explained. (2)
  10. Hit start and wait till the firmware flashing is complete, as soon as your device restarts, remove it from PC.
  11. Congrats! your device is now running on Android 4.4.2 KitKat firmware.

That’s all. In case you got any queries or you face any issues regarding this guide, please feel free to stop by the comment box below and let us know about it. We will get back to you as soon as possible. Thank you.

Download Google Play 4.9.13 Apk [ Update 1x ] [ Direct Download

Download Google Play 4.9.13 Apk [ Update 1x ] [ Direct Download

Here it is Google has started rolling out his new Google Play 4.9.13 update for Android devices. Good things is that its Google Play is revamped in rich style. Hope so it fix all the previous errors of Google Play Store. If you cannot wait for the official update then you can download the Google Play 4.9.13 Apk  from the given link below.

Download Google Play 4.9.13 Apk


From Google Play twitter:

Our latest update is rolling out right now! We’re excited to share a sneak peek of what you’ll get in the coming days


Google Play 4.9.13 Apk


Root Galaxy S5 G900H On Android 4.4.2 XXU1ANG3 Kit-Kat Official Firmware

Root Galaxy S5 G900H On Android 4.4.2 XXU1ANG3 Kit-Kat Official Firmware

Well the last update was the 2nd update for Galaxy S5 G900H from its release. We can say that you have gotten your hands on it as fast as you could and as far as we all remember, if you update your device to an Official Firmware, you are to loose the root access of your device and they only way to get it back is to root it again. I know that a person who is addicted to a rooted device won’t be able to live a single day without root access. If you want to use your device to full potential, then rooting is a necessary part of it, you can make a lot of Customizations in your device with just root access, then you can’t even with a Custom ROM, nonetheless, let’s proceed and see how we can root the device again.

update-galaxy-s5-g900hxxu1ane2-android-4-4-2-stock-firmware

Rooting allows you to get full control over your device, Stock apps and mods are good, but installing Custom Mods gives you better support and great battery life, you might need to delete some Stock apps from the device, a non-rooted device can’t do that, but a rooted one has the power to remove stock apps too.If you are familiar with Odin and it’s working, then this tutorial might not be difficult for you. Otherwise read the whole tutorial first before trying it on your device. In this Article, we will show you How To Root Galaxy S5 G900H On Android 4.4.2 XXU1ANG3 Kit-Kat Official Firmware. But before we begin, Make sure that:

  1. Update Your Device To Android 4.4.2 Kit-Kat:Link
  2. That you have a Well Charged Battery, 60%-80% is better.
  3. Back-Up all your important ContactsCall Logs & Messages.It is highly recommended in case of any mishap or data loss to back up all your important data.
  4. Back-Up your Mobiles EFS DataHow To Restore and Back-Up EFS Data On Samsung Galaxy Devices.
  5. Check your device model, Go To Setting > About and Make sure that it is G900H .
  6. Do-not try this tutorial on any other device.

Disclaimer:

The methods involved in flashing custom roms and rooting your phone is highly custom and may result in bricking your device,and has nothing to do with Google or the device manufacturers which is Samsung in our case. In case of any mishap we may not be held responsible. Follow these instructions to the letter to avoid any mishap or bricking. Make sure that whatever you do, you are doing it at your own responsibility

How To Install CWM Recovery:

odin_explained6

  1.  Download CWM Recovery Package For your Galaxy S5 to your computer and extract the zip file.
  2. Download Odin.
  3. Turn off your Phone and Turn it On While Pressing, Power + Volume Down + Home button until you see some text on-screen, Press Volume Up to continue.
  4. Make Sure that the USB drivers are installed.
  5. Open Odin in Computer and connect your device to PC, while it is in the Download mode.
  6. If your Phone is successfully connected to PC, the Odin port will turn Yellow with COM port number.
  7. Now Click on PDA and select the File ‘g900h-cwm-recovery-6.0.4.7.tar
  8. In Odin, Check Auto reboot  Option.
  9. Now Click the start button and wait for the process to complete.
  10. After the installation is complete you device will restart and once you see the Home Screen and get the “Pass” Message on Odin, unplug the cable.

How To Flash Super SU:

  • Connect your device with PC.
  • Download Super SU for your device.
  • Copy and Paste the Above zip files to the root of your sdcard.
  • Disconnect the cable.
  • Turn Off your Device
  • Open Recovery mode. How? Press and hold the Volume Up + Home + Power buttons until you see some text on screen.
  • Navigate to ‘Install zip from sd card’ another windows will open in front of you.
  • Select ‘choose zip from sd card’ from the Options.
  • Select the Super SU.zip file and confirm the installation on next screen.
  • Once the Installation is Over, Select +++++Go Back+++++
  • Select Reboot Now to Reboot the System.

How To Fix Rebooting Problem On Xperia Z

0
How To Fix Rebooting Problem On Xperia Z
Rebooting Problem On Xperia Z

Sony Xperia z is the mid-range high-end device that comes with a large screen and with 2 awesome features ( Water and dust resistance ). This is the first device that came with water resistance technology. I prefer this device over Xperia z1 and z2, not with specs but according to the size you can easily put Xperia z in the pocket but on the other hand, Xperia Z1 and Z2 are much bigger in size. But today i am not giving a specs review etc.

Rebooting Problem On Xperia Z

I have heard that Sony Xperia Z is facing rebooting problem from our many readers so i’ve gathered a helpful solutions to fix Rebooting Problem On Xperia Z.

How To Fix Rebooting Problem On Xperia Z:

  1. First of all observe what causing rebooting on Xperia Z.
  2. Try deleting recent apps that you have installed before the rebooting problem start.
  3. Make a backup of your device and perform a factory reset through your phone settings.
  4. Remove SD card reset your device.
  5. Try to use your Xperia Z without Sim and see if its rebooting or not.
  6. Root your device and install a custom rom may be stock software is corrupted and its causing your Xperia Z to reboot.
  7. Go into recovery and ” Select Wipe cache partition ” then turn on your device and use it.
  8. After performing Wipe cache partition nothing happened, reboot your device go into recovery and Select ” Factory data reset “.
  9. Press the power + Volume up button for 10 seconds. Release the buttons when phone vibrates for 3 times.
  10. Download Sony PC Companion software. Attach your device with PC and goto Support Zone > Start > Phone Software Update > Start.

After applying these steps your device is still in rebooting loop goto near Sony center they will fix your device or you will get a new device if your device is still in warranty.

How To Fix error while searching for network

5
How To Fix error while searching for network

Most of the users of Samsung Galaxy device are well aware of a common problem ” Error while searching for network “. This error comes whenever we are facing Not Registered on Network issue or problem with network provider. Today in this guide we are going to tell you how to fix ” error while searching for network ” on Samsung Galaxy devices.

How To Fix error while searching for network


How To Fix error while searching for network on Samsung Galaxy Devices:

Follow all the steps carefully in order to fix Samsung Galaxy error while searching for network issue. You can also use this guide to fix ” your sim card does not allow connection for this network “.

  1. First goto settings.
  2. Then Mobile Networks.
  3. Now while you are in Mobile Network menu press home + Power button until your device is turn off.
  4. Check that you device is completely turned off. Now remove your battery.
  5. Now press Home + Power button 10 times properly.
  6. After that press and hold Home + Power button for 2 or 3 mins.
  7. Now insert the battery back and turn on your device.
  8. Don’t attach the back cover yet. When your device is booted up remove and insert sim card for 3 times.
  9. Now you have to restart your device when say so.
  10. After your device is rebooted the issue of ” error while searching for network ” will be gone for good.

Do tell me in comments if you face any kind of issue regarding this guide. 🙂

VIA.

How to Fix Fifa 14 “d3dx9_43.dll is missing” on PC

0
How to Fix Fifa 14 “d3dx9_43.dll is missing” on PC

DO you love soccer then i am sure you’ll be fan of FIFA 14 pc version. One of my friend told me that he downloaded fifa 14 from internet and when ever he try to launch fifa 14 a a pop-up comes up ” d3dx9_43.dll is missing “. I am sure that most of you people are facing this issue, well not to worry you can fix this issue by installing the missing .dll file. Follow my step by step guide on how to fix fifa 14 d3dx9_43.dll is missing.

how to fix fifa 14 d3dx9_43.dll is missing

How to Fix Fifa 14 “d3dx9_43.dll is missing” on PC:

All you have to do is follow all the steps below in order to run and fix fifa 14 ” d3dx9_43.dll is missing” on your computer. There is no rocket science in this guide all you have to do is goto your fifa root directory and apply all the following steps.

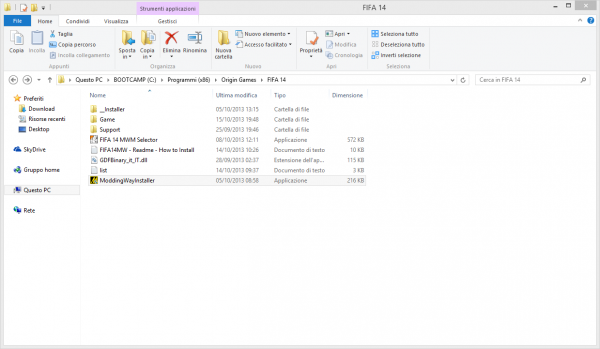
  1. First Download the D3DX9 FILE on your PC.
  2. Now navigate to fifa 14 root directory where it is installed.
  3. Click on the Shortcut of Fifa 14 and select “open file location”.
  4. Now extract the file that you’ve downloaded in first step.
  5. After extracting the file you’ll get 2 files.
  6. Copy both the files and paste them into the root directory of fifa 14.
  7.  Now close the folder and restart your system.
  8. Error ” d3dx9_43.dll is missing” is fixed.
  9. Run fifa 14 and it will work smoothly.

If you face any kind of issue regarding this guide you can tell me in the comments. !

Fix HTC One M8 Camera Crashing Problem In Portrait Mode

1
Fix HTC One M8 Camera Crashing Problem In Portrait Mode

Are you using HTC One M8 ? The latest and best HTC device ever came. HTC One M8 was launched in 2014 Feb along with Samsung Galaxy s5, it was the best device from HTC and gave a handsome amount of profit to the company. Till as more people started using HTC one M8 more complains came along with it. Today i’ll tell you how to fix HTC One M8 Camera Crashing Problem In Portrait Mode. This is not the only issue people are facing HTC One M8 is in metal body so user’s are reporting about heating problems. First lets start to fix camera crashing problem.

HTC-One-M8-Camera-Crashing-Problem-In-Portrait-Mode

Fix HTC One M8 Camera Crashing Problem In Portrait Mode :

Before starting e let me tell you what is causing camera cashing problem in portrait mode. There is a apps which is the main reason of this problem. ( LastPass and Password Manager tool ). Either delete the app or use other camera app or you can keep the app and also use builtin camera.

  1. Open the Last Pass app and login in using your id/pass.
  2. Now you’ll be in Last Pass interface.
  3. Select Preferences.
  4. Now select Edit App Associations.
  5. Select camera from the App Associations.
  6. Now select “do not show fill window”.
  7. This it , All Done !.

Now you can use HTC One M8 camera and hope you’ll not face camera crashing problem in portrait mode. Enjoy !