Home Blog Page 430

Here’s How You Can Download Windows Phone 8.1 Update 1 Developer Preview

Here’s How You Can Download Windows Phone 8.1 Update 1 Developer Preview

Few day’s back we’ve told you that Microsoft has announced Windows Phone 8.1 Update 1. Microsoft developers were adding some new features including Cortana voice assistant. If you want to try the Windows 8.1 Update 1 developer preview on your high end Windows Phone ( compatible for Windows 8.1 ) you can easily install and enjoy the new features. Now how to download Windows Phone 8.1 Update 1 Developer Preview ? follow my guide below. Just to tell you that this is a sort of beta version as we get on Android and iOS devices, so after installing the developer preview you might face some kind of bugs.

Windows phone 8.1 update 1

Also See: How to merge a contact in Windows Phone

How To Download Windows Phone 8.1 Update 1 Developer Preview:

First goto this link to registered your self as a developer.
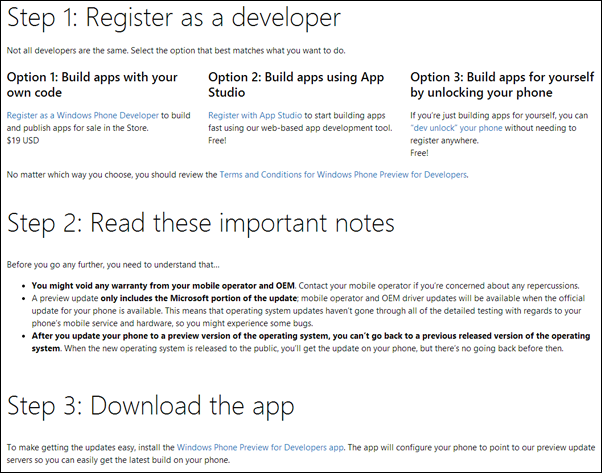
DP-steps

  • Now fill all information required to complete the registration.
  • Once you are registered as a developer, now you can download the Windows Phone 8.1 Update easily
  • If you are already have developer account then goto Settings > Phone Update and then tap on Check for Updates.
  • To make getting the updates easy, install the Windows Phone Preview for Developers app.

image Credit: SBWire

A Simple Way, How to merge a contact in Windows Phone [ Complete Guide ]

A Simple Way, How to merge a contact in Windows Phone [ Complete Guide ]

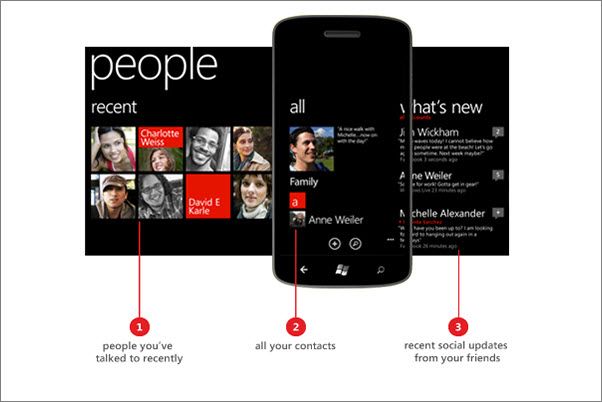
A good thing about Windows Phone is People Hub in which we have all our contacts. People Hub works awesome it integrates your contact form Facebook/Twitter and merges with the contacts on the phone, basically, it keeps all of your friend’s data in one place. But sometimes not, have you ever wonder why sometimes you face a problem that when you saved a contact with a friend’s nickname or his complete name, but when you try to search you find his/her Facebook name or Twitter or you find double contacts. It happens because the first and last name is not the same on either contacts or Facebook/Twitter. So today I’ll tell you a simple way to merge a contact in Windows Phone.

windows-phone-people1

How to link and merge contacts in Windows Phone:

Follow all the simple steps to link and merge your contacts in Windows Phone and this method is for all variants of Windows Phone. Choose the right contacts.

  1. First Select the contact you want to link to other.
  2. After taping on the contact a new page will open, now at the bottom of the page you’ll see 3 options. [ Pin,link and Edit ].
  3. Now tap on the link icon.
  4. You’ll be passed on to next page where you’ll see all you phone contacts.
  5. Now tap on the contact that you want to link with the one that you have chosen in the 1st step.
  6. You have successfully linked your two contacts.
  7. Do tell me your experience in comments.

Related: Fix the ‘resuming’ bug after uninstalling Live Lock Screen beta in Windows Phone 8.1

Credit: WpCentral

how to fix Wi-Fi option is grayed out on your iPhone or iPad [ Easy Guide ]

0
how to fix Wi-Fi option is grayed out on your iPhone or iPad [ Easy Guide ]

One of my friend told me that he is facing some kind of grayed out issue on Wifi option while he is toggling on/off on his iPhone or iPad. Then is searched for more and yes many people have reported about it. So today i’ll will tell you how to fix it ” Wi-Fi option is grayed out on your iPhone or iPad “. This is a serious issue because this cause “Wi-Fi Not Available” error message. So lets fix it :). You can find more iPhone issues guides in my collection do check out. All credit goes to imore writer Allyson Kazmucha for this working guide.

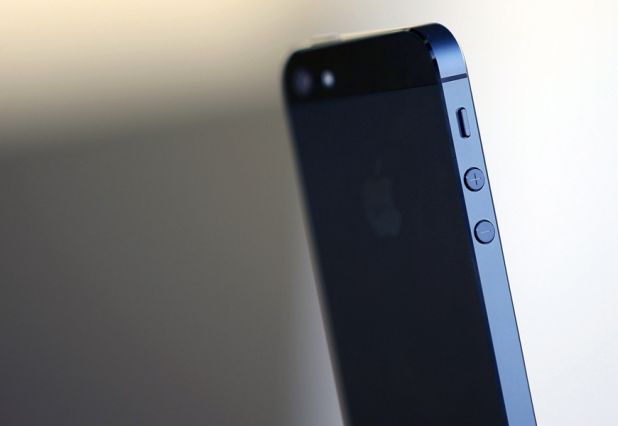
iphone-5-apple-235

How did you fix grayed out Wi-Fi on your iPhone or iPad:

Ok now follow all the steps carefully in order to fix grayed out wifi problem on your iPhone or iPad. If none of this works for you in first time please perform these solution one more time and still no luck the best option is to goto Apple store they’ll fix it for you.

  • First try to hard reboot your iPhone or iPad this might help because if any app or jailbreak causing grayed out wifi error then hard reset will work for you.
  • Update your device to latest version of iOS don’t worry now you can jailbreak all of iOS 7 versions. See Here How to Jailbreak iOS all Versions .
  • Try reseting your network settings.


  1. Settings app
  2. General
  3. Reset
  4. Reset Network Settings
  5. reboot
  • Now Try to restore your iPhone or iPad connect your device with iTunes and click on restore. Make sure you backup your iPhone or iPad before performing a restore.
  • As i told you before if none of this work for you then visit nearest Apple Store and get your iPhone repaired.

Do tell me in comments did these worked for your or not ??

Fix the ‘resuming’ bug after uninstalling Live Lock Screen beta in Windows Phone 8.1

Fix the ‘resuming’ bug after uninstalling Live Lock Screen beta in Windows Phone 8.1

Microsoft launched the Beta version of the much anticipated Live Lock Screen and many have installed in on their device, however, one thing that everyone forgets about the beta versions, that they constantly receive updates, after you people start giving your suggestions and pointing out the mistakes for the Developer,one of the best reasons why they always release the Beta version of any app before releasing the final release. Most of  the times, users don’t participate in the Beta versions, but there are times when the app is so good, that they have no choice, but to try the Beta version as well.

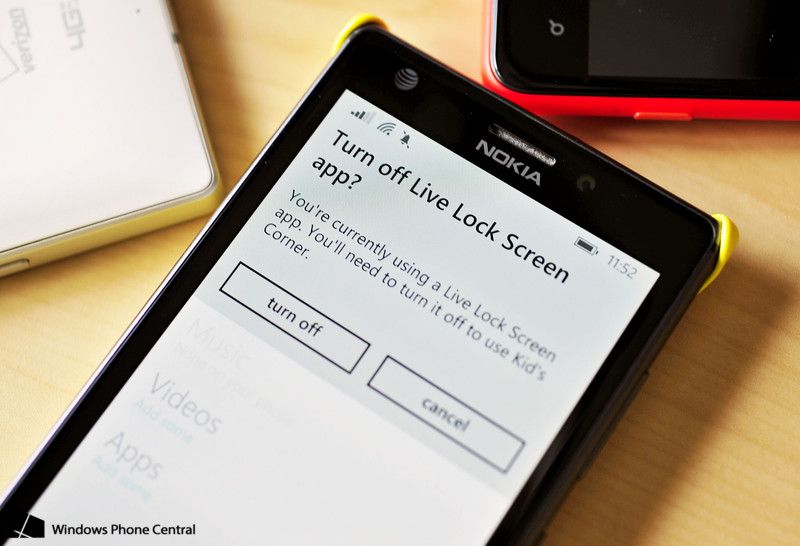
Turn_off_Live_Lock_Screen_Tip


IMG Credits: WPCentral

That is the case here, many of the Windows Phone 8.1 users downloaded and Installed the Live Lock Screen Beta and those who loved it kept it and those who didn’t love it tried to un-install it, well somehow, they succeeded but with a little problem in their hands. You see, those who un-installed it are now receiving the “Resume” error on their Lock Screen, and despite the solution is quite simple, yet everyone is accusing the Microsoft, instead of just looking for a Solution. Today we will show you How To Fix the ‘resuming’ bug after uninstalling Live Lock Screen beta in Windows Phone 8.1.

How To Fix This Problem:

Solution # 1:

  1. Open Settings.
  2. Navigate to Lock Screen.
  3. Choose Bing instead of Photo Background
  4. This should solve the Problem.
  5. Enjoy

Solution # 2:

  1. Go to Settings.
  2. Navigate to Kids Corner
  3. Enable it, if you see it Disable.
  4. Now you’ll see a Message saying “Turn Off Live Lock Screen”.
  5. Turn it Off.
  6. Once it is turned off, your Lock Screen will be back to normal, with Bing instead of Photo.
  7. That will sure to solve your problem.
  8. Enjoy

Download Flappy Birds Family For PC ( Windows 8.1,8,7,Mac – Computer )

0
Download Flappy Birds Family For PC ( Windows 8.1,8,7,Mac – Computer )

A few hours back i told you how to download Flappy Birds Family on your Android devices. But now i’ve got some good news for you all, if you cannot directly download Flappy Birds Family For PC and enjoy the annoying madness on computer. In this guide i’ll teach you how to download and install Download Flappy Birds Family For PC ( Windows 8.1,8,7,Mac – Computer ). As i told you that only you can install Flappy Birds Family on Amazon Fire Phone and Kindle Fire.

Also See: Flappy Birds Family apk

blue 1

Flappy Birds Family Features:

  • Drive the bird through pipes and ghosts
  • Play and share your best score
  • Challenge your friends
  • Person vs Person mode
  • more obstacles

How To Download and Install Flappy Birds Family For PC ( Windows 8.1,8,7,Mac – Computer ):

  1. First of all Download BlueStacks on your PC and Install it.
  2. Now you’ve to download Amazon App apk on your PC.
  3. Open BlueStacks and wait for to load first time.
  4. Now right click on the apk file that you’ve downloaded in second step. Select open through BlueStacks.
  5. Wait for Installation to be completed.
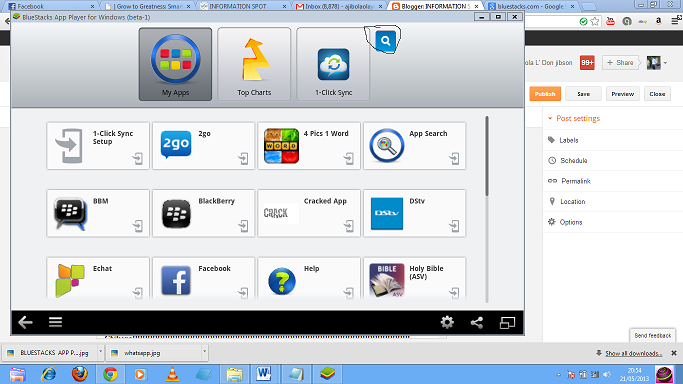
  6. Now click on the search button in BlueStacks and write amazon and enter.
  7. You’ll see a pop-up, now click on install and you’ll get the option to choose the appstore.
  8. Select amazon->Search->Flappy Birds Family->Get This app->login in using amazon id pass.
  9. 10373116_815691125128016_3773909770423105454_o
  10. 10498423_815691128461349_1584115710696956551_oAll Done !! Now goto my apps and you’ll see Flappy Birds Family.


Download Flappy Birds Family for Android [ Free apk ] [ Multiplayer ]

Download Flappy Birds Family for Android [ Free apk ] [ Multiplayer ]

Here we go again Flappy Birds Madness is back and this time its Multiplayer , as we all know that Flappy Birds was a huge hit but the developer removed the app form both App Stores. But Techbeasts team was there for you and we provide you the helpful guides on Flappy Birds apk , Flappy Birds for PC and Flappy Birds for iPhone. Well it was past and now its Flappy Birds Family time, a bad news is that this time its not on Android/iOS App store, developer added this annoying game to Amazon Play Store. This is why i thought about let me tell you how to download Flappy Birds Family for Android.

flappy birds family


Now before going any further you have to know one thing this time developer added a new restriction on the game, you cannot play this game on Android nor iPhone. Flappy Birds Family is compatible with only Amazon Fire Phone, or the array of Kindle Fire tablets.

Flappy birds family multiplayer

Download Flappy Birds Family for Android:

  1. First you must have an Amazon Fire Phone.
  2. Now Goto Amazon App Store and search for ” Flappy Birds Family “.
  3. After finding the right one tap on free and then tap on install.
  4. Now wait for installation to be completed.
  5. When the installation is completed, now goto Amazon App Store and install File Explorer.
  6. Now download Apk Extractor on your Amazon Fire Phone.
  7. By using Apk Extractor you can easily extract the ” Flappy Birds Family “.
  8. Then send the apk file on your Android device and install the Flappy Birds Family new version on your Android device.
  9. Right now i didn’t get my hand on apk file but as soon as i got it, i’ll add the link here.

(Download: Flappy Birds Family from the Amazon Appstore)

Fix Samsung Galaxy S4 not charging- grey battery Easiest Method

2
Fix Samsung Galaxy S4 not charging- grey battery Easiest Method

Today i am discussing about a new problem in Samsung Galaxy S4 “not charging- grey battery”. First let me tell you about not charging- grey battery issue main symptoms are when you put your phone on charging it won’t charge and you’ll grey symbol on screen. Your phone will vibrate while showing grey battery symbol on screen. These are main symptoms of the not charging- grey battery issue, now lets start fixing Samsung Galaxy S4 not charging- grey battery. 

What are the main reason of Samsung Galaxy S4 not charging- grey battery:

As i have assumed that the main reason of Samsung Galaxy S4 not charging- grey battery is shorted charging port, or your charging port strips is broken. Following are the other main reason of the Samsung Galaxy S4 not charging- grey battery problem.

  1. Dust entered into the charging port.
  2. Charging port gets bent.

Also See: How To Transfer Files from Samsung Galaxy S4 to PC/Desktop

SAMSUNG DIGITAL CAMERA

HOW TO FIX SAMSUNG GALAXY S4 NOT CHARGING- GREY BATTERY PROBLEM.

Following are the solution according to the conditions which you are facing please read the solutions according the your current condition on your phone.

  1. First if your drop your phone accidentally and start facing Grey Battery on your phone screen then you have to do following steps:
  2. You need a pointed wooden toothpick.
  3. magnifying glass and the a torch.
  4. Now carefully check your charging port and see if the center chip is bent or not.
  5. If its bent then use wooden toothpick and lift it up a bit and then put your charger cable and see if its working or not.
  6. You have to do this until the center chip is back on its position.

Now check your charging port and see if you find any dust, yes dust whenever we put our phone in pocket a chunk of cloth piece stuck in the charging port or dust stuck in charging port, in our daily routine we place our phone on tables, seats at park, using while running and more, so there is a chance that dust got into the charging port and it is causing not charging – grey battery problem.

If you are still facing Samsung Galaxy S4 not charging- grey battery problem then first turn off your device, remove battery cover and take out your battery. Wait for few minutes and insert the battery back now, turn on your phone and grey battery issue is fixed.

Update Galaxy S4 Mini I9190 To Android 4.4.2 KitKat XXUCNG1 Official Firmware

1
Update Galaxy S4 Mini I9190 To Android 4.4.2 KitKat XXUCNG1 Official Firmware

Galaxy S4 Mini has joined the list of Samsung’s lucky devices to receive Android 4.4.2 KitKat update. Samsung dealt the users being hard enough when it came to the Android updates, there hasn’t been a very good response by Samsung while Sony and other manufacturers have been trying their best to update maximum of their devices to Android KitKat. Galaxy S4 Mini users don’t need to live in any software side disappointments anymore now as there’s an official firmware based on the build number XXUCNG1 available for the Galaxy S4 Mini I9190.

S4 Mini I9190 Android 4.4.2 KitKat XXUCNG1

Samsung has updated a number of applications with so many new features, some of the applications have got a new UI out of which Settings app is one. There are white icons in the transparent notification bar, music player on the lockscreen has a new look. Bug fixes and performance enhancements have been made as well. On the core, it is Android 4.4.2 KitKat that makes this update a must have as well.

The update is currently available for Russian region only, however that doesn’t matter while you can manually update your device to this firmware as well. As you move forward in the following post, you will come across a complete and comprehensive guide that will help you to update your Galaxy S4 Mini GT-I9190 to Android 4.4.2 KitKat XXUCNG1 official firmware using Samsung’s flashtool Odin3. Make sure that you follow the guidelines properly in order to get this done without any hiccups here and there.

Here are the firmware details:

  • Device: Samsung Galaxy S4 Mini GT-I9190
  • OS: Android 4.4.2 KitKat XXUCG1
  • Region: SER
  • Build Number: I9190XXUCNG1
  • Build Date: 03/7/2014
  • Changelist: 1995154

Here are the early preparations:

      1. This guide is only for  Samsung Galaxy S4 Mini GT-I9190. Do not try this on any other device. Check your device’s model number in Settings > About Device.
      2. Make sure that your phone’s battery is charged at least over 60%.
      3. Use the original data cable for establishing the connection between your PC and phone.
      4. Backup all your important contacts, find the full guide here.
      5. Backup all your important sms messages, find the full guide here.
      6. Backup all your important call logs, find the full guide here.
      7. Backup all your important media content manually. (Copy to your PC.)
      8. If you’ve flashed a custom recovery, it is suggested that you create a Nandroid Backup. [Important]
      9. Don’t forget to make EFS backup before flashing this firmware. [Important]
      10. If your device is rooted, you may use Titanium Backup to backup each and everything on your phone.
      11. Although it is not necessary to wipe your phone before flashing this firmware, but to achieve the best performance, it is recommended that you perform a factory reset before flashing this firmware.
      12. A clean install is always preferred for the best results from the new firmware. It is recommended that you wipe your phone from the recovery using “Factory Data Reset” option and then install this firmware.
      13. Turn off /disable Samsung Kies while using Odin3.
      14. Turn of any Anti Virus softwares while using Odin3.
      15. Alright. Follow the instructions carefully.

Things you need to download:

  1. Download and extract Odin3 v3.09.
  2. Download and Install Samsung USB drivers.
  3. Download  and extract Official Android 4.4.2 KitKat For  Samsung Galaxy S4 Mini.

How To Update Galaxy S4 Mini I9190 with Official Android 4.4.2 KitKat:

  1. Clean install is always recommended, at first, you need to backup everything as explained above. Now boot your Galaxy S4 Mini into recovery mode and wipe factory data / reset. In order to do so, turn off your device first, now turn it on by pressing and holding Volume Up + Home + Power Key and you should be able to see the recovery in a while.
  2. Open Odin3.exe.
  3. Put your S4 Mini  in download mode. To do so, turn it off and wait for 10 seconds. Turn it on by pressing and holding Volume Down + Home Button + Power Key simultaneously, You should see a warning, press Volume Up to continue. In case this method doesn’t work for you, try one from this guide.
  4. Connect your S4 Mini to your PC.
  5. As soon as Odin detects your phone, the ID:COM box should turn blue.  Make sure that you’ve installed Samsung USB drivers before connecting.
  6. For Odin 3.09 hit the AP tab. Select the extracted firmware file, that should be in .tar.md5 format.
  7. If you’re using Odin 3.07, you will select “PDA” tab instead of the AP tab, rest of the options remain untouched.
  8. Make sure that the options selected in your Odin are exactly as shown in the pic.
  9. Odin 3.09 explained. (2)
  10. Hit start and wait till the firmware flashing is complete, as soon as your device restarts, remove it from PC.
  11. Congrats! your device is now running on Android 4.4.2 KitKat firmware.

That’s all. In case you got any queries or you face any issues regarding this guide, please feel free to stop by the comment box below and let us know about it. We will get back to you as soon as possible. Thank you.


Update Galaxy S4 Mini LTE I9195 To Android 4.4.2 KitKat XXUCNF9 Official Firmware

8
Update Galaxy S4 Mini LTE I9195 To Android 4.4.2 KitKat XXUCNF9 Official Firmware

The LTE variant of the Galaxy S4 Mini can be now updated to the latest and greatest version of Android, the Android 4.4.2 KitKat firmware. Samsung has made quite a few changes in the new firmware. Notable changes are the new settings applications, music player on the lockscreen, white icons in the transparent notification bar and some of the applications have been updated with new features and new UI. Samsung has also fixed so many bugs and the performance surely is pretty much better now. Latest firmware for the Galaxy S4 Mini LTE GT-I9195 is based on the build number XXUCNF9.

S4 Mini LTe Android 4.4.2 KitKat XXUCNF9 Official

As usual, the software updates vary region to region. There is no guarantee when the latest firmware will hit your region and your device will be able to taste the latest software enhancements. If you happen to be an Android enthusiasts and its getting hard to wait, you may consider updating your device manually using the method. As you scroll down, following post will help you to update your Galaxy S4 Mini LTE GT-I9195 to Android 4.4.2 KitKat XXUCNF9 official firmware using Samsung’s flashtool Odin3. All you need is, you need to follow this guide being careful and get it done successfully without any hiccups here and there.

Here are the firmware details:

      • Device: Samsung Galaxy S4 Mini LTE GT-I9195
      • OS: Android 4.4.2 KitKat XXUCNF9
      • Region: NZC
      • Build Number: I9195XXUCNF9
      • Build Date: 23/6/2014
      • Changelist: 1646188

Before you flash this firmware:

      1. This guide is only for  Samsung Galaxy S4 Mini LTE GT-I9195. Do not try this on any other device. Check your device’s model number in Settings > About Device.
      2. Make sure that your phone’s battery is charged at least over 60%.
      3. Use the original data cable for establishing the connection between your PC and phone.
      4. Backup all your important contacts, find the full guide here.
      5. Backup all your important sms messages, find the full guidehere.
      6. Backup all your important call logs, find the full guide here.
      7. Backup all your important media content manually. (Copy to your PC.)
      8. If you’ve flashed a custom recovery, it is suggested that you create a Nandroid Backup. [Important]
      9. Don’t forget to make EFS backup before flashing this firmware. [Important]
      10. If your device is rooted, you may use Titanium Backup to backup each and everything on your phone.
      11. Although it is not necessary to wipe your phone before flashing this firmware, but to achieve the best performance, it is recommended that you perform a factory reset before flashing this firmware.
      12. A clean install is always preferred for the best results from the new firmware. It is recommended that you wipe your phone from the recovery using “Factory Data Reset” option and then install this firmware.
      13. Turn off /disable Samsung Kies while using Odin3.
      14. Turn of any Anti Virus softwares while using Odin3.
      15. Alright. Follow the instructions carefully.

Things you need to download:

      1. Download and extract Odin3 v3.09.
      2. Download and Install Samsung USB drivers .
      3. Download  and extract Official Android 4.4.2 KitKat For  Samsung Galaxy S4 Mini LTE.

How To Update Galaxy S4 Mini LTE I9195 with Official Android 4.4.2 KitKat:

  1. Clean install is always recommended, at first, you need to backup everything as explained above. Now boot your Galaxy S4 Mini LTE into recovery mode and wipe factory data / reset. In order to do so, turn off your device first, now turn it on by pressing and holding Volume Up + Home + Power Key and you should be able to see the recovery in a while.
  2. Open Odin3.exe.
  3. Put your S4 Mini LTE in download mode. To do so, turn it off and wait for 10 seconds. Turn it on by pressing and holding Volume Down + Home Button + Power Key simultaneously, You should see a warning, press Volume Up to continue. In case this method doesn’t work for you, try one from this guide.
  4. Connect your S4 Mini LTE to your PC.
  5. As soon as Odin detects your phone, the ID:COM box should turn blue.  Make sure that you’ve installed Samsung USB drivers before connecting.
  6. For Odin 3.09 hit the AP tab. Select the extracted firmware file, that should be in .tar.md5 format.
  7. If you’re using Odin 3.07, you will select “PDA” tab instead of the AP tab, rest of the options remain untouched.
  8. Make sure that the options selected in your Odin are exactly as shown in the pic.
  9. Odin 3.09 explained. (2)
  10. Hit start and wait till the firmware flashing is complete, as soon as your device restarts, remove it from PC.
  11. Congrats! your device is now running on Android 4.4.2 KitKat firmware.

That’s all. In case you got any queries or you face any issues regarding this guide, please feel free to stop by the comment box below and let us know about it. We will get back to you as soon as possible. Thank you.

How to Fix Lag Issue on LG G3 Easy Method No Root [ Video ]

0
How to Fix Lag Issue on LG G3 Easy Method No Root [ Video ]

LG G3, LGs latest flagship device is available for general public, and from the success meter of LG G2, its predecessor, LG G3 is gaining a lot of Publicity. After all, it is filled with so many features and if we look at the Specs, 5.5″ screen size with True IPS HD display, 2/3GB of RAM, 16/32GB of RAM, 13MP camera, Qualcomm snapdragon 801 2.5GHz Quad-Core Krait processor, running Android 4.4.2 Kit-Kat out-of-the-box. Now with such high specs, if the device shows even a little lag, there is a reason to fret and guess what, some of the LG G2 users are complaining about experiencing Lag in LG G3.

Now when we talk about lag, whether you are using a tablet or a Smartphone, the time lapse between your finger tap on screen and the reaction of the device according to your action or the response from the device. Usually it happens, because of the insufficient processing power, but sometimes the reason can be something else, for a Samsung users, the Lag is a pretty familiar term. Even though the LG G3 has best possible Hardware ported in it, still it lags and we are going to solve this problem for you.

lg-g3-screencap

In this Article, we will show you How to Fix Lag Issue on LG G3, without any root. However, if this solution doesn’t work for you, take your device to near Repairing center, or if you can, do claim the warranty, a hardware problem can also cause such problem.

Fix Lag Issue on LG G3:

  • Open the Phone Dialer in your LG G3.

  • Now according to your LG G3 variant, type the following code:

  1. International Model : 3845#*855#
  2. Verizon: #228378 + send
  3. Sprint: 5689#*990#
  4. AT&T: 3845#*850#
  5. T-Mobile: 3845#*851#
  • Upon seeing the Service menu on your Phone, Scroll down to High Temperature Property Off option.

  • Select the Option and Turn it On.

  • Now get out of the menu and Turn off your phone.

  • Just wait for 10-seconds and Turn On your device.

  • Wait till the device boots up and Home Screen is in front on you.

  • That’s It. Now you’ll sure to experience some noticeable difference in your Phone Performance

How To Fix Sony Xperia Z2 Call Dropping Problem

0
How To Fix Sony Xperia Z2 Call Dropping Problem

Sony Xperia Z2 is the latest flagship device from Sony and according to them this is the best Sony Smartphone ever like, Samsung said about Galaxy S2, the best Smartphone ever, however, successor of such devices always beat them and it will happen to Sony Xperia Z2 eventually. Till then you keep enjoying Sony Xperia Z2 and we keep solving all of your problems related to Sony Xperia Z2. Recently some of the users complained that they are having Some call dropping issues with Sony Xperia Z2, most of them said that they just hear a Beep sound while attending a call and the screen of the device is not turning On after the call.

Well the problem is with the Proximity Sensor, when you took the device to your face while listening to a call, the Proximity Sensor turns off the screen, so you face won’t touch the screen and interrupt the call. And since it is not working properly, the screen will remain turn On while you are listening to the call thus letting your face to tap the End button or any other button, while you are hearing it. In this article, we will give you some tips on How To Fix Sony Xperia Z2 Call Dropping Problem.

xperia-z2-hero-black-1240x840-fc5a31e4db7ebb88498f29f05732c912

How To Fix Sony Xperia Z2 Call Dropping Problem:

Call-Dropping-Problem-On-Sony-Xperia-Z22

  • Go to Settings > Display > and see if the Tap to Wake-up is enabled, if it is enabled. Untick it and Check if the problem still exists.

  • Check if the Proximity Sensor is Clean, it might be covered with dust or something else, clean it.

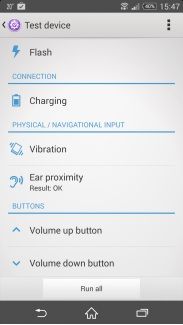
  • Now go to Settings > About Phone > Diagnostics > Choose Test Device and check Proximity Sensor, if the problem is occurring because of any Hardware fault, you need to take your device to near Sony Center.

  • Check your Carrier service, call dropping might be occurred because of poor signals

Download Turbo FAST for PC ( Windows, Computer and Mac )

0
Download Turbo FAST for PC ( Windows, Computer and Mac )

Turbo Fast is racing game where famous cartoon character Tito will help you to make your ride and he will guide you how to get on top using tricks like Race, drift, slide and jump. So you can beat all your opponents and be on top of leaderboards. Today in this post i’ll tell you how to download turbo fast for PC so you can play it on Windows, Computer and Mac. You can install Turbo Fast on Mac OS X or later and Windows 7,8,8.1 and XP.

Also See: farmville 2 for pc 

Download Turbo FAST for PC ( Windows, Computer and Mac )

Turbo FAST Features:

• 11 Unique Race Tracks to Test Your Skills
• Special Race Events: Time Trials, Limited Fuel, Slalom and Rival Races
• Thousands of Performance & Design Combinations: Shell Upgrades, New Paint Jobs and Neon Glows
• Pre-race mods enable you to improve your performance with things like extra speed, fuel and time
• Ability to record your greatest race moments, watch on instant replay and share with your friends
• Optional Facebook and Twitter posting to show off your pimped-out Shell and best scores
• Leaderboards show how you rank amongst your friends and all the top players

For More Visit Google Play.

Download and Install Turbo FAST for PC:

  1. You need an Android emulator to run this game on your Windows PC or MAC. We recommend using BluestacksUse our guide to install it on your PC.
  2. After downloading and installing Bluestacks, Download Turbo FAST apk.
  3. Open the downloaded APK file now, and let Bluestacks install it.
  4. Open BlueStacks now > All Apps > Turbo FAST.
  5. Now click on Install Button to start the downloading.
  6. Follow the initial screen instruction after installation is done.
  7. Goto My Apps after all installation is completed.
  8. There you’ll see Turbo FAST icon. Double click on it to open.
  9. Enjoy the most tough game ever!
  10. Don’t forget to let us know about your high score.
  11. That’s All!

Also See: Kim Kardashian hollywood for pc