Home Blog Page 426

How To Download and Install iOS 8 Beta 5 on iPhone and iPad

0
How To Download and Install iOS 8 Beta 5 on iPhone and iPad

Apple iOS 8 beta is out you can download it form the Dev center if you have Apple developer account. This following guide is about how to install iOS 8 Beta 5 on iPhone 5s, 5c, 5, 4S, iPad 2 and  iPod touch 5G. Few days back Apple released iOS 8 beta 5, many people updated their devices to beta versions, every body wants to see whats new so in order to install iOS 8 beta 5 follow the guide below.

iOS-8-download

How To Download and Install iOS 8 Beta 5 on iPhone and iPad:

  1. Open developer.apple.com/programs/ios/ and signup.
  2. After signup process complete, now sign in into your Apple dev account.
  3. Now you have to register your UDID of the device.
  4. Connect your device with iTunes and copy UDID number of your device.
  5. Now developer.apple.com/account/ios/device/deviceList.action to register your UDID.
  6. Now you’ll be developer control panel, switch iOS 7 to iOS 8 and scroll down to download
  7. Downloaded file will be in .zip file, when download is completed extract the file.
  8. After extracting the file you’ll get the ISPW file.
  9. Connect your device with iTunes and make sure you your device is updated to the latest version. Now press hold the Alt key (on Windows PC, this will be the Shift key) click on restore iPhone.
  10. Choose the file ISPW file where you have saved. Press OK !

It will take time so sit back and wait.. !! Until installation is completed.

Ignore No More Won’t Let The Teens Ditch Their Parents Anymore

0
Ignore No More Won’t Let The Teens Ditch Their Parents Anymore

Since smartphones are a must have accessory of the teenagers, and smartphones can be used in a number of ways, it usually is hard for the parents to monitor their kids all the time and keep track of their activities. That’s another fact that the teenagers of this generation don’t care much about keeping their parents informed about themselves, and they simply look for excuses to ditch the phone calls made by their parents.

While parents get annoyed when their kids do such things and they just go out of control and specially when the use of a smartphone is involved in it, the situation gets quite frustrating. To calm down this frustration, Mountaineer Technology Ventures came up with an amazing application, named as “Ignore No More“. The application will allow the parents to lock their kid’s smartphone if they feel that they are being ignored or ditched. Once the device is locked, the only operation allowed will be making a call to the kid’s parents or any other authorized contact with the Ignore More application.

Basically, the idea behind locking down the device is, it won’t let the teenager unlock it, unless she/he has made a call to the parents, and get the unlock code that is probably set by them. Apparently, it’s not possible to bypass or delete this application, but a techie geek will probably get rid of it using some across the boundary trick that involves the use of root access, custom ROM or any other tweak. Keeping this in mind, the parents who are going to use Ignore No More should make sure that you check their kid’s device once in a while to check if their kids have stumped the application.

Ignore No MoreIgnore No More 2 Ignore No More 3

Ignore No More is available in the Google Play Store for $1.99. Let us know if you’re going to use this application and how much useful do you find it.

Via: AndroidAuthority

6 Best Tips To Save Your Smartphone From Getting Damaged

0
6 Best Tips To Save Your Smartphone From Getting Damaged

Smartphones are common these days and people love to get their hands on one as soon as they can. These smartphones definitely cost a hefty amount, it actually depends whether it’s an Android powered or an iOS powered device, but after all its a smartphone and it’s going to have some cons on the outside that you need to protect it from. While you spend a lot of money on a smartphone, you probably won’t like to get it damaged at any cost and you would definitely like to apply all the precautions to prevent any mishap and that is something important as well.

If you’re wondering that why do you need to protect your smartphone, we will definitely go through a brief answer we before actually head towards the set of precautions I’ve compiled up right here. There are several reasons that make a smartphone expensive. The very first thing is the smartphone’s level, whether it’s a high end or a low, as mentioned above. If it’s a high end device, it definitely has a great build quality, a very nice design and a very nice display as well and if it’s a low end device, it will have comparatively low build quality/material on all of its ends. Smartphone’s most sensitive and the most expensive part is it’s screen, then is it’s bezel and then comes the rest of the body. If any of these gets affected either it’s going to get damaged or malfunctioned, and then it is going to cost you more than a lot to get it fixed, or it is going to result in downing your phone’s value.

If you’re a new smartphone user and you have no idea about protecting it, you may have spotted the right place to apply all the precautions. Let’s go through the 6 best ways/tips to save your smartphone from getting damaged and let it last long.

1. Use a good screen protector 

A while ago I mentioned that the screen is the most sensitive and the most expensive part of a smartphone. All the manufacturers use the best material for the displays, but that is not enough to rely on so some extra protection is required. The very first thing you should do after getting a smartphone is, you should paste some nice screen protector on its screen. There are different protectors available, you may go for one that keeps your phone’s screen safe for a very long time. The best choice is to go with the bullet proof protectors, these are just named as bullet proof because of a very thick sheet that is shock resistant as well. These protectors are a bit costlier as compared to the ordinary ones, but you won’t probably save a few bucks and put your expensive smartphone in danger.     screen-protector-glas-625x625

2. Use a back protector

If your smartphone has a sensitive back case, or a sensitively built back, you must put some nice protector on its back too. It will not only protect your phone’s body, but will also protect its camera and flash. A back protector is similar to a screen protector, although there are back cases, but putting a protector will result in some extra protection and will prevent any scratches to get printed on the back of your expensive smartphone. A back protector is usually recommend on the Apple iPhone(s), iPad(s) and iPod(s) while Samsung’s and other manufacturer’s do not use that much sensitive material for their devices.

Clear-Screen-Protector-Guard-FRONT-And-BACK-3-part-Full-Body-For-iPhone-5-5G-200

3. Use a Silicon Flip Case

There’s a vast variety of cases available for all the smartphones, but the question arises when you got to pick up one that is the best to go with. The heading here says that you should use a Silicon Flip Case, there’s a strong reason behind that. Using a back cover for your phone will only protect its back and its bezel, but it won’t be able to protect your phone’s screen. Using a bumper case on your device will only protect its bezel, it won’t protect its screen nor it will protect i’s back, and using a plastic back case or cover will result in damaging your phone’s bezel while putting it on and off.

So, the use of a Silicon Flip Case can be justified here. The very first thing to note down is, Silicon won’t damage your phone’s bezel or bring any scratches on your phone’s body. If your phone is dropped accidentally, Silicon will definitely play its role in absorbing the shock, and won’t let the smartphone get damaged. Now why this case should be a flip one? Well, it will save your phone’s screen as well and you don’t actually need to worry about any part of your smartphone once it’s packed inside a Silicon Flip Case.iPhone Flip case

4. Do not drop your phone, be careful while holding it.

Your hands should grip the smartphone carefully and avoid dropping it at any cost. If your phone doesn’t have any case and it accidentally slips out of your hands, and it falls on some hard floor, the jerk will be good enough to crack any of its parts. So hold your smartphone carefully, and put it in your pocket after you’ve used it.Girl With Mobile Smart Phone
5. Use a Cord/Wriststrap

If your smartphone or it’s case has a wristrap/cord hook, that’s a going to help you protect your smartphone. Once you’ve attached a cord or a wriststrap with your smartphone, and you’ve tightened it on your wrist, it will not let your smartphone fall if it accidentally slips from your hands. As a precaution, you must wear a wriststrap plugged into your smartphone while you’re using it, it will help you to be fearless with the use as well. ea59604e16c4cc5064ca702fc9fbbfe7

6. Avoid accidental drop:

The most common thing that happens with the smartphone owners. While you’re sleeping deep on your bed and your phone is somewhere besides you, it might fall off the bed anytime, or just when you wake up and you get yourself out of your bed, you might result in throwing it down. If you’re sitting somewhere, whether on a chair in your house, or on a car’s driving seat and you’ve put your smartphone on your lap, while getting up you may forget that your smartphone is placed on your lap. This will result in throwing your smartphone far away, and result in a serious damage as well. So, make sure that you do put it at a safe place before you sleep, and you do not put it on your lap while sitting somewhere. hero-phones-Galaxy_s5

That’s all. I hope that this guide helps you to protect your smartphone and keep it safe. If you think that there’s something that can improve it any further, make sure that you drop it in the comment box below.


Download Battlefield HD & Widescreen Wallpapers for Desktop and Mobile

0
Download Battlefield HD & Widescreen Wallpapers for Desktop and Mobile

Battlefield, don’t know about the previous versions, but Battlefield 3 and Battlefield 4 was a huge a success. Battlefield as the name suggest, is a game that completely revolves around the Battleground, where you get to use any type of weapon you want or you can have, now when we look at the Single Player mode, it is not as good as it should be, but when it comes to Multi-Player mode, this game is one of the best one ever, in Shooting and Fighting category. We can’t provide you the game because of the terms and conditions of the Company and developers, but we can provide you the best wallpapers of this game, both the Battlefield 3 and Battlefield 4 wallpapers are included in this collection, because in my opinion, these two versions are the best one among the series.

Download Battlefield HD & Widescreen Wallpapers for Desktop and Mobile:

battlefield_3_premium_aftermath-HD

Battlefield-4-Wallpaper-HD-3

Battlefield-Bad-Company-2-mobile-review

battlefield4real_hero

BF3_Original_1920

gamers-hd-wallpaper-battlefield-logo-hdultimate-collection-of-hd-games-images-battlefield-hd-wallpaper

Header288

Soldato_ferito_Battlefield_Bad_Company_21

Update Sony Xperia Z2 D6503, D6502 And D6543 To 17.1.2.A.0.314 Official Firmware

0
Update Sony Xperia Z2 D6503, D6502 And D6543 To 17.1.2.A.0.314 Official Firmware

Sony recently rolled out a new update for its flagship, the Xperia Z2. This update is based on the build number 17.1.2.A.0.314 while the core is still Android 4.4.2 KitKat. The new update packs up voice quality enhancements, improved battery performance, the touch and performance has been improved while the overall stability and performance is improved. The new update is now available for all the variants of the Xperia Z2 and is reaching the users through OTA or through Sony PC companion.

Since the OTA updates take some time reaching all the regions, some of the users might not be able to wait for the latest and improved version of Android for their device. In this case, the only solution to get the latest update is through Sony Flashtool, and that is what we are here for. We are going to install this latest official firmware, based on the build number 17.1.2.A.0.314 on our beloved Sony Xperia Z2 D6503, D6502 and D6543 in the succeeding guide. Let’s go through the early preparations and then install this firmware.Xperia Z2 .314

Early Preparations:

1. This is only for Sony Xperia Z2 D6503, D6502 And D6543!

This ROM is only for the device mentioned above. Make sure that your model number matches the one listed above. To do so, go to Settings > About Device on your device and see your model number. Flashing this firmware on any other device will result in bricking it so make sure that you meet this requirement first of all.

2. Battery should be charged at least over 60%.

Make sure that your battery is charged enough to complete the flashing process. In case your battery is low and your device goes dead during the flashing process, you may end up soft bricking your device as it won’t complete the flashing process.

3. Backup everything!

Just to be on the safe side, you may consider backing up each and everything from your Android device. This is highly recommended so that in case anything goes wrong, you still have the access to all of your data and you can restore it immediately. You may backup everything as listed below.

4. Enable USB Debugging Mode on your device.

Enable USB debugging mode on your device. To do so, tap settings>developer options>USB debugging. If you can’t find developer options in settings, then tap settings > about device and tap “Build Number” for 7 times and you’ll get em’ activated under settings.

5. Install and setup Sony Flashtool.

You must have installed Sony Flashtool. Find the full guide here.After installing Sony Flashtool, open the Flashtool folder from the drive where you installed it.Now open Flashtool>Drivers>Flashtool-drivers.exe and install the Flashtool, Fastboot & Xperia Z2 drivers from the list. [Important]

6. Use OEM data cable to establish connection.

Make sure that you use the phone’s original data cable to establish connection between your phone and the PC. Using a different data cable might result in interrupting the firmware installation.

Xperia Z2

How To Update Sony Xperia Z2 D6503, D6502 And D6543 To 17.1.2.A.0.314 Official Firmware:

  1. Before moving forward, please make sure that you’ve read the pre requisites and ensure that you are set to go ahead.
  2. Download the latest firmware Android 4.4.2 KitKat 17.1.2.A.0.314 FTF file.
    1. For Xperia Z2 C6502 [Generic/Unbranded]
    2. For Xperia Z2 C6503 [Generice/Unbranded]
    3. For Xperia Z2 C6543 [Generice/Unbranded]
  3. Copy the file and paste in Flashtool>Firmwares folder.
  4. Open Flashtool.exe now.
  5. Hit the small lightening button on the top left corner and select Flashmode.
  6. Select the FTF firmware file that you placed in the Firmware folder.
  7. From the right side, select what do you want to wipe. Data, cache and apps log, all wipes are recommended, perhaps you may select if you don’t want.
  8. Click on OK, and it will start preparing the firmware for flashing. This may take a little while to load.
  9. As soon as the firmware is loaded, it will prompt you to attach the phone by turning it off and keeping the back key press.
  10. For Xperia Z2, Volume Down key will do the job of back key, just turn off your phone, keep the Volume Down key pressed and plug in the data cable.
  11. As soon as the phone is detected in Flashmode, the firmware will start flashing, Do not leave the Volume Down key until the process is complete.
  12. As soon as you see “Flashing ended or Finished Flashing” leave the Volume Down key, plug the cable out and reboot.
  13. That’s All! Congrats! You’ve installed latest Android 4.4.2 kitkat on your Xperia Z2. Enjoy

In case you got any queries or face any problems regarding this guide, please feel free to stop by the comment box below and let us know. We will get back to you as soon as possible. Thanks all!

[ How To ] [ Guide ] Windows Phone 8.1 GDR1 Lets you Create Live Folders

0
[ How To ] [ Guide ] Windows Phone 8.1 GDR1 Lets you Create Live Folders

Creating folders on Smartphones helps us to categories our apps and games. On Android and iPhone devices we can easily create folder and sub folders. After updating your Windows Phone 8.1 To GDR1 you can now create live folders of your apps. Microsoft called these folders “Live”. Today i’ve prepared a guide in which i’ll tell you how to create live folders in Windows Phone 8.1 GDR1.

live_folders
Credit:Wpcentral

[ How To ] [ Guide ] Windows Phone 8.1 GDR1 Lets you Create Live Folders:

  1. First choose a tile, tap and press it until the tile fadeaway.
  2. Now drag and drop the tile on the other tile. It will automatically create a live folder.
  3. After the Live folder is created, tap on it to rename the folder.
  4. Now drag and drop any tile you want to add in the folder.
  5. To resize the folder, press and hold the folder. Now tap on the arrow on left corner.

You can follow my other guides on Windows Phone 8.1 GDR1. If you face any kind of issue regarding this guide please do tell me in comments.

Easily Mirror Your Windows Phone 8.1 Screen On a Windows Computer

0
Easily Mirror Your Windows Phone 8.1 Screen On a Windows Computer

Screen Mirroring is easy now a days high end devices like Samsung Galaxy S5 have built-in screen mirroring options and this help us in many ways we can give presentation through screen mirroring, we can play mobile games on our Windows PC through screen mirroring, we can play video on our desktop using screen mirroring. It’s a good thing that most of high end devices are giving built-in options but not all of them, if you are using Windows phone 8.1 then you have to use a app for screen mirroring on a desktop PC. The following guide is about how to Mirror Your Windows Phone 8.1 Screen On a Desktop PC.

screen mirror windows phone 8.1 on pc

Easily Mirror Your Windows Phone 8.1 Screen On a Desktop PC:

  1.  First download Project My Screen app.
  2. Now install the Project My Screen on your Windows desktop.
  3. After installation is done, launch the app and connect your device with USB cable.
  4. When your device will be connected with PC you’ll get a notification ” you want to let the PC project what’s on your screen “. Tap Ok.
  5. This following menu will help you to use Project My Screen App on PC and Windows Phone 8.1.

Screenshot-197

Windows 9 Main Features and Concepts Most likely What Comes

0
Windows 9 Main Features and Concepts Most likely What Comes

Microsoft Windows 8 was the biggest make over in the Microsoft Windows Family and now we are hearing that Microsoft is planning to launch Windows 9 a technology previewer . As i’ve heard from many reliable sources that Windows 9 will be a big change, total make over of Windows 8. Release date is not confirmed by any official but most likely Microsoft will push Windows 9 update in last of 2014 or early in 2015.

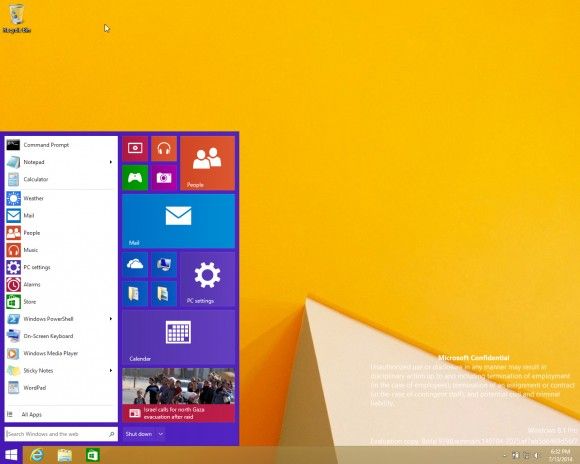
Following are the main concepts of Windows 9 Features shown in images. Please share your thoughts with us what do you want in Windows 9.

Return of the Start Menu:

windows-9-start-menu-leak-580-90

Windows 9 with Modern UI apps

windows-9-windowed-app-credit-myce-580-90

Windows 9 Main Features:

  • Windows 9 will utilised less space for installation.
  • More Apps.
  • Default iCoud integration.
  •  Better performance.
  • High Power Management.
  • Most likely 4k Video supported.
  • Start Menu.
  • Built-in Driver Support.
  • Cortna Support.

03-window-8

app tile to download-578-80

BeA9xjZCEAA7bMs

Windows-8-1-zoomed

windows-8-home-screen110913184405

windows-8-start8-start-menu-crop

windows-9-design-concept

Windows-9

Update Samsung Galaxy Note N7000 To Android KitKat With ParanoidAndroid Custom ROM

0
Update Samsung Galaxy Note N7000 To Android KitKat With ParanoidAndroid Custom ROM

Samsung’s very first phablet, the Galaxy Note won’t be receiving any further Android updates due to hardware limitations. If you own this device and you’re tired of the old stock firmware, you may want to flash some nice custom ROM, that will also let you taste the latest and greatest version of Android and also give a new life to your device. We’ve done this job and found a nice custom ROM, that is ParanoidAndroid based on Android 4.4.4 KitKat.

This ROM is presented by XDA recognized developer beerbong. ParanoidAndroid is one of the best custom ROMs after CyanogenMod and is used by thousands of users. In the succeeding post, we are going to install ParanoidAndroid Android 4.4.4 KitKat Custom ROM on our beloved Samsung Galaxy Note GT-N7000. Before we head towards the installation instructions, you need to keep in mind that this is a Custom ROM and there’s a high chance of bugs. It may not be kept for everyday use. You need to make sure that you’ve a good idea about Custom ROMs and you can handle these without any problems. Let’s go through the early preparations and then flash this ROM.

Samsung-Galaxy-Note

Early Preparations:

This is only for Galaxy Note 1 GT-N7000!

This custom ROM is only for the device mentioned above. Make sure that your model number matches the one listed above. To do so, go to Settings > About Device on your device and see your model number. Flashing this ROM on any other device will result in bricking it so make sure that you meet this requirement first of all.

Battery should be charged at least over 60%.

Make sure that your battery is charged enough to complete the flashing process. In case your battery is low and your device goes dead during the flashing process, you may end up soft bricking your device as it won’t complete the flashing process.

Flash a Custom Recovery.

A custom recovery, whether a TWRP or  CWM is required to flash this ROM. You may find CWM for the Galaxy Note GT-N7000 on our site and flash it using the instructions explained in the guide.

4. Backup everything!

Just to be on the safe side, you may consider backing up each and everything from your Android device. This is highly recommended so that in case anything goes wrong, you still have the access to all of your data and you can restore it immediately. You may backup everything as listed below.

5. Disclaimer

The methods involved in flashing custom recoveries, roms and rooting your phone are highly custom and may result in bricking your device, and has nothing to do with Google or the device manufacturer that is SAMSUNG in our case. Also rooting your device will void its warranty and you will be no longer eligible for any kind of free device services by the manufacturers/warranty providers. In case of any mishap we may not be held responsible. Follow these instructions to the letter to avoid any mishap or bricking. Make sure that whatever you do, you are doing it at your own responsibility.

How To Update Samsung Galaxy Note N7000 To Android KitKat With ParanoidAndroid Custom ROM:

    1. Make sure that you’ve installed a custom recovery. There’s CWM linked above.
    2. Download  pa-n7000-4.5-BETA2-20140813.zip.
    3. Download Google Gapps.zip file
    4. Copy both the .zip files to your phone’s SD card.
    5. Boot into CWM recovery mode on your phone now. To do so, turn if off completely first. Now turn it on by pressing and holding Volume Up + Home + Power Key. As soon as you see the screen turning on, leave the buttons and you should boot into the recovery mode.
    6. Once in recovery, perform and factory data reset and also wipe cache.
    7. Now select “Install Zip > Choose Zip from SDcard > locate the pa-n7000-4.5-BETA2-20140813.zip file > Yes” and flash it.
    8. Once flashed, now once again select “Install Zip > Choose Zip from SDcard > locate the Gapps.zip file” and flash it.
    9. Once flashed Gapps, wipe cache and dalvik cache from the CWM recovery and reboot your device.
    10. As soon as your device boots up, you will see the ParanoidAndroid ROM.
    11. First boot may take up to 10 minutes, hold on tight till it boots up completely.
    12. That’s all. Enjoy KitKat on your device now.

In case your device is having issues, you may return to your old system using the Nandroid backup or follow our guide here to install stock firmware.

In case you got any issues or you face any difficulties regarding this post, please feel free to stop by the comment box below and let us know. We will get back to you as soon as possible. Thank you all.

Update Samsung Galaxy Note GT-N7000 To Andorid 4.4.4 KitKat With CM 11 Custom ROM

29
Update Samsung Galaxy Note GT-N7000 To Andorid 4.4.4 KitKat With CM 11 Custom ROM

Samsung Galaxy Note’s updates stopped at Android 4.1.2 Jelly Bean. Although this device still stands at a good place and is a great choice to go with, but unfortunately the Galaxy Note owners won’t be able to taste any further version of Android on their device. In this case, the only solution is a custom ROM. Custom ROMs always add life to the device that are actually forgotten by the manufacturers, and when it comes to choosing a Custom ROM, CyanogenMod stands at the first spot. Android 4.4.4 KitKat, based on CyanogenMod 11 is available for the Galaxy Note GT-N7000. So, the users owning this device have a chance to taste KitKat on their device with the help of this ROM.

Android 4.4.4 KitKat based on CyanogenMod for the Galaxy Note GT-N7000 is presented by XDA recognized contributor hernaThis ROM is a nightly version, so chances are it’s going to be very buggy. Before you go ahead and start flashing it, make sure that you’ve a good idea about custom ROMs and you actually know how to handle em’. This ROM may not be kept for everyday’s use. Let’s go through the early preparations and then flash this ROM to get the KitKat on your Galaxy Note GT-N7000.

Samsung-Galaxy-Note

Early Preparations:

This is only for Galaxy Note 1 GT-N7000!

This custom ROM is only for the device mentioned above. Make sure that your model number matches the one listed above. To do so, go to Settings > About Device on your device and see your model number. Flashing this ROM on any other device will result in bricking it so make sure that you meet this requirement first of all.

Battery should be charged at least over 60%.

Make sure that your battery is charged enough to complete the flashing process. In case your battery is low and your device goes dead during the flashing process, you may end up soft bricking your device as it won’t complete the flashing process.

Flash a Custom Recovery.

A custom recovery, whether a TWRP or  CWM is required to flash this ROM. You may find CWM for the Galaxy Note GT-N7000 on our site and flash it using the instructions explained in the guide.

4. Backup everything!

Just to be on the safe side, you may consider backing up each and everything from your Android device. This is highly recommended so that in case anything goes wrong, you still have the access to all of your data and you can restore it immediately. You may backup everything as listed below.

5. Disclaimer

The methods involved in flashing custom recoveries, roms and rooting your phone are highly custom and may result in bricking your device, and has nothing to do with Google or the device manufacturer that is SAMSUNG in our case. Also rooting your device will void its warranty and you will be no longer eligible for any kind of free device services by the manufacturers/warranty providers. In case of any mishap we may not be held responsible. Follow these instructions to the letter to avoid any mishap or bricking. Make sure that whatever you do, you are doing it at your own responsibility.

How To Update Galaxy Note N7000 To Android 4.4.4 KitKat With CyanogenMod 11 Custom ROM:

    1. Make sure that you’ve installed a custom recovery. There’s CWM linked above.
    2. Download  cm-11-20140813-NIGHTLY-n7000.zip 
    3. Download Google Gapps.zip file
    4. Copy both the .zip files to your phone’s SD card.
    5. Boot into CWM recovery mode on your phone now. To do so, turn if off completely first. Now turn it on by pressing and holding Volume Up + Home + Power Key. As soon as you see the screen turning on, leave the buttons and you should boot into the recovery mode.
    6. Once in recovery, perform and factory data reset and also wipe cache.
    7. Now select “Install Zip > Choose Zip from SDcard > locate the cm-11-2014813-NIGHTLY-n7000.zip file > Yes” and flash it.
    8. Once flashed, now once again select “Install Zip > Choose Zip from SDcard > locate the Gapps.zip file” and flash it.
    9. Once flashed Gapps, wipe cache and dalvik cache from the CWM recovery and reboot your device.
    10. As soon as your device boots up, you will see the CM logo.
    11. First boot may take up to 10 minutes, hold on tight till it boots up completely.
    12. That’s all. Enjoy KitKat on your device now.

In case your device is having issues, you may return to your old system using the Nandroid backup or follow our guide here to install stock firmware.

In case you got any issues or you face any difficulties regarding this post, please feel free to stop by the comment box below and let us know. We will get back to you as soon as possible. Thank you all.

How To Update Your Xbox One Controller In 7 Simple Steps

0
How To Update Your Xbox One Controller In 7 Simple Steps

For all the PC users, using a Joystick is not an easy task, as both Mouse and Keyboard are doing the best job ever, however, all those who are used to Gaming Consoles, can’t live without an upgraded Controller. Not in terms of Hardware, but in terms of Software. Sometimes you need to update the Software of your Controller in order to make sure that it is compatible with all the Hardware you are using. Most of the times, users neglect the Firmware update until they start experiencing the problems. Despite this Firmware is available for a long time and it is not important to update, but if you are using Xbox Stereo Headset Adaptor, you are in desperate need to update the Firmware of your Xbox Controller.

The set-up and installation process is not that difficult, however, I suggest if you are not using the Headset Adaptor, then do not update your Console Controller, otherwise, do update it. If you don’t know How To Update Your Xbox One Controller In 7 Simple Steps, we will show you how it is done, now grab the necessary things and get ready.

Xbox_One_controller_update_2

Requirements:

  1. An Xbox One
  2. Xbox Stereo Headset Adaptor
  3. Xbox Controller
  4. Micro USB Cable, that comes with the Xbox
  5. Active Internet connection

How To Update Your Xbox One Controller:

  1. Turn On your Xbox One and Sing-in to Xbox Live, just to make sure that your device is ready to accept the updates.
  2. Plug-in the Headset Adaptor to the Bottom of your Controller, and also connects it with the Headset, otherwise the adaptor won’t Turn On.
  3. Plug the Micro USB cable to the Console, the cable must be the one that comes with the Console, otherwise, you might have slow installation process.
  4. Plus the Micro USB cable (Small Port) to the Xbox Controller.
  5. It will trigger the Update process automatically, Follow the on-screen instructions and don’t disconnect the Cable.
  6. If the update doesn’t start automatically, Press the Menu button  and Navigate to Settings > System > Update Controller and Select Continue.
  7. Once the update is complete, Unplug the USB Cable, If you want to update another controller, connect them one-by-one until all of them are updated.

How To Fix Lumia 1520 tap and scroll problem linked to flexing the screen

0
How To Fix Lumia 1520 tap and scroll problem linked to flexing the screen

Nokia Lumia 1520 is one of the best Windows phone available in present time, it is if you are fine with the 6-inch display, and some problems which are sure to be experienced in such devices, no matter how much of a Flagship device it is. Most of the times, when users experience any issue related with the Touch or Scroll of any device, firstly it is considered as the problem of Software/Firmware problem, however, not all the times such problems are related with Software.

Nokia Lumia 1520 is also the victim of Scroll/Touch Problem, where users have witnessed that when they Scroll up or down on the screen, instead of scrolling, the app on which they have started the scrolling, the application opens up. At first, users tried to factory reset their device or update their software to solve this problem, upon failing, they then start looking for a solution. A new theory has arrived on the Web, explaining and solving this problem.

1520_forum

A users at WP Central, Hesham, has found an interesting idea about this Scroll/Touch problem, his words described it as the problem with the Size of the Screen, thus the digitizer contacts behind the display become misaligned, and the reason why it is misaligned is because of the Screen flex, like when you put the device in your Pocket with screen upside down, thus causing it to loose its position.

There are Two solutions for this Problem:

  • Don’t be harsh while scrolling up and down
  • Do not carry your device in your front pocket, upside down.

The explanation from this man has become more eligible, as he proves why the Software is not related with this Problem and also it proves why most users are not experiencing this problem, while others are still roaming with a perfect device. Considering this as the cause of this problem, Microsoft, can’t recall anything, as it won’t stop the popularity of this device and stop people from buying it. If you are experiencing this problem, do try these solutions and if they works for you, good if not, then start looking for another solution.

VIA:Wpcentral