Home Blog Page 373

Android M Announced, Here’s What You Need To Know

0
Android M Announced, Here’s What You Need To Know

At Google I/O 2015 today, Google pulled the curtains off form the latest iteration of Android codenamed as Android M. During the last week, Android M made a number of rounds in the rumor mills, Google just brought all the rumors to an end today at the developer conference. With the release of Android M, Google aims to go back to the basics as said by Sundar Pichai (Senior VP Google). Android Lollipop focused more on the interface by means of Material Design, but Android M will focus on stability, performance and usability of the software. Google didn’t hint at the Android M name or version number, but gave us a handful of information about what the Android M will bring.Android-M


Chrome Custom Tabs

Google is going to load Android M with plenty of new and enhanced features. One of the changes is in the Google Chrome browser. In the earlier versions of Android we saw that whenever an application required the use of a Google Chrome browser, users had to go out of the application and use the browser separately. Google now offers Google Chrome Custom Tabs, which lets developers integrate Google Chrome in their applications. So if the application now prompts the users to use the Chrome browser, they can use it within the application without switching into the browser and leaving the current application. Automatic sign-in, saved passwords, autofill and all such features for Chrome browser will be available within the apps.

Application Permissions

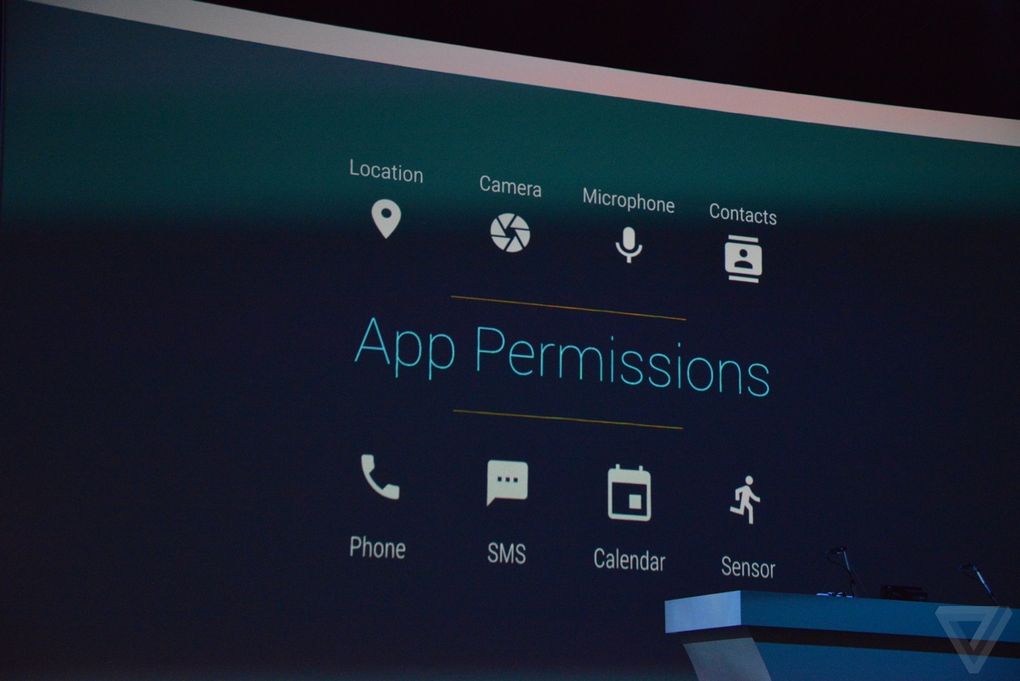
Another change in the Android M is the in application permission department. Applications will ask for security permissions as required. Earlier the applications asked for all security permissions at once, but now these permissions are divided into 8 different categories. google-io-android-m-0105.0
Intent Update

Another cool addition in the Android M is the in-built app linking system, which also known as “intent”. For example if you have clicked a Facebook, DropBox, Google Plus or Twitter link in a web page, your Android will prompt you to select the application using which you want to open that certain link. It will either ask you to open that link using a browser, or using that particular application that link is from. In Android M, this has been changed. Android M will no longer ask you to choose from a list of applications. If you’ve clicked a Facebook link, it will open it in Facebook application. If you have clicked a DropBox link, it will open it up in the DropBox application.

Android Pay

Google Wallet, which is Google’s payment application currently on Android is going to get replaced with Android Pay. Android Pay will use NFC and Host Card Emulation for tap-to-pay services. App developers will be able to integrate Android Pay in their applications for in-app purchases. Android Pay will be accepted in 700,000+ US stores. It will be pre-installed in At&t, Verizon and T-Mobile devices. Android Pay will also support fingerprint scanner on devices like Galaxy S6.

Doze

When Android Lollipop came out, users had severe battery issues which added to dislikes of Android Lollipop. Google seems to have taken a serious notice of this issue and bring the fixes in Android M. Android M will offer the users a much better battery management and a much longer battery backup. A feature named “Doze” is implemented in Android M, that works on motion detection. It basically detects which application is in use and which is not, and shuts down the in-active applications or background process immediately.
imagesUSB Type-C Support

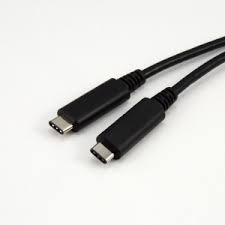
For faster charging, Android M will bring native USB Type C support. With the help of USB Type-C connectors, you can plug in a cable in any direction. You can even charge another Android device using your Android device.

According to Google’s vice president of engineering Dave Burke, Google has added a number of features to the core of Android, which were folded into the Android OS by different device manufacturers.


Android will make its way to the public later this year. Android M’s developer preview is already available for Nexus 5, 6, 9 and Nexus Player. If you own of these devices, go ahead and install the developer preview right away. Don’t forget to tell us what do you think about the latest iteration of Android.Screenshot at May 29 00-13-06


Install HTC Sense on any Android device with HTC BlinkFeed

Install HTC Sense on any Android device with HTC BlinkFeed

I don’t know about others, but I love to try other devices features, apps and interface on another device. I always wanted to have the Samsung Multi-Tasking on my Nexus 5, although, didn’t like it even using on a Samsung device. I even wanted to see the iOS interface on an Android device, once again looked stupid. HTC Sense, till HTC Sesne 5, was not much of a beautiful thing as well as it was quite buggy, although after they updated it to HTC Sense 6, there was something, that you should see on your device.

Now in such cases, mostly we have to rely on a Custom ROM, but the performance of that ROM doesn’t provide much satisfaction that one should stick to it. What we want is the whole interface on our device, while even using the stock ROM and it looks like XDA member xpirthas the perfect answer for all of us. It is like a bundle that will transform your whole device into a perfection with HTC Sense. What it requires is an Android device running Android 4.4 Kit-Kat, rooted device will be even better. In this article, we will show you How to Install HTC Sesne on any Android device with HTC BlinkFeed, without further ado, let us continue.

Install HTC Sesne on any Android device with HTC BlinkFeed

Downloads Required:

HTC BlinkFeed: Link

Make Sure to download all the Apps and Plugins

How to Install HTC BlinkFeed:

  1. Make Sure your device is either on Kit-Kat or above.
  2. Download and copy all the .apk files to your device.
  3. Use any File Manager to Navigate to Copied location.
  4. First Install the HTC BlinkFeed and wait for it to load properly.
  5. Then Install all the Apps one-by-one.
  6. Restart your device.
  7. Once Again, navigate to the copied location and Install the Plugins one-by-one.
  8. Try all the apps and Plugins and if anything doesn’t work, restart the device and try again.

Root Xperia ZR C5502, C5503 10.6.A.0.454 LP Firmware

20
Root Xperia ZR C5502, C5503 10.6.A.0.454 LP Firmware

Xperia ZR has also started receiving the Android 5.0.2 Lollipop update. The build number for Lollipop update is 10.6.A.0.454. It is based on Material Design. This guide will follow through all the steps to root Xperia ZR Lollipop firmware with build number 10.6.A.0.454. This rooting guide can be used on C5502 and C5503 variants of Xperia ZR. Do not attempt to use this guide on any other variant of this phone. Make sure that your phone is running Android 5.0.2 10.6.A.0.454 firmware. These precautions are necessary to ensure the safety of your phone during the rooting process.

By rooting, phone can be customized and bloatware can be removed. Bloatware is term that describes the pre-installed content on any device. Sony pre-installs lot of applications and features on Xperia ZR which cannot be removed or uninstalled like other applications. These useless application make phone slower. To remove these applications, phone must be rooted. To root 10.6.A.0.454 firmware on Xperia ZR, follow the given steps below. Do not miss any steps. Every step is explained will necessary details so that even those who are rooting a phone for first time should not face any issue.

1. This is only for Sony Xperia ZR C5502 and Xperia ZR C5503

This rooting method is only for the device mentioned above. Make sure that your model number matches the one listed above. To do so, go to Settings > About Device on your device and see your model number. Flashing this firmware on any other device will result in bricking it so make sure that you meet this requirement first of all.

2. Battery should be charged at least over 60%.

Make sure that your battery is charged enough to complete the flashing process. In case your battery is low and your device goes dead during the flashing process, you may end up soft bricking your device as it won’t complete the flashing process.

3. Backup everything!

Just to be on the safe side, you may consider backing up each and everything from your Android device. This is highly recommended so that in case anything goes wrong, you still have the access to all of your data and you can restore it immediately. You may backup everything as listed below.

4. Enable USB Debugging Mode on your device.

Enable USB debugging mode on your device. To do so, tap settings>developer options>USB debugging. If you can’t find developer options in settings, then tap settings > about device and tap “Build Number” for 7 times and you’ll get em’ activated under settings.

5. Install and setup Sony Flashtool.

You must have installed Sony Flashtool. Find the full guide here.

After installing Sony Flashtool, open the Flashtool folder from the drive where you installed it. Now open Flashtool>Drivers>Flashtool-drivers.exe and install the Flashtool, Fastboot & Xperia ZR drivers from the list. If you do not find the Flashtool drivers in Flashmode, skip this step and install Sony PC Companion instead, for drivers support. [Important]

6. Use OEM data cable to establish connection.

Make sure that you use the phone’s original data cable to establish connection between your phone and the PC. Using a different data cable might result in interrupting the firmware installation.

7. Unlock Bootloader (Optional)

Use the following guide to unlock the bootloader of your Xperia device before proceeding.

Disclaimer: The methods involved in flashing custom recoveries, roms and rooting your phone are highly custom and may result in bricking your device, and has nothing to do with Google or the device manufacturer that is SONY in our case. Also rooting your device will void its warranty and you will be no longer eligible for any kind of free device services by the manufacturers/warranty providers. In case of any mishap we may not be held responsible. Follow these instructions to the letter to avoid any mishap or bricking. Make sure that whatever you do, you are doing it at your own responsibility.

Steps For Rooting Xperia ZR C5502, C5503 10.6.A.0.454 Firmware

1. Downgrade to .283 Firmware and Root It

  1. If you have already updated your smartphone to Android 5.0.2 Lollipop, then you have to downgrade your device to KitKat OS and Root it.
  2. Use this guide to Install .283 firmware.
  3. Root using this guide.
  4. Now you have to Install XZ Dual Recovery (Steps below).
  5. Now phone is rooted, USB Debugging must be enabled.
  6. Download latest installer for Xperia ZR from here. (ZR-lockeddualrecovery2.8.10-RELEASE.installer.zip)
  7. Connect phone to PC using OEM date cable and run install.bat.
  8. It will install the custom recovery.
  9. Now work here is done. Lets move on to next step.

2. Make A Pre-Rooted Flashable Firmware For .454 FTF

  1. Download PRF Creator and install on your system.
  2. Download SuperSU zip and place anywhere on PC.
  3. Download .454 FTF and place it anywhere on PC. [For your phone model only!]
  4. Download ZR-lockeddualrecovery2.8.10-RELEASE.flashable.zip
  5. Now run PRFC and add all three required files in it.
  6. Then click on Create.
  7. Once the Flashable ROM is created, it will show the successful message.
  8. Do not touch any other option while creating the pre-rooted firmware.
  9. Now copy the pre-rooted firmware to the phone’s internal storage.
  10. Our work in this step is now done. Move on to next step.

3. Root and Install Recovery on ZR C5503, C5502 5.0.2 Lollipop Firmware

  1. Custom recovery was installed in the first step.
  2. The pre-rooted firmware was created and copied to phone in next step.
  3. Now you have to turn off phone.
  4. Turn it on again and press volume up or down repeatedly to enter custom recovery.
  5. Click on install and locate the folder where you placed the flashable zip earlier.
  6. Tap on it and install it.
  7. Now reboot the phone.
  8. If phone is still connected to PC via USB cable, disconnect it.
  9. Now go back to the .454 ftf you downloaded in second step and copy it to /flashtool/firmwares
  10. Open flashtool and click on lightning icon in the top left.
  11. Click on it and click on flashmode.
  12. Select the .454 firmware.
  13. In the right bar, in the exclude options, exclude System only while flashing. Leave every other options as it is.
  14. While flashtool prepares the software for flashing, turn off your phone.
  15. Keep the volume down button pressed and connect it to PC via USB cable.
  16. The button must be pressed during it.
  17. The phone will enter flashmode.
  18. Flashtool will automatically detect it and start flashing.
  19. After flashing phone will reboot and you will be done 🙂
  20. That’s all 🙂 Enjoy!

Got any questions? Ask me in the comments below

Root Xperia ZL C6502, C6503 10.6.A.0.454 LP Plus CWM/TWRP

24
Root Xperia ZL C6502, C6503 10.6.A.0.454 LP Plus CWM/TWRP

Sony Xperia ZL is the non-glass variant of Xperia Z. Everything except the build material in these two phones is same. Xperia ZL comes in two main variants; C6502 and C6503. Both of these variants are now receiving Android 5.0.2 Lollipop update. The build number for the new update is 10.6.A.0.454. It is based on Material Design of Android Lollipop. The performance of the phone is supposed to be increased with Lollipop update as it brings better RAM Management and better power saving features. Those who have not updates their Xperia ZL to Lollipop yet, should update it using this Guide.

After updating Xperia ZL to Lollipop, root access on the phone(If rooted) will be wiped. This guide follows the steps to root stock Xperia ZL C6503 and Xperia ZL C6502. To root 10.6.A.0.454 Xperia ZL Firmware, you must follow all three major steps given below. The rooting steps for 10.6.A.0.454 firmware listed with all the details required for even those who are rooting their devices for the very first time. By rooting, phone can be customized at will. This guide will also provide steps to install CWM and TWRP Dual Recovery on Xperia ZL. The custom recoveries can be used to install custom mods and custom ROMs. Follow all the steps given below to root Xperia ZL 10.6.A.0.454 LP Firmware.

1. This is only for Sony Xperia ZL C6502 and Xperia ZL C6503

This rooting method is only for the device mentioned above. Make sure that your model number matches the one listed above. To do so, go to Settings > About Device on your device and see your model number. Flashing this firmware on any other device will result in bricking it so make sure that you meet this requirement first of all.

2. Battery should be charged at least over 60%.

Make sure that your battery is charged enough to complete the flashing process. In case your battery is low and your device goes dead during the flashing process, you may end up soft bricking your device as it won’t complete the flashing process.

3. Backup everything!

Just to be on the safe side, you may consider backing up each and everything from your Android device. This is highly recommended so that in case anything goes wrong, you still have the access to all of your data and you can restore it immediately. You may backup everything as listed below.

4. Enable USB Debugging Mode on your device.

Enable USB debugging mode on your device. To do so, tap settings>developer options>USB debugging. If you can’t find developer options in settings, then tap settings > about device and tap “Build Number” for 7 times and you’ll get em’ activated under settings.

5. Install and setup Sony Flashtool.

You must have installed Sony Flashtool. Find the full guide here.

After installing Sony Flashtool, open the Flashtool folder from the drive where you installed it. Now open Flashtool>Drivers>Flashtool-drivers.exe and install the Flashtool, Fastboot & Xperia ZL drivers from the list. If you do not find the Flashtool drivers in Flashmode, skip this step and install Sony PC Companion instead, for drivers support. [Important]

6. Use OEM data cable to establish connection.

Make sure that you use the phone’s original data cable to establish connection between your phone and the PC. Using a different data cable might result in interrupting the firmware installation.

7. Unlock Bootloader (Optional)

Use the following guide to unlock the bootloader of your Xperia device before proceeding.

Disclaimer: The methods involved in flashing custom recoveries, roms and rooting your phone are highly custom and may result in bricking your device, and has nothing to do with Google or the device manufacturer that is SONY in our case. Also rooting your device will void its warranty and you will be no longer eligible for any kind of free device services by the manufacturers/warranty providers. In case of any mishap we may not be held responsible. Follow these instructions to the letter to avoid any mishap or bricking. Make sure that whatever you do, you are doing it at your own responsibility.

Steps For Rooting Xperia ZL C6502, C6503 10.6.A.0.454 Firmware

1. Downgrade to .283 Firmware and Root It

  1. If you have already updated your smartphone to Android 5.0.2 Lollipop, then you have to downgrade your device to KitKat OS and Root it.
  2. Use this guide to Install .283 firmware.
  3. Root using this guide.
  4. Now you have to Install XZ Dual Recovery (Steps below).
  5. Now phone is rooted, USB Debugging must be enabled.
  6. Download latest installer for Xperia ZL from here. (ZL-lockeddualrecovery2.8.10-RELEASE.installer.zip)
  7. Connect phone to PC using OEM date cable and run install.bat.
  8. It will install the custom recovery.
  9. Now work here is done. Lets move on to next step.

2. Make A Pre-Rooted Flashable Firmware For .454 FTF

  1. Download PRF Creator and install on your system.
  2. Download SuperSU zip and place anywhere on PC.
  3. Download .454 FTF and place it anywhere on PC. [For your phone model only!]
  4. Download ZL-lockeddualrecovery2.8.10-RELEASE.flashable.zip
  5. Now run PRFC and add all three required files in it.
  6. Then click on Create.
  7. Once the Flashable ROM is created, it will show the successful message.
  8. Do not touch any other option while creating the pre-rooted firmware.
  9. Now copy the pre-rooted firmware to the phone’s internal storage.
  10. Our work in this step is now done. Move on to next step.

3. Root and Install Recovery on ZL C6503, C6502 5.0.2 Lollipop Firmware

  1. Custom recovery was installed in the first step.
  2. The pre-rooted firmware was created and copied to phone in next step.
  3. Now you have to turn off phone.
  4. Turn it on again and press volume up or down repeatedly to enter custom recovery.
  5. Click on install and locate the folder where you placed the flashable zip earlier.
  6. Tap on it and install it.
  7. Now reboot the phone.
  8. If phone is still connected to PC via USB cable, disconnect it.
  9. Now go back to the .454 ftf you downloaded in second step and copy it to /flashtool/firmwares
  10. Open flashtool and click on lightning icon in the top left.
  11. Click on it and click on flashmode.
  12. Select the .454 firmware.
  13. In the right bar, in the exclude options, exclude System only while flashing. Leave every other options as it is.
  14. While flashtool prepares the software for flashing, turn off your phone.
  15. Keep the volume down button pressed and connect it to PC via USB cable.
  16. The button must be pressed during it.
  17. The phone will enter flashmode.
  18. Flashtool will automatically detect it and start flashing.
  19. After flashing phone will reboot and you will be done 🙂
  20. That’s all 🙂 Enjoy!

Got any questions? Ask me in the comments below

Root Xperia Z C6602,C6603 10.6.A.0.454 5.0.2 LP Plus CWM/TWRP

33
Root Xperia Z C6602,C6603 10.6.A.0.454 5.0.2 LP Plus CWM/TWRP

Sony Xperia Z has started receiving the Android 5.0.2 Lollipop update with build number 10.6.A.0.454. The update is being rolled out for both C6602 and C6603. One is 3G only model while other is 3G+4G Model. The basic and most probably the only difference between both phones is the bands that these phones support. Those who have not received the OTA Lollipop update yet can update their devices using manual Update Xperia Z To Lollipop Official Firmware Guide. After updating, Android power users will lose root access. Keeping phone in stock state is something power users would never do.

Rooting an Android phone opens the gate of customizations and custom mods. These custom mods are designed to make the phone work even better and add features of users’ choice. To root Xperia Z Lollipop update, there is not simple method available yet. 10.6.A.0.454 root can be done using the pre-rooted firmware. This method requires the phone to be using the older firmware first and then updating to new Lollipop firmware using the pre-rooted Lollipop firmware for Xperia Z. This method will be used to root both C6602 and C6603 10.6.A.0.454 in addition to installing CWM and TWRP custom recoveries. The custom recoveries can be used to install custom mods and custom ROMs on the phone. Too root C6602, C6603 10.6.A.0.454 ftf, follow the guide given below. Make sure that you follow all the steps given below if you have not rooted any device before or even if you have rooted using any other method.

1. This is only for Sony Xperia Z C6602 and Xperia Z C6603

This rooting method is only for the device mentioned above. Make sure that your model number matches the one listed above. To do so, go to Settings > About Device on your device and see your model number. Flashing this firmware on any other device will result in bricking it so make sure that you meet this requirement first of all.

2. Battery should be charged at least over 60%.

Make sure that your battery is charged enough to complete the flashing process. In case your battery is low and your device goes dead during the flashing process, you may end up soft bricking your device as it won’t complete the flashing process.

3. Backup everything!

Just to be on the safe side, you may consider backing up each and everything from your Android device. This is highly recommended so that in case anything goes wrong, you still have the access to all of your data and you can restore it immediately. You may backup everything as listed below.

4. Enable USB Debugging Mode on your device.

Enable USB debugging mode on your device. To do so, tap settings>developer options>USB debugging. If you can’t find developer options in settings, then tap settings > about device and tap “Build Number” for 7 times and you’ll get em’ activated under settings.

5. Install and setup Sony Flashtool.

You must have installed Sony Flashtool. Find the full guide here.

After installing Sony Flashtool, open the Flashtool folder from the drive where you installed it. Now open Flashtool>Drivers>Flashtool-drivers.exe and install the Flashtool, Fastboot & Xperia Z drivers from the list. If you do not find the Flashtool drivers in Flashmode, skip this step and install Sony PC Companion instead, for drivers support. [Important]

6. Use OEM data cable to establish connection.

Make sure that you use the phone’s original data cable to establish connection between your phone and the PC. Using a different data cable might result in interrupting the firmware installation.

7. Unlock Bootloader (Optional)

Use the following guide to unlock the bootloader of your Xperia device before proceeding.

Disclaimer: The methods involved in flashing custom recoveries, roms and rooting your phone are highly custom and may result in bricking your device, and has nothing to do with Google or the device manufacturer that is SONY in our case. Also rooting your device will void its warranty and you will be no longer eligible for any kind of free device services by the manufacturers/warranty providers. In case of any mishap we may not be held responsible. Follow these instructions to the letter to avoid any mishap or bricking. Make sure that whatever you do, you are doing it at your own responsibility.

Steps For Rooting Xperia Z C6602, C6603 10.6.A.0.454 Firmware

1. Downgrade to .283 Firmware and Root It

  1. If you have already updated your smartphone to Android 5.0.2 Lollipop, then you have to downgrade your device to KitKat OS and Root it.
  2. Use this guide to Install .283 firmware.
  3. Root using this guide.
  4. Now you have to Install XZ Dual Recovery (Steps below).
  5. Now phone is rooted, USB Debugging must be enabled.
  6. Download latest installer for Xperia Z from here. (Z-lockeddualrecovery2.8.10-RELEASE.installer.zip)
  7. Connect phone to PC using OEM date cable and run install.bat.
  8. It will install the custom recovery.
  9. Now work here is done. Lets move on to next step.

2. Make A Pre-Rooted Flashable Firmware For .454 FTF

  1. Download PRF Creator and install on your system.
  2. Download SuperSU zip and place anywhere on PC.
  3. Download .454 FTF and place it anywhere on PC. [For your phone model only!]
  4. Download Z-lockeddualrecovery2.8.10-RELEASE.flashable.zip
  5. Now run PRFC and add all three required files in it.
  6. Then click on Create.
  7. Once the Flashable ROM is created, it will show the successful message.
  8. Do not touch any other option while creating the pre-rooted firmware.
  9. Now copy the pre-rooted firmware to the phone’s internal storage.
  10. Our work in this step is now done. Move on to next step.

If you do not want to create your own pre-rooted firmware, then download the one created already for your phone’s model from one of the links given below.

C6602 Pre-Rooted 10.6.A.0.454 Firmware Download || C6603 Pre-Rooted 10.6.A.0.454 Firmware Download

3. Root and Install Recovery on Z C6603, C6602 5.0.2 Lollipop Firmware

  1. Custom recovery was installed in the first step.
  2. The pre-rooted firmware was created and copied to phone in next step.
  3. Now you have to turn off phone.
  4. Turn it on again and press volume up or down repeatedly to enter custom recovery.
  5. Click on install and locate the folder where you placed the flashable zip earlier.
  6. Tap on it and install it.
  7. Don’t reboot the phone.
  8. Turn it off from the recovery
  9. If phone is still connected to PC via USB cable, disconnect it.
  10. Now go back to the .454 ftf you downloaded in second step and copy it to /flashtool/firmwares
  11. Open flashtool and click on lightning icon in the top left.
  12. Click on it and click on flashmode.
  13. Select the .454 firmware.
  14. In the right bar, in the exclude options, exclude System only while flashing. Leave every other options as it is.
  15. Keep the volume down button pressed and connect it to PC via USB cable.
  16. The button must be kept pressed during it.
  17. The phone will enter flashmode.
  18. Flashtool will automatically detect it and start flashing.
  19. After flashing phone will reboot and you will be done 🙂
  20. That’s all 🙂 Enjoy!

Got any questions? Ask me in the comments below

Transform Your Galaxy Note 4 into a Nexus 6

0
Transform Your Galaxy Note 4 into a Nexus 6

Now the thing is that we all want to have a lot of speed in our Mobile devices, but again we want to have all the Gimmicks in it too, which is not possible if we try to bring all the Pure Android things on it. Obviously if we install the CyanogenMod based ROMs on our device, they are most likely to erase all the gimmicks from our device and brings all the Stock looks on it. Simply said, you’ll have speed and performance but you are sure to loose all the attention that a Stock OS can do. Now in case of Galaxy Note 4, if we erase all the Stocks Features, that won’t be much fun at all.

The best way to bring speed and keep a hold onto everything that your device can provide, is to install 3rd party Launchers and Two of the best are Apex and Nova launchers. Since these launchers support themes and their kit sets, including Icon and others stuff, there won’t be much need to customize it, all you need is to download the theme and apply it. Apex and Nova both are supporting Lollipop and the new update has brought the Materialized interface and the best part is that let you use the Stock Features of Galaxy Note 4 and the Google Now Launcher.

Transform Your Galaxy Note 4 into a Nexus 6

However, to Install the Google Now, you must first need to install Nova or Apex launcher first. They both features a Paid version too, allowing you to have more features and stuff in it, so if you like it, do purchase it. So, without further ado, let us see, how we can bring Note 4 closer to Nexus 6 in terms of internal looks and performance.

Downloads Required:

Lollipop Kit: Link

Apex Launcher: Link

Transform Galaxy Note 4 into Nexus 6:

  1. Download and Install the Apex Launcher.
  2. Navigate to Theme section or the Play Store and Install the Lollipop Theme for Apex Launcher.
  3. The New update has bring this launcher to Lollipop on Default.
  4. Now Just Tap the Home Key and Select the Apex Launcher and everything will turn Pure Android.
  5. Long Press the Home Key will bring out the Google Now Launcher
  6. Now Just visit the Play Store and install more of the Google Apps and disable the Stock apps of your device.
  7. Enjoy the Sweetness of Pure Android, Performance and speed.

Install Android 5.1.1 Lollipop on the Nexus 5 [ Easy Way ]

0
Install Android 5.1.1 Lollipop on the Nexus 5 [ Easy Way ]

Android 5.1.1 Lollipop is here officially and this time i got good news for Nexus 5 owners, the latest factory image is up for Nexus 5 ( LMY48B ). If you own a Nexus 5 then you have to spare only 5 minutes to flash the Android 5.1.1 Lollipop factory image on Nexus 5. All the required files are added below just click on the link to download it. Here’s how you can install Android 5.1.1 Lollipop on the Nexus 5.

20131018T122945

 Before you proceed you need these thing:

How To Install Android 5.1.1 Lollipop on the Nexus 5:

Step#1: First turn off you Nexus 5 by holding down the power button for few seconds.

Step#2: Once you device is completely turned off, now you have to go in bootloader.

Step#3: Now Press and hold Power and Volume Down in order to restart your Nexus 5 into bootloader, if it didn’t work kindly repeat the whole process again.

Step#4: Now that your device is in Bootloader, connect your device with your computer using a USB cable.

Step#5: Open a windows where you have unpacked the downloaded firmware.

Step#6: Find the file name flash-all.bat and double click on it, now let the process to finish.

Once the installation process is completed, your Nexus 5 will reboot and when it boots up your device will be running Android 5.1.1. Its a simple method to install Android 5.1.1 on Nexus 5, if you face any problem please do tell me in comments.

Update Sony Xperia ZR C5502/C5503 To Official Android Lollipop 10.6.A.0.454 Firmware

14
Update Sony Xperia ZR C5502/C5503 To Official Android Lollipop 10.6.A.0.454 Firmware

The wait is over and the great day has come. Sony started rolling out the long-awaited Android Lollipop update for the very first Xperia ZR siblings last night. The update has made its way for Xperia ZR, ZR, ZL & Tablet Z. Android 5.0.2 Lollipop rolled out through OTA update at first, but the firmware is now available through Sony PC Companion and through unofficial firmware download tools as well. If you’ve been waiting for the latest and greatest iteration of Android to hit your beloved Xperia ZR, this may be the  chance for you to update your device. New firmware for Xperia ZR carries the build number 10.6.A.0.454 and its Android 5.0.2 Lollipop on the core. The update will take quite a while to hit all regions all around the world, but if you can’t wait, you may flash the Android 5.0.2 Lollipop 10.6.A.0.454 FTF file using Sony Flashtool in order to update your Xperia ZR C5502/C5503.

Before we head towards the guide to update Xperia ZR, let’s have a look on what’s new in the latest update. Android 5.0.2 brings the biggest changes in the history of Android to the devices it hit. The very first change is in the display department. Google introduced a new UI named as Material Design. All manufacturers who are rolling out Android Lollipop for their devices have revamped the UI according to Google’s Material Design. There are new notification cards on the lock screen. Multi-user and guest modes are there. Some applications have been enhanced. Over-all performance and battery life of the device seems to be improved.xperia-zr-lollipop

The firmware that we are going to flash is completely official and untouched. It will not void the warranty of your device nor it will result in causing any damage. You can flash it using the guidelines carefully and update your Xperia ZR to latest Android 5.0.2 Lollipop 10.6.A.0.454 firmware right away. Without any further discussion, let’s go ahead and install the firmware on your beloved Xperia ZR now.

C5502 C5503

Some early preparations: 

1. This is only for Sony Xperia ZR C5502 & C5503

This ROM is only for the device mentioned above. Make sure that your model number matches the one listed above. To do so, go to Settings > About Device on your device and see your model number. Flashing this firmware on any other device will result in bricking it so make sure that you meet this requirement first of all.

2. Battery should be charged at least over 60%.

Make sure that your battery is charged enough to complete the flashing process. In case your battery is low and your device goes dead during the flashing process, you may end up soft bricking your device as it won’t complete the flashing process.

3. Backup everything!

Just to be on the safe side, you may consider backing up each and everything from your Android device. This is highly recommended so that in case anything goes wrong, you still have the access to all of your data and you can restore it immediately. You may backup everything as listed below.

4. Enable USB Debugging Mode on your device.

Enable USB debugging mode on your device. To do so, tap settings>developer options>USB debugging. If you can’t find developer options in settings, then tap settings > about device and tap “Build Number” for 7 times and you’ll get em’ activated under settings.

5. Install and setup Sony Flashtool.

You must have installed Sony Flashtool. Find the full guide here.

After installing Sony Flashtool, open the Flashtool folder from the drive where you installed it. Now open Flashtool>Drivers>Flashtool-drivers.exe and install the Flashtool, Fastboot & Xperia ZR drivers from the list. [Important]

6. Use OEM data cable to establish connection.

Make sure that you use the phone’s original data cable to establish connection between your phone and the PC. Using a different data cable might result in interrupting the firmware installation.


How To Update Sony Xperia ZR C5502 & C5503 To Official Android 5.0.2 Lollipop 10.6.A.0.454 Firmware

Before moving forward, please make sure that you’ve read the pre requisites and ensure that you are set to go ahead.

  1. Download the latest firmware Android 5.0.2 Lollipop 10.6.A.0.454 FTF file.
    1. For Xperia ZR C5502 [Generic/Unbranded. Link1 | Create your own FTF using this guide.
    2. For Xperia ZR C5503 [Generic/Unbranded] Link 1 | You can also create your own FTF using this guide.
  2. Copy the file and paste in Flashtool>Firmwares folder.
  3. Open Flashtool.exe now.
  4. Hit the small lightening button on the top left corner and select Flashmode.
  5. Select the FTF firmware file that you placed in the Firmware folder.
  6. From the right side, select what do you want to wipe. Data, cache and apps log, all wipes are recommended, perhaps you may select if you don’t want.
  7. Click on OK, and it will start preparing the firmware for flashing. This may take a little while to load.
  8. As soon as the firmware is loaded, it will prompt you to attach the phone by turning it off and keeping the back key press.
  9. For Xperia ZR Volume Down key will do the job of back key, just turn off your phone, keep the Volume Down key pressed and plug in the data cable.
  10. As soon as the phone is detected in Flashmode, the firmware will start flashing, leave the Volume Down key and let it flash the firmware.
  11. As soon as you see “Flashing ended or Finished Flashing” leave the Volume Down key, plug the cable out and reboot.
  12. That’s All! Congrats! You’ve installed latest Android 5.0.2 Lollipop on your Xperia ZR Enjoy

In case you got any queries or face any problems regarding this guide, please feel free to stop by the comment box below and let us know. We will get back to you as soon as possible. Thanks all!

NEXT: Root Xperia ZR C5502, C5503 10.6.A.0.454 LP Firmware

Update Sony Xperia ZL To Official Android Lollipop 10.6.A.0.454 Firmware

0
Update Sony Xperia ZL To Official Android Lollipop 10.6.A.0.454 Firmware

Sony Xperia ZL also known as Sony Xperia ZQ, one of the early members of Xperia ZL family is now getting updated to official Android 5.0.2 Lollipop. The new firmware carries the build number 10.6.A.0.454, which is also the same for other old Xperia ZL smartphones. New firmware brings a lot of goodies to the device. The notable changes are in the UI. Sony has revamped its UI in order to comply with Material Design introduced by Google. Some applications are updated. Performance and battery life of Xperia ZL are reportedly enhanced.

At the moment, this update is rolling out through OTA, Sony PC companion and also available in XperiFirm. The update will take some time to hit all regions. If you happen to be in a region where updates reach late, or just in case you can’t wait for OTA or Sony PC Companion to bring this update for you, you may want to flash it right away. You can update your device manually by means of an FTF file and using Sony Flashtool. Wondering how? Well, that’s what we are here for.sony-xperia-zl

In the on-going guide we are going to install the official Android 5.0.2 Lollipop 10.6.A.0.454 firmware on our beloved Sony Xperia ZL C6502, C6503 & C6506. We will be flashing the latest 10.6.A.0.454 FTF using Sony Flashtool. The firmware linked here is completely official and untouched. This doesn’t contain any kind of modification. This firmware will not void the warranty of your device, nor it will cause any damage to your device. In order to flash the firmware and update your Xperia ZR to Android Lollipop successfully, make sure that you follow this guide to the letter. Let’s move ahead and install the Lollipop Android on your Xperia ZR.

C6502 C6506

Some early preparations: 

1. This is only for Sony Xperia ZL C6502, C6503 & C6506.

This ROM is only for the device mentioned above. Make sure that your model number matches the one listed above. To do so, go to Settings > About Device on your device and see your model number. Flashing this firmware on any other device will result in bricking it so make sure that you meet this requirement first of all.

2. Battery should be charged at least over 60%.

Make sure that your battery is charged enough to complete the flashing process. In case your battery is low and your device goes dead during the flashing process, you may end up soft bricking your device as it won’t complete the flashing process.

3. Backup everything!

Just to be on the safe side, you may consider backing up each and everything from your Android device. This is highly recommended so that in case anything goes wrong, you still have the access to all of your data and you can restore it immediately. You may backup everything as listed below.

4. Enable USB Debugging Mode on your device.

Enable USB debugging mode on your device. To do so, tap settings>developer options>USB debugging. If you can’t find developer options in settings, then tap settings > about device and tap “Build Number” for 7 times and you’ll get em’ activated under settings.

5. Install and setup Sony Flashtool.

You must have installed Sony Flashtool. Find the full guide here.

After installing Sony Flashtool, open the Flashtool folder from the drive where you installed it. Now open Flashtool>Drivers>Flashtool-drivers.exe and install the Flashtool, Fastboot & Xperia ZL drivers from the list. [Important]

6. Use OEM data cable to establish connection.

Make sure that you use the phone’s original data cable to establish connection between your phone and the PC. Using a different data cable might result in interrupting the firmware installation.


How To Update Sony Xperia ZL C6502, C6503 & C6506. To Official Android 5.0.2 Lollipop 10.6.A.0.454 Firmware

Before moving forward, please make sure that you’ve read the pre requisites and ensure that you are set to go ahead.

  1. Download the latest firmware Android 5.0.2 Lollipop 10.6.A.0.454 FTF file.
    1. For Xperia ZL C6502 [Generic/Unbranded. Link1 | Create your own FTF using this guide.
    2. For Xperia ZL C6503 [Generic/Unbranded] – Create your own FTF using this guide.
    3. For Xperia ZL C6506 [Generic/Unbranded] –  Create your own FTF using this guide.
  2. Copy the file and paste in Flashtool>Firmwares folder.
  3. Open Flashtool.exe now.
  4. Hit the small lightening button on the top left corner and select Flashmode.
  5. Select the FTF firmware file that you placed in the Firmware folder.
  6. From the right side, select what do you want to wipe. Data, cache and apps log, all wipes are recommended, perhaps you may select if you don’t want.
  7. Click on OK, and it will start preparing the firmware for flashing. This may take a little while to load.
  8. As soon as the firmware is loaded, it will prompt you to attach the phone by turning it off and keeping the back key press.
  9. For Xperia ZL Volume Down key will do the job of back key, just turn off your phone, keep the Volume Down key pressed and plug in the data cable.
  10. As soon as the phone is detected in Flash-mode, the firmware will start flashing, leave the Volume Down key and let it flash the firmware.
  11. As soon as you see “Flashing ended or Finished Flashing” leave the Volume Down key, plug the cable out and reboot.
  12. That’s All! Congrats! You’ve installed latest Android 5.0.2 Lollipop on your Xperia ZL Enjoy

In case you got any queries or face any problems regarding this guide, please feel free to stop by the comment box below and let us know. We will get back to you as soon as possible. Thanks all!

NEXT: Root Xperia ZL C6502, C6503 10.6.A.0.454 LP Plus CWM/TWRP

Update Sony Xperia Z To Official Android Lollipop 10.6.A.0.454 Firmware

9
Update Sony Xperia Z To Official Android Lollipop 10.6.A.0.454 Firmware

The great news finally landed in for Xperia Z users. Android 5.0.2 Lollipop update roll out began last night. The update started making its way to the Xperia Z users through OTA. Sony Xperia Z remained in the que for receiving the update for quite a long time. Sony updated the top Xperia Z series smartphones to Android Lollipop first of all. New firmware brings a new cool UI based on Google’s Material Design. Sony Xperia Z users can also enjoy the new lock-screen notification cards. Sony has improved the performance and battery life of the device in this update. Ultra stamina mode, quick settings with notifications are some other features that can be found in this latest update.

The update carries the build number 10.6.A.0.454 and has Android 5.0.2 Lollipop on the core. This is the very first Lollipop build for Xperia Z, so we expect that Sony will roll out a number of updates in a few more days. For now, you may install this firmware and check out the Lollipop touch and feel on your Xperia Z. The new firmware is worth updating as it brings all the goodies to the device.

The update initially made its way through OTA only and wasn’t available through Sony PC companion or through other firmware download tools, but the good news for Xperia Z owners is, the update has appeared in the form of FTF now and can be installed manually. If you’ve been waiting for this update for so long, now maybe the time for you to go ahead and update your Xperia Z C6902, C6903 or C6616 to official Android 5.0.2 Lollipop 10.6.A.0.454 firmware. Let’s go ahead without any further ado and get some Lollipop sweetness on your beloved Xperia Z.xperia-z-purple-1240x840-928a11b774c06ae3e939c7b5f9752be81

Please keep in mind that this is official and untouched firmware. This firmware does not contain any kind of modifications and flashing it will not hurt the warranty of your device or cause a damage in any way. We will be using Sony’s Flashtool to install Android 5.0.2 Lollipop 10.6.A.0.454 FTF file on the target device. Make sure that you follow all the instructions to the letter to avoid any mishaps.

Some early preparations: 

1. This is only for Sony Xperia Z C6602, C6603 & C6616

This ROM is only for the device mentioned above. Make sure that your model number matches the one listed above. To do so, go to Settings > About Device on your device and see your model number. Flashing this firmware on any other device will result in bricking it so make sure that you meet this requirement first of all.

2. Battery should be charged at least over 60%.

Make sure that your battery is charged enough to complete the flashing process. In case your battery is low and your device goes dead during the flashing process, you may end up soft bricking your device as it won’t complete the flashing process.

3. Backup everything!

Just to be on the safe side, you may consider backing up each and everything from your Android device. This is highly recommended so that in case anything goes wrong, you still have the access to all of your data and you can restore it immediately. You may backup everything as listed below.

4. Enable USB Debugging Mode on your device.

Enable USB debugging mode on your device. To do so, tap settings>developer options>USB debugging. If you can’t find developer options in settings, then tap settings > about device and tap “Build Number” for 7 times and you’ll get em’ activated under settings.

5. Install and setup Sony Flashtool.

You must have installed Sony Flashtool. Find the full guide here.

After installing Sony Flashtool, open the Flashtool folder from the drive where you installed it. Now open Flashtool>Drivers>Flashtool-drivers.exe and install the Flashtool, Fastboot & Xperia Z drivers from the list. [Important]

6. Use OEM data cable to establish connection.

Make sure that you use the phone’s original data cable to establish connection between your phone and the PC. Using a different data cable might result in interrupting the firmware installation.


How To Update Sony Xperia Z C6602, C6603 & C6616 To Official Android 5.0.2 Lollipop 10.6.A.0.454 Firmware

Before moving forward, please make sure that you’ve read the pre requisites and ensure that you are set to go ahead.

  1. Download the latest firmware Android 5.0.2 Lollipop 10.6.A.0.454 FTF file.
    1. For Xperia Z C6602 [Generic/Unbranded. Link1Link 2 | Create your own FTF using this guide.
    2. For Xperia Z C6603 [Generic/Unbranded] Link 1  | You can also create your own FTF using this guide.
    3. For Xperia Z C6616 [Generic/Unbranded] –  Link1 | You can also create your own FTF using this guide.
  2. Copy the file and paste in Flashtool>Firmwares folder.
  3. Open Flashtool.exe now.
  4. Hit the small lightening button on the top left corner and select Flashmode.
  5. Select the FTF firmware file that you placed in the Firmware folder.
  6. From the right side, select what do you want to wipe. Data, cache and apps log, all wipes are recommended, perhaps you may select if you don’t want.
  7. Click on OK, and it will start preparing the firmware for flashing. This may take a little while to load.
  8. As soon as the firmware is loaded, it will prompt you to attach the phone by turning it off and keeping the back key press.
  9. For Xperia Z Volume Down key will do the job of back key, just turn off your phone, keep the Volume Down key pressed and plug in the data cable.
  10. As soon as the phone is detected in Flashmode, the firmware will start flashing, leave the Volume Down key and let it flash the firmware.
  11. As soon as you see “Flashing ended or Finished Flashing” leave the Volume Down key, plug the cable out and reboot.
  12. That’s All! Congrats! You’ve installed latest Android 5.0.2 Lollipop on your Xperia Z Enjoy

In case you got any queries or face any problems regarding this guide, please feel free to stop by the comment box below and let us know. We will get back to you as soon as possible. Thanks all!

NEXT: Root Xperia Z C6602,C6603 10.6.A.0.454 5.0.2 LP Plus CWM/TWRP

Galaxy S5 AccuWeather Widget for Galaxy S4 and Other devices

0
Galaxy S5 AccuWeather Widget for Galaxy S4 and Other devices

One thing that almost all the Android users wants is to purchase the brand new device with new features and some cool new stuff, although, there are other ways to try the new things on your old device. When I owned the LG Viewty, I always wanted to install anything on it, that could bring it closer to an Android device, in looks only. Thanks to Viewtygate, I got what I wanted, however, slowed down my device to an extreme level. When I upgraded to a Galaxy S2, always wanted to have HTC Sense on it, same as the case was when I wanted to try the Floating window and Multi-Window concept On it.

What I meant to say is that we all wanted to try new things on our Android devices, especially from the New release. Galaxy S5 arrived with the brand new AccuWeather Widget, which I don’t like, but most of the other Galaxy Device owners wants to try it on their devices, especially the Galaxy S4 owners, Galaxy S6 has already the same thing, so all these owners don’t have to worry about it. We are going to show you How to Install Galaxy S5 AccuWeather Widget on other Galaxy Devices, without further ado, let us continue.

Galaxy S5 AccuWeather Widget for Galaxy S4 and Other devices

Requirements:

A Rooted TouchWiz based device.

AccuWeather Widget: Link

Weatherdemon App: Link

How to Install AccuWeather widget:

  1. Download both the files and Copy them to your device.
  2. Install Root browser on your device.
  3. Open Root Browser and Navigate to system > app folder.
  4. Search for the following files: AccuweatherPhone2013.apk AccuweatherPhone2013.odex
  5. Now Rename them by adding the .bak at the end of them.
  6. Save them.
  7. Now look for the Following: WeatherWidgetDaemon.apk WeatherWidgetDaemon.odex
  8. Once Again, Rename them and add the .bak at the end.
  9. Save and close the Root browser.
  10. Install the Downloaded Apk files.
  11. Reboot the device and Once on Home-Screen, Add the Galaxy S5 AccuWeather widget
  12. Enjoy!

Root and Install Recovery Files on Samsung Galaxy Devices using Odin

Root and Install Recovery Files on Samsung Galaxy Devices using Odin

Rooting is, now a days, a primary need of any of the Android user, no matter which device they own, if they want to have a complete control over it and also wants to use the device to its full extent, then they must root their device and also make sure to install the Custom Recovery, if you want to use any sort of custom Stuff on your device like Mods, Tweaks. Even installing the Custom ROMs requires both of these things and in most of the cases, it becomes a little tricky to root your device let alone the installation of Custom Recovery, however, in case of Samsung devices, thanks to Odin, it becomes quite easy to root your device and install recovery files on it,

CF-Auto-Root is by far the easiest way to install the Root binaries on your device, even better than all the one-click tools. One click root tools are good but is most of the cases they left user device Bricked, however, in Odin case, even if you get the fail message, all you need is to try the process again and you are good to go. CF-Auto root not only roots your device but also install the Superuser Apk, so you won’t have to separately install the Super SU on your device. In this article, we will show you How to Root your device with CF-Auto root and Install Recovery Files on your Samsung Device, without further ado, let us continue.

Root and Install Recovery Files on Samsung Galaxy Devices using Odin

Disclaimer:

The methods involved in flashing custom recoveries, roms and rooting your phone are highly custom and may result in bricking your device, and has nothing to do with Google or the device manufacturer that is Samsung in our case. Also rooting your device will void its warranty and you will be no longer eligible for any kind of free device services by the manufacturers/warranty providers. In case of any mishap we may not be held responsible. Follow these instructions to the letter to avoid any mishap or bricking. Make sure that whatever you do, you are doing it at your own responsibility

Early Preparations:

Downloads Required:

How to Root or Install Recovery Your Device:

  1. CF-Auto Root comes in .zip format, just extract it and save the XXXXX.tar.md5 file anywhere you can remember.
  2. The Recovery File must be a .img file.
  3. Download and Extract the Odin file too.
  4. Open Odin3.exe.
  5. Put your Galaxy Device in download mode. To do so, turn it off and wait for 10 seconds. Turn it on by pressing and holding Volume Down + Home Button + Power Key simultaneously, You should see a warning, press Volume Up to continue. In case this method doesn’t work for you, try one from this guide.
  6. Connect your device to your PC.
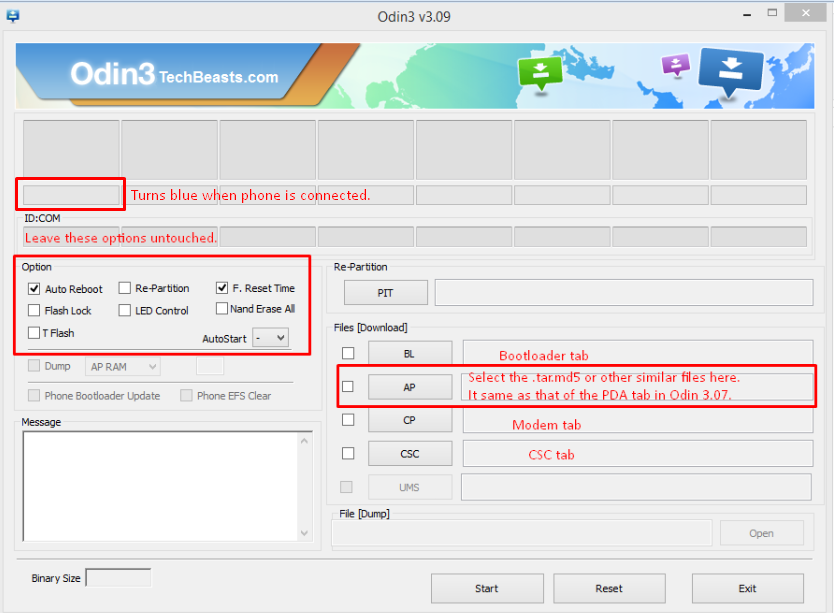
  7. As soon as Odin detects your phone, the ID:COM box should turn blue.  Make sure that you’ve installed Samsung USB drivers before connecting.
  8. For Odin 3.09 hit the AP tab. Select the firmware.tar.md5 or firmware.tar, that you downloaded and extracted above.
  9. If you’re using Odin 3.07, you will select “PDA” tab instead of the AP tab, rest of the options remain untouched.
  10. Make sure that the options selected in your Odin are exactly as shown in the pic.Odin-3.09-explained.-2
  11. Hit start and wait till the firmware  flashing is complete, as soon as your device restarts, remove it from PC.
  12. Wait for your device to reboot, as soon as it reboots check out the new firmware!
  13. That’s all!