Home Blog Page 370

How To Take Screenshot on a Blu Studio 5.0 S [ Guide ]

0
How To Take Screenshot on a Blu Studio 5.0 S [ Guide ]

Here’s how you can take screenshot on a Blu Studio 5.0s, if you happen to own a Blu Studio 5.0s then you must read this post because i’ve seen many people asking about how to take screenshot on Blu Studio 5.0s. There is no rocket science in it all you have to do properly press two buttons, Which two buttons ? for that you have to read the guide below.

how take screenshot on BLU 5.0s

How To Take Screenshot on a Blu Studio 5.0 S:

Its a simple guide only you have to do follow all the steps as mentioned and i’ve also added a video tutorial on How To Take Screenshot on a Blu Studio 5.0 S at the end of the guide.

Step 1: Open the screen of which you want to take the screenshot.

Step 2: Now Press the Volume Down and Power button at the same time.

Step 3: If you’ve properly pressed both buttons you’ll see an animation in notification area.

Step 4: Go to Gallery there you’ll see a folder screenshots, all your capture screenshots will be saved here.

All Done !!!

How To Take Screenshot on a Blu Studio 5.0 S [ Video Guide ]

Hide or Display Applications on Samsung Galaxy S4 [ Tutorial ]

Hide or Display Applications on Samsung Galaxy S4 [ Tutorial ]

Here’s how you can hide or display Applications on Samsung Galaxy S4, most us know how to do this but not every one. Samsung Galaxy S4 is the best device in Galaxy S series, size was perfect and processing was good. Today i will tell you how to hide or display apps on Samsung Galaxy S4 with step by step guide. 

hide or display apps on s4

Hide or Display Applications on Samsung Galaxy S4 [ Tutorial ]:

Following are the simple steps to hide or display application on Samsung Galaxy S4 also i have added a video so that it will be more easy for you.

How to Hide Application on Samsung Galaxy S4:

  1. Tap on Application drawer on your home screen.
  2. Now Tap on the 3 dots located right side of you screen.
  3. Tap on hide apps.
  4. Choose the apps you want to hide.
  5. After selecting tap on done.
  6. Go to home screen.
  7. Now Press the Menu located left side of the home button.
  8. Tap on Hide Applications from the list.
  9. Select the Apps you want to hide.
  10. Tap on Done.

How to Hide Application on Samsung Galaxy S4:

  1. Tap on Application drawer on your home screen.
  2. Now Tap on the 3 dots located right side of you screen.
  3. Tap on show hidden apps.
  4. Choose the apps you want to show.
  5. After selecting tap on done.
  6. Go to home screen.
  7. Now Press the Menu located left side of the home button.
  8. Tap on show hidden Applications from the list.
  9. Select the Apps you want to show.
  10. Tap on Done.

Hide or Display Applications on Samsung Galaxy S4 [ Video Tutorial ]

List of iOS 8.3 Compatible Jailbreak Tweaks On Cydia [ 2015 ]

0
List of iOS 8.3 Compatible Jailbreak Tweaks On Cydia [ 2015 ]

Today, the new version of Jailbreak that supports iOS 8.1.3 to 8.3 was released by TaiG. With the release of the new version, more people will be jailbreaking sooner or later they will want to know which of the Lydia Tweaks and apps are supported by the new version. As iOS 8.3 could not be broken until today, most of you who have jailbroken might notice some unexpected behaviour while using tweaks and apps. This means that you will have to wait before the tweaks get updated.

 11291991_10207017585261410_1609976159_n

Given below is a list of all of those Jailbreak Tweaks that are compatible with iOS 8.3. Go through this list to avoid getting a tweak that might not be compatible with the latest version of iOS and in that case it may crash. With the release of TaiG’s 8.1.3 to 8.3 Jailbreak, you may expect more tweaks coming up your way and the Tweak makers speeding up as well and hence more Tweaks will hopefully start working on the new version. The Tweaks mentioned in the list have been previously tested with 8.3 to see if they are supported by iOS 8.3 even before updating to iOS 8.3.

Screen-Shot-2015-06-24-at-12.44.15-AM

This list is being updated continuously by the community. Check back for updates.

Also See:

How To Jailbreak iOS 8.3 On Mac OS X With TaiG [ Tutorial ]

How To Jailbreak iOS 8.3, iOS 8.2, iOS 8.1.3 with TaiG 2.0

How To Install Android M Developer Preview On Nexus 5, 6, 9 & Player

0
How To Install Android M Developer Preview On Nexus 5, 6, 9 & Player

Google introduced Android M to the world at the developer I/O 2015. The upcoming iteration of Android is going to see some core changes. Google hasn’t made any prominent changes to the UI, Android M is all about system enhancements basically. New features in the Android OS include better app permissions, intent update, doze, Android Pay and Fingerprint integration in the core OS, App Standby features etc. Google has provided all the necessary information and highlighted the key features of Android M at the I/O event however, the name of firmware remains disclosed and will be announced when the firmware makes its way in fall, 2015.

Android M will be adapted by device manufacturers for their latest flagship devices in the first go, and then to some of the old devices as well. As usual, Google itself will be the very first one to roll out this firmware for its latest and past flagship devices, but while Google cooks the complete firmware for GoogleBees, it has already brought up the developer preview of Android M.Android M

Android M developer preview’s images are available for Google Nexus 5, 6, 9 & Nexus Player. These images can be flashed on all these devices without any hiccups here and there. If you’re an Android enthusiast who doesn’t want to wait for the complete build of Android M to come out and eager enough to taste Android M, you may want to flash the developer preview right now. Wondering how can you do so? Well, that’s what we are going to do in the following guide. Let’s go ahead now and learn how to install Android M developer preview on Google Nexus 5, 6, 9 and Nexus Player.

Here are some pre-requisites in order to make this installation safe and secure

  1. This guide is only for Google Nexus 5, 6, 9 and Nexus Player. Do not try this tutorial on any other device. It may result in bricking it.
  2. Your phone’s battery should be charged at least over 50%. This is recommended in order to avoid power issues during the flashing process.
  3. Enable USB debugging mode on your device. You have to enable developer options first. You can do so by going in to settings > tap build number for 7 times. Now you will have developer options in settings. Open developer options > Enable USB debugging.
  4. Backup all your important contacts, text messages and call logs. Also copy your media content to your PC. Backup is recommended as your device will be wiped during the flashing process.
  5. Download and install latest Google USB drivers. Installation of these drivers will be a little different. Download the file from the attached link and unzip it. Now connect your phone to your PC. Right click “Computer or This PC > Click on Manage > Device Manager > Find your device i.e. Nexus 5 or Nexus 6 > Right click Update driver > Browse My Computer For Driver Software > Locate and select the Google USB folder that you got after unzipping > select install now”.
  6. Once the installation has been completed, your device will be shown as Android  Composite ADB Interface.
  7. Download and install Minimal Android ADB & Fastboot drivers on your computer.

Download Android M Developer Preview image file according to your phone.

Extract the downloaded image file to get the following files:

  • boot.img
  • cache.img
  • recovery.img
  • system.img
  • userdata.img
  • bootloader.img
  • radio.img
  • vendor.img (only in Nexus 9 file)

How To Install Android M Developer Preview Now:

  1. Copy all the .img files from the extracted folder to Minimal ADB & Fastboot Folder in C>Program Files > Minimal ADB & Fastboot folder.
  2. Now connect your Nexus device to your PC. Make sure that you’ve followed all the pre-requisites prior to this step.
  3. Now open Minimal ADB & Fastboot.exe file from the shortcut on your desktop or from the Minimal ADB & Fastboot folder under program files in your Windows drive.
  4. To verify your device’s connection with your PC issue this command:

    adb devices

  5. It should show you the list of attached devices followed by a code.
  6. Once you’ve verified the connection, issue the following command and press enter: adb reboot-bootloader
  7. Your Nexus will now reboot into bootloader mode. Once it has booted up, enter the following commands.
  8. fastboot flash bootloader bootloader.img

  9. fastboot flash radio radio.img

  10. Now reboot your device into the bootloader mode again by issuing the following command.
    1. fastboot reboot-bootloader

  11. Your device will boot up into the newly flashed bootloader. You’re all set to flash the remaining files now. Issue the following commands one by one.
    1. fastboot flash recovery recovery.img

    2. fastboot flash boot boot.img

    3. fastboot flash system system.img

    4. fastboot flash cache cache.img 

    5. fastboot flash userdata usersata.img

    6. fastboot flash vendor vendor.img (Only Nexus 9 users will issue this command.)

  12. Once done, reboot your device using the following command.
  13. fastboot reboot.
  14. That’s all. Your Nexus will now boot into the newly installed Android M Developer Preview.

How To Jailbreak iOS 8.3 On Mac OS X With TaiG [ Tutorial ]

0
How To Jailbreak iOS 8.3 On Mac OS X With TaiG [ Tutorial ]

Now that iOS 8.3 Jailbreak tool is out and we have posted about how to Jailbreak iOS 8.3 using TaiG on Windows, Mac user’s have to wait because right TaiG tool is only available for Windows. No need to get worry in the following guide i’ll tell you how To Jailbreak iOS 8.3 On Mac OS X With TaiG, Yes ! but you have to be patient because first we have to install Windows 10 Insider Preview using Parallels Desktop. Follow all the steps carefully mentioned below in order to use TaiG V2 on Mac so that you can Jailbreak iOS 8.3.

How To Jailbreak iOS 8.3 On Mac OS X With TaiG

How To Jailbreak iOS 8.3 On Mac OS X With TaiG [ Tutorial ]:

Step 1: Download Parallels Desktop from your Mac from here.

Step 2: Once downloaded launch Parallels Desktop 10 and click on create a new virtual drive.

Step 3: Now click on Free System and there you’ll see Windows 10 Insider Preview.

Step 4: Click on Windows 10 Insider Preview and follow the instruction show on the screen to proceed with the installation.

Step 5: Once installation is completed and Windows 10 Insider Preview is installed in VM in Parallels 10. Launch the VM and install the latest iTunes on your virtual machine.

Step 6: Now that iTunes are installed on your VM shell, download the TaiG V2 Jailbreak Tool from here and run it on your virtual machine.

In order to perform the Jailbreak on iOS 8,3 you need to follow this guide Jailbreak iOS 8.3, iOS 8.2, iOS 8.1.3 with TaiG 2.0 on Windows. If you face issues like processing stuck on 20% or errors like 1101, 1102, 1103 & More use this guide to fix these issues.


How To Fix TaiG iOS 8.3 Jailbreak Errors: 1101, 1102, 1103 & More

0
How To Fix TaiG iOS 8.3 Jailbreak Errors: 1101, 1102, 1103 & More

TaiG just released the latest version of its Jailbreak tool which jailbreaks the latest version of iOS, iOS 8.3, 8.2 and 8.1.3. If you’ve been anxiously waiting for a Jailbreak to arrive for your iOS 8.3 device, this may be the right time for you to go ahead and break all the barriers implemented by Apple. While trying to Jailbreak your iOS 8.3 or 8.2/8.1 device using TaiG Jailbreak, you may come across several annoying errors. We’ve found a list of these errors followed by their solutions, just in case you’re facing one of these, follow the steps to fix and achieve Jailbreak on your iOS 8.3 device easily without any hiccups here and there.taig-ios-8.3-jailbreak

Error 1101 (Stuck at 20%) –  Solution

TaiG  iOS 8.3 Jailbreak Error 1101 can be fixed by simply downgrading from iTunes 12.1.2 to 12.0.1. Here’s how you can do so on Windows or Mac OS X.

Windows Users:

  1. If you’ve installed latest version of iTunes (iTunes 12.1.2) uninstall it completely from your computer.
  2. Now rename the iTunes Library.itl file to iTunes Library.bak. This file can be found under: C:\Users\[username]\Music\iTunes.
  3. Now restart your windows PC.
  4. Now installed iTunes 12.0.1 on your Windows PC – Download: iTunes 12.0.1 32 bit | iTunes 12.0.1 64 bit.
  5. Once downgraded iTunes, run the TaiG 2.0 Jailbreak to Jailbreak your iOS 8.3, 8.2 or 8.1 device.
  6. You won’t face the error anymore.

MAC Users:

  1. Download and install Pacifist on your MAC.
  2. Open Activity Monitor and quit iTunes and all of its components completely.
  3. Download iTunes 12.0.1 for Mac OS X now and mount it.
  4. Open Pacifist that you installed in the very first step.
  5. Now in Pacifist, click on “Open Package > Under Devices click on iTunes(on the left)  > install iTunes and Open it (Right corner)”.
  6. Once iTune installation has loaded, click on “Contents of install iTunes > select install”.
  7. Now follow the on-screen instructions to finish the process. Once done, a box will prompt up saying “Application already exists”. Check the “Don’t ask again for this installation” option and then click Replace.
  8. Now wait for a while till everything is done, you’ll have iTunes 12.0.1 running on your Mac.
  9. Once done, run TaiG 2.0 to Jailbreak your iOS 8.3, 8.2 or 8.1 device. That’s all.

Error 1102 –  Solution

TaiG  iOS 8.3 Jailbreak Error 1102 can be simply fixed by applying Airplane mode and turning of Touch ID / Passcode on your iOS device. Here’s how to do so.

  1. On your iOS device open Settings > turn on Airplane mode.
  2. Make sure that Touch ID / Passcode are turned off.
  3. Try running TaiG iOS 8.3 after doing this.

Error 1103 –  Solution

TaiG iOS 8.3 Jailbreak Error 1102 an occur because of an incomplete download of the TaiG 2.0 tool. This error can be fixed by re-downloading the tool properly and making sure that the installation file is not corrupt.

Error 1104 (Stuck at 30-40%) –  Solution

TaiG iOS 8.3 Jailbreak Error 1104 can be fixed by trying a different USB port on your Windows or Mac computer. If the error persists, you may try using a different computer.

Error 1105 (Stuck at 50%) –  Solution

TaiG iOS 8.3 Jailbreak Error 1105  can by fixed by applying the following changes:

  1. Turn off any Antivirus or Firewall applications if you’ve enabled on your Windows PC.
  2. Turn off Find My iPhone in settings on your iOS 8.3 or iOS 8.2 device.
  3. Once you’ve Jailbroken your device, turn on both the turned off options in step 1 and 2.

Injecting –  Solution

TaiG iOS 8.3 Jailbreak Injecting error can be fixed by applying the following solution:

  1. Reboot your iOS device.
  2. Reboot your Windows Computer.
  3. Run TaiG iOS 8.3 Jailbreak as administrator. To do so, navigate to TaiG iOS 8.3 .exe file, right click the file and click on “Run as administrator”.
  4. Now connect your iOS 8.3 device and run the tool again. Good Luck.

“Jailbreak Failed” –  Solution

Turn off WiFi on your iOS device and connect it again. Run the Jailbreak tool, it should work fine this time.

“Apple driver hasn’t been found” –  Solution

This error an occur most likely if you’re running 64 bit Windows OS. You can download and install iTunes 64 bit drivers from here.

“Storage almost full” after jailbreak –  Solution

This error can occur before you run Cydia for the first time on your newly Jailbroken iOS device. To get rid of this issue, open Cydia and let it load everything. Once it has loaded, your device will be fine.

That’s all. Let us know if the solutions worked for you or not.

How To Get Galaxy S6 Edge Lighting Feature On Any Android Phone

0
How To Get Galaxy S6 Edge Lighting Feature On Any Android Phone

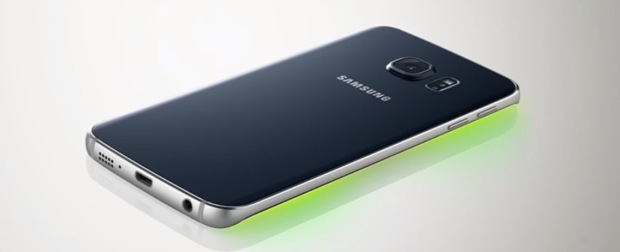
Galaxy S6 Edge is one of its-own-kind smartphone by Samsung. The two sided curved display, and the gorilla glass build makes the smartphone pretty cool. Samsung has also equipped this smartphone with some cool features making the best use of the edges. One of the edge features is “My People” which allows you to add 5 different contacts to the list against different colours. When your phone is placed  in the face-down direction on a table and you get a call from one of the people from “My People” list, the light against which you have added that content, the light starts floating in the edge of the phone. This feature is mesmerising and adds a lot to this device’s beauty.

Other Android smartphone users can’t get the edge display on their phones, but they sure can import some features. Since this is Android, anything is possible and the Lighting feature has already been ported from Galaxy S6 Edge to other smartphones by means of a little application. The application makes the phone show lighting on either both sides or left/right side of the screen when a call is in place. Although getting this feature is pretty useless as it won’t work when you’ve placed your phone in the face-down position, you can only see the lights on the screen when your phone is placed in the face-up direction. The application “Edge Color Notifications” also allows you to select the lighting for app notifications, which is not a feature of the S6 Edge basically. S6 Edge only shows the light on 5 contacts against phone calls, but Edge Colour Notification allows your desired applications to show the colours on both sides of your phone. You can select whether you want the lighting on both sides, left side or right side only.

If you just want to see how do these lights look, you may go ahead, install this application and check it out.

How To Get Galaxy S6 Edge Lighting Feature On Any Android Phone

  1. Download and install Edge Colour Notifications application from the Google Play Store.
  2. Once installed, open the app from app drawer.
  3. Once opened, setup using the options on-screen.
  4. Checkout the lighting on your phone’s screen once you get a call or notification.
  5. That’s all. Good Luck

11202685_10206271356795481_660776674_o-side

Here’s the app’s official description:

Emulates the Galaxy S6 Edge feature (Edge lighting) that shows colors in the edge of the phones when there is an incoming call.
People Edge feature soon!!

UNINSTALL: just click the uninstall option in the app menu.
if the button is not working:
Go to SETTINGS->Location and Security-> Device Administrator and deselect the admin then uninstall normally

Please if you report a crash while using the app, pleas add your email so i can contact you to work together and fix it!

No memory drains!! no battery drains…just easy, simple and lighweight.

– Set different animations with glow effects!
– Set different colors for you contacts
– Set colors for your incoming app notifications!

How To Get Galaxy S6 Quick Launch Camera Feature On Any Android Phone

0
How To Get Galaxy S6 Quick Launch Camera Feature On Any Android Phone

Galaxy S6 and S6 Edge came out of the curtains few months back. Samsung named this project as project zero that hinted at a complete new shape, build, design and features. The result of project zero was pretty great. Galaxy S6 and S6 Edge were very well received by the users. Both of these devices sport same specifications with a little design variations. The S6 Edge has a curved/edge display on both the sides of its screen, while S6 has an ordinary screen.

Samsung loaded these devices with some exclusive features. One of the cool features on both these devices is the Camera Quick Launch Key. By simply pressing the home key twice, Camera opens up on S6 or S6 Edge. The short cut works from any screen, whether you’re on the lock screen, you’re playing a game or some other process is running on your phone. This feature is one of the most wanted features among Android users at the moment, and the good news is you can now get this Galaxy S6 Quick Launch Camera features on any Android phone.

This can be done using a small application “Home2 Shortcut”. Basically, this application shortcuts to your favourite applications. You can setup the double tap of your device’s home key to open your desired application. Home2 Shortcut works on all Android versions from Android 1.6 to Android 5.1.1 Lollipop. We have used the double tap to bring the Galaxy S6’s Camera Quick Launch feature to other devices, and that’s what we will teach you to do so as well. Let’s go ahead and learn how to do this now.

How To Get Galaxy S6 Quick Launch Camera Feature On Any Android Phone

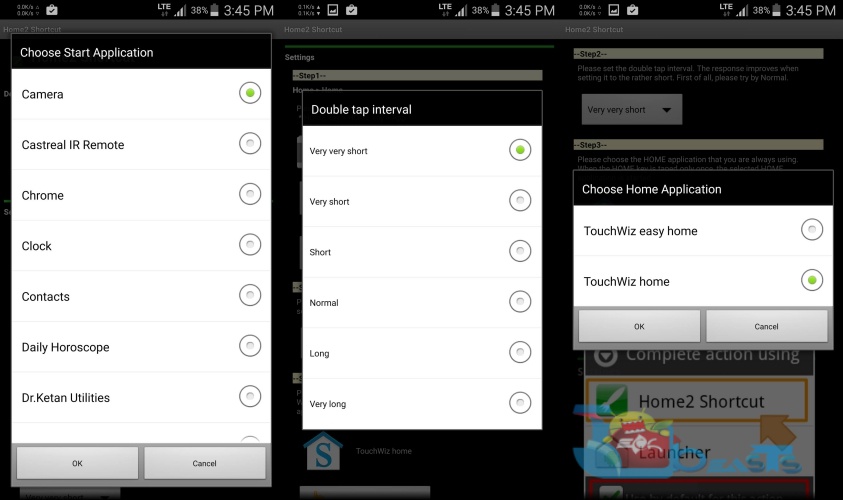
  1. Download and install Home2 Shortcut on your Android smartphone.
  2. Tap “Choose Application” and choose Camera.
  3. Tap “Double tap interval” and choose “Very very short”.
  4. Tap “Choose Home Application” and select your device’s current launcher. For Samsung devices it is “TouchWiz Home”, for Xperia devices it is “Xperia Home” and for HTC, it should be “HTC Sense”.
  5. Now scroll down and tap “Close”. Once the launcher prompts up for selection, select “Home2 Shortcut”.
  6. Once done, double tap your home key. It should open Camera quickly.
  7. That’s all.11639234_10206270854582926_1903473961_o-side

How To Download Windows 8.1 Pro ISO File Legally Without Product Key

How To Download Windows 8.1 Pro ISO File Legally Without Product Key

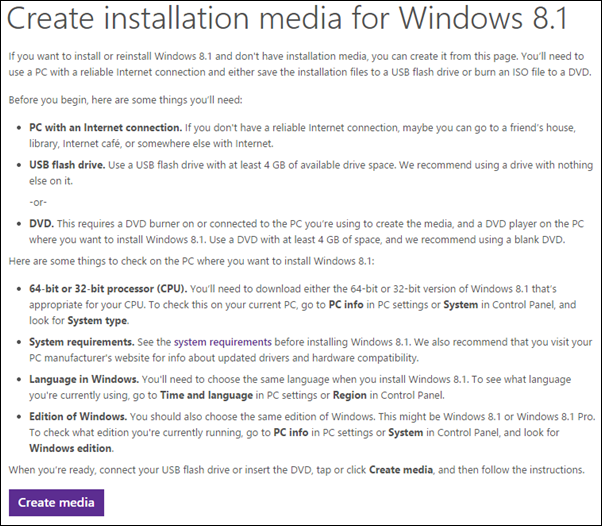
Until now most people believed that it is a hassle to get their hands on Windows 8/8.1 especially due to the product key factor. Good news is that Windows has silently released a tool that can solve if not all but many issues regarding this.The tool that Windows has introduced is called Windows Installation Media Creation Tool. What this tool does is simple; it let’s you create an ISO copy or a bootable USB stick to install Windows on your PC. In the following guide i’ll tell you how to download Windows 8.1 Pro ISO File Legally Without Product Key

step-1

  • Using the Windows tool, Windows Installation Media Creation Tool, I will show you how you can Download Windows 8/8.1 on your PC without Product Key. The guide is to Download and Install Windows 8/8.1 ISO file legally and you will not require Product key for this.
  • To begin with, you will have to download the app. Click on ‘Create Media’ to automatically begin download.
  • Once the app has been downloaded and installed, Run the app.
  • Choose your Language as well as the version of Windows that you want to install and architecture.
    Next, you will get two options to choose from; You can either choose to save in ISO for later use or to a USB stick. The USB stick is set as default.
  • Note: Use an empty USB or backup your data before hand as everything on the USB will be erased during this process.
  • Now the Windows will get downloaded in the USB stick. During this process, the USB stick will be converted into bootable USB.

How To Fix ” Forgot alternative fingerprint password Galaxy S5 “

0
How To Fix ” Forgot alternative fingerprint password Galaxy S5 “

Here’s how you can fix Forgot alternative fingerprint password on Samsung Galaxy S5, yes this problem can be solved after few days of hard work finally i’ve found a working method. In the following guide i’ll explain all the possible methods to solve Forgot alternative fingerprint password Galaxy S5. There is no rooting involved in these methods. Please carefully follow all the steps mentioned below in order to fix alternative fingerprint password.

alternative fingerprint password

How To Fix ” Forgot alternative fingerprint password Galaxy S5 “:

Method #1: If you can still access you settings then goto Settings->Finger Scanner -> Fingerprint manager -> Long Tap on Finger Print 1 and delete it. Now go back to the finger scanner menu and Tap on change backup password and add you new password.

Method #2: Go to Device Manager Androidy configure the remote lock & delete feature if you have not already. Once the installation program to use the lock function to reset your password. This allows you to change your “unlock screen” password.

Method #3:

  1. Restart the device in Safe mode.
  2. Press the Home key.
  3. Select Touchwiz.
  4. Clear the app cache.
  5. Restart the device and test.

Method #4:

Step #1: Goto online Android device manager and login with your Google account.

Step #2: Now wait till Android devcie manager locate your device.

Step #3: Click on lock your device and add a new password.

Step #4: Now turn on your device and you’ll see black screen with locked written on it.

Step #5: Tap on back button two times and on the next screen insert your password.

All Done. !!

How To Zoom In Instagram Photos

0
How To Zoom In Instagram Photos

Instagram is the most widely used photo sharing application. Instagram offers some cool features that make this application a great choice. You can snap the pictures, add filters and share on the go with your friends and your followers. Where Instagram takes the pictures to a whole new level, it also lacks some features. One of the most important features that it misses is the zoom in/out feature for the pictures. You can’t open the picture in a new screen, and you can’t zoom in to have a close view of the picture. Just in case you want to see a picture in detail, you won’t be able to do so using Instagram. But you don’t need to worry about it anymore, as we have a trick here that will allow you to zoom in Instagram photos.Instagram_Rainbow_Banner

This can be done by using Android’s very own magnification gestures feature. The magnification option hidden under Android Accessibility settings allows you to zoom in the whole screen of your Android smartphone. Once you’ve activated this option, you can simply open Instagram application, bring up your desire picture and triple tap the screen to zoom in the on-screen part. The magnifier will highlight the magnified area in an orange box that you can zoom in and zoom out by simply pinching in or out the screen.

Let’s have a look on how to activate magnification gestures on your Android and zoom in Instagram photos.

How To Zoom In Instagram Photos

  1. First of all, go to settings > accessibility > vision > magnification gestures > turn on.
  2. Now open Instagram application and navigate to your desire picture.
  3. Now tap the screen three times and it will zoom in that particular area of the screen.
  4. You can now pinch in/out the screen to zoom in/out.
  5. You can use two finger swipe to pan the zoomed in picture.
  6. To get out of the zoomed screen, tap the screen thrice again.
  7. After using the feature, don’t forget to turn off magnification gestures from accessibility settings.
  8. That’s all.11297042_10206245778716045_812070678_o-side

How To Download Instagram Photos

0
How To Download Instagram Photos

Facebook owned Instagram has grown drastically over the past few years. Instagram has millions of users who use this application to capture, share and save their precious moments and have fun. Instagram photos can be shared on social media platforms like Facebook and Twitter within a few clicks. As of now, there are thousands of celebrities sharing their pictures with their fans through Instagram, different companies, channels and organisations have also made their profiles on Instagram to share the pictures. In short, Instagram has become the largest photo sharing hub for photoholics.instagram-followers1

Instagram is not only about sharing the pictures, but it also allows the users to snap and then add filters to the pictures. Instagram confines photos to square shape in order to make them mobile friendly. Users can also comment or select their favourite pictures from different profiles. The application offers pretty cool features, but it lacks one of the very main features that is saving the photos. Apparently, there is no way to download or save pictures from Instagram. You can only view the pictures, make comments or select as your favourite ones. If you want to save some of your favourite pictures from Instagram, you may want to know how to do so. The good news is, we have found a working application, that will help you to download your favourite Instagram photos in bulk.

InstaSave is a free application available in the Google Play Store. You can download the application, login using your Instagram details and then you can select the pictures that you want to save. Let’s go through these detailed steps to learn it.

How To Download Instagram Photos Using InstaSave

  1. Download and install InstaSave on your Android smartphone.
  2. Open InstaSave from app drawer.
  3. Login in to InstaSave using your Instagram details.
  4. Select the photos that you want to save.
  5. Tap the save button at the top.
  6. InstaSave will save all of your selected photos in your device’s internal storage.
  7. That’s all.11543199_10206245470628343_2011533396_o-side