Home Blog Page 369

Easily Fix App Icons Disappearing Bug After iOS 8.3 Jailbreak [ Tutorial ]

0
Easily Fix App Icons Disappearing Bug After iOS 8.3 Jailbreak [ Tutorial ]

After Jailbreaking iOS 8.3 users have reported that they are facing App Icons Disappearing after sometime. If you are facing App Icons Disappearing bug after iOS 8.3 Jailbreak then follow the guide below to fix App Icons Disappearing after iOS 8.3 Jailbreak. The issue is coming TaiG 2.0 and the later 2.1.2 and Saurik has explained this issue in detail here. But now they have find the working solution, we have prepared a step by step guide to fix this bug.

fix icon disappearing after ios 8.3 jailbreak

How To Fix App Icons Disappearing Bug After iOS 8.3 Jailbreak:

Step #1: Open Cydia on your iPhone.

Step #2: Tap on Changes tab and hit Refresh.

Step #3: Now wait for it to load everything, once all repositories are refreshed. Tap on search.

Step #4: Write UIKit Tools, install/Upgrade it.

All Done ! Restart your device and i am sure App Icons Disappearing Bug will be fixed.

Here’s the official changelog of UIKit Tools:

Version 1.1.10 now supports iOS 8.3!

This fixes the issue with TaiG jailbreak where sometimes all of your icons would disappear and you would be sad.

(UIKitTools continues to be compatible with all previous versions of iOS.)

Check out:


Racing Rivals for PC Download – Windows/ Computer/ Mac

0
Racing Rivals for PC Download – Windows/ Computer/ Mac

Here’s how you can download and install Racing Rivals for PC and play it on Windows 7,8,8.1/Mac. Racing Rivals is the latest sensation from the creator’s of Asphalt 8 and Hill Climb Racing. Today i will tell you how you can play and install Racing Rivals for PC Windows and Mac. Officially Racing Rivals for PC is not available, but we can still install Android Apps for PC using third party emulators. Before going any further let me give you an overview on the features of Racing Rivals for PC.

Racing Rivals for PC

Racing Rivals Features:

·LIVE OPPONENTS. REAL COMPETITION.
True real-time racing at your fingertips. Racing Rivals lets you challenge or be challenged by live opponents in game lobbies with feature race replays and live chat.

HIGH STAKES BETTING
Back your bets with skill unless you’re prepared to lose cash – or your car! The stakes are high and the risk is real. Can you handle it?

WEEKLY EVENTS!
Does your team have what it takes to dominate Turf Wars? Race in weekly competitions to control cities, earn gems, and bonuses for your team! Exclusive Prizes means cars no one else can buy, wrapped in livery no one else has seen.

OFFICIALLY LICENSED CARS
Racing Rivals presents a huge collection of licensed cars ranging from tunes and exotics to classic American muscle. Featured brands include McLaren, Subaru, Dodge, Mitsubishi, Ford, RWB, Scion, BMW, Acura and SRT with more on the way!

TUNE, UPGRADE & CUSTOMIZE
Find the optimal tune for your car with hundreds performance parts in thousands of combinations – everything from air filters to crankshafts will impact your car’s performance. Up your game by adding NOS, a supercharger or turbo, custom rims from the biggest players like Volk Racing, Pacer, and SSR, plus real world tires from Nitto!

How To Install Racing Rivals For PC or MAC Using Blackstacks

Method 1:

  1. Install Bluestacks on your PC or MAC.
  2. Download Racing Rivals Apk on your PC.
  3. Make sure that you have installed Bluestacks. Double click the downloaded Racing Rivals apk to install it.
  4. The APK will be installed through Bluestacks, once the notification pop ups determining the installation completion, open Bluestacks.
  5. Now click on My Apps and then click on Racing Rivals.
  6. The application will open up. Now follow on-screen instructions to Play Racing Rivals.

Method 2:

  1. Install Bluestacks on your PC or MAC.
  2. Open Bluestacks and setup your Google Play Store account.
  3. Now open Google Play Store and search for “Racing Rivals“.
  4. Once found, install Racing Rivals.
  5. Now click on My Apps and then click on Racing Rivals
  6. The game will open up. Now follow on-screen instructions to Play Racing Rivals.

How To Install Racing Rivals For PC or MAC Using Andy OS

  1. Download and install Andy OS on your Windows PC or MAC.
  2. Once downloaded, open Andy OS.
  3. Setup Google Play Account on it.
  4. Now open Apps > Google Play Store and search for “Racing Rivals“.
  5. Install Racing Rivals and wait for it to finish installation.
  6. Once done, open “Uncategorized” portion in Andy and click on Racing Rivals to play it.
  7. That’s all.

Download Sonic Runner for PC / Computer / Mac

0
Download Sonic Runner for PC / Computer / Mac

Every one is the fan of Sonic from our childhood and now we have many version of the sonic games for our smartphones. As smartphone market is growing companies shifting their focus on the mobile games that’s the reason we have million of games from famous developers. Today i have a game form SEGA CORPORATION name as Sonic Runner and its a endless running game. In this post i’ll guide you how to install Sonic Runner for PC using third party emulators BlueStacks and Andy. Before going any further let me tell you the main features of Sonic Runner.

Sonic Runner for PC

Sonic Runner Features:

TRUE SIDE-SCROLLING SONIC ACTION
– Run and spin at Sonic speeds with mobile friendly controls
– Retro designs, hidden rings, classic enemies and bosses
– Master the Color Powers and run stronger with a Buddy
– By SONIC TEAM, SEGA’s Sonic experts
PLAY AS SONIC AND HIS FRIENDS
– Unlock Tails and Knuckles as player characters
– Master their Speed, Aerial, and Power attributes
– Evolve your character’s powers with collected rings
– Look for new Sonic characters and Buddies in future releases
COMPETE IN ALL-NEW RANKING BATTLES
– Four categories: Rival League, Friend, World, and Historical
– Set records against your friends and the world
– Earn powerful items and Buddies in league play
– Compete with up to 50 players in Rival League
– Claim the supreme honor in the S League


How To Install Sonic Runner For PC or MAC Using Blackstacks

Method 1:

  1. Install Bluestacks on your PC or MAC.
  2. Download Sonic Runner Apk on your PC.
  3. Make sure that you have installed Bluestacks. Double click the downloaded Sonic Runner apk to install it.
  4. The APK will be installed through Bluestacks, once the notification pop ups determining the installation completion, open Bluestacks.
  5. Now click on My Apps and then click on Sonic Runner.
  6. The application will open up. Now follow on-screen instructions to use Sonic Runner.

Method 2:

  1. Install Bluestacks on your PC or MAC.
  2. Open Bluestacks and setup your Google Play Store account.
  3. Now open Google Play Store and search for “Sonic Runner“.
  4. Once found, install Sonic Runner.
  5. Now click on My Apps and then click on Sonic Runner.
  6. The game will open up. Now follow on-screen instructions to use Sonic Runner.

How To Install Sonic Runner For PC or MAC Using Andy OS

  1. Download and install Andy OS on your Windows PC or MAC.
  2. Once downloaded, open Andy OS.
  3. Setup Google Play Account on it.
  4. Now open Apps > Google Play Store and search for “Sonic Runner“.
  5. Install Sonic Runner and wait for it to finish installation.
  6. Once done, open “Uncategorized” portion in Andy and click on Sonic Runner to use it.
  7. That’s all.

Use the SOS Feature on Your Galaxy S6 in Case of an Emergency [ Tutorial ]

0
Use the SOS Feature on Your Galaxy S6 in Case of an Emergency [ Tutorial ]

Samsung has added many new features in Samsung Galaxy S6, there is one features that every wishes not to use but its really helpful. I am talking about SOS Feature in Samsung Galaxy S6 and S6 Edge, most us don’t even know that this features exists. SOS Feature can be activated by tapping three times on home button, it will immediately send pictures from your front and rear camera to a set of emergency contacts. Today i will tell you how to use and activate SOS Feature on Your Galaxy S6 in Case of an Emergency.

fix s6 not registered on network

How To Use the SOS Feature on Your Galaxy S6 in Case of an Emergency:

Step#1: Goto your settings and then tap on “Privacy and Safety”.

Step #2: In Privacy and Safety menu tap on Send SOS messages, by default it will be off.

Step #3: Now toggle the switch to turn of on Send SOS messages service.

Step #4: Tap on Agree on Terms and condition page.

Step #5: You’ll see a popup ” To enable Send SOS messages add atleast one primary contact from the list “. Choose 4 of the contact whom you want to Send SOS messages. Once you’ve selected the contacts tap on done.

Step #6: Tap on back button and there you’ll see review the information that will be sent.

Step #7: Now to check that service is working or not, tap 3 time your home button and you’ll see a popup saying or notification informing you SOS mode was activated.

Step #8: Once its activated it will take pictures of you from front and rear cam, then it will make a video clip with a message ” I Need your Help ” and send it to your emergency contacts with your current location.

All Done !. Please do share this with your friends and do tell me if you face any issue regarding this guide.

Download TaiG 2.1.2 For iOS 8.3 Jailbreak, Support For Cydia Substrate

0
Download TaiG 2.1.2 For iOS 8.3 Jailbreak, Support For Cydia Substrate

TaiG 2.1.2 is released for iOS 8.3 Jailbreak with few bugs fixed and also the support for Cydia Substrate. The latest version build number is 2.1.2 and its an official version not like others unofficial versions and again its available for windows. Mac users can use this guide to Jailbreak iOS 8.3 on Mac using TaiG.

downnload taig 2.1.2

Now there is no need to install the old version of iTunes in order to perform Jailbreak, TaiG 2.1.2 come with the support of latest iTunes. The best thing about TaiG 2.1.2 is that it support Cydia Substrate that means now you can easily install your favourite tweak. You can also check the list of compatible tweak for iOS 8.3.

Here’s the full official changelog:

Fixes problems of getting stuck at 20% and 60%, and adaptate for latest iTunes.

Compatible with Cydia Substrate (Mobile Substrate).

Corrects the blank Settings problem while matching Apple Watch with iDevice.

Fix issues of UIcache.

Download TaiG 2.1.2 For iOS 8.3 Jailbreak:

  • English version SHA1 65F55468216B0D584E4B48E1B910E4C87ECF6B00

TaiGJBreak_EN_2120.zip Official Link [Fast Mirror Link]

  • Chinese version SHA1 16f5b1c1775b3a28244cb8ef6d966b7a102f0ef2

TaiGJBreak_2120.zip: Official Link [Fast Mirror link]

Tips To Speed Up Google Chrome Browser For Android

0
Tips To Speed Up Google Chrome Browser For Android

Google Chrome is by far the best web browser for not only PCs but also for Android smartphones as well. Google has embedded Chrome browser in Android OS, which has almost replaced the other stock browser and most of the users prefer using Chrome browser instead. Chrome for Android includes a lot of features which can enhance your browsing experience up to a great extent.

Although Google Chrome browser in its stock state is pretty fast, you can improve its performance and speed it up by applying some changes using the options available in Google Chrome settings. Recently, Google made some changes to the Google Chrome browser.

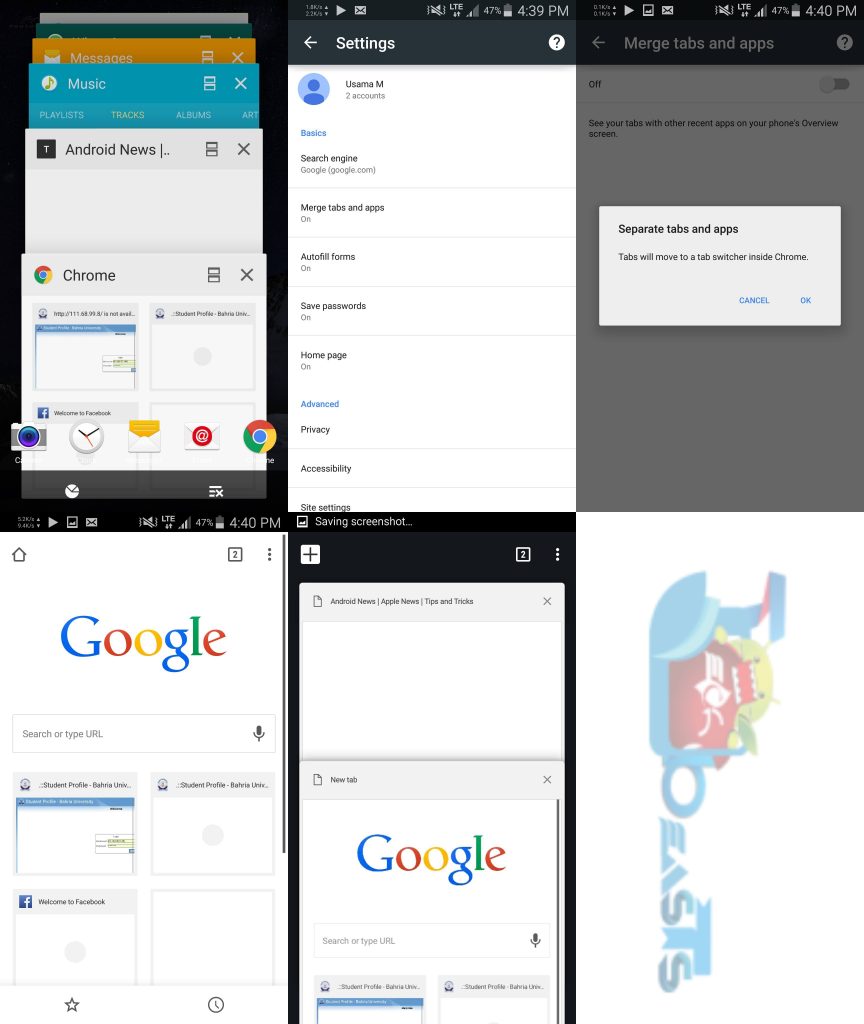
The tabs are now embedded in the recent apps menu, that means you no longer can switch between tabs using the icon next to the URL box, but you will have to open the recent apps menu to switch between tabs. This change was made when Google revamped the Google Chrome browser for Android Lollipop. But this feature never went permanently out of the browser. You can still bring it back and you can make a lot more changes to boost your browsing experience.chrome-android-merger

Speed Up Google Chrome Browser For Android

We’ve compiled some of the best working tips and tricks that will help you to improve the performance of your Chrome browser. Let’s go through these now and enhance your Chrome for Android.

Get The Tabs Back Next To Address Bar

To get the tab switcher next to the address bar back, follow these steps:

  1. Tap the menu button(three vertical dots) on the top right corner of your Chrome browser.
  2. Now tap settings.
  3. Now in settings tap “Merge tabs and apps”
  4. Turn off the merge tabs and apps feature from the next screen.
  5. Your chrome will now close and re-open and you will have the tab switcher back next to the address bar.11655765_10206294870623312_146806134_o-tile

Learn To Quickly Switch Between Tabs

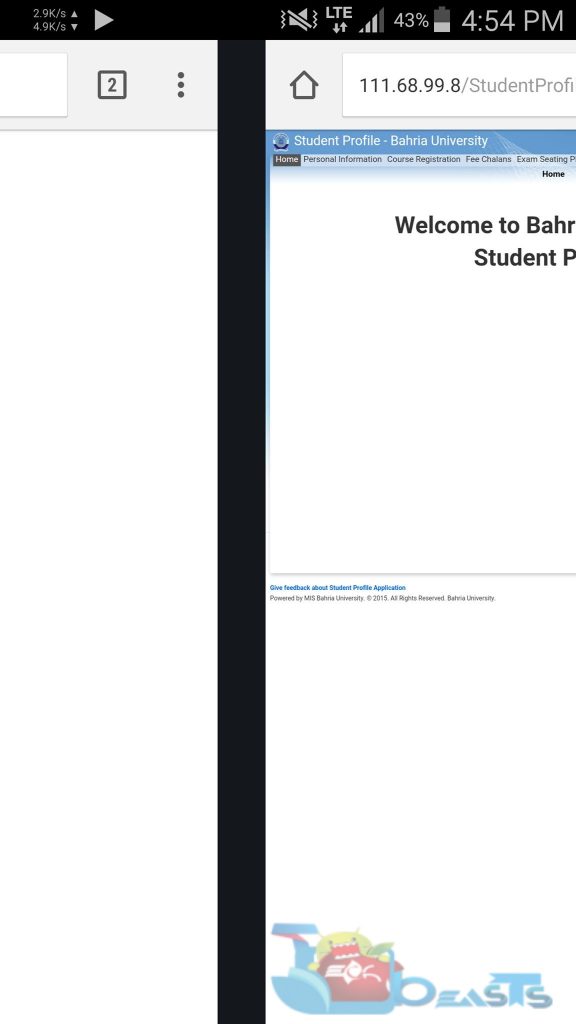
Once you’ve brought the tab switch option back to its place, you can quickly switch between the tabs by simply swiping the address bar/toolbar from left to right or right to left. You can simply tap and hold the toolbar and swipe to switch between your desired tabs. This feature won’t work if you have merged tabs and apps, you’ve to turn it off first using the instructions explained above.11655775_10206294886103699_186504719_o
Use Data Saver To Compress Pages & Save Your Data Plan

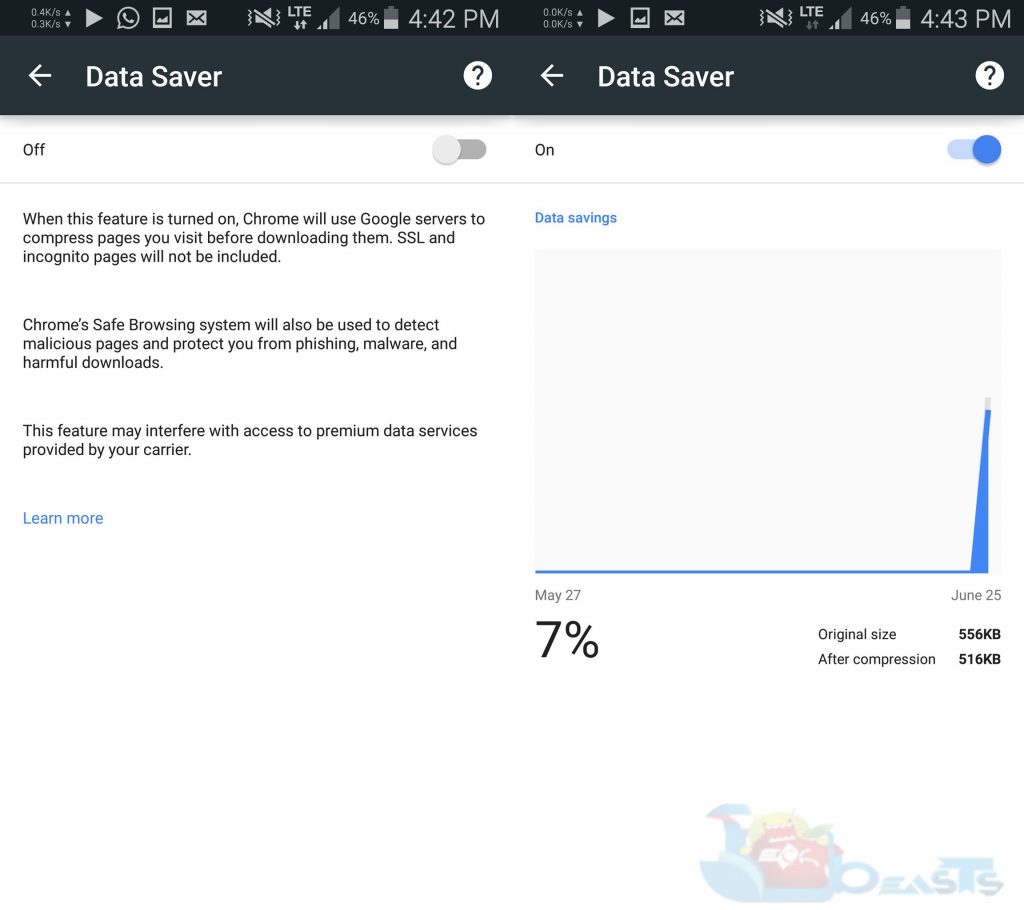
This is one of the most useful features of Chrome for Android. You can save your Data Plan by using the Data Saver option located in Chrome settings.

When you’ve turned on Data Saver mode, Chrome uses Google’s servers to compress the pages you visit before downloading them. This feature also detects malicious pages and protects the users from malware, phishing, and harmful downloads.

To enable data saver, follow these steps.

  1. Tap the menu button(three vertical dots) on the top right corner of your Chrome browser.
  2. Now tap settings.
  3. Now in settings tap “Data Saver”.
  4. Turn on the Data Saver mode now.
  5. Chrome will now load the pages faster by compressing the unnecessary material.11660366_10206294885623687_1961296958_o-tile

Clear Google Chrome Browsing Data With Time

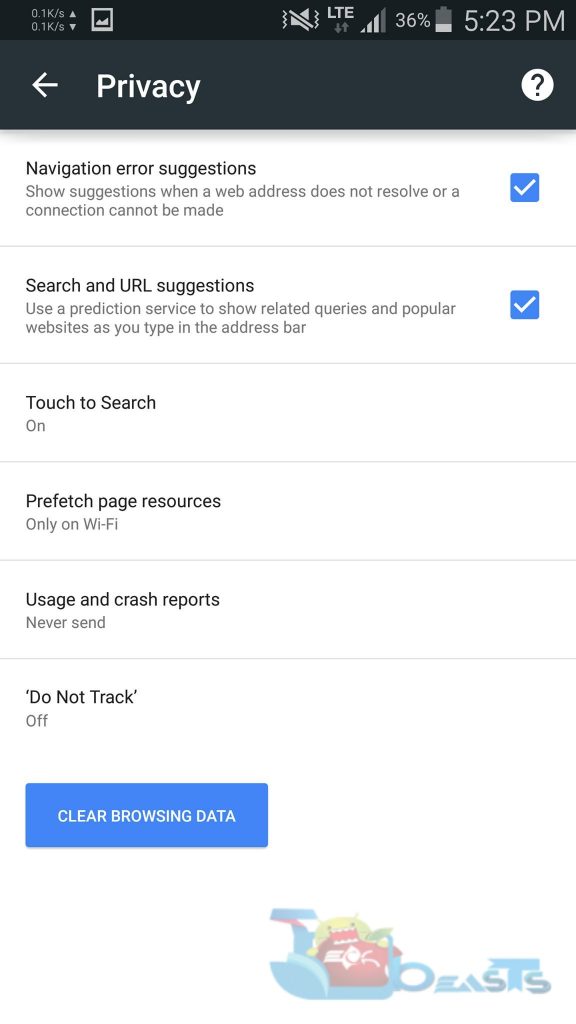
If your Google Chrome is lagging too much, you may try clearing up the cache, cookies, history and temporary files. You can do so by following these instructions.

  1. Open Google Chrome and tap the menu key > open settings.
  2. Now in settings tap “Privacy”.
  3. In Privacy tap “Clear Browsing Data” and select the data that you want to remove.
  4. Relaunch Chrome, it should be fine now. 11660203_10206294886383706_142287999_o
Speed Up Chrome

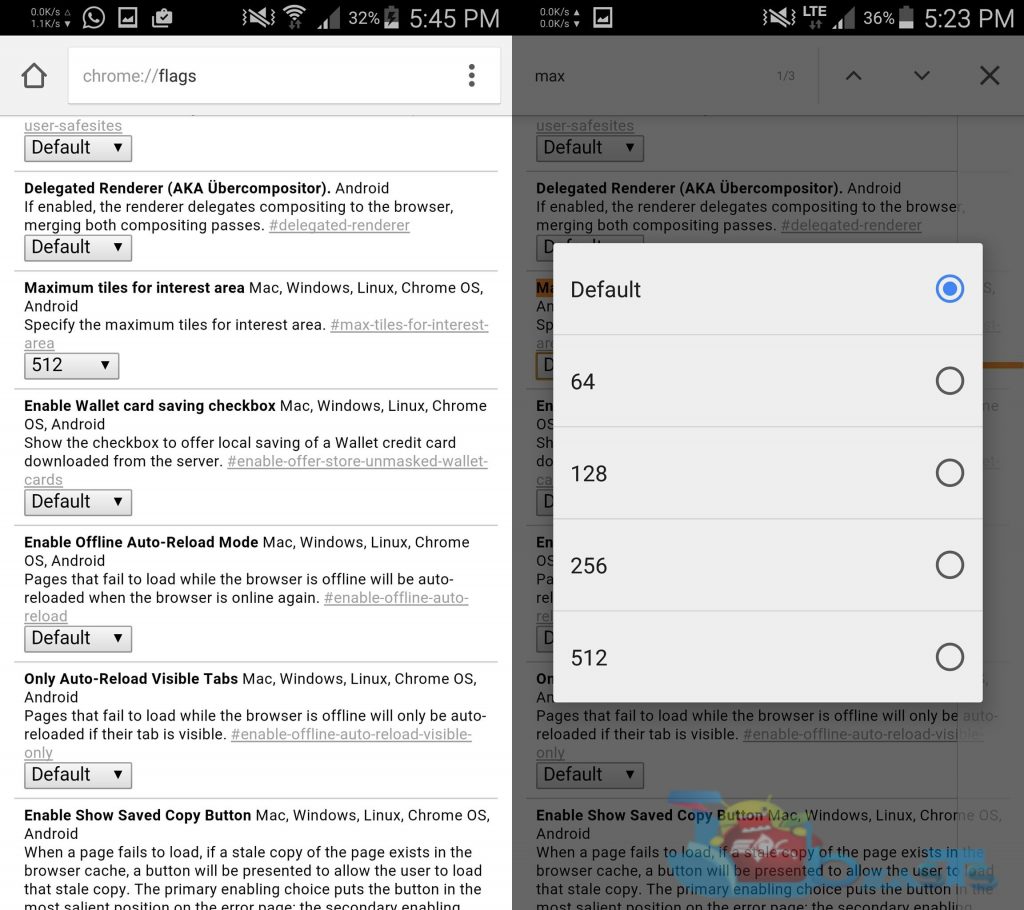
This is how you can actually boost up the browsing speed of your Chrome browser. You’ve to make a little tweak in the flags of your Google Chrome to achieve this. Basically what we will be doing is, we will be allowing Google Chrome to access more memory. This will finish the sluggish behaviour of Google Chrome and make the browsing much more smoother. Specially when you’re scrolling down a heavy web page, it will be much more smoother after allowing Chrome to access more memory. By default, this memory is 64, you can set it to 512 or 256 depending upon your liking. Here’s how to do it.

  1. Copy and paste the following text in your Chrome address bar
    • Chrome://flags
  2. Once you’re in flags settings, tap the menu key and then tap “Find in page”.
  3. Now in Find in page type “Maximum tiles” and hit the arrow key to find.
  4. Once you’ve found Maximum Tiles, tap it and set the value according to your choice. i.e. 512 or 256.
  5. Once done, relaunch your Chrome browser.
  6. Checkout the browsing speed of your Chrome browser now. That’s all.123

Add Bookmark Icons To Your Home Screen – Make Your Favourite Sites Your Homescreen Icons

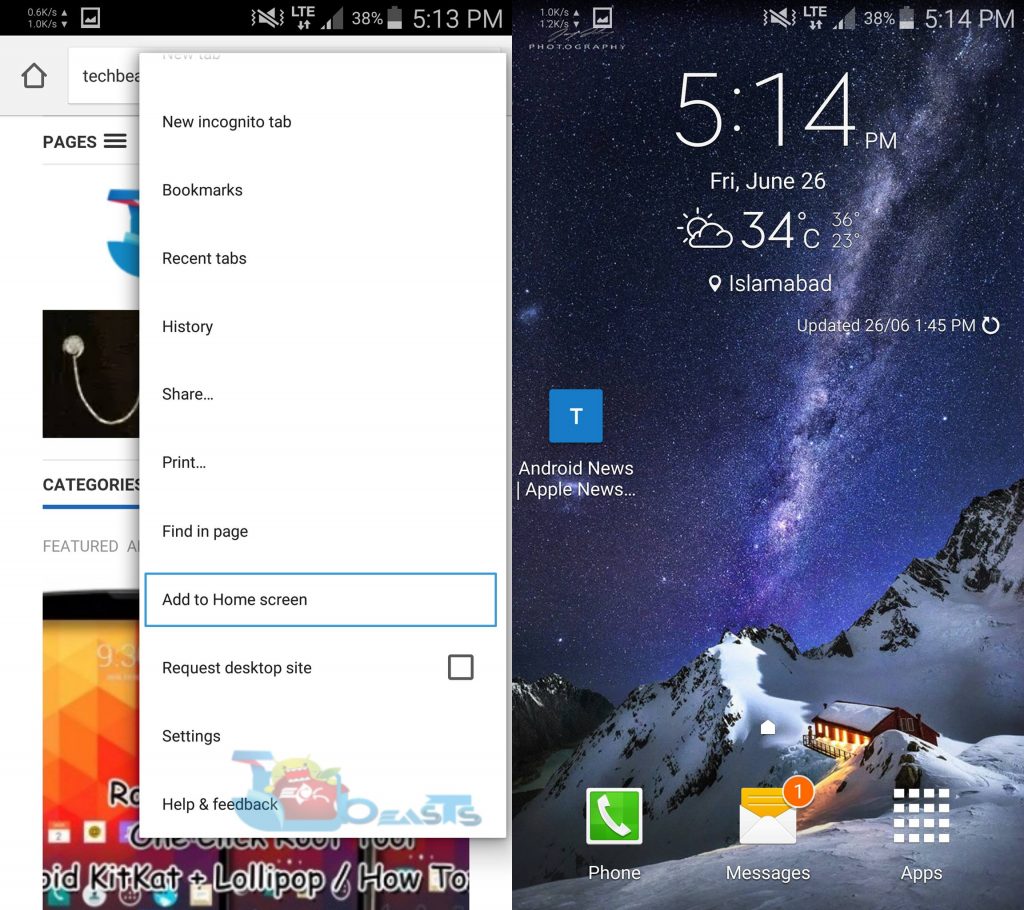
For quick navigation, you can add your favorite sites/pages shortcuts to your Android phone’s home screen. Here’s how you can do it.

  1. Open your desired site.
  2. Tap the menu key at the top right corner.
  3. Tap “Add to homescreen” option in the list.
  4. Set the name and you will have the icon on your homescreen.
  5. That’s all.11655851_10206294871863343_1048245106_o-tile

Slide Down The Menu To Make Quick Selection

Not much of a use, but good to have in knowledge. You can tap and hold the menu key and then slide down to navigate through the options. If you’re so lazy to put your finger off from the screen after pressing the menu button, you may keep it intact with the screen and slide down for selection an option.

Play The Hidden Game When You’re Offline

Google loves to hide games in its applications/softwares. We have a hidden game in Android Lollipop, and we have a hidden game in Google Chrome for Android and PC as well. You can access this game when you’ve no internet connectivity. While you’ve no access to packet data or WiFi, open Google Chrome and it will show you the offline screen with a small dinosaur. Simply, tap anywhere on the screen and the game will begin. You’ve to jump over the hurdles and keep running as long as you can to make a bigger score.11665983_10206294886983721_82689322_o-tile
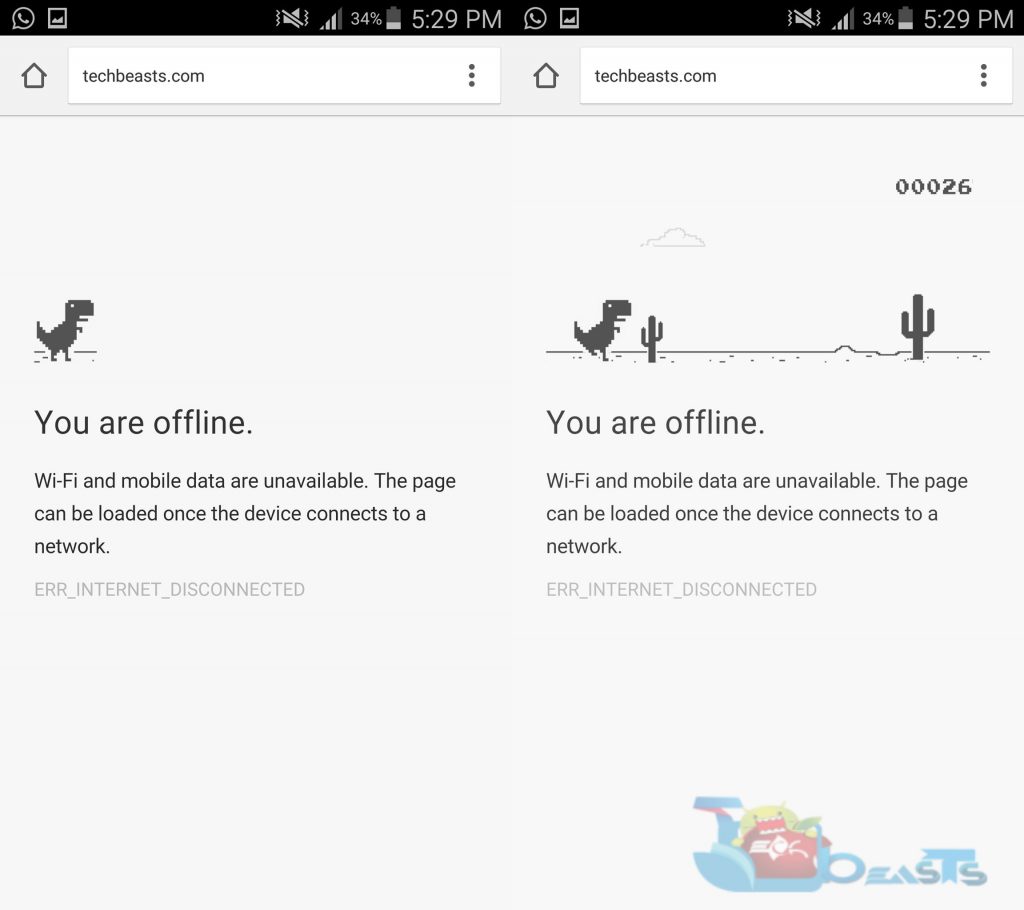
That’s all. We hope that you find these tips and tricks useful. Got anything to add to this post? Reach us out through the comment box below.

Download and install Activator For iOS 8.3 [ Tutorial ]

0
Download and install Activator For iOS 8.3 [ Tutorial ]

As the TaiG has released their tool to Jailbreak iOS 8.3 developers of the famous tweaks are working hard to release their latest version of tweaks which are compatible with all Apple devices. Today the famous Jailbreak tweak Activator is out for iOS 8.3, in the following guide i’ll tell you how to download and install Activator For iOS 8.3.

activator for iso 8.3 download

Easy Guide To Download and install Activator For iOS 8.3:

Before proceeding any further let me tell you few things, Activator is released to support Jailbreak iOS 8.3, but you can only install it when your Cydia Substrate works. Good news is that TaiG has released v2.1.2 Jailbreak Tool with support of Cydia Substrate. So perform a fresh Jailbreak on your iPhone, iPad or iPod Touch to install the Activator.

Also See: List of iOS 8.3 Compatible Jailbreak Tweaks On Cydia [ 2015 ]

Now lets proceed with the guide on how to install Activator For iOS 8.3.

Step #1: Open Cydia from your Jailbroken device.

Step #2: Now tap on Changes tab at the bottom of your screen and the tap on refresh.

Step #3: Wait for the repositories to refresh.

Step #4: Tap on search and write Activator press enter.

Step #5: Once you find it, Tap on Activator and then Tap on install.

All Done !

You’ve have successfully installed the latest Activator for your iOS 8.3 Jailbroken devices. Please do share it with your friends and tell me if you face any issue regarding this guide .

How to fix The “DF-DFERH-01” error when you are into Google Play

0
How to fix The “DF-DFERH-01” error when you are into Google Play

If you are facing “DF-DFERH-01” error when you are into Google Play then here’s how you can fix “DF-DFERH-01” error when you are into Google Play. Please follow all the steps carefully mentioned below in order to fix DF-DFERH-01.

how fix DFERH-01


How to fix The “DF-DFERH-01” error when you are into Google Play:

I’ve tried many solutions and most of them worked for me but only for a day or hour, but this time i finally found a working solution to fix “DF-DFERH-01” error when you are into Google Play.

Step #1: Go to your Android device settings.

Step #2: Now Tap on the Applications from the setting list.

Step #3: In Application menu Tap on Manage Applications.

Step #4: Tap on All Tab from the application manager menu.

Step #5: Scroll down and find Google Play Store app and press “Clear Data” button.

Step #6: Go back to the All Tab and search for “Google Services Framework” or “Google Service Framework” , Tap on it now tap on clear data.

Step #7: Now head back to home screen, now disable WiFi or Mobile data if its on.

Step #8: Turn off your device and remove the battery and insert it back. Now turn on your device and wait for few minutes. You’ll see that DF-DFERH-01 error will be gone for good.

All Done ! Here’s how you can fix DF-DFERH-01 error on Google Play. Please do Share it with your friends and also if its not working tell me in comments.

Easily Root LG Phones On KitKat/Lollipop With One Click Tool

3
Easily Root LG Phones On KitKat/Lollipop With One Click Tool

Own an LG device running KitKat or Lollipop? You may want to unleash its real power by means of root access and bringing in some custom stuff on it. Android’s open nature has been explored by developers ever since it came up, and by modifying your device’s firmware you can get the best out of it. Making customisations and tweaks to your Android device requires root access, which you can gain by applying different methods and tricks. You can root your LG device powered by Android now easily with a one click root tool.

There were methods to root LG devices like LG G3, G2 running Android KitKat or Lollipop in past, but the methods were pretty complex and hard for newbies to follow, so a much easy method was required. In the early days of Android Lollipop, it wasn’t possible to gain root access on this firmware because of some core changes made by Google, so the development also comes over this hurdle and roots a number of LG smartphones running Android Lollipop.LG-Mid-range-2015-798x310

The One-Click Root Tool developed by XDA senior member avicohh is based on a method discovered by XDA recognised developer Unjustified Dev. This tool can easily root your LG G3, LG G2, LG G Pro 2, LG G Pad and a variety of other LG smartphones running KK/LP firmware. The tool doesn’t only root a specific variant of the device, but roots almost all variants of the supported smartphones. If you’ve been looking for such an easy method to root your KitKat or Lollipop powered LG smartphone, you may have spotted the right place. We are going to have a look on how to use this tool and root your LG phone in One-Click.

Here is a list of supported devices:

  • Easily Root LG G3 (All Variants) With One Click Root Tool
  • LG G3 Beat (All Variants)
  • LG G2 (All Variants)
  • LG G2 Mini (All Variants)
  • LG G Pro 2 (All Variants)
  • LG G Pad (All Variants)
  • LG F60 (All Variants)
  • LG L90 (All Variants)
  • LG Tribute (All Variants)
  • LG Spirit (All Variants)
  • LG Volt (All Variants)
  • LG G Vista (All Variants)
  • LG MS395/D393

According to the developer, if your device is not listed above, even then the tool might work fine for you. So give it a try and see if it works or not.

Precautions:

  • Do not try this on any other device. Trying the method on an incompatible device may result in bricking it.
  • Your phone’s battery must be charged at least over 50% to avoid any power issue during the flashing process.
  • Just to be a safe side, backup all your important contacts, sms messages, call logs and copy your media content to your PC as well.
  • For a while disable Firewall or any Antivirus if you have enabled.
  • Use your device’s original data cable to establish connection between your phone and your PC.
  • Before connecting your device, enable USB debugging mode on it. To do so, on your LG smartphone go to settings > about device > tap the build number for 7 times to get the developer options in settings. Now go back to settings > developer options > Enable USB debugging.
  • Download and install LG USB drivers on your PC.
  • Make sure that you’ve read all instructions carefully and applied the precautions. Let’s go ahead now.

How To Easily Root LG Phones On KitKat/Lollipop With One Click Tool

  1. Download LG_One_Cick_Root_by_avicohh.exe file for your LG smartphone.
  2. Connect your LG phone running Android KitKat/Lollipop to your PC.
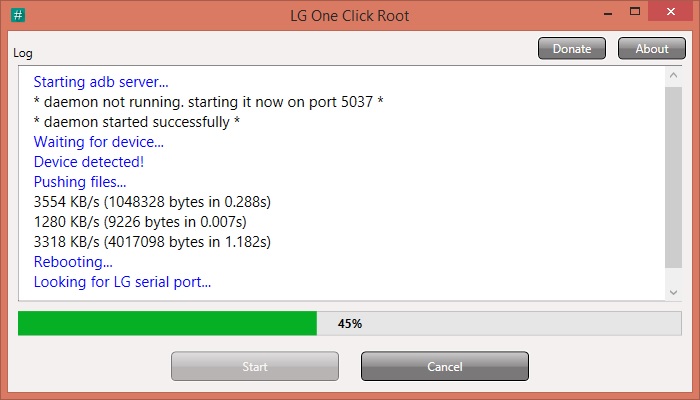
  3. Run the LG One Click Root Installer.exe file and follow the on-screen instructions to root your phone.
  4. If your device isn’t being recognised by your PC, try switching between MTP and PTP mode for the connection.
  5. If you’re facing “MSVCR100.dll is missing” error, you need to install Visual C++ Redistributable. Get it here: 32 Bit | 64 Bit
  6. If you want to unroot your device, simply use SuperSu settings to unroot it.
  7. That’s all.30naccm

Let us know if the tool worked fine for you or not. If you manage to root a device which is not listed above, don’t forget to mention it in the comment box below.


Install Android 5.1.1 Lollipop On Galaxy S4 Mini With CyanogenMod 12.1

Install Android 5.1.1 Lollipop On Galaxy S4 Mini With CyanogenMod 12.1

The 2nd mini device by Samsung, Galaxy S4 Mini debuted with Android Jellybean, and got an update to Android KitKat. But there are no chances that the device will see any further update of Android due to hardware limitations. That puts a lot of Galaxy S4 Mini users to a little bit of disappointment. Lollipop sweetness is everywhere these days, manufacturers are updating their flagship and there other mainstream devices to this latest and greatest iteration of Android. Forgetting S4 Mini is just an unfair thing from Samsung, but the great developers are always there to cheer the users up.

Good news for the Galaxy S4 Mini owners. Android 5.1.1 Lollipop CyanogenMod 12.1 custom ROM is now available for all Galaxy S4 Mini GT-I9190, I9192 & I9195. The current version for S4 Mini is quite stable and doesn’t contain so many bugs which would hurt everyday use of this ROM. If you don’t know about CyanogenMod yet, you may want to know that CyanogenMod is the most popular custom Android firmware. It is the aftermarket version of Android, which is available for almost all the devices which have been forgotten by the device manufacturers. CyanogenMod is the best way to give old devices a completely new life. The best thing about this ROM is that, it is in the pure stock Android form, and contains no bloatware at all. CyanogenMod also paves a way for other custom ROMs, most of the custom ROM developers make use of the CM sources to compile there ROMs. So far, it is the most widely used and the most popular custom ROM available for any Android device.30472-GT-I9190-Samsung-stellt-das-Galaxy-S-4-mini-offiziell-vor

Earlier, we covered a guide to install Android 5.0 Lollipop on Galaxy S4 mini, but now that the Android 5.1.1 Lollipop is also available, so we will be installing this firmware in the following guide. Let’s go ahead now and install Android 5.1.1 Lollipop on our beloved Galaxy S4 Mini GT-I9190(3G), I9192 (Duos) & I9195 (LTE).

Precautions:

  1. This guide is only for Samsung Galaxy S4 Mini’s following variants
    1. Galaxy S4 Mini 3G GT-I9190
    2. Galaxy S4 Mini Duos GT-I9192
    3. Galaxy S4 Mini LTE GT-I9195 | Do not try this guide on any other device. Flashing a file on an incompatible device may result in bricking it.
  2. Your device must be charged at least over 50% in order to avoid any power issues during the flashing process.
  3. Your device must have a custom recovery installed on it. Follow our full guide to install Philz Advanced Touch recovery.
  4. Backup your important media content, contacts, call logs and text messages. This is highly recommended as we will be making a complete clean installation and you will have to factory reset your device.
  5. Create the EFS backup of your device and save it to your PC.
  6. Create a Nandroid backup of your device and save it to your PC.
  7. Follow this guide to the letter to avoid any mishap.

Disclaimer: In case something goes wrong, or your device messes up, we or the device manufacturers may not be held responsible. Custom process involve a high risk, so make sure that what every you’re doing, you’re taking full responsibility for that and you’re well aware of the procedures.

How To Install Android 5.1.1 Lollipop On Galaxy S4 Mini With CyanogenMod 12.1

  1. Make sure that you’ve flashed the Philz Advanced Touch recovery linked above.
  2. Download CM 12.1 Custom ROM.zip file according to your device.
    1. cm-12.1-20150620-UNOFFICIAL-serrano3gxx.zip [I9190]
    2. cm-12.1-20150620-UNOFFICIAL-serranodsxx.zip [I9192]
    3. cm-12.1-20150620-UNOFFICIAL-serranoltexx.zip [I9195]
  3. Download Google GApps for Android 5.1.1 for your device.
  4. Copy both the downloaded .zip files to the internal or external storage of your device.
  5. Now boot into recovery mode on your device. To  do so, turn it off completely. Now turn it on by pressing and holding Volume Up + Home + Power Key.
  6. Once your device boots up, leave the keys. You should be in the recovery mode now.
  7. Now in Philz Touch Recovery tap “Wipe & Format Options > Factory Reset > Yes”.
  8. Now go back to the main menu in Philz Touch and tap “Install Zip > Choose zip from /sdcard or storage depending on where you placed the file > select the ROM.zip file > Select Yes in next screen and wait for it to flash the ROM”.
  9. Now go back to the main menu again, once again tap “Install Zip > Choose zip > Select the GApps.zip file this time > Yes and wait for it to flash”.
  10. Once done, using the wipe options wipe cache and dalvik cache.
  11. Now reboot your device.
  12. You should be running Android 5.1.1 Lollipop on your Galaxy S4 Mini now. That’s all.

Just in case you’re stuck with anything, feel free to reach us out through the comment or through our contact us page.

Root LG G2 Running Android Lollipop & Install TWRP Recovery

Root LG G2 Running Android Lollipop & Install TWRP Recovery

LG rolled out the Android 5.0 Lollipop update for its all time famous flagship LG G2 around 2 months ago. The update brought graphical changes and some core changes to this device. Lollipop on LG G2 was quite a surprise for G2 owners as LG was busy with LG G4, which is a great piece from LG but LG didn’t forget it its loyal G2 users at all. LG G2 debuted with Android 4.2.2 KitKat,  and the device is no seeing the 5th iteration of Android. Development threads for G2 are pretty active as well which are keeping this device alive in all the ways.LG-G2-11ad

If you’ve just updated your G2 to Android Lollipop, and you happen to be Android power user as well, you must have come across the rooting issues on Android Lollipop. Because of some changes made to the system by Google, rooting the device directly wasn’t possible so it took a bit of a time for developers to come with some easy methods to root this device without any hiccups here and there. Now that the methods are available, you can easily root all variants of LG G2 running Android Lollipop. You can also install TWRP recovery on your device and explore the open nature world of Android Lollipop. In the following guide we have explained both the methods to root the device and to install TWRP recovery

The method to root LG G2 running Android Lollipop is pretty easy, we will be using One Click Root Tool that is the result of hard work of XDA senior member avicohh. We will install the TWRP recovery by means of a little application named as AutoRec developed by XDA senior member bender_007. Let’s go ahead and perform the steps now.

Precautions:

  • This guide is for the following variants of the LG G2:
  • LG G2 D800 AT&T
  • LG G2 D801 T-Mobile
  • LG G2 D802 Global
  • LG G2 D803 Canada
  • LG G2 D805 Latin America
  • LG G2 LS980 Sprint
  • LG G2 VS980 Verizon
  • LG G2 D852G
  • Do not try this on any other device. Trying the method on an incompatible device may result in bricking it.
  • Your phone’s battery must be charged at least over 50% to avoid any power issue during the flashing process.
  • Just to be a safe side, backup all your important contacts, sms messages, call logs and copy your media content to your PC as well.
  • For a while disable Firewall or any Antivirus if you have enabled.
  • Use your device’s original data cable to establish connection between your phone and your PC.
  • Before connecting your device, enable USB debugging mode on it. To do so, on your LG G2 go to settings > about device > tap the build number for 7 times to get the developer options in settings. Now go back to settings > developer options > Enable USB debugging.
  • Download and install LG USB drivers on your PC.
  • Make sure that you’ve read all instructions carefully and applied the precautions. Let’s go ahead now.

How To Root LG G2 Running Android Lollipop & Install TWRP Recovery

  1. Download LG_One_Cick_Root_by_avicohh.exe file for your LG G2.
  2. Connect your LG G2 to your PC.
  3. Run the LG One Click Root Installer.exe file and follow the on-screen instructions to root your LG G2.
  4. If your device isn’t being recognised by your PC, try switching between MTP and PTP mode for the connection.
  5. If you’re facing “MSVCR100.dll is missing” error, you need to install Visual C++ Redistributable. Get it here: 32 Bit | 64 Bit

Installing TWRP:

  1. Now download and install AutoRec application on your LG G2 according to your variant.
    1. LG G2 D800 AT&T – Download AutoRec
    2. LG G2 D801 T-Mobile – Download AutoRec
    3. LG G2 D802 Global – Download AutoRec
    4. LG G2 D852G – Download AutoRec
    5. LG G2 VS980 Verizon – Download AutoRec
  2. Once you’ve installed the AutoRec application, open it from the app drawer.
  3. First time, AutoRec will create some important backups, once done, go ahead and tap the “Flash TWRP” button.Screenshot at Jun 25 16-37-01-side
  4. Grant the SuperSu permissions, and wait for it to complete the process.
  5. Once done, turn off your phone and reboot into recovery mode.
  6. That’s all. Wasn’t that easy?

Let us know if the method worked fine for you or not. In case you’re stuck with anything, reach us out through the comment box below or through our contact us page.


How To Replace a Cracked Smartphone Screen [ Video Tutorial ]

How To Replace a Cracked Smartphone Screen [ Video Tutorial ]

Have you recently dropped or cracked your smartphones screen then here’s how to replace a cracked smartphone screen. You need few tools like Samsung Digitizer and Screen Replacement, iFixit Pro Toolkit, iFixit Pro Screwdriver Set and iFixit Magnetic Project Mat. In the following video we are using Samsung Galaxy S4, but this tutorial is for all Samsung Galaxy devices and if by any chance you cannot find what’s in video or your device assembly is changed no need to worry about that. You can find your device tutorial on iFixit. Let’s start the guide on how to replace a cracked smartphone screen.

How To Replace a Cracked Smartphone Screen

How To Replace a Cracked Smartphone Screen [ Video Tutorial ]:

Follow all the steps carefully shown in the video in order to replace your cracked smartphone screen. Also you need the following equipments.

Requirements:

Samsung Digitizer and Screen Replacement: http://j.mp/1pVGTr4
iFixit Pro Toolkit: http://j.mp/1ygJ6Af
iFixit Pro Screwdriver Set: http://j.mp/1FO2B20
iFixit Magnetic Project Mat: http://j.mp/1CGFlH5

Source