Home Blog Page 368

Download TaiG 2.2.0 Jailbreak tool for iOS 8.4

0
Download TaiG 2.2.0 Jailbreak tool for iOS 8.4

It was quick first PP Jailbreak tool was released for iOS 8.4 and after that TaiG Jailbreak tool for iOS 8.4 is released. Few days back we got iOS 8.3 update and then Apple announced that they are releasing iOS 8.4 with Apple Music and its out. But this time developers didn’t hold their horses and they released the TaiG v 2.2.0 Jailbreak Tool. Download TaiG 2.2.0 Jailbreak tool for iOS 8.4 from the following links.

taig-jailbreak-8-4


Compatible Devices:

  • Phone 6, iPhone 6 Plus, iPhone 5s, iPhone 5c, iPhone 5, iPhone 4S
  • iPad Air 2, iPad Air, iPad 4, iPad 3, iPad 2
  • iPad mini 3, iPad mini 2, iPad mini
  • iPod touch 5G

You can Jailbreak iOS 8.4, iOS 8.3, iOS 8.2 and iOS 8.1.3. using TaiG V2.2.0, at the moment TaiG 2.2.0 is available for Windows and Mac use have to run Windows in a virtual machine to use the TaiG jailbreak.

Also See: Download and Install iOS 8.4 for iPhone, iPad and iPod touch

Download and Install iOS 8.4 for iPhone, iPad and iPod touch

0
Download and Install iOS 8.4 for iPhone, iPad and iPod touch

Here we go Apple has released their latest iOS 8.4 and yet again we are the first to post about how to install iOS 8.4. You can download iOS 8.4 for iPhone, iPad and iPod touch the following links and also i have added the installation method at the end.

ios-8-4-logo

iOS 8.4 is compatible with the following iOS devices:

  • iPhone 4S, iPhone 5, iPhone 5c, iPhone 5s, iPhone 6, iPhone 6 Plus
  • iPad Air 2, iPad mini 3, iPad 2, iPad (third-generation), iPad (fourth-generation), iPad Air, iPad mini, iPad mini with Retina display
  • iPod touch 5G

iOS 8.4 IPSW download links for iPhone:

iOS 8.4 IPSW download links for iPad:

iOS 8.4 IPSW download links for iPod touch:

How To Install iOS 8.4 for iPhone, iPad and iPod touch:

  • Open Settings app and tap on General > Software Update. You’ll get the notification of iOS 8.4 OTA update.

Backup your device

Before you perform any update, it is always recommended that you backup all of your important data. A clean install is always recommended, you might have to wipe your device so make sure that you’ve backed up all of your important stuff. You can backup your iOS device using iTunes or iCloud.

10668736_10205042703816828_151985274_n

Clean-up your device – Delete unused applications – Free up space

It is always recommended to wipe up the applications you merely use. Since you’re going to have a completely new iOS running on your device, you won’t like any old applications putting any burden on your device’s latest and greatest iOS. You may delete all unnecessary files from your Apple device as well. iOS 8’s installation would require at least 1 GB of free space, so if you’re running low on space, make sure that you clear it up before you begin installing iOS 8.

Jailbreakers

Jailbreakers definitely enjoy a completely different world of apps and features on their Apple device and if you happen to be one jailbreaker, it won’t be comforting for you to update to iOS 8 right now. There’s no telling about the arrival of Jailbreak for iOS 8 anytime soon, the firmware just came out today and there’s no idea when the developers come up with the tweaks made to this latest version of iOS. Also, once you update your device to iOS 8’s very first build, you won’t be able to downgrade your device to iOS 7.x in order to gain the jailbreak privileges back on your device, so it is advised that jailbreak lovers stay away from the iOS 8 update for now.

Install iOS 8.4:

Through OTA Update

  1. Make sure that your Apple device is charged good enough to perform this whole action, which will take around 1 hour.
  2. Turn on WiFi on your Apple device now.
  3. Go to Settings > General > Software Updates.
  4. Your device will automatically check for iOS update, if the update is found tap on “Download” to download the iOS 8 update.
  5. Once the update is downloaded, your device will leave a notification, you can go to Settings > General > Software Update > Install it.
  6. It will install iOS 8 on your device in a few minutes.

Through iTunes:

Updating your device using iTunes is pretty much easy and useful as well. You might be facing internet connectivity issues with your WiFi, and you may want to use your PC connected through a LAN cable that can perform the download way faster than your Apple device. You can simply plugin the USB cable in your device and begin the update process. Here’s how to do that.

  1. Download and install iTunes 11.4 from the link attached above.
  2. Once iTunes is installed, plug-in your Apple device.
  3. Now open iTunes and wait for it to detect your device.
  4. As soon as your device is detected, click on “Check for updates”.
  5. If the update is available through iTunes, it will begin downloading and install it once done.
  6. That’s all.

Easily save iOS 8.3 SHSH blobs using TinyUmbrella [ Tutorial ]

0
Easily save iOS 8.3 SHSH blobs using TinyUmbrella [ Tutorial ]

Only few hours left in the release of the Apple latest iOS 8.4, its a good thing because Apple is introducing the their new product for the first time Apple Music. But the thing is that just few days back TaiG released their Jailbreak Tool for iOS 8.3 and now new update is coming and we would love to see whats new in it. The things is that Apple will stop signing the firmware that means you cannot downgrade to older version, unless you have saved SHSH blobs. In the following guide i’ll tell you how to save iOS 8.3 SHSH blobs using TinyUmbrella.

save iOS 8.3 SHSH blobs using TinyUmbrella

How To Save iOS 8.3 SHSH blobs using TinyUmbrella:

Step #1: Download the latest TinyUmbrella beta from this link.

Step #2: You must have Java installed on your PC because TinyUmbrella requires Java. Download Java from this link for your Windows or Mac.

Step #3: Now launch TinyUmbrella.

Step #4: Connect your device with your PC using data cable.

Step #5: Once your device is connected with PC TinyUmbrella should automatically recognize it and begin downloading all of the available SHSH blobs.

Step #6: Once done disconnect and make sure you have saved SHSH blobs to secure location.

All Done. If you face any issue regarding this guide please do tell me in comments, i would love to solve your problem. Also i am adding a video tutorial so you can easily save SHSH blobs.

TaiG iOS 8.3 jailbreak: Fix App Store updates and Settings app crash

0
TaiG iOS 8.3 jailbreak: Fix App Store updates and Settings app crash

After Jailbreaking iOS 8.3 many users have reported that they are facing issues like, they cannot update their apps on App store and also settings app is crashing. At the moment we haven’t received any word from TaiG team on this matter, but we can still fix App Store updates and Settings app crash after Jailbreaking iOS 8.3 using TaiG.

jailbreak iOS 8.3 - fix app store updates and settings app crashes issue

Fix App Store updates and Settings app crash after Jailbreaking iOS 8.3 With TaiG:

Follow the steps mentioned below most of the users have tried these steps and results were good. If after applying these steps there is no success for you then you have to restore your backup using iPhone and again Jailbreak your device.

Settings App Crashing (iPhone6) – Settings app fails to load at all, crashes out after ~30 seconds.

Confirmed fix – unpair any paired Apple watches and reboot.

Maps / GPS (iPhone6, no fix yet?) – Maps app crashes, other GPS apps say that location services are disabled.

Notification Center (iPhone6, no fix yet?) – Notification center is unusable, freezes immediately upon viewing.

App Installation / Updates (iPhone6, 6+) – Cannot update or install new apps from the App Store.

Possible fix – Go to “iTunes and Appstore” pane in settings, and it may ask for your password. Sign in as normal if prompted.

Possible fix #2 – Go to App Store > Updates > Purchased. You may be prompted to login even though you are already logged in. Login as normal, and you should see the list of your previous purchases. Once you click download on one of these applications it should let you download apps as normal.

Cydia Account (iPhone6, no fix yet?) – Cydia says the device has not been able to be identified and asks If you are using Cydia with a web browser.

Spotlight (iPhone6, no fix yet?) – Spotlight functionality is broken.

Source: Reddit

List of 50, iOS 8.3 Compatible Jailbreak Tweaks On Cydia [ 2015 ]

0
List of 50, iOS 8.3 Compatible Jailbreak Tweaks On Cydia [ 2015 ]

Here you go 50 new Jailbreak Tweaks for iOS 8.3, Yes more and more developers are now updating their tweaks to support iOS 8.3. You can also check our old list of Jailbreak tweaks for iOS 8.3, most of these tweaks are free but few are paid. It doesn’t matter if its paid, it depends on its functionality so check out the list below and also i’ve added video of all the tweaks.

50 Jailbreak Tweaks for iOS 8.3

List of 50, iOS 8.3 Compatible Jailbreak Tweaks On Cydia:

VIA | Source

Download WhatsApp v2.12.159 Apk – Direct Download

Download WhatsApp v2.12.159 Apk – Direct Download

WhatsApp updates are popping out on daily basis now as yesterday i posted about WhatsApp v2.12.88 Apk and now we got another update, but this there are new things. Calling interface is updated to material design, default wallpapers is changed, finally they have removed the ugly gingerbread icon under the menu and fixed few bugs. You can download the latest WhatsApp v2.12.159 Apk directly from the following links or you can download it via Google Play Store.

We have all the latest and old version of WhatsApp on Techbeasts and also on Apkbeasts, you can download the desired version from both of our sites.

How To Fix Unfortunately WhatsApp Has Stopped on Android

What’s New:

# Materializing the calling interface.

# default wallpaper is changed.

# New search bar.

# Menu icons are updated.

How to download & install WhatsApp Messenger v2.12.159 APK:

  1. Download WhatsApp APK v2.12.159 | Mirror
  2. Download it to your PC and transfer it to your phone or else download it to your Phone directly.
  3. Uninstall any previous versions of Snapseed from your phone.
  4. Now locate the WhatsApp  APK on your phone and tap it.
  5. Begin the installation, allow “Unknown Sources” if required.
  6. Select “Package Installer” if asked.
  7. Complete the installation.
  8. Access the installed app from the app drawer.
  9. Enjoy Socializing!

Here’s How To Root Samsung Galaxy Grand Prime

14
Here’s How To Root Samsung Galaxy Grand Prime

Galaxy Grand’s sibling, Galaxy Grand Prime came out few months back. This mid ranger by Samsung brought it a lot respect from the users. Galaxy Grand Prime packs up some very nice specifications in a beautiful body, and the device costs $199 at max. On the front we have a 5 inches display with 220 ppi. Under the hood we have a 1.2 Ghz Qualcomm Snapdragon 410 Quad Core CPU clocked at 1.2 Ghz which is accompanied by an Adreno 306 GPU for the gaming experience on this phone. Samsung’s selling point for this phone is the secondary camera, which is actually very nice for taking selfies. On the front you can find a 5 MP shooter while on the back Samsung has used an 8 MP shooter. Galaxy Grand Prime is one of the perfect choices among the mid rangers if you want to go for one at the moment.

But what to do after you’ve got your hands on a Galaxy Grand Prime? Well, if you just want to unleash the real power of your new Grand Prime, you should gain the root access on it and apply performance tweaks to get the maximum out of your device. Once you’ve rooted your device, you will be able to apply battery tweaks as well for better battery backup and a lot more. If you’ve decided to become an Android power user using your Galaxy Grand Prime, you may have spotted the right place already. In the on-going post, we are going to show how you can root your Galaxy Grand Prime using CF-Autoroot by means of Samsung’s flashtool Odin3. This guide will help you to root almost all variants of your Galaxy Grand Prime. If you’re still wondering about the root access, let’s have a look on brief overview of root access and then proceed towards the method to root your Galaxy Grand Prime.

Rooting your phone gives you complete access over all the data which is apparently locked by the manufacturers. This includes removal of the factory restrictions and making changes to the internal system and the operating system. Gaining the root access gives you the privileges to install various applications to enhance the performance of your device, allows you to remove the built-in applications/programs, helps you to upgrade the battery life of your device & install the apps which require the root access for the proper functionality and modify your device in so many other ways e.g using mods and custom ROMs.

Precautions:

  • Use this guide only for the following variants of the Galaxy Grand Prime:
    • SM -G530F
    • SM-G530H
    • SM-G530Y
    • SM-G530M
    • SM-G530BT
    • SM-G5308W
    • SM-G5309W
  • Use this guide for any other smartphone may result in bricking it, so check your device’s model number before proceeding.
  • Your phone’s battery should be charged at least over 50%. This is recommended to ensure that no power mishap happens during the flashing process.
  • Use original data cable to establish connection between your phone and your PC.
  • Enable USB debugging mode. To do so, go to settings on your phone. In settings > tap build number for 7 times. Now you will have developer mode in settings. Open developer mode and Enable USB debugging mode.
  • Turn off your firewall or Antivirus if you’ve enabled any on your PC.
  • Follow this guide to the point in order to make this process successful.


Disclaimer: The methods involved in flashing custom recoveries, roms and rooting your phone are highly custom and may result in bricking your device, and has nothing to do with Google or the device manufacturer that is SAMSUNG in our case. Also rooting your device will void its warranty and you will be no longer eligible for any kind of free device services by the manufacturers/warranty providers. In case of any mishap we may not be held responsible. Follow these instructions to the letter to avoid any mishap or bricking. Make sure that whatever you do, you are doing it at your risk.

Installations & Downloads:

  • Download and install Samsung USB Drivers on your PC.
  • Download & extract Odin3 on your PC.
  • Download CF Autoroot according to your device:

Extract the downloaded .zip file once only to get the .tar.md5 or .tar file. Do not extract the file twice.

How To Root Galaxy Grand Prime Now

  1. Open Odin3.exe.
  2. Put your Galaxy Grand Prime in download mode. To do so, turn it off and wait for 10 seconds. Turn it on by pressing and
    holding Volume Down + Home Button + Power Key simultaneously, You should see a warning, press Volume Up to continue. In case this method doesn’t work for you, try one from this guide.
  3. Connect your device to your PC.
  4. As soon as Odin detects your phone, the ID:COM box should turn blue.  Make sure that you’ve installed Samsung USB drivers before connecting.
  5. For Odin 3.09 hit the AP tab. Select the CF-Auto-Root.tar.md5, that you downloaded and extracted above.
  6. If you’re using Odin 3.07, you will select “PDA” tab instead of the AP tab, rest of the options remain untouched.
  7. Make sure that the options selected in your Odin are exactly as shown in the pic.Odin 3.09 explained. (2)
  8. Hit start and wait till the rooting process is complete, as soon as your device restarts, remove it from PC.
  9. Find SuperSu in app drawer now.
  10. That’s all with the rooting, let’s verify the root access now.

How To Verify Root Access:

  1. To do so, go to Google Play Store on your Galaxy Grand Prime.
  2. Find “Root Checker” and install it.
  3. Open Root Checker.
  4. Tap “Verify Root”.
  5. It will ask you for SuperSu rights, tap “Grant”.
  6. It should show you Root Access Verified Now!
  7. That’s All!
Screenshot_1
This picture has been used as a reference here only.


If you’re stuck with anything regarding this guide, feel free to utilize the comment box below and reach us. We will get back to you immediately. Thank you all.

Credits: Chainfire XDA

Jailbreak iOS 8.3, iOS 8.2, iOS 8.1.3 with TaiG 2.0 [ Windows – Mac ]

0
Jailbreak iOS 8.3, iOS 8.2, iOS 8.1.3 with TaiG 2.0 [ Windows – Mac ]

Here’s how you can Jailbreak iOS 8.3, iOS 8.2, iOS 8.1.3 with TaiG 2.0, finally wait is over for all those who updated their devices to iOS 8.3. At the moment TaiG 2.0 is only available for Windows users, Mac users have to wait for the treat.

Also See: How To Jailbreak iOS 8.3 On Mac OS X With TaiG [ Tutorial ]

Also See: How To Fix TaiG iOS 8.3 Jailbreak Errors: 1101, 1102, 1103 & More

taig-ios-8.3-jailbreak

The TaiG iOS 8.3 – iOS 8.1.3 jailbreak is compatible with the following devices:

  • iPhone 6, iPhone 6 Plus, iPhone 5s, iPhone 5c, iPhone 5 and iPhone 4s
  • iPad Air 2, iPad mini 3, iPad Air, iPad 4, iPad 3 and iPad 2
  • iPad mini 1 (1st generation iPad mini), iPad mini 2 (Retina iPad mini), iPad mini 3
  • iPod touch 5th generation

Important points:

  • The jailbreak is an untethered jailbreak.
  • Backup your device before proceeding.
  • This tool can jailbreak iOS 8.3, iOS 8.2 and iOS 8.1.3.

Update: Download TaiG 2.1.3 Jailbreak tool ; fixes UI cache, getting stuck at 20%

Update 1x: Easily Fix App Icons Disappearing Bug After iOS 8.3 Jailbreak

Update 2x: Download TaiG 2.1.2 For iOS 8.3 Jailbreak, Support For Cydia Substrate

How To Jailbreak iOS 8.3, iOS 8.2, iOS 8.1.3 with TaiG 2.0:

Jailbreak iOS 8.3 Using TaiG

Step 1: Download the latest version of TaiG jailbreak from here.

Step 2: Backup your device using iTunes.

Step 3: Connect your device with Pc using USB cable.

Step 4: Now Temporarily Disable Passcode and Find my iPhone.

Step 5: Launch TaiG 2.0 as administrator from your desktop.

Step 6: TaiG will auto detect your device, it will take few minutes. Once you confirmed that its showing the correct firmware deselect 3K Assistant 2.3.0 (TaiG’s App Store), just below Cydia 1.1.16.

Step 7: Now click on the Green button to start the process. Wait for few minutes.

Step 8: Once Jailbreak process is completed your device will reboot automatically.

All Done !!

Empires and Allies for PC Download – Windows 8,8.1,7/Mac

0
Empires and Allies for PC Download – Windows 8,8.1,7/Mac

Here’s how you can download and install Empires and Allies for PC and play it on Windows 7,8,8.1/Mac. Racing Rivals is the latest sensation from the creator’s of Looney Tunes Dash and FarmVille 2 Country Escape. Today i will tell you how you can play and install Empires and Allies for PC Windows and Mac. Officially Empires and Allies for PC is not available, but we can still install Android Apps for PC using third party emulators. Before going any further let me give you an overview on the features of Empires and Allies for PC.

Empires and Allies for PC.

Empires and Allies Features:

– DESIGN YOUR PERFECT ARMY from the arsenals of today’s militaries with battle-hardened tanks, drones, helicopters, and more.
– DEPLOY MODERN WEAPONS including tactical nukes, hellfire missiles, and orbital strikes.
– DYNAMIC BATTLEFIELDS deliver increasingly difficult scenarios that emulate the unpredictability of warfare.
– JOIN ALLIANCES to fortify defenses and reinforce attacking units
– SAVE THE WORLD from the GRA, an evil terrorist organization, and defend your territories from other players

How To Install Empires and Allies For PC or MAC Using Blackstacks

Method 1:

  1. Install Bluestacks on your PC or MAC.
  2. Download Empires and Allies Apk on your PC.
  3. Make sure that you have installed Bluestacks. Double click the downloaded Empires and Allies Apk to install it.
  4. The APK will be installed through Bluestacks, once the notification pop ups determining the installation completion, open Bluestacks.
  5. Now click on My Apps and then click on Empires and Allies.
  6. The application will open up. Now follow on-screen instructions to Play Empires and Allies.

Method 2:

  1. Install Bluestacks on your PC or MAC.
  2. Open Bluestacks and setup your Google Play Store account.
  3. Now open Google Play Store and search for “Empires and Allies“.
  4. Once found, install Empires and Allies.
  5. Now click on My Apps and then click on Empires and Allies.
  6. The game will open up. Now follow on-screen instructions to Play Empires and Allies.

How To Install Empires and Allies For PC or MAC Using Andy OS

  1. Download and install Andy OS on your Windows PC or MAC.
  2. Once downloaded, open Andy OS.
  3. Setup Google Play Account on it.
  4. Now open Apps > Google Play Store and search for “Empires and Allies“.
  5. Install Empires and Allies and wait for it to finish installation.
  6. Once done, open “Uncategorized” portion in Andy and click on Empires and Allies to play it.
  7. That’s all.

Arrow for PC Download – Windows 8,8.1,7,Xp/Mac

0
Arrow for PC Download – Windows 8,8.1,7,Xp/Mac

Here’s how you can download and install Arrow for PC and play it on Windows 7,8,8.1/Mac. Arrow is the latest sensation from the creator’s of Stick Hero and ZigZag. Today i will tell you how you can play and install Arrow for PC Windows and Mac. Officially Arrow for PC is not available, but we can still install Android Apps for PC using third party emulators. Before going any further let me give you an overview on the features of Arrow for PC.

Arrow for PC

Arrow Game Play:

Move through the maze without hitting the walls. Collect points to grow your tail. Smash gems to unlock cool new arrow heads and backgrounds!

How To Install Arrow For PC or MAC Using Blackstacks

Method 1:

  1. Install Bluestacks on your PC or MAC.
  2. Download Arrow Apk on your PC.
  3. Make sure that you have installed Bluestacks. Double click the downloaded Arrow Apk to install it.
  4. The APK will be installed through Bluestacks, once the notification pop ups determining the installation completion, open Bluestacks.
  5. Now click on My Apps and then click on Arrow.
  6. The application will open up. Now follow on-screen instructions to Arrow.

Method 2:

  1. Install Bluestacks on your PC or MAC.
  2. Open Bluestacks and setup your Google Play Store account.
  3. Now open Google Play Store and search for “Arrow“.
  4. Once found, install Arrow.
  5. Now click on My Apps and then click on Arrow.
  6. The game will open up. Now follow on-screen instructions to Play Arrow.

How To Install Arrow For PC or MAC Using Andy OS

  1. Download and install Andy OS on your Windows PC or MAC.
  2. Once downloaded, open Andy OS.
  3. Setup Google Play Account on it.
  4. Now open Apps > Google Play Store and search for “Arrow“.
  5. Install Arrow and wait for it to finish installation.
  6. Once done, open “Uncategorized” portion in Andy and click on Arrow to play it.
  7. That’s all.

How To Add iOS 9 Low Power Mode On iOS 8 [ Jailbreak ]

0
How To Add iOS 9 Low Power Mode On iOS 8 [ Jailbreak ]

iOS 9 will come with many useful feature but the one i think is more important then other is Low Power Mode, although its pretty late to introduce but still its worthy to have. Today i’ll guide you how to install iOS 9 Low Power Mode On iOS 8, this feature make battery last longer then usual by disabling thing like email fetching, background app refreshing and more.

ios 9 low power mode on ios 8

Also See: List of iOS 8.3 Compatible Jailbreak Tweaks On Cydia

How To Add iOS 9 Low Power Mode On iOS 8:

Before going any further you need to Jailbreak your device in order to install iOS 9 low power mode on iOS 8. If you haven’t Jailbroken your device then you can Jailbreak your iPhone, iPad and iPod Touch using TaiG.

Step #1: Open Cydia on your iPhone.

Step #2: Tap on Sources.

Step #3: Now wait for page to reload, once done tap on edit.

Step #4: Tap on Add.

Step #5: Now add http://elijahandandrew.com/repo/, tap on add source.

 11651076_10207052957345690_1352443245_n 11650840_10207052957425692_1639530973_n

Step #6: Wait for installation process to complete.

Once the tweak is installed go to your iPhone Settings-> General -> Usage -> Battery Usage. Tap on Power Saving mode to turn it on. If you face any kind of issue regarding this guide please do tell me in comments. Also Please share it with your friends.

Download TaiG 2.1.3 Jailbreak tool ; fixes UI cache, getting stuck at 20%

0
Download TaiG 2.1.3 Jailbreak tool ; fixes UI cache, getting stuck at 20%

Just yesterday TaiG released v2.1.2 version of their Jailbreak tool with support of Cydia Substrate and today we got another update from team TaiG v2.1.3 with update of fixes UI cache, getting stuck at 20% and more. At the moment getting stuck at 20% is not fixed yet because we have seen people still reporting it. You can download the TaiG 2.1.3 Jailbreak tool from the following links.

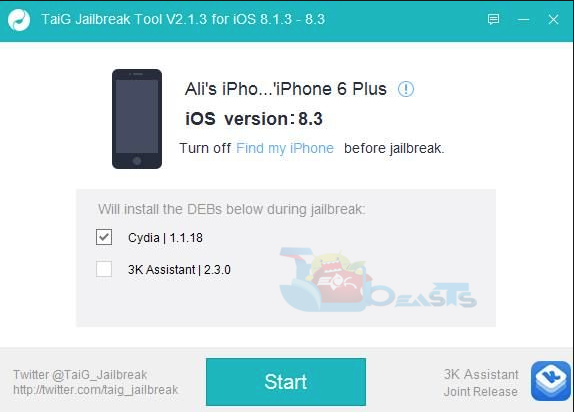
download taig 2.1.3

TaiG 2.1.3 change log:

Fix the issue of getting stuck at 20% while jailbreaking.

Update the latest Cydia 1.1.18 and UIKitTools 1.1.1.0; fix the issue of icon missing after jailbreak.

Fix long startup time of iPhone 4s after jailbreak.

Fix the issue that TaiG Jailbreak Tool doesn’t work on the virtual machine.

Update:

TaiG team has released an update for TaiG 8.1.3-8.x Untether package on Cydia. Please add TaiG’s repo “apt.taig.com” to Cydia to get the update.

TaiG 2.1.3