Samsung Galaxy Note 9 has started making its way to the users now. The Galaxy Note 9 has already been rooted, it has got a TWRP recovery and a custom ROM as well. This is the time when the users will start experimenting on their Galaxy Note9 which they should be doing for obvious reasons. The Galaxy Note 9 is packed with the most powerful hardware available to date. To expose the real potential of the powerful hardware of the Galaxy Note 9, the users will try everything they can. In the meanwhile, they will soft-brick their phone many times. This is when they will need a method to install Galaxy Note 9 stock ROM.
Contents
Galaxy Note 9 Stock ROM
Installing the stock ROM on a Galaxy Note 9 wipes off everything that was previously running on the phone. So for example, if your phone was rooted previously, the stock firmware installation will unroot the phone. If your phone was lagging or giving a poor battery life, a new firmware can also help you with that. Stock firmware installation also comes in handy when your phone gets caught up in a bootloop. To cut it short, there are going to be many situations when the only solution to recover your phone will be the installation of a clean stock ROM or stock firmware.
The stock ROM installation method we are going to tell you about is the manual method. The reason to opt for a manual method is that when the phone is not in a properly working state, it fails to work with the tools like Smart Switch. The only method accessible in such cases is the use of Odin. That is because Odin works with the phone when it boots up in the Download Mode. The Download Mode does not work with software like Samsung Kies or Smart Switch. Now there is another great advantage of installing the firmware manually, you can update your phone.
For example, there is a new firmware available for the Note 9. The firmware rollout is happening region-wise. Your region hasn’t received the update yet. You want to update your phone manually to get the update before it officially makes its way to your region via OTA. The best option you have is to download the firmware files and flash them manually. That is exactly what you can do by following this method. So by using a simple method, here is what you will be able to do.
Advantages of flashing stock ROM on Galaxy Note 9
- Update Galaxy Note 9 to new firmware manually.
- No need to wait for the region-wise OTA to reach your region – cut the wait.
- Install Stock ROM to recovery a soft-bricked Galaxy Note 9.
- Stock firmware installation on Note 9 will unroot the phone.
- Flash stock software to get your Note 9 out of the Bootloop.
- Refresh the performance and battery life of your Note 9 via stock ROM.
- Restore your Galaxy Note 9 to factory settings.
How To Install Galaxy Note 9 Stock ROM
Now follow the steps given here carefully to install a brand new factory firmware on your Galaxy Note 9.
Preparations needed to Download Stock ROM on Galaxy Note 9
- This guide is valid for all Galaxy Note 9 variants. You just need to have the right firmware file.
- Charge your phone’s battery up to 50% to avoid power loss.
- Backup each and everything from your Galaxy Note 9 via Smart Switch.
- Enable OEM Unlocking on your Galaxy Note 9.
- Enable USB Debugging mode on the phone as well.
- Use OEM Data Cable to connect the phone to the computer.
- Close Smart Switch and Samsung Kies while using Odin.
- Follow rest of the instructions with full attention.
Note: This is a stock firmware which means it will not harm your device. Installing this firmware will not void the warranty of your phone. The firmware can wipe your phone or keep the data from wiping depending upon your choice.
Require downloads
- Samsung USB Drivers
- Odin 3.13.1 – Extract to get the Odin.exe file.
- Samsung firmware – Download Firmware carefully by entering the model number of your phone.
- Extract the downloaded firmware file to get the AP, BL, CP, CSC and HOME_CSC files.
Installing Stock ROM on Galaxy Note 9
- Turn off your Galaxy Note 9.
- Now connect the USB Type-C cable to the computer.
- On your Galaxy Note 9, press and hold Volume Down + Bixby button. While keeping the buttons pressed, plug the other end of the USB Type-C cable to your phone.
- Keep the buttons pressed until the phone takes you into the download mode.
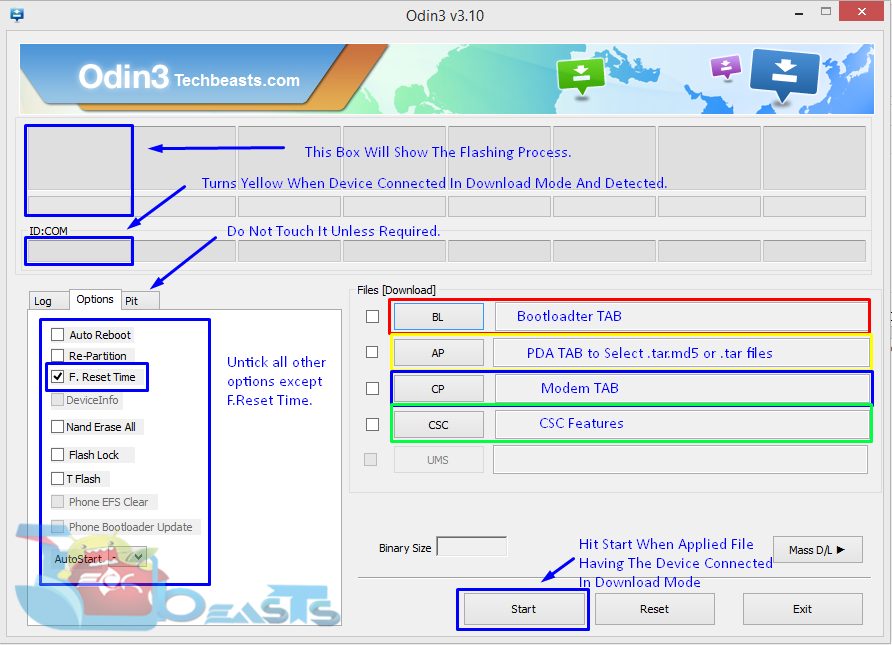
- Go to the “Options” tab in Odin and make sure only options checked are F.Reset.Time and Auto Reboot.
- Now press Volume Up to continue in download mode. Your Note 9 is ready for firmware installation.
- In Odin, click on the AP tab and select the AP file.
- Similarly, select the BL file in the BL tab.
- Select the CP file in the CP tab.
- In the CSC tab, select the CSC file if you want to wipe your phone otherwise select the HOME_CSC file.
- After Odin has loaded all the files, click on the “Start” button.
- Odin will now flash the firmware. It will take a few minutes.
- After the Odin shows success, remove your phone and enjoy the stock ROM on it.
Conclusion
That’s all with the stock firmware flashing on the Note 9. This method is quite useful to revert back your Note 9 to the original state from almost any situation. If you have found this guide helpful, don’t forget to drop the feedback. In case you have got any kind of queries, feel free to reach out to me through the comments section below.


