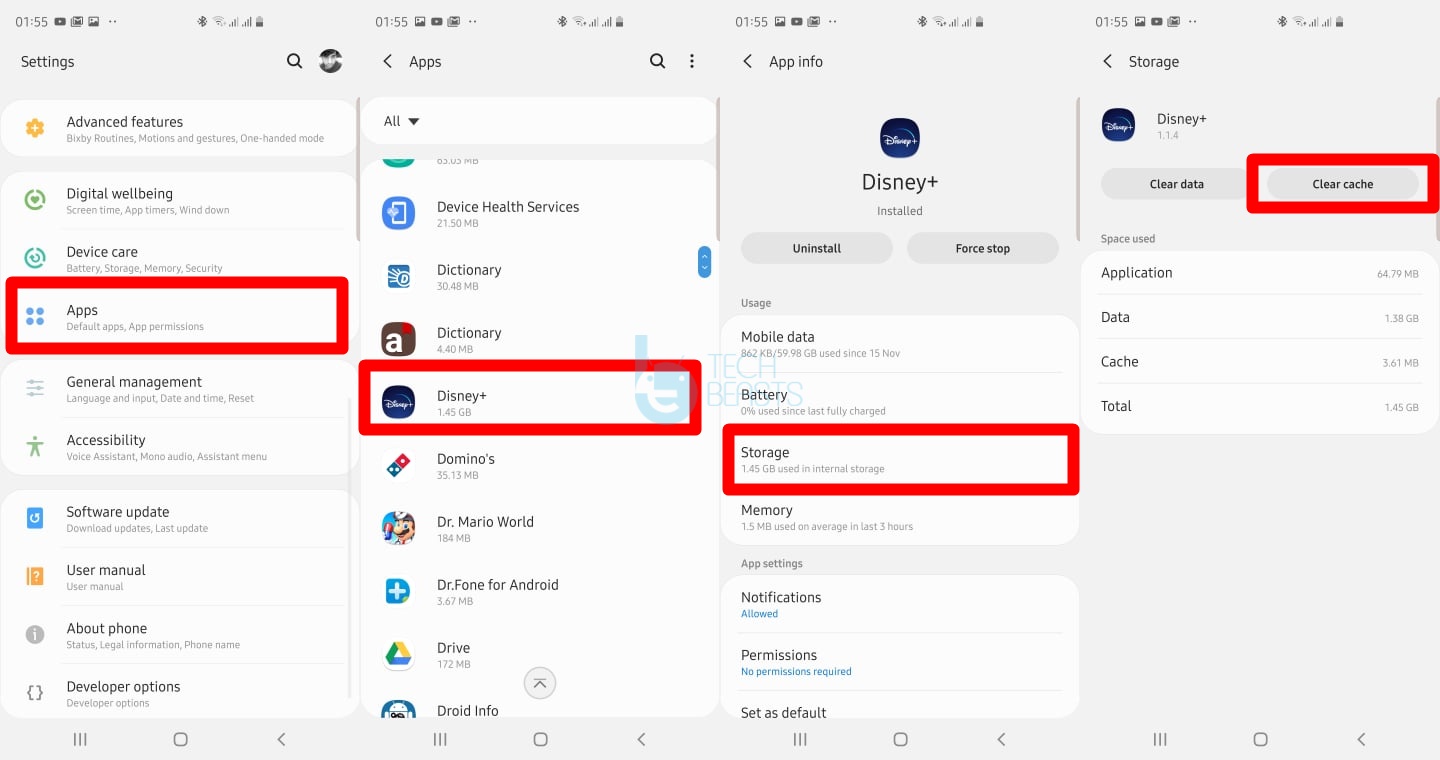
Follow the steps given in this guide to clear Disney+ Cache and Data on Android phones. Clearing the Disney+ cache and data can fix potential problems that you are currently facing on this app.
Clear Disney+ Cache and Data
These are the simple steps to delete Disney+ cache and data.
Total Time: 2 minutes
On the Android phone, open Settings.
First of all, open the Settings application on your Android phone or tablet.
From the Settings, open Apps or App Manager.
Scroll down in the settings and open the Apps or Application Manager inside the settings.
Now open Disney+ settings.
You will now see a list of all the installed apps, scroll down, find, and open Disney+ settings.
Click on Storage in the Disney+ settings.
In the Disney+ settings, you will see the “Storage” option. Click on it to open it.
Clear Disney+ Data and Cache!
You will now see the Clear Data and Clear Cache buttons. Click on the buttons one by one to clear it. That’s all.
Clearing the Disney+ cache and data will not delete the application. If you only clear the cache, it will only refresh the Disney+’s processes. If you clear the Data, it will log you out of the Disney+ app removing all the background processes and refreshing everything linked with the Disney+. After clearing data and cache, you can log back in. The app will work better and will fix problems like Disney+ being stuck on the loading screen.
That’s all. If you have any further questions/queries related to the Disney+ application, feel free to drop it in the comment section below.
Take a look at more Disney+ guides:
- How to cancel Disney+ subscription via Play Store
- How to watch Disney+ on Vizio Smart TV with AirPlay 2
- Disney+ Error Code List & How to fix
- Best Disney+ VPN in 2019
- How to cast Disney+ with Google Chromecast
- Download Disney+ for PC on Windows 10 and mac
- How to fix Disney+ stuck on loading screen – Disney+ won’t load
- Download Disney+ APK – Install on any Android device in any Country