


The HTC U12 Plus smartphone was launched by the Taiwanese giant HTC in June 2018. The device comes with top of the line hardware under the hood and a planned Android 9.0 upgrade is on the table. As of now, there’s no official TWRP recovery for HTC U12 Plus and there are no reports of unofficial ports as well. However, you’ll be relieved to hear that there is a simple method to root HTC U12 Plus without TWRP recovery.
HTC has followed suit with Samsung to break the notch display tradition that has become the centerpiece of 2018 smartphones. But you still have to live without headphone jack as HTC chose to ditch it. The device is powered by Snapdragon 845 SoC paired with 6GB of RAM, 6-inch Quad HD+ (2880×1440) display with 18:9 resolution, a dual camera setup and the other standard features. It comes in two storage options of 64GB and 128GB and has a moderate 3500 mAh battery.
Coming to the root process, the method was found by Freak07 of XDA. This method doesn’t need a custom recovery like TWRP which is the standard process to root any smartphone these days. Instead, the developer achieved the root by patching boot image manually and install Magisk. Follow the below process to easily root HTC U12 Plus smartphone.
Contents
Prerequisites
- Make sure you have an unlocked bootloader on your HTC U12 Plus. If you don’t know how to unlock the bootloader, you can follow our detailed HTC bootloader unlock guide.
- Your device needs to have at least 60% charge to ensure it doesn’t run out of battery during the rooting process.
- Enable USB Debugging on your phone. To do this, go to device Settings » Developer options » toggle the “USB Debugging” switch.
- Install ADB & Fastboot tools on your PC. You can follow our simple guide which lets you install ADB & Fastboot tools in 15 seconds.
Downloads
- Download the latest Magisk Manager APK. The current version is 5.7.0 and you can download it from the official Github source.
- You’ll need to download the boot image compatible with your current firmware version on the device. The XDA developer 5m4r7ph0n36uru has provided the latest boot image files for different firmware. You can download the boot image from below based on your device firmware.
How to Root HTC U12 Plus without TWRP Recovery
- Download and extract the boot image zip from above. You’ll get a .img file from the zip file.
- Copy the .img file to your HTC U12 Plus smartphone.
- Download and install the Magisk Manager APK on your device and open it.
- In the Magisk Manager app, tap on Install button in the main screen.
- You’ll see a popup now, click on Install button followed by Patch Boot Image File option.
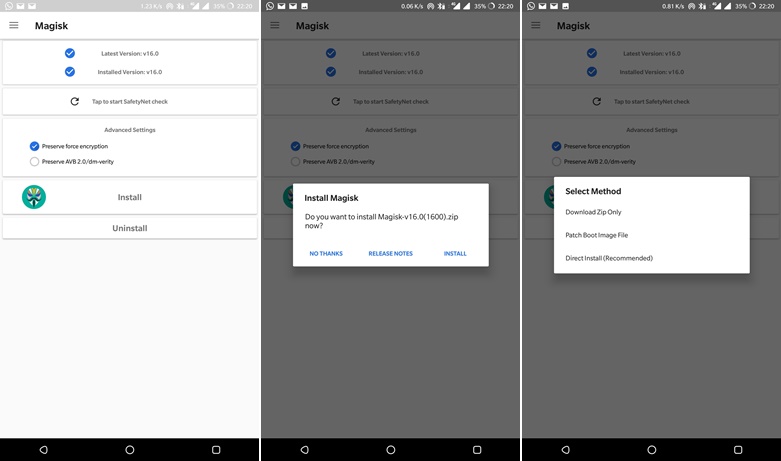
- Navigate your device and select the boot image file, boot_signed.img. The Magisk Manager will take a few seconds to patch the boot image file.
- Connect your device to PC now using a USB cable and open the command prompt on PC.
- Now, use the following ADB command to pull the patched boot image.
adb pull /sdcard/MagiskManager/patched_boot.img
- Now, reboot your phone to bootloader using the below command:
adb reboot bootloader
- On your phone, check the active bootloader slot and use one of the below commands depending on the active slot.
- If slot a is active, then use:
fastboot flash boot_a patched_boot.img
- If slot b is active, then use:
fastboot flash boot_b patched_boot.img
- If slot a is active, then use:
- It will take a couple of seconds for your PC to flash the image file to your device. Use the below command to reboot your device after the flashing part.
fastboot reboot
That’s all. Once the device is rebooted, your device will be rooted and you can check this from Magisk Manager.
Source: XDA


")


