Home Blog Page 510

20 Hidden Features of iOS 7 that you must try.

0
20 Hidden Features of iOS 7 that you must try.

iOS 7 has been built with a lot of features, many of them are not for your everyday use and so-called hidden from your Knowledge. If you own an iOS 7 device and wants to try these features, follow this article till end and if you don’t want to try them, then I suggest leave this article and search of other iOS 7 tutorials. Let’s move ahead and find out which of them you have used and which are not.

1. Use Safari to See Tweets with Links or URLs.

You can now quickly see the updated tweets while browsing through, just click on the bookmark icon in Safari and Tap ‘@’ to see all the tweets.

IMG_0261


2. Turn Parallax On/Off.

To increase the speed of your iOS 7, I suggest that you should turn off your Motion Effects in other words, Turn off the parallax Effect. But if you want to see some real life scenario effects in your iPhone, then let parallax Effect On. Go to Settings > Accessibility > Reduce Motion.

IMG_0262


3. Enable/Disable Bold Text.

If you don’t like the iOS 7 thin Text, then try switching it to Bold Text. Go to Settings > General > Accessibility and Turn Bold Text On.

IMG_0263

4. Change the Size of Text.

On the other hand if you have any sort of problem seeing the text size of iOS, just Change it. How? Go to Settings > General > Text Size and drag the slider to right to increase the text size.

IMG_0264


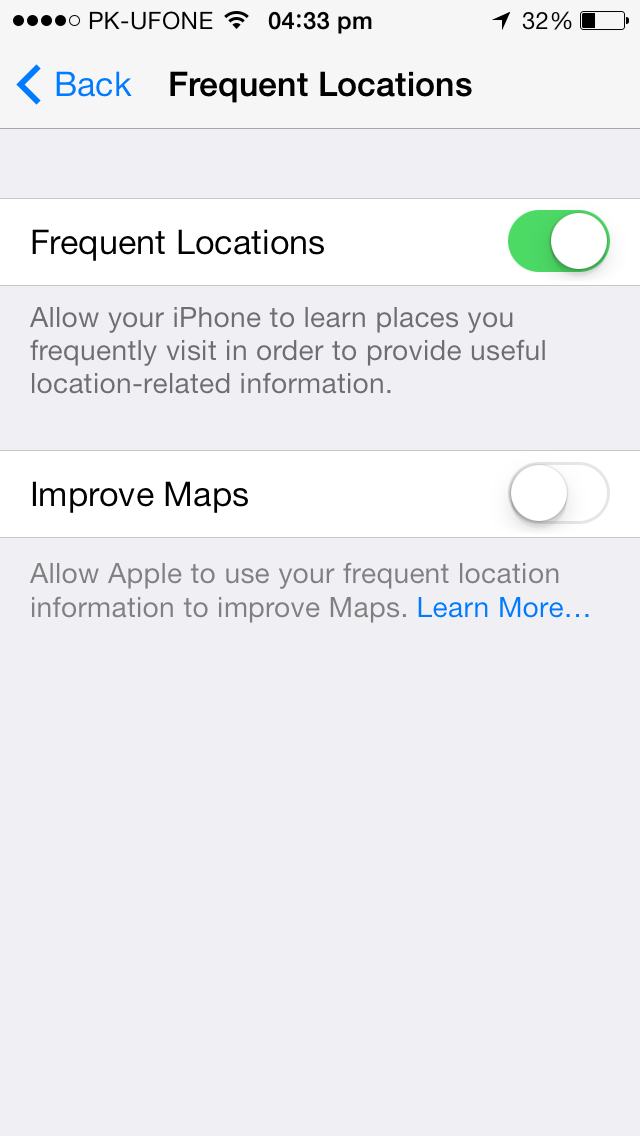
5. See the Frequently Visited Places on the Map.

Now you can see what place you most frequent visit in your free time, or what you have been visiting in past couple of days. Just Go to Settings > Privacy > Location Services > System Services > Frequent Locations, but i suggest to turn if Off, otherwise it will keep draining your battery.
IMG_0265


6. Block Callers and Un-Wanted Messages.

The best option that i have loved in iOS 7, is the option of blocking the unwanted calls and messages. To activate it, go to Settings > Messages > Blocked. For calls, just open the contact and then scroll down to the bottom to contact details and press Block this Caller.

IMG_0266


7. Show TimeStamps in Message App.

Knowing time of the message sent or received is not a big demand, but in rare occasions it can save your life. Now in iOS 7 if you haven’t been able to find anyway to activate the timestamp in messages, we will show you how it is done. Open Messages and Swipe from Right to Left and you will see the sent and received time along with the day, if the messages are more than one day older.

IMG_0267


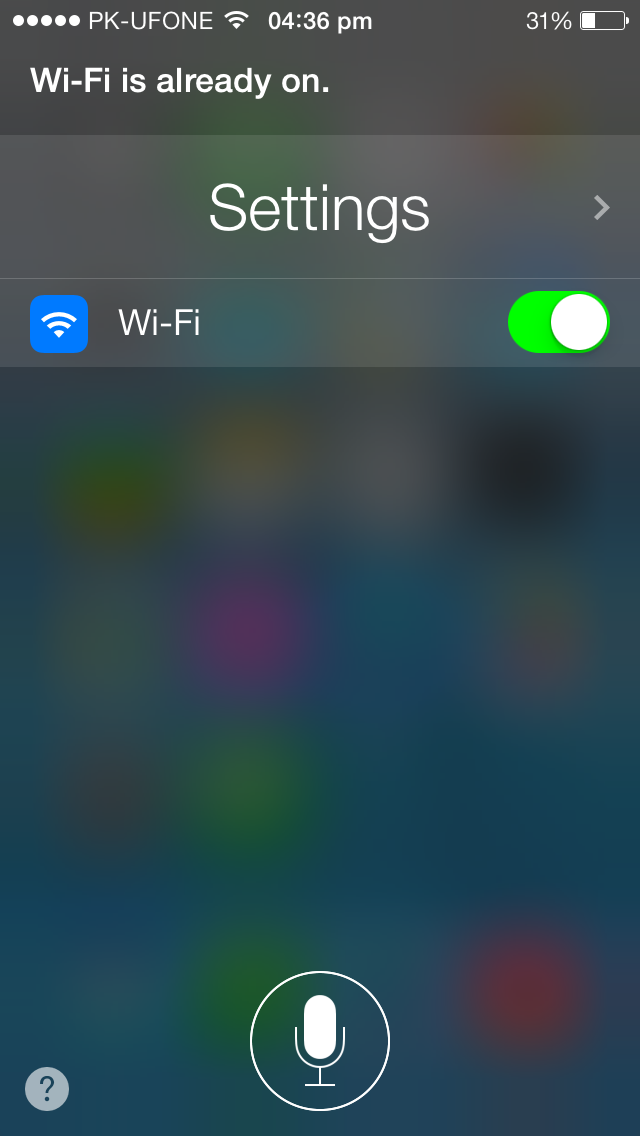
8. Use Siri to Enable/Disable System Toggles.

Well Notification tray has given a lot of convenient in case of System Toggles, but Siri can be even more faster in case of such things. All you need to do is to Activate Siri and tell it what you want like “Turn On WI-Fi” and Siri will do it, if your Wi-fi or Bluetooth is already active you will be notified by Siri.
IMG_0269


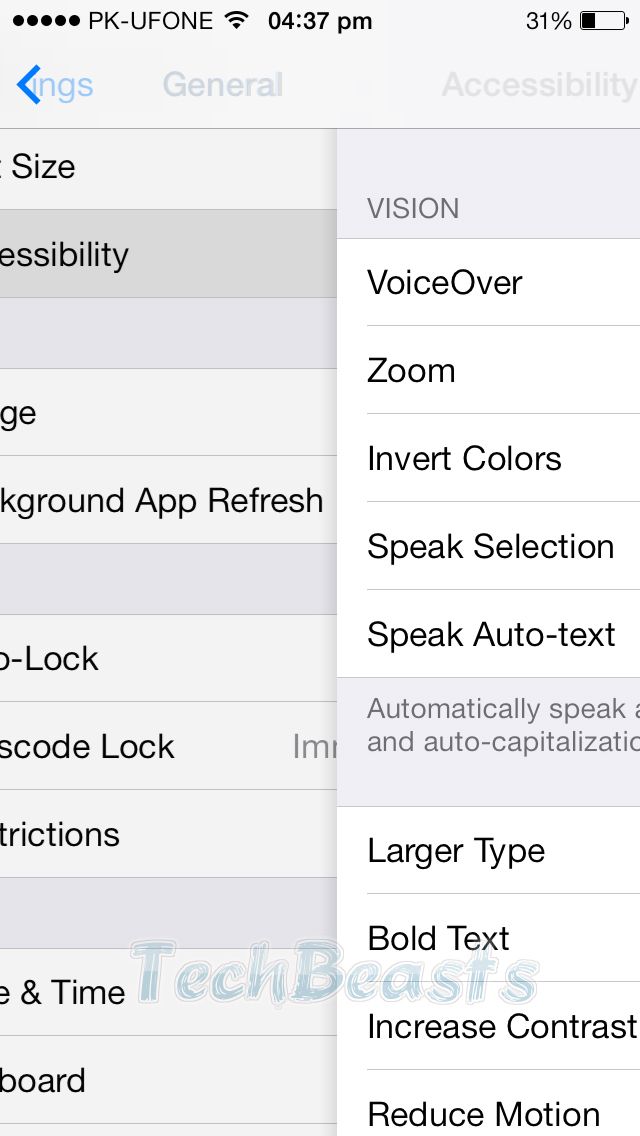
9. Use Swipe Gesture to Go back to Previous Screen.

Now you can swipe from Left to Right to go back to the previous screen, there is no need to press the Home button and again open the same app, to visit the just the previous screen.
IMG_0271


1o. Take Square Photos Using Camera App.

If Regular Photos are good enough for you, iOS 7 camera app can now take Square Photos. Just Open the Camera app and Swipe from Right to Left to open Square Photo, using the same sequence you can open Vidoe and Panorama.

IMG_0274


11. Update Apps in Background.

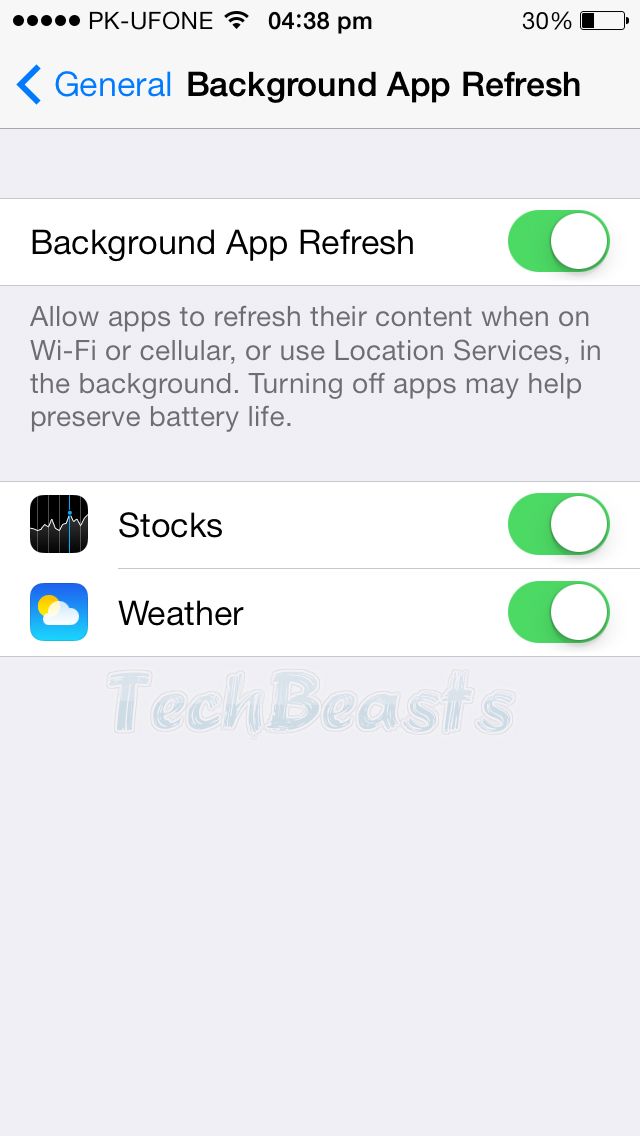
Now in iOS 7 you don’t need to worry about the App Background refresh, is will be done for you without causing any sort of trouble. Just go to Settings > General > Background App Refresh and activate it, but if you want your iPhone to work fast and preserve the battery life, don’t turn it On.
IMG_0275


12. Use Panorama Photos to Illuminate the Home and Lock Screen.

Now you can put the panorama Photos in your Library as your Home and Lock Screen Wallpaper. It will be the full panorama instead of just one thumbnail or page. On Lock screen, since you can’t have more than one window, you can try it fully on Home Screen. Go to Settings > Wallpaper and Lock Screen and Choose the wallpaper for both Lock and Home Screen, enable parallax Effect if you want it more dynamic.

IMG_0277


13. Bubble Level In Compass App.

Now this might get a bit difficult for you to understand, but if you want to show off in front of your friends, turn your simple compass to Bubble Level Compass, Open Compass app, after the calibration, Swipe from Right to Left and you will see the Bubble Level in Compass.

IMG_0278


14. Use Siri For Updates from your Favourite Site.

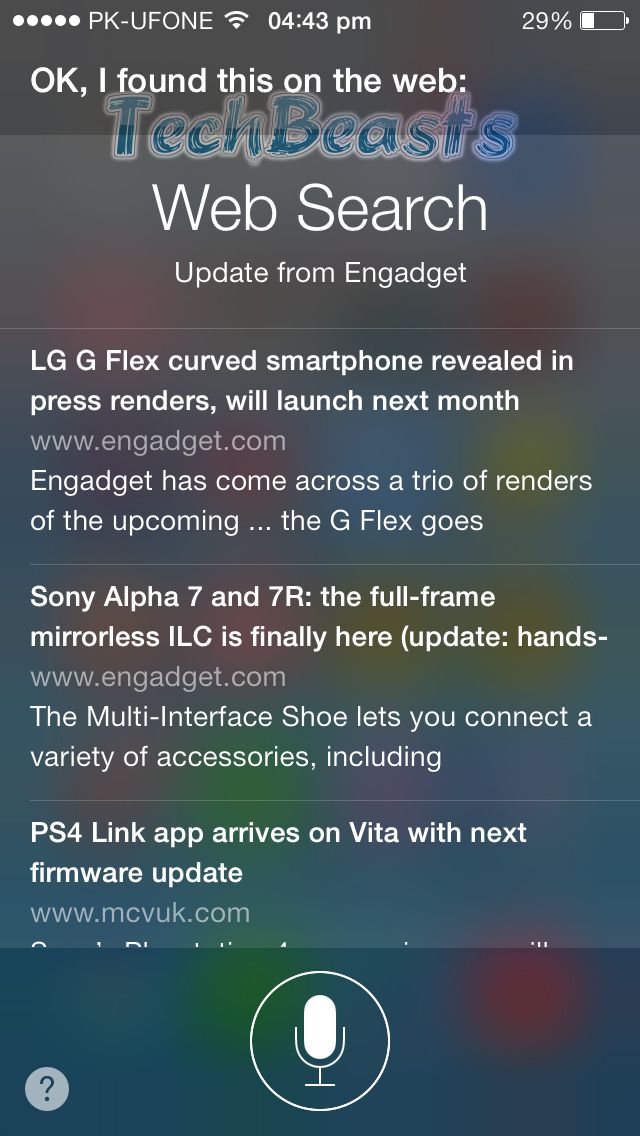
Yes! Now you can ask Siri about what “this” site has to offer, for example, I follows Engadget more than any other site. So, just ask Siri About Engadget and it will open all the updates from Engadget in front of you.
IMG_0279

15. Turn Automatic Updates On/Off.

If you are getting tired from the excess drainage of battery because of Automatic Updates, just turn it Off, Go to Settings > iTunes and App Store and Tap the Automatic downloads to turn it On/Off.

IMG_0280

16. Disable/Enable Control Center in Lock Screen and Apps.

If you don’t want anyone else or yourself to keep accidentally lauch Control Center in Lock Screen and Apps, Turn if off, Go to Settings > Control Center and Tap the both Access Within apps and LockScreen to either Turn in On or Off.

IMG_0286


17. Create Folder for Ease.

Now you can put unlimited apps in folders and the best part you home screen will look like a piece of Beauty, because of less Junk on it. To create a folder Merge Two Apps, folders can give space to unlimited apps.

IMG_0281


18. Disable or Enable Advertise Tracking.

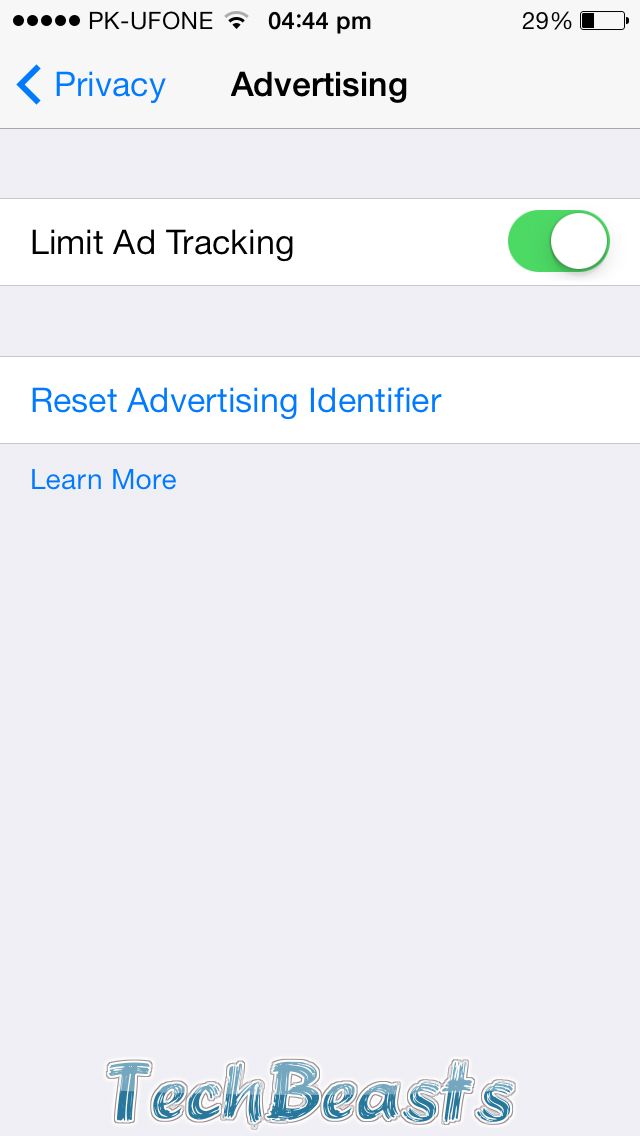
Don’t want your iOS device to be tracked for some specific ads. Go to settings > Privacy > Advertising and disable the Limit Ad Tracking. Disabling this feature will also save your battery life.
IMG_0282


19. Dynamic Wallpapers.

Just like Live Wallpapers in Android, Apple has given Dynamic Wallpapers in iOS 7, we suggest to activate parallax Effect if you want to use Dynamic Wallpapers to make it more stylish.

IMG_0283


21. Edit Queries in Siri.

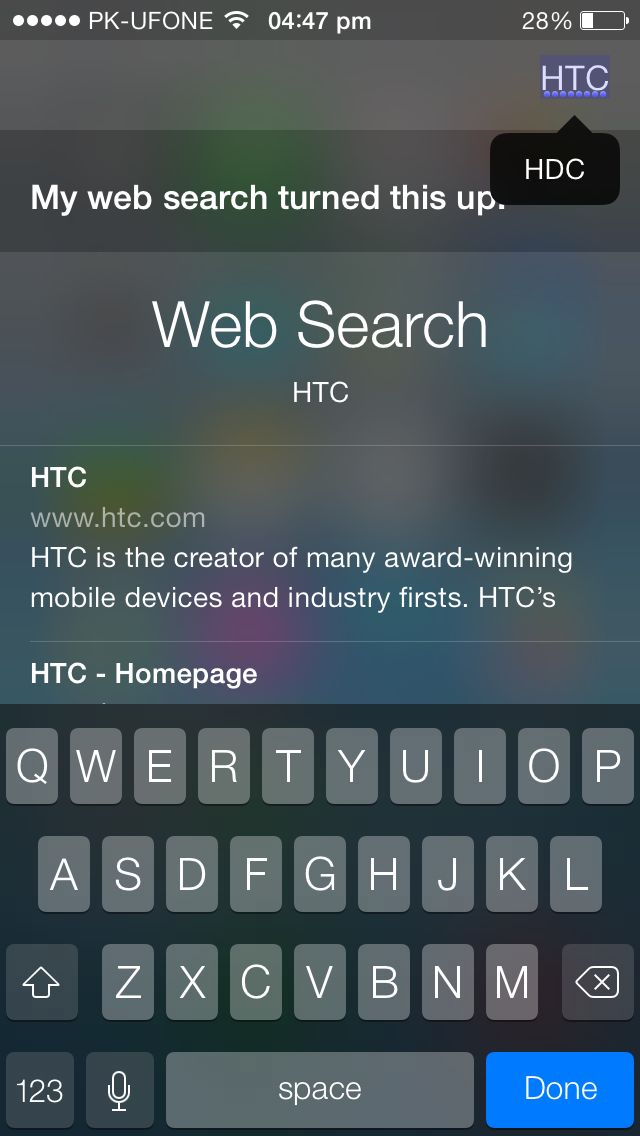
Most of the time Siri can’t able to judge the right word and instead it will launch something else, don’t fight with it if happened, instead Tap on Edit, just below the word and change the word according to your desire and then search it. Doing this won’t only save your time but effort too.
IMG_0284


22. Zoom into Album Art in iOS 7 Music App.

Now the iOS 7 Music app, when turned to landscape mode, instead of showing tiles, Music App will show you Album Art. looks cool, but the real thing is that you can zoom in or out while in your Album Art.’

IMG_0285

How To Set-up Touch ID On iPhone 5S.

0
How To Set-up Touch ID On iPhone 5S.

It seems like that many people are having some sort of trouble with setting up the touch ID in iPhone 5S.  Even though they set it up and received the success message, when they tried to unlock their phone using their finger, then can’ get pass the lock screen. I have seen many requests at Apple forum and thought to search for ir and finally found it on Theunlockr.com. Following is the accurate way to set-up your finger print for the Unlock screen.

iPhone-5S-Has-Fingerprint-Scanner-Repositioned-Buttons-Analyst-Says

But before we begin make sue to remember:

  • Your finger Tip is clean and there is not much dirt on it.
  • There shouldn’t be nay mark of Scar on your finger tip, which you will be using to set-up your ID.
  • If you have done it before, you will need to remove those Prints to set-up the new ones.

How To Remove Your Old Finger Prints:

  • Tap on Settings.
  • Open General.
  • Tap Passcode and FingerPrint.
  • Enter your Pincode/Password if asked.
  • Tap FingerPrints.
  • Tap Edit at Top Right.
  • Tap the red minus next to one of your current fingers below, then tap Delete.
  • Repeat the Above step to remove all fo your finger prints.

How To Add the New FingerPrints.

  • Tap Add a FingerPrint.
  • Put the majority of your Hand thumb on the Home Button of iPhone 5S and make sure that it covers the entire Home Button, hold it there until phone scans it.
  • Now for the Next scans, imagine your thumb in four different quadrants. ( top left, top right, bottom left, bottom right).
  • Now cover the entire home button with your Top Left side of your Thumb and press down. Wait till it got scanned.
  • Now do the same with other 3 quadrants and make sure to cover the entire button and press down a bit hard.
  • Finally put the centre part of your thumb on the home button and wait for the scan, now that you whole thumb has been scanned, now no matter which part will be scanned by the phone, you phone will unlock and there won’t be any error.

How To Adjust Your Grip.

Now this part is a tricky one, but if you get a hold of it, the above tutorial will get even easier, and you won’t be having any trouble while scanning for unlocking your iPhone.

  1. Rotate your Thumb to 45-degree angle onto its right side and scan it.
  2. Now rotate your Thumb to the left side in the same manner and scan it too.
  3. Now make sure that your fingers Top is on the scanner and scan it.
  4. Now scan the lower side of your finger.
  5. Repeat all the Four steps and make sure to scan until it is done scanning.
  6. If you won’t succeed after all the scans, just do the random position scanning until it is finished.
  7. Once Done, you have a finger scanned.

Make sure to scan all the fingers you want to use in near future.


Source: TheUnlockr

How To Use AirDrop On iOS Devices.

0
How To Use AirDrop On iOS Devices.

AirDrop is another amazing feature of iOS 7, that allows you to send and receive things to other devices using AirDrop. It’s simply looks like that Apple wants to compete with Android, because if you look at the functioning of AirDrop, it’s the same as Android Beam. Well, let’s forget about it and get straight to the point. In this article, we will tell you how to Enable and Use AirDrop to transfer media among iPhones using AirDrop.

13.09.18-AirDrop-1

 But Before we begin, remember:

  • This tutorial is only for iOS, because iOS 7 is currently featured with AirDrop.

How To  Enable AirPlay in iOS 7 Devices.

In order for others to see your device to send data via AirDrop, you must first Enable the option of AirPlay in your device. How? Follow the guide.

  • Open AirDrop How? Pull up the command centre from bottom of screen and Tap AirDrop.
  • Select Everyone or Contacts only, One will allow everyone around you to send you things, while other will only allows those who are in your contact list to send you things around. Don’t worry, you need to accept everything before it gets saved in your device, so even selecting everyone won’t be a problem.
  • Make sure that the person tho whom you are sending things has enable it as well.

How To Send Something VIA AirDrop.

  • Open any sort of media like, Photo, video or Music or anything that has a share button,  in your iPhone.
  • Once you are viewing the thing, tap on Share icon.
  • Tap AirDrop.
  • People around you with enabled AirDrop will be shown as a Circular icon.
  • Tap on anyone you want to share, the other person must click accept.
  • The item will be transferred and automatically opened in others iPhone.

Update Samsung Galaxy S4 GT I9500 to Android 4.3 I9500XXUEMJ5 Official Firmware

Update Samsung Galaxy S4 GT I9500 to Android 4.3 I9500XXUEMJ5 Official Firmware

Yesterday, we reported that Samsung overcame its promise of rolling out the Android 4.3 update for its flagship device, the Galaxy S4 in the month of October. The update rolled out for Galaxy S4 GT – I9505 yesterday and Its just about time, and the update has started rolling out today  for GT –  I9500 as well, starting from Russia. The initial firmware is I9500XXUEMJ5 and the region code is SER.

There are no changes made to the UI apparently, but there is a number of improvements in the area of performance and a lot of bugs have been fixed as well, that might be the reason for Samsung to roll out this update too late. Anyways, a lot of you might be eager to get your hands on the new Android 4.3 Jelly Bean firmware, but it takes quite long for the updates to reach different regions through OTA or through Samsung Kies.

If you are one of those, then here is our guide for you on how you can update your Galaxy S4 GT – I9500 to official Jelly Bean 4.3 firmware.

Things you need to download:

Things you need to download:

      1. Download Odin – Get it HERE.
      2. Download and Install Samsung USB drivers – Get HERE.
      3. Download and extract the Android 4.3 Jelly Bean XXUEMJ5 Official Firmware for Galaxy S4 I9500- Get it HERE.

How to Update:

      1. Open Odin.
      2. Put your phone in download mode. To do so, turn it off and wait for 10 seconds. Turn it on by pressing and holding Volume Down + Home Button + Power Key simultaneously, You should see a warning, press Volume Up to continue.
      3. Connect your phone to your PC.
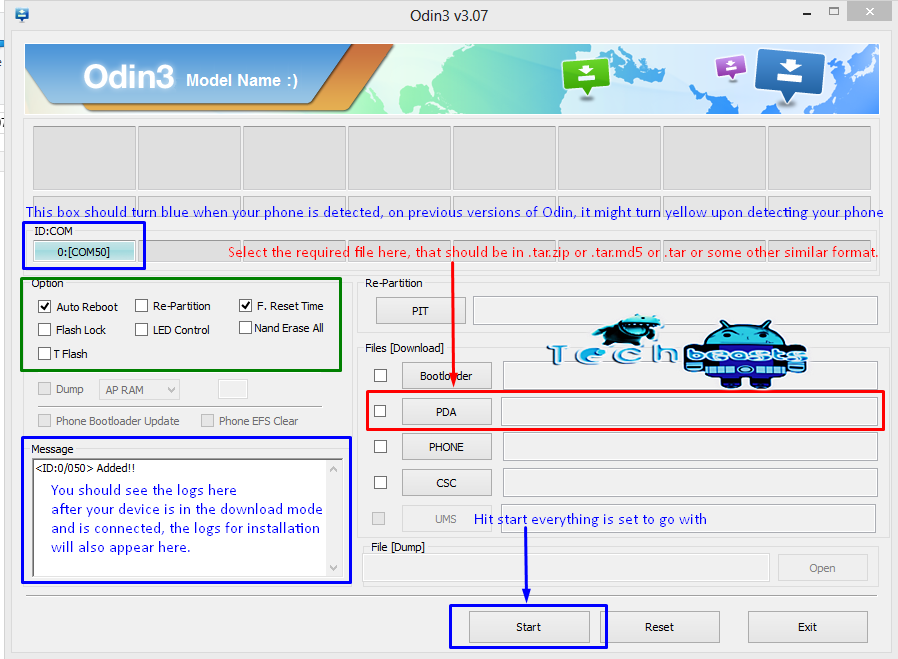
      4. As soon as Odin detects your phone, the ID:COM box should turn blue.  Make sure that you’ve installed Samsung USB drivers before connecting.
      5. Hit the PDA tab, for Odin 3.09 hit the AP tab. Select the extracted firmware file, that should be in .tar.md5 format.
      6. Make sure that the options selected in your Odin are exactly as shown in the pic.
      7. odin_explained
      8. Hit start and wait till the firmware flashing is complete, as soon as your device restarts, remove it from PC.
      9. Congrats! You’ve installed the latest Android 4.3 Jelly Bean on your Galaxy S4 I9500 now.

It is not necessary to wipe your phone completely after flashing the latest firmware, but it is highly recommended if you do so. Removing factory data ensures that all the junk has been removed and your device gives you the best performance on the latest firmware. Backup all the contacts, call logs, messages and important data on your device’s internal SD  before you wipe it completely through recovery.

Got any problems? Feel free to leave us a comment, we will try our best to help you out. Thank you.

How to take screenshots on Samsung Galaxy Note 3

0
How to take screenshots on Samsung Galaxy Note 3

Samsung recently pulled the curtains off from its next gen Note device. The Galaxy Note 3 came packed up with Samsung’s very own Exynos 5 Octa Chipset, and Snapdragon 800 chipset as well. The RAM is ranged at 3GB while the device has an impressive 5 inch Full HD display with 386 ppi. Under the hood, it has got a massive 3200 mAh battery, while Samsung Galaxy Note 3 is the world’s first mobile device to have USB 3.0 in it. The device left the factory doors having Android 4.3 installed in it.

As Galaxy Note 3 is a new device, and some of you might have got your hands on the device and wondering how you can capture the screen your Galaxy Note 3. Well, this is pretty simple, and those methods used on the previous Galaxy devices to take the screenshots can be used for Galaxy Note 3 as well, while the S Pen may be used for the purpose too.

Let’s start by Method 1 – the most easiest and universal method for Samsung Galaxy Devices:

    • Press and hold the Home Button + Power Key simultaneously for 1 – 2 seconds and it takes the screenshot.
    • Swipe your hand’s palm on the screen and it takes the screenshot.
      • Screenshot_2013-10-18-00-47-56[1]
    • Press and hold your S-Pen’s button and touch it on the screen, it will capture the screen as well.
    • Press and hold your S-Pen’s button and select a specific area on your screen to take screenshots of only your desired area.

That’s all. We hope that it helped you.

Update Samsung Galaxy S4 GT-I9505 to Android 4.3 (XXUEMJ5) Official Firmware

2
Update Samsung Galaxy S4 GT-I9505 to Android 4.3 (XXUEMJ5) Official Firmware

Samsung has just overcome its promise of rolling out the Android 4.3 update for its latest flagship Samsung Galaxy S4. The Android 4.3 Jelly Bean update for Samsung Galaxy S4 LTE GT-I9505 has started rolling out. The update has been rolled out for Germany(DBT) first of all and might take a bit long to reach your region. You may update your device via OTA update or using Samsung Kies but only when the update hits your region.

If you are one of those, who can’t wait to receive the official update roll outs, and eager to get their hands on the official firmware as soon as possible, then you may follow this guide as we will tell you how you can update your device to Android 4.3 Jelly Bean right at the moment.

Things you need to download:

      1. Download Odin – Get it HERE.
      2. Download and Install Samsung USB drivers – Get HERE.
      3. Download and extract the Android 4.3 Jelly Bean XXUEMJ5 Official Firmware for Galaxy S4 LTE – Get it HERE.

How to Update:

      1. Open Odin.
      2. Put your phone in download mode. To do so, turn it off and wait for 10 seconds. Turn it on by pressing and holding Volume Down + Home Button + Power Key simultaneously, You should see a warning, press Volume Up to continue.
      3. Connect your phone to your PC.
      4. As soon as Odin detects your phone, the ID:COM box should turn blue.  Make sure that you’ve installed Samsung USB drivers before connecting.
      5. Hit the PDA tab, for Odin 3.09 hit the AP tab. Select the extracted firmware file, that should be in .tar.md5 format.
      6. Make sure that the options selected in your Odin are exactly as shown in the pic.
      7. odin_explained
      8. Hit start and wait till the firmware flashing is complete, as soon as your device restarts, remove it from PC.
      9. Congrats! You’ve installed the latest Android 4.3 Jelly Bean on your Galaxy S4 LTE now.

It is not necessary to wipe your phone completely after flashing the latest firmware, but it is highly recommended if you do so. Removing factory data ensures that all the junk has been removed and your device gives you the best performance on the latest firmware. Backup all the contacts, call logs, messages and important data on your device’s internal sd before you wipe it completely through recovery.

Got any problems? Feel free to leave us a comment, we will try our best to help you out. Thank you.

How To: Turn off BlinkFeed in Sense 5.5

0
How To: Turn off BlinkFeed in Sense 5.5

Sick of Blinkfeed? Why frustrate? Turn it off.

One of the most amazing features that HTC added to its Sense 5 user interface is the BlinkFeed which is a customizable newsfeed or a news reader that has been built on the homescreen.

You see new features are not that easy to introduce, especially when you have them forced on your homescreen and that too when there is no way that you could get rid of it. One way could be installing a new launcher, but people like me will not like doing so too. Oh hey, Wait! I do have another solution.. You could ignore the BlinkFeed in the first place. Okay, now that was lame..

blinkfeed-off

Well, Sense 5.5 does actually have this option that lets you turn off the BlinkFeed. Yes, I’m talking about the sense which debuts on the HTC One Max. In order to turn the BlinkFeed off on sense 5.5 , follow these simple steps:

  1. From the home screen, pinch your fingers together. That’ll take you to the home screen overview.
  2. Tap the BlinkFeed On/Off button in the top left.

Now, I feel it necessary mentioning there actually are people who like BlinkFeed around. After all, it brings you everything that you’re already obsessed with. And even if people don’t use it, they’ll like having it turned on.

How to: Use Burst Mode in iOS 7

0
How to: Use Burst Mode in iOS 7

If you have had a chance to attend a sporting event, you might have felt the need of a DSLR camera or even when it was your birthday and the pictures of you blowing up the candles are so blurry that you starting wishing for a DSLR. And we’re not doubting that innocent fantasy of yours too. After all, a DSLR camera can capture 8 frames( or more) per second. But, not everybody has a DSLR, no? No problemo! All you gotta do is to learn how to use the Burst Mode on your iOS 7 device.

I said iOS 7 so its clear that this guide is only for those of  you who have an iPhone 4 or newer. The Burst Mode on iOS 7 devices lets you capture 10 frames per second. Yes, 10! The older iPhones can capture 2-3 frames.

Using Burst Mode

The first thing that you need to know is that the Burst Mode is listed nowhere in the list of the capture modes that you’ll normally choose one from when you’re using the camera app.

When you capture a photo, you normally press the capture button and release it, but to capture images in the burst mode, you tap the capture button and don’t release it right away- keep holding it down unless the device starts capturing images one after the other. You’ll hear a continuous shutter noise. In case you have an older iPhone, you’ll have to have a look at the small gallery preview icon in the left corner to make sure you’ve had those burst-mode-images captured.

camera-burst-mode-iphone-620x541

Managing Burst Mode Images

Ofcourse, when you’ve had so many pictures taken in a go it will result in dozens of photos piled up in your Photos app. iOS has a great way to save you the fatigue of viewing all the pictures separately and deciding which ones to keep. It makes a folder of the images taken in one attempt of the burst mode and shows it as a single photo in the Photos app.

You click on the folder and it opens revealing all the images that it holds. Press the “Favourites” button and then, by tapping on each photo, select which ones you want to keep. Then, tap “Done”. This saves the selected pictures separately as single photo and keeps the original folder as it was originally.

Enjoy! 🙂

How To Root AT&T Galaxy Note 3 SM-N900A.

How To Root AT&T Galaxy Note 3 SM-N900A.

Having a Galaxy Note 3, not matter which variant it is from, is a happiness without a  doubt. But if you can able to root it, now that I something really worth being happy for. Rooting does not only allows you to install custom ROMs on it, but with tweaks in those ROMs allows you to speed up your device as well. The AT&T Galaxy Note 3 is the only one left, whose tutorial of rooting is not available in market. But since the time is up for it too, and developers have found a way to Root it too.

samsung-galaxy-note-3

In this Article, we will tell you How To Root AT&T Galaxy Note 3 SM-N900A.But before we begin make sure to Backup all your data placed on your phone’s internal storage, contactscall logs and messages. This is necessary as if something go wrong during the process, so you will be able to restore it afterwards.

Disclaimer:

The methods involved in flashing custom roms and rooting your phone is highly custom and may result in bricking your device, and has nothing to do with Google or the device manufacturers which is Samsung in our case. In case of any mishap we may not be held responsible. Follow these instructions to the letter to avoid any mishap or bricking. Make sure that whatever you do, you are doing it at your own responsibility.

Downloads Required:

Important things:

  • Your Device must be in download Mode.
  • Enable USB debugging mode.
  • Make sure that battery level is at 85% or more.
  • This tutorial is only for At&t Galaxy Note 3 SM-N900A

How To Root AT&T Galaxy Note 3 SM-N900A.

odin_explained


Installation Process:

  • First of all download the required file and extract it anywhere on PC.
  • Then downland Odin.
  • Open Odin in PC and select the option shown in picture above.
  • Turn Off your device and Turn it On while pressing Power + Volume Down button, so your device can start in Download mode.
  • Connect your device with PC.
  • Once the drivers are installed one of the Odin’s port will turn either Yellow or Blue.
  • Click on PDA and Select the .tar file from the downloaded files.
  • Press ‘Start’ and wait for the process to finish.
  • Once the process is complete, you will get the ‘Pass’ Message, and on device colour you will see ‘Done’ text.

Noe download Root Checker app to verify that your device is Rooted.

Root Canadian Galaxy Note 3 SM-N900W8 and Install TWRP Recovery On It.

Root Canadian Galaxy Note 3 SM-N900W8 and Install TWRP Recovery On It.

In the World of Android, rooting your device is the most important thing, which allows you to install different tweaks on your device. The main reason behind rooting is to install custom ROMs on it, to make it a perfect open source device. The latest flagship of Samsung is out for quite a time and with owning Samsung Galaxy Note, but not able to find any way to root it, is quite teasing. But worry not, here you can find answer to all of your questions about Samsung Galaxy Note 3.

samsung-galaxy-note-3

This tutorial is all about Samsung Galaxy Note 3, the Canadian version, SM-N900W8. We will tell you how to Root Canadian Galaxy Note 3 SM-N900W8 and Install TWRP Recovery On It.But before we begin make sure to Backup all your data placed on your phone’s internal storage, contactscall logs and messages. This is necessary as if something go wrong during the process, so you will be able to restore it afterwards.

Disclaimer:

The methods involved in flashing custom roms and rooting your phone is highly custom and may result in bricking your device, and has nothing to do with Google or the device manufacturers which is Samsung in our case. In case of any mishap we may not be held responsible. Follow these instructions to the letter to avoid any mishap or bricking. Make sure that whatever you do, you are doing it at your own responsibility

Downloads Required:


Important things:

  • Your Device must be in download Mode.
  • Enable USB debugging mode.
  • Make sure that battery level is at 85% or more.
  • This tutorial is only for Verizon Galaxy Note 3 SM-N900W8.

How T0 Root Canadian Galaxy Note 3 SM-N900W8 and Install TWRP Recovery On It.

odin_explained


Installation Process: [Root]

  • First of all download the required file and extract it anywhere on PC.
  • Then downland Odin.
  • Open Odin in PC and select the option shown in picture above.
  • Turn Off your device and Turn it On while pressing Power + Volume Down button, so your device can start in Download mode.
  • Connect your device with PC.
  • Once the drivers are installed one of the Odin’s port will turn either Yellow or Blue.
  • Click on PDA and Select the CF-Auto-Root-hltecan-hlteub-smn900w8.tar.md5 file from the downloaded files.
  • Press ‘Start’ and wait for the process to finish.
  • Once the process is complete, you will get the ‘Pass’ Message, and on device colour you will see ‘Done’ text.

Use any Root checker app to check whether Device is rooted or not.

Installation Process: [TWRP Recovery]

  • Launch Odin again.
  • Turn Off your device and Turn it On while pressing Power + Volume Down button, so your device can start in Download mode.
  • Connect your device with PC.
  • Once the drivers are installed one of the Odin’s port will turn either Yellow or Blue.
  • Click on PDA and Select the openrecovery-twrp-2.6.xx-hltecan.tar file from the downloaded files.
  • Press ‘Start’ and wait for the process to finish.
  • Once the process is complete, you will get the ‘Pass’ Message, and on device colour you will see ‘Done’ text.

Now, Finally Turn off your device again, then turn it on while Pressing Volume Up + Power button, if you see the windows with TWRP Recovery, then everything went good.

How To Root Samsung Galaxy Note 3 SM-N900V.

How To Root Samsung Galaxy Note 3 SM-N900V.

In some cases, developers come up with rooting method for the new device within hours, but sometimes these hours can transform into days, weeks or months, especially if it’s a carrier device. However, if you bring something in the XDA section, it is sure to get cracked, in this case it’s Verizon Samsung Galaxy Note 3 SM-N900V. If you don’t often visit XDA but wants to root your Verzion Galaxy Note 3, we got a pretty good news for you.

samsung-galaxy-note-3

In this Article, we will tell you How To Root Samsung Galaxy Note 3 SM-N900V.But before we begin make sure to Backup all your data placed on your phone’s internal storage, contactscall logs and messages. This is necessary as if something go wrong during the process, so you will be able to restore it afterwards.

Disclaimer:

The methods involved in flashing custom roms and rooting your phone is highly custom and may result in bricking your device, and has nothing to do with Google or the device manufacturers which is Samsung in our case. In case of any mishap we may not be held responsible. Follow these instructions to the letter to avoid any mishap or bricking. Make sure that whatever you do, you are doing it at your own responsibility.

Downloads Required:

Important things:

  • Your Device must be in download Mode.
  • Enable USB debugging mode.
  • Make sure that battery level is at 85% or more.
  • This tutorial is only for Verizon Galaxy Note 3 .

How To Root Samsung Galaxy Note 3 SM-N900V.

Odin-Flash Guide


Installation Process:

  • First of all download the required file and extract it anywhere on PC.
  • Then downland Odin.
  • Open Odin in PC and select the option shown in picture above.
  • Turn Off your device and Turn it On while pressing Power + Volume Down button, so your device can start in Download mode.
  • Connect your device with PC.
  • Once the drivers are installed one of the Odin’s port will turn either Yellow or Blue.
  • Click on PDA and Select the .tar file from the downloaded files.
  • Press ‘Start’ and wait for the process to finish.
  • Once the process is complete, you will get the ‘Pass’ Message, and on device colour you will see ‘Done’ text.
  • After that, connect your device again with PC and  copy and paste the extracted files from “Root_de_le_vega.zip” to the root of your internal SD.
  • Reboot your Galaxy Note 3, after the reboot, open File manager and delete the above 2 files from your device.
  • Finally, reboot it one more time, and check with any Root checker app to verify that your device is rooted.

How To Root and Install TWRP Recovery on LG G2 (All Versions).

4
How To Root and Install TWRP Recovery on LG G2 (All Versions).

There was a time when LG was one of the greatest leaders in smartphone market but in last couple of years LG was so casted aside from the Android family that most don’t even bother looking at them. Only stories of LG handsets were seen on Web, most reviews were put on, but many won’t even show interest in LG. Despite that everything that has been in Smartphones today was invented and shown to the world by someone else and took over the world with someone else. Like Dual-Core technology, LG brought the first smartphone with Dual-Core Technology, but Samsung was the one who took over the world with Samsung Galaxy S2 after using the Dual-Core technology.

Screen-Shot-2013-07-09-at-4.32.29-PM

In this Article, we will tell you How To Root and Install TWRP Recovery on LG G2. But before we begin make sure to Backup all your data placed on your phone’s internal storage, contactscall logs and messages. This is necessary as if something go wrong during the process, so you will be able to restore it afterwards.

Disclaimer:

The methods involved in flashing custom roms and rooting your phone is highly custom and may result in bricking your device, and has nothing to do with Google or the device manufacturers which is Samsung in our case. In case of any mishap we may not be held responsible. Follow these instructions to the letter to avoid any mishap or bricking. Make sure that whatever you do, you are doing it at your own responsibility.

Downloads Required:

Download the Appropriate .img file from below:

Important things:

  • Make sure that battery level is at 85% or more.
  • This tutorial is only for LG Optimus G2.

How To Root LG Optimus G2:

  1. Download the ioroot file from above and extract it anywhere on PC.
  2. Install the LG USB drivers.
  3. Enable USB Debugging mode, Go to settings > Developers Options > Enable USB debugging mode.
  4. Once again go to Settings > PC Settings and select the proper method to connect device to PC.
  5. Now Connect your Phone to PC.
  6. Go to ioroot folder and run root.bat file.
  7. Press any key on Keyboard. It will run the rooting script and Super SU will be pushed into your device.

How To Install TWRP On LG Optimus G2:

  • Install LG USB Drivers.
  • Enable USB debugging mode on PC.
  • Make sure that ADB and Fastboot is configured on PC. How? Read Here
  • Download Loki-master and extract it on PC.
  • Copy and paste the TWRP.img file to ADB folder. (openrecovery-twrp-2.6.3.2-g2xxx.img)
  • Connect phone to PC.
  • Launch cmd window inside ADB folder, Press and hold Shift Key and Right click anywhere in that folder, then type in the following command (replace the name of recovery image [in Red] with that of the one you have downloaded).


Screenshot_14


  • TWRP will now be installed on your Phone, in case if you won’t see the # prompt after issuing the above command, type su to gain root access.
  • To reboot into TWRP recovery, tpye in the following command (change the name of recovery image with your own).

Screenshot_15


  • If you have done everything right, then you should see yourself in TWRP recovery mode

TO get out of recovery, reboot your phone normally. If any problem occurs, feel free to write us.