Home Blog Page 499

How To Boot a Mac From FireWire.

0
How To Boot a Mac From FireWire.

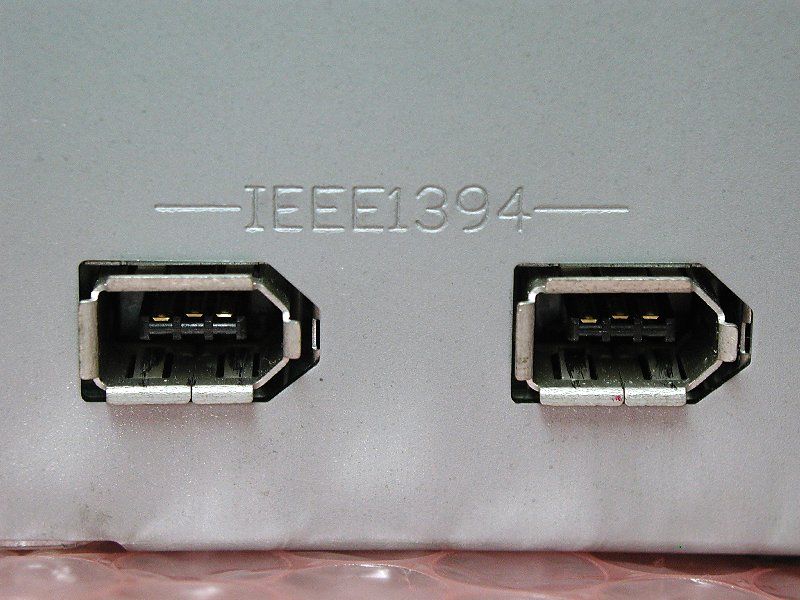
Booting a Mac using FireWire is a quite good thing if you are having issues at Mac Boot Screen or you want to run a Diagnostic or you want to access to Computer but can’t do it through itself. You can either Purchase a FireWire drive or a Hard Drive with FireWire connector or you can use MacBook as a FireWire, if it has an appropriate FireWire connector.

firewire

Method 1:

Use FireWire When Mac Won’t Boot on Its Own.

Locate the FirwWire port near a USB Port, it must be with Angled Corners on one side of port.

Connect your Mac With FireWire Drive.

Hold Down the “Option” Key as you Power-up the Macintosh.

Select the FireWire Drive from the List of Options.

Click the Right Facing Arrow to select the FireWire Drive and finish Booting.

Method 2:

Operate FireWire After a Normal Reboot:

Connect your Mac with FireWire after a Successful Boot.

Open finder Window to make sure that FireWire device is listed in your Devices.

Open System Preferences, and select “Start-up Disk”.

Select FireWire drive to boot with.

Now Click “Restart” to reboot your Computer using FireWire.

Install Android 4.4 KitKat on Samsung Galaxy Nexus using CyanogenMod 11

0
Install Android 4.4 KitKat on Samsung Galaxy Nexus using CyanogenMod 11

Samsung’s Galaxy Nexus is not going to get Android 4.4 KitKat update, the sad news came right after the release of Android 4.4 KitKat when Google announced the devices which will get KitKat update and Galaxy Nexus wasn’t listed in that. Galaxy Nexus runs on Android 4.0 Ice Cream Sandwich out of the box, and currently the device is running on Android 4.3 Jelly Bean, as off now there is no official word about its KitKat update and we can’t even say if Google will ever think of bringing KitKat to the G Nexus.

Well, it may have made the Galaxy Nexus owners a little worried, but it isn’t going to hang in their while there are great custom rom builds like CyanogenMod. The great developers over XDA forums have done this for the G Nexus as well, CyanogenMod 11 custom ROM based on Android 4.4 KitKat is available now and you may install it on your phone to tasted the KitKat unofficially.The full guide to do so is right here for you in simple and easy steps explained.Samsung-Galaxy-Nexus

Before we head towards the ROM installation, here is what you need know and have:

  1. This guide is only for Samsung Galaxy Nexus I9250, Sprint & Verizon. Don’t try this on any other device.
  2. This is a custom ROM. Flash this only if you are familiar with custom ROM flashing, and are a custom ROM freak.
  3. In case of any bugs we may not be held responsible, as said that it is a custom ROM it is highly expected to contain bugs and may not be kept for everyday’s use.
  4. Make sure that your device has at least 60% of the battery charged. I highly recommend this in order to prevent any mishap during the installation process.
  5. Make sure that you’ve backed up all your important media content, contacts, call logs and text messages. This is highly recommended in case you need to wipe your phone during the installation process or something goes wrong.
  6. Your phone must have a CWM or TWRP recovery installed. In order to do so, follow our full guide for the Nexus Root Toolkit here and install the custom recovery for your device. Follow the instructions carefully.
  7. Using the custom recovery backup your current system/rom as well. I highly recommend this, as this will allow you to go back to your previous system immediately in case you don’t like the new custom ROM and want your previous Android back.
  8. Alright! Follow this guide to the letter in order to prevent any mishap. Good Luck.

Disclaimer: The methods involved in flashing custom roms and rooting your phone is highly custom and may result in bricking your device, and has nothing to do with Google or the device manufacturer that is Samsung in our case. Also rooting your device will void its warranty and you will be no longer eligiblefor any kind of free device services by the manufacturers/warranty providers. In case of any mishap we may not be held responsible. Follow these instructions to the letter to avoid any mishap or bricking. Make sure that whatever you do, you are doing it at your own responsibility.

How to Flash Android 4.4 KitKat CyanogenMod 11 on Galaxy Nexus:

  • Download the ROM.zip file for your device:
      1. Make sure that you’ve installed a custom recovery on your phone. In case you don’t like to install a custom recovery, check out our guide for the Nexus Root Toolkit and flash the .zip files using that. Here’s the guide.
      2. In case you are using custom recovery, follow the following guidelines.
      3. Place both the downloaded .zip files on your phone’s SD card.
      4. Boot into CWM or TWRP recovery on your Galaxy Nexus.
      5. Now in custom recovery Wipe Cache and Dalvik Cache.
      6. Select “Install>Choose Zip>Select the ROM.zip file” and flash the ROM.
      7. As soon as ROM flashing is complete, flash Gapps using step 4.
      8. Reboot your device now.
      9. Congrats! You’ve installed Android 4.4 KitKat based on CyanogenMod 11 on your Galaxy Nexus. You should see the CM logo on the boot screen now.
      10. In case you are stuck on the bootscreen, boot into custom recovery once again and wipe cache and dalvik cache.
      11. Please keep in mind that the first boot might take a few minutes in order to take you to the home screen, so keep patience.
      12. That’s All!

In case you got any queries, suggestions or facing any difficulties regarding this custom ROM on your G Nexus, feel free to stop by the comment box. We will respond you as soon as possible. Thanks All!.

How To Restart a Frozen MacBook.

0
How To Restart a Frozen MacBook.

Once upon a time, I borrowed a MacBook from a Friends and I was happily using it until, it keeps getting freeze after every 10-minutes work, at that time I just lost all my senses, first it was not my own thing and Second according to Him, it didn’t happened before. After a long search, I was able to find it on WikiHow, and it completely worked, according to the Friend its battery was a bit faulty. Whatsoever, I am sharing it with you people, so you won’t get scared the next time.

17_32_1345716278_0_macwithblkscreenangrynew-1

Step 1:

Locate the Power Button and Hold it for Five Seconds and the Computer will shut down.

SAMSUNG DIGITAL CAMERA

Now Press the Power Button again and release it as soon as you press it, Your Mac will restart, if the problem still occurs, it’s time to take it to another level.

There are Two Good reasons, Number One, the Power Supple you are using it Damage or a Dead Battery can cause such problem.

SAMSUNG DIGITAL CAMERA


How To Change Your MacBook Name.

0
How To Change Your MacBook Name.

So you have named your MacBook and now you are just not sure that it’s good and want to change it but don’t know how to change it. Perhaps you are new at MacBook or one of your friends handed it to you or maybe some family member gave it to you and now you don’t want to disappoint them, that you don’t know how to change it. Well don’t worry, we will show you how it is done. Just choose a name and follow the rest of the Guide.

macbook

Method 1:

Change the Name of your Mac.

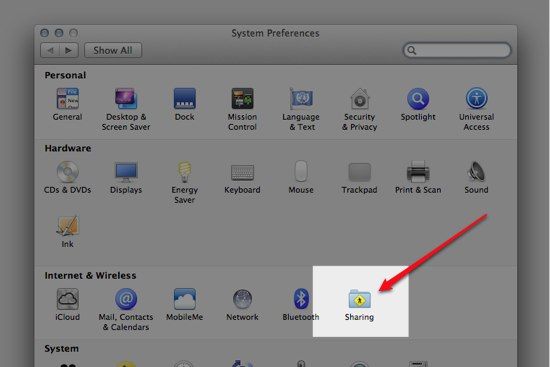
Open up System Preferences, From the Apple Menu and Click System Preferences.

System-Preferences-4

Click the Sharing Folder, you can find it in the Third Row, right next to the Bluetooth icon.

Sharing-is-good

At the top if Window that popped-up, you will see Computer name, just click on it and Enter the New Name.

Original-Name


Method 2:

Change It From Finder Preferences.

From the Finder Menu, select the Finder Preferences.

Preferences-menu

In the Finder Preferences, locate your MacBook Icon, Tick it, once done then close the Window. Your MacBook should be appear on the Finder’s SideBar.

471px-Your-macbook


This Methods will work on All Mac OS X.

A Standard name will be “Steve Job’s MacBook”, just personalized with it your Name.

One Click Unlock/Root/Custom Recovery Flash Method for Google Nexus 4,5,7,10, Nexus S & Galaxy Nexus[How To Guide]

2
One Click Unlock/Root/Custom Recovery Flash Method for Google Nexus 4,5,7,10, Nexus S & Galaxy Nexus[How To Guide]

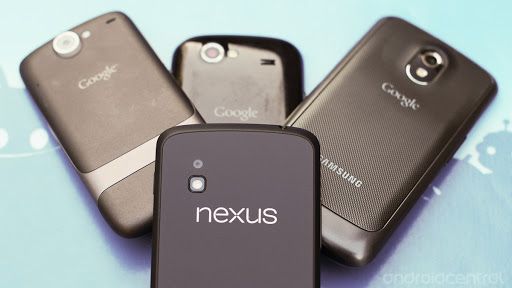
Google’s Nexus devices are doing well in the markets these days as these devices are a little cheaper and always have the best Android support. Google has always tried to bring the latest and greatest version of Android to it’s devices, just in case a device is too old, that may not get the latest updates. So far, Google has partnered with different cellphone giants to get the Nexus devices manufactured, these include LG, Samsung, ASUS and HTC. But the only thing that makes these devices siblings of each others is the Nexus by Google.Nexus-phones

Well, Let’s get back to the topic. Today a friend of mine asked me for a method to root her Nexus 5, as she spent hours while searching and googling, she ended up finding no single easy method that can unlock her phone’s bootloader, root it and install a custom recovery as well. There is a number of methods available on the XDA developers forum for all the Nexus devices, but as I mentioned an easy method was needed here that contains not so many If’s and but’s. As I started looking out, I found something awesome that I’m going to share with you guys today, and right now. I found the Nexus Root Toolkit, a great tool that can unlock, root, install a custom recovery and relock/restore your device back to stock condition with one click each.nexus

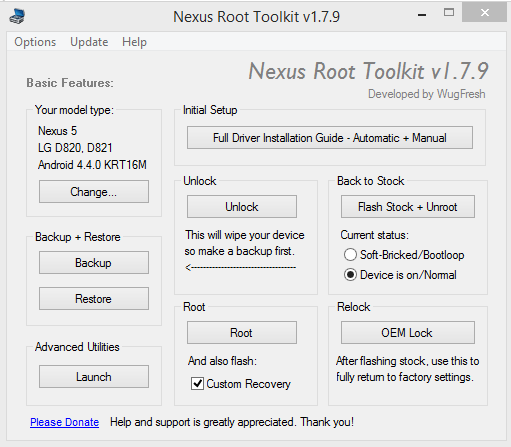
Before I start explaining the features and functions of this great tool, I would like to say thanks to the developer, WugFresh, who’s hardwork has made this so much easy for us. As you will find this tool really useful, I would like you guys to consider a donation to the developer as well. MainMenu_Root ToolKit

So, here is what this Toolkit can do. Google’s Nexus devices come with a locked bootloader, to flash custom roms, or custom recoveries you need to get it unlocked first.. If you are wondering how you can do so, and you don’t want to use a complex method, then this tool will make this job much easier for you, connecting your device and pressing the unlock button will unlock your phone’s bootloader. Once you select your device, the tool intelligently downloads the required recovery, root, and other necessary files to perform different process on your phone. Pressing the root button, and having checked the custom recovery installation option will root and also install a custom recovery on your Nexus device. The tool also offers you an option to flash stock factory image on your phone and unroot it in order to bring it back to the factory state back. You can also relock your device’s bootloader just in case you don’t want to keep it unlocked.

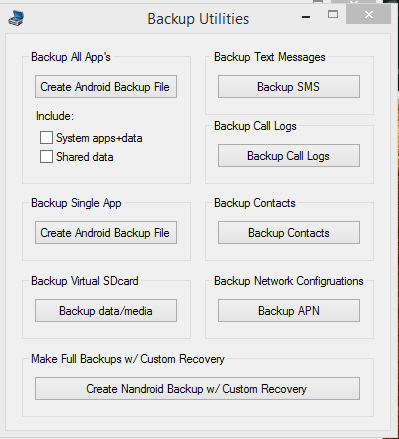
The most useful feature that you would love to use on this tool is the backup option. Clicking the backup button takes you to the backup options panel, you can backup your Apps, Apps + Data, Contacts, Call Logs, SMS Messages, APN Settings, Media Content + Data on Sd Card. The tool also let’s you create a Nandroid backup using the custom recovery installed on your phone.  Just in case you need to restore anything, there is a restore option right below the backup button.

BackupRestore

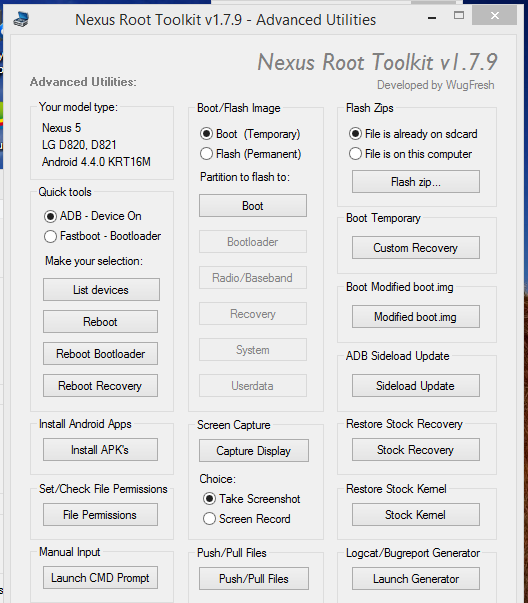
The list of features in this tool just doesn’t end here. The Advanced Utilities let you do a lot of other things like bootings/flashing img files, flashing zip files, Install Apk files, flash stock recovery, stock kernel etc.Advanced Utilities

List of supported devices:

      1. Galaxy Nexus GSM/HSPA+
      2. Galaxy Nexus Verizon LTE
      3. Galaxy Nexus Sprint LTE
      4. Nexus S (WorldWide, I9020t, I9023 )
      5. Nexus S (850 MHz, I9020a)
      6. Nexus S (Korea, M200)
      7. Nexus S 4G d720
      8. LG Nexus 4 E960
      9. LG Nexus 5 D820, D821
      10. Nexus 7 Mobile Tablet
      11. Nexus 7 WiFi Tablet
      12. Nexus 7 v2 WiFi Tablet
      13. Nexus 7 v2 Mobile Tablet
      14. Nexus 10 WiFi Tablet

Let’s have a look on how to use this tool.

  1. Download the tool Nexus Root Toolkit v1.7.9: Link1 |k” rel=”noopener”> Link 2
  2. Install the Tool.
  3. Run the tool, on the first run it will prompt you to select your device and select the firmware version.
  4. Carefully select your device, and the firmware that its currently running on.
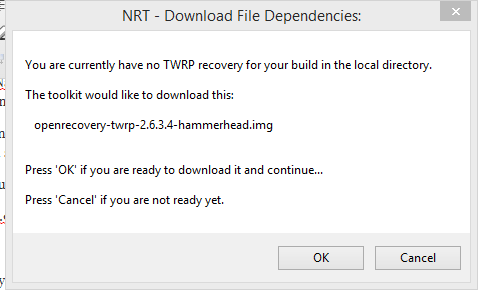
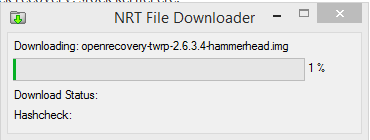
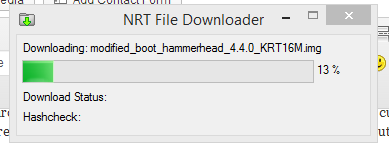
  5. As soon as you click the apply button, the tool will begin to check the dependencies for your device and let you know what files it requires, and have to be downloaded.
  6. Screenshot_1
  7. Screenshot_2 Screenshot_3
  8. After downloading the files, the tool will take you to its main menu.
  9. You can find all the features of this tool here.
  10. Before rooting your device, you must unlock its bootloader.
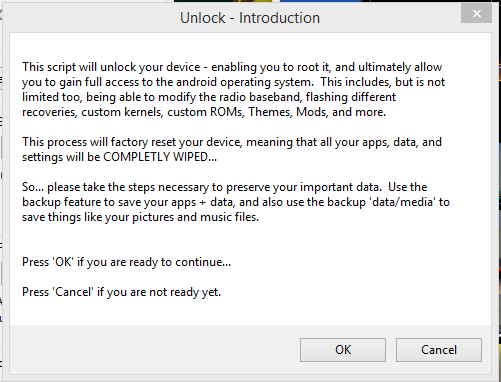
  11. As unlocking your device will erase everything on your phone, using the backup option in the tool is a good choice here. Connect your device having USB debugging mode enabled and backup everything.Unlock Instructions
  12. In order to do unlock your phone’s bootloader , enable USB debugging mode on your phone, make sure that you’ve installed the drivers properly on your PC, just in case you don’t have the drivers, used the Full Driver Installation guide, that is available in the tool.Unlock Instructions2
  13. Connect your phone to your PC and hit the Unlock button in the tool, and follow the on screen instructions. The tool will do the job for you.
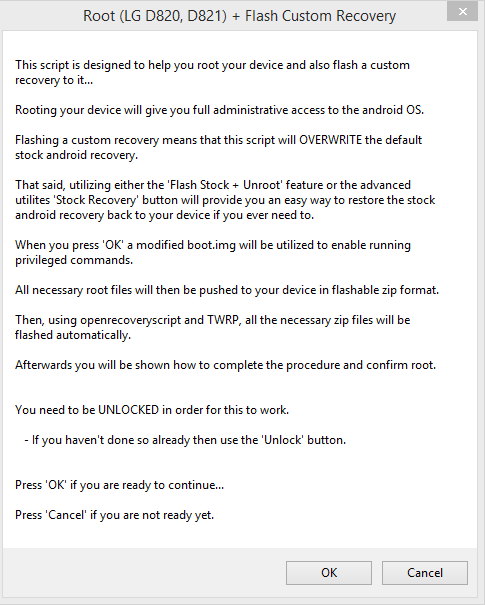
  14. Similarly, after having unlocked the bootloader, you can root your phone and also check the recovery installation option. As soon as you hit the root button, the tool will show you the instructions.
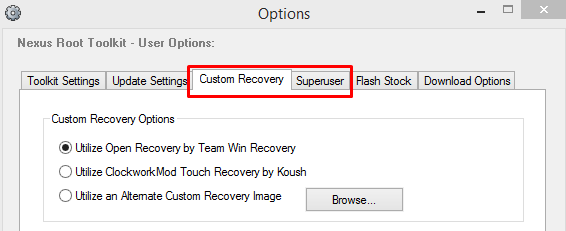
  15. By default, the tool is set to install TWRP recovery, but if you wish to change the recovery, you can select another recovery under Custom Recovery tab in the options. You can also provide the tool an img file if you wish to install some other recovery from your computer.Root_RootToolKit
  16. You can also make a choice between whether you want to flash koush’s SuperSu or Chainfire’s SuperSu from the options tab.
  17. Upon installing a custom recovery along rooting your phone, the stock recovery on your device will be over written by the custom recovery. You can flash zip files, make nandroid backup and perform other tasks using the custom recovery on your phone now.Choices
  18. Just in case you don’t want to flash a custom recovery, the tool can let you use the custom recovery temporarily on your device, you can also flash zip files using the advanced utilities tab.
  19. In case you don’t know how you can boot into custom recovery on your phone, use the Advanced Utilities option in the tool and select the Reboot into Recovery option.
  20. Also you can change the device using the Change option within the tool.
  21. Explore the tool to use more features.

Make sure that you follow all the instructions explained above carefully. Please keep in mind that rooting your device, flashing custom roms, unlocking bootloader voids the warranty of your device and you may not be eligible to claim any free services from your phone’s manufacturers if its in warranty. Do each and everything at your own risk. In case of any mishap or in case you end up bricking your device, we may not be held responsible.

In case you got any queries, have any suggestions or face any difficulties, feel free to stop by the comment box below. We will try our best to respond you as soon as possible.

Google Chrome Latest Version (Standalone) Offline Installer – Download Here

0
Google Chrome Latest Version (Standalone) Offline Installer – Download Here

While setting up a new PC, I had to install Google Chrome, and just while installing it, I realized that I need internet connectivity in order to get this installation finished, facing some connection issues didn’t let me install Google Chrome, and  I started looking out for the complete offline setup of the best internet browser Google Chrome and luckily found one on the official site of Google Chrome. I installed it and works well, I felt the need to share it for you guys as well as it may be of much use, so here’s the post I’ve cooked to explain the advantages of Google Chrome and its offline installer.

Google Chrome, being the best internet browser by the internet giant Google has taken the place of other browsers since it’s birth. The browser provides you the best and the fastest and the most secure  internet browsing experience for any kind of websites either flash or static or dynamic or video hosting websites. The very thing that adds charm to the functionality of Google Chrome, is the Chrome Webstore. The webstore allows you to install apps in your Google Chrome, you can find themes,games, tools, applications for your desktop, applications for offline use and a lot of other stuff  in the webstore as well, and one of the very best things is  the extensions department. You can add as many extensions as you want and enhance the functionality of your browser, over all the browser also provides you the best user customization options. We can say that, Google Chrome is not just a browser, but is something more than that.Download-Google-Chrome-30-0-1599-37-Beta-382176-2

Despite having all the awesome features offered to the users, Google Chrome aims at protecting the user’s privacy and data from getting stolen. Google has always stressed it’s privacy policies in order to attain the best user satisfaction. The hefty list of advantages of Google Chrome may take quite long to be explained but let’s end it with having a look at the Sync feature that it has. You can add your gmail account in your desktop or laptop’s Google Chrome, the Sync allows you to get all your PC’s chrome’s data on your Android smartphone/tablet. As soon as you login and Sync, your bookmarks, browsing history will appear in your Android device. For now Google Chrome only works on the devices having Android 4.0 +.

Let’s get back to the topic now, many of you might be wondering what the heck is this Standalone offline installer, let me tell you. When you download Google Chrome from the official site, it basically downloads the installer and the installer then begins to download the browser after connecting your PC to the internet. That means If you don’t have the internet connection, the basic installer is going to get failed and you can’t install Google Chrome on your PC. The standalone installer may be of much help in the case, you can download the setup of Google Chrome’s latest version and install it anytime anywhere on any device without having access to the internet.

To make this thing easy and save your time from googling and searching, I have embedded the download link for the latest and greatest standalone installer of the Google Chrome right here. What are you waiting for? Go ahead and download it right now, and keep a copy or distribute in your friends to help em’ too.

Google Chrome Standalone Offline InstallerDownload.

Google Chrome for AndroidGet it Here.

That’s all. We hope that the offline installer helps you and saves your time. In case of any queries, or suggestions, feel free to stop by the comment box below. We will respond as quickly as we can. Thanks.

Install Android 4.4 KitKat on Samsung Galaxy S I9000 using CyanogenMod 11

1
Install Android 4.4 KitKat on Samsung Galaxy S I9000 using CyanogenMod 11

Google recently pulled the curtains off from the Android 4.4 KitKat running on its latest flagship Nexus 5. Major smartphone manufacturers have announced the devices that will be getting Android 4.4 KitKat first of all, if we specifically talk about Samsung, the devices announced that will get the Andorid 4.4 KitKat include Galaxy S3, Galaxy Note 2, Galaxy S4 and Galaxy Note 3 first of all, perhaps the older devices may not taste the KitKat. Samsung’s Galaxy S1 stopped receiving Android updates after Android 2.3.6 Ginger Bread. Initially, the device ran on Android 2.1 Eclair out of the box, unfortunately Galaxy S1 owners can’t taste the latest and greatest versions of Android through official updates.

Well, that’s the thing to worry about, but not really when we have the really awesome developers working over CyanogenMod and Xda developers. You can update your device to the higher version of Android using the CyanogenMod builds. Android 4.4 KitKat Nighlty ROM based on CyanogenMod 11 is available for download now, you may want to taste the Android 4.4 KitKat unofficially on your Samsung Galaxy S1, if so then you’ve spotted the right place. I’ve explained the method to flash Android 4.4 KitKat CM 11 based nightly in simple and easy steps below. Follow this guide to the letter.

GalaxyS1 KitKat

Before we head towards the flashing process, here are some important things to keep in mind.

    1. This guide is only for Samsung Galaxy S GT I9000. Do not try this on any other device. Check your device’s model underSettings > About device.
    2. Make sure that your phone’s battery is charged enough to do all the process. It should be at least 80%. This is highly recommended to prevent any power issues during the flashing process.
    3. Your device must be rooted and have a custom recovery installed. Follow our full guide here to root and install CWM recovery.
    4. After you’ve installed CWM recovery, boot into it (Volume Up+Home Button + Power Key) and backup your current ROM/System using the backup option in the CWM. This is highly recommended in case something goes wrong and you want to go back to the previous working state of your phone immediately.
    5. Make sure that you’ve backed up all your important media content, contactscall logs and text messagesThis is highly recommended in case you need to wipe your phone during the installation process or something goes wrong.
    6. Enable USB debugging mode under Settings > Developer options.
    7. Flash this ROM only if you know what you are doing, if you have much knowledge about the Custom ROMs and if you can handle the nightly builds.
    8. As said earlier, this is a nightly build, and may contain a lot of bugs, this ROM may not be kept for every day use. We may not be held responsible for any kind of bugs or mishaps.
    9. Alright! Make sure that you applied all the pre requisites and pre cautions as explained, follow this guide to the letter to avoid any mishaps.

Disclaimer: The methods involved in flashing custom roms and rooting your phone is highly custom and may result in bricking your device, and has nothing to do with Google or the device manufacturer that is Samsung in our case. Also rooting your device will void its warranty and you will be no longer eligiblefor any kind of free device services by the manufacturers/warranty providers. In case of any mishap we may not be held responsible. Follow these instructions to the letter to avoid any mishap or bricking. Make sure that whatever you do, you are doing it at your own responsibility.

How to Flash CyanogenMod 11 Android 4.4 KitKat on Samsung Galaxy S I9000:

      1. Download CyanogenMod 11 custom ROM for Galaxy S1cm-11-20131206-NIGHTLY-galaxysmtd.zip 
      2. Download Gapps for Android 4.4:  gapps-kk-20131119.zip
      3. Place both the downloaded .zip files on your phone’s internal or external sd card.
      4. Boot into CWM recovery on your phone. To do so, turn off your device completely, now turn it on by pressing and holdingVolume Up+Home Button+Power Key, you will see the CWM interface now.
      5. In CWM recovery wipe data, cache, and then Advanced>wipe dalvik cache as well.
      6. Now select “Install Zip>Choose Zip from Sd/Ext Sd>Select the cm-11-20131206-NIGHTLY-galaxysmtd.zip ”.
      7. Select “Yes” and begin the flashing process, it will take a few minutes to install Android 4.3 CM 10.2 on your phone.
      8. Now once again select “Install Zip” in CWM recovery, and select Gapps.zip file this time.
      9. Select “Yes” and flash the Gapps for Android 4.4.
      10. As soon as the flashing is done, Reboot! Phewww! You’ve successfully installed CyanogenMod 11 custom ROM on your Samsung Galaxy S1, you should see the CM Logo on the boot screen now.
      11. The first run will take some time to boot you into the home screen, in case the boot screen is stuck on the CM logo, boot into CWM recovery and wipe cache and dalvik cache, reboot and it should take you into the home screen.

That’s All! In case you have any queries, suggestions or face any difficulties, feel free to stop by the comment box below. We will try our best to catch you up. Thanks All!

Install Android 4.3 on Samsung Galaxy S I9000 using Cyanogenmod 10.2 Stable Custom ROM

16
Install Android 4.3 on Samsung Galaxy S I9000 using Cyanogenmod 10.2 Stable Custom ROM

The very first S series Galaxy’s manufacturing may have stopped, but the device is never forgot by the great developers over CyanogenMod and XDA developers and there is a lot of stuff to mess with on the device. Galaxy S is still used by a number of users, and  many of em’ might be looking out for the upgraded version of Android to install on their device, but unfortunately the device’s updates stopped on Android 2.3.6 Ginger Bread, while the device ran on Android 2.1 Eclair out of the box.

In case you don’t know about what the device sports, let’s have a recap. The device sports a 4.0 inches Super AMOLED display with 233 ppi,5 MP camera at the back, a VGA camera on the front. 8/16 GB internal storage with microSD card slot, 1 GHz cortex A-8 CPU and a RAM of 512 MBs. Under the hood it has got a 1500 mAh battery.

Well, what I have for you guys here today is the stable CyanogenMod 10.2 custom ROM for our beloved Samsung Galaxy S 1. CyanogenMod custom ROM 10.2 is based on Android 4.3 Jelly Bean and  the one we linked here, as I said its stable, and is free of bugs, you may install it for every day use if you want to taste Android 4.3 Jelly Bean on your device unofficially and if you are a custom ROM freak.

Samsung-Galaxy-S-GT-I9000_01-580-90

Before we head towards the ROM flashing process, here are some pre requisites and pre cautions you must have:

    1. This guide is only for Samsung Galaxy S GT I9000. Do not try this on any other device. Check your device’s model under Settings > About device.
    2. Make sure that your phone’s battery is charged enough to do all the process. It should be at least 80%. This is highly recommended to prevent any power issues during the flashing process.
    3. Your device must be rooted and have a custom recovery installed. Follow our full guide here to root and install CWM recovery.
    4. After you’ve installed CWM recovery, boot into it (Volume Up+Home Button + Power Key) and backup your current ROM/System using the backup option in the CWM. This is highly recommended in case something goes wrong and you want to go back to the previous working state of your phone immediately.
    5. Make sure that you’ve backed up all your important media content, contactscall logs and text messages. This is highly recommended in case you need to wipe your phone during the installation process or something goes wrong.
    6. Enable USB debugging mode under Settings > Developer options.
    7. Alright! Make sure that you applied all the pre requisites and pre cautions as explained, follow this guide to the letter to avoid any mishaps.

Disclaimer: The methods involved in flashing custom roms and rooting your phone is highly custom and may result in bricking your device, and has nothing to do with Google or the device manufacturer that is Samsung in our case. Also rooting your device will void its warranty and you will be no longer eligiblefor any kind of free device services by the manufacturers/warranty providers. In case of any mishap we may not be held responsible. Follow these instructions to the letter to avoid any mishap or bricking. Make sure that whatever you do, you are doing it at your own responsibility.


How to Flash CyanogenMod 10.2 Android 4.3 Jelly Bean on Samsung Galaxy S I9000:

      1. Download CyanogenMod 10.2 custom ROM for Galaxy S1: cm-10.2.0-galaxysmtd.zip
      2. Download Gapps for Android 4.3:  gapps-jb-20130813-signed.zip
      3. Place both the downloaded .zip files on your phone’s internal or external sd card.
      4. Boot into CWM recovery on your phone. To do so, turn off your device completely, now turn it on by pressing and holding Volume Up+Home Button+Power Key, you will see the CWM interface now.
      5. In CWM recovery wipe data, cache, and then Advanced>wipe dalvik cache as well.
      6. Now select “Install Zip>Choose Zip from Sd/Ext Sd>Select the cm-10.2.0-galaxysmtd.zip”.
      7. Select “Yes” and begin the flashing process, it will take a few minutes to install Android 4.3 CM 10.2 on your phone.
      8. Now once again select “Install Zip” in CWM recovery, and select Gapps.zip file this time.
      9. Select “Yes” and flash the Gapps for Android 4.3.
      10. As soon as the flashing is done, Reboot! Phewww! You’ve successfully installed CyanogenMod 10.2 custom ROM on your Samsung Galaxy S1, you should see the CM Logo on the boot screen now.
      11. The first run will take some time to boot you into the home screen, in case the boot screen is stuck on the CM logo, boot into CWM recovery and wipe cache and dalvik cache, reboot and it should take you into the home screen.

That’s All! In case you have any queries, suggestions or face any difficulties, feel free to stop by the comment box below. We will try our best to catch you up. Thanks All!

Vector for PC Download Free -Windows Computer.

Vector for PC Download Free -Windows Computer.

Vector is Another arcade game for Android, It is an exciting, arcade-style game featuring you as the exceptional free runner who won’t be held down by the system. If you have ever played it on your Mobile, you would have known its awesomeness, the game opens with a view into a totalitarian world where freedom and individually is nothing more than a distant dream. It is another endless running game but with additional tasks, normally you would have to collect coins and dodge stuff to remain alive, but in Vector you have to perform specific stunts to remain in the game.Thanks to the developers of Bluestacks, now users can play Android games on PC. All you need to do is to follow our Tutorial and All is Well.

Screenshot_1

Vector Features:

  • Arcade gameplay from the makers of the hit Facebook game
  • Astoundingly lifelike Parkour-inspired moves made possible by Cascadeur animation tools
  • 20 challenging levels (40 in the “Deluxe Version”)
  • Quick to learn, challenging to master
  • The best parkour-inspired action game! Vector lets you break free and run! Don’t get caught!

Today we will show you how to download and install Vector for PC, so even you don’t own an Android or iOS device, you will be able to Play with your Friends. You will need an Emulator like Bluestacks and an Apk file of Vector , afterwards follow the instructions to start using Vector on PC.

How To Install Vector On PC.

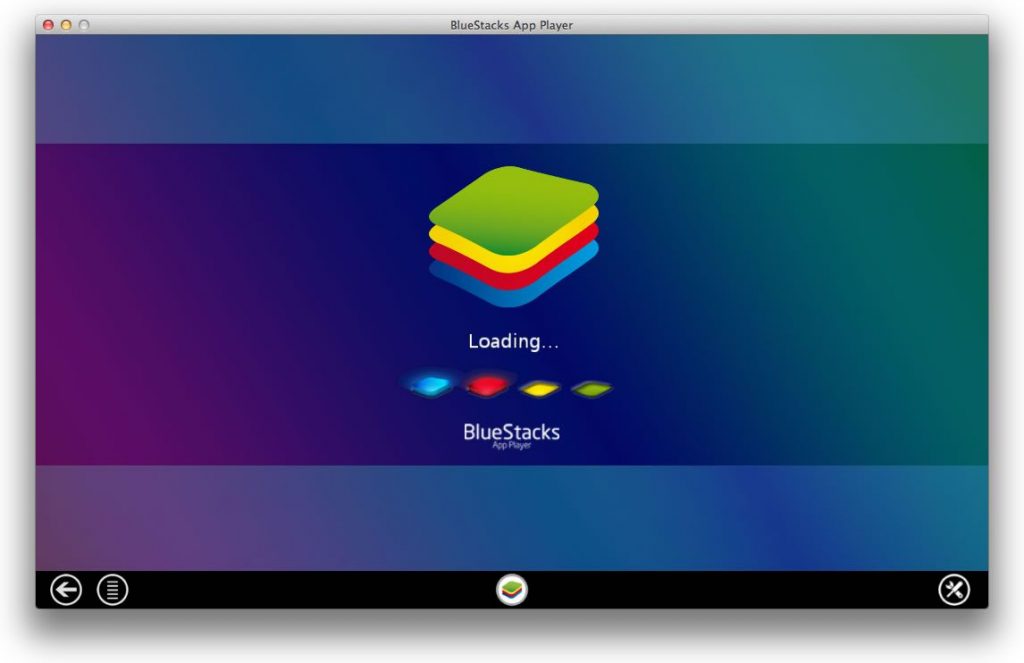
BlueStacks-app-player-1024x663


  • First Download And install BlueStacks.
  • Start Bluestacks, click on Search icon.
  • Search for Vector and Click on Install.
  • Just like on Android it will first download then install.
  • After the installation Click on Vector Icon to start using the App.

If you are using an Apk file.

  • Download an Apk file of Vector.
  • If you have already installed Bluestacks, then just double-click the apk file will start the installation.
  • If not then Install Bluestacks to start the installation.
  • Once the installation is done, Open Bluestacks and click the App icon to start playing.

Download Temple Run for PC Windows {XP,7,8}

Download Temple Run for PC Windows {XP,7,8}

Temple Run was one of the first endless running game for Android, who was able to reach a recorded height, afterwards, Subway Surfers took its place, Temple Run 2 was there to take the Throne again…but still Subway Surfer is still on top. Temple Run is available for Both iOS and Android and its totally free. But if don’t have any Android or iOS device then we have another Solution for you, you can play it on PC, Yes! you can. Thanks to the developers of Bluestacks, now users can play Android games on PC. All you need to do is to follow our Tutorial and All is Well.

temple-run.png

Temple Run Features:

You’ve stolen the cursed idol from the temple, and now you have to run for your life to escape the Evil Demon Monkeys nipping at your heels. Test your reflexes as you race down ancient temple walls and along sheer cliffs. Swipe to turn, jump and slide to avoid obstacles, collect coins and buy power ups, unlock new characters, and see how far you can run!

Today we will show you how to download and install Temple Run for PC, so even you don’t own an Android or iOS device, you will be able to Play with your Friends. You will need an Emulator like Bluestacks and an Apk file of Temple Run, afterwards follow the instructions to start using Temple Run on PC.

How To Install Temple Run On PC.

BlueStacks-app-player-1024x663


  • First Download And install BlueStacks.
  • Start Bluestacks, click on Search icon.
  • Search for Temple Run and Click on Install.
  • Just like on Android it will first download then install.
  • After the installation Click on Temple Run Icon to start using the App.

If you are using an Apk file.

  • Download an Apk file of Temple Run.
  • If you have already installed Bluestacks, then just double-click the apk file will start the installation.
  • If not then Install Bluestacks to start the installation.
  • Once the installation is done, Open Bluestacks and click the App icon to start playing.

Top 5 Free Android Car Racing Games – Download Here.

0
Top 5 Free Android Car Racing Games – Download Here.

Having owned an Android smartphone and not playing the Car Racing games is just unfair. Racing games have always been popular and most additive among the Android game freaks. Having a look at the growing number of Android users, and also the number of growing apps in the Google Play Store, I came across the need of picking up some best racing games from the Google Play Store that may help the users to save a lot of time and pickup from the choice of a few best ones.

I’ve listed the top 5 Car Racing games below, that are free to download, the download links are embedded as well. Some of these games will work only on high end Android devices, while some will also work on low end Android devices. Just go ahead and pick up one for you.

Let’s start with the game I like the most.

1. Asphalt 8: Airborne Asphalt8_Techbeats

Gameloft’s new addition to its Asphalt series. Asphalt 8: Airborne, as the name suggests packs up the new Dynamic Aerial stunts. The game consists of new cars, new tracks in addition to these Gameloft also added the Music Track change feature to the game. The graphics are much improved from the previous additions of the Asphalt series. The game consists of 47 cars, out of which, 80% are new according to Gameloft. The new stunts like barrel rolls, wild 360 degree jumps, and the new locations are just awesome.The game also sports new features in the career mode, simultaneous multiplayer and ghost challenge mode is also there, while the car damage system looks even more realistic. Gameloft released the game for only 99 cents at start, but later Gameloft made it free. As off know, the game is available for free download, it would not be wiser to waste time, go ahead and download it right now before Gameloft makes it paid once again.

2. Real Racing 3RealRacing_Techbeasts

Just as the name suggests, everything seems real in this game. Real Cars, Real Tracks & Real People. The game packs up HD graphics and requires at least 1.2 GB of free space on your phone’s internal memory. Real Racing 3 is the sequel to the popular and widely played racing game Real Racing 2. The game is developed by EA Swiss Sarl, previously known as EA sports. Real Racing 3 features the cars from the manufacturers like Porsche, Lamborghini, Dodge, Bugatti, and Audi, there are over 50 racers you can compete with. The new advanced Time Shifted Multiplayer system makes the game play even more easier with your friends, at anytime, on any smartphone or tablet.Despite being heavy, packing up all the goodies, the very thing I love about this game is, this is available in the play store for free. So what are you waiting for? Go ahead and download it right now 🙂


3. GT Racing 2: The Real Car ExpGTRACing_Techbeasts

Another racing game by Gameloft, GT Racing 2 is also among the most widely played racing games but not as much as the ones linked above. GT Racing 2, has slightly lower graphics, and is of 1.02 GBs. The game consists of Solo and Multiplayer gaming modes. Has the cars from over 30 manufacturers and 13 different tracks. If you don’t want to play Asphalt 8 Airborne or Real Racing 3, or if your device doesn’t support any of em’ then this one is the choice you should go for. Go ahead and download it from here.


4. Drag RacingDragRacing_Techbeasts

The most fun game I’ve ever played. Packed up in only 25 MBs, the game gives you the best graphics. The online multiplayer system lets you go head to head with your friends and beat em’. You can buy cars and install performance upgrades, there are over 50+ officially licensed cars. Drag Racing is just the perfect racing game for those who don’t have a high end Android device which can support a game like Asphalt 8 or Real Racing, Creative Mobile has done the job for you by bringing up Drag Racing. Go ahead and download it right now and have fun while playing this awesome game.


5. Drift Mania Championship 2 LEdriftmania_Techbeasts

Another lite racing game for Android smartphone users. Drift Mania Championship is packed up in 245 MB, is good for low end Android devices if you have enough internal phone storage. Similar to the other racing games, you can purchase cars, upgrade em’ by installing aftermarket performance products etc. The game focuses specially on Car Drifting, there are various drifting modes. The graphics are good in its size, and depend on your phone’s hardware. Download it from here.


That’s All. Please keep in mind that this list is based on the randomly picked Racing Games from the Google Play Store, that I played on my phone and found interesting and addictive. In case you’ve any suggestions, or you’ve any game in mind that should replace any of these, feel free to stop by the comment box. We will respond immediately and have a look. Thanks All!.

Top Free Android Puzzle Games – Download Here

0
Top Free Android Puzzle Games – Download Here

Android is the fastest growing mobile operating system in the world, Most of the mobile phone users own an Android smartphone whether a high end or low end. In the past few years, a number of new smartphone companies has arise which adds to it. The reason which helps Android to sit atop of all other mobile phone operating systems is its vast and open source development and millions of apps available in the Google Play Store, that can be downloaded for free or purchased directly on your phone. But a huge number of applications sometimes makes you confused about which one to select or which one is the best as there may be multiple apps to perform a same task.

Are you a game freak, or you want to test how strong your brain is, through games? Well, Our concern here is to pick out the 10 best and free Brain & Puzzle games for Android in order to save your time while looking out for the best mind games. Let’s have a look on the list we made.

Shoot Bubble Deluxe

Shoot Bubble Deluxe_TechBeasts

Developed by City Games LLC, Shoot Bubble Deluxe is the Puzzle Bubble game that prompts the players to make a combination of at least 3 same colored bubbles and pop em’, upon clearing the  bored before the time runs out, the players are promoted to the next level. The game features 3 modes Puzzle, Arcade & Game Center. In the Puzzle mode, the players can shoot the balls to make combinations, the bubbles come down after a specific time interval and you need to finish the level before it overs the game. There are over 300 levels in the Puzzle mode, while in the Arcade mode, the bubbles come down gradually and one has to shoot the bubbles before they touch the bottom. In the Game Center, the players get 10 points for each blast of the bubbles and can submit the high score to the global leader boards. Download the APK file here or get it on Google Play Store.


Cut the RopeCut The Rope Full Free_Techbeasts


As the name suggests, you have to cut the Rope that hangs the Candy at its end, the Rope should be cut in such a way that the little monster Om Nom catches and eats it. The game consists of over 375 levels. With each level, the game gets tough. You can collect the gold stars by cutting the Rope in right direction, and discover hidden prizes. Cut the Rope has become a widely played fun game. Download the APK file Here or get it on Google Play Store.


Unblock MeUnblock Me_Techbeasts

Simple, Addictive and Mind boggling game. A Red block is stuck between the brown blocks, and wants you to get it unblocked just as the name suggests. The other blocks can be moved vertically or horizontally depending upon their direction, and you got to pave a way for out of em’ to release the Red one. The game consists of different difficulty levels from Beginner to Expert, different game modes Relax and Challenge,  and over 6500 different puzzles. My choice to pass the time when I’m free, go ahead and download the APK file from here or get it on Google Play Store.


Jigty Jigsaw Puzzles:

Jigty Jigsaw Puzzle_TechBeasts


Jigty Jigsaw Puzzles prompts the players to solve jigsaws. The game is meant to be for the people of all ages. You can use your own pictures in the game and join the pieces to solve the jigsaw, no two pieces are of same shape. There is a wide variety of themed photos available as well in the game that can be used to make the jigsaw puzzle and solve it. Download the APK file here or get it on Google Play Store.


  Flow FreeFlow Free_Techbeasts

The game you would love to play. Simple, easy and addictive. You need to join different colors by drawing pipes and create a flow. Upon joining all the colors properly and creating a flow, you are promoted to the next level. The game consists of over 1000 different puzzles and a number of different levels. Also you can pickup from a number of different level packs, that includes Regular Pack, Bridge Pack etc. The Bridge pack allows you to pass two different pipes through a same block. Download the game right now from HERE or get it on Google Play Store and have fun 😀


 Logo Quiz

Logo Quiz_TechBeasts


While trying different products, have you ever cared about the logos? Well, its time to test how much strong is your brain and how good do you remember the logos. Logo Quiz prompts the players to identify different logos and earn points accordingly. The game somehow helps you to become familiar with different products, and adds to your general knowledge. Download Logo Quiz  from here or get it on Google Play Store and have fun playing it.


Tic Tac Toe

TicTacToe_TechBeasts


Remember playing the cross and tick game in your school? Well, that fun is unforgettable when we used to play it on the desks of our classes, on the walls, and only a few times on our copies. Tic Tac Toe is available in the Google Play Store and is same as the one we used to play in real. Beat the Android’s player if you can. The game consists of different difficulty levels. Download it here right now  or get it on Google Play Store and check how much strong is your brain.


Where’s My Water 2
Where's My Water_Techbeasts


A nice game by Disney. Where’s My Water 2 is the sequel of the popular Where’s My Water. You got to help Swampy by guiding water towards him, and get rid of his broken shower. Where’s My Water 2 has got three new locations that include Sewer, the Soap Factory, the Beach. There are over 100+ levels to play on. You will definitely love it upon playing. Download the APK here or get it on Google Play Store.


Jewels Star

Jewels Star


Quite similar to the Shoot Bubble Deluxe, this game contains the jewels in a board. The players have to make combination of at least 3 same jewels in order to pop em’. Finishing the game, popping all the jewels promotes you to the higher level. The game consists of over 350 levels and 8 different scenes. Consists of different bonus prizes as well. Download the APK file here, or get it on Google Play Store.


4 Pics One Word4Words 1 Pic_Techbeasts

Another mini and lite game for the Android users, is quite addictive once you learn to play it properly. The game prompts the users to name a picture, the picture actually contains a set of 4 pictures and all 4 pictures have one specific thing in common. You need to identify that and name it, and that’s what the game’s name suggests “3 Pics One Word”. Download the APK file or get on Google Play Store.


This list is based on the randomly picked games from the Google Play Store, that were found interesting and addictive. These are not ranked as best after one another, you may find a lot of other interesting games in the Play Store. In case you feel that some games are missing in the list, or some games should be replaced, feel free to stop by the comment box below. We will act accordingly.