Home Blog Page 455

How To Customize Android Share Menu and Share With Multiple Apps

0
How To Customize Android Share Menu and Share With Multiple Apps

If you compare an iOS Device with an Android one, the result will be in favor of Android because of utmost control over Customization. Even if you want to share a photo from Facebook, on Android you can just share it directly from the app to another app easily, but on iOS, users first need to download the photo and then Upload or share it with others on WhatsApp or Viber etc. However, Android uses a smarter way as I said above, it gives you a share button, you tap on it and select the app on which you want to share.

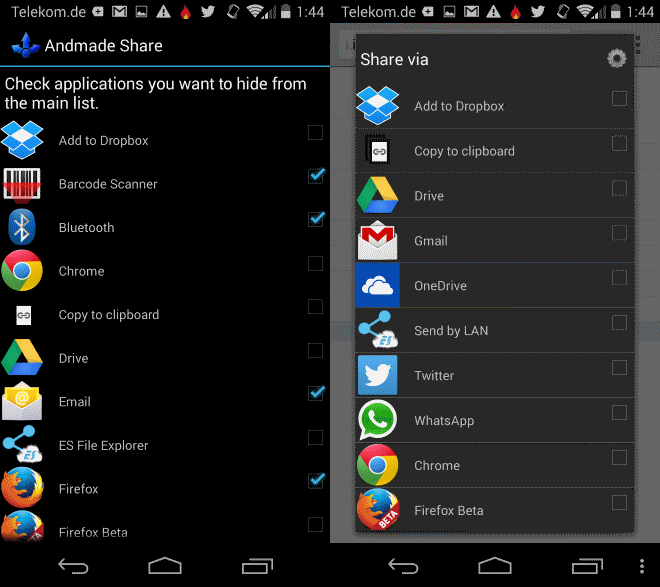
The Share menu on Android smartphone, shows the app which support intra-app sharing, the list will increase as you keep installing such apps. As the list increased, you need to scroll down to get the right one and most of the app in Sharing menu are those, we never tend to use. What you need, is to customize your Sharing menu, so you can easily find the apps you are looking for, not only will it save your time but also a little effort. How, Let’s find out. Andmade Share is an app, that can help you in this manner.

Screenshot_8

How To Ues Andmade Share:

android-optimized-share-menu

  1. Download Andmade Share or Purchase Andmade share Pro, if you like, from the Play Store
  2. Once Downlaoded, Open the app.
  3. Tap Hidden Apps, to open the list apps support such sharing.
  4. Now check the ones, you want to exclude from the list.
  5. After that just, just open anything you want to share, and from the list of sharing, choose Andmade Share.
  6. Tap the Always option for more ease.
  7. All you need is to click the apps to which you want to share the Items.
  8. Purchase the Pro version for more features.

HTC One M8 Unlock Bootloader,CWM Recovery, Root and Achieve S-OFF [How To – Guide]

HTC One M8 Unlock Bootloader,CWM Recovery, Root and Achieve S-OFF [How To – Guide]

HTC’s all new One, the M8 has helped HTC to once again take the lead over other manufacturers in terms of pulling out the most beautiful smartphone in the world. As HTC says “The best just got better”, the new M8 is much more elegant than its predecessor. When it comes to specs, the M8 might win HTC some good votes this time because of it’s heavy spec-sheet. The device sports a 5.0 inches full HD display with 441 ppi. HTC has used a dual 4 MP Camera at the back and a 5 MP shooter on the front. Like other smartphone manufacturers, HTC has also used latest Snapdragon 801 Quad Core CPU in the M8, clocked at 2.3 GHz and accompanied by Adreno 330 GPU and a RAM of 2 GB is also there. Atop of all these nice specifications, HTC One M8 runs on Android 4.4.2 KitKat having HTC Sense UI v6.

Well, that’s enough about the phone itself for now. As mentioned, having all these cool specs and a very beautiful design, M8 has the ability to impress anyone and chances are, a number of users will be going towards this device. As it’s getting old with time, the development is moving forward slowly as well and you may find a number of things that can help you to unleash the true power of your device running the open nature Android OS.

To do all the cool stuff and test the limitations of your device, you need to cross the barbed wires set by the manufacturer. The Taiwanese giant, by default locks the bootloader of its devices, and also there’s an S-ON restriction on the device as well. Basically, both these restrictions are put by HTC in order to make the device’s working and functionality invulnerable by means of flashing a custom kernel, loading custom operating systems, flashing mods or disturbing the NAND partition. S-ON’s purpose is also to perform a signature verification task whenever a user tries to flash a new firmware on the device using RUU or any other tools.

These two things leave the users in thoughts for a while about what to do and what not. HTC allows unlocking the bootloader of the devices, but once you do, the device all yours and the manufacturer is free from any responsibilities as it results in voiding the warranty. However, this is not dangerous nor it is something to worry about, and while we have the great people working over XDA-Developers, we can always expect the great things to come out, to continue their support, the developers have already achieved S-OFF on the HTC One M8.

UnlockBootloaer-S-OFF-One-M8

Let’s head towards our actual topic now. In the following post we will be unlocking the bootloader of HTC One M8, and we will also install a custom recovery [CWM or TWRP], root it and achieve S-OFF on the device. The methods should be valid for all the variants of the HTC M8, however you may try and check how it goes at your end. All you need is, proceed at your own risk and follow all the steps being very careful.

Pre-installation Instructions:

  • This guide is for HTC One M8 [International / Verizon / Sprint / At&t and T-Mobile]. Do not try this on any other device.
  • Make sure that you’ve battery charged over at least 60%. This highly recommended in order to prevent any power issues with the phone during the bootloader unlocking and S-OFF process.
  • Download and install Android ADB and Fastboot Drivers. Follow the guide carefully, and download the Fastboot folder separately on your desktop to avoid any complexity. You may use our Minimal ADB and Fastboot Drivers guide instead for the ease.
  • Make sure that you backup all your important contacts, messages, call logs and all other media content as unlocking the bootloader will completely wipe your phone.
  • Make sure that you’ve installed all the HTC Drivers and HTC Sync Manager – Download Here.
  • Enable USB debugging mode on your phone. In order to do so go to Settings > Developer Options > Enable USB Debugging. If you couldn’t find the developer options in settings then you need to activate the dev options first. In order to do so go to Settings > About and tap the ”Build Number” 7 times and your developer options should appear now.
  • Disable your windows firewall and any anti virus programs if installed in order to prevent any interruption.
  • HTC Sync must be turned OFF while you’re going to unlock the bootloader, it is just recommended for avoiding any connection issues.
  • Use your device’s genuine data cable to connect it to your computer.

Note: All these process will result in voiding the warranty of your device. In case of any mishap, we may not be held responsible with what’s happening or what happened to your device, nor the manufacturer “HTC” will be held responsible as all these process are highly custom. Make sure that whatever you’re doing, you’ve enough knowledge of that and you’re doing it at your own risk.

Here’s How You can Unlock the Bootloader of HTC One M8.

  • First of all goto the Htcdev.com and login. If you don’t have an existing account then create one by pressing the ”register button”, verify your account through the verification mail and login.
  • Now open the Bootloader Unlock page:  Htcdev.com/bootloader and select your device here, if your device is not listed here then select ”All other supported devices” and press begin unlocking. A pop will appear asking you if you wish to continue or not, hit yes in the next step another popup will appear, here you need to accept legal terms and conditions and hit Proceed to unlock instructions.
  • Ok now the HTCDev will give you step by step Unlocking Bootloader Instructions. In the very first step you need to boot your phone into the Hboot Mode. In order to do so turn OFF your phone by long pressing the power key, as soon as it turns OFF wait for 30 seconds. Now long press the Volume Down + Power key. Your phone will now boot into the Hboot mode. Here you can move between the options by press volume up and down keys, and to make a selection you need to press the power key. Highlight the ”Fastboot” option by moving up and press the power key.
  • After selecting Fastboot connect your HTC One M8 to your PC.

Unlock_1b Unlock_2 Unlock_3b Unlock_4

  • Scroll down to the bottom on HTCdev page and hit Proceed to Step 5.
  •  Ok so, now you don’t need to do anything here on the HTCdev’s 2nd page. While you’re on the 2nd page, Open the Fastboot folder that you created using our ADB and Fastboot guide, or open Minimal ADB and Fastboot folder located in program files in your windows drive.
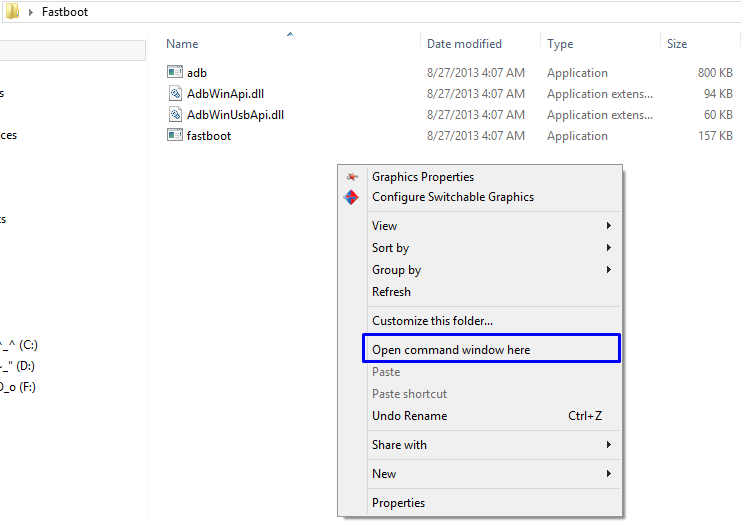
  • Once in any of the either folders, press the shift key and left click on an empty area inside that folder and click on “Open Command Window Here”.
Screenshot_14

  • Command window will now open from the fastboot directory. You need to enter the following command here: fastboot devices
  • This command will tell you if your devices has been detected by your PC or not. If your device is not detected it will not show you any info and you will be forced to re-install HTC Sync manager and re-boot your computer and start this whole process from the start. In case your device is detected it will show you the info and you can proceed to the next step.
  • Now scroll down to the bottom of the HTCDev’s 2nd page and hit Proceed to step 8 button.
  • Now on the 3rd page you need to follow all the instructions i.e
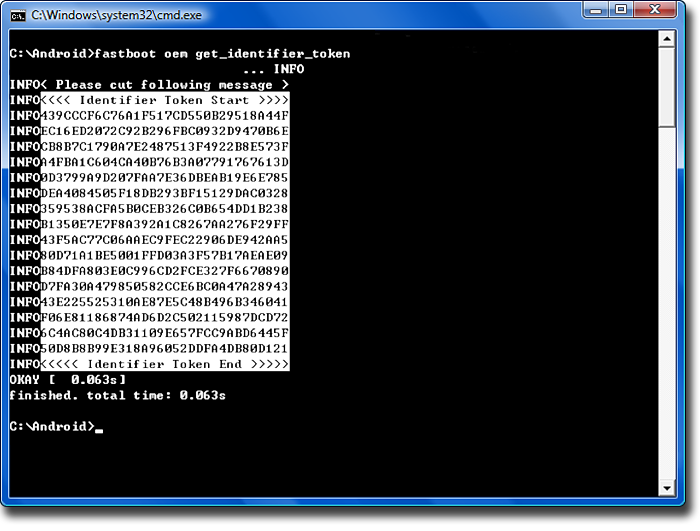
  • Type the following command in the command prompt: fastboot oem get_identifier_token.
  • You’ll see a long block of text in the command prompt. Copy the log starting from ”<<<< Identifier Token Start >>>>  to <<<< Identifier Token end >>>>”. The long block will appear in the form of one of the following two screens.
pict_6a

pict_6b

  • Now paste the copied token code in the box titled “My Device Identifier Token:” on the HTCDev’s 3rd page and hit the Submit button.
  • As soon as you press the submit button you’ll get an email from the HTCDev having a file attached named as ‘Unlock_code.bin”. Download the file and copy it in the Fastboot folder which you extracted on your desktop.
  • Get back to the Command Prompt and type the following command in order to get your HTC M8’s bootloader unlocked:  fasboot flash unlocktoken Unlock_code.bin
  • Now your HTC One M8 will show a request to unlock the bootloader. You simply need to press the Volume Up Key and Select Yes and confirm it using the Power Key.
  • As soon as you press the Power Key, your HTC M8  will now restart and it will complete the Factory Reset process. You can disconnect it now from your PC.


That’s All! Congrats, you have the bootloader unlocked now on your HTC One. 

How to Install CWM / TWRP Recovery on HTC One M8:

T-Mobile’s One M8’s recovery will be linked here as soon as we find it.

Download the recovery.img file from above links carefully for your device.

Here’s how to flash the recovery now:

  1. Your bootloader must be unlocked, unlock it using the method above.
  2. You must have Android ADB and Fastboot drivers, install carefully using the guide above.
  3. Once installed, copy the downloaded Recovery.img file to the Fastboot or Minimal ADB and Fastboot folder that you got from the guides.
  4. Close the HTC Sync Manager to avoid any interruption.
  5. Open the Fastboot folder, or open Minimal ADB and Fastboot folder located in program files in your windows drive. Once in any of the either folders, press the shift key and left click on an empty area inside that folder and click on “Open Command Window Here”.
  6. Enable USB Debugging Mode on your device.
  7. Put your device in Fastboot mode now. To do so,  long press the Volume Down + Power key. Your phone will now boot into the Hboot mode. Here you can move between the options by press volume up and down keys, and to make a selection you need to press the power key. Highlight the ”Fastboot” option by moving up and press the power key.
  8. Connect your device to your PC now.
  9. Now in ADB command panel, issue this command to verify your connection: fastboot devices

  10. This command will list the device connected in Fastboot mode.
  11. Once the devices are shown up, type: fastboot flash recovery recovery.img

  12. This will flash the recovery in your phone quickly.
  13. As soon as the flashing is done, issue this comamnd: fastboot reboot or remove your device and reboot into recovery mode using Volume Up + Volume Down combination.

  14. That’s all!


How to Root HTC One M8:

  1. Download SuperSu.zip file.
  2. Copy the downloaded .zip file to your phone’s sd card.
  3. Boot into recovery mode, use the same method explained above.
  4. Once in recovery mode, tap “Install > Choose Zip form SDcard > SuperSu.zip”.
  5. Proceed with the installation and flash it.
  6. Once done, reboot your device.
  7. Phewww! You’re rooted now.
  8. In order to install Busybox now, go to Google Play Store.
  9. Search for “BusyBox Installer”.
  10. Install it and install BusyBox now.
  11. That’s all.


How to S-OFF HTC One M8:

Pre-Requisites:

  • ADB and Fastboot drivers must be installed properly. Use the guides linked above in the pre-installation instructions.
  • Your device must be HTCDev unlocked, the method is explained above so make sure that you perform it properly. Also, your device should be rooted. Use the method above to root as well, you may also use WeakSauce method to root Verizon HTC One M8.
  • Uninstall HTC Sync Manager now.
  • There shouldn’t be any screen lock (password, pin or pattern) settled up on your device.

How to S-OFF: 

  1. Download Firewater S-OFF file.
  2. Once downloaded, copy the Firewater file to Fastboot or Minimal ADB and Fastboot folder that you got after using our ADB and Fastboot guides.
  3. Open the Fastboot folder, or open Minimal ADB and Fastboot folder located in program files in your windows drive. Once in any of the either folders, press the shift key and left click on an empty area inside that folder and click on “Open Command Window Here”.
  4. Enable USB Debugging Mode on your HTC One M8.
  5. Connect your HTC One M8 to your PC now.
  6. Now in command prompt, type: adb devices

  7. This will enlist the Android devices connected with the PC.
  8. Now issue the following commands in command prompt:

adb reboot [Important]
adb wait-for-device push firewater /data/local/tmp
adb shell
su
chmod 755 /data/local/tmp/firewater
/data/local/tmp/firewater

  1. Allow access on the device if prompted for any permission.
  2. Complete the procedure and reboot.
  3. Check S-OFF status on the bootloader now. That’s all.

That’s all. We hope that you find this guide easy to use and helpful. In case you got any queries or you face any difficulties regarding this post, don’t hesitate to reach us through the comment box below. We will get back to you as soon as possible. Thank you all.
How To Save Maps In the Updated Google Maps App

0
How To Save Maps In the Updated Google Maps App

Google Maps is the best Maps application available on any embedded platform, and with the help of 3G/4G connectivity, Google Maps can be a great service if you want to explore the world around you, I myself found a lot of places with the Help of Google Maps, especially when it comes to searching for Institutes, not all of them can be found easily. However, if there is an option of Saving the maps and using them Offline, cause connectivity is not available all the time, will be the best thing in any Maps application.

There are many applications available on App Stores, which provides the feature of  accessing Maps Offline, but what offers in Google Maps is the best. I mean Street View is available, and the places are being updated ever since the beginning. In the recent update of Google Maps app for both Android and iOS, they have given the option of search the maps and save them afterwards. How let’s find out.

Screenshot_7

 How To Save Maps in Google Maps:

  1. Open Google Maps.
  2. Search for Any Location.
  3. While you tap the Search bar, you will see your history.
  4. At the very end you will see, Either “Make this map area available offline” or “Save map to use offline”

2014-05-07-17.40.43-BorderMaker

You can Even Filter the Search, searching only Four Star Review restaurants will give you better places. In the update, Maps will tell you the timing, when the restaurants will be open and when it will close. Phone Number and Website is already included there, in previous versions too. Moreover, you can see the timing of the Entire week, by tapping More Info.

Permanently Remove Bloatware From Your Windows 8 Laptop – How To Guide

Permanently Remove Bloatware From Your Windows 8 Laptop – How To Guide

Windows 8 and Bloatware are like Brothers, they will go hand in hand and always will be like this. However, unlike any other OEM Microsoft tried to go creative with Bloatware, you know like, when you open your desktop lid, you are greeted with beautiful Metro tiled UI. That screen is filled with apps, tiles and sometimes even pictures of those people, whom you don’t even know telling you the news, Sports, Scores and where you should travel next.

It all looks cool and beautiful but once you get used to it, you’ll realize that all of these apps are only making your PC slow, afterwards, you’ll be looking for the solution to delete these apps. You’ll be needing your own Desktop back and this time you have to do a lot more than normal to win. But still whatever Windows 8 is, it is still a Software, and any type of editing can be done with a Software, even removing the Blotware.

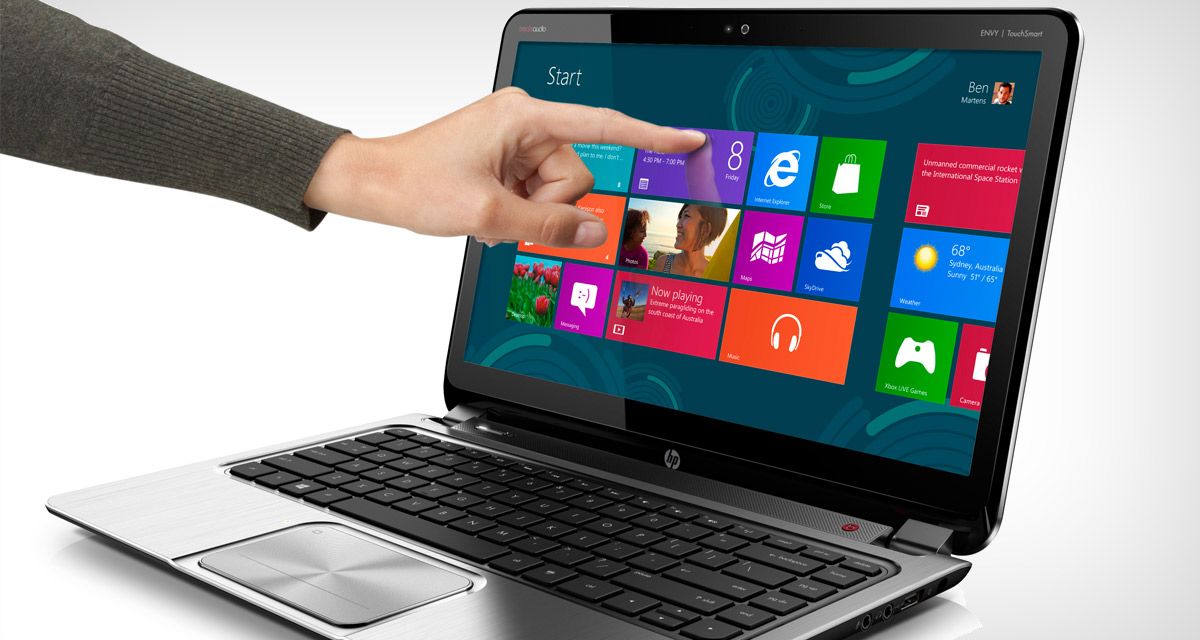
windows-8-touchscreen-laptop

Microsoft has 20 apps that comes with every install of Widows 8 and these odd apps are the ones you need to delete, you can delete them manually, just find them then Right click and uninstall. However, there is an easy way. Windows 8 App Cleaner is an easy way to uninstall all these apps. How, let’s find out.

How To Use Windows 8 App Cleaner:

Screenshot-130

  1. Download and Install Windows 8 App Cleaner.
  2. Open the app and from the Top right corner, choose your Windows version.
  3. Click List of Apps to scan your System for Windows app.
  4. On the Right side of Screen, you will see the Listed apps of Windows 8.
  5. You can Tick the apps you want to delete or select all of them.
  6. Click Remove apps button and in a few minutes, your PC will be Bloat free.
  7. However for apps like McAfee Centerl you need to uninstall them Manually.

You can try Decarp to remove the bloatware.

Learn Different Languages On The Go With Duolingo For iOS

0
Learn Different Languages On The Go With Duolingo For iOS

Now who don’t want to talk in Multiple Languages, My brother always wanted to learn Japanese, so he can watch Anime without Subtitles. Learning English is not a difficult task ,you can watch Movies with English subs and after a little time you will be able to speak smoothly, But when it comes other languages, like French, Chinese etc. they are not as easy as anyone can think, even if you can adapt their style, still speaking such languages are not easy. The best way you can learn them is not by the book, but with using Applications that can translate and help you in learning different languages.

The best way is to start with some cool dialogues, then cut off the words and learn the word by word. iOS is offering such apps with multiple Language support and easy tutorial to help you in learning different languages and Duolingo is the best one among them, Only Italian, Spanish, French, German and Portuguese is supported for now, but the updates will bring more languages in Future. Without Further ado, let’s look at how you can install it. The same app is Available for Android as well.

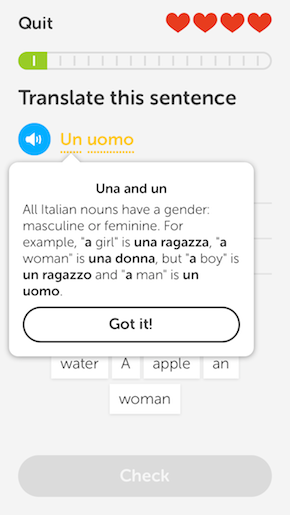
Screenshot_2

How To Install And Use Duolingo:

  • Visit App Store and Download Duolingo. The app is totally free.
  • After the Installation, open the app.
  • Click on the Daily Goal if you want to learn a Track daily or tap may be later.

Duolingo-Daily-Goal-1

  • Afterwards, there are a Variety of Lessons Provided by Duolingo.
  • These Lessons are the Best part of this app, you have different objects written in different languages and the easiest way to learn any language is by starting from the goods.

Duolingo-Lessons-2

  • In the end of every lesson, you have the option to Check what you have learn in the meantime. You can practice what you learn by translating content.
  • All the Lessons are available offline, a great advantage for all those people who roam outside and don’t use Internet connectivity much.

Duolingo-Translation-2

Armed Forces Day Wallpapers HD 2014 – Download Here

0
Armed Forces Day Wallpapers HD 2014 – Download Here

Armed Forces are the best and valuable assets of every country, every body loves their Armed Forces because these are the ones who protect our nation from terrorist attacks, security threats and much more, for this reason every year on 17th May we celebrate Armed Forces Day. Giving tribute to our forces tell them how much we love them. To Celebrate Armed Forces Day 2014, I’ve collected Armed Forces HD Wallpapers and Armed Forces Day Badges.

armed forces day


If you love your Armed Forces Please Share these with your friends.

armed forces day

armed forces day

armed forces day

armed forces day

armed forces day

armed forces day

armed forces day

armed forces day

armed forces day

armed forces day

armed forces day

armed forces day

armed forces day

armed forces day

armed forces day

rifles soldiers video games ruins army military snipers buildings sniper rifles special forces 19_www.wallpaperhi.com_53


How To Turn off Activation Lock On iPhone running iOS 7

0
How To Turn off Activation Lock On iPhone running iOS 7

Now a days mobile snatching is every where to stop that Apple has introduced a feature called Activation Lock, that means if your iPhone is stoled so first thing every one is do perform a factory reset or try to remove pass lock through custom ISPW. After doing all these steps still they need your login credentials to remove the Apple id and Turn off Find My iPhone. This is a good thing to stop crime but it cause lot of difficulties for those who sell their devices to others and forget to remove the Activation Lock. New owner cannot perform factory reset, cannot add his/her iCloud and Apple. So here’s you can Turn off Activation Lock On iPhone, iPad and iPod running iOS 7.

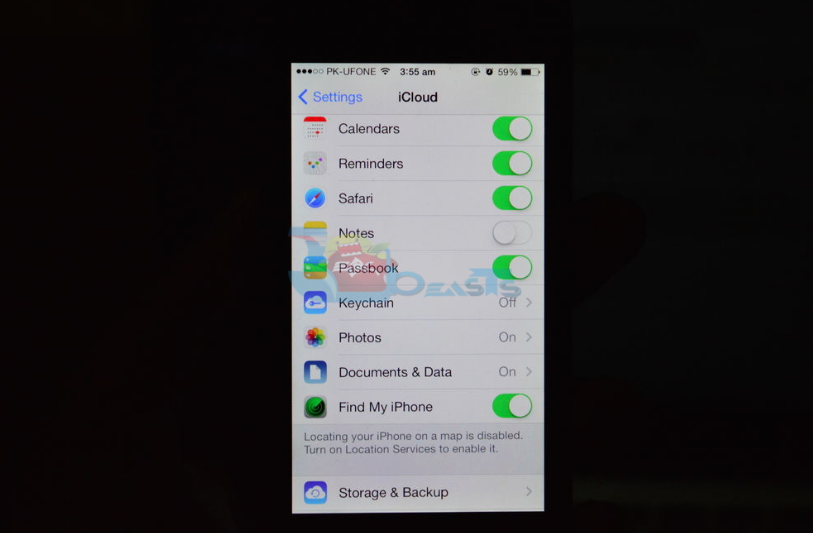
how to turn off Activation Lock on iPhone running ios7

How To Turn off Activation Lock On iPhone running iOS 7:

  • Open setting on your iPhone and goto iCloud.
  • Now search for Find My iPhone and turn it off.
  • You’ll have to add your Apple id login credentials to completely turn off Find My iPhone.


Turn off Activation Lock On iPhone running iOS 7 [ iCloud ]:

  • Open iCloud.com on your PC/Mac Browser.
  • Sign into iCloud account.
  • Now open ” Find My iPhone ” select the device you’ve sold.
  • It will take time to get the location of your device.
  • After selecting your device click on the cross button right next to your device. You’ll get a confirmation alert click on remove. 

This will remove the Activation lock from the device you sold.

Unlock Or Auto-Lock Your Windows 8 PC Using a Bluetooth Enabled Phone

Unlock Or Auto-Lock Your Windows 8 PC Using a Bluetooth Enabled Phone

Automatic Locks is a great relief over manual locks, after all it saves your time and you don’t have to worry about anything as you received the confirmation that your device is locked, in old Nokia Phones,when you hear a beep and on your device screen it will appear as Keypad Locked/Unlocked. Inspired by this trend, Windows 8 also features Bluetooth Unlocking and Locking using any Bluetooth enable Phone. This process will work with any device with Bluetooth 2.0 or above, so you don’t need Android or iOS device.

BlutoothKeyless

We will show you how to Set Automatic Lock using BTPproximity, it is a 3rd party application available. As you know that, installing a 3rd party software asks for the security warning, so when you run the Set-up file the warning will appear, just ignore and proceed ahead. Once the installation is over, proceed further to Configure the BTPproximity.

installing

How To Configure BTPproximity:

  1. Open the App.
  2. Click the Configure Option.
  3. You need to Pair the device with your PC before trying this thing.
  4. Right Click the Bluetooth icon and Add a New Device.
  5. Now Search for your Mobile and Pair it.
  6. After you have Paired the device, Click the Select button to select the Mobile you would like to Configure the device with PC.
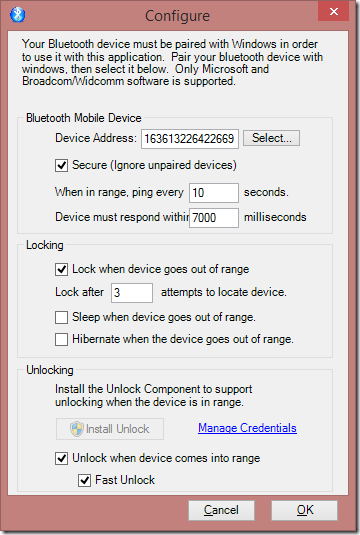
  7. Once the Connection is successful, the device will be pinged by the App after the time you set, default is 90seconds.
  8. Three Fail responses will lock your device.
  9. Once everything is set, turn off the Mobile Bluetooth to see whether it works or not.
  10. Your computer will be Locked after 30 secs, that is like 3attempts of 10 secs each.

BT-pair-settings


The app itself is great, it works and lets you forget about the unlocking of your device, however, you need to Open your Mobile Bluetooth all the time, which is battery consuming and not goo either, otherwise a great app for all of us.

View Saved Wi-Fi Passwords In iOS and Android – How To Guide

0
View Saved Wi-Fi Passwords In iOS and Android – How To Guide

Well there are not much cafes available with Wi-Fi connectivity, but there are some and there is nothing more comfortable than working in a little noise while having a hot cup of tea, and it is even better if these cafes are outdoor, a cool breeze with a cup of Coffee is the perfect atmosphere to use your Laptop for writing articles, you get to enjoy the scenery as well as work or watch videos or stuff with your friends. The password of the Wi-Fi connection is something that is easily to expose when you are using a Laptop, but on a Phone, it is not as easy as it is on a PC.

Asking the Officials there is the easy way, but why bother them when you can retrieve it from the Phone itself, Plus you will know another secret method, you can share with others and it also comes in handy when you don’t have any other connectivity than Wi-Fi. However, remember that this tutorial will only work on Rooted Android and Jailbroken iOS devices.

Screenshot_2

Jailbreak your iOS Device.

Since the following tutorial needs an iOS device which is Jailbroken, you need to Jailbreak your device. If your device is still in its normal condition. Follow our Jailbreak Section to find out how to Jailbreak your device

Root Your Device:

Since the following tutorial needs an Android device which is Rooted, you need to Root your device. If your device is still in its normal condition. Follow our Root Section to find out how to Root your device

How To Retrieve Wi-Fi Passwords On Android:

  1. Download and Install ES File Explorer.
  2. Navigate to the Root folder, in ES File explorer open your device Tab.
  3. Tap Data > Misc > Wi-Fi.
  4. Tap the wpa_supplicant.conf. and open it.
  5. In the file, you will see the Network SSID and their Passwords, do not edit anything otherwise you will experience problems.
  6. Note them down or share them on Spot.

How To Retrieve Wi-Fi Passwords On iOS:

  1. Open Cydia.
  2. Download and Install NetworkList from Cydia
  3. Go To Device Wi-Fi settings and you will see a new button called Network Password, in iOS 7 it will be mentioned as Known Networks.
  4. Tap it and see the Saved passwords
  5. The Tweak will only show the Password, you can’t do anything else.

Install CWM Recovery and Root Sony Xperia M2 D2305 Running 18.0.A.1.30 Firmware [How to – Guide]

Install CWM Recovery and Root Sony Xperia M2 D2305 Running 18.0.A.1.30 Firmware [How to – Guide]

Sony isn’t in a mood to take a break and is bringing a nice smartphone one after another. Xperia M2, released at MWC, 2014 is Sony’s new mid-range Android device, sporting a 4.8 inches display with 299 ppi, 8 MP shooter at the back and a secondary cam on the front. The device is powered up with a Quad Core CPU clocked at 1.2 GHz accompanied by Adreno 305 GPU while a RAM of 1 GB is there and 8 GB storage memory is there as well. Out of the box, Xperia M2 runs on Android 4.3, but will receive KitKat update in near future.

Well, these specs are good enough to win your pocket. In case you’re planning to get this device or you’ve already got your hands on the Xperia M2, you may want to explore the world of Android and unleash the true power of your device by flashing custom stuff on the device. To do so, you probably will need a custom recovery, so to cut down your search we have it right here for you. In the following post we are going to install CWM [ClockworkMod] 6 Recovery and Root Sony Xperia M2 D2305 running stock Android 4.3 Jelly Bean 18.0.A.1.30 firmware. It is always important to make the things less complex, and remove any confusions that may stream around the newbies. To do so, we will first go through a brief introduction of a custom recovery and root access.

Root-CWM-Xperia M2

A custom recovery allows you to install custom roms, mods etc. Along with these, you can make a Nandroid backup, this helps you a lot as you can move back to the previous working state of your phone at any time you want if you have backed up your current system. In some cases, to root the phone you need to flash SuperSu.zip file in the custom recovery, having installed the recovery may help you while in some casesto install the recovery easily, you need to have the phone rooted. You can also wipe cache and dalvik cache of your phone using a custom recovery.

Rooting your phone gives you complete access over all the data which is apparently locked by the manufacturers. This includes removal of the factory restrictions and making changes to the internal system and the operating system. Gaining the root access gives you the privileges to install various applications to enhance the performance of your device, allows you to remove the built-in applications/programs, helps you to upgrade the battery life of your device & install the apps which require the root access for the proper functionality and modify your device in so many other ways e.g using mods and flashing custom recoveries and custom ROMs. There is a laundry list of things you can do after having your device rooted and installed the custom recovery, now once you’re rooted and haveinstalled custom recovery, go ahead and enjoy it on your phone. Here’s our collection of 10 Best Root Apps.

Here are the pre-installation instructions that you must follow:

  1. The CWM recovery is only for Xperia M2  running latest Android 4.3 JellyBean Firmware. Check your firmware version in Settings > About Device and make sure that it matches the one mentioned here.
  2. You must have installed Android ADB & Fastboot drivers. Follow the quick guide here.
  3. Your device must have an unlocked bootloader. Follow our full guide here in order to unlock. While you unlock your phone’s bootloader, make sure that you read the guide and all the precautions carefully.
  4. Please make sure that your phone’s battery is charged at least over 60%. This is highly recommended in order to prevent any power issues during the recovery flashing process.
  5. Backup each and everything on your Android phone as follows:
  6. Backup all your important contacts, find the full guide here.
  7. Backup all your important sms messages, find the full guide here.
  8. Backup all your important call logs, find the full guide here.
  9. Backup all your important media content manually. (Copy to your PC.)
  10. Enable USB debugging mode on your device.  Get it in Settings > Developer Options > USB Debugging mode.
  11. Use only OEM data cable to establish connection between your PC and Phone.
  12. Alright! Follow this guide to the letter now.

If you want to root your device without unlocking the bootloader, check out this post.

Disclaimer: The methods involved in flashing custom roms and rooting your phone is highly custom and may result in bricking your device, and has nothing to do with Google or the device manufacturer that is SONY in our case. Also rooting your device will void its warranty and you will be no longer eligible for any kind of free device services by the manufacturers/warranty providers. In case of any mishap we may not be held responsible. Follow these instructions to the letter to avoid any mishap or bricking. Make sure that whatever you do, you are doing it at your own responsibility.

How to Install CWM 6 Recovery on Xperia M2 D2305:

  1. Download Doomlord’s Advanced Stock Kernel with CWM Recovery.img file
  2. Rename the downloaded .img file to boot.img.
  3. Place the downloaded boot.img file in the Minimal ADB & Fastboot folder that you created using our ADB & Fastboot Quick Setup Guide.
  4. If you are using Android ADB & Fastboot full package, you can place the downloaded and renamed boot.img file in the Fastboot folder or in the Platform-tools folder.
  5. Open the folder where you placed the boot.img  file. E.g Minimal ADB & Fastbootor Fastboot or Platform Tools.
  6. Press and hold the shift key and right click on an empty area within the folder, and click on “Open Command Window Here”.
  7. Turn off your Xperia M2 completely.
  8. Now press the Volume Up Key and while keeping it pressed plug in the USB cable.
  9. You should see a blue light in the notification light of your phone, that means your device is now connected in Fastboot mode.
  10. Now type the following command:

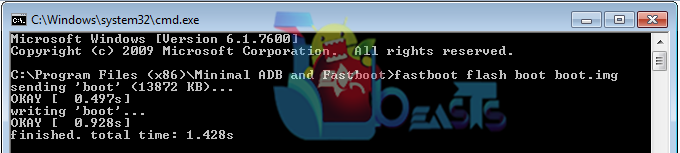
     fastboot flash boot boot.img

  11. Hit Enter and it will quickly flash CWM 6 recovery in your Xperia M2.
  12. Once recovery is flashed, now issue this command

    “fastboot reboot”

  13. In case this doesn’t work, you may reboot the device manually.
  14. Your device will reboot now, as soon as you see the Sony logo,  and the pink LED, press Volume Up key to enter recovery.
  15. Congrats! You should now see the custom recovery.
  16. That’s all.
Screenshot_1


How to Root Xperia M2 D2305 Running Android 4.3 Jelly Bean 18.0.A.1.30 Firmware:

  1. You need to install CWM recovery first using the above instructions.
  2. Download Supersu.zip file now.
  3. Place the downloaded Supersu.zip file on your phone’s external sd card.
  4. Now boot into CWM recovery on your phone. To do so, turn off your device first. Now turn it on, as soon as you see the Pink LED, press the Volume Up Key rapidly.
  5. You should see the CWM recovery interface shortly.
  6. Once in CWM, select “Install Zip > Choose Zip from SDcard > Select SuperSu.zip > Yes”.
  7. This will flash SuperSu.zip file, once flashing is complete, reboot your device.
  8. Congrats! You’re rooted now!
  9. SuperSu


How to install busybox now?

  1. Go to Google Play Store on your phone.
  2. Search for “Busybox Installter”.
  3. Once you find it, install it.
  4. Run the Busybox installer and proceed with the installation.
  5. That’s all!

How to check if the device is properly rooted or not?

  1. To do so, go to Google Play Store on your Xperia M2.
  2. Find “Root Checker” and install it.
  3. Open Root Checker.
  4. Tap “Verify Root”.
  5. It will ask you for SuperSu rights, tap “Grant”.
  6. It should show you Root Access Verified Now!
  7. That’s All!

1560688_10202529514651766_2061540064_n

That’s all. In case you have some queries or you’re facing some issues regarding this post, feel free to stop by the comment box below and drop us your words. We surely will get back to you as soon as possible. Thanks all.

Credits: Doomlord for CWM  | Chainfire for SuperSu.

Recover Deleted Photos from iPhone or iPad [ Easy Guide ]

1
Recover Deleted Photos from iPhone or iPad [ Easy Guide ]

Today, I’ll tell you that how you can recover deleted photos from iPhone or iPad. It happens whenever we have tried to update our device through custom ipsw files, iPhone got stuck on boot loop, performing factory restore and many more things. First thing came to mind is iTunes because when ever we connect to iTunes we got option to backup our devices so if you are lucky to have a backup then you can get most of your deleted pics. If not then no need to worry there are ways to restore. You can restore photos through following steps.

Recover Deleted Photos from iPhone or iPad

How To Recover Deleted Photos from iPhone or iPad:

Method 1:

  • Open iTunes.
  • Connect your device with iTunes.
  • Now on the side bar right click on your device a drop down menu will appear select ” Restore from backup “.
  • Now choose the latest backup.

This method will work if you’ve sync your device with iTunes and took a backup last time. Note you’ll get only the last backup photos not the new ones.

Recover Photos from Photo Stream / iCloud:

iCloud or third party apps might come handy for this situation. If you have iCloud account added with your device and Photo Stream is enabled then all of your new and old photos will be there. You can enable photo stream on iCloud by ( Settings -> iCloud -> Photo Stream -> Switch ON ‘My Photo Stream’).

  • Add your iCloud with your iPhone or iPad.
  • Goto your photos on your iPhone.
  • Now Tap on photo stream and hope so you’ve have your photos there.

Third-party Software:

There are many software available in market to recover the photos. You’ll be provided steps after then installation of the software or you can find the guide on web.

Following the are best software to Recover Deleted Photos from iPhone or iPad: