Home Blog Page 516

Update Samsung Galaxy S2 GT-I9100 to Android Jelly Bean 4.3 using CyanogenMod 10.2 Custom ROM

50
Update Samsung Galaxy S2 GT-I9100 to Android Jelly Bean 4.3 using CyanogenMod 10.2 Custom ROM

The good thing I love about Samsung is, Samsung doesn’t forget its smartphones and tries to bring the latest operating system to its popular and best selling devices. But unfortunately we saw the updates for Samsung Galaxy S2 only till Android 4.1.2 Jelly Bean. Samsung has not decided/announced to roll out any new firmware update for Galaxy S2 until now. Anyways, the other good thing is that Samsung’s devices have a vast development platform and the developers always find it easy to bring the latest mods and custom roms for Samsung devices.

ss

You may be an Android Freak and wanting to get your hands on the latest Android 4.3 Jelly Bean on your Galaxy S2. While Android Jelly Bean 4.3 will not be available for GS2 officially, many of the GS2 owners may get disappointed but wait!, as mentioned earlier, the developers always find it easy to develop custom roms for Samsung devices. CyanogenMod developers have successfully developed the CyanogenMod 10.2 custom rom based on Android Jelly Bean 4.3 for some devices including Samsung Galaxy S2, so if you want to taste the unofficial Jelly Bean 4.3 you may follow our easy guide to get it on your phone.

Let’s head towards our guide and learn how you can get the Android Jelly Bean 4.3 on your Galaxy S2

Disclaimer: The methods involved in flashing custom roms and rooting your phone is highly custom and may result in bricking your device, and has nothing to do with Google or the device manufacturers which is Samsung in our case. In case of any mishap we may not be held responsible. Follow these instructions to the letter to avoid any mishap or bricking. Make sure that whatever you do, you are doing it at your own responsibility.

Before we begin, make sure that you have battery charged over 60 % and have backed up all your important ContactsCall LogsMessages. It is highly recommended in case of any mishap or data loss to backup all your important data.

    1. First of all you need to gain the root access on your device and install a custom recovery.
    2. In order to do so Follow Our Easy Guide, and gain root access + custom recovery on your GS2.
    3. Verify that you have installed the custom recovery by entering into recovery mode by pressing Volume Up + Home Button + Power key simultaneously. Your phone should boot into a custom recovery based on ClockworkMod.
    4. Download the unofficial Android Jelly Bean 4.3 CyanogenMod 10.2 from HERE.
    5. Download the Gapps for CyanogenMod 10.2 from HERE.
    6. Place the downloaded file on your phone’s sd card.
    7. Boot into the recovery mode on your phone. In order to do so turn off your phone by pulling our the battery for 30 seconds or by long pressing the power key. Now press and hold Volume Up + Home button + Power key simultaneously, your phone should now boot into ClockworkMod recovery.
    8. You can move between the options by pressing volume up and down keys, if you have CWM Advanced addition you can use touch. To make a selection you may press power key or home button.
    9. Select ”Install Zip from Sd Card” and the select ”Choose Zip from Sd Card”.
    10. Now select the downloaded Android Jelly Bean 4.3 Custom Rom .zip file which you placed on your Sd Card.
    11. Select Yes and let the installation process complete. As soon as your phone reboots, you have the Custom Rom installed on your phone. Boot into the recovery mode once again now and wipe all your factory data and cache in order to clean all the system junk.
    12. Now you may find that the Google Play Store is missing on your device, but there’s no need to worry about. You need to simply flash the downloaded GApps .zip file for CyanogenMod 10.2 by entering into the recovery and repeating the step G – J but this time you will select GApps file.
    13. As soon as your phone reboots, you have the Google Play Store installed as well.
    14. Congrats! You have now Android 4.3 installed on your GS2, Enjoy using it!

We hope that you find our guide easy to use, leave us feedback through comment box below :). Got any queries? Feel free to ask us, we’ll try our best to help you out.

How to reset Nokia Lumia 1020 if it becomes unresponsive

2
How to reset Nokia Lumia 1020 if it becomes unresponsive

Bad things come unwarned about. One such type is the one that leaves your phone useless. Your phone stucks and does not respond. Luckily, we have a solution for you for such a problem.

Two reasons could have brought you here to this page: one- you’re having this problem and two- you’re just exploring stuff. Whatsoever the reason may be, just go through these simple steps and you’re good to go!

  • Phone is On
  1. Go to settings>about>and select “reset your option”.

lumia2625534

  • Phone is Off and wont turn on/ Frozen
  1. Hold down the power button, the camera key and the volume down key at the same time, utill you feel your phone vibrate.
  2. Release the power button, but keep holding the camera key and the volume down key until the phone reboots to the start screen.
An alternate method by Nokia:

In case the above method does not work, Nokia has issued an aternate way to reset your Nokia Lumia 1020. Follow the steps below:

  1. Turn off your phone
  2. Press and hold the power key. The phone vibrates, release the power key.
  3. Press  and hold the volume down key until it shows an exclamation mark on the screen. Release the volume down key.
  4. Perform the following key combination:
    • Volume Up
    • Volume Down
    • Power key
    • Volume Down

5.  The phone will reset and will automatically boot up.

(This might take a few minutes)


A revision of the above method is shown below through pictures:

lumia1 lumia2 lumia3

Please note that the reset will wash all the data on your phone.

Source: Nokia

Samsung Galaxy Note 3 HD Wallpapers For Free – Download Here

0
Samsung Galaxy Note 3 HD Wallpapers For Free – Download Here

Samsung Galaxy Note 3 is still alive, a number of users are still using this device. That’s why we collected the Samsung Galaxy Note 3 HD Wallpapers. Moreover, we are not only providing you the latest Samsung Galaxy Note 3 HD Wallpapers. We are also providing you the live Wallpapers for Galaxy Note 3. If you don’t know how to add live wallpapers on your Samsung devices, heed the instructions below.

All you have to do is Home -> Menu -> Wallpapers -> Live Wallpapers and select whatever you want on your screen. Cheer’s, Keep visiting Techbeasts and get more exciting stuff. Let’s Start with the Lock Screen wallpapers of Samsung Galaxy Note 3.

Also, See Samsung Galaxy Note 4 Wallpapers.

Galaxy Note 3 HD Wallpapers

Samsung Galaxy Note 3 HD Wallpapers For Free:

That’s all.

Install No-ip2 to Host Servers on a Dynamic IP Address On Ubuntu 12.04 LTS.

0
Install No-ip2 to Host Servers on a Dynamic IP Address On Ubuntu 12.04 LTS.

Now who doesn’t want to own a server? You can share photos, videos and other stuff and host a website of your own, stream your own media from anywhere in the world. All that requires is a location on internet called URL like http://www.anything.com. This is normally done by purchasing a domain which is not free. But in Ubuntu 12.04 LTS it can be done free of cost, Ubuntu 12.04 LTS is a perfect host for your own websites and streaming services.

All you require is a PC, simply an old PC you were about to throw will work, just intall a Lamp server on it and after installing go all the way to Static ip port and stop right there. Once you have Lamp server running with SHH get ready to start the NO-IP service on it.

hqdefault

Go to www.noip.com and Sign-up there, it’s free.

After signing up, you will get a free website name.

Click “no thanks I’ll use no-ip.biz” link to use free DNS with the site you were assigned.

Click or Unclick the “send me free stuff” depend on your likes and interests.

Click “sign up” under “free DNS service” coloumn.

Now open a terminal to your server and login using the same usename and password that you setup during the Lamp installation.

Switch to root user.

sudo -s

When asked, enter the password for the username you installed ubuntu with.

Install the Software required to build the no-ip client.

apt-get install build-essential checkinstall

Download the no-ip client.

cd /usr/local/src/
wget http://www.no-ip.com/client/linux/noip-duc-linux.tar.gz
tar xf noip-duc-linux.tar.gzdir

Remember the directory where the client is saved.

cd  noip-2.1.9-1/

Start the installation.

checkinstall

click y to accept the default docs.

Enter “noip” as the name for the Software.

Press Enter 3 times to accept the name and description for the program.

Now you will configure the clinet for your no-ip web service.

When asked enter your no-ip login name and password.

Press Enter to accept 30 second update rate, then accept N and go on without running a script on succesful update.

Press Enter to accept n and skip listing the included docs. Again press Enter to accept y and exclude docs from Package.

Note down the dpkg uninstall but donot run the process as it will uninstall the package.

Switch back to normal user.

su <ubuntu_username>

For your own ease make the file permiss0ion quit premissive for ease of setup but restirict them later.

sudo chmod 7777 /usr/local/etc/no-ip2.conf.

Now write this script so when the PC starts the client starts too.

sudo nano /etc/init.d/noip

Copy and Paste the following lines, between the ##### lines, into the file you just started.

#######################################################
#! /bin/sh
case "$1" in
    start)
        echo "Starting noip2"
        /usr/local/bin/noip2
    ;;
    stop)
        echo -n "Shutting down noip2"
        for i in `noip2 -S 2>&1 | grep Process | awk '{print $2}' | tr -d ','`
        do
          noip2 -K $i
        done
    ;;
    *)
        echo "Usage: $0 {start|stop}"
        exit 1
esac
exit 0#######################################################

Now to test the startup script use this.

sudo /etc/init.d/noip stop

sudo /etc/init.d/noip start

Now to reset permisiion so only the root user will run the startup  procedure.

sudo chmod 700 /usr/local/bin/noip2
sudo chown root:root /usr/local/bin/noip2
sudo chmod 700 /etc/init.d/noip
sudo chown root:root /etc/init.d/noip
sudo chmod 700 /usr/local/etc/no-ip2.conf
sudo chown root:root /usr/local/etc/no-ip2.conf

Now add the noip start script to ubuntu startup process.

sudo nano /etc/rc.local

In the Line above “exit 0” add the following line:

/etc/init.d/noip start

You will need to open port 8245 through the server, depend on your Router.This is called port forwarding, to learn more visit www.portforward.com.

Finally after all, you server will be available anywhere at

http://<your_noip_user_name>.no-ip.biz


Source: howtoforge.com


HTC One Max Leaked photos Again: fingerprint scanner, removable battery confirmed

3
HTC One Max Leaked photos Again: fingerprint scanner, removable battery confirmed

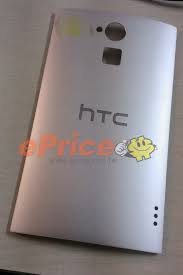
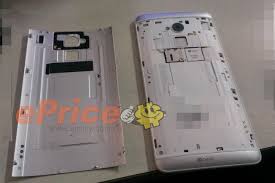
Today, HTC One Max was sighted again and the leaked photos suggest that the smartphone is to have a fingerprint scanner at the back right under its camera lens and the LED flash. The photos and specs had been leaked once prior to this as well. But, the ones leaked today in a Chinese social network as more detailed.

htconemaxhtconemax1htc_one-maxNext week, IFA 2013 will open its gates to the public and give a rest to the eager anticipation of smartphone enthusiasts by unveiling the much-awaited HTC One Max along with the Samsung Galaxy Note 3 phablet and the Sony Xperia Z1 camera phone.
The fresh batch of pics also reveal a removable back lid hence it can be expected that HTC One Max would come with a removable battery. The pictures attached show a toggle menu that shows a menu that looks like a finger-print. Looks like HTC wants to get back into therace again and compete Apple’s newly attained fame that its iPhone 5S brought it. And it also seems that HTC finally realized the importance of having the power button on the side.HTC-One-Max-side-1024x909

Rumor has it that the HTC One Max will sport a handsome 5.9-inch display with full HD resolution and Super LCD3 technology, while being equipped by Qualcomm’s flagship chipset, the Snapdragon 800 unit based on a Quad core Krait 400 clocked at 2.2 GHz. It seems that the phablet manufactured by the Taiwanese phone maker will also come with 2 GB of RAM and 32/64 GB of internal flash storage, but the drawback of having no extendable memory still persists.

The HTC one Max is expected to leave the factory gates with Android 4.3 pre-installed and with HTC’s proprietary Sense 5.5 user interface.It is rumored to have a 4MP front facing camera, just as the HTC One, with ultra pixel technology and auto-focus,2µm pixel size.

Meanwhile, some pictures showing off the HTC One Max’s About screen identify it as “HTC 8088”

The war for the king of the phablets will be very interesting to watch this year. Sony and Samsung already launched the Xperia Z Ultra and the Galaxy Note 3 and HTC’s One Max is expected to be a worthy rival to them. Which one do you think will win? We’ll have to wait and see.

More: HTC One Max

Galaxy Note 3 pre-orders on T-mobile announced

Galaxy Note 3 pre-orders on T-mobile announced
Latest Note device to launch on T-Mobile  on Oct. 2 for $199.99 down payment

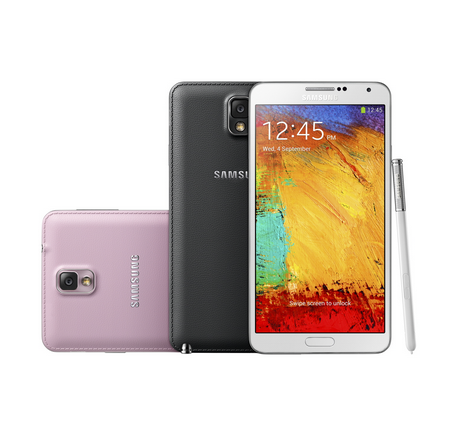
T-mobile has announced that pre-orders for Samsung Galaxy Note 3 will commense from Sep. 18. This means that you no longer need to wait to have the most-awaited smartphone in your hands.Galaxy Note 3_Techbeasts (2)

The pre-orders are expected to arrive on or before the launch date i.e Oct. 2. So, hold your breaths as Samsung throws upon you the most rumored and anticiated beast of this year. You will not be kept waiting for more than a couple of weeks.

Let the count-down begin!

More: Samsung Galaxy Note 3

Galaxy Note 3_Techbeasts (1)

Purple Samsung Galaxy Mega 6.3 sighted: news, images

0
Purple Samsung Galaxy Mega 6.3 sighted: news, images

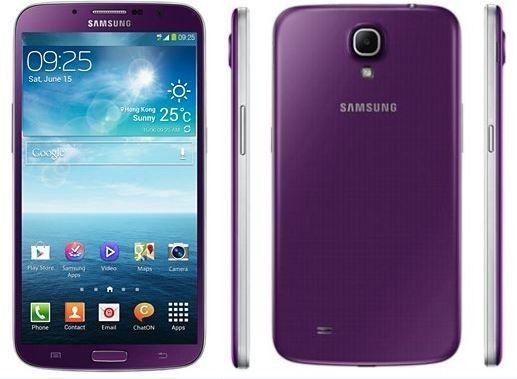
In June it had been rumored that the Samsung Galaxy Mega 6.3 would come in a new color i.e Plum Purple. Today Samsung took away one more reason to complain. You thought Samsung Galaxy Mega 6.3 wasn’t colorfull enough for your tastes? Well, here, let Samsung surprise you once again, as a purple-colored Galaxy Mega 6.3 has been spotted on Samsung’s Hong Kong portal.

purple-galaxy-mega

Despite the change in the color, it remains the same as the Samusng Galaxy Mega 6.3 that we had already reviewed earlier. It remains the same handsome and appealing small sized, mid-ranged tablet of its sort and not like an over-sized phone.

This does not confirm whether the Samsung Glaxy Mega 5.8 would come in purple-color or not as it was rumored initially. This news also does not say a word on the release of Samsung Galaxy Mega 6.3 in purple color which puts a question mark on its release outside Hong Kong.

The Samsung Galaxy Mega 6.3 sports a 6.3-inch display of 720p resolution with a dual-core 1.7 GHz Krait processor, 8/16 GB of internal storage, and 1.5 GB of RAM. For full specs read our full review.


Read More: Purple Samsung Galaxy Mega 6.3; Samsung Galaxy Mega 6.3 smarthphone detailed review

Samsung Announces 64-bit processors for its next smartphones

0
Samsung Announces 64-bit processors for its next smartphones

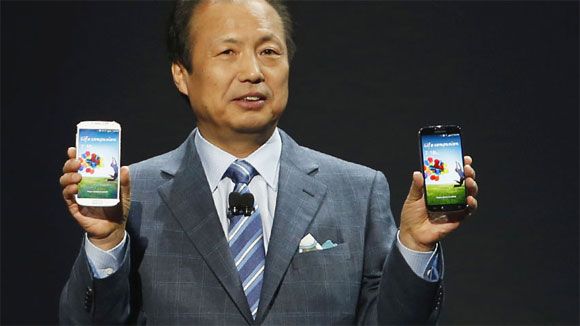
Samsung’s CEO JK Shin announced that Samsung’s “next smartphones” will be equipped with 64-bit processors. By next smartphones, he clearly means Samsung’s 2014 flagships like Samsung Galaxy S5.

Samsung_64bit_techbeasts

It is being discussed that 64-bit processors are a must-have for smatphones with 4GB or more RAM. There seems a fair chance of Android 4.4 KitKat supporting a 64-bit CPU. There also seems a possibility that Samsung surprises us with a device that is sported with 4GB of RAM the coming year, no wonders it has already brought us Samsung Galaxy note 3 that has 3GB RAM.

This announcement came as a hush-call to the Apple’s new device iPhone 5S that already has a 64-bit processor. But, Android is yet to support a 64-bit CPU, while IOS has already optimized iOS 7 for 64-bit CPU..


What do you think about this announcement by Samsung? Comment your opinion below in the comment box.
Thanks.

Subway Surfers For Windows PC – Download Here

4
Subway Surfers For Windows PC – Download Here

Subway Surfers – the Arcade Action game by Kiloo has been much popular among Android and iOS users. The gameplay is pretty much simple and easy, if you don’t know about it then let me tell you that you have to run your avatar and keep it running collecting coins and stamps to complete collections, you need to avoid hitting the fast coming trains from the front. You also get the bonuses to boost up your coins. The avatar basically runs away from the train ticket inspector and his dog. The player has to keep the avatar running, and protect him from getting caught by the train ticket inspector or his dog.

The game has outnumbered Temple Run couple in terms of active players. You may not be owning an Android or iOS smartphone / tablet and want to play Subway Surfers, you may not worry about it anymore as you can also enjoy this awesome game now on your desktop PC having windows in it.

Let’s begin installing Subway Surfers on your PC from method 1.

Method 1

Method 1 is pretty safe, and is highly recommended as it uses an Android Emulator. You need to follow the following simple and easy steps to get your hands on Subway Surfers on your PC.

  1. First of all you need to install an Android Emulator, the one we selected is Bluestacks.
  2. Find Bluestacks Here. We have a complete tutorial for, you may follow our guide to set it up.
  3. Download Subway Surfers .apk file from HERE.
  4. Double click the downloaded .apk file and complete the installation process with Bluestacks.
  5. Bluestacks Apk Handler Screenshot_1
  6. Boom! you have Subway Surfers installed now on your PC. To begin playing, simply access it from the icon which appeared on your desktop now.
  7. If you wish to download Subway Surfers with Unlimited Coins and Keys you can find the modified apk files HERE. The method is same, you’ll simply need to double click the downloaded apk file, install and start playing it having unlimited keys and coins.


Method 2:

  1. Method 2 involves a .exe file is quite easy and simple.
  2. Download the .zip file attached, unzip it and get the Subway Surfers.exe file. Download Here: Link 1 Subway Surfers for PC | Link 2 (open and press Ctrl + S)
  3. After unzipping the downloaded file, double click the downloaded Subway Surfers .exe file and install it.
  4. Boom! you have Subway Surfers installed now on your PC. To begin playing, simply access it from the icon which appeared on your desktop now.

You can adjust the screen resolution according to your requirements and your monitor’s display size.Screenshot_2


And here’s a look at the Game running on a Windows PC.

Subway surfers pc_Techbeasts

Enjoy ! 😀

Subway Surfers for Android and iOS.

As mentioned earlier, Subway Surfers is a free game and is available in the Google Play Store and iTunes. In order to play it on your Android Device you may download it by accessing Play Store on your Android Smartphone / Tablet and if you wish to play it on your Apple iPhone or iPad you may find it in iTunes store.

We hope that you found this tutorial easy and enjoyed the game. We would love to hear from you, leave your precious words in the comment box below 🙂

Apple iPhone 5S vs iPhone 5C vs iPhone 5 Specs Comparison

0
Apple iPhone 5S vs iPhone 5C vs iPhone 5 Specs Comparison

In an official press event held at Apple’s HQ in Cupertino, Calif on 10th of September, 2013, Apple announced two of it’s iPhone(s) iPhone 5S and iPhone 5C.

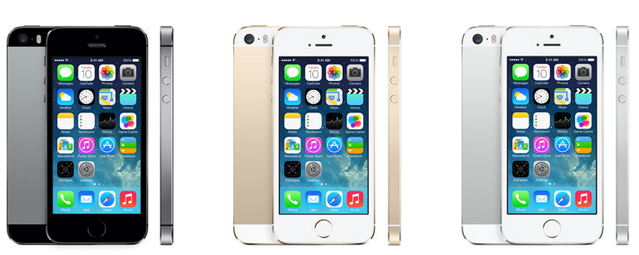
Techbeasts_iPhone5S (4)

Apple has upgraded the iPhone 5S with an A7 chip having a 64 bit architecture that is accompanied by an M7  motion co-processor that supports the Accelerometer, Gyroscope and Compass. The battery associates with the M7 motion co-processor instead of directly with the A7 chip and saves power. iPhone 5S is in spotlight for its fingerprint scanner that is called ”Touch ID” by apple. Touch ID recognizes owner’s fingerprint and unlocks the device. Apple aims at making the security system easier as Apple’s lock code is not used by half of the iOS users.

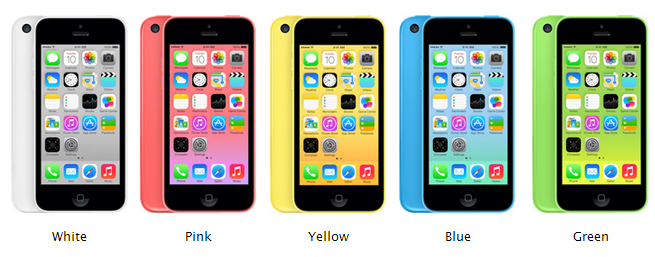
The all new iPhone 5C is the one you’ve never seen before,  or held it as stated by Apple. While it wasn’t possible to build the iPhone 5C in different colors using a steel material,  to do the color justice Apple has used plastic to build the iPhone 5C with a steel reinforced frame that also acts as an antena to the device. iPhone 5C is unveiled in 5 different colors. Both the iPhone 5C and iPhone 5 share an A6 chip.

Iphone 5C _ Techbeasts

To get a better idea about what’s new in the iPhone 5S, iPhone 5C and how these differ from the iPhone 5 checkout the specs comparison table below.

iPhone 5S vs iPhone 5C vs iPhone 5

Specs iPhone 5S iPhone 5C iPhone 5
OS iOS 7 iOS 7 iOS 6
Dimensions Height 4.87 inches (123.8 mm) 4.90 inches (124.4 mm)  4.87 inches (123.8 mm)
Width  2.31 inches (58.6 mm) 2.33 inches (59.2 mm)  2.31 inches (58.6 mm)
Depth 0.30 inch (7.6 mm) 0.35 inch (8.97 mm)  0.35 inch (8.97 mm)
Weight 112 grams 132 grams 112 grams
Display Size 4-inch (diagonal) Retina Display 4-inch (diagonal) Retina Display 4-inch (diagonal) Retina Display
Resolution 1136 x 640 1136 x 640 1136 x 640
Pixel Density 326 ppi 326 ppi 326 ppi
Camera iSight (Primary) 8 megapixels with 1.5µ pixels
ƒ/2.2 aperture
True Tone flash
Burst mode
1080p HD video recording @30fps
8 megapixels
ƒ/2.4 aperture
LED flash
1080p HD video recording @30fps
 8 megapixels with 1.3µ pixels
LED flash
1080p HD video recording 
@30fps
Facetime Camera (Secondary) 1.2MP (1280 x 960)
720p HD video recording
1.2MP (1280 x 960)
720p HD video recording
1.2MP (1280 x 960)
720p HD video recording
Processor A7 CPU with 64 bit ArchitectureM7 motion coprocessor A6 CPU(32 bit) A6 CPU(32 bit)
RAM 1 GB 1 GB 1 GB
Memory 16/32/64 GB 16/32 GB 16/32/64 GB
Battery Type Built-in rechargeablelithium-ion battery Built-in rechargeable lithium-ion battery Built-in rechargeable lithium-ion battery
Talk Time Up to 10 hours on 3G Up to 10 hours on 3G Up to 8 hours on 3G
Standby Time Up to 250 hours Up to 250 hours Up to 225 hours
Internet Use  Up to 8 hours on 3G, up to 10 hours on LTE, up to 10 hours on Wi-Fi  Up to 8 hours on 3G, up to 10 hours on LTE, up to 10 hours on Wi-Fi  Up to 8 hours on 3G, up to 10 hours on LTE, up to 10 hours on Wi-Fi
Video Playback Up to 10 hours Up to 10 hours Up to 10 hours
Audio Playback Up to 40 hours Up to 40 hours Up to 40 hours
Connectivity    Bluetooth 4.0 4.0 4.0
4G LTE Yes Yes Yes
GPS & GLONASS Yes Yes Yes
Wi-Fi   (802.11a/b/g/n; 802.11n on 2.4GHz and 5GHz)  (802.11a/b/g/n; 802.11n on 2.4GHz and 5GHz)  (802.11a/b/g/n; 802.11n on 2.4GHz and 5GHz)
NFC No No No
Sensors Three-axis gyro
Accelerometer
Proximity sensor
Ambient light sensor
Fingerprint identity sensor
Three-axis gyro
Accelerometer
Proximity sensor
Ambient light sensor
Three-axis gyro
Accelerometer
Proximity sensor
Ambient light sensor
Carriers at&t, Sprint, Verizon, T-Mobile at&t, Sprint, Verizon, T-Mobile at&t, Sprint, Verizon, T-Mobile
Price $199, $299, $399 $99, $199, $549 off contract (16GB) Discontinued
Colors Gray, gold, silver Blue, green, pink, yellow, white Black, white


Stay tuned with us for more news and updates. Thanks All!

How to Root and Install CWM Recovery on Samsung Galaxy Note GT-N7000

59
How to Root and Install CWM Recovery on Samsung Galaxy Note GT-N7000

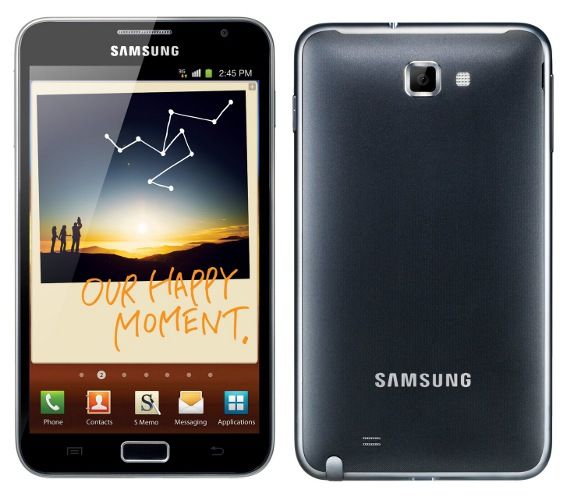
Samsung Galaxy Note is the first phablet by any of the smartphone manufacturers, and the device really changed the era of gadgets after its release in 2011. Galaxy Note sported a 5.3” Super AMOLED display, 1.4 GHz Dual Core processor and 1 GB RAM as well. Initially the device came with Android 2.3 Gingerbread installed in it, perhaps the good thing about Samsung that it never forgets it’s old devices and it managed to get Android 4.1.2. Samsung-Galaxy-Note Since Android is an open source and has no restrictions, the users are free to play with their devices the way they want. This included flashing mods, custom roms and messing with the files that are apparently locked by the manufacturers. If you are also looking to play with your device beyond the boundaries you probably need to have root access first. Following your need, we will today learn how we can gain root access on Samsung Galaxy Note GT-N7000.

Before we begin, I would like you to have the following precautions. Make sure that you have battery charged over 60 % and have backed up all your important ContactsCall Logs & Messages. It is highly recommended in case of any mishap or data loss to backup all your important data. Rooting Samsung Galaxy Note on Android ICS / JB:

  1. First of all go to your Galaxy Note’s Settings > About Phone.
  2. Check your phone’s Android Version here, whether it is Android IceCream Sandwitch (4.0.x) or Android Jelly Bean (4.1.2).
  3. In the about phone, you also need to check your phone’s Kernal version.
  4. Download the .zip file for your phone’s kernel version fromHERE.
  5. Place the downloaded .zip file on your phone’s external sd card.
  6. Turn off your phone by long pressing the power button or pulling off the battery, wait for about 30 seconds. Turn it on by pressing and holding Volume Up + Home + Power Keys.
  7. Your phone should now boot into the recovery mode, you can move between the options by using volume up and down keys, the power key can be used to make a selection.
  8. Select ”install update from external sd card”.
  9. Select the downloaded .zip file and then select yes.
  10. Let the process begin, it will install the custom recovery and root your phone. You can enter into the custom recovery by repeating the step 6. Find the SuperSu application installed in your phone in the apps menu, or verify the root access by installing the Root Checker App from the play store. Congrats!

Rooting the phone on Android Gingerbread: Rooting the Samsung Galaxy Note running on Android 2.3.x Gingerbread is not possible therefore, you will have to flash a pre-rooted ROM. follow the steps explained below to flash a pre-rooted ROM.

  • Download and Unzip Odin PC – Get it here.
  • Download & Install Samsung USB Drivers – Get here.
  • Download and unzip the Pre-Rooted Gingerbread ROM – Get it here.
  • Open Odin
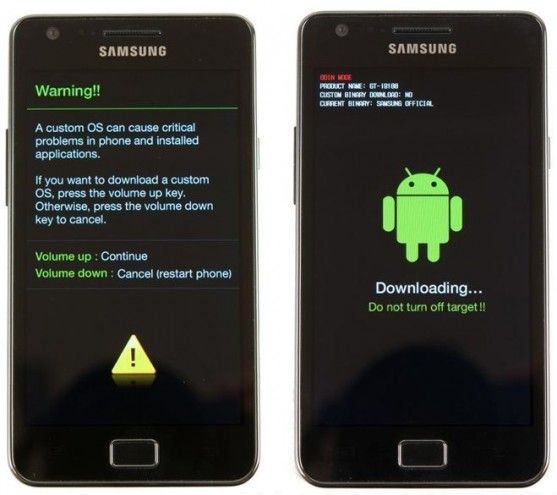
  • Put your phone in the download mode, in order to do so turn off your phone first of all by pulling out the battery for around 30 seconds or by long pressing the power button. Turn it on by pressing and holding the Volume Down + Home + Power Keys.
  • download-mode-s2
  • Attach your phone to your computer using the original USB cable.
  • The ID:COM port at the top left in ODIN should turn blue or yellow now.
  • Select the PDA tab and select the downloaded pre-rooted ROM.
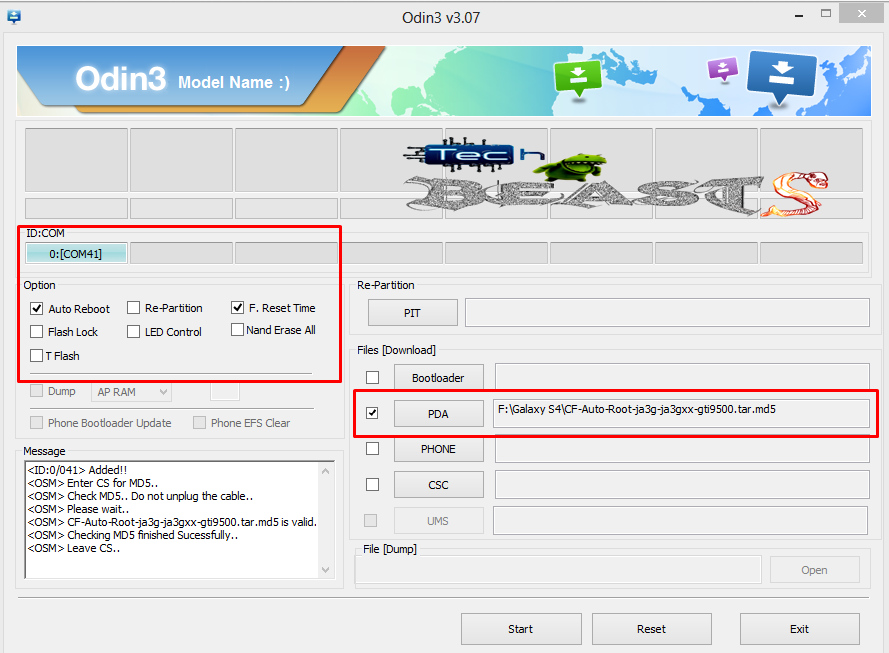
  • The options selected in your ODIN must be same as shown below.
  • TEchbeasts-rootS4
  • Click on ”Start”, the installation process will start in ODIN and on your phone too. As soon as it is done, your phone will restart and you have the pre-rooted ROM installed with CWM recovery.
  • In case you are facing any screen issues, you don’t need to worry at all as these issues will vanish after updating your ROM. Download a ROM from HERE and flash it using the method explained in above steps.
  • Congrats! You’ve rooted and updated your Galaxy Note now.

Now wondering what to do with your rooted phone? 

Here’s the answer for you! Rooting your phone gives you complete access over all the data which is apparently locked by the manufacturers. This includes removal of the factory restrictions and making changes to the internal system and the operating system. Gaining the root access gives you the privileges to install various applications to enhance the performance of your device, allows you to remove the built-in applications/programs, helps you to upgrade the battery life of your device & install the apps which require the root access for the proper functionality and modify your device in so many other ways e.g using mods and custom roms.

How to keep Root after OTA Updates

The OTA updates rolled out by the manufacturers wipe the root access on your phone. In case you don’t know how you can restore the root access after OTA update, you’ll have to root your phone once again, but there is no need to do it as you can restore it using the OTA Rootkeeper App which is available in the Google Play Store. The app creates backup of your root and simply restores it after any OTA update.

While rooting your phone, please keep it in mind that the Root Process isn’t  official and has nothing to deal with Google Inc and the device manufacturer, which is Samsung in our case. Follow the guide carefully to prevent any damages to the device as the method is completely custom.

Got any questions? Feel free to leave a comment below, we’ll try our best to help you out :D Good Luck

How to Root and Install CWM Recovery on Samsung Galaxy S2 GT-I9100 on Android GB, ICS & JB

2
How to Root and Install CWM Recovery on Samsung Galaxy S2 GT-I9100 on Android GB, ICS & JB

We’ve been talking about what is root access and the benefits of it since a quite long time now. It’s time to learn how to gain root access on a new device today that is Galaxy S2 this time. You might be owning a Galaxy S2 device and looking to play with your device beyond the boundaries. Galaxy S2 is no doubt, one of the awesome devices ever developed by Samsung have a 1.2 dual core processor, 1 GB RAM, 4.3” Super AMOLED display and 1650 mAh battery inside. You’ve spotted the right place in order to gain the root access on your phone.

How to Root and Install CWM Recovery on Samsung Galaxy S2 GT-I9100

First of all, you need to take some precautions to avoid any mishap. These include:

Before we begin, make sure that you have the battery charged over 60 % and have backed up all your important ContactsCall Logs & Messages. It is highly recommended in case of any mishap or data loss to backup all your important data.

  1. Download and Unzip Odin PC – Get it here
  2. Download & Install Samsung USB Drivers – Get here
  3. Download & Unzip Cf Auto Root Package file once on your desktop
  4. Download the Cf-Root (Root Package File) matching your baseband version from HERE.

Method 1: For Android Gingerbread (2.3.x) and Ice Cream Sandwitch (4.0.x)

  1. In order to check your Kernel version open Settings > About Phone > Kernel Version. See the Kernel Version number here and match it with the root packages available on the attached link above. Download your phone’s kernel’s rooting package file and unzip it once on the desktop of your computer.
  2. Put your phone in download mode. In order to do so turn it off first of all by pulling out the batter, or by long pressing the power key. Wait for 30 seconds and then press Home + Voume Down + Power Key simultaneously. It should now ask you for a warning, press the Volume Up key in order to continue.download-mode-s2
  3. Open Odin and attach your phone to your PC using the original data cable.
  4. The ID:COM at the top left should turn blue or yellow depending upon your odin version as soon as your phone is detected.TEchbeasts-rootS4
  5. Click PDA tab in odin and select the extracted Cf Root package file, which you downloaded in step 4 above and extracted in step 1 in below.
  6. Click on Start button in odin. Make sure that the options selected in your odin are exactly as shown above. Your CF Root file will be a different one as the pic above is for Galaxy S4 (Just to give you an idea of odin it is attached here). The process is quite fast and it will flash a kernel in your phone in order to give it root access and install CWM recovery. As soon as it is finished, your phone will restart automatically. Disconnect it from the PC now and check that you have SuperSU installed in the apps.

Congratulations! You have gained the root access on your phone now having Android Gingerbread or Android Ice Cream Sandwitch firmware.

Method 2: For Android 4.0.x Ice Cream Sandwitch & Android 4.1.2 JellyBean (Recommended)

Since this method is not suitable for a device running on Android Gingerbread, you may not try this method if you have Android 2.3.x installed on your phone.

  • First of all you need to download the Rooting Package file for your phone’s Kernel Version
  • Check your phone’s kernel version in Settings > About > Kernel version.
  • Download the file for your device’s kernel below.
Download for ICS – Android 4.0.x  Download for JB – Android 4.1.2 
  •  XWLSS
  • DVLSH


  • If  the file for your device’s Kernel version is not attached above, try finding it on the official thread HERE.
  • Download the .zip file and place it on your phone’s sd card storage.
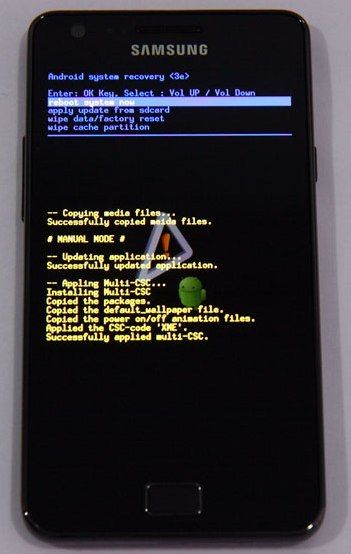
  • Turn off your phone by holding the power button or by pulling out the battery, wait for 30 seconds and turn it on into recovery mode. In order to do so press Home + Volume Up + Power Key simultaneously. Your phone should show you the recovery menu now.Samsung-S2-Recovery-Mode
  • You can move between the options here by pressing volume up and down keys, in order to make a selection press power or home key one of these will work.
  • Here select install update from sd card and select the .zip file you placed on your phone’s sd card.
  • Confirm the process by pressing yes in between a lot of nos and the .zip file should begin the installation.
  • As soon as the installation is finished your phone will reboot.

PHewww you have the root access now, you can check the SuperSu app in the apps menu. You also have installed the CWM recovery with the .zip package.

Enjoy!

Now wondering what to do with your rooted phone? 

Here’s the answer for you!

Rooting your phone gives you complete access over all the data which is apparently locked by the manufacturers. This includes removal of the factory restrictions and making changes to the internal system and the operating system. Gaining the root access gives you the privileges to install various applications to enhance the performance of your device, allows you to remove the built-in applications/programs, helps you to upgrade the battery life of your device & install the apps which require the root access for the proper functionality and modify your device in so many other ways e.g using mods and custom roms.


How to keep Root after OTA Updates

The OTA updates rolled out by the manufacturers wipe the root access on your phone. In case you don’t know how you can restore the root access after OTA update, you’ll have to root your phone once again, but there is no need to do it as you can restore it using the OTA Rootkeeper App which is available in the Google Play Store. The app creates backup of your root and simply restores it after any OTA update.


While rooting your phone, please keep it in mind that the Root Process isn’t  official and has nothing to deal with Google Inc and the device manufacturer, which is Samsung in our case. Follow the guide carefully to prevent any damages to the device as the method is completely custom.

Credits: Chainfire – Recognized Developer XDA

Credits: Phil3759 – Recognized Developer XDA

Got any questions? Feel free to leave a comment below, we’ll try our best to help you out :D Good Luck