Home Blog Page 509

Install Android 4.3 Jelly Bean on Galaxy S3 Mini Using CyanogenMod 10.2 Custom Rom

57
Install Android 4.3 Jelly Bean on Galaxy S3 Mini Using CyanogenMod 10.2 Custom Rom

Samsung Galaxy S3’s mini version came out right after a few months of the S3 itself. The device was well received by the users, and became much popular because of being an affordable Android smartphone, especially among those who could not afford Samsung Galaxy S3 and wanted to enjoy some of the features of Galaxy S3 in a mini version.

Galaxy S3 mini boasted off a 4.0 inch Super AMOLED screen with 233 ppi, 1 GHz dual core processor, 1 GB Ram, 8/16 GB internal memory, while an external Sdcard slot supporting up to 32 GB. Out of the box, Galaxy S3 Mini runs on Android 4.1.1, while the device received an update to Android 4.1.2 after some time of its release.

While Android is an open source operating system and allows the developers to play with it in so many ways, and that being the operating system on Galaxy S3 Mini paved a way for the developers to develop custom ROMs, recoveries and mods for the device. Maclaw studios successfully managed to develop CyanogenMod 10.2 Custom Rom for Galaxy S3 Mini based on Android 4.3 recently. As of now the device is only upgradeable to Android 4.1.2, there is no official update for Android 4.2.2 or 4.3, so this is a good choice for those who want to get their hands on Android 4.3 Jelly Bean’s features before it officially rolls out for Mini S3 (that is not going to happen anytime soon).

GALAXY_SIII_mini_Product_Image(4).jpg_610x406

***Please keep in mind that as soon as you install custom recovery or root your device, you may void the warranty. As the methods involved in rooting/flashing/modifying your device are highly custom, and these have nothing to do with the manufacturer, that is Samsung in our case, so make sure that whatever you do, you are doing at your own risk. Follow the instructions explained below to the letter, in case you didn’t you may end up bricking your device and we may not be held responsible in that case.***

Before we begin, here are some pre requisites that you must have:

Things you need to download: 


How to Install CM 10.2 Android Jelly Bean 4.3 on Samsung Galaxy S3 Mini i8190:

      1. Place the downloaded file on your device’s internal or external storage.
      2. Boot your phone into the recovery mode, to do so,  press and hold Volume Up + Home Button + Power Key simultaneously and your device should now reboot into recovery mode.
      3. Select ”choose zip from sd card”, now select the directory here where you placed the downloaded files, either it is external storage or internal storage.
      4. Select the cm10.2_golden.maclaw.20131021.zip file and press yes.
      5. It should take a few minutes to flash the custom rom your Galaxy S3 Mini.
      6. As soon as the flashing has been finished, select the ”choose zip from sd card” again, and select the directory where you placed the files, this time select the  file and press yes.
      7. After installing both the files successfully, choose wipe data/factory reset. This is not necessary but is highly recommended in order to avoid any bootloop or lag issues.
      8. After wiping the data, select advanced > wipe dalvik cache.
      9. All done, reboot your device.
      10. Congrats! You’ve successfully installed the Android 4.3 Jelly Bean Custom firmware on your Samsung Galaxy S3 Mini.

Got any queries? Feel free to leave us a comment. We will try our best to help you out with this. Thanks!

Download Google Gapps for Android

9
Download Google Gapps for Android

Google Gapps are the applications included in the Android operating by Google itself. These apps are necessary for the proper working and functionality of your Android smartphone as these applications include the core applications such as Google Play Store, Google Sync, Google Talk, Google Backup Transport, Gmail, Youtube, Google Search and other similar ones by Google. These applications can be found in almost all of the Android smartphones.

Screenshot_2013-10-25-01-49-21

Most of these apps can now be found on the Google Play Store and installed/updated using wifi, but what if you don’t even have the Play Store itself? In the case, the Gapps might become handy. While flashing custom roms you may have noticed that you need to find the latest version of Gapps to flash after flashing the custom rom, so that you may get the Android Market / Play Store and other google services on your custom rom, or you may be a newbie and wondering why do you need to install Gapps after flashing the custom rom, the above description explains you all. Following the need we’ve compiled up all the versions of Gapps that are needed or you may need in the future.

Download Latest Google GApps For Andorid 5.0.X Lollipop [All ROMs]


CyanogenMod Version Android Version HDPI MDPI TINY TEGRA
11.0 4.4
10.2.x 4.3.0
10.1.x 4.2.2
4.2.1
4.2.0
10.0.x 4.1.2
4.1.1
4.1.0
9.0.x 4.0.4
4.0.3
4.0.2
4.0.1
3.2.2
3.2.1
3.2
3.1
3.0
7.1.x to 7.2.x 2.3.7
2.3.6
2.3.5
2.3.4
7.0.x 2.3.3


If your desired link is not attached above, you may find it on the official site HERE.

While downloading the Gapps, please make sure that you have chosen the correct version. Invalid one may result in malfunctioning your device.

In case you get any queries, feel free to leave us a comment, Thanks!

Install CWM Recovery and Root Samsung Galaxy S3 Mini [i8190/N/L] [How to Guide]

Install CWM Recovery and Root Samsung Galaxy S3 Mini [i8190/N/L] [How to Guide]

After Samsung’s success with its flagship device Samsung Galaxy S3 in 2012, Samsung announced the mini version of the phone for its fans who could not afford the Galaxy S3 itself. The Galaxy S3 Mini caught the user’s eye having a 4.0 inch Super AMOLED screen, 1GHz Dual core processor, 5 MP camera at the back and a VGA camera at the front. The device comes with 8 and 16 GB of the internal memory while it has a RAM of 1 GB, out of the box, the device runs on Android Jelly Bean 4.1.1. Being mini in size and hosting a lot of features, the device was well received by the users and the developers as well.

GALAXY_SIII_mini_Product_Image(4).jpg_610x406

Although having already said that it’s a smaller version of Samsung Galaxy S3, but it still is a great device to play with beyond the boundaries of the operating system. Many of the Galaxy S3 mini owners might be looking up for modifying their device in different ways, this may include flashing a custom recovery, flashing custom roms, flashing mods to enhance the use of their device by installing different features, and playing with the clock speed of the device. While all this is only possible after having root access, so following the need, we will today learn how we can install a custom recovery that is ClockworkMod and root the Galaxy S3 Mini i8189, i8190N and i8190L.

Install CWM Recovery and Root Samsung Galaxy S3 Mini [i8190/N/L]

***Please keep in mind that as soon as you install custom recovery or root your device, you may void the warranty. As the methods involved in rooting/flashing/modifying your device are highly custom, and these have nothing to do with the manufacturer, that is Samsung in our case, so make sure that whatever you do, you are doing at your own risk. Follow the instructions explained below to the letter, in case you didn’t you may end up bricking your device and we may not be held responsible in that case.***

Before we begin, here are some prerequisites that you must have:

      • Make sure that your phone’s battery is charged over at least 60%.
      • Use the original data cable for establishing the connection between your PC and Mobile phone.
      • Use this method only on Samsung Galaxy S3 Mini i8190 or i8190N or i8190L not on any other device.
      • Make sure that you back up all of your important ContactsCall Logs & Messages. Although rooting your device does not delete any files, but this is highly recommended as it may become helpful in case of any mishap or data loss.

Things you need to download/install:

      1. Download Odin3 PC and extract it. – Get it Here.
      2. Download and install Samsung USB Drivers – Get Here.
      3. Download and extract CWM Recovery – Get it HERE.
      4. Download the Root file – Get it HERE.

Here’s how to install ClockworkMod recovery on your Samsung Galaxy S3 Mini:

      1. Open Odin3.
      2. Put your phone in download mode. To do so, press and hold Volume Down + Home Button + Power key simultaneously and your phone should reboot showing you a warning, press Volume Up to continue.download-mode-500x397
      3. Connect your phone to your PC.
      4. As soon as your device is detected by your PC, the ID:COM box should turn blue in the top left corner in Odin3.
      5. Hit the PDA tab now and select the extracted CWM recovery file here.
      6. Make sure that the options selected in your Odin are only F.Reset Time and Auto Reboot, and is exactly as shown below in the pic.odin_explained
      7. Hit Start, this should take a few seconds to install the CWM recovery in your phone, as soon as your device restarts, plug out the USB cable.
      8. Congrats! You’ve successfully installed the CWM recovery on your device now. To boot into recovery mode, press and hold Volume Up + Home Button + Power Key simultaneously and your device should now reboot into recovery mode.

Here’s how you can root your Galaxy S3 Mini.

      1. Place the downloaded root.zip file on your device’s storage.
      2. Boot into recovery mode on your device now. To do so, press and hold Volume Up + Home Button + Power Key simultaneously and your device should now reboot into recovery mode.
      3. Now select ”choose zip from sd card”.
      4. Now choose the directory here, where you placed the root.zip file. Whether it is external sd card or internal sd card you can navigate to the file here. To move between the options in cwm recovery, you may use Volume Up ad Volume Down key, while to make a selection you may press Home Button or Power Key.
      5. After you’ve navigated to the root.zip file, select it and press yes.
      6. It should take a few seconds to flash the root.zip file, after the flashing process gets completed, reboot your device.
      7. Phewww! You’ve successfully rooted your Samsung Galaxy S3 Mini now. Find the SuperSu app in your app drawer 😀

Now wondering what to do with your rooted phone? 

Here’s the answer for you!

Rooting your phone gives you complete access over all the data which is apparently locked by the manufacturers. This includes removal of the factory restrictions and making changes to the internal system and the operating system. Gaining the root access gives you the privileges to install various applications to enhance the performance of your device, allows you to remove the built-in applications/programs, helps you to upgrade the battery life of your device & install the apps which require the root access for the proper functionality and modify your device in so many other ways e.g using mods and custom roms.

How to keep Root after OTA Updates

The OTA updates rolled out by the manufacturers wipe the root access on your phone. In case you don’t know how you can restore the root access after OTA update, you’ll have to root your phone once again, but there is no need to do it as you can restore it using the OTA Rootkeeper App which is available in the Google Play Store. The app creates a backup of your root and simply restores it after an OTA update.

Root Credits: Shaan – Xda Recognized Developer

Recovery Credits: Seedrom193 – Xda Senior Member

In case you got any queries, feel free to leave us a comment. We will try our best to help you out.

How To Make Your Phone Number Appear As a Private Number

1
How To Make Your Phone Number Appear As a Private Number

There are many benefits for not having your number shown to the person you are calling, but when he calls you back you can see his number. Your number will appear as Private, Restricted, Blocked or Unavailable.  Imagine you can stalk your friends or scare the hell out of them with such a trick. Here is how you can make your mobile number appear as private.

Make Your Phone Number Appear As a Private Number

Method 1:

Enter an ID-Blocking Prefix.

Dial *67 on your phone dialer, entering this code before the number will temporarily hide your side of caller ID, instead of your number the receiver will find the Private Number thread. *67 will only work in North America.

Make Your Phone Number Appear As a Private Number

Here are the codes for some other Regions:

  • Albania, Australia, Greece, Israel, Italy, Sweden: #31#
  • Argentina, Denmark, Iceland, Switzerland, South Africa: *31*
  • Germany: *31# or #31#
  • Hong Kong: 133
  • Japan: 184
  • UK and Ireland: 141
  • New Zealand: 0197 (Telecom) or *67 (Vodafone)

Method 2:

Adjust Your Phone Setting.

  • Go to Phone Settings > Call.
  • Now find Either Show/Send My Caller ID Or Show/Hide My Number.
  • Your current settings will be automatically set up by the provider.
  • Change it to Hide ID/No ID. This will stop the company to send your information to the receiver.
  • Now restart your phone and try calling someone.

Method 3:

Permanent Blocking:

Many Service providers are offering such privacy, visit your Service provider Website to Check.

Note: Many users enable the option of ‘Reject From Blacklist”, those who have enabled it might not be able to receive calls from you. In other words, you can’t call them.

How To Create a USB drive In OS X Mavericks Through Lion DiskMaker and Createinstallmedia [ Guide ]

0
How To Create a USB drive In OS X Mavericks Through Lion DiskMaker and Createinstallmedia [ Guide ]

Although there are many guides related to create a USB Drive Mac OS X, but today i will tell you how to create a USB drive In OS X Mavericks Through Lion DiskMaker and Createinstallmedia from terminal. As most of us know that there is a terminal command that does all the processing. First we have to create OS X 10.9 Installation through UNIX Createinstallmedia. After that all you need to know is where it says untitled must write the name we gave to our memory USBformatting from Disk Utility.

Just copy and paste into the terminal carrying out the entire process:

sudo / Applications / Install \ OS \ X \ Mavericks.app / Contents / Resources / createinstallmedia – volume / Volumes / Untitled – ApplicationPath / Applications / Install \ OS \ X \ Mavericks.app – nointeraction

apps-1

How To Create USB Drive Thorugh Lion Disk Maker:

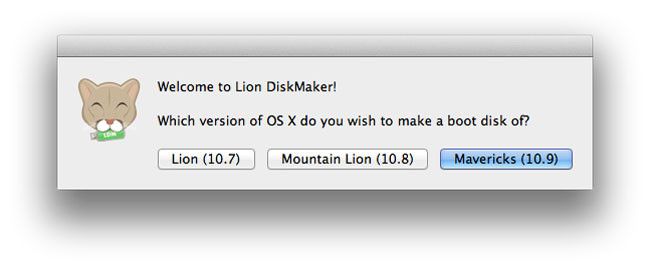
With the arival of OS X Mavericks Lion DiskMaker also get a update. Through this Loin DiskMaker we will create a unit USB or SD card from which we can boot and install the system from scratch. The steps are as follows.

a2


1. First Download Mavericks ( 10.9 ) from Mac App store. When you open the upgrade wizard DiskMaker Lion launched the application and select the boot disk you want to create, in our case 10.9 Mavericks. As Show above in the pic.

a1

2. All you have do is follow the steps. It will ask you ” it will be completely erased. If you choose another kind of disk, ONLY the chosen volume will be erased.

a3

3. Remember this if you want to install Mavericks from scratch you must boot from the created Disk Utility. To do this all you have to do is hold down theALT nothing more pressing the power button on your Mac then, when we see the installer window select Disk Utility and erase and create the partitions or want in our HDD or SSD . Your installation will begain. !


Google Play Store 4.4.21 Apk – Download Here

0
Google Play Store 4.4.21 Apk – Download Here

This is what i love about Android when ever new Android version is about to roll out they re-design everything like icon’s , menus , gallery , interface and Play store etc. Today i got my hand on new upcoming Google Play Store 4.4.21 apk file and its working. Its improved and comes with silde features and we are giving you before the official update since this time not everything is changed but they have added few cool features as show in pictures.

Google-Play-650x382


This new update will come Android 4.4 KitKat and Nexus 5. This new Slide-Out Navigation Drawer UI was first suggested by the developers to make their content as a primary focus rather than jumping to the new pages if a user wants some extra info regarding the app.

Google play 4.4

Google Play Store 4.4.21 apk [DOWNLOAD LINK] Size: 5.8 mb

iPad Air (iPad Mini 2) HD Wallpaper For Free – Download Here

0
iPad Air (iPad Mini 2) HD Wallpaper For Free – Download Here

Today, Apple announced their new tablet flagship named ” iPad Air”. iPad mini 2 comes with awesome features like 64-bit A7 processor – with the M7 motion coprocessor, 7.9-inch display, 2,048 x 1,536 resolution panel, 5-megapixel for the rear camera, and features 1080p video recording, facetime HD camera improved and much more along with new cool features. Well, I love to change my device wallpapers on daily basis. So, I thought as I have to purchase new iPad mini 2 soon, that’s why I have started collecting HD wallpapers for iPad Air. These wallpapers are also for iPad mini. So Enjoy my HD wallpapers collection for iPad mini 1 and iPad Air ( iPad mini 2 ).

original


Just to give a glimpse of iPad mini 2 ( iPad Air ):

apple-ipad-mini-2


Following are the HD Wallpapers for iPad mini 2 and iPad mini 1 Download and Enjoy !!

Abstract Triangles Pattern iPad Wallpaper HD

Windows Monochrome iPad Wallpaper HD

gallery-1_apple-my-ipad-mini-wallpaper-hd-apple-logo-60-

gallery-2_simple-my-ipad-mini-wallpaper-hd-simple-3-

gallery-5_fun-my-ipad-mini-wallpaper-hd-fun-177-

gallery-11_patterns-my-ipad-mini-wallpaper-hd-patterns-55-

gallery-13_3d-my-ipad-mini-wallpaper-hd-3d-30-

How To Set-Up Text Shotcuts On iOS 7.

0
How To Set-Up Text Shotcuts On iOS 7.

There is quite a little but neat feature of iOS 7 which most of the people don’t know, it’s called Text Shortcuts. Simply put, you can use a few letters and iOS will automatically expand it all for you, however you want it. For Example, ‘omg’ could become ‘Oh My GOD’ …. ‘tc’ could become ‘Take Care’. Not only will it saves your time but you can also make yourself more proper and your own shortcuts can be more useful than ever. Like ‘num’ can become your own number, ’eml’ can become you own ‘e-mail’. Don’t get to excited, you don’t even know how to set it up. So follow this simple tutorial and find out how?

IMG_0296

How To Set-Up Text Shortcuts On iOS 7. [Tutorial]

  • Open Settings > General > Keyboard.
  • Scroll down to the bottom and Tap Add New Shortcut.
  • Type in the Phase you want it to expand out in the top text field.
  • Type in the shortcut, make sure to remember it too.
  • Tap Save.
  • Repeat steps until you are done adding texts.

IMG_0297

Now try them in the messages and enjoy…Your Welcome…!! 😀

How to Install CWM & Root Samsung Galay S2 Plus GT-I9105 / I9105P on Android 4.2.2 [Guide]

23
How to Install CWM & Root Samsung Galay S2 Plus GT-I9105 / I9105P on Android 4.2.2 [Guide]

Samsung Galaxy S II plus recently received the Android 4.2.2 update, that brought a lot of changes to the UI and improved stability and performance. Many of the Galaxy S II plus owners might be looking for a way to play with their device beyond the boundaries on the latest Android 4.2.2, this may include flashing mods, custom recoveries, playing with the clock speed of your device and much more.

Galaxy s2 Plus

While this is only possible after having the root access, following the need, we will be having a look on how we can gain the root access on Samsung Galaxy S II Plus GT-I9105 and GT-I9105P running on latest Android 4.2.2 Jelly Bean.

Before we begin, here are some pre requisites that you must have:

Things you need to download: 

  1. Download Odin PC and extract it. – Get it Here.
  2. Download and install Samsung USB Drivers – Get Here.
  3. Download Jerry_recovery.tar.md5 file – Get it Here.
  4. Download SuperSu v-2.46.zipGet it Here.
  5. Update: You can also download TWRP 2.8.6.0, flash the recovery the same way as mentioned below.
    1. TWRP for I9105
    2. TWRP for I9105P
    3. TWRP for Nougat

Now Here is How you can Install CWM recovery on your Galaxy S2 Plus GT-I9105 and GT-I9105P:

      1. Open Odin.
      2. Put your phone in download mode. To do so, Turn it off, Turn it on now by pressing and holding Volume Down + Home Button + Power Key simultaneously, you should see a warning now, press Volume Up to continue. You should be in download mode now.
      3. Connect your phone to your PC. As soon as it gets connected, the ID:COM box should turn blue.
      4. Hit the PDA tab and select the downloaded Jerry_recovery.tar.md5 or TWRP.tar file here. If you get some error here, then rename the downloaded file to only Jerry_recovery.tar and select it once again in PDA tab in Odin3. Make sure that the ticked options in Odin3 are only F.Reset Time and Auto-Reboot.
      5. Hit Start, this should take a few seconds. As soon as the flashing process gets finished, your device should restart.
      6. Congrats! You’ve installed the custom recovery now. To boot into custom recovery, that is ClockworkMod or TWRP, press and hold Volume Up + Home Button + Power Key and your device should boot into recovery mode now.

odin_explained

How to Root your Galaxy S2 Plus GT-I9105 – GT-I9105P.

      1. Place the downloaded SuperSu.zip file on your device’s SDcard.
      2. Boot into the recovery mode on your device by pressing and holding Volume Up + Home Button + Power Key.
      3. Select ”install zip from sd card>choose zip from sd card” and select the downloaded SuperSu file here, and hit yes.
      4. It should take a few seconds to flash the SuperSu.zip file, as soon as it gets finished, reboot your device and find the SuperSu in your app drawer.
      5. That’s All! You’ve successfully rooted your Galaxy S2 Plus as well now.

Now wondering what to do with your rooted phone? 

Here’s the answer for you!

Rooting your phone gives you complete access over all the data which is apparently locked by the manufacturers. This includes removal of the factory restrictions and making changes to the internal system and the operating system. Gaining the root access gives you the privileges to install various applications to enhance the performance of your device, allows you to remove the built-in applications/programs, helps you to upgrade the battery life of your device & install the apps which require the root access for the proper functionality and modify your device in so many other ways e.g using mods and custom roms.

How to keep Root after OTA Updates

The OTA updates rolled out by the manufacturers wipe the root access on your phone. In case you don’t know how you can restore the root access after OTA update, you’ll have to root your phone once again, but there is no need to do it as you can restore it using the OTA Rootkeeper App which is available in the Google Play Store. The app creates backup of your root and simply restores it after any OTA update.

In case you got any queries, feel free to leave us a comment. We will try our best to help you out.

How to Install I9105PXXUBMI1 Android 4.2.2 Jelly Bean Official Firmware on Samsung Galaxy S2 Plus I9105P [Guide]

4
How to Install I9105PXXUBMI1 Android 4.2.2 Jelly Bean Official Firmware on Samsung Galaxy S2 Plus I9105P [Guide]

Samsung has rolled out the Android 4.2.2 Jelly Bean official update for its device Samsung Galaxy S2 Plus GT-I9105P.  The update has started making its way to different regions through OTA updates and through Samsung Kies. Samsung Galaxy S2 plus initially came having Android 4.1.2 installed in it. The new update Android 4.2.2 makes the device more stable and improves the performance.

Galaxy s2 Plus

As mentioned above, these updates roll out region wise, and might take quiet long to reach some regions. If you are one of those who can’t wait for OTA updates or Kies updates, and eager to get your hands on the new firmware as soon as possible, then you’ve spotted the right place as we will be having a look on a method to install Android 4.2.2 Jelly Bean official firmware with the build number I9105PXXUBMI1 on Samsung Galaxy S2 having model number I9105P.

Before we, begin let’s have a look at the features that you’re going to get after updating your device to Android 4.2.2 Jelly Bean.

Android 4.2.2 Features and Changes:

  • New Lock Screen – Multi Pages and Lock Screen Widgets support.
  • New Daydream Feature.
  • List and Grid view options in Notifications Panel.
  • Settings UI revamped. Options are now under tabs.
  • Move to SD Card option added for moving 3rd party apps to SD card with data.
  • Improved performance, bug fixes and more stable.

Before we begin, Here are some pre-requisites that I would like you to have.

    • Check your device’s model carefully, it must be GT-I9105P. Check it under Settings > About Device.
    • Make sure that your phone’s battery is charged over at least 60%
    • Use original Data Cable for PC connection.
    • Backup all your important data on internal storage, also backup your important ContactsCall Logs & Messages. This is important as you will have to wipe your factory data after flashing this firmware. It is not necessary but it is highly recommended to achieve the best performance results.
    • Enable USB debug mode in Settings > Developer Options > USB debugging mode.
  • Please keep in mind that if you have rooted your phone or have installed a custom recovery, then as soon as you flash the latest Android 4.2.2 Jelly Bean stock firmware, you will loose the root access and custom recovery as well.

Things you need to download:

  1. Download Odin PC and extract it. – Get it Here
  2. Download and install Samsung USB Drivers – Get Here
  3. Download latest Android Jelly Bean 4.2.2 I9105PXXUBMI1  Firmware – Get it HERE.

Firmware Link Updated!

Here are the Firmware Details: 

Region: DBT – Germany

Version: I9105PXXUBMI1 

OS: Android 4.2.2 Jelly Bean.

Build Date: 02.09.2013

Change List: 1571687

In case you want to choose a different firmware, Get it HERE. You may follow the same method, while the only different thing will be the firmware file.


How to update Galaxy S2 Plus I9105 to Android 4.2.2 Jelly Bean:

  • Open Odin.
  • Extract the downloaded firmware file once.
  • Put your phone in download mode. To do so, Turn it off, Turn it on now by pressing and holding Volume Down + Home Button + Power Key simultaneously, you should see a warning now, press Volume Up to continue. You should be in download mode now.
  • Connect your phone to your PC. As soon as it gets connected, the ID:COM box should turn blue.
  • Now in Odin: 
      • Hit PDA tab and give it the file having your firmware, that should be and MD5 file and in .tar.md5 format.
      • Hit Phone tab and give it the file for Phone. (Only if you get this file, otherwise ignore it)
      • Hit CSC tab and give it the file for CSC. (Only if you get this file, otherwise ignore it)
      • Hit Bootloader tab and give it the file for Bootloader. (Only if you get this file, otherwise ignore it)

odin_explained

  • Wait for a while till Odin sets it up. Once the logs appear, hit Start.
  • It should take a few minutes while Odin finishes installing the latest Android 4.2.2 Jelly Bean on your Galaxy s2 Plus I9105P.
  • As soon as the installation process ends, your device should restart.
  • Phewww! Congrats! You’ve successfully installed the Android 4.2.2 Jelly Bean latest stock firmware on your Galaxy S2 Plus.

To update your Samsung Galaxy S2 Plus GT-I9105 to Android Jelly Bean 4.2.2, Checkout this Link.

Although the firmware has been installed and will most likely work well. But it is highly recommended that you must wipe your phone’s data and wipe cache partition from recovery after installing the new firmware. This results in the best performance and stability of your device, also in case you face the bootloop after installing the latest firmware then the above lines will help you to fix it.

That’s all. In case you got any difficulties or got any queries, feel free to leave us a comment. We will try our best to help you out. Thanks.

How to Install I9105XXUBMH4 Android 4.2.2 Jelly Bean Official Firmware on Samsung Galaxy S2 Plus I9105 [Guide]

12
How to Install I9105XXUBMH4 Android 4.2.2 Jelly Bean Official Firmware on Samsung Galaxy S2 Plus I9105 [Guide]

Samsung has rolled out the Android 4.2.2 Jelly Bean official update for its device Samsung Galaxy S2 Plus GT-I9105.  The update has started making its way to different regions through OTA updates and through Samsung Kies. Samsung Galaxy S2 plus initially came having Android 4.1.2 installed in it. The new update Android 4.2.2 makes the device more stable and improves the performance.

Galaxy s2 Plus

As mentioned above, these updates roll out region wise, and might take quiet long to reach some regions. If you are one of those who can’t wait for OTA updates or Kies updates, and eager to get your hands on the new firmware as soon as possible, then you’ve spotted the right place as we will be having a look on a method to install Android 4.2.2 Jelly Bean official firmware with the build number XXUBMH4 on Samsung Galaxy S2 having model number I9105.

Before we, begin let’s have a look at the features that you’re going to get after updating your device to Android 4.2.2 Jelly Bean.

Android 4.2.2 Features and Changes:

    • New Lock Screen – Multi Pages and Lock Screen Widgets support.
    • New Daydream Feature.
    • List and Grid view options in Notifications Panel.
    • Settings UI revamped. Options are now under tabs.
    • Move to SD Card option added for moving 3rd party apps to SD card with data.
    • Improved performance, bug fixes and more stable.

Before we begin, Here are some pre-requisites that I would like you to have.

    • Check your device’s model carefully, it must be GT-I9105. Check it under Settings > About Device.
    • Make sure that your phone’s battery is charged over at least 60%
    • Use original Data Cable for PC connection.
    • Backup all your important data on internal storage, also backup your important Contacts, Call Logs & Messages. This is important as you will have to wipe your factory data after flashing this firmware. It is not necessary but it is highly recommended to achieve the best performance results.
    • Enable USB debug mode in Settings > Developer Options > USB debugging mode.
  • Please keep in mind that if you have rooted your phone or have installed a custom recovery, then as soon as you flash the latest Android 4.2.2 Jelly Bean stock firmware, you will loose the root access and custom recovery as well.

Things you need to download:

  1. Download Odin PC and extract it. – Get it Here
  2. Download and install Samsung USB Drivers – Get Here
  3. Download latest Android Jelly Bean 4.2.2 I9105XXUBMH4 Firmware – Get it HERE.

Firmware Link Updated!

Here are the Firmware Details: 

Region: INU – India

Version: I9105XXUBMH4

OS: Android 4.2.2 Jelly Bean.

Build Date: 21.08.2013

Change List: 1356917

In case you want to choose a different firmware, Get it HERE. You may follow the same method, while the only different thing will be the firmware file.


How to update Galaxy S2 Plus I9105 to Android 4.2.2 Jelly Bean:

  • Open Odin.
  • Extract the downloaded firmware file once.
  • Put your phone in download mode. To do so, Turn it off, Turn it on now by pressing and holding Volume Down + Home Button + Power Key simultaneously, you should see a warning now, press Volume Up to continue. You should be in download mode now.
  • Connect your phone to your PC. As soon as it gets connected, the ID:COM box should turn blue.
  • Now in Odin: 
      • Hit PDA tab and give it the file having your firmware, that should be and MD5 file and in .tar.md5 format.
      • Hit Phone tab and give it the file for Phone. (Only if you get this file, otherwise ignore it)
      • Hit CSC tab and give it the file for CSC. (Only if you get this file, otherwise ignore it)
      • Hit Bootloader tab and give it the file for Bootloader. (Only if you get this file, otherwise ignore it)
      • odin_explained
  • Wait for a while till Odin sets it up. Once the logs appear, hit Start.
  • It should take a few minutes while Odin finishes installing the latest Android 4.2.2 Jelly Bean on your Galaxy s2 Plus I9105.
  • As soon as installation process ends, your device should restart.
  • Phewww! Congrats! You’ve successfully install the Android 4.2.2 Jelly Bean latest stock firmware on your Galaxy S2 Plus.

 To update your Samsung Galaxy S2 Plus GT-I9105P to Android Jelly Bean 4.2.2, Checkout this Link.

Although the firmware has been installed and will most likely work well. But it is highly recommended that you must wipe your phone’s data and wipe cache partition from recovery after installing the new firmware. This results in the best performance and stability of your device, also in case you face the bootloop after installing the latest firmware then the above lines will help you to fix it.

That’s all. In case you got any difficulties or got any queries, feel free to leave us a comment. We will try our best to help you out. Thanks.

How to Root Samsung Galaxy S1 GT-I9000 [Guide]

3
How to Root Samsung Galaxy S1 GT-I9000 [Guide]

Samsung Galaxy S1, Samsung’s first Galaxy S device, that gave Samsung a breakthrough in the Smartphone world was one of the best devices ever, and if seen, the device is still being used by millions of people around the world. Samsung Galaxy S1 sports a 4.0 – inch Super AMOLED display, 512 MB of RAM, and 1 GHz processor. It has a 1500 mAh battery, while the internal memory is 8 GB, an external Sdcard slot is available that supports upto 32 GB.

samsung-galaxy-s1

Out of the box, Samsung Galaxy S1 ran on Android 2.1 Eclair and the updates ended with Android 2.3 Gingerbread. Many of the Galaxy S1 owners want to get their hands on Android 4.0 or higher version on their Galaxy S1 but since the official updates have ended, this is not possible through a stock firmware. The only way to play with your device beyond the boundaries is getting root access and installing a custom recovery, and than getting the higher version of Android through custom roms. Root access does not only give you  a way to get higher version of Android through custom roms, but only allows you to modify your device, install themes, play with the clock speed of your processor and increase battery life using root applications and much more.

We will be learning today, how we can gain root access on Samsung Galaxy S1 through an easy process.

Before we begin, please make sure that you have battery charged over 60 % and have backed up all your important ContactsCall Logs & Messages.It is highly recommended in case of any mishap or data loss to backup all your important data.

Also Please keep in mind that as soon as you root your device, you will void its warranty. The method involved in rooting your device or modifying it is highly custom and has nothing to do with the device manufacturers that is Samsung in our case or Google. What ever you do, make sure that you are doing it at your own risk.

Things you need to download:

  1. Download Odin PC and extract it. – Get it Here
  2. Download and install Samsung USB Drivers – Get Here
  3. Download CF-root Kernel for your device – Get it Here. (Choose the CF-Root file carefully depending upon your device’s ROM.)

How to Root your Galaxy S1:

      1. Extract the CF-Root kernel file on your desktop or somewhere you can navigate to easily.
      2. Open Odin.
      3. Turn off your phone. Turn it on booting into the download mode. To do so, press and hold Volume Down + Home Button + Power Key simultaneously and you should see a warning now on the screen. Press Volume Up to continue. Your phone should be in download mode now.
      4. Connect it to your PC, as soon as it gets detected the ID:COM box in odin should turn Blue or Yellow depending upon your Odin’s version.
      5. Hit the PDA tab and give it the extracted CF-Root Kernel file.
      6. Make sure that the options selected in your odin are exactly as shown below.
      7. odin_explained
      8. Hit Start, it should take a few seconds to flash the CF-Root Kernel file, as soon as it is finished your device will get restarted.
      9. Pheww! That’s all, you’ve successfully rooted your device now. Find the SuperSU app in the app drawer.

How to Install CWM Recovery on Galaxy S1:

      1. Your phone must be rooted.
      2. Install ROM manager from the Google Play Store.
      3. Select “Recovery Setup” and choose ClockworkMod Recovery.
      4. Select Galaxy S I9000 as your device.
      5. Grant the Super User access as soon as it prompts.
      6. Follow the instructions and get it done.
      7. That’s All! You’ve installed the CWM Recovery on your Galaxy S1. To boot into CWM recovery, turn off your device completely, then turn it on by pressing and holding Volume Up + Home Button + Power Key.


Credits: Chainfire – Xda Elite Developer.

Credits: Koush Xda Recognized Developer.

That’s All! Got an queries or difficulties? Feel free to leave us a comment. We will try our best to help you out. Thanks.