Home Blog Page 508

Root Sony Xperia Z C6602/3 Running on Latest Android 4.2.2 [10.3.1.A.0.244 / 10.3.1.A.2.67] Firmware

6
Root Sony Xperia Z C6602/3 Running on Latest Android 4.2.2 [10.3.1.A.0.244 / 10.3.1.A.2.67] Firmware

Japanese phone-maker Sony’s flagship device Xperia Z hit the shelves back in this January, 2013. Xperia Z, one of its own kind,  was well received by the users. The front line features boasted off a water proof body, for the first time in any smartphone, it’s dust proof as well. Let’s have a recap on the specs in case you don’t know, the phone runs on a Quad Core processor clocked at 1.5 GHz, it has got a 2GB RAM, 16 GB internal memory, while there is an microSD card slot as well. The display is Full HD 5” TFT  capacitive touch screen and has 441 ppi. It may also be learnt that Sony Xperia Z also boasted off a new design and shape, that Sony migrated from Xperia S and other Xperia designs.

With all those heavy specifications, the phone outdated its competitors having a number of exclusive features like unparalleled sharpness, world’s first image sensor with HDR video for smartphones, overall the display simply topped the charts. The phone has got an impressive 13.1 MP camera at the back while a 2.2 MP camera at the front.

sony_xperia_z_large

Getting back to the topic, Sony Xperia Z runs on Android 4.1.2 Jelly Bean out of the box, the phone received Android 4.2.2 update a few months back and has been updated to the latest firmware version 10.3.1A.0.244 and 10.3.1.A.2.67. Earlier, we posted the root method for the device running on Android 4.1.2 and the previous version, while the newest firmware’s root method was missing and we’ve been getting a number of requests to post the guide, so here it is. Today, we’re going to learn how we can gain root access on Sony Xperia Z running on latest Android 4.2.2 firmware version 10.3.1.A.0.244 or 10.3.1.A.2.67. 

It may be learnt that this method works for both Xperia Z models, C6602 and C6603, and also for both Locked and Unlocked Bootloaders.

Let’s begin with the rooting process.

Here are some of the pre-requisites you need to follow:

      • Make sure that you have the battery charged over 60%.
      • Make sure that you back up all of your important Contacts, Messages & Call logs. This is not necessary but it is highly recommended in case of any mishap.
      • Make sure that you use the original data cable for establishing the connection between your PC and phone.
      • Disable any antivirus/firewall if enabled.
      • Make sure that your device is running on the latest Android 4.2.2 Jelly Bean Firmware.
      • Make sure that everything you do, you’re doing it at your own risk. In case of any mishap, we may not be held responsible as these methods are highly custom and have nothing to do with the manufacturer that is Sony in our case.
      • All good, now follow the guide to the letter to successfully root your device.

Things you need to download:

Download this file according to your current firmware:

        • XperiaZ_C660X_KernelOnly_10.3.1.A.2.67.ftf  – Download it Here.
        • XperiaZ_C660X_KernelOnly_10.3.1.A.0.244_BE.ftf – Download it Here.

How to Root Sony Xperia Z:

      1. After having installed the Flashtool, place the downloaded XperiaZ_C660X_KernelOnly_10.3.A.0.423_Generic_NL.ftf  file in the Flashtool>Firmware folder in your C: drive or the directory where you installed the Flashtool.
      2. Open Flashtool and hit the lightening button on the top left, select flashmode and then select the XperiaZ_C660X_KernelOnly_10.3.A.0.423_Generic_NL.ftf , and hit Flash.
      3. The firmware will take a while to load, as soon as it prompts you to connect the device, turn off your device, press Volume Down and connect it to your PC while keeping the Volume Down key pressed. This connects the device in Flashmode. 
      4. As soon as your device is detected in the Flashmode, the flash process will start and you’ll get the Flashing finished message in the logs.
      5. Close the Flashtool now. [important]
      6. Connect your device to your PC again now, This time enable the USB debugging mode under Settings > Developer Options on your device.
      7. Extract the downloaded DooMLoRD_Easy-Rooting-Toolkit_v18_perf-event-exploit.zip to your C: drive or to whatever drive you’ve installed the windows.
      8. Now run the runme_OSversion file, this file will execute the rooting toolkit, and will root your phone.
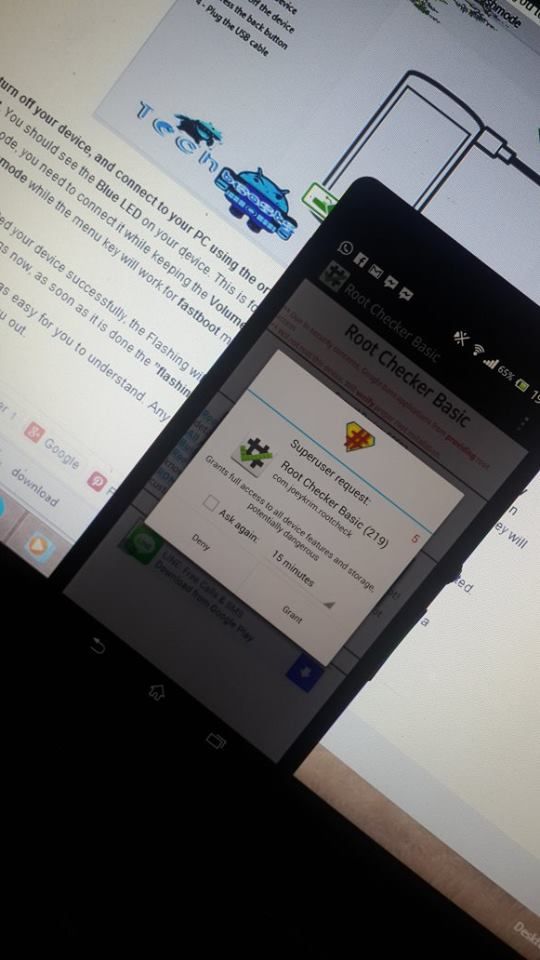
      9. As soon as your device is rooted, it will restart. Congrats your device is now rooted, check the SuperSu app in the app drawer.
      10. Now download the Kernel file according to your device’s firmware on which it was running previously i.e [10.3.1.A.0.244 OR 10.3.1.A.2.67]
      11. Open Flashtool again, and Flash the new kernel file using the same method explained in steps 2 & 3.
      12. As soon as the flashing process is done, turn on your device and enjoy having the root access!

1390718_10201913366768454_351691808_n

That’s All! We hope that you find it easy to root the phone using our guide above. Please support the original developer in order to appreciate.

In case of any difficulties or queries, feel free to leave us a comment or use the Request Box at on the right site. Thanks!
Top 5 Android Video Player – Download Here.

0
Top 5 Android Video Player – Download Here.

Most of the Android smartphones have a built-in video player that is more than enough for all the videos, but some are not equipped with such powerful players, For example, In Samsung Galaxy S2, the video player can play all sort of Videos, Mp4, AMV, AVI, FLV,but in HTC Sensation XE, it won’t run FLV videos. Long ago on Symbian the same problem was there too and it wasn’t easy to find such things back then. Thanks to developers today we can get everything we want. In this article, we will show you the Top 5 Android Video players and then let you decide the best one for you.

1. MX Player/MX Player Pro:

MX player is the best Android video player so far, well the free version is not as good as the pro one, but still it offers such features that make it totally irresistible. best-media-player-for-android The best thing I like was, than you can increase the Brightness in Player, once you quit it Brightness level will go back to normal. Second, the option of Start Over or Resume. Screenshot_1

MX Player

2.Mobo Player

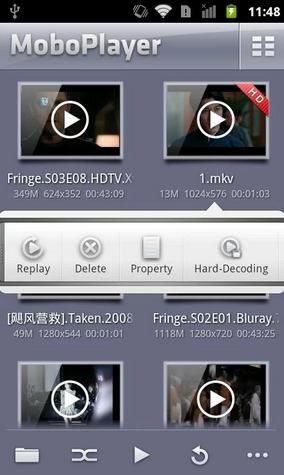
It’s another nice Video player for Android ,but not as cool as MX player, it supports all sort of video formats, supports Subtitle formats such as SRT, ASS, SAA. Along with many other nice features it can be used as an alternate Video player, but there is one thing above MX player is it’s looks. Mobo Player has better UI than MX player. Screenshot_2

Mobo Player

3. Real Player

It is an all in one player, it can run both Audio as well as Video Files, supports all sort of Formats like Mp3, acc, AVI, FLV etc. But the problem is all about a bit of lag is there when you use it more. Except the lag, it is the best Video and Audio Player for Android.

Screenshot_3


Real Player

4. Poweramp

Poweramp is good for listening songs and stuff but for Videos, not good at all. It can support all sort of Audio formats but it won’t show videos in your library instead you will see only audio files once you try to run them, Crash!.


Screenshot_4


Poweramp


5. Double Twist

According to New York Times “The Cure for iTunes withdrawal”, because you can sync your music with PC. It has the same features like above mentioned players just the syncing one is new and extra.

Screenshot_5


Double Twist for Android.

How to Install and Use Sony Flashtool on Xperia Devices

168
How to Install and Use Sony Flashtool on Xperia Devices

Japanese manufacturer Sony’s Xperia line is going quite good and is being used by a number of people, the Xperia series runs on Android (that is an open source operating system), as the developments are getting fast day by day on Android,  getting the latest mods, tweaks and modify your Xperia device makes you even love it more.

Sometimes the users want to flash a new firmware in case of getting their device soft brick, or sometimes just to improve the performance. While the OTA updates take a long time to reach different regions, some of the users also look for a way to flash the latest firmware on their devices before it makes a way to their devices through OTA updates. Rooting the phone is another option that allows the tinkering on the device, flashing custom ROMs, kernels, and a lot more things are there that can be flashed in an Xperia device, but wondering how? Well, Sony has a Flashtool for its Xperia line up.

Sony Flash Tool

Flashtool is a light software, that allows the flashing through ftf (flashtoolfirmwarefiles). It becomes handy if you are stuck somewhere. In today’s tutorial, we will be having a look at the detailed guide to use Flashtool.

How to Install and Use Sony Flashtool on Xperia Devices

As this is the main tutorial for Flashtool, we will be having a look at the method to flash firmware in an Xperia device.

Before we begin you need to download and install the following.

Understanding & Using the Flashtool:

      1. After you’ve downloaded and installed the Flashtool, you’ll get a folder named ”Flashtool” in your C: drive, or the drive which you selected while installation.
      2. Here you can see the folders like Custom, Devices, Firmwares, Drivers.
      3. The devices folder contains the supported devices, the firmware is the folder where you will place the .ftf file to be flashed in your phone, while the drivers’ folder has the Flashtool-drivers for all Xperia devices, you may install drivers through Flashtool in case you face any difficulty at the time of flashing.
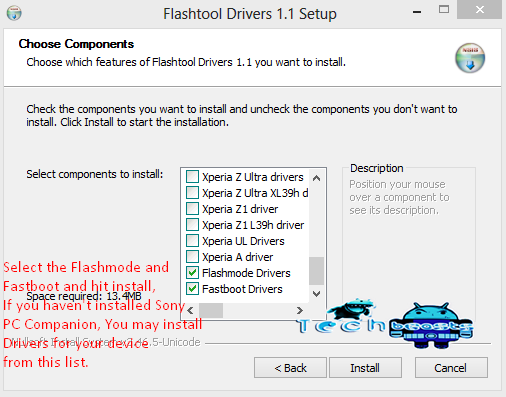
      4. Access the Flashtool-drivers and install Fastboot & Flashmode drivers as well first.Screenshot_2 
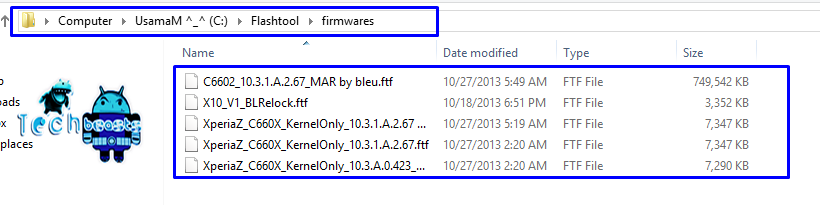
      5. After the drivers have been installed, you’re good to go with Flashtool now. The first thing you need to do is, you need to download your desired file, that you are going to flash. It may be a firmware, a kernel or a root file, but it should be in .ftf format. Download the file and place it in ‘‘Firmwares” folder that is is in Flashtool folder.Screenshot_6
      6. Run the Flashtool.exe now, access it from the installed programs or from the same folder under drive C:.
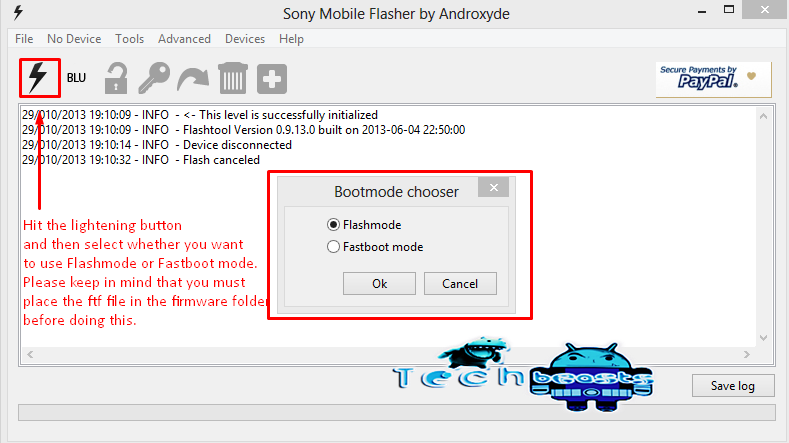
      7. In Flashtool, hit the lightning button on the top left, select whether you want to run Flashmode or Fastboot mode. Flashmode is the one you’ll need most probably while you’re trying to install an ftf file, select it and press Ok.Screenshot_1
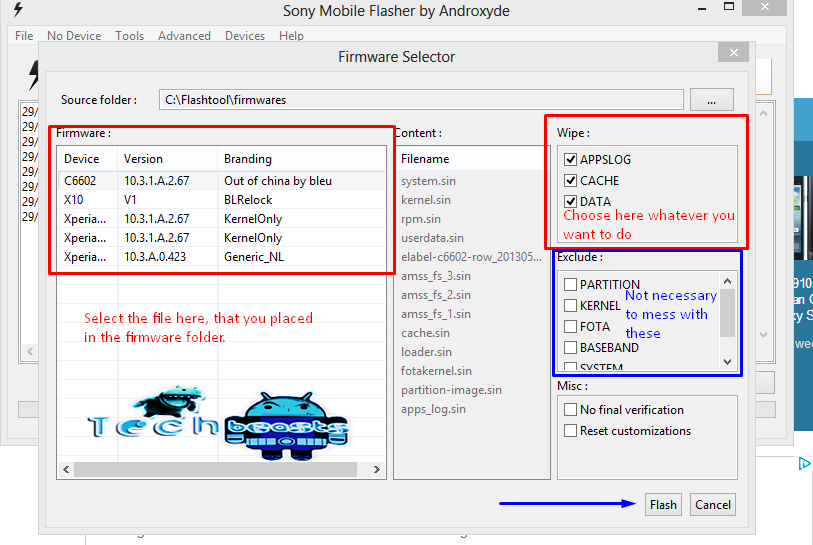
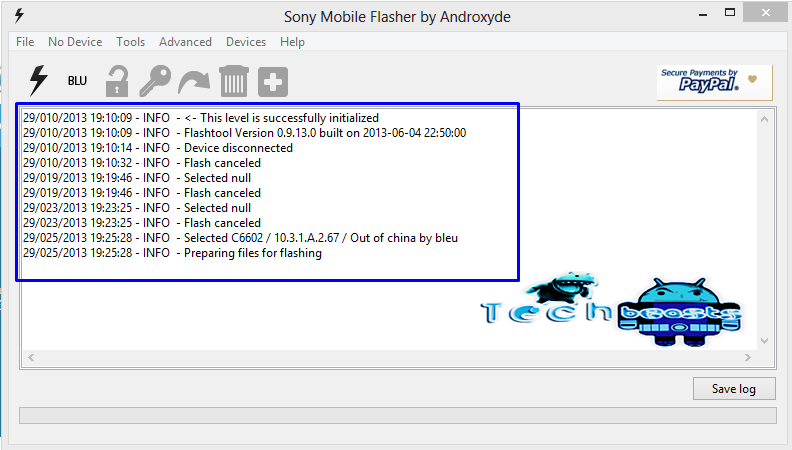
      8. Select the firmware or the file that you want to flash here, and make the other selections accordingly, below is an image showing the procedure for a firmware’s ftf file. After you’ve settled it up, hit the Flash button at the bottom now, it will start loading the ftf file and show you logs. Screenshot_3
        Screenshot_4
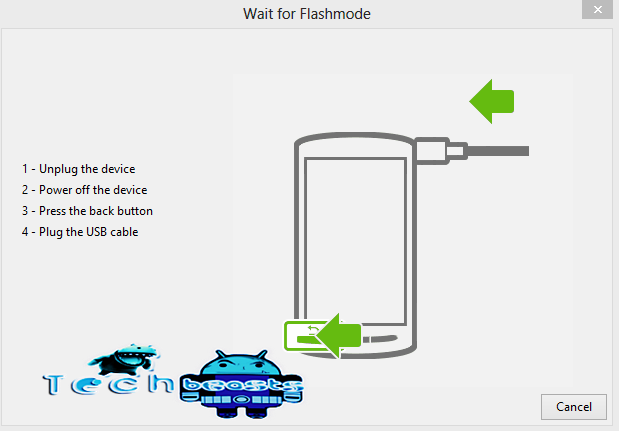
      9. As soon as the file is loaded, you should see a pop up, prompting you to connect your device to the PC in Flashmode.
        Screenshot_5
      10. Now, turn off your device, and connect to your PC using the original data cable while keeping the Volume down key pressed. You should see the Green LED on your device. This is for flashmode, in case you want to connect your device in fastboot mode, you need to connect it while keeping the Volume Up key pressed and you should see the Blue LED now. For older Xperia devices, the back key will work for Flashmode while the menu key will work for fastboot mode.

      11. After you’ve connected your device successfully, the Flashing will start, wait and sit back while the flashing gets completed. You should see the logs now, as soon as it is done the ”flashing done” will appear at the bottom.

That’s All! We hope that the tutorial was easy for you to understand. Any difficulties or queries you got? Feel free to leave us a comment, We will try our best to help you out.


Google Zero Gravity Tricks

0
Google Zero Gravity Tricks

Google is not just an awesome search engine but it also provides you a lot of entertainment with itself. Thanks to the developers around the world they have created some tricks on Google that will first scare you then confuse you and finally gives you another way to stall your friends. One of them is Google Gravity, now Google Gravity has a lot of tricks and today I will show you how to use them. It’s a great way to confuse your friends if they don’t know about it.

Screenshot_15

Top 5 Google Gravity Tricks and Pranks:

First of all you need to visit Google.com on your browser and follow the information below.

1.Zero Gravity.

All you need to do is to Open the Following Link on Google and embrace the act of Gravity on Google.

Screenshot_12


Once open, just bring your mouse anywhere on the page and see what happens.

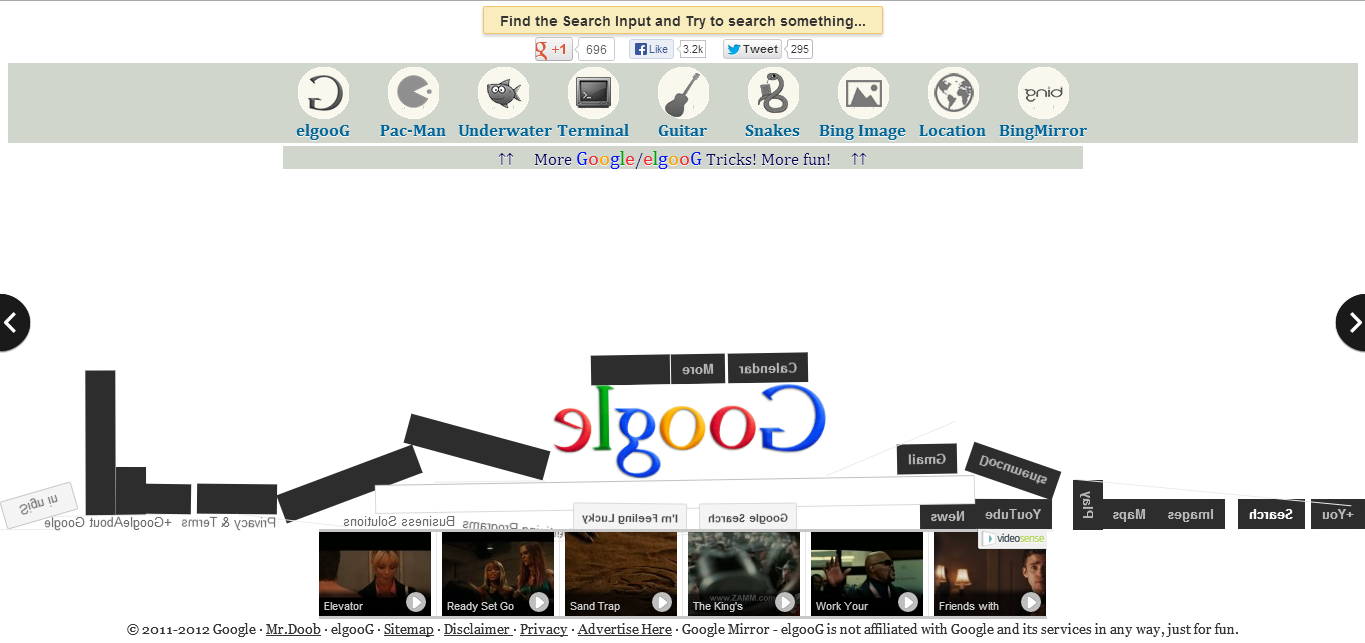
2.Zero Gravity + Invasion Mirror.

Now with zero gravity, you can also use the mirror tick.

The best part, you will still able to use it as a normal search engine, just that everything will be a reserve.

Screenshot_13


3.Google Sphere

Now, this is something that will tease the heck out of anyone, not because of its look, but because of its movements, it will be a challenge for you to type anything on the search bar.

Just click on the link and see Google icons and links dancing is a sphere around you. Even the search result will be dancing.

Screenshot_14

4.Zerg Rush

Just search Zerg Rush on Google and watch everything gets devour by O characters.

Screenshot_18


Once the green bar reaches the end, the same search has been eaten, it keeps going on and on until the whole page is blank, then the 0s will make Two big Gs in the center of the page with the option of Share Score and Clear.

5.Tilt

Simply write Tilt on the search bar, and you will see the page tilted a little. This will not act like any other tricks mentioned above, just a slight tilt of the page will be there.

Screenshot_16


That’s all folks, try these tricks and confuse your friends. Hope you have enjoyed these tricks and pranks. If you find anything new, feel free to let us know in the comments section.

How To Download IDM On Android [ Apk ]

0
How To Download IDM On Android [ Apk ]

I love using Internet Download Manager, it’s just amazing, awesome speed easy to use and almost download everything. You can even download videos from any site, without using their own Downloader, IDM is enough. Now the same app is available for Android too, but not with the same features, but even on Android it’s fast and good, but a little time taking, you have to Copy and Paste the Download link and it will then download it.

Screenshot_2013-10-28-02-48-24


This application can split maximum of 32 parts!

Note:

  • You need 2x(file size) the space on your storage to download a file in this very first version.
  • For some server, the maximum connections is limited. So, if you continuous get ERROR, please set lower maximum parts in Setting to download file from that server.

Here are the Download links, try it and let us know your experience.

Download Instruction:
http://www41.zippyshare.com/v/77009188/file.html
http://www.2shared.com/file/Xs6U9l1-/IDM_apkfullappscom.html

How To Download Google Keep For PC.

0
How To Download Google Keep For PC.

You might have heard that recently Google is trying to release some apps that are simple but fora great use of users and released an app to keep your notes of your daily tasks and if you want to use this app but don’t own an Android device, there is another solution for this. There is another app like Google Keep called Evernote, but it’s just like Google Search engine, no matter how great and powerful search engine will be provided to users, they will still use Google.

379476-google-keep


This app allows you to take pictures and then assign them according to your to-do-list or note, this way you can easily remember your to-do task. This app has a direct access to the camera so you won’t have any trouble taking pictures. You can even put different colors to your note according to your priority. Apart of these simple features there is a lot more, You can make a reminder just by speaking and it will automatically convert into text.

download-Google-Keep-for-PC


How To Download and Install Google Keep On PC.

  • First Install BlueStacks emulator on PC.
  • After the installing open Bluestacks.

Screenshot_3


  • Click On Search Icon.

Screenshot_4

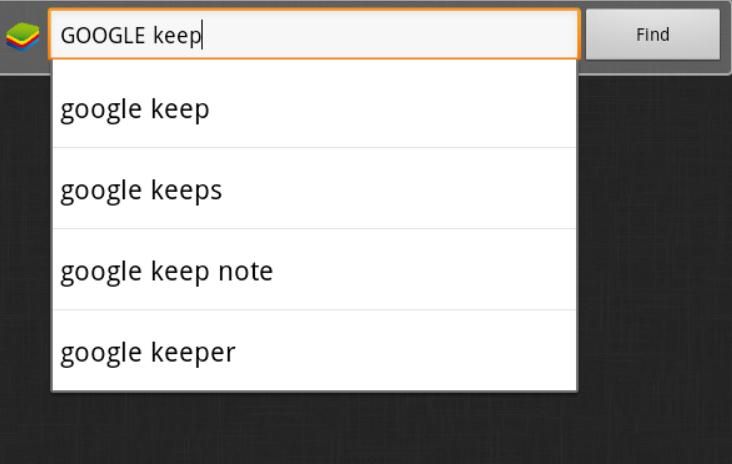
  • In the search bar, search for Google Keep.

Screenshot_5

  • Click On Install.

Screenshot_6

  • After the installation, Open the app from the app icon in Bluestacks.

Google Chrome Offline Installer- Download.

0
Google Chrome Offline Installer- Download.

Google Chrome made its debut in 2008, but Firefox was on Top at that moment so it took Google Chrome a whole year to get settled and start getting famous. In 2009, Google Chrome start getting famous and it stole the best browser award from Firefox in 2010, and now Google Chrome is the fastest, simplest and clean browser of all times, providing you the best performance of all times. Now Google Chrome is on its 28th version and the latest update is the finest for all the previous ones and if you are here to find the Google Chrome Offline Installer, you are at the Exact Right place.

In this article, We will show you how to download Google Chrome Offline Installer. The Best thing about Google Chrome is it supports a lot of plug-ins and Chrome Store offers a variety of plug-ins like Ad Block and it’s Play Store allows you to play different games, so it’s like an all-in-one Browser.

Download-Google-Chrome-Offline-Installer1

How To Download Google Chrome Offline Installer.

Here’s the link to Download Google Chrome Offline Installer,Choose Wisely:

Download Link

Choose between two alternate installers for Chrome:

How-To-Download-Google-Chrome-Offline-Installer-For-Free

Update Samsung Galaxy S3 Mini I8190 to XXAMG4 Android Jelly Bean 4.1.2 Official Firmware

Update Samsung Galaxy S3 Mini I8190 to XXAMG4 Android Jelly Bean 4.1.2 Official Firmware

Samsung Galaxy S3 Mini, following its bigger version made an entry in 2011 right after a few months of the Galaxy S3 thus setting a trend of mini versions of the flagships by Samsung. The Galaxy S3 Mini sports a 4.0 inch Super AMOLED screen with 233 ppi, 1GB RAM, 1Ghz Dual Core CPU, 8/16 GB internal storage with an SD card slot, a 5MP camera at the back while having a VGA camera at the front. The device initially ran on Android 4.1.1 Jelly Bean out of the box.

GALAXY_SIII_mini_Product_Image(4).jpg_610x406

Being smaller in size, affordable and having a lot of features, the device was very well received by the users and became much popular within a short span of time. Samsung rolled out the Android Jelly Bean 4.1.2 update after some time of the device’s release that fixed a lot of bugs and improved the performance. In this post, we will be having a look on how we can update Samsung Galaxy S3 Mini to Android 4.1.2 if your’s is running on Android 4.1.1. Let’s have a look on the guide….

There are several methods for updating your device to Android 4.1.2, before we head to the manual method we recommend you to try it using the following two ways.

Method 1: via OTA Updates:

Try updating via OTA updates, to do so tap Settings>About Device > Software Update > Check for Updates

If the update is available via OTA in your region, you may be able to update your device using Wi-Fi.

2nd method: via Samsung Kies:

Samsung Kies is Samsung’s official pc suite software for its devices. You may install it, connect your device to your PC and check for updates via Samsung Kies.

The above two methods are the easiest ones to update your device to the latest firmware, but as the updates take a quite a long time to reach different regions, you may not be able to update your device immediately. To overcome this hurdle, we’ll be learning a manual method to update Samsung Galaxy S3 Mini to Android 4.1.2.

Before we begin, please keep in mind that this is a custom method, and this will raise your device’s flash/binary counter from 0 to 1. This will result in voiding your warranty, so please make sure that you are doing it at your own risk, we may not be held responsible in case of any mishap.

Pre Requisites:

      • Make sure that your phone’s battery is charged at least over 60%.
      • Use the original data cable for establishing the connection between your PC and phone.
      • Turn off / disable Samsung Kies while using Odin.
      • Turn of any Anti Virus softwares while using Odin.
      • Backup all your important data on internal storage, also backup your important ContactsCall Logs & Messages. This is important as you will have to wipe your factory data after flashing this firmware. It is not necessary but it is highly recommended to achieve the best performance results.
      • Please keep in mind that if you have rooted your phone or have installed a custom recovery, then as soon as you flash the latest Android 4.1.2 Jelly Bean stock firmware, you will loose the root access and custom recovery as well.

Things you need to download:

      1. Download Odin PC and extract it. – Get it Here
      2. Download and install Samsung USB Drivers – Get Here
      3. Download latest Android Jelly Bean 4.1.2 I8190XXAMG4 Firmware – Get it HERE.

Firmware Link Updated!

Installing Android 4.1.2 XXAMG4 Jelly Bean Official Firmware on Samsung Galaxy S3 Mini:

    • Open Odin.
    • Extract the downloaded firmware file once.
    • Put your phone in download mode. To do so, Turn it off, Turn it on now by pressing and holding Volume Down + Home Button + Power Key simultaneously, you should see a warning now, press Volume Up to continue. You should be in download mode now.
    • Connect your phone to your PC. As soon as it gets connected, the ID:COM box should turn blue.
    • Now in Odin: 
        • Hit PDA tab and give it the file having your firmware, that should be and MD5 file and in .tar.md5 format.
        • Hit Phone tab and give it the file for Phone. (Only if you get this file, otherwise ignore it)
        • Hit CSC tab and give it the file for CSC. (Only if you get this file, otherwise ignore it)
        • Hit Bootloader tab and give it the file for Bootloader. (Only if you get this file, otherwise ignore it)
    • odin_explained
    • Wait for a while till Odin sets it up. Once the logs appear, hit Start.
    • It should take a few minutes while Odin finishes installing the latest Android 4.1.2 Jelly Bean on your Galaxy S3 Mini.
    • As soon as installation process ends, your device should restart.
    • Phewww! Congrats! You’ve successfully install the Android 4.1.2 Jelly Bean latest stock firmware on your Galaxy S3 Mini.

Although the firmware has been installed and will most likely work well. But it is highly recommended that you must wipe your phone’s data and wipe cache partition from recovery after installing the new firmware. This results in the best performance and stability of your device, also in case you face the bootloop after installing the latest firmware then the above lines will help you to fix it.

That’s all. In case you got any difficulties or got any queries, feel free to leave us a comment. We will try our best to help you out. Thanks.

Tango For PC – Free Dwonload.

0
Tango For PC – Free Dwonload.

Tango is another application that allows you to make calls and send messages via WI-Fi and 3G or 4G. It’s available on iOS and Android for free, but today we will show you how to download and install it on PC, so without owning an Android and iOS device you can still remain connected with your friends over Tango.This app is the combination of both Viber and Whatsapp. People use Whatsapp to send messages and use Viber to make calls only, i don’t get it why just use Viber, it can do both of the things. But if you wanna try something like this for the first time, try Tango.

In this article, we will show you how to Download and Install Tango On PC. It’s completely secure but if anything happens to your OS while installing this Software, we will not held responsible for the damage, Proceed at your own risk.

Download Tango For PC:

Link

Open the above link and Click on Download for Laptop, PC.

Screenshot_7

Since I am using IDM to downlaod, you can download it using any other downloader.

Screenshot_6

How To Install Tango On PC:

After the download, Click on .exe file to install it.

Screenshot_8

Click on Install to Start the installation.

Screenshot_9


After the installation, you will see an iPhone giving you the Tips.

Screenshot_10


Click on OK, and fill the requirements.

Screenshot_11


That’s all once you fill the form, you can start using Tango. Add contacts to send request to friends.

20 Best Themes For Windows 8- Download Here.

20 Best Themes For Windows 8- Download Here.

Windows 8 has a lot of customization features which allows users to change the overall look of Windows 8 and enhance the performance of Windows 8. But for people like me, looks matter more than speed, since I can work with low details in terms of games and I don’t run a lot of process at the same time, even low-speed is awesome for me.  But the problem is that Microsoft does not allows to install 3rd party themes on Windows 8, they want your PC secure and many 3rd party apps can cause a lot of problems, but worry not, the following themes are pretty much secure and safe.

In this Article, we will tell you how to install 3rd Party Themes on Windows 8 and will also provides you with 20 of the best Windows 8 themes. But going forward will be your choice, if anything happens to your OS during this process, we will not held responsible for the damage.

How To Install 3rd Party Themes On Windows 8.

By default, you can’t install themes on Windows 8, you can only change the default themes installed on Windows 8. In order to install themes on Windows 8, you will first need to patch it using UltraUXThemePatcher. How? we will show you how.

ultrauxthemepatcher

  • Download the UXThemePatcher from here – Link.
  • Install It and restart the system.
  • After you have done it, you can install any sort of theme on your Windows 8.
  • All you need to do is to paste them in this directory: C:\Windows\Resources\Themes


Now that you have Patched your Windows you are ready to install themes on it, just scroll through and choose your favourite one. Make sure to check for additional description on any other theme.

20 Best Themes For Windows 8.

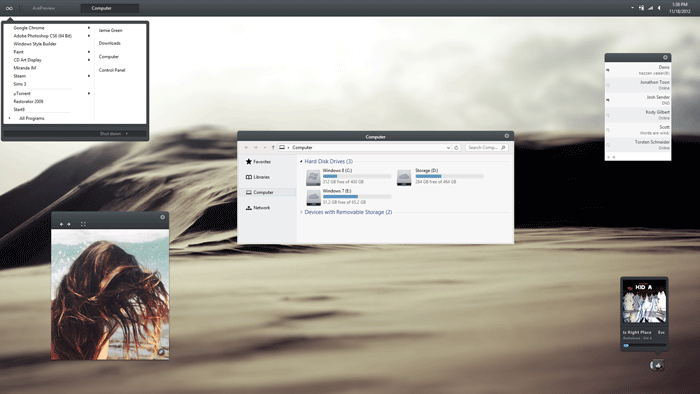
1. Space Blueberries by Neiio

space_blueberries_4_8_by_neiio-d5lhwqz

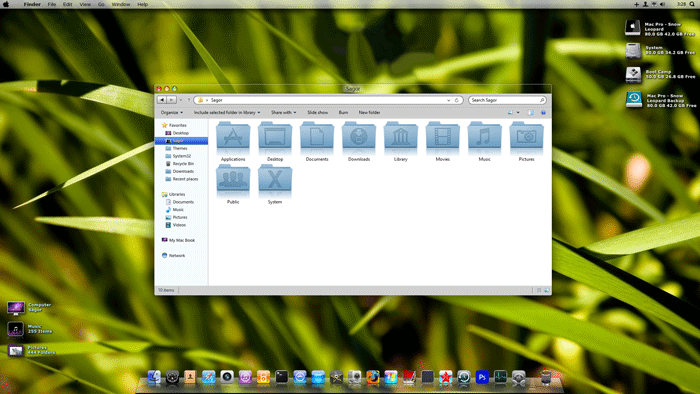
2. Snow Leopard glass by Sagorpbd

snow_leopard_glass_for_win_8_by_sagorpirbd-d6ff5xe

3. Incomplete VS by sinopt

incomplete_vs_for_windows_8_rtm_by_sinopt-d5enog8

4. Alduin Windows 8 themes  by charleston2378

alduin_w8_port__by_charleston2378-d5l188f

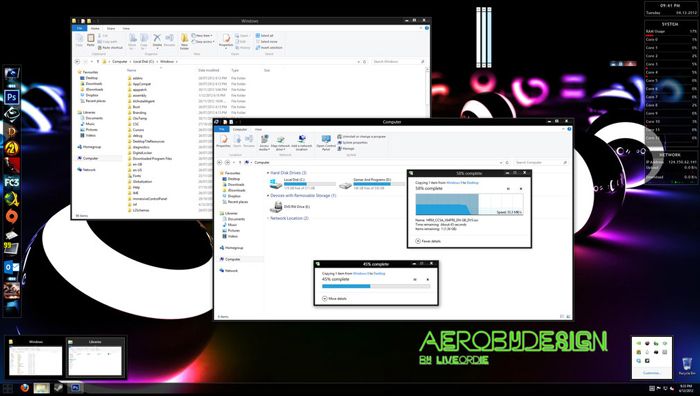
5. Aerodesign Windows 8 themes by LiveorDieTM

aerobydesign_for_windows_8_by_liveordietm-d5i5uz0

6. Gray8 by gsw953onda

gray8_final_by_gsw953onda-d5navyx

7. Base by link6155

base_for_windows_8_by_link6155-d5xf3on

8. Holo visual style Windows 8 themes by bhast2

holo_visual_style_prefinal_paid_and_free_win_8_by_bhast2-d5h3ifx

9. Abisso  by ezio

abisso__dark_visual_style_windows_8____update_8_by_ezio-d5u476a

10. Twentythirteen by sand-and-mercury

twentythirteen_for_windows_8_rtm_1_03_by_sand_and_mercury-d5gbe8a

11. Glow Windows 8 themes by seahorsepip

glow_by_seahorsepip-d5eogzp

12. Simplex RC by link6155

simplex_rc_for_windows_8_by_link6155-d5vdkpf

13. Gnommit dark windows 8 themes by neiio

gnomnit_dark_for_windows_8_by_neiio-d69s4mz

14. WhiteDior by ridkurn

whitedior_visual_style_for_windows_8_by_ridkurn-d5zbau7

15. duMBaSS Windows 8 themes by neiio

dumbass_v8_by_neiio-d5lnd76

16. Elune by neiio

elune_for_windows_8_by_neiio-d6a67ig

17. 8look V3.1 VS by carborunda

8look_v3_1_vs_for_windows_8_by_carborunda-d5t0yjk

18. Ourea windows 8 themes by neiio

ourea_by_neiio-d5metgo

19. Win 8 thrives by neiio

win_8___thrives_by_neiio-d65mh5x

20. Work by neiio

work_for_windows_8_by_neiio-d5kunrs

Download Samsung Galaxy Note 3 Stock Wallpapers

0
Download Samsung Galaxy Note 3 Stock Wallpapers

Samsung’s 3rd generation phablet, the Samsung Galaxy Note 3 remained in news for a long time for its features and specifications, which no other phone had by that time. The device sports a 5.7” Full HD display with 386 ppi, a 3GB RAM, 32/64GB internal storage, a 13 MP camera at the back and a 2.1 MP camera at the front. The device is powered up with a Exynos 5 Octa chipset clocked at 1.9 GHz or a Snapdragon 800 chipset clocked at 2.3 GHz. Under the hood, it got a massive 3200 mAh battery. For a detailed review of the Galaxy Note 3 check out our post here.

Well, Galaxy Note 3’s graphics are pretty awesome, and while talking about the graphics we may not forget the colorful and magnificent wallpapers added by Samsung that add charm to its display. Samsung’s stock wallpapers are always popular among the users, and many of the non-samsung and non-galaxy owners want to get those stock wallpapers on their device, while these stock wallpapers can’t be easily found over web, the only way is to extract them from the device.

I’ve extracted all stock wallpapers from my Galaxy Note 3 and uploaded right here for you guys 🙂 you just need to go ahead and download single or all wallpapers, and set on your device.

fhd_01 fhd_02 fhd_03 fhd_04 fhd_05 fhd_06 fhd_07


We hope that you liked these wallpapers. Thanks!