Home Blog Page 506

New iOS 8 Concept, What’s New or Should Be In iOS 7.

0
New iOS 8 Concept, What’s New or Should Be In iOS 7.

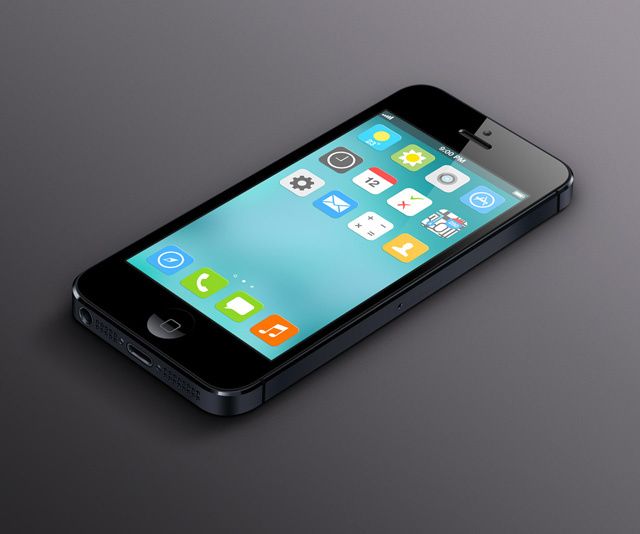
iOS 7 has been released only 6 weeks ago and some are already looking towards it’s successor, iOS 8. iOS 7 was somehow the biggest change made by Apple since it’s release. But many believes that iOS 7 is still incomplete, because there are many amendments that Apple has yet to make in iOS 7 or it’s next release may b iOS 7.1 or iOS 8. Keeping this in mind designer Sangam Bhandari, came up with an idea of the next version of iOS. He gave a real beautiful concept of iOS, even though many liked the changes made by Jony Ive and Apple made in 2013 release, it’s hard to pick holes in this beautiful and elegant design presented by Him.

ku-xlarge


The whole idea revolves around the revamped Home Screen, which is far great deal, more functional than the current grip of icons. Despite the many changes over the last 12-months, the Home Screen is still One Dimensional . It works almost like the current Notification center bringing hordes of information at first glance. By flicking between the icons of your Notification Center, you can get daily updates and check the notifications directly from Home Screen, without any need of opening the apps.

Functioning is lot better, but the real thing is to feel the interface, Smartphone which can look beautiful is only because of interface. It should be design with keeping in mind to play nicely with the user-ship as possible. The best part is, despite having much going on, iOS 8 still manages to look minimal, it’s not overly cluttered with unnecessary add-ons.

iOS-8-concept-chart

Top 5 Camera Apps for Android

0
Top 5 Camera Apps for Android

There was a time when people used to keep a separate budget out of their expenses just to buy a Camera to capture their memories. The era moved from those days of black and white pictures and came to the trend of digital cameras. Cameras in mobile phones were introduced somewhere in the 21st century, but those were not powerful enough to fulfill the needs. With the arrival of Android OS, the cameras in the newly introduced(at that time) smartphone started getting better and also started taking over the trend of digital cameras, that helped the people to minimize that separate budget and enjoy plenty of features packed up in just one small device.

So, Android smartphones are common now a days, whether they are high budget, or low budget, everyone around keeps one today. Android smartphones have crossed the camera up to 20.3 Megapixel in today’s date. Although there is a stock camera app, which is packed up with different features and scene modes, but to enhance the camera effects a little more and to expand the features, there is a number of camera apps available on the Play Store. I’ve compiled up 5 best camera apps available on the Google Play Store. Have a look through these apps and choose for your device and enjoy capturing your precious memories.


Camera 360 Ultimate:    Screenshot_5

With 8 shooting modes, Camera 360 has taken over all other camera apps, and is the best app to take pictures available on the play store.  These 8 shooting modes include Sony camera mode, effects mode, self-portrait mode, quick-shoot mode, funny mode, tilt-shift mode, color-shift mode, audio camera. Camera 360 offers live-effects that help you to take the pictures in real-time that adds charm to the pictures and the pictures look like  just as you are viewing them in real, not on the phone screen. With  funny mode, Camera 360 lets the users take pictures by putting funny frames and backgrounds. There is a lot more to try out on Camera 360, go ahead and download it.


Camera JB+Screenshot_3

My favorite camera app, Camera JB+ is the camera and gallery app based on the latest Android 4.3 Jelly Bean. The app has a photo editor packed in as well. It features plenty of scene modes and effect modes. Camera JB+ is Best Android photography app award winner. With camera, video recording and panorama modes, Camera JB+ also guides its users about using the app and all the features properly. Download it right now and start capturing the moments.


Camera FV-5 Lite:Screenshot_2

Designed for professional photographers, Camera FV-5 puts DSLR-like manual controls in your fingertips. In Camera FV-5, all photographic parameters are adjustable and always at hand like exposure compensation, ISO, light metering mode, focus mode, white balance and program mode. It also offers a DSLR-like viewfinder display, you can see exposure time, aperture and stops display with EV and bracketing settings. There is a laundry list of features that this app offers, go ahead and download it right now and start taking the pics in a professional way.


Focal (Beta):Screenshot_4

Focal is a newly introduced free camera app. Captures photos and videos, Focal has the features like bust mode, timer mode and scene mode that help you to enhance the beauty of the pics. Focal app features PicSphere mode that takes 360 degree sphere shots. At the moment, it also supports the panorama mode, but that is not expected to work well as this is the beta version and may contain bugs. Download it here.


ProCapture FreeScreenshot_1

Just like the other camera apps, this app also offers features of its own. ProCapture has multiple camera shooting modes. To improve the photography experience on Android, ProCapture has the reduced noise and widescreen modes. The wideshot mode captures and sharply links 3 pics together to achieve the HD result, the original pic looks like just a single shot. You can download it here.


That’s all. In try these apps and share the experience with us. We would love to hear from you. Thanks!

 

Facebook Camera App – Download Here.

0
Facebook Camera App – Download Here.

If you have ever wonder why Instagram was worth $1 Billion, the reason was the Facebook Camera app. It is a simple app that allows you to upload pictures faster than ever, just like in Instagrm, you can edit them as well, you can also see what your friends up to, but nothing more than their photos. You can:

  •  Post a bunch of photos at once
  • See friends’ latest photos in one place
  • Play with crops and filters
  • Tag friends, add captions and say where you are
  • See photos from different apps

facebook-camera-app-this-is-why-instagram-was-worth-1-billion-a1d211a8d8


If you are interested in using this Facebook Camera app, you can download it from Apple Store, since this app is only available for iOS, so for all the Android users they have to wait for until Facebook releases it.

Download Link: Apple Store


How To Root Any Android Device With Just One-Click via Framaroot.

7
How To Root Any Android Device With Just One-Click via Framaroot.

Framaroot.Have you just owned an Android device, it’s quite amazing isn’t it, if you are worry about limitations and wanted to root your Android device, but afraid because of complex tutorial or not having enough things that can be used to root your device. Users like me who are never satisfied with Stock ROM and wanted to try almost every new Custom ROM arrived for my device. There are several methods to root an Android device, pushing the Su binaries with help of fastboot or ADB using command line or any Root toolkit. Most of the devices have their specific Toolkits to perform this action and others are really dependent on PC.

Screenshot_19

While on the other hand, an App called Framaroot which requires no command and no PC connectivity, the device just root itself right after your run it. It is a simple rooting application developed by alephzain (Donate), which can be installed as a normal apk file and pushes the SU binaries and Super SU in your device, hence rooting it. This application is compatible with a long list of devices, running Android 2.x.x to 4.x.x. The list keep expanding as users are showing a lot of interest and encouraging it a lot.

Also See: Farmaroot apk – Universal one click Root app

Here is the List of Compatible devices:

Compatibility for Qualcomm devices (Gandalf exploit only) :

  • Asus Padfone 1/2
  • Asus Padfone Infinity
  • Asus Transformer Pad Infinity TF700KL
  • BW T18+ (Fortis Evo)
  • Cloudfone Thrill 430x
  • Disgo 8400g
  • DNS S4504/S4503/S4502
  • FAEA F1
  • Gigabyte GSmart G1315 Skate
  • Gigabyte GSmart Rio R1
  • Google Nexus 4
  • Highscreen Spark/OMEGA Q/Blast/Strike/Boost
  • HTC One S
  • Huawei Honor Pro (U8950-1)
  • Huawei U8815/U8816 Ascend G300/G301
  • Huawei U8825D Ascend G330D
  • Karbonn Titanium S5
  • Kyocera Torque
  • Lenovo S870E
  • LG Nitro HD
  • LG L7 II P710/P714/P715
  • LG Optimus F5 (P875)
  • LG Optimus G E970/E975
  • LG Optimus L3 II E425
  • LG Optimus L5 E610/612/615
  • LG Optimus L7 II P710/P713/ P714/P715
  • LG Optimus L7 P700/Р705
  • LG Optimus LTE 2
  • MEDION LIFE P4013
  • Micromax A111 Canvas Doodle
  • Oppo Find 5
  • Orange Nivo
  • Pantech Discover
  • Pantech IM-A840S Vega S5
  • Samsung Galaxy Win I8552
  • Sharp Aquos Phone SH930W
  • Sony Xperia E C1505/Dual C1605
  • Sony Xperia L C210X
  • teXet TM-3204R
  • teXet TM-4677
  • Xiaomi Mi-2S
  • ZTE V880G/ZTE V955
  • Waiting feedbacks …

Compatibility for MTK devices (Boromir exploit only) :

  • Alcatel OT 4030D S’POP
  • Alcatel OT 8008D Scribe HD
  • Alcatel OT 997D
  • Alcatel OT Idol 6030X/6030D/6030H
  • Amoi N828
  • ASUS Memo Pad HD 7
  • Chinese Star S7589
  • DAXIAN XY100S
  • Explay HD Quad
  • Explay infinity II
  • Explay Polo
  • Explay Surfer 7.32 3G
  • Explay Surfer 8.31 3G
  • Fly IQ440 Energie
  • Fly IQ441 Radiance
  • Fly IQ442 Miracle
  • Fly IQ443 Trend
  • Fly IQ446 Magic
  • Fly IQ450 Quattro Horizon 2
  • Fly IQ451
  • GoClever Fone 570Q
  • Haipai I9389
  • Highscreen Alpha GTX
  • HKC Q79 3G
  • Huawei U8836D G500 Pro
  • IconBIT NetTAB Space 3G Duo
  • iOcean X7
  • Jiayu G2
  • Jiayu G3S
  • Jiayu G4
  • KENEKSI Beta
  • Lava iris 405
  • Lenovo IdeaPhone P700i
  • Lenovo IdeaPhone S720
  • Lenovo IdeaTab A3000-H
  • Lenovo IdeaTab S6000-H
  • Lenovo P770
  • Lenovo S820, S920, A390
  • Micromax Canvas HD
  • Motorola RAZR D3
  • Newman N1
  • Oppo findway U7015
  • OUMEI X5
  • Philips W536
  • Philips W736
  • Prestigio MultiPhone 4055
  • Prestigio MultiPhone PAP 4505DUO
  • Sharp AQUOS SH837W
  • Star S5 Butterfly
  • TeXet NaviPad TM-7055HD
  • Texet TM-5277
  • THL V12
  • THL W100 (130711)
  • THL W200
  • ZOPO C2 Platinum
  • ZOPO ZP 910
  • ZOPO ZP300+
  • ZOPO ZP900 Leader
  • ZTE V880G/H
  • ZTE V987 Grand X Quad
  • Waiting feedbacks …

Compatibility for Huawei K3V2 devices (Pippin exploit only) :

  • Waiting feedbacks …

Compatibility for Samsung devices (Legolas and Aragorn exploits only) :

  • Samsung Galaxy Core GT-I8262
  • Samsung Galaxy Proclaim S720C
  • Samsung Galaxy Young GT-S6312/GT-S6310
  • Samsung Lightray SCH-R940
  • Waiting feedbacks …

Compatibility for Exynos devices (Sam, Frodo, Legolas and Aragorn exploits only) :

  • AT&T Galaxy Note 2 SGH-I317
  • Highscreen Explosion
  • Hyundai T7s
  • Impression 9702 (Exynos 4412)
  • Lenovo K860/К860i
  • Newman N2
  • Meizu MX2
  • Samsung Galaxy Camera EK-GC100
  • Samsung Galaxy Note 10.1 GT-N8000, GT-N8010, GT-N8013, GT-N8020
  • Samsung Galaxy Note 2 GT-N7100
  • Samsung Galaxy Note 2 LTE GT-N7105
  • Samsung Galaxy Note 8.0
  • Samsung Galaxy Note GT-N7000
  • Samsung Galaxy S GT-i9000
  • Samsung Galaxy S2 AT&T SGH-I777
  • Samsung Galaxy S2 Epic 4G Touch – SPH-D710
  • Samsung Galaxy S2 GT-I9100
  • Samsung Galaxy S3 GT-I9300
  • Samsung Galaxy S3 LTE GT-I9305
  • Samsung Galaxy Tab Plus GT-P6200/GT-P6210
  • Samsung Galaxy Tab 7.7 GT-P6800/GT-P6810
  • Samsung SGH-i997 Infuse 4G
  • T-Mobile Galaxy Note 2 T-889
  • Verizon Galaxy Note 2 SCH-I605
  • iBerry Auxus CoreX2 3G and CoreX4 3G

Compatibility for Omap36XX devices (Gimli exploit only) :

  • Archos Gen8
  • Cliq 2 MB611
  • Coolpad Quattro 4G
  • Droid 2 (a955)
  • Droid 2 Global (a956)
  • Droid X (MB810)
  • LG Marquee LS855
  • LG P970 Optimus Black
  • Motorola DEFY+ (MB525 / MB526)
  • Motorola Droid PRO
  • Motorola Droid X
  • Motorola XPRT
  • Parrot ASTEROID Smart
  • R2D2 (a957)

Possible Cases:

  • A popup saying “Your device seems not vulnerable to exploit included in Framaroot”, in this case you can uninstall app
  • You seeing one or more exploit name, also click on one after you have selected an action and you will see one of the above messages.
  • “Success  … Superuser and su binary installed. You have to reboot your device”
  • “Failed  … Exploit work but installation of Superuser and su binary have failed”
  • “Half-Success :-/ … system partition is read-only, use local.prop trick. Reboot your device and use adb to see if it run as root”, happen when the filesystem in use on system partition is a read only filesystem (ex: squashfs)
  • “Failed  … Try another exploit if available”

How To Root Your Device Using FramaRoot.

  1. Download Framaroot: Link
  2. Connect your Device with PC.
  3. Copy and Paste Framaroot.apk to your device
  4. Disconnect the device.
  5. Using any File manager, install the apk file.
  6. Go to Device drawer and Launch the framaroot file.
  7. Now Select Superuser or Super SU upon your choice.
  8. Select the Exploit and the process will begin.
  9. Once done, reboot your device.

To Unroot, follow the same procedure, but choose unroot instead of Super SU (step #7) and skip further. It will automatically unroot your device.

How To Make Your LCD Super Private, That Only You Can See What’s Going On.

0
How To Make Your LCD Super Private, That Only You Can See What’s Going On.

Now if you want to hide what you are seeing on your Computer LCD and don’t want anyone else to see what you are watching, there are plenty of ways. You can close the door, have fast reflexive, a Browser Filter , Panic button, but all it takes is a right angle or too slow motion to blow your cover. Want a foolproof way to make sure that no one else is seeing what you are seeing? Brusspup has a way to solve your problem.

hack-old-lcd-monitor-into-secret-computer-screen-only-you-can-see.w654

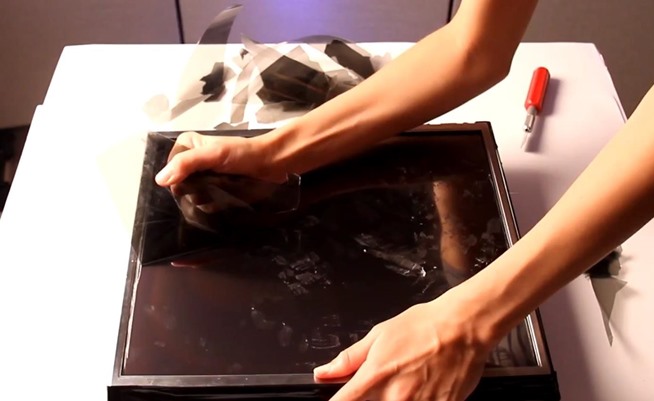
He built an “Amazing Secret Monitor” by stripping the polarized layer off the LCD and adding it to a pair of Glasses. This way only the person wearing polarized Glasses can see what is happening on LCD/Monitor. It’s an easy thing to do, all it requires is a Pair of Scissors and an X-Auto Knife. You can either order an online Polarized Layer or you can use an Old LCD Monitor. If you haven’t tried anything like this before, best option is to grab an Old LCD from any Thrift store to make sure that if anything goes wrong, it won’t cost you much.

hack-old-lcd-monitor-into-secret-computer-screen-only-you-can-see.w654 (1)

The Entire process shouldn’t take more than 30-Minutes. Here is the Video Tutorial to see how it is done.

The entire process shouldn’t take more than 30 minutes. Take a look at the video to see how it’s done.

More Google Secrets To Try Out.

0
More Google Secrets To Try Out.

If you have only been using Google to search for desired topics but never searched for the entertainment Google can give you itself , then you have only wasted your time there. There are many tricks Google can do for you ,and if you can, confuses your friends for you. Last time we only posted a little bit of Google Tricks and the other little bit are being posted this time. Get ready to learn more about Google right after this break.


GoogleSecrets-TipsTricks


1. Get To Mordor Using Google Maps.

For all the Lord Of The Rings fans, if you want to get to Mordor but don’t know where to start, do not worry good Google is here to save you. Just open the Maps or just search in the bar “How To Get To Mordor” and get the direction to get to infamous Mordor along with a very familiar warning.

391206


2. Goglogo

Ever wanted to see your name instead of Google? Now you can, just Visit goglogo.com and write your name in the bar and see your name as Google Logo.

Screenshot_6


3. Let Me Google That For You.

For all your lazy friends who can’t even Google something for the answers, this is the exact thing for them. Just Open lmgtfy.com and type anything in the box or just share the URL with them.

Screenshot_7

4. Google Guitar

Open the Link and play that Guitar which Google commemorated guitar genius Les Paul in 2009.

Screenshot_95. Google Pac-Man

In 2010, Pac-Man celebrated it’s 30th anniversary and Google also want’s to take part in it, Google brought the popular 80s game back. The developers stayed true to the 8-bit masterpiece, even recreating its original bugs. If you still want to play it follow the above link and start playing. Insert a coin and use arrow keys to control the Pac-Man.

Screenshot_106. Atari Breakout

Just like Pac-Man 2013 was the 30th anniversary of Atari Breakout and like Pac-Man Google’s logo was transformed into Atari Breakout.

391212


7. Do A Barrel Roll.

Now there is something that will freak out someone who accidentally tries it. Type “do a barrel roll” and watch your Google page doing the barrel roll for you.

Screenshot_11

How To Root Nexus 5 On Android 4.4 Kit-Kat Using CF-Auto Root.

1
How To Root Nexus 5 On Android 4.4 Kit-Kat Using CF-Auto Root.

Last time we post the tutorial of rooting Nexus 5 by installing Super SU directly on it, for that you have to install a custom recovery on it. But this time we are posting a tutorial of rooting Nexus 5 with the help of CF-Atuo Root, you don’t need to install any recovery to root your device when it comes to CF-Auto root. This tutorial is far easier than the previous one, but you need to unlock the bootloader first otherwise it will wipe all of your App data.  How To Unlock Bootloader of Nexus 5.

nexus_5_0120131031183937590_0

In this Article,we will show you How To Root Nexus 5 On Android 4.4 Kit-Kat Using CF-Auto Root. But before we begin make sure to Backup all your data placed on your phone’s internal storage, contactscall logs and messages. This is necessary as if something go wrong during the process, so you will be able to restore it afterwards.

Disclaimer:

The methods involved in flashing custom roms and rooting your phone is highly custom and may result in bricking your device, and has nothing to do with Google or the device manufacturers. In case of any mishap we may not be held responsible. Follow these instructions to the letter to avoid any mishap or bricking. Make sure that whatever you do, you are doing it at your own responsibility.

Downloads Required:

CF-Auto Root

Fastboot files, if you haven’t download them already.

Nexus 5 USB Drivers.

Important things:

  • Your Device must be Running Android 4.4 Kit-Kat.
  • Enable USB debugging mode.
  • Make sure that battery level is at 85% or more.
  • This Tutorial is Only For Nexus 5.
  • Make sure that ADB and Fastboot is configured on PC. HOW? Follow the link
  • Make sure that you have already unlocked the Bootloader. HOW? Follow the Link

How To Root Nexus 5 On Android 4.4 Kit-Kat Using CF-Auto Root.

After Configuring the ADB  and Fastboot, and unlocking the Bootlaoder, Proceed below.

  • Download the Required files.
  • Put Fastboot in android-sdk-windowsplatform-tools directory. If there is no directory, create one. But if you have followed our tutorial of Android SDK and Fastboot Configuration, there will already be one.
  • Connect Nexus 5 with PC, make sure to use Original USB Cable.
  • Turn Off your Phone.
  • Now go to Bootloader/Fastboot mode, Press and hold Power + Volume Down Buttons till you see some text on-screen.
  • Put the CF-Auto Root files in Fastboot Directory.
  • Now Depending on your OS, run the following.

Windows:

  1. Run root-windows.bat

Linux:

  1. chmod +x root-linux.sh
  2. Run root-linux.sh

Mac OS X:

  1. chmod +x root-mac.sh
  2. Run root-mac.sh
  • Now wait for the Process to complete, or follow the On-Screen instruction if you have a Locked Bootloader.
  • After the installation is complete, your phone will reboot, it will take at least 5-minutes for the First run. So, Be Patient.

That’s it your Nexus 5 is now rooted on Android 4.4 Kit-Kat, Check the Super SU or Download Root Checker app to Verify.

Install Android 4.3 Jelly Bean XXUGMJ9 Test firmware on Galaxy S III GT-I9300

0
Install Android 4.3 Jelly Bean XXUGMJ9 Test firmware on Galaxy S III GT-I9300

A new day, a new leak. The folks over Sammobile managed to get hold on Android 4.3 Jelly Bean official test firmware for Samsung Galaxy S III. It hints at the official release of the Android 4.3 update for Samsung Galaxy S III and Galaxy Note II soon now. To know all about the leaked firmware check out our post here.

There are performance enhancements, stability, and the core UI has changed to that of the Galaxy S IV and Galaxy Note 3, while the launcher and widgets on Galaxy S III are still the old ones. While this is a test firmware, it may consist for minor issues and bugs, the stable roms will be only available once the update rolls out officially.The test firmware is available for download, you may update your device manually to this test build and enjoy the features of Android 4.3 Jelly Bean on your Samsung Galaxy S3. The official release date is not known yet. Go ahead and install this update on your device right away…

Android 4.3 Update

Before you head towards the method, please keep in mind that:

  • The test firmware will not raise your flash counter, nor it will void the warranty.
  • This test firmware will wipe your device – Please make sure that you backup everything before you proceed.
  • This is a test firmware, is not official / final build by Samsung.

Here are some pre requisites you must have:

      • Make sure that your phone’s battery is charged over at least 60%.
      • Make sure that you use original data cable for establishing connection between your computer and the phone.
      • Backup all your important data on internal storage, also backup your important ContactsCall Logs & Messages. This is important as you will have to wipe your factory data after flashing this firmware. It is not necessary but it is highly recommended to achieve the best performance results.
      • Make sure that your device is GT-I9300. Check the model number in Settings>About Device.
      • All Set? Go Ahead.

Things you need to download: 

  1. Download Odin3 PC and extract it. – Get it Here
  2. Download and install Samsung USB Drivers – Get Here
  3. Download and extract Android 4.3 Jelly Bean I9300XXUGMJ9 Firmware – Get it Here

Firmware Details:

Model: GT-I9300
Country: Germany (Vodafone)
Version: Android 4.3
Changelist: 1902166
Build date: Sat, 26 Oct 2013 12:24:03 +0000
Product Code: VFG
PDA: I9300XXUGMJ9
CSC: I9300VFGGMJ5
MODEM: I9300BUUGMJ3

How to install Android 4.3 Jelly Bean test firmware on Samsung Galaxy S III GT-I9300:

Open Odin.

    • Put your phone in download mode, to do so power off your phone, and then turn it by pressing and holding Volume Down + Home Button + Power key simultaneously, keep the keys pressed until your phone shows you a warning, press Volume Up to continue.
    • Connect your phone to your PC. The ID:COM box in Odin should turn blue as soon as your phone is detected by the PC.

Now in Odin:

      • Hit the Bootloader tab and select  the file BL_I9300XXUGMJ9_1902166_REV00_user_low_ship.tar.md5 from the extracted firmware folder
      • Hit the PDA tab and select the file AP_I9300XXUGMJ9_1902166_REV00_user_low_ship.tar.md5
      • Hit the Phone tab and select the file MODEM_I9300BUUGMJ3_REV02_REV04_CL1413323.tar.md5
      • Hit the CSC tab and select the file CSC_VFG_I9300VFGGMJ5_1986192_REV00_user_low_ship.tar.md5

Make sure that the rest of the options selected in Odin are exactly as shown below.

odin_explained1

    • After selecting all the files and setting up Odin, hit Start, the flashing process should take a while to install the Android 4.3 Jelly Bean firmware on your Galaxy S III.
    • As soon as the process is finished, your device will restart automatically and you’ve the latest firmware installed on your device.
    • In case you face any issues like bootloop or lag, boot into recovery mode (press and hold Volume Up  + Home Button + Power Key) and wipe factory data / cache partition. This will wipe your device completely including media content as well.Reboot your device now and  Your device should be working fine.

That’s all. In case of any queries, or difficulties, feel free to leave us a comment. We will try our best to help you out.

How To Update At&t HTC One To 4.3 Jelly Bean

0
How To Update At&t HTC One To 4.3 Jelly Bean

HTC one is the best Android device till now and now a days Android 4.3 Jelly bean update is every where for all HTC One models. Those who have HTC One international model they don’t have to worry about a thing all they have to do is goto Setting>About>Software update. But those who are using carrier devices like me i am using AT&T HTC One i can not update my device through simple update. I have to goto settings > AT&T Software Update> Check for updates. Like Samsung we can not download official firmware and update it through ODIN that’s bad. Ok now lets start the process .

Update HTC One to 4.3

Things To Remember:

  • Your battery should be charged 60%.
  • This process is not for HTC One International Model.

How To Update At&t HTC One To Official 4.3 Jelly Bean:

Step 1: Goto Settings then At&t Software Update> Check for Updates.

at&t htc one 4.3


Step 2: Now when you are in the menu tap on the ” Check for Updates ”  and at first you will get a update of 20 MB, wait for download to complete and your device will reboot and it will take 2 mins to install.

Step 3: After the 1st update is installed go back to setting and again ” AT&T software update ” then tap on ” check for updates ” after few seconds you will get a pop-up message ” wait for 24 hours and 12 mins “. No need to worry about that , go to settings select Date & time and change date to next day e.g if its 11/3/2013 change it to 11/4/2013.

Step 4: When the date is changed go back to setting again AT&T software update > check for updates and you will get the update of official Android 4.3 Jelly Bean for AT&T HTC One.

You will get 2 updates before the 4.3 Jelly Bean update first will be 22MB second 256MB and after these 2 you will get the 4.3 update of 565.7 MB. You have to change two times date to get the main update.

Let me know in comments if you have any problems.

Update Sony Xperia L C2104/C2105 to Android 4.2.2 [15.3.A.0.26] Official Firmware

80
Update Sony Xperia L C2104/C2105 to Android 4.2.2 [15.3.A.0.26] Official Firmware

Sony’s Xperia L is a mid-range Android smartphone. The phone was pulled out by Sony back in March, 2013. Sporting a 4.3 inch TFT capacitive touchscreen display with 243 ppi, the device is equipped with a  Qualcomm MSM8230 Snapdragon Dual Core CPU clocked at 1 GHz, having Adreno 305 GPU. The device is supported by a 1 GB RAM and the internal storage space is 8 GB while the device supports a microSD card as well up to 32 GB.

Out of the box, Sony Xperia L runs on Android 4.1 Jelly Bean. Sony promised its users that the Sony Xperia L will get  Android 4.2.2, so, overcoming its promise Sony has rolled out the Android 4.2.2 Jelly Bean update for Sony Xperia L. While each Android update is packed up with a lot of bug fixes, stability and performance enhancements, we’re sure that the Xperia L got much better with the Android 4.2.2 update.

Xperia L

You can update your device to Android 4.2.2 though Sony PC companion by connecting your phone to your PC and checking for the update in Sony’s official PC suite software (Sony PC Companion) or through the OTA updates, for this hit Settings>About Device >Software > Check for updates and get it done if the update is available.

The official updates take quite long to reach the different regions through OTA updates or through the Sony PC companion, while some of the users can’t wait to get their hands on the newest firmware running on their device, they try to find a method to update their phone to the latest firmware manually. We’ll be having a look on a method to update the Sony Xperia L to Android 4.2.2 manually, scroll down to begin…

Before we go ahead, here are some of the pre requisites you must have:

  • Make sure that your phone is charged over at least 60%. It is highly recommended in order to complete the process successfully and prevent any mishap regarding the device’s power.
  • Use the original data cable for establishing the connection between your phone and PC.
  • Make sure that you’ve installed the Sony PC Companion and Sony Flashtool properly. You may find the links with guides below.
  • Make sure that your device is Sony Xperia L, don’t try this method on any other device.
  • Choose your device’s model carefully under Settings > About device, and download the exact firmware for your device.
  • Make sure that you back up all of your important ContactsCall Logs & Messages. Although rooting your device does not delete any files, but this is highly recommended as it may become helpful in case of any mishap or data loss.
  • All Set? Let’s go ahead now.

Files you need to download:

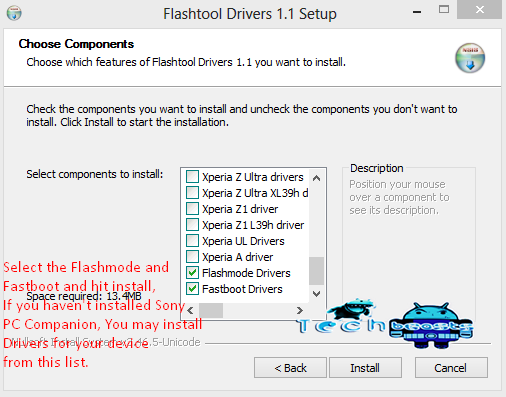
Sony Flash ToolDownload it Here [Follow the guide carefully to install Flashmode drivers]

Screenshot_2 

Sony PC CompanionDownload it Here.

Download the firmware for your device carefully:

  • Download Android 4.2.2 [15.3.A.0.26] Firmware for Sony Xperia L C2104


Here’s how to Update Sony Xperia L to Android 4.2.2.

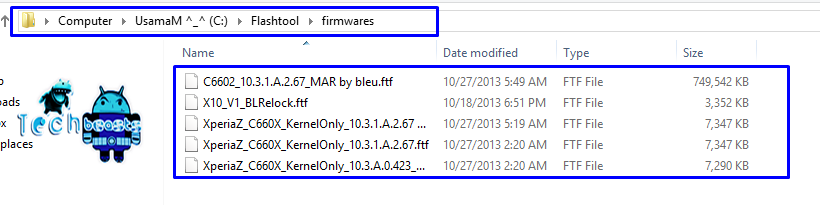
  1. After you’ve successfully installed and understood the Sony Flashtool, and downloaded the firmware file, that is in .ftf format, place the .ftf file in Flashtool>Firmwares folder. The Flashtool folder should be in the drive where you installed the Sony Flashtool, and there should be a Firmwares folder in   it.Screenshot_6
  2. After you’ve placed the .ftf file in the Firmwares folder, Open Flashtool.exe.
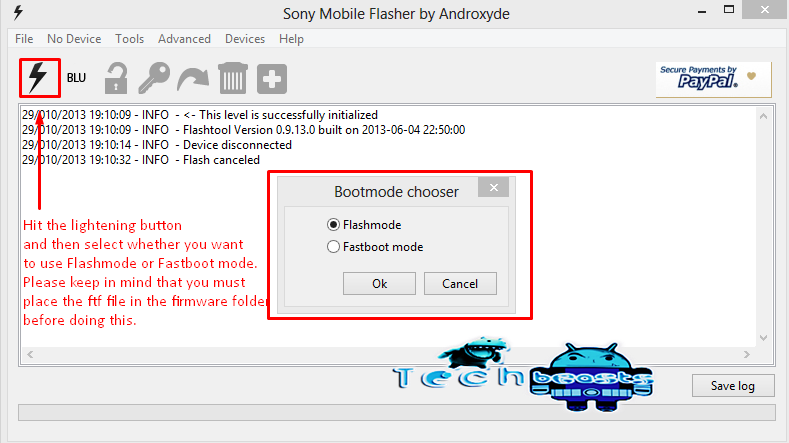
  3. In Flashtool, hit the lightening button on the top left, select whether you want to run Flashmode or Fastboot mode.Flashmode is the one you’ll need most probably while you’re trying to install an ftf file, select it and press Ok.Screenshot_1
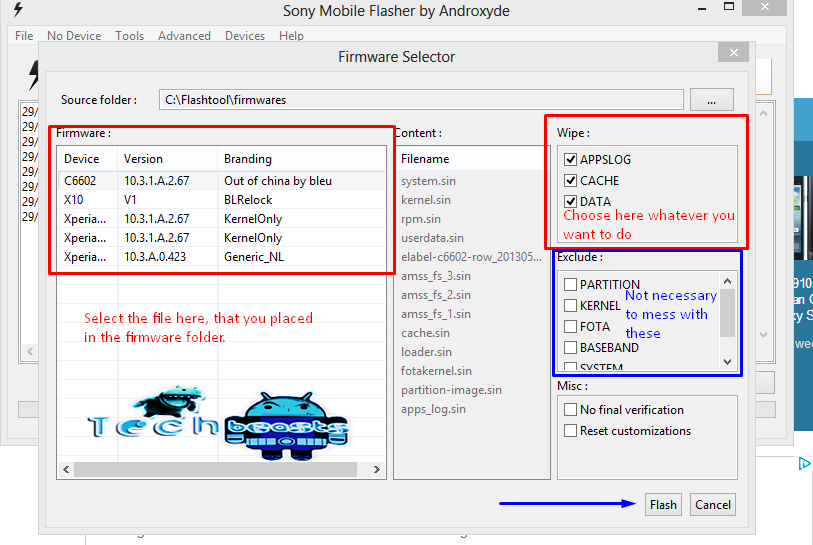
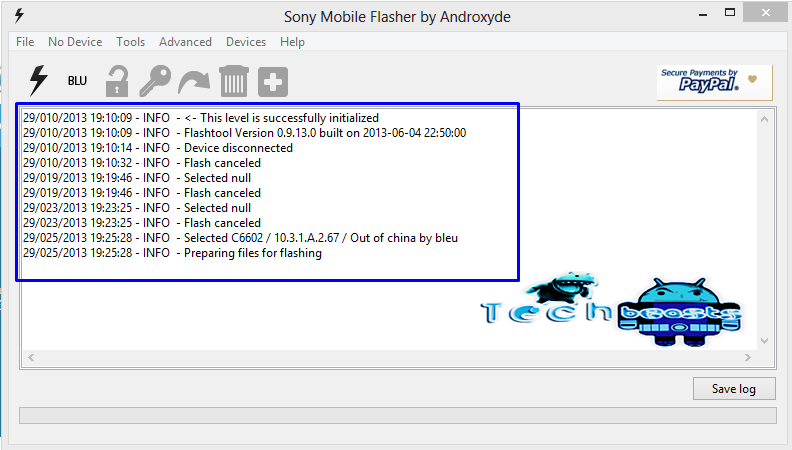
  4. Select the firmware or the file that you placed i the Firmwares folder, and make the other selections accordingly, below is an image showing the procedure for a firmware’s ftf file. After you’ve settled it up, hit the Flash button at the bottom now, it will start loading the ftf file and show you logs. Screenshot_3Screenshot_4
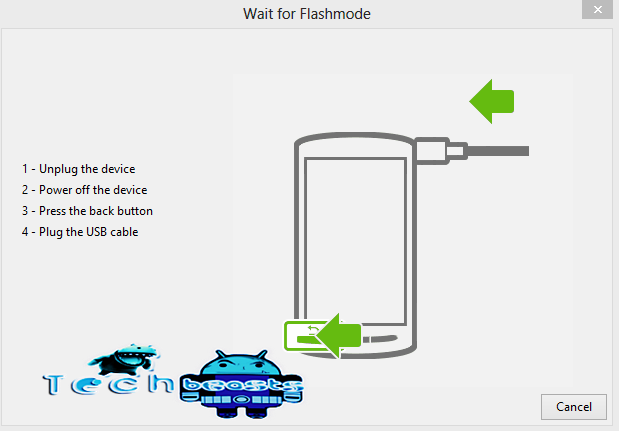
  5. As soon as the file is loaded, you should see a pop up, prompting you to connect your device to the PC in Flashmode.
    1. Screenshot_5
  6. Now, turn off your device, and connect to your PC using the original data cable while keeping the Volume down key pressed. You should see the Green LED on your device.
  7. After you’ve connected your device successfully, the Flashing will start, wait and sit back while the flashing gets completed. You should see the logs now, as soon as it is done the ”flashing done” will appear at the bottom.

That’s All! As soon as the flashing is done, remove your device from your PC and turn it on. You’ve the latest Android 4.2.2 firmware running on your device. Verify it by opening Settings > About Device > Firmware.

In case of any difficulties or queries, feel free to leave us a comment. We will try our best to help you out. Thanks!

How To Unlock Bootloader Of Nexus 5.

1
How To Unlock Bootloader Of Nexus 5.

Since Nexus 5 came with a locked Bootloader, so the only way to install Custom ROMs on it is to unlock the Bootloader First. Unlocked Bootloader will allow you to install Custom Recoveries and Rooting your device. We have already posted the tutorial about Rooting and Installing CWM Recovery on Nexus 5, but it can’t be done without Unlocking the Bootloader First, it’s not a very difficult task like unlocking Bootloader of an HTC Device, it’s quite simple but need preparations.

android-root-unlock

In this article ,we will show you How To Unlock Bootloader Of Nexus 5. This tutorial is only for Nexus 5, do not try it on any other Device.But before we begin make sure to Backup all your data placed on your phone’s internal storage, contactscall logs and messages. This is necessary as if something go wrong during the process, so you will be able to restore it afterwards.

Disclaimer:

The methods involved in flashing custom roms and rooting your phone is highly custom and may result in bricking your device, and has nothing to do with Google or the device manufacturers which is Samsung in our case. In case of any mishap we may not be held responsible. Follow these instructions to the letter to avoid any mishap or bricking. Make sure that whatever you do, you are doing it at your own responsibility.

Requirements:

Fastboot Files.

Android SDK and ADB Must be Configured. HOW? Follow the Link

A Nexus 5.

How To Unlock Bootloader Of Nexus 5.

Important tthings:

  • Enable USB debugging mode.
  • Make sure that battery level is at 85% or more.
  • This Tutorial is Only For Nexus 5.
  • Since Unlocking Bootloader Erase all your installed Application, make sure to back it up.
  • Nexus 5 USB Drivers.

How To Unlock Bootloader Of Nexus 5.

First of all make sure that you have install Android SDK and USB Drivers Package install on your PC. HOW? Follow the Link

  1. Download the Fastboot files and extract it in android-sdk-windowsplatform-tools directory.
  2. Power Off your Nexus 5.
  3. Now go to Bootloader/Fastboot mode, Press and hold Power + Volume Down Buttons till you see some text on-screen.
  4. Navigate to android-sdk-windowsplatform-tools directory and Open Command Prompt here. How? Hold Shift Key + Right Click anywhere in the folder and then click Open command window here.
  5. Type in the Following Command: fastboot oem unlock……Press Enter.
  6. Follow the On-screen instructions and confirm the Bootloader Unlocking and erase all data, proceed.
  7. In the end, Nexus 5 will reboot itself , if not then type in the following command: fastboot reboot.

Now open the Bootloader mode and try the following tutorial to confirm that the Bootloader in Unlocked.

Root and Install CWM Recovery on Nexus 5

How To Root Nexus 5 on Android 4.4 Kit-Kat and Install ClockworkMod Recovery.

1
How To Root Nexus 5 on Android 4.4 Kit-Kat and Install ClockworkMod Recovery.

Nexus 5 is dominating its way through the Mobile world to get the throne but it won’t be possible without knowing how much support it will provide when it get’s totally open source and the only way to get full control of your Nexus 5 is by Rooting it. Well since the mobile is only Two days old in terms of release, rooting method is not that easy to find. But this is the kind of challenge what developers want and it looks like they have succeeded in creating a rooting method for Nexus 5 running Android 4.4 Kit-Kat. The best part is that you can even install CWM Recovery on Nexus 5 by following our tutorial.

cover_rooting_android_640x360

In this article,we will show you How To Root Nexus 5 on Android 4.4 Kit-Kat and Install ClockworkMod Recovery. But before we begin make sure to Backup all your data placed on your phone’s internal storage, contactscall logs and messages. This is necessary as if something go wrong during the process, so you will be able to restore it afterwards.

Disclaimer:

The methods involved in flashing custom roms and rooting your phone is highly custom and may result in bricking your device, and has nothing to do with Google or the device manufacturers which is Samsung in our case. In case of any mishap we may not be held responsible. Follow these instructions to the letter to avoid any mishap or bricking. Make sure that whatever you do, you are doing it at your own responsibility.

Downloads Required:

Download SuperSU v1.65 (UPDATE-SuperSU-v1.65.zip)

Download Fastboot

Nexus 5 USB Drivers.

ClockworkMod Recovery.

Important things:

  • Your Device must be Running Android 4.4 Kit-Kat.
  • Enable USB debugging mode.
  • Make sure that battery level is at 85% or more.
  • This Tutorial is Only For Nexus 5.

How To Root Nexus 5 on Android 4.4 Kit-Kat and Install ClockworkMod Recovery.

Nexus-5-official-Press-Image-8

First of all make sure that you have install Android SDK and USB Drivers Package on your PC. HOW? Follow the Link

  1. Download Super SU but do not exact it.
  2. Now Connect Nexus 5 with PC and make sure to use the original USB cable.
  3. Now Copy and Pate the UPDATE-SuperSU-v1.65.zip to the root of your SD card.
  4. Turn Off your Phone.
  5. Download CWM 6.0.4.4.img and Paste it to the Fastboot folder.
  6.  Now go to Bootloader/Fastboot mode, Press and hold Power + Volume Down Buttons till you see some text on-screen.
  7. Navigate to Fastboot folder and Open Command Prompt here. HOW? Hold Shift Key + Right Click anywhere in the folder and then click Open command window here.
  8. Type in the following Command: fastboot flash recovery hammerhead-cwm-6.0.4.4-unofficial.img
  9. Once completed, choose Recovery from Fastboot menu.
  10. In CWM Recovery, Choose ‘flash zip from sd card’ then Select ‘Choose zip from Sd card’.
  11. Now choose the UPDATE-SuperSU-v1.65.zip file and confirm the installation on next screen.
  12. Wait for the process to over, go to “+++++Go Back” then select ‘reboot system now’.

That’s it your Nexus 5 has been rooted and ClockworkMod Recovery has been installed on it. If the CWM Recovery does not work, try the TWRP Recovery it will work.