Home Blog Page 460

Use pushNotify To Send notifications from iPhone to your Mac

0
Use pushNotify To Send notifications from iPhone to your Mac

It’s very annoying when we are working in office and at the same time we get notification on iPhone, we have to take it out from pocket and check. Most of the people usually put their phones in their pocket while working at the office and as for me I have to set it on vibration mode and so do the others, because of this we miss some of our important notification. Well not anymore because today I got my hands on a jailbreak tweak named ” PushNotify “.

PushNotify is basically Jailbreak tweak that helps us to connect and send iPhone notification to Mac. So we won’t miss a single notification. I have prepared a step by step guide on how you can Send notifications from iPhone to your Mac.
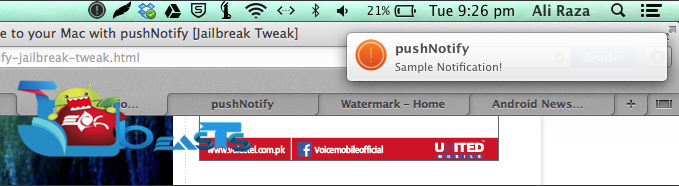
send iphone notifications to mac

Guide:

  • First go to Cydia and install PushNotify.
  • After install PushNotify goto http://pushnotify.freemanrepo.me and install PushNotify app for Mac.
  • On your iPhone goto setting open PushNotify setting and select reconfigure.
  • Now open PushNotify on your Mac and scan, you’ll see your iPhone name in the list and select it.
  • Now your device is connect with Mac through PushNotify. 

To check that you connection is working, go to setting on your iPhone -> PushNotify -> Select Test Banner -> Tap. You’ll see a notification on your Mac as a sample notification.

Screen Shot 2014-04-29 at 21.51.17

There more option to customize the PushNotify app like ‘Suppress option’ will not show the notification on your iOS device but it will be shown on your computer. Device Name option will include current device’s name in the banner on your Mac. You can use Disable for Apps to disable forwarding for certain apps as well. Choose the App you want to see notification on Mac. Even you can add custom banner for your Mac.

If you face any issue do tell me in comments.

Easily Backup & Restore EFS On Samsung Galaxy Devices With Samsung Tool App

16
Easily Backup & Restore EFS On Samsung Galaxy Devices With Samsung Tool App

Samsung Galaxy users must have heard of the EFS backup while updating or flashing a new firmware or flashing a custom ROM. EFS, Encrypting File System is basically a partition where the device’s radio information/data is stored. Backing up this partition is important before you make any changes to your Galaxy device’s system because of its highly sensitive nature that may result in turning off your device’s radio and having no connectivity at all.

What causes this radio issue to happen is, flashing invalid or inappropriate firmware damage the current EFS partition and results in changing the IMEI of the device to null. EFS issue is most likely to happen especially when you downgrade your Samsung Galaxy device. Having backed up EFS data is the only thing that can save your device life in this case. There is a number of methods available over the web to backup EFS on different devices, but most of these methods vary through different devices. Earlier we posted some methods, but a much easier method was still required.

While going through the XDA-developers forum, I came across the Samsung Tool App, developed by XDA Recognized Contributor ricky310711. Samsung Tool is a lite and easy to use the app, that can backup and restore EFS data on any Samsung Galaxy Device. You don’t need to worry about your device’s model number or firmware in order to use this application. All you need is, your device must be rooted and have a busy box installed and it will work perfectly great. Along with the EFS Backup & Restore options, the developer has also added the reboot options in the application that is just a bonus here. Samsung Tool app can be installed as a normal APK. Let’s have a look at how you can use this application to backup & restore the EFS partition. Let’s move forward and learn about the tool now.

How to Backup & Restore EFS using Samsung Tool:

  1. Your device must be rooted.
  2. Your device must have Busybox installed. If your device is rooted, you can install it from the play store as well.
  3. Download Samsung Tool APK. Download it directly to your phone or copy it to your phone from your PC.
  4. Locate the APK file on your phone and install it. Select Package Installer if prompted, allow unknown sources if required.
  5. Once installed, access the application from the app drawer.
  6. You will find all the options in the Samsung Tool, select whether you want to Backup, Restore EFS or Reboot your device.
  7. That’s all with the use.
  8. EFS Backup & Restore

As mentioned, Samsung Tool App works with all the Samsung Galaxy Devices(those as well which are not listed below), the confirmed devices are:

Samsung GT-I9300
Samsung GT-I9305
Samsung GT-I9505
Samsung GT-I9500
Samsung GT-N7100
Samsung GT-N7105
Samsung SM-N900
Samsung SM-N9005
Samsung SM-G900A
Samsung SM-G900F
Samsung SM-G900H
Samsung SM-G900I
Samsung SM-G900P
Samsung SM-G900T
Samsung SM-G900W8
Samsung SPH-L710

Backing up EFS is the very first thing you should do once you root your Android powered Samsung Galaxy device. What are you waiting for now? Back it up and let us know how this application worked for you.

Automatically add Facebook photos to your Contacts with OS X Mavericks

0
Automatically add Facebook photos to your Contacts with OS X Mavericks

OS X Mavericks comes with a lot of improved features which are far better from the previous OS X. You can add internet account in just a few steps. There is no rocket science, even you can sync your contacts with Facebook photos. Windows don’t have such a kind of option. Today I will tell you how you can Automatically add Facebook photos to your Contacts with OS X Mavericks. Just to clear you that not only Facebook, you can add Gmail, Twitter, Hotmail and many more.

How To Automatically add Facebook photos to your Contacts with OS X Mavericks:

  • First click on the Apple Logo on your Macbook Extreme left.

facebook photos on OS X contacts

  • A drop down menu will drop, click on System Preferences.

facebook contacts

  • Now from System Preferences click on Internet Accounts.

Screen Shot 2014-04-29 at 01.59.19

  • After clicking  on Internet Accounts you will get a list of Accounts, you can add click on Facebook.

Screen Shot 2014-04-29 at 02.00.30

  • After Clicking on Facebook a box will appear, fill in your Facebook ID and Password.

Screen Shot 2014-04-29 at 02.01.40

  • After logging in to your Facebook, account will be automatically added. Click on Facebook -> Contacts -> Select -> Get Profile Photos. You will get an option box asking permission to access your contacts, select update contacts.

All Done now, you’ll see Facebook photos on your contacts. Do tell me if you face any kind of issue.

You can also Check:

How to restore archived contacts on a Mac ( OS X Mavericks )

0
How to restore archived contacts on a Mac ( OS X Mavericks )

This is a good thing to have a backup of your contacts every time when you add more contacts to your list. It’s a better way to rely on iCloud auto sync. If you are using Windows or Android, then backup of your contacts and restoration of them is so easy. But on Mac to restore archived contacts is not that easy, until now. But now it’s so easy and safe in just a few steps.

restore archived contacts on mac

How to restore archived contacts on a Mac Guide:

  • Launch the Contact App on your Mac.
  • Now click on the File in the top menu and click on Import.

import contacts on mac

  • Now locate your backup file where you placed it last time. Select the File and click on open.
  • Done! your contacts are restored.

Follow all the these simple steps to restore your archived contacts on Mac. If you face any problem with this guide, do tell me in comments. It would be better to manually save you contacts after few days so that you list will be updated and Safe.

You can also Check:

How To Install Flash Player On Firefox With Android KitKat 4.4 [ Tutorial ]

0
How To Install Flash Player On Firefox With Android KitKat 4.4 [ Tutorial ]

Few days back we have posted how to Install Flash Player on Android. As we all know that official flash player app has been taken down by Adobe for reasons I don’t know, but there are still apk files of Flash Player for Android on web. You can install flash player through these apk files. Let’s get to the topic how you can install flash player on Firefox with Android Kitkat. As Adobe has stopped development of Flash Player for Android, because of this we get some compatibility issues with Android 4.4 KitKat. Well there is no need for flash payer to be installed because most of sites are using HTML5, But still there are sites that are using flash compatible objects, that is why some times while browsing we see blank spaces. Firefox is bringing back the flash player so you can install version 27 as a plugin.

Before we start install the Firefox from Google Play Store and lets install Adobe Flash Player from our guide [ Install Flash Player ].

Screen Shot 2014-04-28 at 21.34.05Screen Shot 2014-04-28 at 21.37.09

To see the the flash content on FireFox you have to enable the plugins under display section in the Firefox settings. As shown in the following images.

 Screen Shot 2014-04-28 at 22.01.02Screen Shot 2014-04-28 at 22.00.22

Now you don’t have to tap on flash content every time plugin will load the content automatically. It is very simple and now you can easily open flash content sites like online games, video and much more.

Update Samsung Galaxy Grand Duos To Andorid 4.4.2 KitKat with Resurrection Remix ROM

Update Samsung Galaxy Grand Duos To Andorid 4.4.2 KitKat with Resurrection Remix ROM

Resurrection Remix is a well known and one of the most used custom ROMs, available for a number of Android devices around. The ROM has made its way to the Galaxy Grand Duos GT-I9082 as well now based on the unofficial Android 4.4.2 KitKat having a little taste from a number of other custom ROMs e.g CM, AOKP, Omni, Slim PA etc. Galaxy Grand originally runs on Android 4.1.2 out of the box, and the device received only Android 4.2.2 Jelly Bean update so far, there hasn’t been any official word by Samsung about any further updates of this device, so the Grand Duos owners who have been sitting in disappointment or who are tired of the stock Android 4.1.2 or 4.2.2 Jelly Bean, it’s a good chance for em’ to get their hands on  the latest and greatest version of Android, but it’s unofficial.Samsung-Galaxy-Grand-Duos-official


So, in the following post we are going to install Resurrection Remix ROM on the Galaxy Grand Duos GT-I9082. The only thing you should keep in mind is, you may proceed with the custom ROM installation if you’re familiar with these ROMs and also if you know how to handle these ROMs on your Android device. These ROMs are not official or linked with the manufacturers in any way, there are high chances of bugs that you may face later on. Make sure that whatever you are going to do, you are doing it at your own risk.


Let’s first get introduced with the Resurrection Remix ROM:

Resurrection Remix ROM has been based on AOKP, CM, Omni, Slim, PA and original Remix ROM builds, creating an awesome combination of performance, customization, power and the most new features, brought directly to your device


We will also be having a look on the features that the Resurrection Remix ROM is offering for the Galaxy Grand Duos GT-I9082:

Resurrection Remix ROM
  • Compiled using Linaro Toolchain
  • Halo
  • Active display
  • Lockscreen Notifications
  • Application side bar
  • Omniswitch
  • Notification panel tweaks
  • Tiles style
  • Music Toggle
  • Pitch Black UI Mode
  • Camera mods
  • ListView Animations
  • Custom system animations
  • Custom progress bar
  • Screen recorder
  • Hardware buttons and navbar options
  • Status bar traffic monitor
  • Battery bar options
  • CRT animations
  • Status bar brightness slider
  • Expanded desktop
  • Profiles
  • Performance controller
  • Flip tiles
  • Theme chooser
  • Keyboard features
  • Lockscreen see blur and reduce slider
  • Show Wi-Fi name
  • Headset action
  • Low battery warning
  • Lock clock widget
  • Privacy guard
  • Permission management
  • Power sounds
  • Share ROM
  • Battery mods
  • Changelog
  • Lockscreen options and targets
  • Center Clock/No clock/Right Clock
  • AM/PM,date and colors
  • New Wallpaper app
  • Nova/Stock launcher included

Pre-Installation Instructions:

  1. This ROM is only for Samsung Galaxy Grand Duos GT-I9082. Do not try this on any other device, please check your device’s model in Settings > About Device > Model.
  2. It is advised that you migrate from a CM 11 based ROM in order to achieve the best results from Resurrection Remix. Follow our guide here to install CM 11 on based custom ROM on your Galaxy Grand.
  3. Your device must have a custom recovery installed, in case you’re missing it you may Follow our full guide here to install CWM.
  4. Your device’s battery should be charged at least over 60%. This is highly recommended in order to prevent any power issues during the flashing process.
  5. Make sure that you backup your important media content, ContactsCall Logs & Messages. This is highly recommended just in case something goes wrong and you need to reset your phone.
  6. If you already have rooted your device, use Titanium Backup to back up all your important apps + system data. Also if you are using a custom recovery, it is recommended that you backup your current system using that first. [Just for the sake of safety]. Here’s our full Nandroid Backup guide.
  7. You will have to go through Data Wipes during installation of this ROM, so make sure that you have backed up all the mentioned data.
  8. Make  EFS backup of your phone before you flash this ROM.
  9. You need enough confidence to flash this ROM on your Galaxy Grand Duos.
  10. Alright! Go ahead and flash the custom firmware, follow this guide to the letter.
Disclaimer: The methods involved in flashing custom roms and rooting your phone are highly custom and may result in bricking your device, and has nothing to do with Google or the device manufacturer that is SAMSUNG in our case. Also rooting your device will void its warranty and you will be no longer eligible for any kind of free device services by the manufacturers/warranty providers. In case of any mishap we may not be held responsible. Follow these instructions to the letter to avoid any mishap or bricking. Make sure that whatever you do, you are doing it at your own responsibility.

How to Install Resurrection Remix Android 4.4.2 KitKat on  Samsung Galaxy Grand Duos:

  • Download Resurrection Remix 5.1.0 Android 4.4.2 KitKat ROM .zip file.
  • Download Google Gapps for Android 4.4.2 KitKat .zip file.
  • Connect your phone to your PC now.
  • Copy both the .zip files to the storage of your phone.
  • Now disconnect your phone and turn it off complete.
  • Boot into CWM recovery now, in order to do so, turn it on by pressing and holding Volume Up + Home Button + Power Key. You should see the recovery mode in a while.
  • Now in CWM recovery, wipe cache, factory data reset and advanced options > dalvik cache.
  • After wiping all these three, select “Install” option.
  • Now select “Install > Choose Zip from SD card > Select Resurrection Remix.zip file > Yes”.
  • This will flash the ROM in your phone.
  • Once again in CWM select “Install > Choose zip from SD card > Google Gapps.zip file > Yes”.
  • This will flash Gapps in your phone.
  • Reboot your device.
  • You should see the Resurrection Remix ROM running on your device in a while.
  • That’s all!

Resurrection Remix Android 4.4.2 KitKat for Galaxy Grand Duos

First boot may take up to 10 minutes, you may not worry if it’s taking that much long. In case it’s taking too long, you may boot into CWM recovery and wipe cache and dalvik cache and reboot your device as it may fix the issue. In case your device is having issues, you may return to your old system using the Nandroid backup or follow our guide here to install stock firmware.

In case you got any issues or you face any difficulties regarding this post, please feel free to stop by the comment box below and let us know. We will get back to you as soon as possible. Thank you all.

Control Your Desktop PC Using Your Android Device With Chrome Remote Desktop

0
Control Your Desktop PC Using Your Android Device With Chrome Remote Desktop

Google introduced its Chrome Remote Desktop application few years back ,but the application only worked between the computers. Recently, Google has launched Chrome Remote Desktop for Android devices, that allows the users to control their desktop PC, Laptop or a MAC device from anywhere, anytime without any hiccups. In case you’re not much familiar with the concept of Chrome Remote Desktop, you must have heard of TeamViewer then (A popular Remote Control and Remote Access tool), Chrome Remote Desktop is pretty much same to as that of the Teamviewer, but nothing is more good than having an application by Google for this very thing as we can expect the best results.

The application is available in the Chrome Web Store and for Android it’s available in the Google Play Store. Google has made the connectivity  much easy and simple, once installed both the applications, you can access each and everything on your Desktop PC / Laptop or MAC using your mobile phone. After using Chrome Remote Desktop application for a while, I was able to say that its an awesome application. In case you want to use this Chrome Remote Desktop between two PCs, both the PCs must have installed this application in the Google Chrome browser and then generate and share the PIN to connect. While the application is new for Android, so chances are, there is a number of Android users who are not aware of this application or who do not know how to use this application. To make it easy, we are going to have a look on a detailed and comprehensive guide on Chrome Remote Desktop.

How You Can Control Your Desktop PC Using Your Android Device With Chrome Remote Desktop.

  1. Download the Chrome Remote Desktop application on your PC.
  2. Sign into the application using your gmail account (same as that on your Android device.)
  3. Download and install Chrome Remote Desktop on your Android device. Google Play Link | APK.
  4. Once installed open the Chrome Remote Desktop. It should show you logged in the application with your gmail account.
  5. Now, on your Google Chrome Browser go to Apps > Chrome Remote Desktop.Chrome Remote Desktop (2)
  6. In Chrome Remote Desktop click on My Computers > Get Started.Chrome Remote Desktop (3)
  7. If you’re not already signed in, it will ask you to sign in here.
  8. Once signed in, Chrome Remote Desktop will ask you to enter a secret pin that you may enter when connecting from Android device.Chrome Remote Desktop (1)
  9. Setup the PIN and Chrome Remote Desktop should start making the host online.
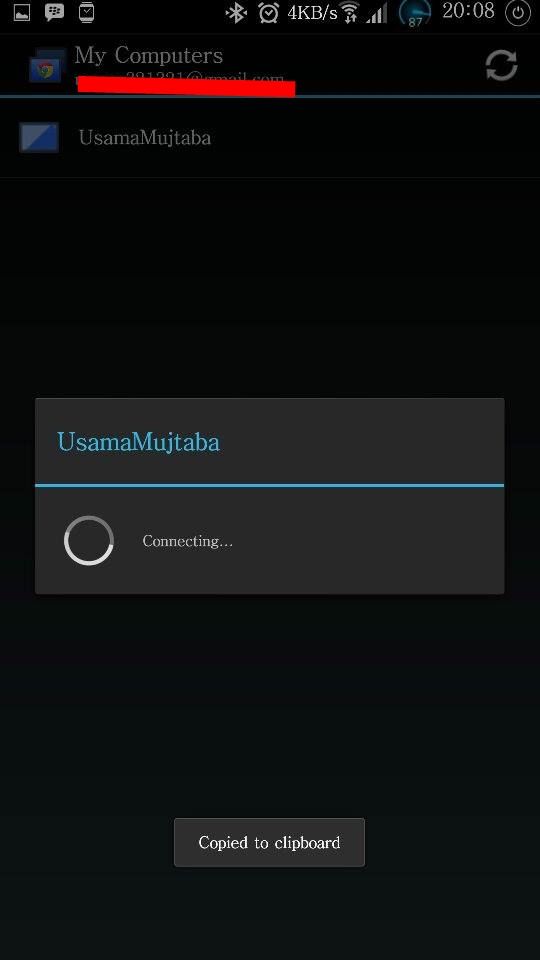
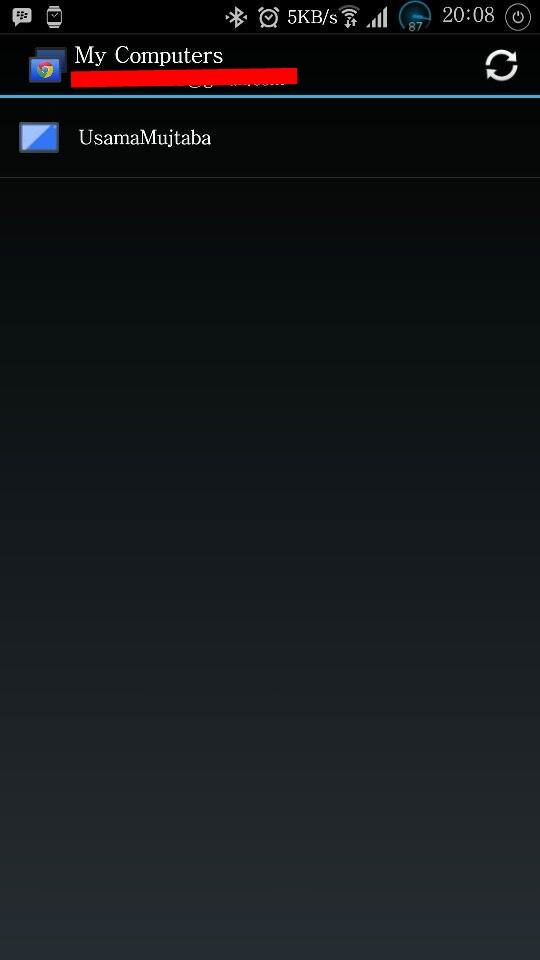
  10. Once the Host is online, the dull PC name on your Chrome Remote Desktop in Android device should turn bright indicating that the Host is online.
  11. Tap the PC name in the application on your Android device, it should ask you for the PIN.
  12. Enter the same PIN you setup on your PC.
  13. Once the connection is established, you will be able to use your PC using your Android device.
  14. That’s all. Enjoy!

  10172793_10203161975502892_4302615993611370521_n10175961_10203161976062906_7033324703769283263_n10155217_10203161975742898_3012298448302460085_n10264687_10203161976542918_4996723971323963243_n


Check Your Browser Benchmark With 4 Free Tools

0
Check Your Browser Benchmark With 4 Free Tools

There are many web browsers now available and the fight between them is still going on, well there is no reason to start such fight but users just don’t want to learn that the browser they are using is slow and not good. Everyone loves their own choice, as some use browsers at a minimum of a one tab, and there are some who use at-least of 10-15 tabs at the same time. However, no matter which browser you are using, it will crash at some point  and then there is Internet Explorer, that browser works perfect until you install any other browser, that is the reason why people start to hate Internet Explorer, otherwise it is a good browser.

Browser-Benchmark-Final

Now the problem is still there, which browser to choose, well whatever you are using right now, keep going with it until you either get bored or that browser start to give problems. At that certain point, users start to look for alternate solutions, and don’t understand what to do, or what to choose. The reason why this article is here, so that you can choose the best browser. We will give you 4 of the best and free applications to give you the Benchmark results of the browsers you are using, afterwards the choice is yours. Here we go:

1. PeaceKeeper

As the name suggests, this software is here to make peace among the users, created by Futuremark, creators of  3DMark and PCMark, popular benchmark tools for PC gaming. All you need to do is to visit Peacekeeper site and click the button Test My Borwser. You can benchmark any browser, even one running on your Mobile device.

image153

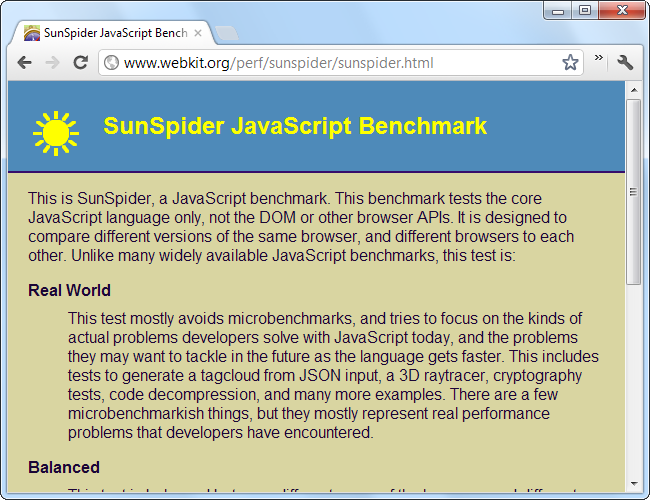
2. SunSpider

SunSpide is created by the WebKit team, the same team rendering the engine that powers Google Chrome, Apple Safari, and the default browsers in iOS and Android. This site is quite simple and like PeaceKeeper, you won’t see any animations in it. You won’t see any score to judge, instead the time will tell everything, you need to test two browsers at the same time to know the difference.

image157

3. V8 Benchmark Suite

This Benchmark is suited by Google to tune V8, the JavaScript Engine used in Google Chrome. It is way faster than any other benchmark machine, given that it is the best benchmark tool available yet, you can test multiple browsers at the same time, it provide score and bigger score are better.

image161

4. Dromaeo

Now this is the Mozilla Benchmark, it makes some of its own tests as well as taken some from V8 and Sunspider, this takes usually longer than any other tool, sometimes for fifteen minutes. You will see a number of runs during the test and again more is better, there is no way to compare the results on the spot, but you can manually compare them as you visit later.

image163

How To See All The Unread Message Notifications On Your iPhone At Once

0
How To See All The Unread Message Notifications On Your iPhone At Once

Many people have asked me that how can we see all of our unread messages notification at once on iPhone. Because at times it is irritating that we have to check each one by one. Like if you are using twitter, Facebook, WeChat, Instagram, Whatsapp and Viber then its very annoying that I have to open up an app one by one just to see the unread messages notifications. So after a little research I have found a way to see all the unread message notifications on iPhone at once.

Screen Shot 2014-04-28 at 05.09.42

How to see all the unread message notifications on your iPhone at Once:

The best way is to organise your all messaging app in one folder, it will help you to use apps easily and also you can see all the unread message notification at once.

  • Tap on your messaging app icon you home screen until it start jiggling.
  • Now drag it onto other messaging app icon , get a hold until it creates a new folder.
  • Now label the Folder as you like.

Its done now, so whenever you’ll open up the folder and it will be easier to see all the unread message at once on your iPhone.

2014-04-28 05.01.29 2014-04-28 05.01.40

Music Volume EQ: Experience the Best Sound on Your Android Device

0
Music Volume EQ: Experience the Best Sound on Your Android Device

A music freak like me would always love to modify the sound going in to my ears to amuse myself, and specially when you own an Android device, you won’t be able to relax for a while when there is a ponderous list of applications available in the Google Play Store to modify the sound coming out of your Android device. Something similar that I came across, and that just added a little more fascination to my favorite music tracks is Music Volume EQ.

A very nice application, available for free that enhances the sound on your Android device the way you want. Music Volume EQ takes the sound to another level, that is normally not achievable using the in-built Equalizer of the device. While these limitations of the stock Equalizer are not always nice to bear, you may find this app handy and love exploring the new tracks to adapt the sound effects from this very application.Music Volume EQ

Music Volume EQ has a simple and user-friendly interface, the app opens up as a popup once you have enabled it. You can select different modes e.g Rock, Jazz, Normal, Classic, Custom etc. The Bass and Treble options are what I actually loved in this application, just like a real Tape-recorder, you can rotate the Bass and Treble buttons and set the sound according to your likings. Apparently, the Bass and Treble options are enough to add the desired charm to your music atop of the normal mode. The application overrides the stock Equalizer in order to achieve the best sound results.

Here are the key features of Music Volume EQ:

Media volume control
* Five band equalizer
* Bass boost effect
* Virtualizer effect
* 9 equalizer presets
* Save custom presets
* Stereo led VU meter
* Home screen widget
* Lock media volume

After using this application for sometime, I couldn’t refrain myself from sharing it here on the site and let the users know about it. The app is packed up in only 2.1 MB and requires Android 2.3+ to run on. At the bottom, I’ve linked in the APK and also explained how you can install Music Volume EQ using the APK file on your Android device, just go ahead and grab it right now and enjoy listening your favorite tracks with a new sound or else you can also install it directly on your Android device using the Google Play Store.

How to Download & Install Music Volume EQ using the APK file:

  1. Download Music Volume EQ APK.
  2. Copy the downloaded APK file to your phone or download it directly on your phone.
  3. Locate the downloaded APK file on your phone and tap it to begin the installation.
  4. Select “Package Installer” if prompted.
  5. All “Unknown Sources” if required.
  6. Complete the installation and access the app through app drawer.
  7. Enjoy the cool sound effects.
  8. That’s all!

How To Enable “Save To SD Card” Option On Samsung Galaxy Note 3

0
How To Enable “Save To SD Card” Option On Samsung Galaxy Note 3

Android 4.4.2 Kit-Kat is full of surprises and every coming device is full of Surprises yet to be discovered. In Android 4.4.2 Kit-Kat there is no default option of moving your data to the SD card, well I don’t know about others, but in Samsung Galaxy Note 3 you can’t use such type of feature. The problem occurs with some specific applications only, but its just a problem and every problem has a solution. However, some solutions require a little more than necessary and in such case, there are a little problems we are about to discuss.

After installing this File, some of the File explorers might show some problems even your SD card, in some explorers you might see your SD card as twice. You will need a rooted device, better follow this guide to root it and also install a Custom Recovery: How To Root Galaxy Note 3. Once the device is rooted, follow ahead.

Android_data_SD_card_settings_thumb

Disclaimer: 

The methods involved in flashing custom roms and rooting your phone is highly custom and may result in bricking your device,and has nothing to do with Google or the device manufacturers which is Samsung in our case. In the case of any mishap we may not be held responsible. Follow these instructions to the letter to avoid any mishap or bricking. Make sure that whatever you do, you are doing it at your own responsibility.

Downloads:


Installation Tutorial:

  • Download the zip file.
  • Copy it to the root of your sdcard.
  • Disconnect the cable.
  • Turn Off your Device
  • Open Recovery mode. How? Press and hold Volume Up + Home + Power buttons until you see some text on screen.
  • Navigate to ‘Install zip from sd card’ another windows will open in front of you.
  • Select ‘choose zip from sd card’ from the Options.
  • Select the extsdcardfix-flashable.zip file and confirm the installation on next screen.
  • Once the Installation is Over, Select +++++Go Back+++++
  • Select Reboot Now to Reboot the System.

How To Recover Images and Videos On An Android Device

How To Recover Images and Videos On An Android Device

Well, finally there is a proper way to restore all of the deleted files, well not all of them, but the Media files like Videos and Pictures. This type of situation arises due to a mistake, well what type of, is the real question? Now in my experience, I was trying to delete the Thumbnails, but instead of using the Gallery, I tried acting genius and used the ES File explorer and guess what, the amount was huge, instead of deleting them on-by-one, I selected all of them and press the delete button. It took a long time and I could still see the progress bar and in the end, Puff! everything just vanished, all of my beautiful pictures were gone in just one second.

Well I did panic on the spot, but since I had saved all my data on the PC, I didn’t have to worry about anything. But that accident gave me an idea and I searched the web for the solution to recover all the Media on an Android device, and I found something very similar to my case, and found a very good solution.

recover-deleted-files-froma-Android


On the Google Play Store, you may found many applications, directing you to restoring your data, but only a handful of them work, and those Handful has very fewer chances to work properly. If you are lucky enough, you might able to restore using such applications. However, what I found is also available on Google Play Store, the reviews described this App as a working and it does works like a charm, I don’t know whether it works for Corrupted Memory cards, but for internal storage, it is sure to work. DiskDigger is the name of the app and it is available at Google Play Store for Free, but for your convenience we are providing the Apk file and also the installation process and how to use it.

How To Install Disk Digger Apk.

Pre-Requirements:

  • Download Disk Digger Apk: Link
  • Allows your device to Install from Unknown Sources. Go to Settings > Security and Tap Unknown Source.

Screenshot_9

How To Install Disk Digger On Android.

  1. Download the Above file.
  2. Connect your Device with PC.
  3. Copy the Apk file to your device.
  4. Disconnect the Device.
  5. Install the Apk like normal file, just tap the Apk File and Confirm the installation.
  6. While installing, if ask for any Installation Process, Choose “Package Installer and if there is a Pop-Up Choose Decline”