Home Blog Page 381

How To Lock and Unlock Samsung Galaxy S6 Using the Fingerprint Scanner

How To Lock and Unlock Samsung Galaxy S6 Using the Fingerprint Scanner

Samsung Galaxy S6 is also coming with Fingerprint Scanner, but its not the same as Samsung Galaxy S5. This time Samsung made a big change now you only have to place your finger on home button and it will unlock your Galaxy S6. It’s much better then Samsung Galaxy S5 because now you don’t have to slide your finger. In the following guide i’ll tell you How To Lock and Unlock Samsung Galaxy S6 Using the Fingerprint Scanner.

Also See: Lock and Unlock Samsung Galaxy S5 Using the Fingerprint Scanner

how use samsung galaxy s6 fingerprint scanner

How To Lock and Unlock Samsung Galaxy S6 Using the Fingerprint Scanner:

  • Pull down the notification bar form home screen by swiping your finger’s down.
  • After getting in to notification bar select setting.
  • Now tap on Finger Scanner.
  • Now Tap on Fingerprint Manager.
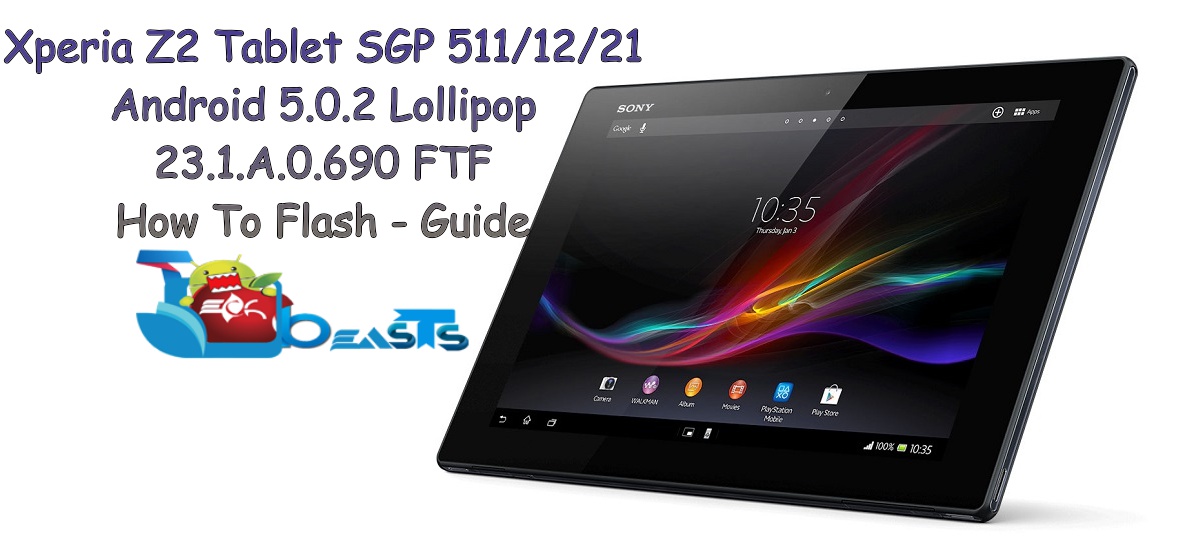
  • After taping the Fingerprint Manager you’ll have to register first time. Follow all the instruction as show in the image.
  • All you have to do is hold your finger on screen and slowly move your finger down-words. You have to swipe 8 time to get it done.
  • When the process is completed you’ve to add an alternative method for emergency incase fingerprint scanner is not working.
  • All Done you’ve successfully enabled the fingerprint scanner on your Samsung Galaxy s6.

Setup Fingerprint Lock on Samsung Galaxy S6:

#1: Pull down the notification bar form home screen by swiping your finger’s down.

#2: After getting in to notification bar select setting.


#3: Now tap on Finger Scanner.

#4: After going into FingerPrint Scanner select Screen lock.

#5: Now from the screen lock select touch Fingerprint.

All done you’ve successfully setup Fingerprint lock on Samsung Galaxy S6.

How To Enable USB Debugging on Samsung Galaxy S6 [ Guide ]

0
How To Enable USB Debugging on Samsung Galaxy S6 [ Guide ]

Last day i posted about how to Turn on Screen Mirroring on Samsung Galaxy S6, today i’ll tell you how to enable USB debugging on Samsung Galaxy S6. Most of you know how to enable USB debugging on Android, but for those who are new to Android and new to Samsung Galaxy devices they can learn How To Enable USB Debugging on Samsung Galaxy S6 from the following guide.

galaxy-s6-edge-black

How To Enable USB Debugging on Samsung Galaxy S6 [ Guide ]:

  • Goto Main menu and launch quick settings.
  • Now go to About Device Menu.
  • Now go to Build Number.
  • Then tap on the build number 7 times.
  • After the 7th tap you’ll get the message that now you are a developer.
  • Now press back button, now you shall see Developer option.
  • Go to developer menu and enable USB Debugging.

Now that USB Debugging option is enable I hope that you don’t have any issue connecting through USB on PC and if any problem still exist please make sure that you are using original USB cable of Samsung Galaxy S6.

How to Set video auto-play settings in the Facebook app

0
How to Set video auto-play settings in the Facebook app

As we have seen in Instagram posts when ever we see a video it start auto playing, same option has added in Facebook app. Today i’ll tell you how to set video auto play settings in Facebook app, in the following guide i’ll explain methods for both iOS and Android devices. On Android devices by default Video auto play option is turned off, but on iOS devices it turned on by default.

facebook_autoplay

How to Set video auto-play settings in the Facebook app [ Android ]:

11051235_10206438976036541_871506745_n

Step#1 : Open Facebook on your Android device.

Step#2: Now Tap on the 3 line icon located on top right side of your screen.

Step#3: You’ll see many options tap on App Settings.

Step#4: Now scroll down and see for Video Auto-Play option.

Step#5: Tap on it, you’ll see a popup tap on Off/On/Wifi Only what ever you like.

Step#6: Tap on Ok.

All Done !!.

How to Set video auto-play settings in the Facebook app [ iPhone ]:

11130549_10206438976196545_1743622299_n

Step#1 : Open Facebook on your Android device.

Step#2: Now Tap on the 3 line icon located on bottom right of your screen.

Step#3: Tap on Videos and Photos.

Step#4: You’ll See 3 options tap on Auto-Play.

Step#5: Now you set what ever option you want, if you want to disable it tap on Smart Auto-Play to Turn off.

All Done!

How to Turn on Screen Mirroring on Samsung Galaxy S6 and Connect With SmartTV

How to Turn on Screen Mirroring on Samsung Galaxy S6 and Connect With SmartTV

When Samsung Galaxy S5 was released i posted about How to Turn on Screen Mirroring on Samsung Galaxy S5 and Connect With SmartTV. Now Samsung Galaxy S6 is out so today i’ll tell you how to Turn on Screen Mirroring on Samsung Galaxy S6. The method totally same because Samsung didn’t changed anything related to screen Mirroring. I’ll be using AllShare Cast Wireless Hub, HomeSync and HDMI Cable.

galaxy-s6-edge-black

How To Enable screen mirroring on Samsung Galaxy S6:

  • Goto quick setting.
  • Tap on Screen mirroring icon and enable it.

Now in the following steps you’ll find out how you can enable screen mirroring with AllShare Cast Wireless Hub, HomeSync, Miracast and HDMI Cable.

How to screen mirror from Samsung Galaxy S6 to a TV using AllShare Cast:

  • Turn on your television.
  • Power on your AllShare Cast though charger.
  • Connect your TV with AllShare Cast with HDMI Cable.
  • Kindly properly put HDMI Cable in the right port.
  • Now wait for the light to get blue from red on your AllShare Cast device.
  • Your TV is connected with AllShare Cast.
  • Now go to Samsung Galaxy s6 quick setting and tap on screen mirroring and first turn off then turn on it again.
  • After turning on Screen mirroring you will get a list of available devices. Select AllShare Cast’s dongle and enter the PIN as showed on TV.
  • Your Samsung Galaxy S6 is connected with your TV through AllShare Cast.

How to screen mirror from Samsung Galaxy S6 to a Samsung Smart TV:

  1. Press Input from your Samsung SmartTV remote.
  2. Select Screen Mirroring from your Smart Tv screen.
  3. Now go to your Galaxy S6 quick setting tap on Screen Mirroring.
  4. Your Phone will list all the available device available for Screen Mirroring.
  5. Select Samsung Smart TV. That’s all.

Update Xperia Z2 Tablet SGP 511/512/521 To Official Android 5.0.2 Lollipop 23.1.A.0.690 Firmware

7
Update Xperia Z2 Tablet SGP 511/512/521 To Official Android 5.0.2 Lollipop 23.1.A.0.690 Firmware

Xperia Z2 Tablet has joined the lucky squad of Android 5.0.2 Lollipop devices. The update started rolling out for this device 2 days ago alongside the D6602 variant of the Xperia Z2. This update carries some major changes, the very first and the most prominent change is in the graphics department. Sony has made the UI according to the Material Design while keeping the changes very minimal. Notifications on the lockscreen have been added, Sony has also added the “Close All” button in the recent apps menu that it forgot in the earlier builds of Android 5.0.2 Lollipop for Xperia Z3 & Xperia Z3 Compact.

Before we head towards the installation guide let’s have a recap on the Xperia Z2 Tablet. It came up 2014 as a sibling of the Xperia Z2. On the front we have a 10.1 inches screen with 224 ppi. Under the hood there’s a Qualcomm Snapdragon 801 CPU clocked at 2.4 GHz, a RAM of 3 GB is placed inside. Xperia Z2 Tablet has a massive battery of 6000 mAh. Xperia Z2 tablet ran on Android 4.4.2 KitKat out of the box initially, but the device is receiving Android 5.0.2 Lollipop update at the moment.

Since the update is rolling out through Sony PC companion or through OTA, it’s going to take some time to hit all  the regions. In case you haven’t got it yet and you’re getting eager to update your Z2 tablet to this latest and greatest Android version, you may want to use a different method to achieve the firmware update. We’ve come up one such method and as you move forward in the following post, you will come across a comprehensive guide to update your Xperia Z2 TAblet SGP 511, 512 and SGP 521 to Android 5.0.2 Lollipop using Sony Flashtool. Let’s head towards the early preparations now.

Early Preparations:

1. This is only for Sony Xperia Z2 Tablet SGP 511/521

This ROM is only for the device mentioned above. Make sure that your model number matches the one listed above. To do so, go to Settings > About Device on your device and see your model number. Flashing this firmware on any other device will result in bricking it so make sure that you meet this requirement first of all.

2. Battery should be charged at least over 60%.

Make sure that your battery is charged enough to complete the flashing process. In case your battery is low and your device goes dead during the flashing process, you may end up soft bricking your device as it won’t complete the flashing process.

3. Backup everything!

Just to be on the safe side, you may consider backing up each and everything from your Android device. This is highly recommended so that in case anything goes wrong, you still have the access to all of your data and you can restore it immediately. You may backup everything as listed below.

  • Backup SMS Messages
  • Backup Call Logs
  • Backup Contacts
  • Backup Media – Copy your files manually to your PC or Laptop.
  • Titanium Backup – If already rooted, use Titanium Backup to backup all of your apps, system data and other important content. If you haven’t rooted your device previously, skip this step.
  • Backup Nandroid – If CWM  or TWRP installed previously, otherwise skip this step and perform this at the end of flashing.

4. Enable USB Debugging Mode on your device.

Enable USB debugging mode on your device. To do so, tap settings>developer options>USB debugging. If you can’t find developer options in settings, then tap settings > about device and tap “Build Number” for 7 times and you’ll get em’ activated under settings.

5. Install and setup Sony Flashtool.

You must have installed Sony Flashtool. Find the full guide here.

After installing Sony Flashtool, open the Flashtool folder from the drive where you installed it. Now open Flashtool>Drivers>Flashtool-drivers.exe and install the Flashtool, Fastboot & Xperia Z2 Tablet drivers from the list. [Important]

6. Use OEM data cable to establish connection.

Make sure that you use the phone’s original data cable to establish connection between your phone and the PC. Using a different data cable might result in interrupting the firmware installation.
Spot-the-Difference-Sony-Xperia-Z2-Tablet-vs-Sony-Xperia-Tablet-Z-429851-4

How To Update Sony Xperia Z2 Tablet To Official Android 5.0.2 Lollipop 23.1.A.0.690 Firmware

Before moving forward, please make sure that you’ve read the pre requisites and ensure that you are set to go ahead.

  1. Download the latest firmware Android 5.0.2 Lollipop 23.1.A.0.690 FTF file.
    1. For Xperia Z2 Tablet SGP 511 [WiFi, 16 GB][Generic/Unbranded] Link 1 | You can also create your own FTF using this guide.
    2. For Xperia Z2 Tablet SGP 512 [WiFi, 32 GB][Generic/Unbranded] Link 1 | You can also create your own FTF using this guide.
    3. For Xperia Z2 Tablet SGP 521 [LTE 16 GB][Generic/Unbranded] Link 1 | You can also create your own FTF using this guide.
  2. Copy the file and paste in Flashtool>Firmwares folder.
  3. Open Flashtool.exe now.
  4. Hit the small lightening button on the top left corner and select Flashmode.
  5. Select the FTF firmware file that you placed in the Firmware folder.
  6. From the right side, select what do you want to wipe. Data, cache and apps log, all wipes are recommended, perhaps you may select if you don’t want.
  7. Click on OK, and it will start preparing the firmware for flashing. This may take a little while to load.
  8. As soon as the firmware is loaded, it will prompt you to attach the phone by turning it off and keeping the back key press.
  9. For Xperia Z2 Tablet Volume Down key will do the job of back key, just turn off your phone, keep the Volume Down key pressed and plug in the data cable.
  10. As soon as the phone is detected in Flashmode, the firmware will start flashing, Do not leave the Volume Down key until the process is complete.
  11. As soon as you see “Flashing ended or Finished Flashing” leave the Volume Down key, plug the cable out and reboot.
  12. That’s All! Congrats! You’ve installed latest Android 5.0.2 Lollipop on your Xperia Z2 Tablet. Enjoy

In case you got any queries or face any problems regarding this guide, please feel free to stop by the comment box below and let us know. We will get back to you as soon as possible. Thanks all!
How To Extend Samsung Galaxy Note 3 Battery Life [ Guide ]

0
How To Extend Samsung Galaxy Note 3 Battery Life [ Guide ]

Samsung Galaxy Note 3 was the best device from Galaxy Note series until Galaxy Note 4 came out, but still Galaxy Note 3 is the best option when it comes to buy a high end device. Samsung Galaxy Note series is famous for its battery life, Note 3 comes with a removable battery of 3200mAh which give a good battery time. But its never enough so today i’ll tell you how to extend Samsung Galaxy Note 3 battery life.

In the following guide i’ll tell you simple steps to extend Samsung Galaxy Note 3 battery life, there is no rooting method involved in the tutorial.

Note-3-1000x500

How To Extend Samsung Galaxy Note 3 Battery Life [ Guide ]:

Step#1: When you are not using GPS, WiFI and Bluetooth make sure to turn them off.

Step#2: Turn Off the Auto brightness and try to use Low the screen brightness.

Step#3: Go to Settings > Device > Display > Screen timeout and decrease it.

Step#4: Use simple Wallpapers, don’t use Live Wallpapers.

Step#5: If you are using Galaxy Note 3 N9005 then you can use Snapdragon Battery Guru App it really improves battery life.

Step#6: Go to Settings > Device > S Pen and then touch the option > Turn off S Pen detection.

Step#7: Goto Settings > Apps Manager > Disable all S Apps.

Tell me in comments is this guide was helpful for your…..

How to easily clear the cache on the Moto X [ Guide ]

0
How to easily clear the cache on the Moto X [ Guide ]

If you are using Motorola Moto X and your device is running slow, facing lag issues and apps are not working properly then clearing the cache on your Moto X will help you alot. In the guide i’ll tell you how to clear cache on Moto X 2014. You can use third party app cleaner to clear cache, but i would suggest that you should use recovery mode to clear the cache on Moto X.

moto-x

How to easily clear the cache on the Moto X:

Step#1: First turn of your Moto X.

Step#2: Now Press and hold Power and Volume Down to enter in Fastboot mode.

Step#3: Choose recovery from the list using volume down and to select it press volume up button.

Step#4: When you see Motorola logo, Press and hold the Power button for a couple of seconds. Now press volume up button to boot in recovery.

Step#5: Use volume up/down button to select Wipe Cache Partition.

Step#6: Now press the power button to confirm it.

Step#7: Wait for few seconds to complete the process. You’ll be returned to recovery menu.

Step#8: Select Reboot System Now and press Power to confirm.

Step#9: You can also clear apps cache by going in to Settings > Application Manager > select the app and clear the cache.

All Done !!

Download OnePlus One’s HD Wallpapers for Free

0
Download OnePlus One’s HD Wallpapers for Free

If you are looking HD Wallpapers for your One Plus One then you have come to right place, i’ve collected the best and free HD Wallpapers. One Plus One was launched with CyanogenMod and this device has all the high end spec’s. Now they company is taking a one step further, recently they have released their first own OS named as Oxygen. I’ll soon post OnePlus One’s OxygenOS HD Wallpapers.

OnePlus_One_home_wall_1

Download OnePlus One’s HD Wallpapers for Free

How to make your Nexus 5 screen bigger [ No Root ]

0
How to make your Nexus 5 screen bigger [ No Root ]

Ever wonder you can make your Nexus 5 screen bigger? Yes you can in the following guide i’ll tell you how to make your Nexus 5 screen bigger. I’ll use method which include no rooting methods, although you can make your Nexus 5 screen bigger using custom rom. I’ve been using Nexus 5 from last three months and when ever i see my friends carrying smartphone with screen size of 5.2 and 5.5-inch it makes me jealous so after a little bit of search finally i found a working method to make mine Nexus 5 screen bigger.

Nexus_5_front

How to make your Nexus 5 screen bigger [ No Root ]:

Step#1: First enable the USB Debugging on your Nexus 5.

Step#2: Download and install ADB Tool on your PC.

Step#3: Connect your Nexus 5 with PC using USB cable.

Step#4: Now goto ADB tool folder and In some blank space, hold Shift and right click. Select Open Command Window Here.

Step#5: Use the following command to confirm your Nexus 5 is connected.

adb devices

Step#6: Type the following command now and reboot your Nexus 5.

adb shell wm density 400

Step#7: After the you enter the command and your device is rebooted you’ll see more space.

If you want to get more space you can change the number in the given command. It depend on what suits you best.

Step#8: Once the screen size is changed, you can also revet it back by typing the following command.

adb shell wm density reset

All Done !.

Update Sony Xperia Z2 D6502 To Android 5.0.2 Lollipop 23.1.A.0.690 Firmware [Official]

12
Update Sony Xperia Z2 D6502 To Android 5.0.2 Lollipop 23.1.A.0.690 Firmware [Official]

Good day for Xperia Z2 D6502 owners. Sony has finally started rolling out the long awaited Android Lollipop for this variant of the Xperia Z2. Its been pretty long since the D6503 users have been enjoying the biggest Android update, which made the other variants users much more anxious for the sweetness of Lollipop. As expected, the new update carries some major UI changes, Sony hasn’t changed its UI completely, but has managed to comply with Google’s all new Material Design UI. New features include notifications on lock screen, enhanced battery life, better performance. Some bugs have been fixed as well.

This update carries the build number 23.1.A.0.690, with Android version 5.0.2. The update is on a slow rollout and hitting different regions one by one. If you can’t wait for this update to arrive via OTA or through Sony PC Companion, you can flash it using Sony Flashtool as well. For users looking out for this Sony Flashtool method, we’ve made this comprehensive guide. As you move ahead, you will be able to update your Sony Xperia Z2 D6502 to this latest official Android 5.0.2 Lollipop 23.1.A.0.690 firmware. Let’s go through some early preparations and update this device now.

Early Preparations:

1. This is only for Sony Xperia Z2 D6502

This ROM is only for the device mentioned above. Make sure that your model number matches the one listed above. To do so, go to Settings > About Device on your device and see your model number. Flashing this firmware on any other device will result in bricking it so make sure that you meet this requirement first of all.

2. Battery should be charged at least over 60%.

Make sure that your battery is charged enough to complete the flashing process. In case your battery is low and your device goes dead during the flashing process, you may end up soft bricking your device as it won’t complete the flashing process.

3. Backup everything!

Just to be on the safe side, you may consider backing up each and everything from your Android device. This is highly recommended so that in case anything goes wrong, you still have the access to all of your data and you can restore it immediately. You may backup everything as listed below.

  • Backup SMS Messages
  • Backup Call Logs
  • Backup Contacts
  • Backup Media – Copy your files manually to your PC or Laptop.
  • Titanium Backup – If already rooted, use Titanium Backup to backup all of your apps, system data and other important content. If you haven’t rooted your device previously, skip this step.
  • Backup Nandroid – If CWM  or TWRP installed previously, otherwise skip this step and perform this at the end of flashing.

4. Enable USB Debugging Mode on your device.

Enable USB debugging mode on your device. To do so, tap settings>developer options>USB debugging. If you can’t find developer options in settings, then tap settings > about device and tap “Build Number” for 7 times and you’ll get em’ activated under settings.

5. Install and setup Sony Flashtool.

You must have installed Sony Flashtool. Find the full guide here.

After installing Sony Flashtool, open the Flashtool folder from the drive where you installed it. Now open Flashtool>Drivers>Flashtool-drivers.exe and install the Flashtool, Fastboot & Xperia Z2 drivers from the list. [Important]

6. Use OEM data cable to establish connection.

Make sure that you use the phone’s original data cable to establish connection between your phone and the PC. Using a different data cable might result in interrupting the firmware installation.

xperia-z2-hero-purple-1240x840-ba08b7ef2ca09a550ee74a9b9dc1eead

How To Update Sony Xperia Z2 D6502 To Official Android 5.0.2 Lollipop 23.1.A.0.690 Firmware

Before moving forward, please make sure that you’ve read the pre requisites and ensure that you are set to go ahead.

  1. Download the latest firmware Android 5.0.2 Lollipop 23.1.A.0.690 FTF file.
    1. For Xperia Z2 D6502 [Generic/Unbranded] Link 1 | You can also create your own FTF using this guide.
  2. Copy the file and paste in Flashtool>Firmwares folder.
  3. Open Flashtool.exe now.
  4. Hit the small lightening button on the top left corner and select Flashmode.
  5. Select the FTF firmware file that you placed in the Firmware folder.
  6. From the right side, select what do you want to wipe. Data, cache and apps log, all wipes are recommended, perhaps you may select if you don’t want.
  7. Click on OK, and it will start preparing the firmware for flashing. This may take a little while to load.
  8. As soon as the firmware is loaded, it will prompt you to attach the phone by turning it off and keeping the back key press.
  9. For Xperia Z2 Volume Down key will do the job of back key, just turn off your phone, keep the Volume Down key pressed and plug in the data cable.
  10. As soon as the phone is detected in Flashmode, the firmware will start flashing, Do not leave the Volume Down key until the process is complete.
  11. As soon as you see “Flashing ended or Finished Flashing” leave the Volume Down key, plug the cable out and reboot.
  12. That’s All! Congrats! You’ve installed latest Android 5.0.2 Lollipop on your Xperia Z2. Enjoy

In case you got any queries or face any problems regarding this guide, please feel free to stop by the comment box below and let us know. We will get back to you as soon as possible. Thanks all!

How to Easily track your data usage on Android

0
How to Easily track your data usage on Android

Now a days mobile data is used by all because WiFi networks are not every where so all the cellular companies provide the best data plans to their customers. As now a days everything is on the web so on daily basis we use more mobile data, but sometimes we lost track of our mobile data and surprisingly at the end of month we get a larger bill. Today i’ll tell you how to easily track your data usage on Android.

In the latest Android we have built in data usage integration so it will be not difficult to track data usage, but if you cannot find the data usage settings then you use third party apps form Google Play Store.

androidpit-nexus-6-data-usage

 How to Easily track your data usage on Android:

Step#1: Open Setting app from your app drawer.

Step#2: Now in the Android 5.0 you’ll find Data Usage icon at the top.

Step#3: Tap on it.

Step#4: Now you’ll see different options, Mobile Data, Set mobile data limit and the apps using mobile data.

Step#5: You’ll also see how much data you have used, you can also set limit so that you won’t use extra mobile data.

Step#6: In Data usage menu you can turn off and turn on mobile data.

Step#7: Use Restrict App backgroud data in order to track which app is using the most.

Step#8: Install Onavo Count  on your mobile and launch it. This is the best app which will help you to easily track your mobile data.

All Done !!.

How to Extract PIT File from Samsung Devices

How to Extract PIT File from Samsung Devices

When it comes to updating or flashing stock roms Samsung is the easiest one, you can easily find roms for Samsung devices and also its more easy to install them. When ever you need to fix Boot loop or unroot your Samsung device you need to flash stock rom. Some times we face issues like “Invalid Ext4 image and “Get PIT for mapping” while flashing rom using Odin. If PIT file is missing you can not flash stock rom. You can find PIT file from Google but make sure you find the correct one, if by any means you cannot find then you need to follow the steps mentioned below to Extract PIT File from Samsung Devices.

We will use two method to Extract PIT File from Samsung Devices, but before going any further you need root access on your Samsung Galaxy device.

extract PIT file from Samsung devices

How to Extract PIT File from Samsung Devices:

Step#1: First download and install Terminal Emulator from Google Play.

Step#2: Download BusyBox app from Google Play and install it.

Step#3: Now launch Terminal Emulator and grant root access.

Step#4: Type in the following command.

su

Step#5: Now after the first command type the following command.

dd if=/dev/block/mmcblk0 of=/sdcard/out.pit bs=8 count=580 skip=2176

Step#6: Open file manager on your device and search for PIT file, save it on your PC.

Method#2:

Step#1: First you have to install and setup Android SDK on your computer.

Step#2: Now enable USB Debugging on your device.

Step#3: Launch command prompt on your Computer.

Step#4: Connect your device using USB cable with PC.

Step#5: Type the following commands in command prompt and press enter.

adb devices
adb shell
su

Step#6: When SU pop-up appears grant the permissions.

Step#7: Now type the following command.

dd if=/dev/block/mmcblk0 of=/sdcard/out.pit bs=8 count=580 skip=2176

Step#8: Your PIT file should be backed up on your devices, Save it on your PC.

All Done !!!