Home Blog Page 363

How To Root Android Lollipop & Install TWRP On Galaxy Note Pro 12.2

28
How To Root Android Lollipop & Install TWRP On Galaxy Note Pro 12.2

81gL+uUkg9L._SL1500_Samsung is slowly updating its mainstream devices to Android 5.0 Lollipop. Recently it was the turn for Galaxy Note Pro 12.2. The update is now available for this device through OTA, Samsung Kies and the firmware files are also floating around the web. New firmware brings so many goodies. Mainstream changes include a revamped UI according to Google’s material design, new notification cards on lockscreen, enhances performance and battery life and much more. Since this is a major Android updated, many users have updated or willing to update to this latest Android iteration.

Updating to this latest Android version will wipe off root access from your device, or if you haven’t rooted yet, you may want to root it after updating to Android Lollipop. In the following post we are going to show you how you can install TWRP recovery and root your Galaxy Note Pro 12.2 SM-P900 (WiFi), SM-901 (3G), SM-P905 (LTE) running Android 5.0.2 Lollipop. Let’s go ahead without any further ado now.

Precautions:

  1. This guide is only for the devices mentioned above. Do not try this on any other device.
  2. Your device must be running Android 5.0 Lollipop or higher.
  3. Backup important contacts, call logs, sms messages and media content as a safety measure.
  4. Charge your Galaxy Note Pro up to 50% to avoid power issues during flashing process.
  5. While using Odin, turn off Samsung Kies, Firewall and any Antivirus software if you’ve enabled.
  6. Follow this guide to the letter.

How To Root Android Lollipop & Install TWRP On Galaxy Note Pro 12.2

Required downloads:

How To Install TWRP & Root Now:

Step#1: Open Odin.exe from the folder you extracted.

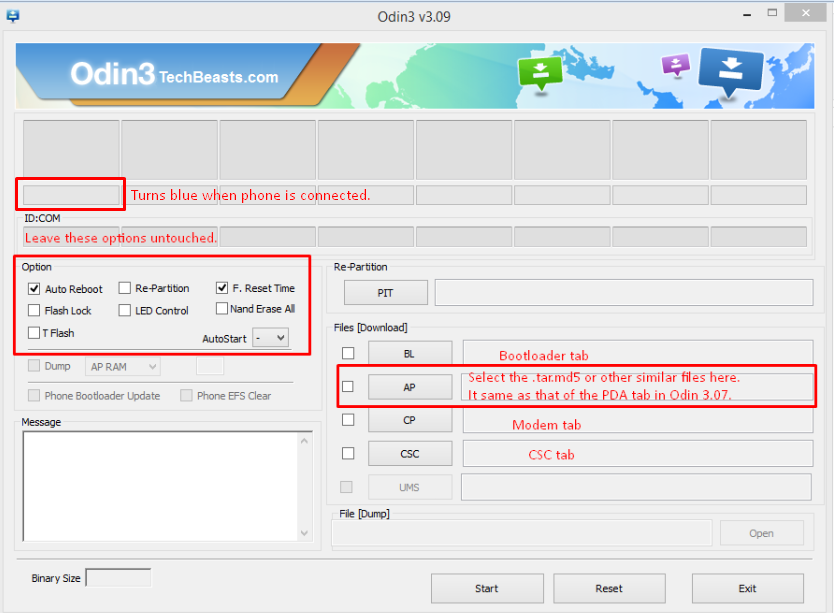
Step#2: Click on “PDA” / “AP” tab and select the downloaded TWRP Recovery.img.tar file.

Step#3: Do not touch any other option in Odin. The only options ticked should be F.Reset Time and Auto-Reboot. Leave all other options as it is.

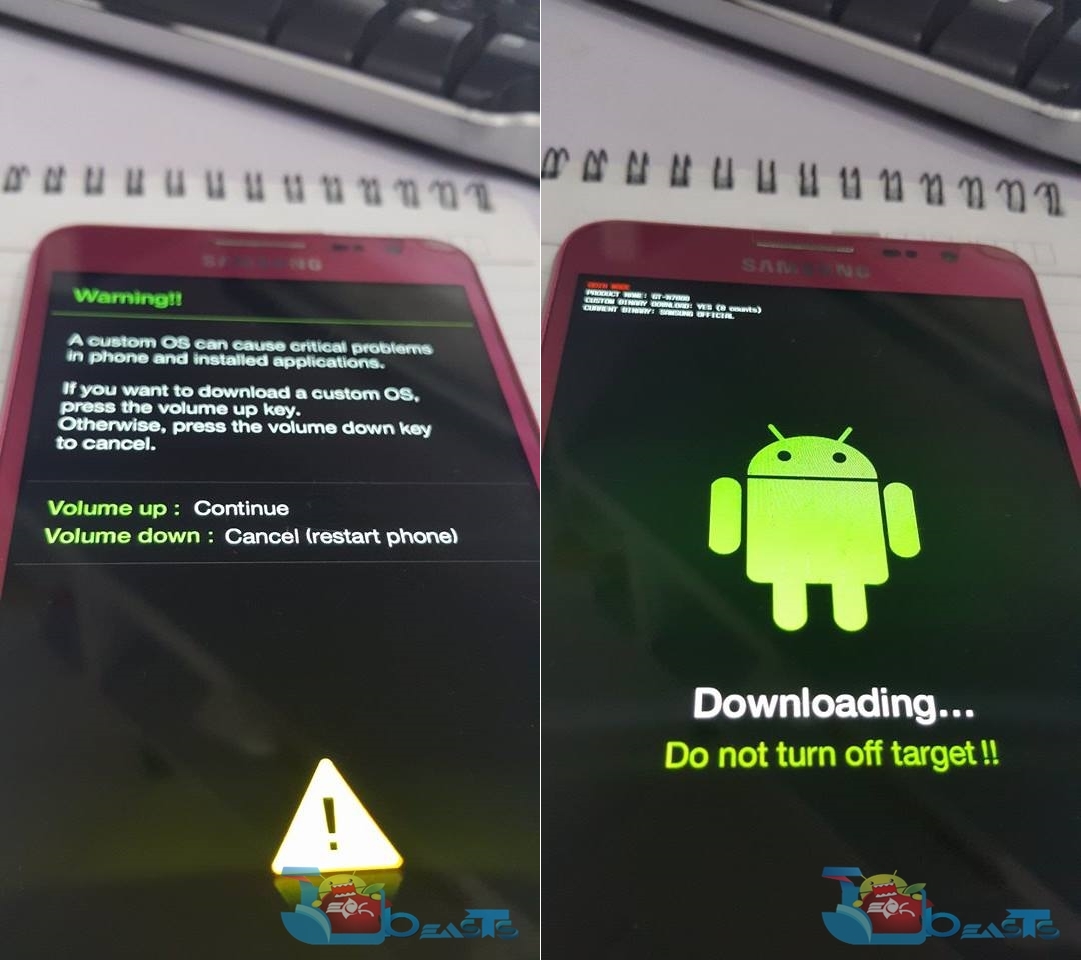
Step#4: Now put your Galaxy Note Pro in download mode and connect it to your PC. To put it in download mode, turn it off completely. Now turn it on by press and holding Volume Down + Home + Power Key. It will boot up with a warning. Press Volume Up to continue. You should be in download mode now. If this combination doesn’t work, here’s How to Boot Samsung Galaxy Devices into Download & Recovery Mode

Step#5: Now connect it with your PC and let Odin detect it. As soon as Odin detects your phone, it will show you a blue or yellow indicator in the ID:COM box.

Step#6: As your device has been connected, click the “Start” button now.

Step#7: Odin will now flash TWRP. Once done, it will reboot your device.

Step#8: Disconnect your device from your PC and turn it off completely.

Step#9: Now we are going to boot it into TWRP recovery mode. To do so, turn it on by pressing and holding Volume Up + Home + Power Key. If this method doesn’t work, try one from the guide linked above.

Step#10: As your device boots up in to recovery mode, tap “Install > locate the copied SuperSu.zip > select it and swipe finger to flash it.”.

Step#11: Let it flash SuperSu.zip, once done, reboot your device. Check SuperSu in app drawer now.

Step#12: Verify root access using Root Checker application.

That’s all. Your device should be rooted running Android Lollipop.

Got any problems? Reach us out through the comment box below.

How To Root Samsung Galaxy With CF-Auto-Root In Odin

8
How To Root Samsung Galaxy With CF-Auto-Root In Odin

When it comes to Android development, Samsung’s Galaxy series is among the luckiest ones. Galaxy smartphones have been enjoying a plethora of custom stuff coming from all around the world. We see new developments every few seconds, owning a Samsung Galaxy isn’t going to bore you in any way.

Android’s open nature makes it possible for developers to play with the operating system across the boundaries and break all the rules. This helps developers to come up with stuff that enhances the performance of the device, battery life or brings new features to the device.

To do something out of the way, you’ve to break the rules and here you can break these rules with the help of root access on your device.

What is Root?

Before we heard towards our target, let’s understand what is root access. Root access is the main system access of your Android-powered Galaxy smartphone. Basically, the main/root system of the device is apparently locked by manufacturers for the safety and security of user’s data on the device. But if you just learn to take the advantage of root access in a proper way, you’re likely not to damage your device in any way at all.

Root access can be gained using different tweaks, glitches, and methods. Once you’ve gained root access on your Android smartphone, you’re all set to unleash the real power that your device is hiding under the hood. Root users can install root specific applications and make their devices fly. Some famous root required applications are listed here which will help you to get an even better idea of this term.

CF Auto Root

Now that you know the advantages of root access, you may want to know how you can root your Samsung Galaxy smartphone. Fortunately, this has never been a problem for Samsung Galaxy users. Being blessed with great developer Chainfire, it has already been a matter of a few seconds to root most of the Samsung Galaxy devices. Chainfire’s small script named as “CF-Auto-Root roots hundreds of Samsung Galaxy devices on almost all available firmware with the help of Odin. Earlier, we’ve been posting guides to root the devices individually, but a generic post as requested by our users is here now.

How To Root Samsung Galaxy With CF-Auto-Root In Odin

In the following guide we are going to show you how you can root your Samsung Galaxy device running any firmware from Android Gingerbread to Android Lollipop, and the upcoming Android M with the help of CF-Auto-RootSamsung’s tool Odin3. CF-Auto-Root is available in the form of .tar files, which are flashable in Odin.

Precautions

  1. Download the CF-Auto-Root file very carefully for your Galaxy smartphone. Match your device’s model number with the model number specified on the CF-Auto-Root file. You can find your Galaxy’s model number in Settings > About Device or Settings > General/More > About Device.
  2. Backup your important contacts, call logs, sms messages and important media content just as a safety measure.
  3. Charge your phone up to 50% to avoid any power issues during the rooting process.
  4. Disable Samsung Kies, Firewall, Antivirus while you’re using Odin3.
  5. Enable USB debugging mode on your Samsung Galaxy.
  6. Use original data cable to establish connection between your phone and your computer.
  7. Follow this guide to the letter to make the rooting process successful.

Disclaimer: Rooting process is highly custom and involves certain risks. Root your Samsung Galaxy will void its warranty. If your device has a Knox counter on the bootloader, Rooting it will trip the counter and you won’t be able to reset Knox after that. In case of any mishap, Techbeats, Samsung or Chainfire may not be held responsible. Make sure that you’re rooting your phone after understanding each and everything, and you’re doing it at your own risk.

Required downloads:

How To Root Samsung Galaxy via CF Auto Root

Step#1: Open Odin.exe from the folder you extracted.

Step#2: Click on “PDA” / “AP” tab and select the unzipped CF-Autroot-tar file that you download and extracted in the third step in required downloads. If you’ve already downloaded the CF-Auto-Root file in .tar format, you do not need to extract it.

Step#3: Do not touch any other option in Odin. The only options ticked should be F.Reset Time and Auto-Reboot. Leave all other options as it is.

Step#4: Now put your Galaxy phone in download mode and connect it to your PC. To put it in download mode, turn it off completely. Now turn it on by press and holding Volume Down + Home + Power Key. It will boot up with a warning. Press Volume Up to continue. You should be in download mode now. If this combination doesn’t work, here’s How to Boot Samsung Galaxy Devices into Download & Recovery Mode

cats

Step#5: Now connect it with your PC and let Odin detect it. As soon as Odin detects your phone, it will show you a blue or yellow indicator in the ID:COM box.Odin-3.09-explained.-2

Step#6: As your device has been connected, click the “Start” button now.

Step#7: Odin will now flash CF-Auto-Root. Once done, it will reboot your device.

Step#8: Disconnect your device, let it turn on completely and check SuperSu in app drawer once it boots up.

Step#9: You can verify root access by installing Root Checker application from Google Play Store.

Device booted up but not rooted? Here’s what to do

If your device isn’t rooted even after flashing CF-Auto-Root, you may try doing this.

  1. Follow the guide step and 2 from the guide above.
  2. Now in the third step, untick Auto-Reboot, the only ticked option should be F.Reset.Time.
  3. Follow the above guide from step 4 – 6.
  4. Once CF-Auto-Root has been flashed, reboot your device manually by either pulling out the battery or using the button combo.
  5. Verify root access as explained above.

How to Unroot?

You can unroot your device and revert back to the stock condition of your phone by flashing stock firmware. Here’s How To Flash Stock Firmware On Samsung Galaxy With Odin,

Got any issues? Reach us out through the comment box below.
Download Sony Xperia Keyboard APK With Numeric Row

3
Download Sony Xperia Keyboard APK With Numeric Row

Have you ever noted that there is no numeric row in the keypad of Sony Xperia smartphones? Well, if no, then it is time to have a look on it now. In the recent Lollipop 5.1.1 release, Sony update the keyboard application and introduced the missing numeric row. Apart from numeric row, Sony also introduced new language support which includes “Punjabi” at the top.

Sony didn’t want to limit the new keyboard changes to the Lollipop supported devices only, but Sony also wanted the loyal users of its old devices to get this keyboard update. As a result, Sony uploaded the standalone installation package file of its latest Keyboard application with numeric row and new language support in Google Play Store. If you’re willing to update your keyboard application, just go ahead, download the application and install it on your device to get it with new features.Screenshot_1

Download Sony Xperia Keyboard APK

Download LG G4 Stock Wallpapers

Download LG G4 Stock Wallpapers

LG is in spotlight these days with its all new G4. Last year when LG uncovered its G3, the phone did great and won space in user’s pockets because of its eye-catching, crispy and QHD display. LG was the very first manufacturer to use a QHD display on their phone. This shown LG’s interest and intension to pocket users by working in the display department. Because of the standards set by LG’s very own G3, expectations from the G4 were pretty high. As the phone came out few months back, it met all the expectations of the users and once again managed to gain a lot of respect.LG G4 Wallpapers_Techbeasts (1)

Alongside a heavy spec sheet, LG G4 carries a QHD display with a resolution of 2560 x 1440 pixels and 538 ppi. Although this display looks great, but LG couldn’t resist attracting some customers towards the charm of G4’s display and it added some cool wallpapers to show off G4’s display. LG G4 contains 10 QHD wallpapers in total. If you’ve already seen these wallpapers and you’re willing to get these wallpapers for your Android device, you may have spotted the right place to fulfill this wish of yours. We’ve pulled out LG G4’s stock wallpapers, you can set these wallpapers on any other Android device simply by downloading in your phone. You can download some of the wallpapers individually from the gallery below or you can download all using our all-in-one link attached below.

Download All LG G4 Stock Wallpapers

Download One Plus 2 Stock Wallpapers

Download One Plus 2 Stock Wallpapers

The most anticipated smartphone of  the year, the One Plus 2 is out now. One Plus managed to reach heights of success once again. One Plus 2 turned out be a huge success as the one million people booked the device and list is still going on. One Plus has boosted the device up with the specifications that would not disappoint the users in any way keeping in view the device’s price. Same top-notch specifications packed up in a smartphone from any other manufacturer will definitely cost a hefty price tag, but One Plus has a different strategy here which made its 2nd smartphone see a great success as soon as it came out of the curtains.OnePlus Wallpaper_Techbeasts (6)

One Plus 2 carries a full HD display, which fulfills the visual requirements of average Android users. To add a little bit charm to this FHD display, Oxygen OS V2 has brought 25 new wallpapers on One Plus 2. In case you’re wondering about Oxygen OS V2, it is the 2nd iteration of One Plus’s very own Oxygen OS. The 25 wallpapers are pretty cool. All these wallpapers are in full HD resolution, which will definitely look cool on any other display. If you’re willing to grab the One Plus 2 wallpapers for your Android device, you may have spotted the right place to grab em’. We’ve collected all 25 full HD stock wallpapers from Oxygen OS V2 of One Plus 2. You can download individual wallpapers from the gallery below, or you can download all wallpapers from the all-in-one link attached below.


Download all wallpapers of One Plus 2

How to protect Android from Stagefright MMS virus

How to protect Android from Stagefright MMS virus

Here’s how to protect Android from Stagefright MMS virus, as you have heard it quite a last few days in headlines, that Android security has been compromised. It is said that hacker has developed a new way of hacking an Android device by send an MMS, named as Stagefright. However, in the following guide, I will help you to get rid of Stagefright MMS virus form your Android.

protect Android from stagefright virus

How to protect Android from Stagefright MMS virus:

Step #1: First you have to change your default messaging app. Goto Settings > More under Wireless & networks > tap on Default SMS app.

Step #2: If by default your messaging app is selected as Hangouts, change it to stock messaging app.

Stop_Android_MMS_virus_step_2

Step #3: If you don’t have any other option other than Hangouts, goto Google Play and install a third party messaging app.

Step #4: Open Hangouts and and tap on vertical lines on top right corner, choose settings >SMS >deselect Auto retrieve MMS.

Step #5: On the latest Android flagships by Auto retrieve MMS option is enabled in stock messaging app. Open messages app goto settings > More Settings > Multimedia messages > disable the option to Auto retrieve.

All Done! Now your Android device is protected from Stagefright MMS virus. I would also suggest that install an Antivirus app for your Android device, it also help to protect your device. If you face any issue regarding this guide please do tell me in comments.

How to download and install Windows 10 even if GWX.exe is missing

2
How to download and install Windows 10 even if GWX.exe is missing

Windows 10 is now installed on at least 14 million computers, while still there are many who are in waiting list to get update notification. If you are among those people, then no need to worry, in the following guide I’ll explain how to install Windows 10 even if GWX.exe is missing or you didn’t get the upgrade notification.

win10_windows_startscreen-4-2000x1126

How to download and install Windows 10 even if GWX.exe is missing:

Step#1: Open Microsoft’s new Windows 10 download page.

Step#2: Now choose 64-bit version, if your computer doesn’t have a 64-bit processor then select 32-bit version.

Step#3: Click on save file and choose run.

Step#4: You’ll be presented with two options; Upgrade now, or create  installation media. Choose upgrade now.

Step#5: Now Windows 10 will start downloading, wait until downloading is complete.

Step#6: Once download is completed agree to licence terms when prompted. Now installer will check your PC, if it is compatible for Windows 10 and have enough space then it will start downloading the updates.

Step#7: You will not need the Windows activation key if your previous version of Windows is eligible.

Step#8: After the downloading process is complete choose install Windows 10 when promoted. Now sit back and wait for installation to be completed.

Step#9: Once installation process is done, Windows 10 desktop will show up. All Done.

You have successfully installed Windows 10 on your Desktop PC or Laptop. If you face any issue regarding this guide please do tell me in comments.

Download the Official Windows 10 ISO files Without Product Key

0
Download  the Official Windows 10 ISO files Without Product Key

Here’s how you can download the Official Windows 10 ISO files Without Product Key. If you haven’t got free update of your Windows 10 yet, then no need to worry. just download the ISO file from the following links. And if you don’t know how to install Windows ISO files, you can follow this guide. Burn ISO images to USB

windows-10-download-iso-32-bit-64-bit-1024x575

Requirements:

  • A working internet connection.
  • USB or external drive for the download.
  • blank USB or DVD with at least 4 GB of space.
  • Read the System Requirements.
  • If you will be installing the operating system for the first time, you will need your Windows product key (xxxxx-xxxxx-xxxxx-xxxxx-xxxxx).

If you don’t know your product key then type the following command in CMD.

wmic path softwarelicensingservice get OA3xOriginalProductKey.

Here’s How To Enable GodMode In Windows 10

1
Here’s How To Enable GodMode In Windows 10

If you want to keep up with all the features and functionalities offered by Microsoft’s operating system, you need to get your hands on the “Godmode”. This will give you an access to a whole lot of features, and the folder that contains all links to the settings will not be available otherwise. Godmode was available for the last three major versions of Windows and fortunately is present in Windows 10 as well and is much easier to initiate than the previous versions.

Windows-10-GodMode

How to Enable Godmode in Windows 10:

Step#1: Create a new desktop folder; right on the Windows 10 desktop and select New>Folder.

Step#2: Name the folder as “GodMode.{ED7BA470-8E54-465E-825C-99712043E01C}” (without inverted commas).

Step#3: This will be the new powerful Godmode folder. Double click on the folder to open it.

Step4: This Godmode folder will contain all the links to the settings for more than forty different categories including User Accounts, Work Folder, Windows Mobility Centre and more.

Note that you will need to be working as an administrator and the system account you use to create the folder should have administrative authority. Also, the speed, like the previous versions can vary depending on the machine’s hardware.

Hackers are sending Malware with Windows 10 Upgrade

0
Hackers are sending Malware with Windows 10 Upgrade

With the release of very new Windows 10, arrived a scam malware which holding people by their nerves. According to Nick Biasini, Cisco security researcher, the ransom-ware uses Windows 10 as a gateway – to get people to install to it.

CTB-Locker

Some people have been trying to get their hands off the Microsoft’s system. The fact that people need to join a virtual line, just in order to install Windows 10, attackers have managed to use it in their favor. In one of the cases, the open malware attack was done by sending email to people that was shown as an email sent by Microsoft. That email tells people of an iteration of the desktop OS where they will not have to use the virtual line to get Windows 10. Once the users download and run the attached file, they receive a message stating that their data has been encrypted and the only way to get it back is by paying a certain ransom.

 win10_windows_startscreen-4-2000x1126

The users need to stay cautious against such attacks and protect their data by simply deleting any such kind of email they receive. Also, be cautious about downloading and running any kind of executable files attached within the email even if they claimed by Microsoft in any of the cases.

(Source: Cisco | Via: ZDNet)

How To Turn Off Windows Update Delivery Optimization in Windows 10

0
How To Turn Off Windows Update Delivery Optimization in Windows 10

Yesterday, I posted about how to fix no Wifi available on Windows 10. However, today I’ll help you all to solve another issue on Windows 10. Many of us are unaware that Microsoft is using our internet connections to share updates with other Windows 10 users across the globe. Microsoft introduced Windows Update Delivery Optimization which is specifically designed to quickly push new updates to users all around the world. In the following post, I’ll tell you all ‘how to disable Windows Update Delivery Optimization’ so that you can save your bandwidth.

win10_windows_startscreen-4-2000x1126

How To Turn Off Bandwidth To Stop Push Updates To Other Users in Windows 10:

Step #1: Open settings and then goto Windows Update settings option.

Step#2: Click on Advanced options.

Step#3: Click on Choose how updates are delivered option.

Step#4: In here by default update option is on, click on it to turn it off.

Step#5: Now restart your PC.

All Done !.

You have successfully disabled Windows Update Delivery Optimization, and now Microsoft can’t access your internet connection anymore to share updates with other Windows 10 users across the world.

Please Share it among your friends and do tell me if you face any issue regarding this guide.

Also See:

  1. how to fix no Wifi available on Windows 10
  2. how to reclaim disk space after Windows 10 free upgrade.

TaiG iOS 8.4 Jailbreak For Mac OS X [ Direct Download ]

0
TaiG iOS 8.4 Jailbreak For Mac OS X [ Direct Download ]

Finally! The wait is over for Mac users, TaiG team has released their Mac OS X Jailbreak tool for iOS 8.4. Interestingly, now you don’t have to go for a user virtual machine to use TaiG on Mac. You can Jailbreak iOS 8.4 on all supported iPhone, iPad and iPod touch devices. You can even Jailbreak iOS 8.4, 8.3, iOS 8.2 and iOS 8.1.3 using TaiG tool for Mac OS X.

Screen Shot 2015-08-03 at 17.52.16

I will post a step by step tutorial shortly, you can also download the TaiG for Mac OS X from the following links. If you have already Jailbroken your device using virtual machine setup then there is no need to Jailbreak your device again. Those who were waiting for Mac OS X version they can now easily Jailbreak iOS 8.X, you just have to download the TaiG Jailbreak tool and run it.

Also See: 

  1. Jailbreak iOS 8.4 – 8.3 With PP On iPhone 6, 6 Plus, 5s, Mor
  2. PP Jailbreak Tool is released for Mac
  3. List of 50, iOS 8.3 Compatible Jailbreak Tweaks On Cydia [ 2015 ]
  4. Fix Cydia iOS sub-process / usr / bin / dpkg returned an error code (2)
  5. Best iOS 8 Cydia Sources/Repos of 2014-2015 [ Ever Green ]

Following is the direct link of TaiG iOS 8.4 Jailbreak Tool for Mac OS X. If you face any issue regarding this link please do tell me in comments.

Download TaiG iOS 8.4 Jailbreak For Mac OS X