Home Blog Page 338

How to Repost Instagram Photos from Android and iOS
How to Repost Instagram Photos from Android and iOS

How to Repost Instagram Photos from Android and iOS: Social Networking is the elixir of the modern lifestyle and I hardly remember when was the last time I haven’t checked any of my social profiles. It’s true that technology took over the good old lifestyle but it also made distances near.

We can quickly peek into the lives of our friends, family and interested persons and share their photos and moments with others. Almost every social networking service has a sharing option — Facebook has Share, Twitter has Retweet, Pinterest has Pinning feature. However, Instagram begs to differ with no such option to share other’s photos.

If you ask me, the whole concept of social networking is to mingle with others and share common interests. With Instagram’s No-Share attitude, it directly contradicts the founding principles of social networking. If you’re looking forward to reposting (popularly known as Regram in Instagram language) other’s picture on your Instagram profile. Here is a simple workaround. You can get the Repost feature using a 3rd party app and it’s pretty simple but first, you need to learn a bit of Reposting etiquette unless you want to an Instagram Pirate with cops looking for you.


Repost Instagram Photos

Repost Instagram Photos:

When you’re reposting someone else’s content on your profile, it’s copying their media on your profile. However, it’s not stealing digital media as you’ll be giving credit to the actual user but make sure you’re reposting content from public profiles. It’s a strict violation of privacy if you’re reposting images from private profiles without the user’s permissions. So, if you’re eagerly waiting for this amazing feature on your Android or iPhone, let’s begin.

Repost Instagram Photos from Android and iOS

  1. Download and install the Repost for Instagram ( Android or iOS.) This app runs alongside the Instagram app on your smartphone.
  2. Launch the app and log in to your Instagram account. It will ask for the confirmation to access basic info from Instagram, accept it. Now, you’ll see your feed here.
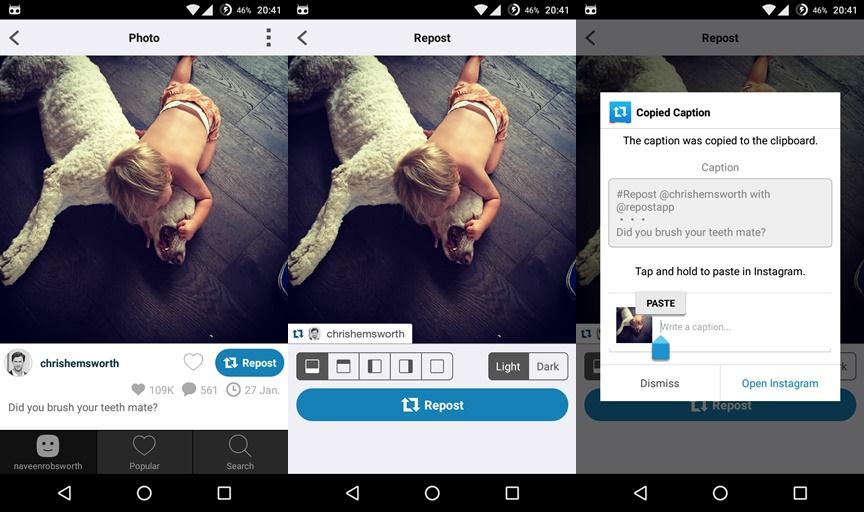
  3. Tap and select the photo you want to report. You’ll see the Repost button just below the image.
  4. It will take you to a photo editor where you can switch between a dark and light theme for the caption and the position of the watermark bearing the original profile where you’re reposting the image from.
  5. Once you’re done with that, the iOS app will bring up the share menu from where you’ll have to select the Open in Instagram option. In Android, the Instagram app will open automatically.
    repost-for-instagram
  6. Now you can edit the image if you want and paste the caption that is copied to the clipboard. Finally, post the image to your Instagram account.

So, isn’t it great to see repost option on Instagram?

How to Reduce Video Size on Android Devices

0
How to Reduce Video Size on Android Devices

How to Reduce Video Size on Android Devices: Smartphones have immensely revolutionized the consumer electronics world and there is absolutely nothing that stops its growth. In the past 10 years, there is huge growth in the number of smartphone users, thanks to a competitive market which is thriving to deliver powerful smartphones at the affordable price tag. With the rapidly increasing technological advancements, the smartphones are now featuring powerful hardware which we thought was impossible and unnecessary a few years back.

Reduce Video Size on Android

The camera is one of the main aspects that has improved in the past few years. Starting from a mere VGA camera, we now have high-quality camera lens integrated into the smartphones which will even put DSLRs to shame in favorable conditions. However, there is a minor disadvantage with the video size of these cameras. We know that everyone love to shoot an HD video on their smartphones but sharing them over social media is a bit of a problem.

Reduce Video Size on Android:

For instance, WhatsApp has an upper limit of 16MB for sharing video files but a single minute of HD video weighs over 100MB sometimes. I have faced error while sharing these huge files over IM chats or social media and I am too lazy to switch on my PC to compress the video. So, after installing a hell lot of video converting apps, I have found a perfect app which does the job. However, I should warn you that it isn’t as great as those powerful programs on PC but it will do just well for a smartphone screen.

So, first of all, install the Video Converter Android app from the Google Play Store. The app comes in both Lite and Pro versions and the advantage of having the Pro version is to access all HD settings, premium profiles and removing ADs. So, it’s up to you on choosing between the Lite and Pro versions but we suggest you start with the Lite version first and then decide. So, let’s see how to convert the HD video to a portable size.

How to Reduce Video Size on Android Devices:

  1. Launch the Video Converter app on your Android device and install the Codecs if prompted.
  2. Select the video from the in-built gallery or choose it from the file manager.
  3. After you select the video, click on the Convert icon located at the bottom of the video preview.
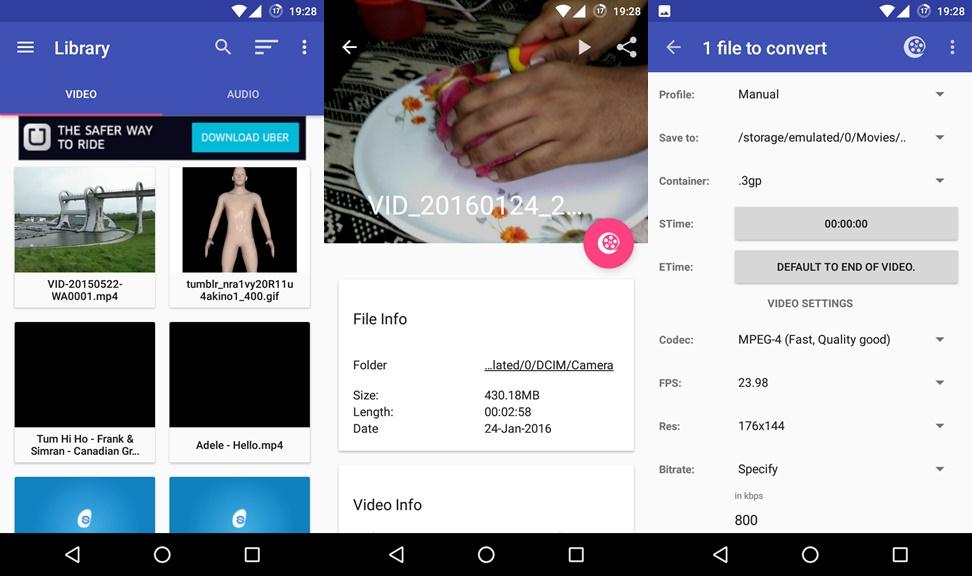
  4. Select the Manual profile to manually set the video resolution, bitrate, and FPS of the video. You can set them on a trail and error method to get the output video according to your requirements.
  5. Initially, try with the minimal settings of 176×144 resolution, bitrate as 800 and FPS as 23.98. Then increase the quality as per your requirements and choose the best output that fits your needs.
    android-video-converter-screens
  6. Once the options are set, click on the Convert icon at the top and wait until the video is compressed and converted as per your settings.

It took me approximately 5 minutes for a 430MB video file to convert into an output size of 44.2MB. Well, that’s cool considering you’re converting the video on a smartphone. Fiddle with the app a little and you’ll get the perfect hang of it soon.

How to Root any Android device [ Tutorial ]

0
How to Root any Android device [ Tutorial ]

Android is known for its customization abilities and open source nature. However, the real fun begins with rooting the Android device to unleash the beast under the hood. Rooting an Android device gives you the root permissions on your smartphone which can be used to gain access to the system files and apps. So, with rooting, you can go beyond just changing themes and installing home screen launchers.

maxresdefault

Rooting an Android device can be really simple or extremely tricky and there is no universal rooting technique that can root all the Android devices. There are many rooting tools and scripts which can be used to gain root access on your device. We have previously covered an article on how to Root any Android Device Without PC which covers many one-click tools that will help you root your device. If you have missed our previous tutorial, you can jump to it from the below link.

Today, we will see some more popular methods which can help you root your device. In this article, we will list many popular rooting techniques, choose the one that is compatible with your device. Please be warned that using an incorrect rooting method will possibly brick your device. So, if you’re all set, let’s begin.

How to Root any Android device

First off, try your luck with the one-click rooting methods which we have covered in our earlier article. If you couldn’t root your device with those apps and tools, check out the below rooting tools.

 1. CF-Auto-Root

CF-Auto-Root is a Samsung-exclusive rooting method which can be used to root Samsung Android smartphones. The CF-Auto-Root package should be installed using Odin tool and the rest will be taken care by itself. First, visit the CF-Auto Root page and download the root package that is meant for your device. Then follow the below guide to root your device with Odin tool.

  1. Download and install Samsung USB drivers on your PC.
  2. Download and extract Odin tool on your PC.
  3. Open Odin.exe from the folder you extracted.
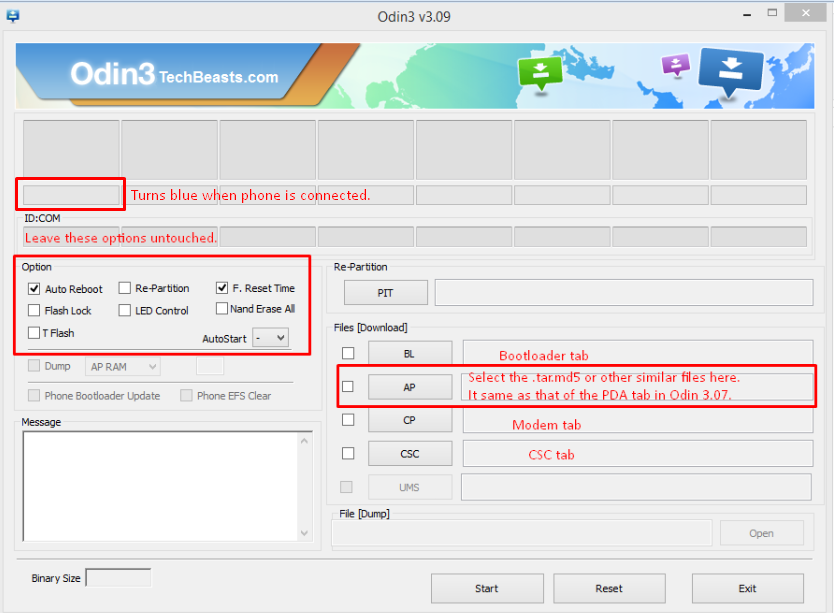
  4. Click on “PDA” / “AP” tab and select the unzipped CF-Auto root-tar file that you download and extracted in the third step in required downloads. If you’ve already downloaded the CF-Auto-Root file in .tar format, you do not need to extract it.
  5. Do not touch any other option in Odin. The only options ticked should be F.Reset Time and Auto-Reboot. Leave all other options as it is.
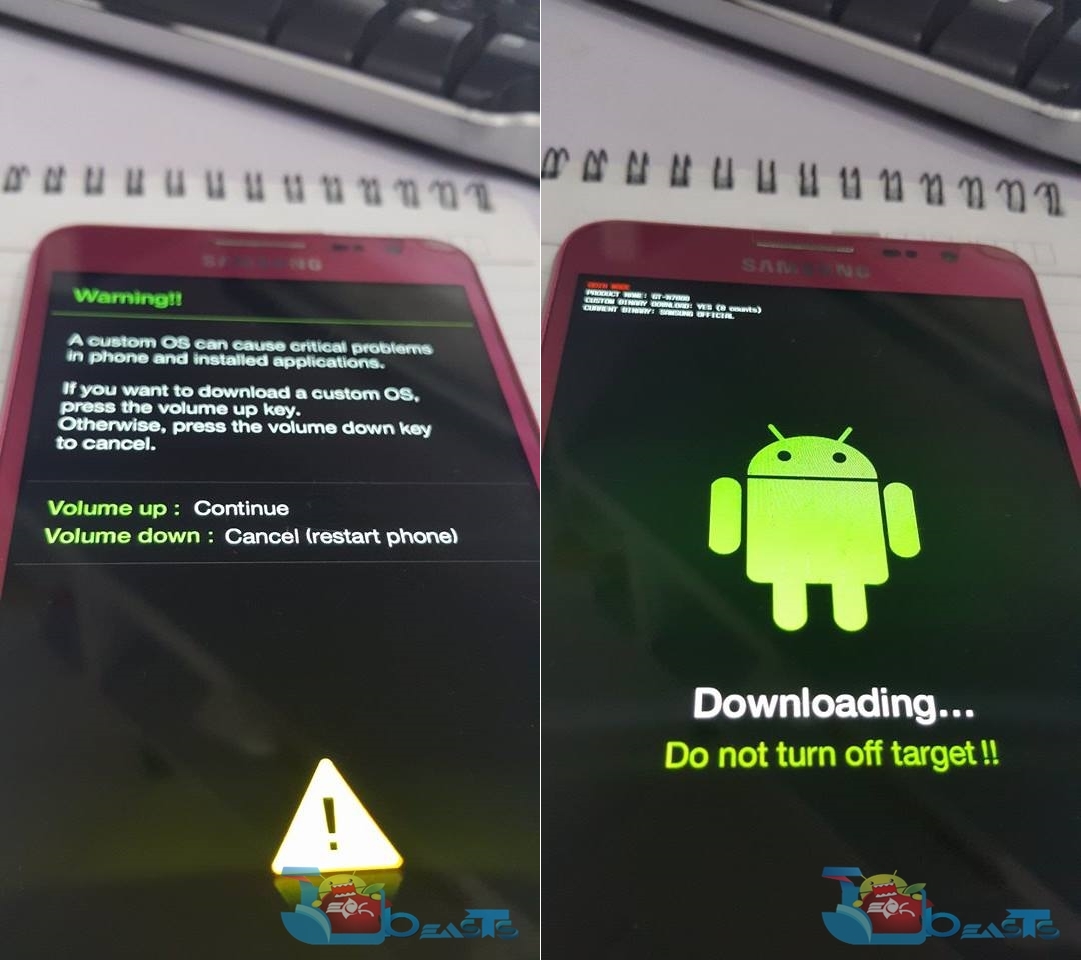
  6. Now put your Galaxy phone in download mode and connect it to your PC. To put it in download mode, turn it off completely. Now turn it on by pressing and holding Volume Down + Home + Power Key. It will boot up with a warning. Press Volume Up to continue. You should be in download mode now. If this combination doesn’t work, here’s How to Boot Samsung Galaxy Devices into Download & Recovery Mode
    cats
  7. Now connect it to your PC and let Odin detect it. As soon as Odin detects your phone, it will show you a blue or yellow indicator in the ID:COM box. (Make sure USB debugging is enabled on your phone)Odin-3.09-explained.-2
  8. As your device has been connected, click the “Start” button now.
  9. Odin will now flash CF-Auto-Root. Once done, it will reboot your device.
  10. Disconnect your device, let it turn on completely and check SuperSu in app drawer once it boots up.
  11. You can verify root access by installing Root Checker application from Google Play Store.

Device booted up but not rooted? Here’s what to do

If your device isn’t rooted even after flashing CF-Auto-Root, you may try doing this.

  1. Follow the guide step and 2 from the guide above.
  2. Now in the third step, untick Auto-Reboot, the only selected option should be F.Reset.Time.
  3. Follow the above guide from Step 6-8.
  4. Once CF-Auto-Root has been flashed, reboot your device manually by either pulling out the battery or using the button combo.
  5. Verify root access as explained above.

2. Installing Super SU Package from Custom Recovery

This is one of the easiest and efficient methods to root your Android device. All you need to do is to install the Super SU package from any custom recovery on your device. If you’re not sure how, follow the below procedure.

  1. Install any custom recovery on your device. You can find a compatible tutorial from our archives here or else you can Google it.
  2. Download the latest SuperSu package from here.
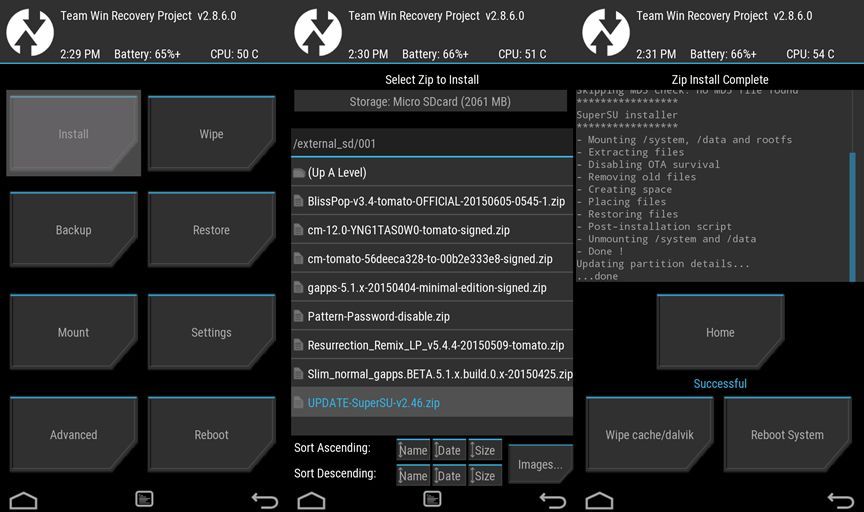
  3. Now, reboot into the recovery mode on your device. In the recovery mode, click on Install button and select the SuperSU zip file you’ve downloaded earlier.
    twrp-flash-zip
  4. Confirm the installation and wait till the package is installed.
  5. Reboot the device.

After the reboot, you should see the SuperSu app in the app drawer.

3. KingRoot Tool

Kingroot tool is one of the best one-click tools which will help you root your Android device. It supports a lot of Android devices including the latest Galaxy S6 and other flagship devices. We have already covered the Kingroot app in our previous tutorial, but you can also use this tool on Windows PC. Follow the below tutorial to root your Android device with KingRoot tool.

  1. Download either the Mobile Version or the Desktop version from here.
  2. The Desktop version also installs the Custom Recovery on your device, I prefer this one, but not for everyone.
  3. For Mobile Version, just download the app to your Mobile.
  4. Install it and Run it, let the App does rest of the things.
  5. For Desktop version, Download and Install the app on desktop.
  6. Connect your device with PC and open the app.
  7. Tap the 开始root to start the rooting process.
  8. Once done, your device will reboot and after a successful reboot, your device will be running the Root Script.
  9. Enjoy!

That’s it. So, did you root your device with these methods?

How to Recover Lost Data on Android (Root and Non-Root Methods)

0
How to Recover Lost Data on Android (Root and Non-Root Methods)

A complete guide on, How to Recover Lost Data on Android (Root and Non-Root Methods). Ever deleted important data from your Android device by mistake? Well, it happens often and personally, I have deleted many precious images and videos from my smartphone. Luckily, our hasty mistakes are not permanent and we don’t have to whine about it for the rest of the day. Recovering lost data is a bit tricky task and it doesn’t yield positive results always. However, it’s the last rescue operation we can perform to get our precious data back.

Recovering lost data involves a lot of factors and time is the most crucial among them. Don’t save anything else to your device or switch it off. It’s essential that you block all the write operations to your device’s storage which means you need to put into Airplane mode for the time being and don’t copy any files to the device. These precautions ensure that the deleted data is still safe under the trashed blocks of your SDcard or internal storage. Now, we will see how to recover lost data on both rooted and non-rooted Android devices.

Recover Lost Data on Android

Recover lost data on Rooted Android Devices

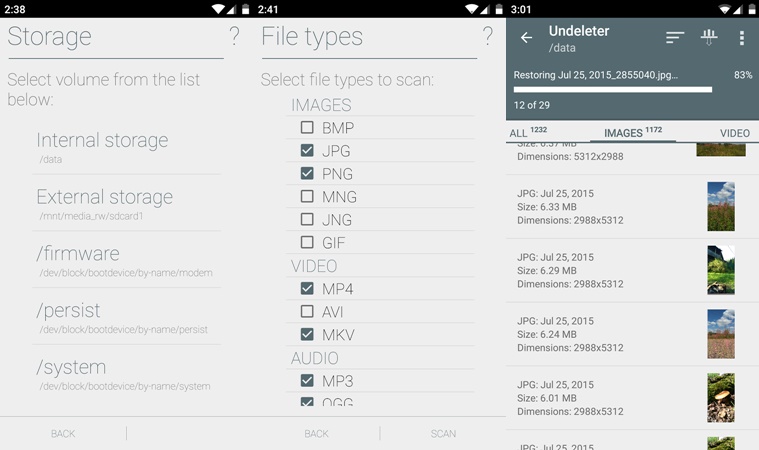
  1. Download Undeleter app from Google Play Store.
  2. The app is pretty straightforward and simple. First, you need to select the storage device from which you want to retrieve your data. It can be either Internal storage or external storage (SDcard).
  3. Grant root permissions for the app if prompted.
  4. Now, scan your device for deleted files. It will take some time for the scan to complete, depending on the storage device size and the access speed of the storage.
  5. Once restored, you can retrieve the data from several tabs – Files, pictures, music, videos and documents.
    undeleter-app
  6. Simply select the file you want to restore and you can restore it to the place of origin or to another location.

The above procedure is efficient and can recover most of the lost data. However, you can also use the below method which works on all Android device, both rooted and non-rooted.

Recover lost data on All Android Devices

In this method, you’ll need to install any data recovery software on your PC. There are a lot of data recovery software in the market and you can pick any program from the lot. Today, we will show you how to recover lost data using the Dr.Fone Android Data Recovery tool. So, let’s see how to bring back your lost data.

  1. Download the Dr.Fone Android Data Recovery Tool from here.
  2. Install the program on your Windows PC and launch the software.
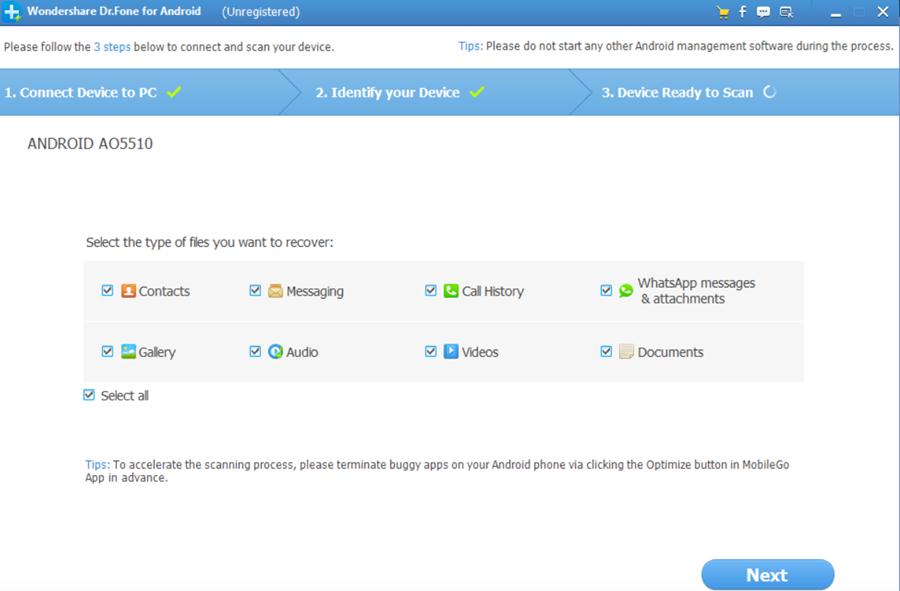
  3. After you launch the software, you’ll see a screen prompting you to connect your Android device to the PC. So, connect your device with a good quality USB cable.
    dr.fone-1
  4. While connecting, make sure USB Debugging is enabled on your device. If you haven’t enabled it, you can enable it from Settings » Developer Options » USB Debugging. (If you don’t see Developer Options in Settings, go to About Phone » tap Build Number 7 times to enable it.)
  5. Once the software detects your smartphone, click Next to begin analyzing the device. It will take some time for the scan to complete and it totally depends on the write speed, storage size and amount of data you have on the device. If you’ve rooted your device, you can also grant root permissions if prompted.
    dr.fone-2
  6. Finally, after the scan is completed, select the files you want to recover and click on the Recover button to restore your lost files.

That’s it. So, you were able to recover your lost files? Let us know.

Download PIP Camera for Windows PC & Mac

0
Download PIP Camera for Windows PC & Mac

A succeeding guide will allow you to install and use PIP camera for PC on your Windows XP, 7, 8, 8.1, 10 and Mac OS X powered Macbook or iMac.

PIP camera uses your laptop’s front cam or the webcam attached to your desktop PC in order to take selfies and work on them. We will be using Android emulators like BlueStacks and Andy OS in order to install PIP camera for PC. Before installing it, we will go through a brief overview of this application.

PIP camera:

PIP camera is one of the finest camera applications available around. The application is something complete different from traditional camera applications that are only known for their cool filters. PIP Camera has a lot more to offer apart from the filters. Using this application you can enhance your pictures according to your liking.

PIP Camera offers a number of beautiful frames that you will love putting your pictures in. The pictures look amazing fitted into a water droplet or a camera lens. The frames look much more beautiful particularly surrounding the selfies. PIP camera has some cool collages to offer as well.

Features:

These frames are not the ordinary frames that you usually find in other applications, but these frames are something that you will definitely fall in love with.  You can either import photos from your gallery or you can snap the shots in real time as well. You can apply any theme on the picture available in the PIP camera application. PIP camera automatically blurs the photos to produce the best possible results in the end picture.

There are over 200+ collage frames available in this application. Magazine layouts make the pictures look stunning. To learn more about this application, you will have to give it a shot. Android users can grab PIP camera for free from the Google Play Store.PIP camera for PC

Download PIP Camera For Windows PC & Mac

  1. Download PIP Camera APK
  2. Download and install Bluestacks: Bluestacks Offline Installer | Rooted Bluestacks | Bluestacks App Player
  3. Once you’ve installed Bluestacks, double click the downloaded PIP Camera APK.
  4. The APK will be installed using Bluestacks, once installed open Bluestacks and locate the recently installed PIP Camera.
  5. Click the PIP Camera icon to open it, follow the on-screen instructions to use it.

You can also use Andy OS to install PIP Camera, here’s the tutorial: How To Run Android Apps On Mac OS X With Andy

The Andy OS tutorial explains how to play a game on your Mac OSX, but the same guide will also work for a Windows PC.

That’s all. In case you’re stuck with anything, reach us out through the comment box below.

Download World Chef for PC Windows 10 & Mac

0
Download World Chef for PC Windows 10 & Mac

With the help of this guide, you will be able to install World Chef for PC on Windows & Mac.

World Chef Reviews:

World Chef is a new game for food lovers. The game from a social point who is also behind the games like Monster Legends and Dragon City. World Chef prompts the players to run a Kitchen that will never stop serving the foodies. You’ve to build your kitchen according to your liking.

You will get a chance to cook the world famous cuisines. As the game starts off, you will be building your restaurant from scratch. You’ve to serve your customers at your best in order to show your honest to your work and your humbleness towards the profession of a cook. You will slowly step-up on the ladder of success and at some point in the game you will be running one of the most famous restaurants in town. You will be expanding your menu dish by dish and in the end you will have plethora of dishes on your menu.

Features:

Another interesting point in this game is, you’re not running a fast-food chain. Take your time to cook the delicious recipes and make your customer’s wait worth it. You can go to the market and buy fresh ingredients to cook fresh dishes. You can also trade your best recipes with other chefs to expand your recipe list. World Chef is a free to play game. You can download it for iOS from the App Store and for Android from the Google Play Store.

World Chef for PC

Download World Chef For PC Windows 10:

  1. First, you need to Download World Chef APK
  2. Download and install Bluestacks: Bluestacks Offline Installer | Rooted Bluestacks | Bluestacks App Player
  3. Once you’ve installed Bluestacks, double click the downloaded World Chef APK.
  4. The APK will be installed using Bluestacks, once installed open Bluestacks and locate the recently installed World Chef.
  5. Click the World Chef icon to open it, follow the on-screen instructions to play it.

Install Word Chef on Mac:

Word Chef users can download Word Chef for PC via BlueStacks 4 on Windows and BlueStacks on Mac. Windows users can install the BlueStacks 4 and Mac users can install the old version of BlueStacks to install Word Chef for PC.

How to use iTunes with Android smartphone

0
How to use iTunes with Android smartphone

Let’s tell you how to Sync iTunes with Android devices. Even if you seriously dislike (Hate would be a strong word, don’t you think?) Apple’s products, there’s no denying the fact that iTunes revolutionized the way we consume music. Long before smartphones came into existence, we used to listen to our favorite albums on iPods and other Apple products. Since then, iTunes has been evolving along with the crazy iPhones and iPads, and we absolutely love the way it syncs your vast music library. However, if you’re parting ways with Apple and owning an Android device (or maybe both), you might be worrying about the absence of iTunes for Android platform.

use iTunes with Android

Well, it’s true that there is no iTunes for Android, but there are many other efficient ways which you can use to sync your iTunes library to your Android smartphone. Today, we will see a couple of popular ways to sync your music from your iTunes library to your Android device. So, without any further ado, let’s start.

Sync iTunes With Android using Google Play Music

Google Play Music is the official and stock music app that comes with Stock AOSP Android. It provides cloud storage for up to 50,000 songs, accessible from both PC and Android smartphone. And the best part is that it provides native iTunes integration which helps you sync your iTunes music library with Android devices. To sync the two platforms, you’ll need to download Google Music Manager (or Google Play Music for Chrome) onto your computer and the Google Play Music app to your Android phone.

Listening to your uploaded iTunes music through Google Play Music app requires an active mobile data or WiFi. However, the bright side is that it saves space on your device, and moreover, you can pin your favorite music for offline listening.

  1. Download Google Play Music for your Android device and Google Music Manager for your PC.
  2. Open the Google Music Manager program on your PC and log in with your Google account. Select the location of the music you want to upload, which is iTunes in this case.
    itunes-play-music
  3. Now the Google Music Manager will automatically start to upload the music files from your iTunes library.
  4. On your Android smartphone, open the Google Play Music app and tap on My Library. Here you’ll see your iTunes music.
  5. If you’re uploading a huge chunk of music, you’ll have to wait for a while before the music totally syncs to your Android device.

Sync iTunes With Android using Double Twist

Double Twist is arguably one of the best ways to sync your iTunes music with Android. It basically syncs the iTunes music to your Android device via USB connection but you can also upgrade to a premium version called AirSync iTunes Sync & AirPlay which costs you $4.99. The premium version allows you to sync iTunes music wirelessly assuming both your PC and Android device are connected to the same network. So, let’s see how to use Double Twist to sync iTunes with Android device.

  1. Install DoubleTwist on your Android device and on download the PC counterpart from here.
  2. Connect your Android device to your PC via USB storage.
  3. Open DoubleTwist program on your computer and look for your device in the left-hand pane.
    Double-twist
  4. Finally, drag and drop music from the iTunes library to your device. You can click on your device to toggle between automatically syncing or not.

So, these are the awesome tools that are going to save your life from going dark without music from iTunes on your Android device. Let us know if these tools helped you sync iTunes music to your Android device.

Update Galaxy E5 E500H to Android 6.0.1 Marshmallow via CyanogenMod 13 custom ROM

7
Update Galaxy E5 E500H to Android 6.0.1 Marshmallow via CyanogenMod 13 custom ROM

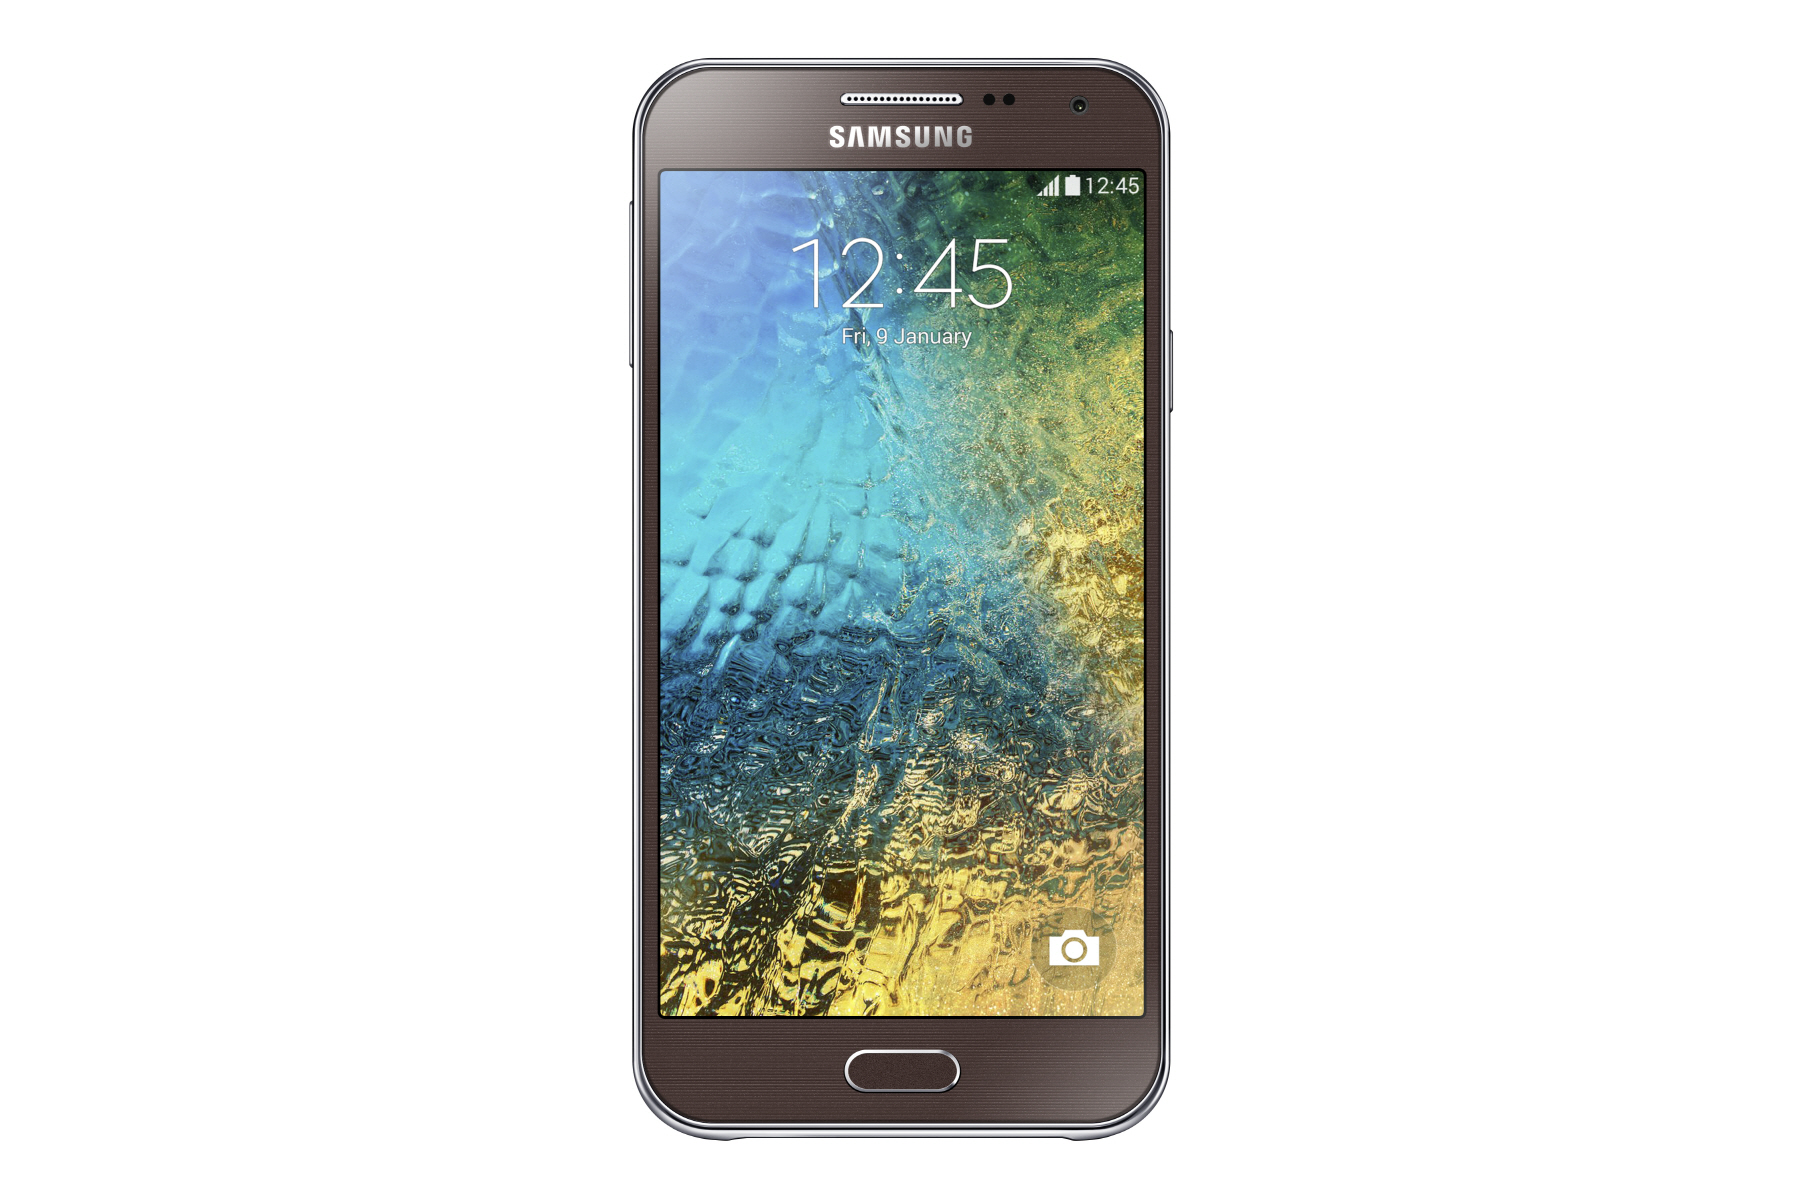
Samsung Galaxy E5 currently runs on Android 5.1.1 Lollipop. Samsung will update this device to Android 6.0 Marshmallow but we have no idea when this good thing will happen. Samsung is too much lazy when it comes to software updates, this fact might disappoint many Galaxy E5 owners as they won’t be able to taste the Marshmallows inside their Galaxy E5 anytime soon. So far, Samsung hasn’t updated any single smartphone of the Galaxy series to Android 6.0 Marshmallow. Any device, that’s enjoying the Marshmallow firmware is only a blessing of custom ROMs. Luckily, Galaxy E5 E500H has been blessed by something similar.Galaxy E5-4

Galaxy E5 owners, who are willing to get Android Marshmallow firmware on their phone can now get it by means of CyanogenMod 13.0 custom ROM. The ROM is the result of hard work of XDA recognised developer jackeagle. Currently, this ROM is in early development stages so expect a number of bugs under the hood. The things that may not work at the moment is the volume coming out of the speaker and FM radio. We expect these bugs to be fixed in the future builds. If these two features are not a big deal for you and you can compromise on the speaker volume by using a handsfree, you may go ahead and flash this custom ROM on your phone. If you’re a newbie, you’ve to be a little extra careful while you follow the procedure. Time for us to take you through the comprehensive guide to install Android 6.0.1 Marshmallow on your Galaxy E5 E500H using CyanogenMod 13.0 custom ROM now.

Pre-installation instructions

  • This ROM has been found working fine on Galaxy E5 500H. Do not use this rom on any other Android device as using an invalid file may result in bricking it.
  • Charge your phone up to 50% to avoid power issues during flashing process.
  • Flash TWRP Recovery on your Galaxy E5 E500H using the instructions below.
  • Backup your important contacts, call logs, sms messages and media content before proceeding.
  • Don’t forget to create a Nandroid backup and also backup its EFS partition after you’ve flashed the TWRP recovery.
  • Follow this guide carefully to avoid any mishaps and get the process done successfully.

DISCLAIMER: FLASHING CUSTOM RECOVERIES, CUSTOM ROMS AND ROOTING THE ANDROID SMARTPHONES AT FIRST INVOLVES GOING THROUGH A COMPLEX PROCESS AND IT INCLUDES POTENTIAL RISKS. ALTHOUGH THE METHODS LISTED ON OUR SITE ARE PRETTY MUCH SAFE TO FOLLOW, BUT WE DO NOT GUARANTEE A SAFE RESULT IN THE END. JUST IN CASE YOU END UP BRICKING YOUR DEVICE OR GETTING SOMETHING WRONG DONE, TECHBEASTS OR THE DEVICE MANUFACTURER MAY NOT BE HELD RESPONSIBLE IN THAT CASE. MAKE SURE THAT YOU’VE READ EACH AND EVERYTHING CAREFULLY AND YOU’RE PROCEEDING AT YOUR OWN RISK.

Install TWRP Recovery on your Galaxy E5 E500H

Required downloads

  1. Open Odin3 V3.10.6.exe that you extracted on your PC.
  2. If there’s OEM Unlock option in your phone, then enable it first. Enable OEM Unlock on your phone. To do so on your phone, go to settings > about device > tap the build number for 7 times to enable developer options. Get back to the settings and open developer options. Under developer options turn on “OEM unlock.
  3. Put your Galaxy E5  in download mode now. To do so, turn it off completely. Now turn it on by pressing and holding Volume Down + Home + Power Key. Once your phone boots up, press the Volume Up key to continue.
  4. Connect your phone to your PC now. The ID:COM box in the top-left corner of Odin3 should  turn blue. This indicates that your phone is connected properly.
  5. Now click the “AP” tab in Odin and select the twrp recovery.tar.md5 file that you downloaded. It will take a second or two for Odin3 to load this file.
  6. Make sure that your Odin3 looks like this. The only option ticked should be F. Reset Time.
    • Odin 3.10.6 Explained_Techbeasts
  7. Now you’re all set to flash the recovery. Just click the start button in Odin3 and sit back.
  8. Once the process box above ID:COM box shows green light and flashing process is finished, disconnect your device.
  9. Now turn off your device properly as we are going to boot into recovery mode. You can turn it off by keeping the power key pressed for a while. 
  10. Now turn it on by pressing and holding Volume Up + Home + Power Key. This will boot your device in recovery mode. It should be TWRP recovery that you just installed.
  11. Once done, reboot your device into system using the reboot option in TWRP recovery.

How To Update Galaxy E5 E500 to Android 6.0.1 Marshmallow via CyanogenMod 13 custom ROM

  1. Download CyanogenMod 13.zip file according to your device
    1. cm-13.0-20160616-UNOFFICIAL-e53g.zip

  2. Download Gapps.zip file for Android 6.0.1 Marshmallow according to your device.
  3. Connect your phone to your PC now.
  4. Copy all .zip files to the storage of your phone.
  5. Now disconnect your phone and turn it off complete.
  6. Boot into TWRP recovery now, in order to do so, turn it on by pressing and holding Volume Up + Home Button + Power Key. You should see the recovery mode in a while.
  7. Now in TWRP  recovery, wipe cache, factory data reset and advanced options > dalvik cache.
  8. After wiping all these three, select “Install” option.
  9. Now select “Install > Choose Zip from SD card > Select cm-13.0…….zip file > Yes”.
  10. This will flash the ROM in your phone, once done get back to the main menu in recovery.
  11. Now once again select “Install > Choose Zip from SD card > Select Gapps.zip file > Yes”
  12. This will flash the Gapps in your phone.
  13. Reboot your device.
  14. You should see the Android 6.0.1 Marshmallow CyanogenMod 13.0 running on your device in a while.
  15. That’s all!

First boot may take up to 10 minutes, you may not worry if it’s taking that much long. In case it’s taking too long, you may boot into TWRP recovery and wipe cache and dalvik cache and reboot your device as it may fix the issue. In case your device is having issues, you may return to your old system using the Nandroid backup or follow our guide here to install stock firmware.

Got any queries? Reach us out through the comment box below.

How to install Google Play Store on Remix OS

0
How to install Google Play Store on Remix OS

Learn How to install Google Play Store on Remix OS:

If you’re a tech junkie, you might have comes across the cool and awesome Remix OS which is ruling the News now. Remix OS is a custom Android operating system designed to bring the Android like fell on your PC or Mac. It can be easily installed on any PC or Macbooks running on Intel or AMD chipsets. Currently, Remix OS can be booted from a bootable CD or USB drive, just like any bootable drive you’ve used before. If you haven’t installed the Remix OS yet, follow our exclusive guide from the below link.

Google Play Store on Remix OS

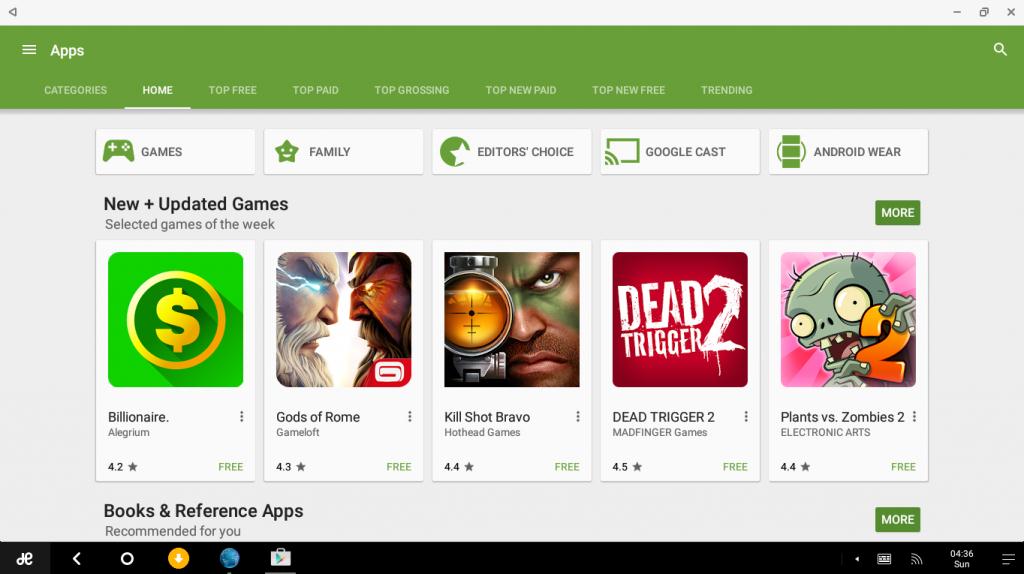
We have installed Remix OS on our computers and it’s quite smooth and light-weight but it lacks many essential Android features like the Google Play Store. So, you can download the APKs and sideload them but you can’t directly download from the Play Store just as you do on your smartphone. Well, not anymore. Today we’ll show you how to install Google Play Store on Remix OS. Follow the below tutorial and enjoy the Google Play Store services on Remix OS.

Note: Boot the Remix OS in Resident Mode instead of Guest mode as the changes won’t be saved in the Guest mode. The below tutorial involves a reboot, so even if you install Play Store in Guest mode, it won’t be saved.

How to install Google Play Store on Remix OS

  1. From the Remix OS on your PC, download the GMSInstaller.APK from the XDA developers link here.
  2. Right-Click on the file and select Open to install it.
  3. Once the app is installed, launch it from the app drawer.
  4. Now select the “One-click to install Google Services” option to download the Google services available.
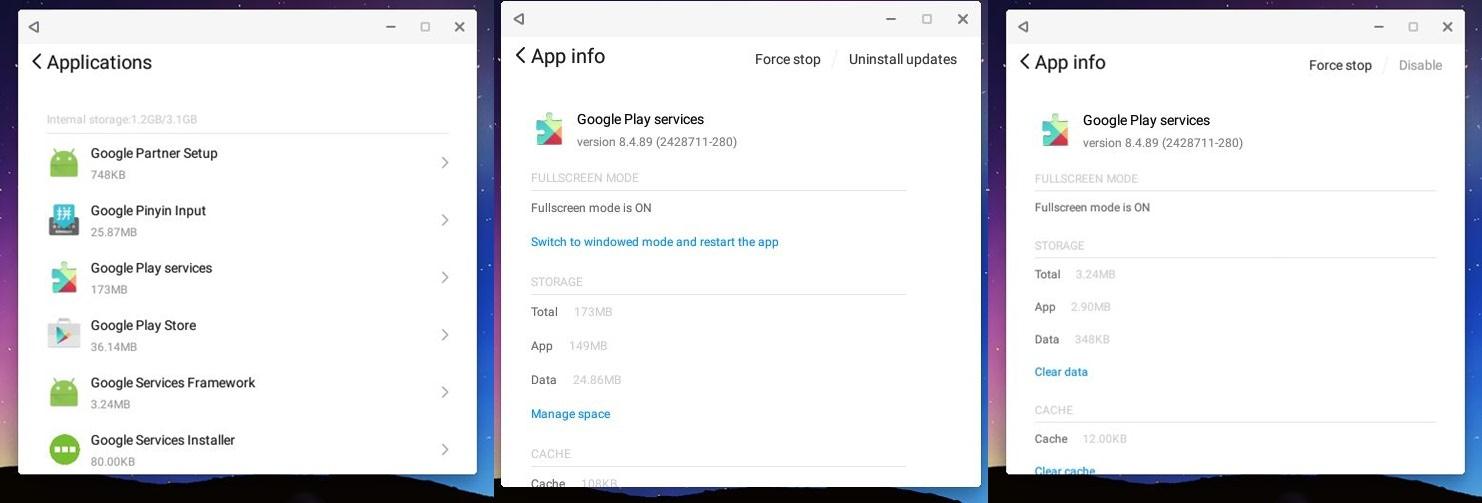
  5. After the Google services are downloaded and installed, open the Remix OS Settings app and navigate to Applications » Manage Applications » then choose All.
  6. Scroll down until you see the Google Play Services app and select it. Click on the Manage Space link and click on Clear All Data option to clear the app data.
    remix-os-screens
  7. Similarly, clear the data for the Google Services Framework app.
  8. Finally, reboot the Remix OS on your PC.

After the reboot, you should see the Google Play Store in your app menu. The first time you run the Play Store, you’ll be prompted to log in to your Google account. After logging in, try and download any app from the Play Store, and if you face any issues, make sure you’ve set the correct time zone and time in the Settings.

How To Root Galaxy Note 3 Neo running Android 5.1.1 Lollipop

9
How To Root Galaxy Note 3 Neo running Android 5.1.1 Lollipop

Galaxy Note 3 Neo runs on Android 5.1.1 Lollipop now. The device has been enjoying Lollipop sweetness since quite a while. The update is worth having, but it was a real pain for Android power users who were unable to root their Galaxy Note 3 Neo after upgrading to Android 5.1.1 Lollipop. Until a while back, it was kind of impossible to root the Note 3 Neo running Android Lollipop because of new security enhancements introduced by Samsung. However, the root has been made available now. It took quite a long while for the developers to get a workaround that could easily root the Galaxy Note 3 Neo running the Lollipop firmware. The root didn’t come from anyone else, but the all time famous Chainfire, who’s behind the famous root script CF-Autoroot.Samsung-Confirms-Galaxy-Note-3-Neo-Will-Get-Android-5-0-Lollipop-Later-in-2015-476703-3

If you’re a newcomer to the root access, you may want to have a little knowledge before you try to root your Note 3 Neo. Root access is the gateway to freedom in the world of Android. Once you’ve rooted your Android smartphone, you can enhance the performance, battery life and you can also add new features in your phone. This is possible by means of root specific applications. Root access also allows you to backup your applications with data, you can also remove bloatware and there’s a lot more that can be done on a rooted phone. You may want to go through the top ten reasons to root your Galaxy Note 3 Neo and you may also want to go through the 10 best applications for a rooted Android smartphone.

Now that you’ve got an idea about root access, we can proceed with the method to root our beloved Galaxy Note 3 Neo running Android 5.1.1 Lollipop.

Here are some early preparations to make sure that nothing goes wrong

  1. This method only works with Galaxy Note 3 Neo N750, N7505, N750K, N750S and N750L. Your device must be running Android 5.1.1 Lollipop. Check your device’s model number and Android version in Settings > About device section.
  2. Enable USB debugging on your Galaxy Note 3 Neo. To do so, go to Settings > About device > tap the build number for 7 times. This will enable developer options in settings. Once enabled, open developer options and enable USB debugging.
  3. Enable OEM unlock on your Galaxy Note 3 Neo if available. If OEM unlock doesn’t appear in developer options, skip this step.
  4. Backup your important contacts, call logs, sms messages and important media content.
  5. Charge your phone up to 50% to avoid and power issues during the flashing process.
  6. Turn off windows firewall, also disable or delete Samsung Kies while you’re using Odin3.
  7. Use your phone’s original data cable to establish connection between your phone and your desktop PC.
  8. Follow this guide to the letter to avoid any mishap.

DISCLAIMER: ROOTING PROCESS IS HIGHLY CUSTOM AND INVOLVES CERTAIN RISKS. ROOT YOUR SAMSUNG GALAXY WILL VOID ITS WARRANTY. IF YOUR DEVICE HAS A KNOX COUNTER ON THE BOOTLOADER, ROOTING IT WILL TRIP THE COUNTER AND YOU WON’T BE ABLE TO RESET KNOX AFTER THAT. IN CASE OF ANY MISHAP, TECHBEATS, SAMSUNG OR CHAINFIRE MAY NOT BE HELD RESPONSIBLE. MAKE SURE THAT YOU’RE ROOTING YOUR PHONE AFTER UNDERSTANDING EACH AND EVERYTHING, AND YOU’RE DOING IT AT YOUR OWN RISK.

Required downloads:

  • Download and install Samsung USB drivers
  • Download and extract Odin. [Recommended Odin v3.09]
  • Open the following page: CF-Auto-Root
  • Once you’re on the CF Auto Root page, press Control + F or Command + F. After the search bar appears, type your phone’s model number to locate its Auto Root file. Download CF-Auto-Root file according to your device very carefully and extract it once only to get the .tar.md5 or .tar file.

How To Root Samsung Galaxy Note 3 Neo on Android Lollipop using CF Auto Root

  1. Open Odin.exe from the folder you extracted.
  2. Click on “PDA” / “AP” tab and select the unzipped CF-Autroot.tar file that you download and extracted in the third step in required downloads. If you’ve already downloaded the CF-Auto-Root file in .tar format, you do not need to extract it.
  3. Do not touch any other option in Odin. The only options ticked should be F.Reset Time and Auto-Reboot. Leave all other options as it is.
  4. Now put your Galaxy Note 3 Neo in download mode and connect it to your PC. To put it in download mode, turn it off completely. Now turn it on by press and holding Volume Down + Home + Power Key. It will boot up with a warning. Press Volume Up to continue. You should be in download mode now. If this combination doesn’t work, here’s How to Boot Samsung Galaxy Devices into Download & Recovery Mode
  5. Now connect it with your PC and let Odin detect it. As soon as Odin detects your phone, it will show you a blue or yellow indicator in the ID:COM box.Odin-3.09-explained.-2
  6.  As your device has been connected, click the “Start” button now.
  7.  Odin will now flash CF-Auto-Root. Once done, it will reboot your device.
  8. Disconnect your device, let it turn on completely and check SuperSu in app drawer once it boots up.
  9. You can verify root access by installing Root Checker application from Google Play Store.

Device booted up but not rooted? Here’s what to do

If your device isn’t rooted even after flashing CF-Auto-Root, you may try doing this.

  1. Follow the guide step and 2 from the guide above.
  2. Now in the third step, untick Auto-Reboot, the only ticked option should be F.Reset.Time.
  3. Follow the above guide from step 4 – 6.
  4. Once CF-Auto-Root has been flashed, reboot your device manually by either pulling out the battery or using the button combo.
  5. Verify root access as explained above.

How to Unroot your Galaxy Note 3 Neo now?

You can unroot your device and revert back to the stock condition of your phone by flashing stock firmware. Here’s How To Flash Stock Firmware On Samsung Galaxy With Odin,

Got any issues? Reach us out through the comment box below.

How to Order Food Directly from Google Search on Android and iOS

0
How to Order Food Directly from Google Search on Android and iOS

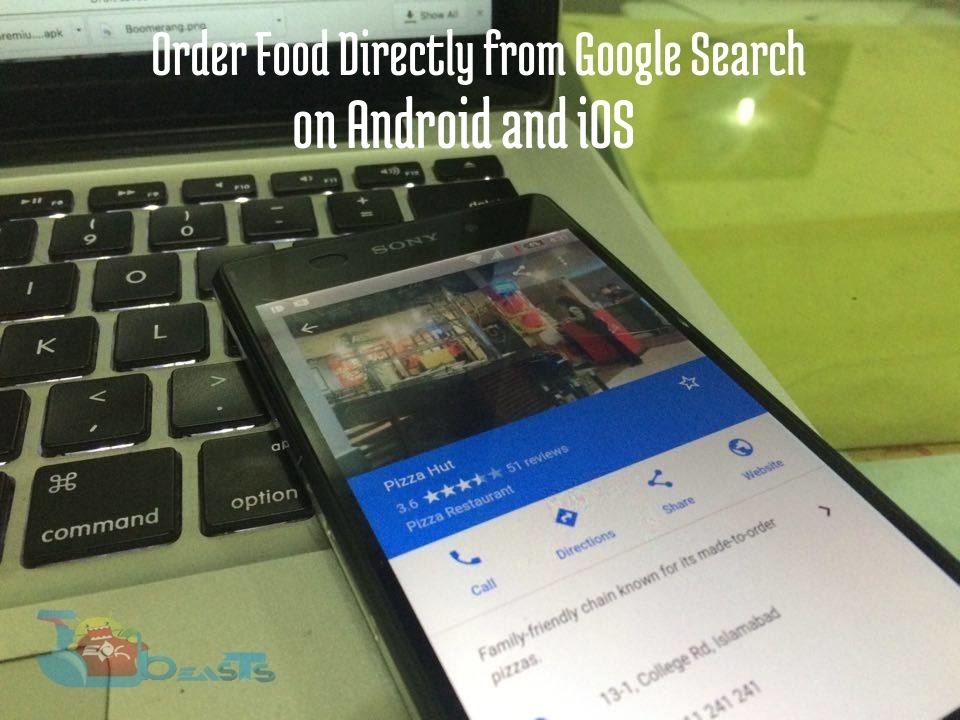
Here is a simple way to Order Food Directly from Google Search on Android and iOS. Technology is getting advanced day by day and it is making thing easier. So I thought why not tell you that you can order Food Directly from Google Search.

We have seen a significant amount of upgrades from the day Google was launched. They are not stopping here, we have seen many awesome features which made our life pretty easy. Using Google search not only you can order food, but you can also get directions of the specific restaurant. Moreover, you can access their contact information, reviews about their food and much more.

Google is not just a search engine. It is so vast and constantly adds features and services for its users. Recently, Google added features including ‘Find My Phone’, set alarms and send directions. One useful feature added to Google search lets you Order Food Directly from Google Search on Android and iOS.

Order Food Directly from Google Search

How to Order Food Directly from Google Search on Android and iOS.

  • To Order Food Directly from Google Search on Android and iOS, you have to ensure that your Google App is refreshed.
  • Presently you can proceed and basically look for Nearby Restaurants. Select a restaurant.
  • You will have the capacity to see the restaurant diagram, data, area, and timing.
  • In the event that you look down, you will have the capacity to discover the element to ‘Place an Order’.
  • Tapping on ‘Place an Order’ highlight will divert you to a nearby conveyance benefit.
  • You can now pick the things you want to get conveyed to your doorstep. It will be much simpler in the event that you have any of these applications previously introduced on your gadget.

This is it, now enjoy your food and let us know how did it go.