Samsung Galaxy S6 Edge is the secondary flagship from Samsung, released with their Primary flagship of this year, Galaxy S6. Arrived in the market in April, with 5.1-inch screen size, powered by the Exynos 7420 Quad-core 1.5 GHz Cortex-A53 and Quad-core 2.1 GHz Cortex-A57, with Mali-T760MP8 for extreme gaming, although it will heat-up a little after an hour or so, available in 32, 64 and 128GB variants and ported with 3GB of RAM, with 16MP of Rear cam, featuring almost everything necessary in a Mobile cam, running Android 5.0.2 Lollipop from the start, this device can be the Best gadget of this year, I can assure you, unless we get to see something even amazing than this.
It has been quite a time since its announcement and we are seeing the rooting method of Samsung Galaxy S6 Edge SM-G925F and the best part it is CF-Auto root tool, that does the job in no time. For all those who don’t know much about CF-Auto root tool, this is a one-click tool to root any device that supports it and in case of Samsung, we have a flash tool to use this CF-Auto root file. Then afterwards, it is up-to you to flash the TWRP recovery and enter the world of ultimate customization.In this article, we will show you How to Root Samsung Galaxy S6 Edge G925F via CF-Auto Root, without further ado, let us continue.
Contents
Early Preparations:
- This is only for Galaxy S6 Edge!
- Battery should be charged at least over 60%
- Backup EFS
- Backup SMS Messages
- Backup Call Logs
- Backup Contacts
- Backup Media – Copy your files manually to your PC or Laptop.
- Titanium Backup – If already rooted, use Titanium Backup to backup all of your apps, system data and other important content.
- Backup Nandroid – If CWM or TWRP installed previously, otherwise skip this step and perform this at the end of flashing
Downloads Required:
CF-Auto Root: Link
How to Root Galaxy S6 Edge:
- Download and extract Odin3 v3.09.
- Download and Install Samsung USB drivers .
Installation:
- Wipe your device completely in order to attain a neat installation.
- Open Odin3.exe.
- Put your Galaxy S6 in download mode. To do so, turn it off and wait for 10 seconds. Turn it on by pressing and holding Volume Down + Home Button + Power Key simultaneously, You should see a warning, press Volume Up to continue. In case this method doesn’t work for you, try one from this guide.
- Connect your device to your PC.
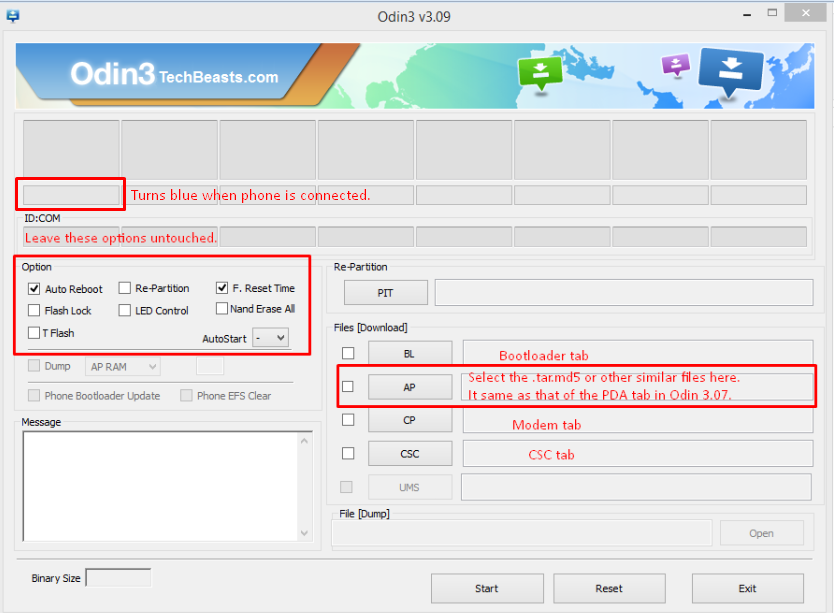
- As soon as Odin detects your phone, the ID:COM box should turn blue. Make sure that you’ve installed Samsung USB drivers before connecting.
- For Odin 3.09 hit the AP tab. Select the CF-Auto-Root-zerolte-zeroltexx-smg925f.zip, that you downloaded and extracted above.
- If you’re using Odin 3.07, you will select “PDA” tab instead of the AP tab, rest of the options remain untouched.
- Make sure that the options selected in your Odin are exactly as shown in the pic.
- Hit start and wait till the file flashing is complete, as soon as your device restarts, remove it from PC.
- Wait for your device to reboot, as soon as it reboots check out the new firmware!
- That’s all!


![Download Odin 3.13.1 for PC [Odin3 v3.13.1] Odin 3.13.1](https://techbeasts.com/wp-content/uploads/2018/03/Screenshot_11.png)


